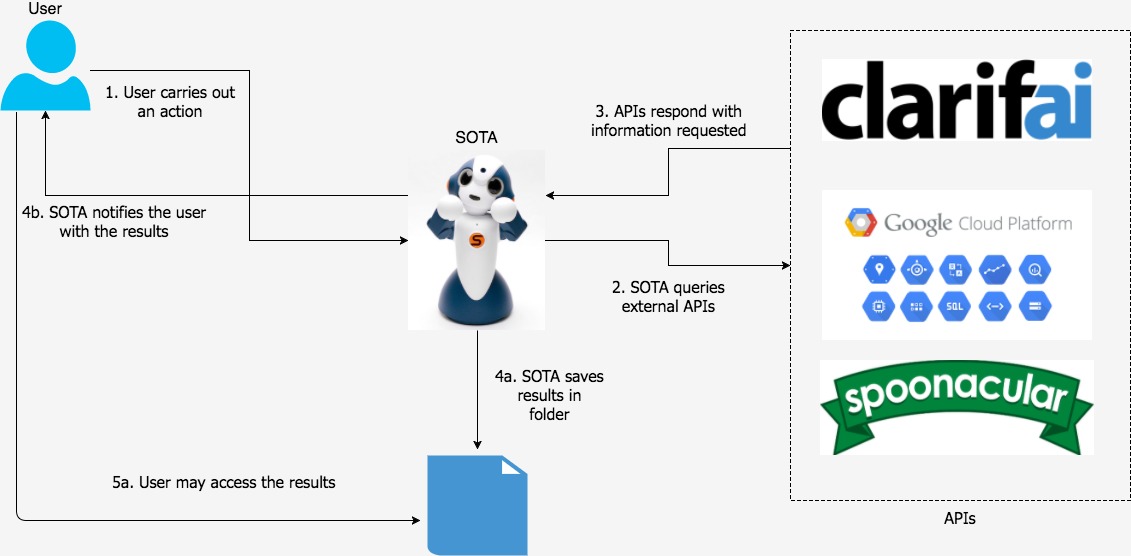
In this section, we overall design of our system and explain the components that we have used.
System Architecture
Hardware
Sota comes in two versions, the Edison version and the Raspberry Pi version. The robot that we have been using throughout this project is the Edison version.
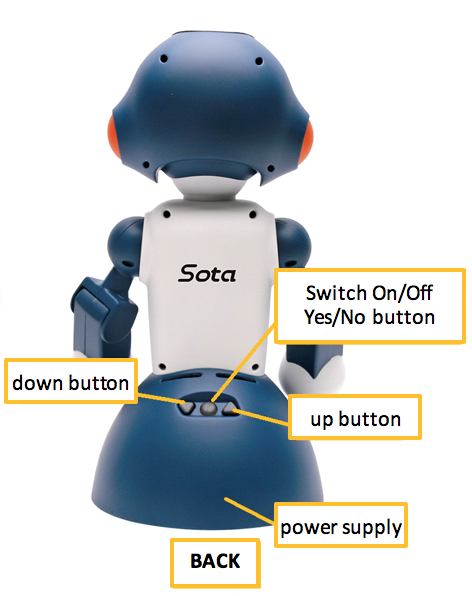
Key hardware components
- Operate console by serial communication with external PC
- Two USB ports
The main difference between this and the Raspberry Pi version is there is no Ethernet connector (Wired network connection possible via USB LAN).
Built in Sota devices
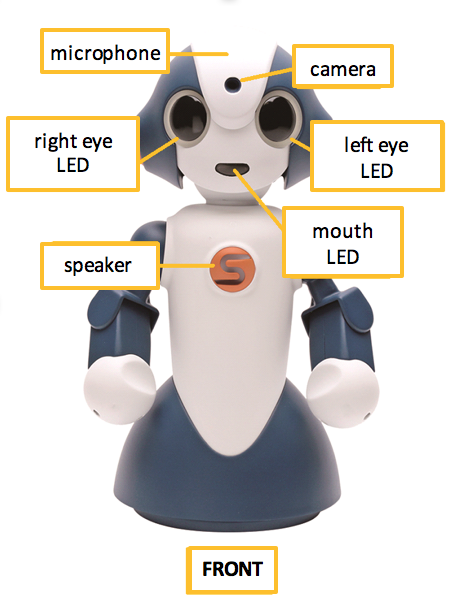
Throughout the project, we have made use of all the components except the mouth LED. These components were controlled using Sota’s library, more specifically the CSotaMotion class, which gives access to Sota’s movements and LEDs.
The speaker and microphone are the basic components that are used during interaction to give responses back to the user and take requests from the user respectively. We changed the color of Sota’s eyes to indicate the different states that LeChefu is in during interaction. This is used to mitigate the negative impact that not having a screen display has on user experience. Because of the limitations that we do not access to external hardware that allow us to continually listen for user’s requests and the fact that Sota’s functionality only allows us to save recordings into files of fixed length, we used the Yes/No Button as a placeholder interface between the user and LeChefu. This means that the user has to click the button every time they want to indicate a request. Other than overcoming the problems mentioned, this approach limits the number of calls that the program makes to Google Speech API, making the system more economically feasible.
We connect to Sota’s camera for the ingredient identification feature. However, in the middle of development, the libraries that the camera depended on had a linking error that cound not be solved, even after extensive research and discussion with NTT Data developers.
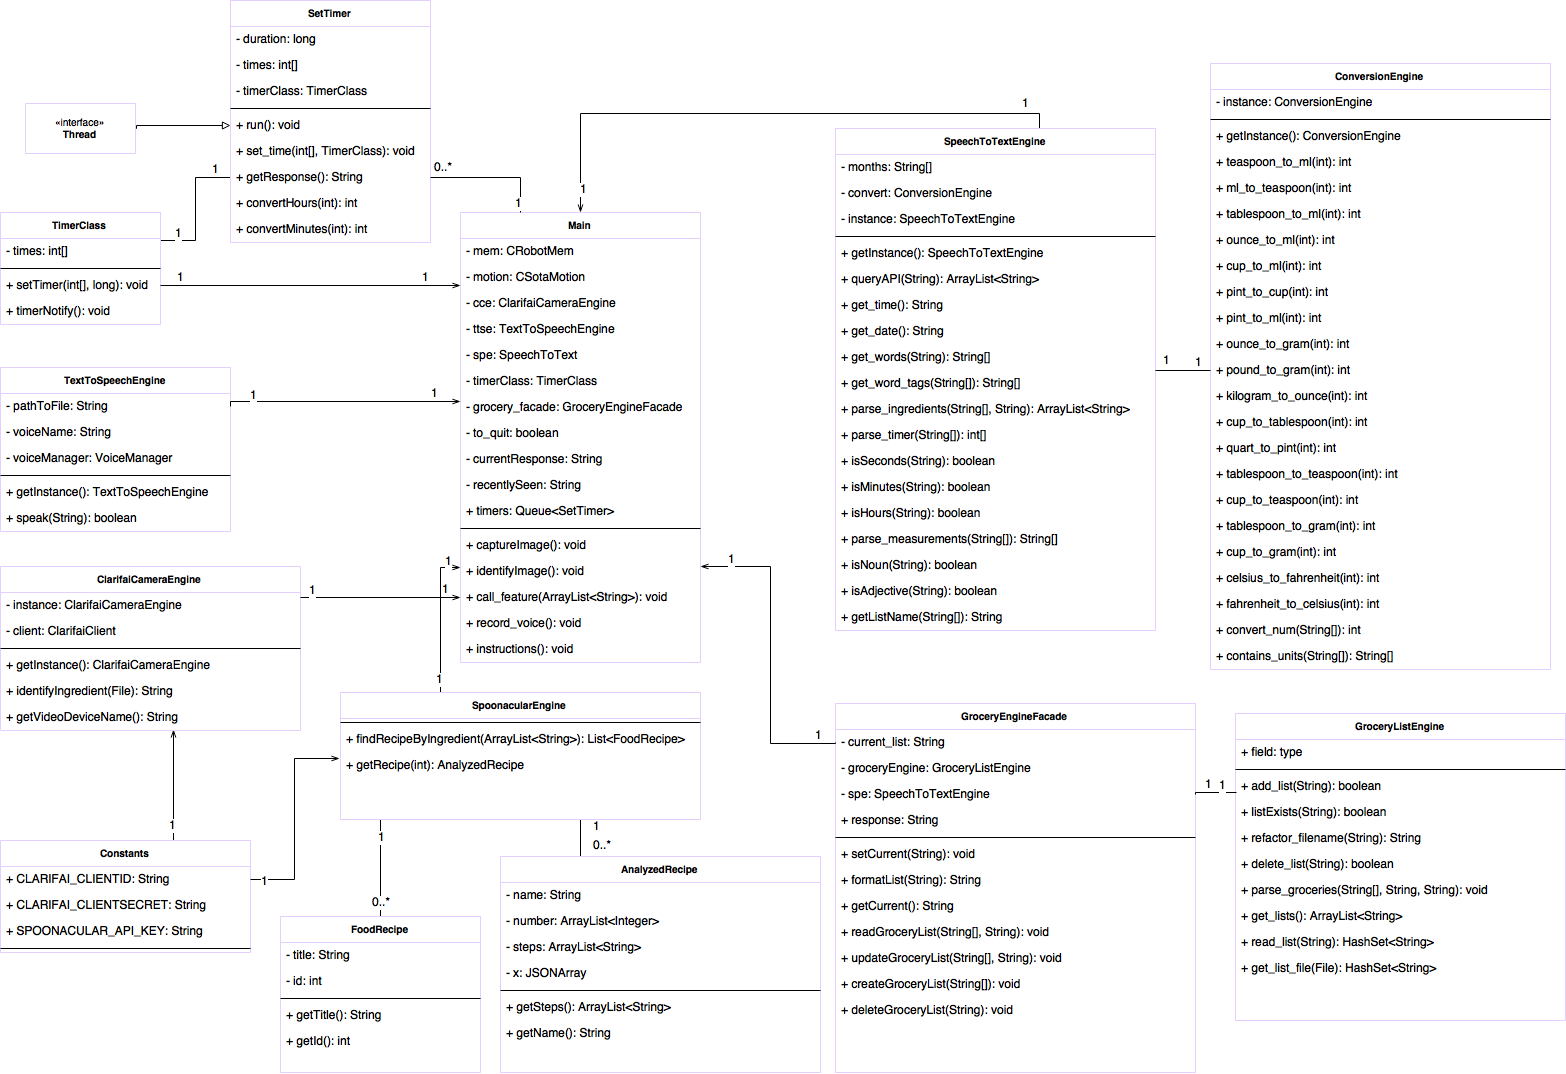
Class Diagram
Design Patterns
Singleton Pattern
This pattern ensures that only one object of a class is ever created.1 It is useful when exactly one object is needed to coordinate actions across the system. Since the Singleton Pattern is considered an anti-pattern for introducing a global state in the application and possibly making the code tightly coupled and more difficult to change, we were careful not to use it too often, but only when we saw it was most advantageous. We created a Singleton class by making the constructor private, disabling cloning, disabling extension and creating a static variable for the instance of the class. With Singleton classes, we can control access to a shared variable when the whole system only needs one instance of this class.2 Although it gives the advantage of having a static instance, we are able to specify creation logic for our Singleton class, unlike in a static class. A disadvantage of this pattern is that the class cannot be subclassed.
We used the Singleton class for the classes of our API engines. This prevented the system from connecting to the API multiple times within one session, which would be costly over a long period.
Facade Pattern
With the Facade Pattern, we can provide a simplified interface to a complex problem carried out by a larger body of code. It is a structural Design Pattern used with classes that require the use of numerous methods that are complicated to use or difficult to understand.3 The newly-created Facade class is a “wrapper” that provides easily understood methods that are simple to use in comparison. These methods provided access the subsystem on behalf of the class using the Facade, hiding the implementation details. Furthermore, it encourages loose coupling between the subsystem4 and its clients, making our system easier to maintain and update. On the other hand, use of the Facade pattern could affect performance of our system, as it adds a layer of indirection.5 Therefore, while implementing this, we analysed our code to ensure that the overall performance was not being affected by using this pattern.
Our use of Facade Pattern is most evident in our implementation of the grocery lists feature. Our Grocery List engine allows users to create, delete, update and access their grocery lists by calling a series of methods from the GroceryListEngine class. As this was starting to make our Main class too convoluted and the calls to the class were expanding while we added more functionality in, we decided to use this pattern to enable the Main class to access each function just by calling one method.
Mediator Pattern
The Mediator design pattern is a behavioral pattern used to deal with the behavior of objects that interact with each other frequently. It provides a centralised communication medium for the different objects in the system. This pattern is useful when the communication logic between objects is complex and a central point of communication that handles the communication logic is needed.6 Furthermore, it provides loose coupling, making the code more maintainable and simple to update. By encapsulating the interactions of objects and distributing responsibility evenly, Mediator classes reduce the need for other objects to communicate with one another, since they all communicate to a central Mediator.
An example of how this is used in our code is our Main.java class. Most other objects interact with Main.java, which decides, based on responses and requests, what calls to objects it should make next. Although our different classes are highly interconnected, this structure allows us to continue development without having to search the whole codebase for uses of the particular object if, for example, we change the characteristics of one object.
Template Method
A Template Method involves defining the “skeleton of an algorithm in an operation, deferring some steps to client subclasses”7. It allows subclasses to redefine steps of the algorithm without changing the algorithm structure and without having a completely different copy of the similar algorithm. It is used when two different components have significant similarities, but demonstrate no reuse of common interface or implementation. The method makes use of inheritance to vary parts of the algorithm.
Since some of our algorithms for requests put in by users are quite similar and share similar steps, we considered using the Template Method and implementing each step as subclasses. However, given the limited number of related algorithms we have, we decided to leave the algorithms design process to Main.java as a manual process.
Development Tools
Communication
We chose to use Trello, which is a Kanban style tool that allows us to keep track of the team’s ideas and deadlines. Trello enables actions like creating cards, moving cards between boards and labelling cards to indicate current progress. It is very flexible and provides an overview of each sprint and access to essential information.
We used Slack as our main communication channel, along with Facebook Messenger, as Slack provides features such as creating separate channels for different topics and discussions, sharing files, syncing events with our personal calendars, pinning important files to a channel, and getting updates from Trello and GitHub bots when changes are made to our board or repository respectively. These features allow us to communicate in a more organised manner while monitoring the activites of various components of our project.
File Storage
To share documents and collaboratively build and update these documents, we used Google Drive because every team member was familiar with using Google Drive and it provided all the features that we needed. Furthermore, it allowed us to create Google Documents to write our Biweekly Reports and client meeting minutes, start Google Slides for presentations and add .jpeg and .png files to share the resources for the website with the rest of the team. The way in which we utilised the creation of different folders allowed us to keep our work more organised.
Version Control
We are using GitLab as a version control system. GitLab allows us to work on the project with speed and efficiency. We created different branches on git, one for each team member. Every time a member updates the code or adds a feature he/she can commit the code to his/her branch and later push all these changes to the master branch.
Integrated Development Environment (IDE)
Our choice of IDE was Eclipse. It is a free and open source Java IDE that gives industrial level of development and supports integration with frameworks like Junit testing. Eclipse IDE is the IDE used within NTT Data to write Java programs for Sota. Therefore, using this IDE would give consistency for future development. We chose to use an IDE instead of a text editor because it saves time and effort by providing quick refactoring tools, auto completion, error debuging tools and simple organisation of imports.
Implementation Details of Key Functionalities
Here, we summarise the key class of each feature that calls performs the main calls to helper methods.
Recipe Finding
After parsing the request for the required parameters, our system connects to the Spoonacular API and requests a recipe. This recipe is then returned by this method and used by other methods to give the user a response.
public final List<FoodRecipe> findRecipeByIngredient(ArrayList<String> ingredients) throws UnirestException {
		String listString = String.join("%2C", ingredients);

		HttpResponse<JsonNode> response = Unirest
				.get("https://spoonacular-recipe-food-nutrition-v1.p.mashape.com/recipes/findByIngredients?ingredients="
						+ listString + "&limitLicense=false&number=3&ranking=1")
				.header("X-Mashape-Key", Constants.SPOONACULAR_API_KEY)
				.asJson();

		final List<FoodRecipe> result = new ArrayList<>();
		final JSONArray body = response.getBody().getArray();

		for (int i = 0; i < body.length(); i++) {
			final JSONObject node = body.getJSONObject(i);
			result.add(new FoodRecipe(node.getString("title"), node.getInt("id")));
		}

		return result;
	}
Converting Measurements
To convert measurements, we parse the user’s request to find the original unit, target unit and a number. If no number is supplied, we assume 1. We then put it into this method to perform conversion. This method has been shortened here to keep it concise.
public int convert_num(String[] query) {
		int num = Integer.parseInt(query[0]);
		String from = query[1];
		String to = query[2];

		// Checks which measurement units are present and convert accordingly, returning a default error value if no matches are found. (not shown here due to length)

		return Integer.MIN_VALUE;
	}
Grocery List
We implemented the grocery list feature by saving grocery lists to text files on the robot. We used the Facade pattern for this feature, shown below in method signatures.
public class GroceryEngineFacade {
	String current_list = "";
	protected GroceryListEngine groceryEngine;
	SpeechToTextEngine spe = SpeechToTextEngine.getInstance();
	TextToSpeechEngine ttse = TextToSpeechEngine.getInstance();
	public String response;

	public GroceryEngineFacade (GroceryListEngine groceryEngine)

	public String formatList (String listname)

	public void setCurrent (String current)

	public String getCurrent ()

	public void readGroceryList (String[] words, String readlist)

	public void updateGroceryList (String[] words, String recentlySeen)

	public void createGroceryList (String[] words)

	public void deleteGroceryList (String toDelete)
}
Image Recognition
public String identifyIngredient(File imageFile) {
		Model<Concept> foodModel = client.getDefaultModels().foodModel();

		ClarifaiImage image = ClarifaiImage.of(imageFile);
		ClarifaiInput inputFile = ClarifaiInput.forImage(image);

		final List<ClarifaiOutput<Concept>> predictionResults = foodModel.predict().withInputs(inputFile).executeSync().get();

		for (final Concept c : predictionResults.get(0).data()) {
			// accuracy was bigger than 90 %
			if (c.value() > 0.9f) return c.name();
		}

		return null;
	}
Timer Class
To implement the timer feature, we created a Timer Class that would handle the Timer Threads (shown below). These timer Threads take its own input then calculates the appropriate time value and response for this request. It then makes use of guarded methods in the Timer Class monitor, which ensures that timers do not overlap and handles timer cancelling.
public class SetTimer extends Thread {
	private long duration = 0;
	private int[] times = null;
	TimerClass timerClass = null;

	public void run()

	public void set_time (int[] time, TimerClass timerClass)

	public String getResponse()

	private int convert_hours (int time)

	private int convert_minutes (int time)
}
References
[1] kamranahmedse (2017) Design Patterns for Humans. Available at: https://github.com/kamranahmedse/design-patterns-for-humans#structural-design-patterns (Accessed: 26 February 2017).
[2] Emmatty, J.T. (2011) Singleton pattern – positive and negative aspects. Available at: https://www.codeproject.com/Articles/307233/Singleton-Pattern-Positive-and-Negative-Aspects (Accessed: 26 February 2017).
[3] Carr, R. (2008) Facade design pattern. Available at: http://www.blackwasp.co.uk/Facade.aspx (Accessed: 26 February 2017).
[4] Javatpoint (2011) Facade pattern. Available at: http://www.javatpoint.com/facade-pattern (Accessed: 26 February 2017).
[5] Mccreath, E. (no date) Facade design pattern. Available at: https://cs.anu.edu.au/courses/comp2500/notes/10facade.slides.pdf (Accessed: 26 February 2017).
[6] Panjak. (2016) Mediator Design Pattern in Java. Available at: http://www.journaldev.com/1730/mediator-design-pattern-java
[7] Source Making. Template Method. Available at: https://sourcemaking.com/design_patterns/template_method