In this section, we take users step-by-step through setting up and using Sota and the LeChefu software.
System Manual
Setting Up
Setting Up Environment
To contribute to the project, you need have an Integrated Development Environment (IDE) installed.
We have been personally using Eclipse, however any other IDE, such as IntelliJ IDEA is suitable for the project.
You need to have Java Development Kit (JDK) installed as well. Most IDEs install JDK during their installation, if not then needs to be installed manually.
Afterwards, clone the project from our GitHub repository and open it in the IDE of your choice. You are ready to develop!
Installing the Application onto the Robot
-
Clone this repository and open the project in your favourite IDE.
-
Edit the build path of your project to include all libraries under
/libfolder. -
Run the Ant build script
send.xml. A prompt should appear asking for IP address and platform, choose robot’s IP address and platform it is running on. (this step assumes the default username & password have remained unchanged! If that is not the case, the build script needs to be edited.) -
sshinto the robot, using the IP address above and credentials defined insend.xml. -
cdinto folder/LeChefu/binwhere.classfiles are located. -
Run
chmod +x *.shto make the bash scripts executable and then run./java_run.sh Main. (without.classextension)
Folder Structure
After the repo was cloned, this is how the folder structure should look like.
.
├── Experiments                     # source for experiments done during Term 1
└── Proof of Concept                # source for LeChefu (our project)
    └── LeChefu
        ├── bin                     # compiled *.class files and *.sh deployment scripts
        │   └── sound               # sounds used by the robot
        │
        ├── lib                     # all libraries used during the development of the project
        │   └── 3rd_party           # 3rd party libraries used
        │       ├── en-pos-maxent
        │       └── freetts         # .jar files related to FreeTTS, a Text-To-Speech library used
        ├── pom.xml                 # Maven to manage the dependencies (under ./lib folder) for the project
        │
        ├── send.xml                # Ant build file for deployment to the robot
        │
        ├── sound                   # sounds used by the robot
        │
        └── src                     # *.java source files
            └── sound               # sounds used by the robot
User Manual
Switching on:
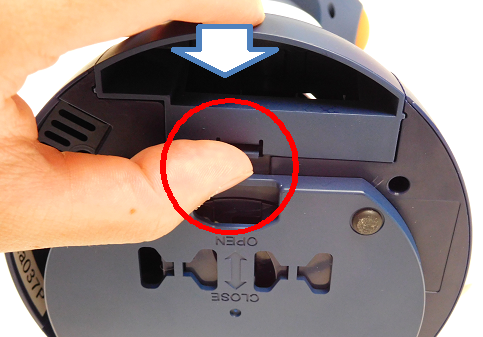
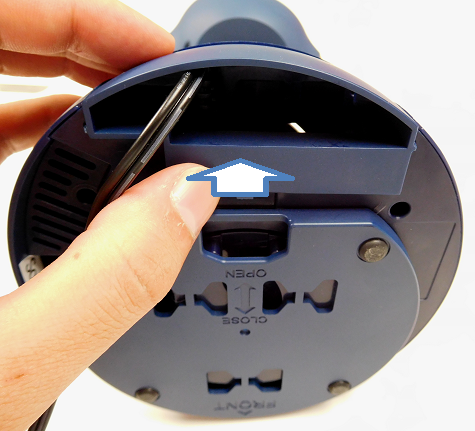
In order to connect the AC power supply and use the USB port, it is necessary to remove the cover of the robot.
1. Remove the cover as follows
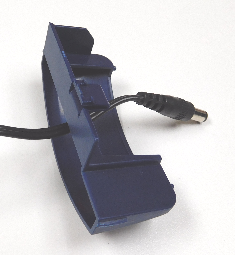
2. Pass the cable of the AC adapter in advance to the removed cover. (Pay attention to the inserting direction)
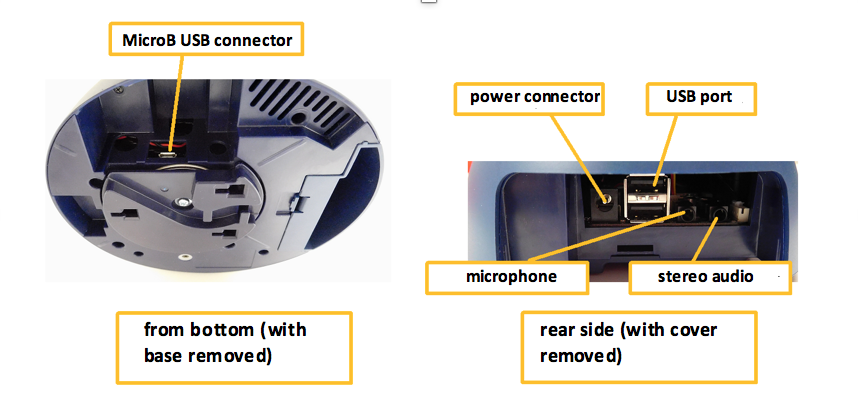
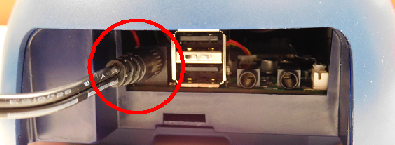
3. Plug the plug of the AC adapter into the power connector of Sota and route it to the rear of the robot from the cable outlet as follows.
4. Reinsert the cover you have just removed. (Until a click sounds)
Caution Do not disconnect power cable during startup!
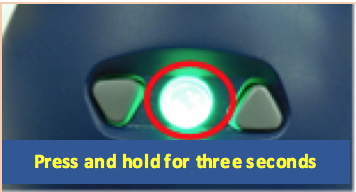
Click this button for several seconds until Sota switches on and says “Good morning!”
Switching off:
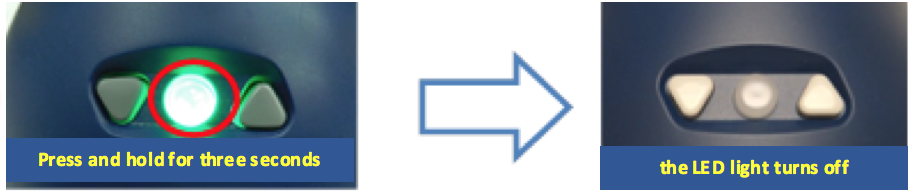
Sota says “Goodnight!” before switching off.
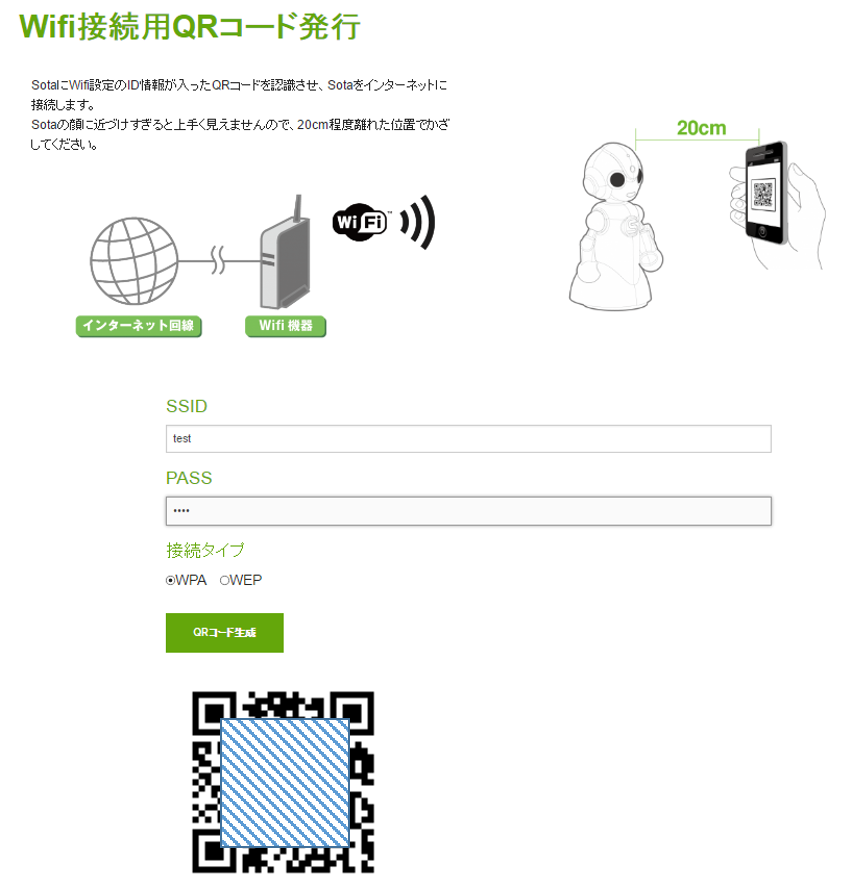
Connecting to WiFi:
1. Please access the [Sota web page] to create a user account and log in.
2. Click “Member” → [“Issue QR code for WiFi connection”] from the menu at the top of the Sota web page.
3. Enter the information of your network into “SSID”, “PASS” and “Connection type” in the page and click “Generate QR code”. When clicked, the QR code is displayed below. You can display it to Sota on the PC screen or printed on paper.
4. Simultaneously press the △ and ▽ buttons for 3 seconds to enter the settings mode.

5. Press the △ button seven times, until Sota says “set by QR code” in Japanese.

6. Press the ○ button and Sota says “I will begin setting up the connection using the QR code, show me the QR code at about 20 cm away” in Japanese. Please hold the screen on which the QR code is displayed or the paper on which it is printed at a position about 20 cm away from Sota. If the QR code is recognized correctly, Sota says “I saw the QR code, wait for a moment while I connect to the network” in Japanese.
If it is difficult to recognize the QR code, please move the QR code back and forth slowly. There is a possibility that the camera is at a distance where it is difficult to gain focus on the QR code.
7. When Sota speaks “I connected to the network” in Japanese, the connection is complete.
Getting Started
Converting Measurements
You can convert measurements between any measurement units supported (listed in the conversion table below). Only these measurement conversions are currently supported.
Recipe Finder
Give LeChefu any combination of ingredients to get a recipe that uses these ingredients! Follow through the recipe at your own pace by clicking the button every time you want to move onto the next step.

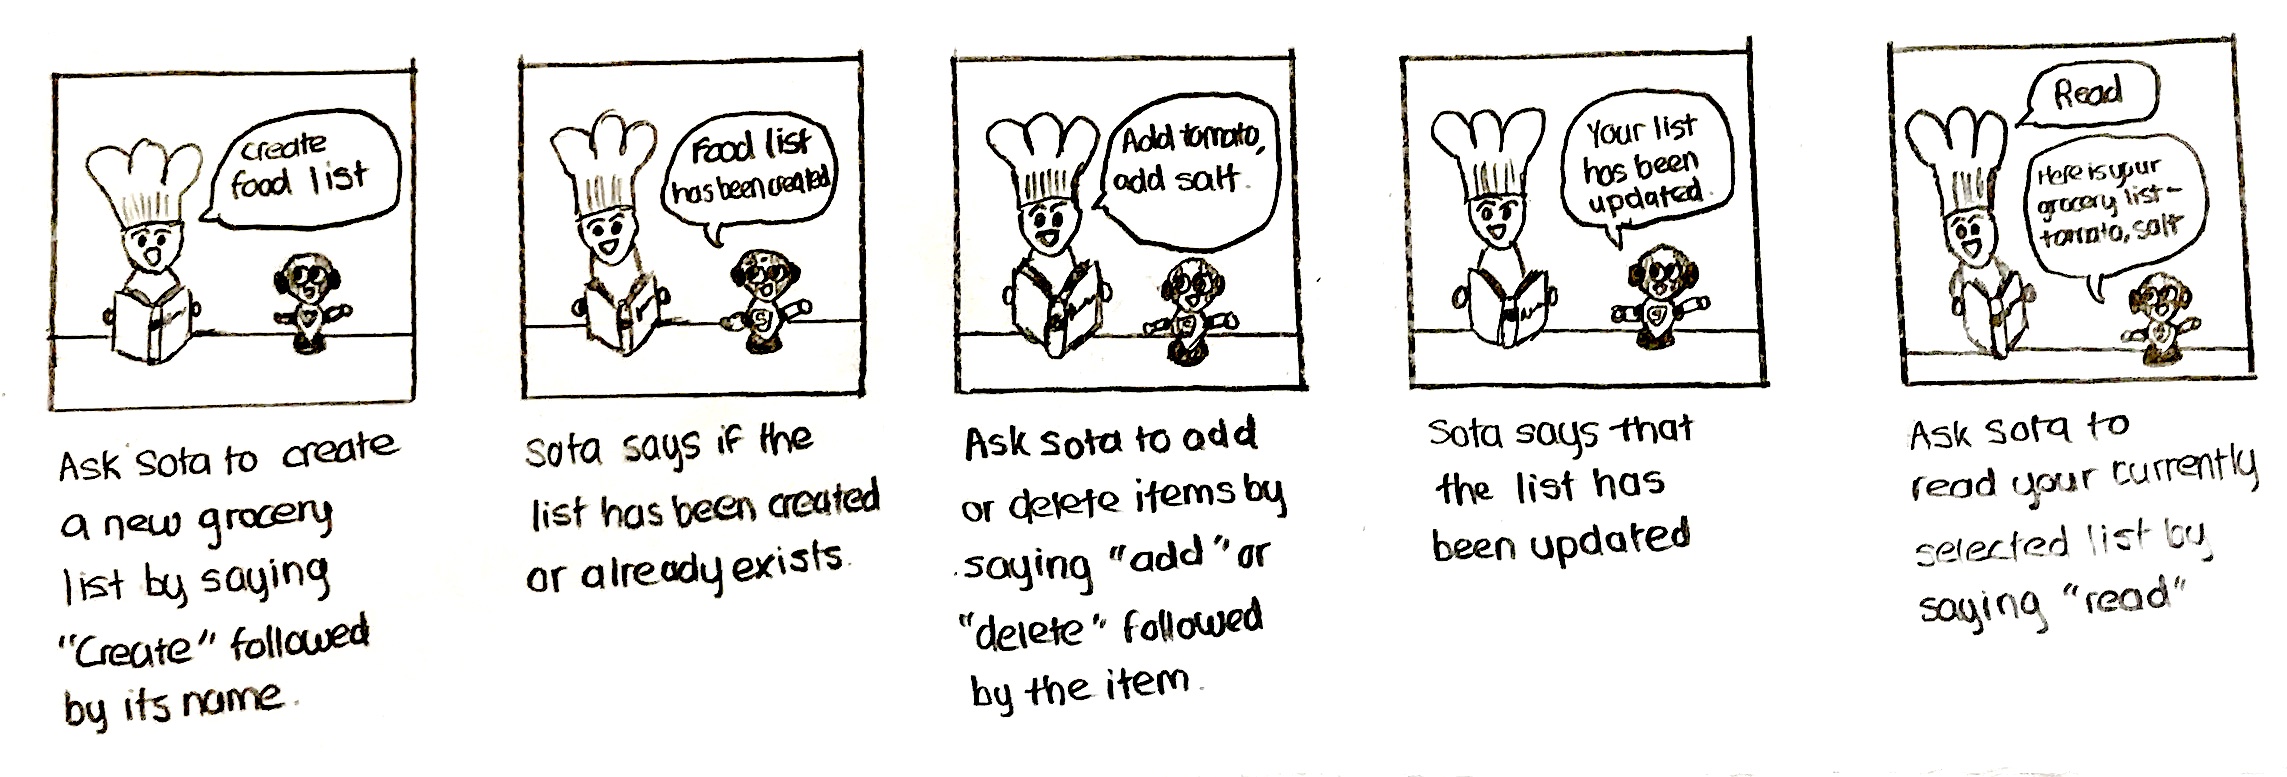
Grocery Lists
Let LeChefu manage your grocery lists. All you have to do is update them whenever you want to and go back to LeChefu to access them. Organize your grocery lists by creating multiple lists with custom names. Here are a few commands to get started with the grocery lists feature.
INPUT: "Create my food list"

LeChefu: "My food list has been created"

INPUT: "Update add sugar add apples"

LeChefu: "Done updating"

INPUT: "Read my food list"

LeChefu: "Here is your groceries list: sugar, apples"
Set Timer
Setting a timer is simple with LeChefu. The timer feature takes in time in seconds, minutes, hours, or any combination of them in any order, just be sure to specify the units of each.
While a timer is set, you would still be able to continue using LeChefu in the meantime, although you would be interrupted briefly when LeChefu indicates the end of the specified time. Changed your mind on a timer? Just say “cancel” and LeChefu would cancel your most recently set timer.
Guide for Activating a Feature
The following are the command phrases used to launch features.
| Feature | Command |
|---|---|
| Unit Conversion | Say “convert” followed by the original amount and unit then the intended unit. INPUT: “Convert 1 tablespoon of water into milliliters” OUTPUT: 15 milliliters. |
| Recipe Finder | Say “recipe” followed by the ingredients that you want to use. INPUT: “Recipe for apple, sugar and flour.” OUTPUT: I’ve found a recipe for apple pie. The steps are… |
| Ingredients Recognition | Hold the ingredient in front of Sota’s camera and say “Identify” INPUT: “Identify this ingredient” OUTPUT: This is a tomato. |
| Creating a new Grocery List | Say “create” followed by the name of your new grocery list INPUT: “Create grocery list for Saturday” OUTPUT: “Your list has been created. Current list is Grocery List for Saturday” *creating a list automatically sets it as the current list |
| Selecting a Grocery List | Say “open” or “select” followed by an the name of an existing grocery list. |
| Grocery List Updating | Say “update” followed by either - <“add” + item> for items that you want to add to the list or, - <”delete” + item> for items that you want to delete from the list INPUT: “Update my grocery list, add flour, add tea, delete eggs.” OUTPUT: Done Updating (Sota has updated your grocery list) *selection required before this if a list has not been selected in current session |
| Grocery List Reading | Say “read” - Optional: the name of an existing grocery list INPUT: “Read.” OUTPUT: Here is your groceries list: flour and tea. *selection required before this if a list has not been selected in current session |
| Set Timer | Say “set timer” or “timer” followed by the number of hours, minutes or seconds that you want the timer to be set. INPUT: “Set timer for 1 hour and 20 minutes.” OUTPUT: Timer has started for 1 hour and 20 minutes. (1 hour 20 minutes later): sound |
| Get Current Time | Say “time. INPUT: “Time.” OUTPUT: 10 45 |
| Get Current Date | Say “date”. INPUT: “Date.” OUTPUT: 28 March 17. |
| Listen to the previous response again | Missed what LeChefu said? No problem. Ask LeChefu to say it again by saying “repeat”. |
Unit Conversion
The following is a table of supported unit conversions.
| From (unit) | To (unit) |
|---|---|
| teaspoon | milliliter |
| milliliter | teaspoon |
| tablespoon | milliliter |
| teaspoon | |
| gram | |
| ounce | milliliter |
| gram | |
| cup | milliliter |
| tablespoon | |
| teaspoon | |
| gram | |
| pint | cup |
| milliliter | |
| pound | gram |
| kilogram | ounce |
| quart | pint |
| Celsius | Fahrenheit |
| Fahrenheit | Celsius |
Feedback from Client
Shanice, Raja and Jaro have been great at managing their partnership project with us, NTTDATA. It has been a pleasure to work with them.
The have researched into trends using NTT DATA Technology foresight, industry trends and analyst reports to understand what Agent AI and Voice UI are and why we would want to use them. They have come up with various scenarios and have been great at eliminating and shaping their use case to a cooking Agent AI called LeChefu.
They were fast and smart with using our assets, the ecosystem and APIs to quickly find their building blocks, which is a good approach for developing complex systems.
They have been informing us of their steps and worked with the partner to eliminate their problems while working with their project.
The development process has been a playground for us to understand and experiment what agent AI and voice UI is, and we have proved it is indeed very promising for the future as it feels natural even while in POC state. Although the HCI (Human Computer Interaction) design was not there, what they have built showed an emotional connection, a great story and provides a utility in a short time frame using the ecosystem.
This will be one of the players when the smartphones start to disappear and we have more diverse and immersive interactions. They have done a great job at learning, POC and iteration as well. I wish the best of success with their further projects. I enjoyed working with them utmost.
KR, Gaye
Trello Board screenshot
Gantt Chart
Click here for a full screen view of the Gantt Chart