Virtual Therapy
Virtual Therapy is a 3D audio feedback system created in Unity to help those with visual impairment and lower-back disability. It focuses on improving and correcting the posture of user's through various iterations of pleasant sounds.
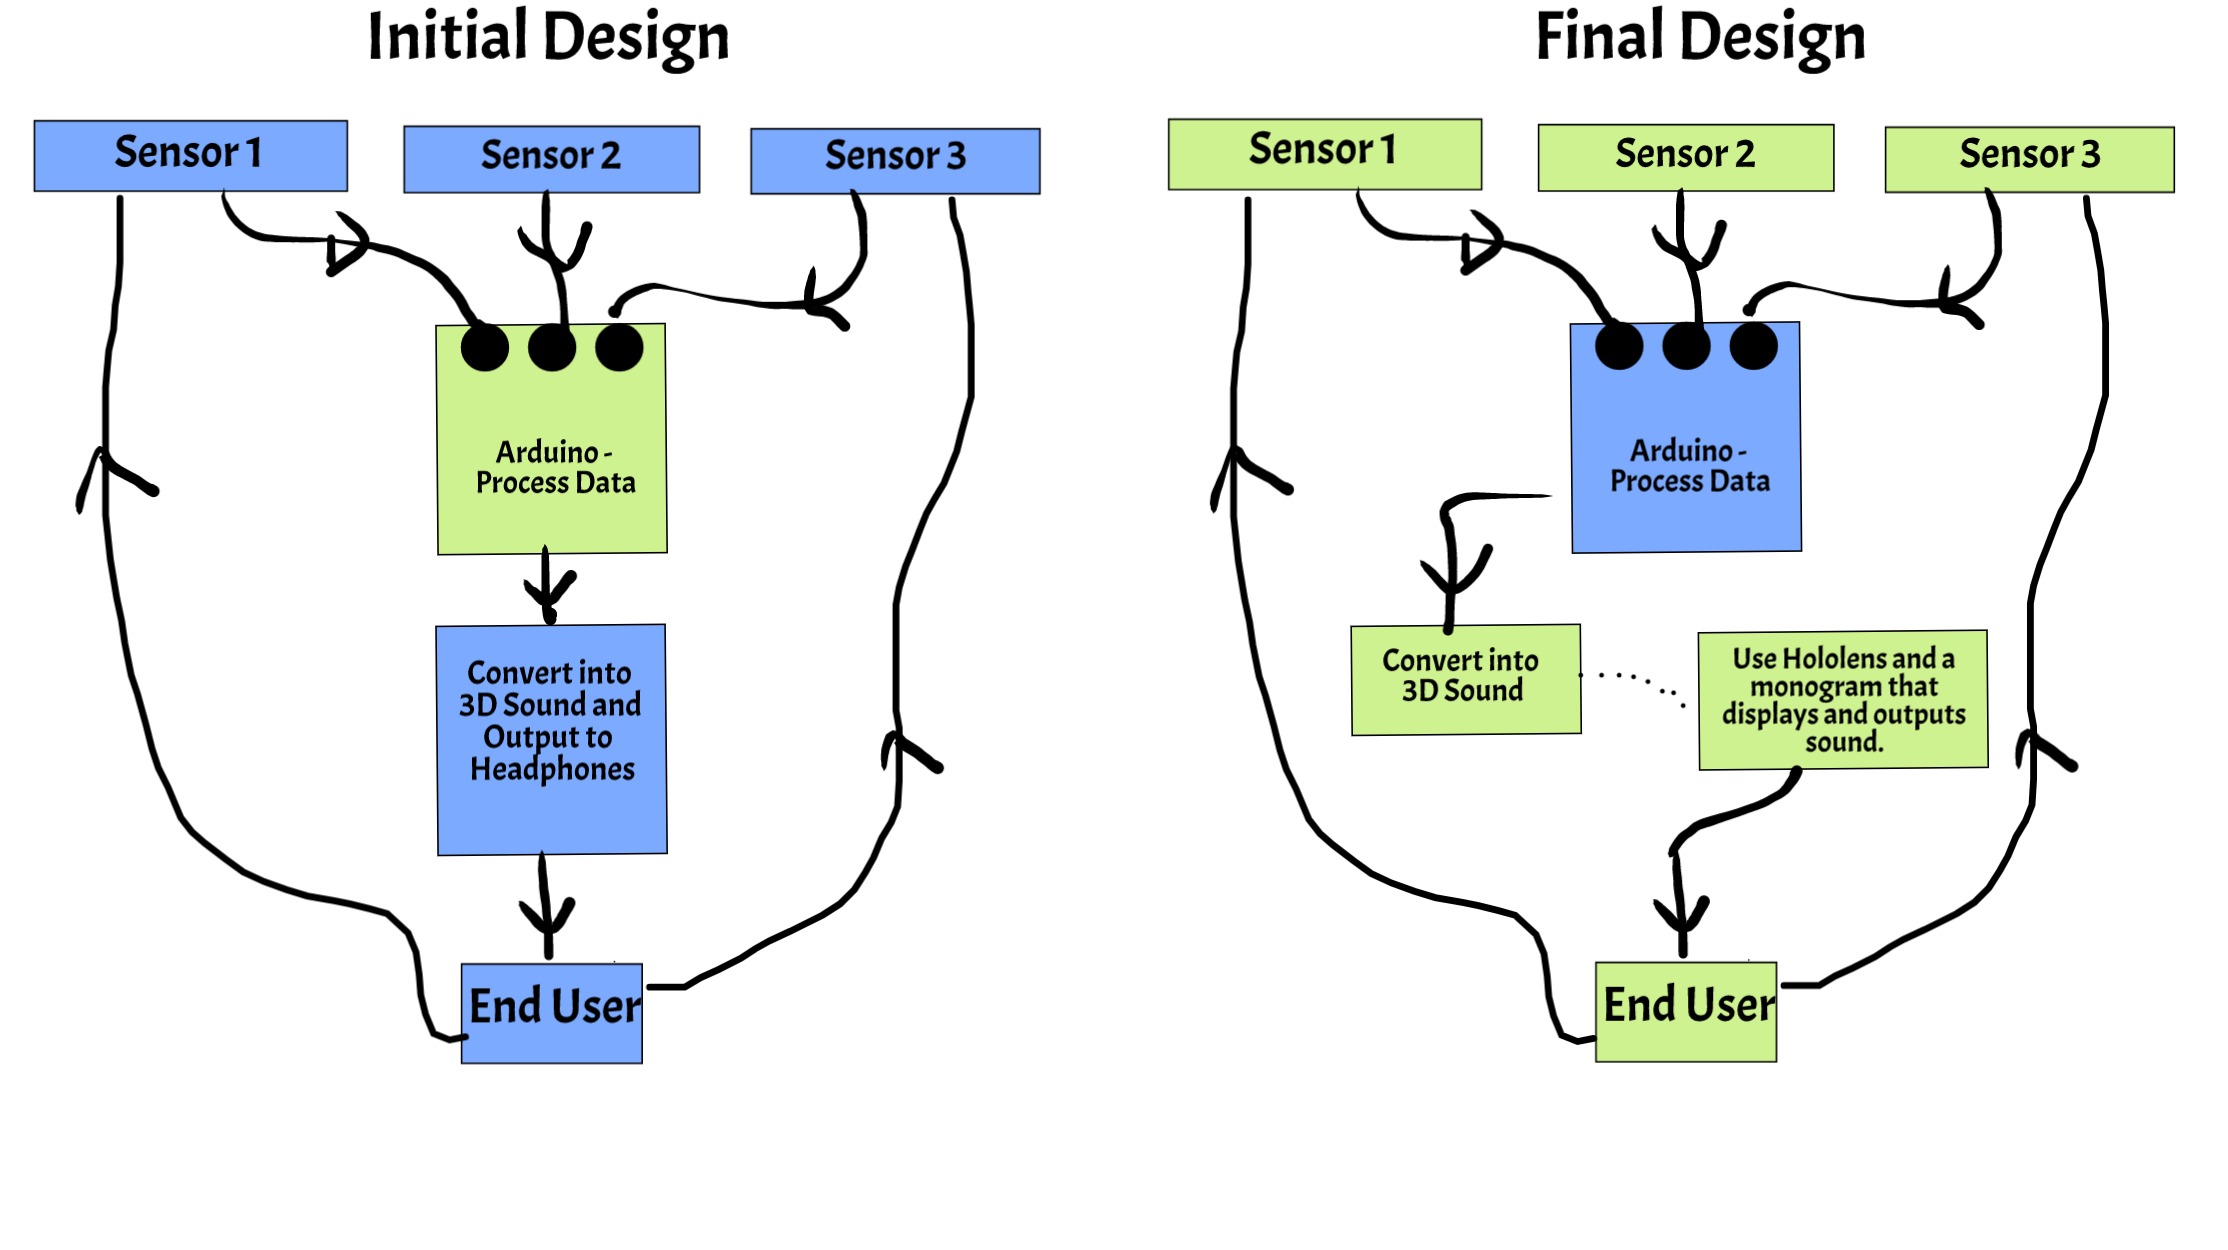
The problem is the need for automatic computer feedback in therapy sessions that would allow the user understand the alignment of his joints. Our approach uses sensors to gather users joint position and rule-based algorithms for pose detection. 3D sound was used as a form of intuitive feedback on how to correct the pose.
We successfully developed a system that tackles this open research problem using innovative technologies. We hope this can be used globally, and positively affect those who require it.
Key Features
Features video
Meet the Team

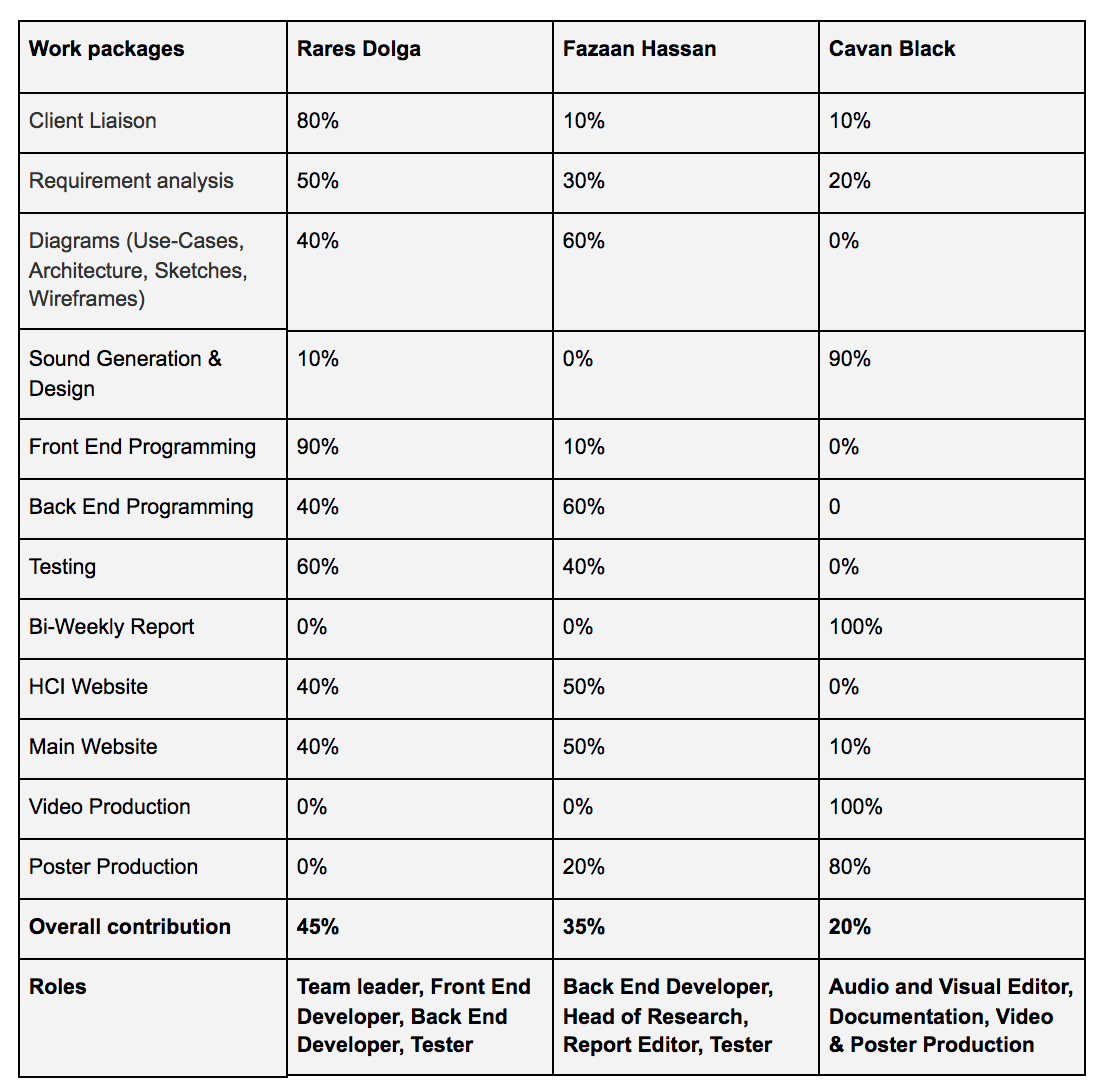
- Rares Dolga
- Team Leader
- Front End Developer
- Back End Developer
- < rares.dolga.16@ucl.ac.uk >

- Fazaan Hassan
- Tester
- Back End Developer
- Head of Research
- < fazaan.hassan.16@ucl.ac.uk >
- Cavan Black
- Audio and Visual Lead
- Researcher
- Documentation
- < cavan.black.16@ucl.ac.uk >
Requirements
Project Background
The assigned name of the project is “Cognitive rewiring through mixed reality”. The affiliated organisation is Microsoft whom require an application for their user Mark Pollock. VirtualTherapy (Name of the application) is created in such a way, that it can be used alongside the current mechanism of a user correcting his/her position with the help of a psychiatrist. The user-interface is developed in mind of further improvements for software engineers in order to provide a friendly interface when using the application, but also for the trainer/psychiatrist to start and stop the program if required so.
Client and User
The group of people part of this project and whom the solution is intended for are as follows: Jarnail Chudge – Client and Project Support, Mark Pollock – Client and Intended user, and finally Dimitry Sayenko – Subject matter expert. Through email communication and skype meetings, we were guided to the right path in terms of the correct technologies and intended hardware to be used for this project.
Project Goals
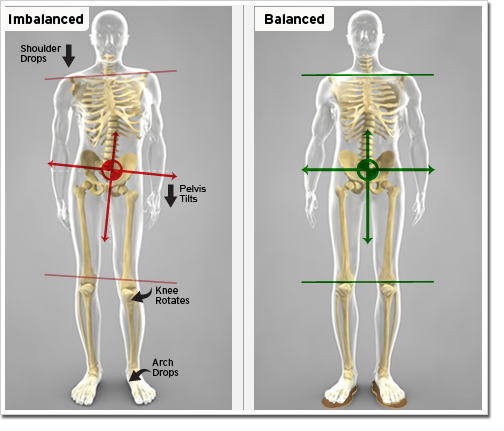
The project is designed to tackle the issue of correcting a user’s posture given the fact that they are visually impaired and paralyzed waist down. The application is trying to give the user more freedom by relying only on pleasant sound iterations to indicate if they are correctly aligned.
Requirement Gathering
In order to obtain client requirements, we had used the method of email communication to obtain more knowledge of the project. Below we will talk about why we chose this and why it was appropriate for our given situation.
Reasons for choosing this method?- Our client was situated in California
- Questions and answers were delivered and responded to quickly
- A record was kept of our communication and any misconceptions were handled quickly.
- We were able to link (‘Cc’) other people related to the project, for example our supervisor Simon.
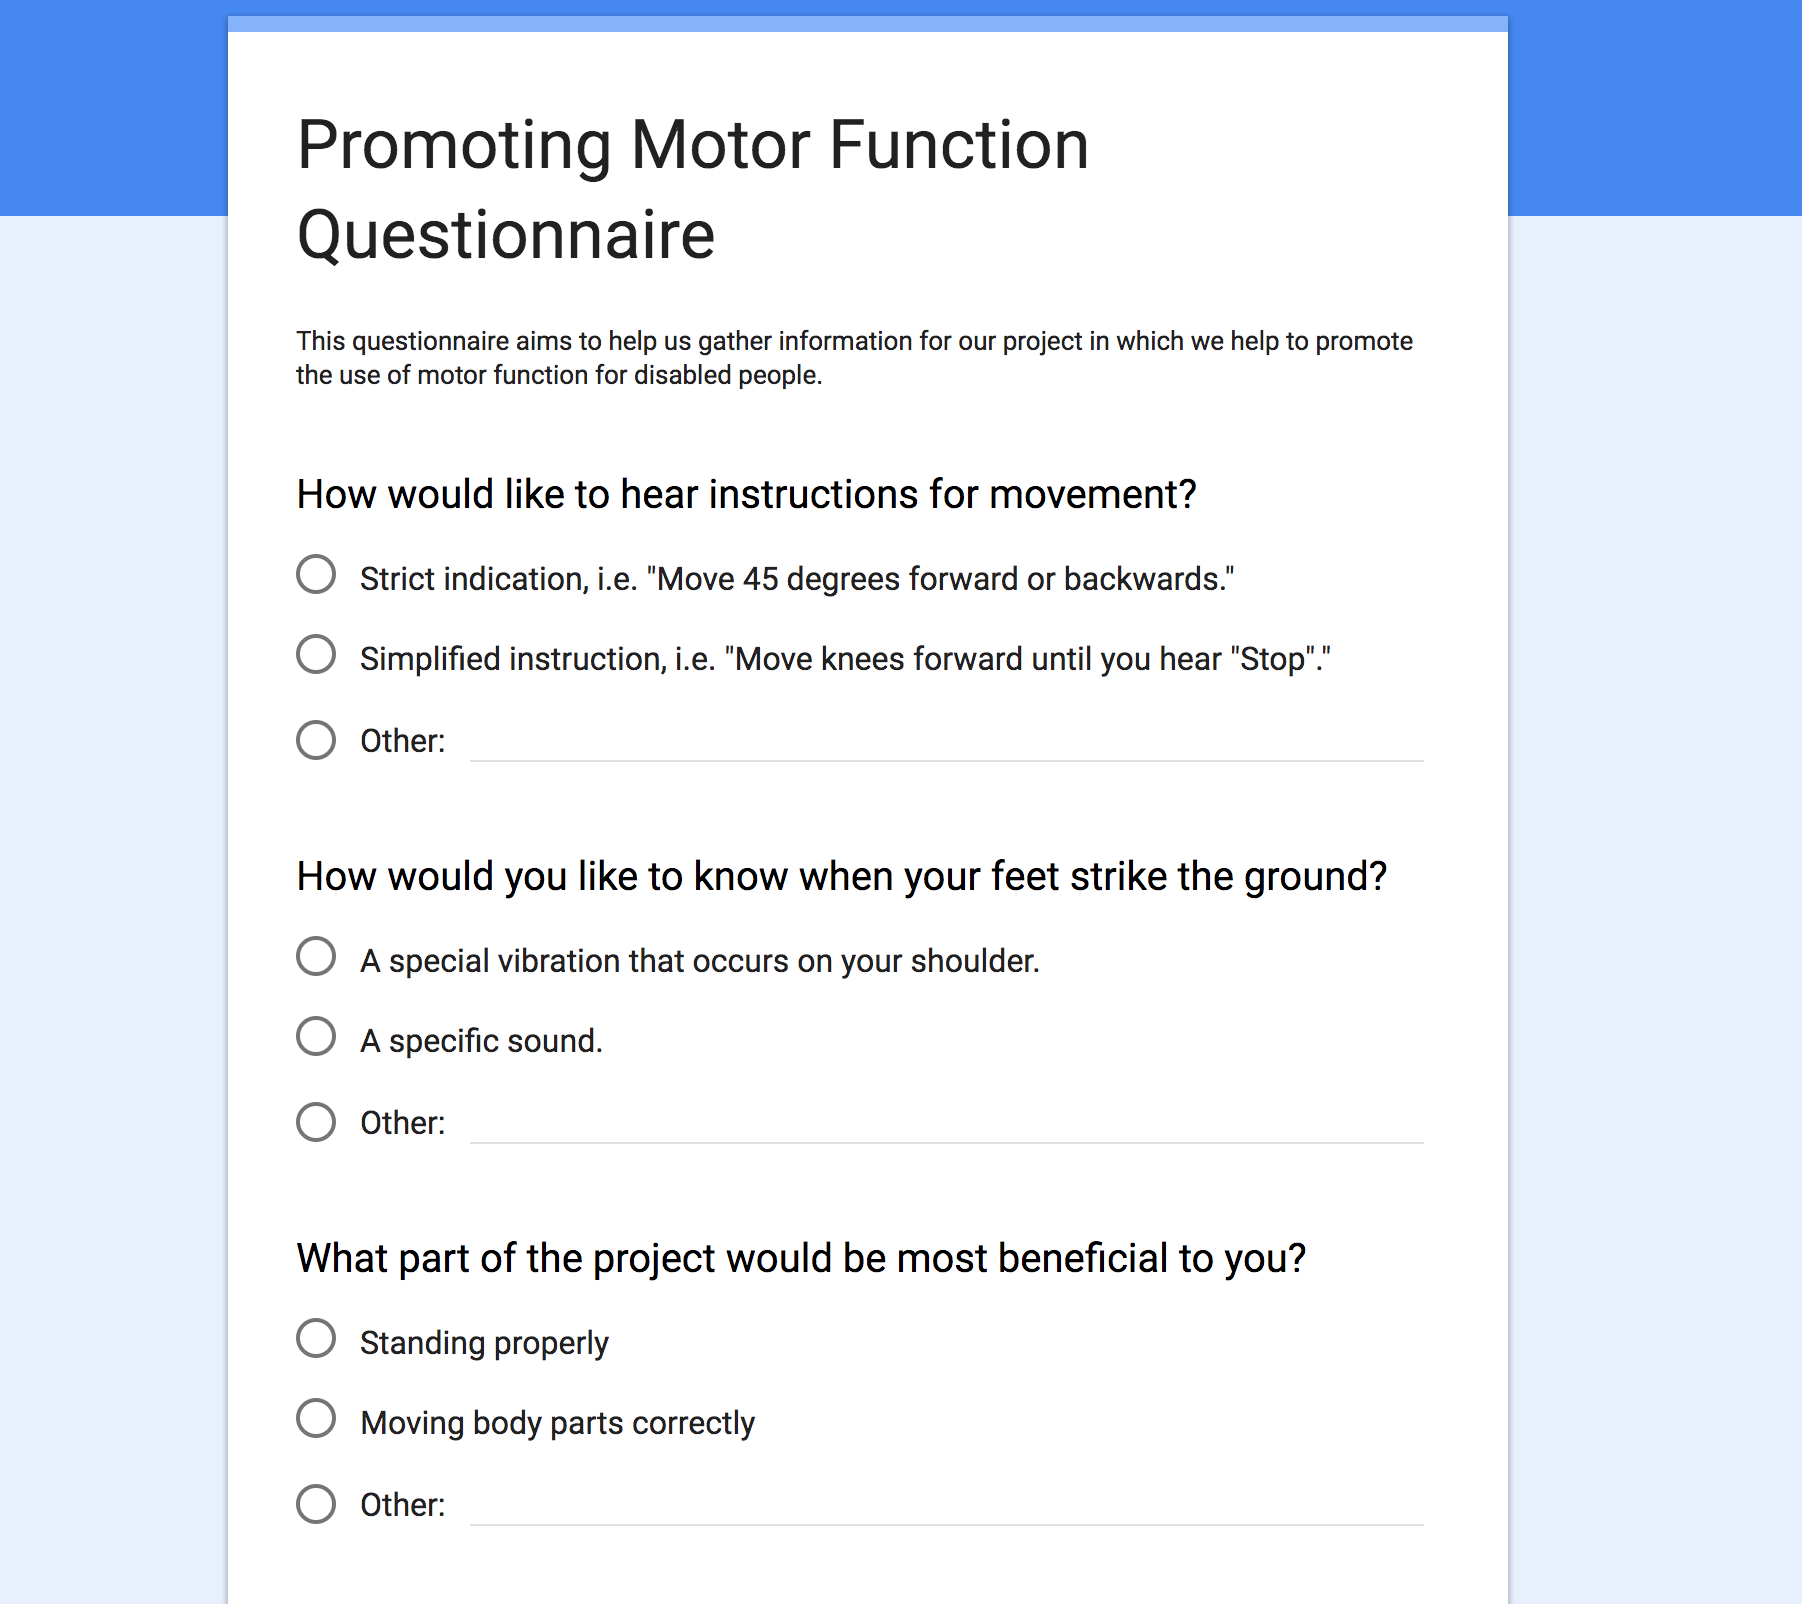
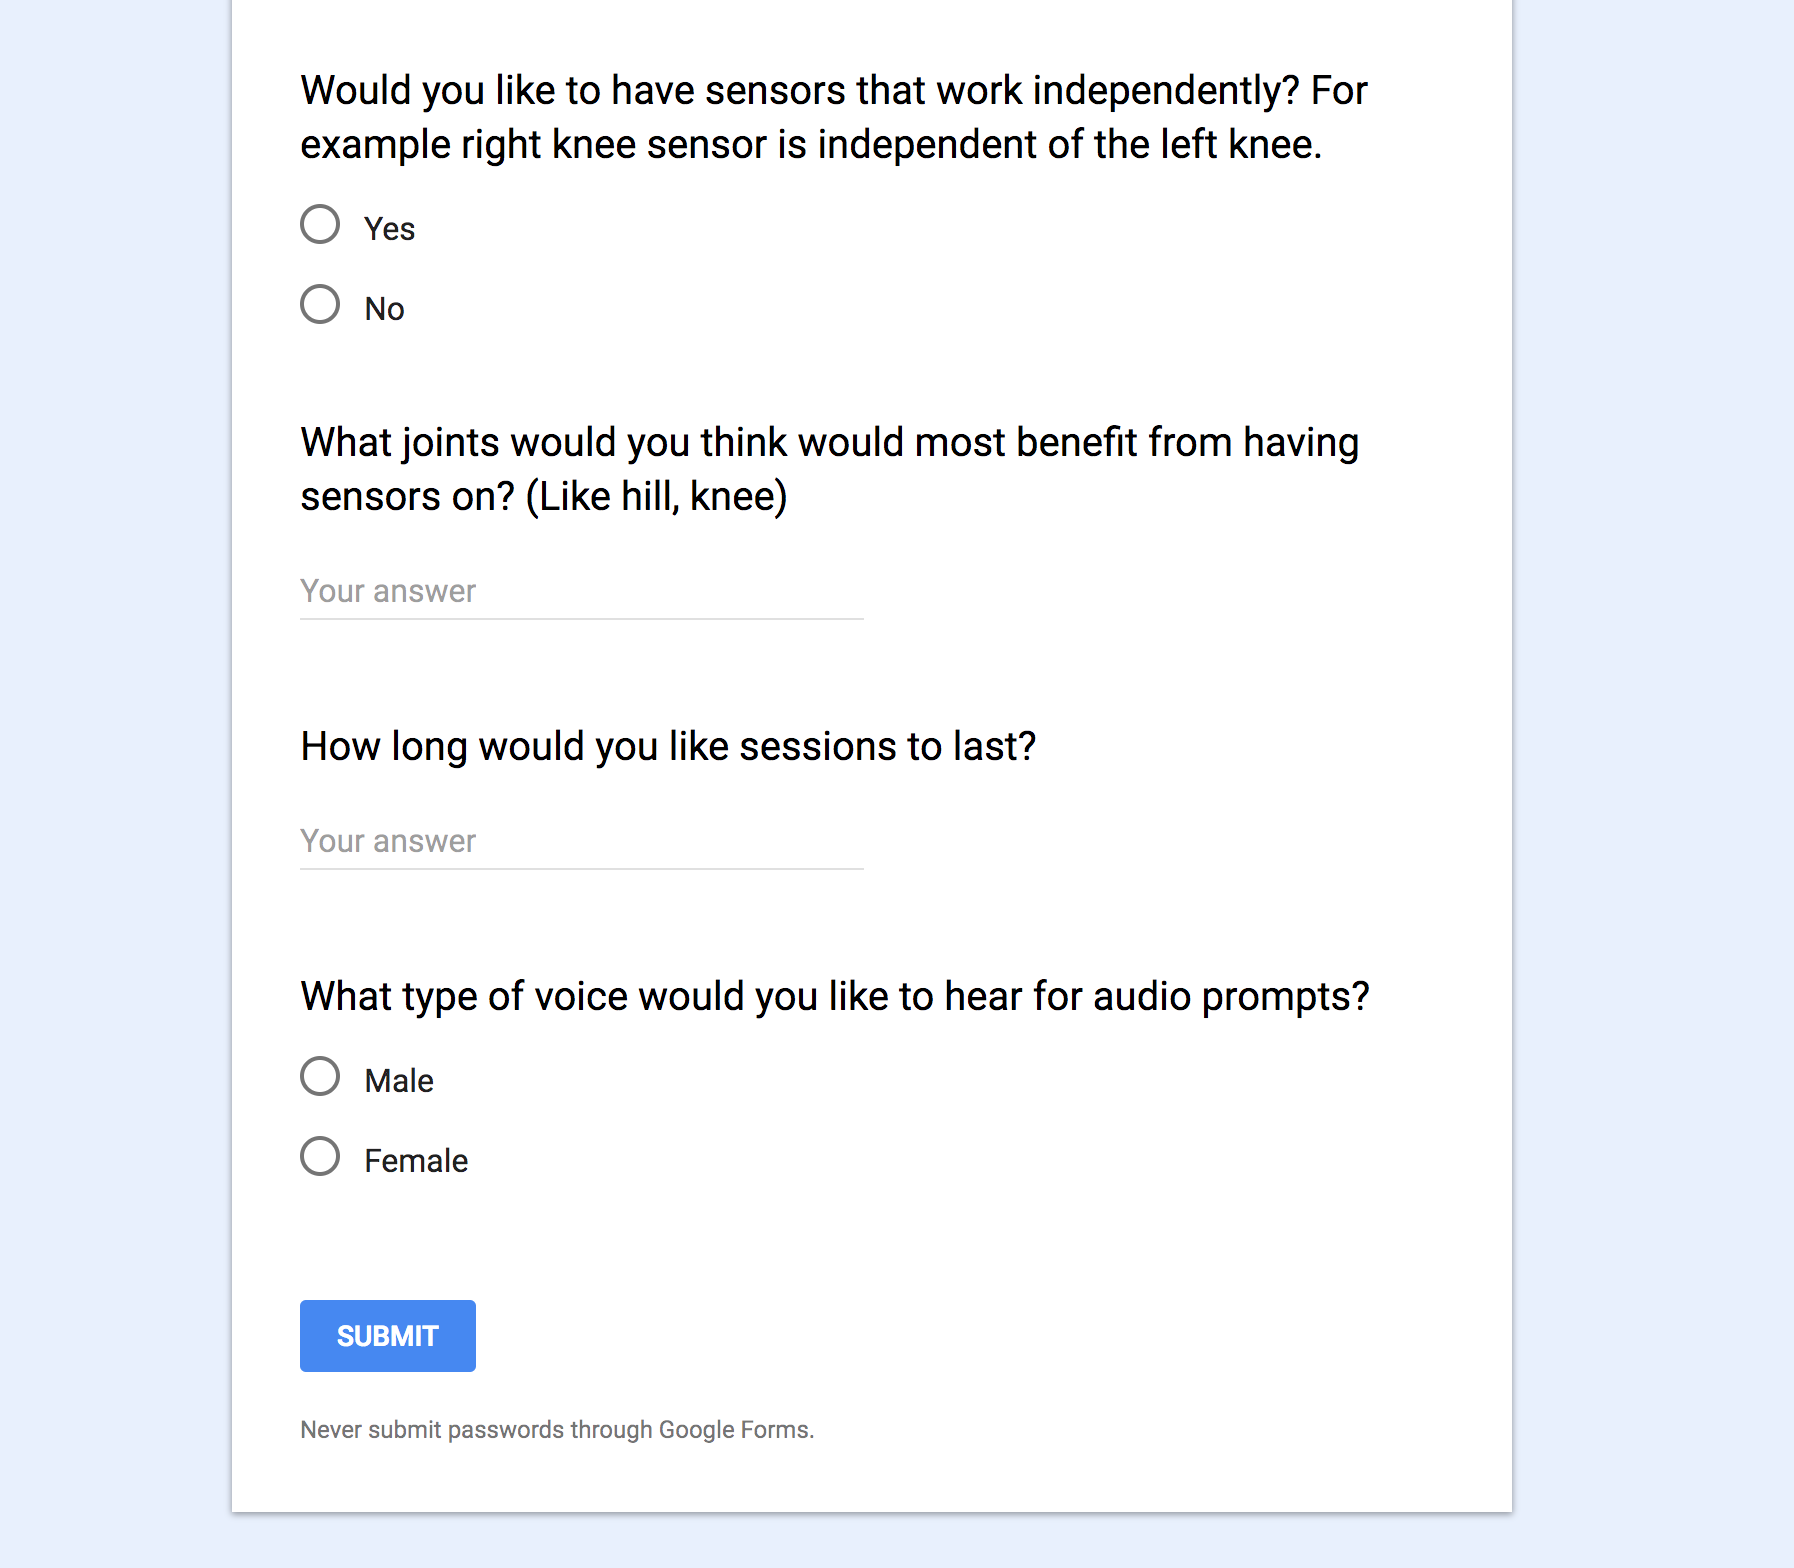
- Below is an example of the questions we asked:
An online Questionnaire was sent to the Mark's physiatrist to retrieve specific information in order to create the solution that was required to help him. The information was valuable because as our project would circulate around these requirements. Based on this we could focus on certain joints of the human body opposed to the whole skeleton which would have been beyond the scope of the project.
After gaining an insight of what the project entails we finally arranged a suitable date to skype our client. Questions were thought of prior to the interview. These skype meetings were set every fornite to update our client and user on our progress.
Why did we choose this?
- Build a friendly and trustworthy relationship with the client
- Clear any doubts about current mock-requirements
- Clarify our budget, skills and what is doable in the given time frame
Personas
Mark Pollock

- Occupation: Athlete
When Mark was five, he lost the sight of his right eye and was forced during the remainder of his childhood to avoid contact team sports to preserve the vision in his left eye. He later went on to study Business and Economics in Trinity College, Dublin, where he became the champion of the institution rowers team. At age 22 he lost the sight in his left eye and was then left blind. In 2012, just weeks before his wedding, Pollock fell from an upstairs window, injuring his back and fracturing his skill. This caused internal bleeding on the brain and resulted in long term paralysis.
James Gordon

- Occupation: Researcher
James Gordon was 8 years old when he had a severe head trauma leaving him blind in both eyes and paralysed waist down. He was educated at the Nottingham High School before graduating and began research into the area of guide dogs and its potential traffic dangers for the blind. He has taken extensive research within the domain of accessibility for patients that are visually impaired. He has contributed to the "ParaEye" society in UK giving up much of his time to young kids. His work has been renowned by many communities.
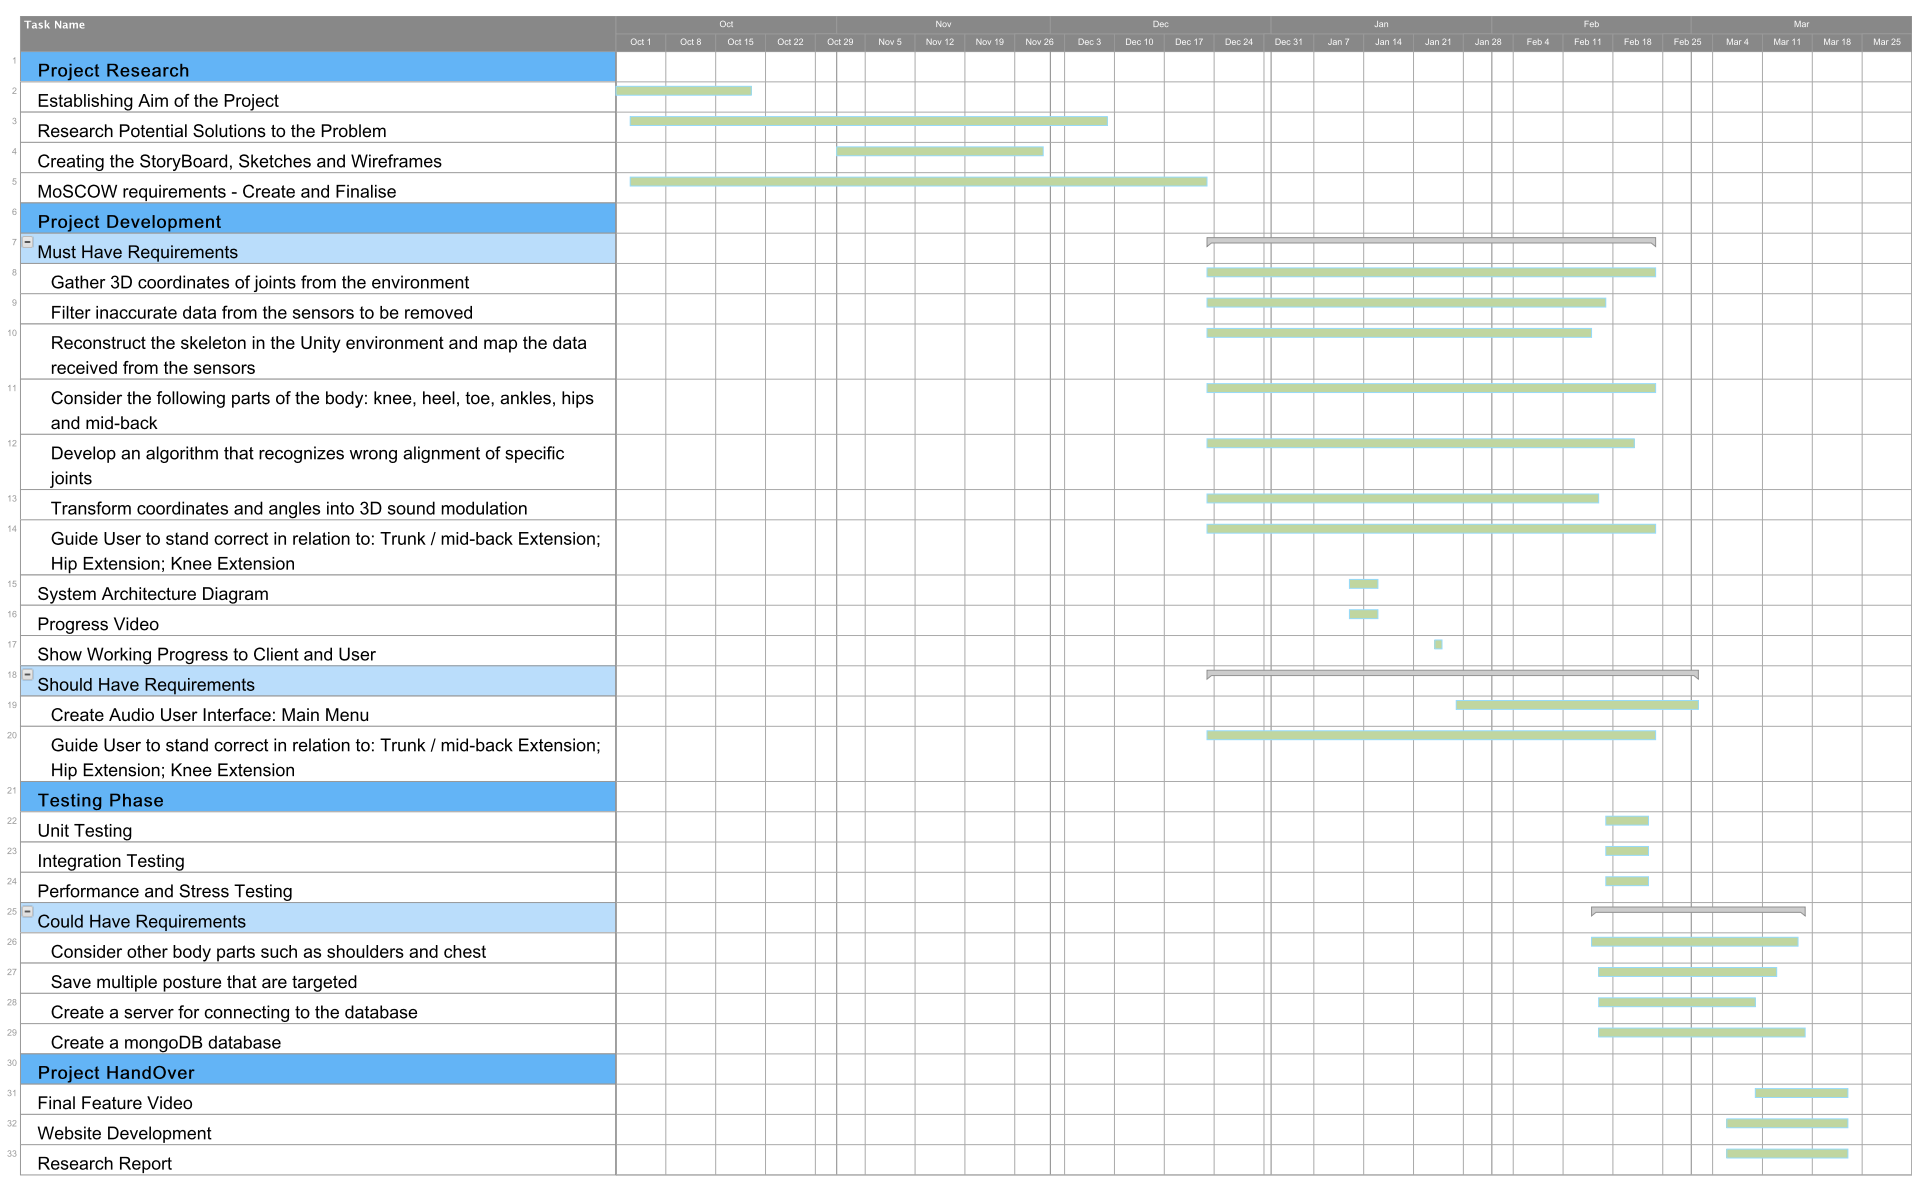
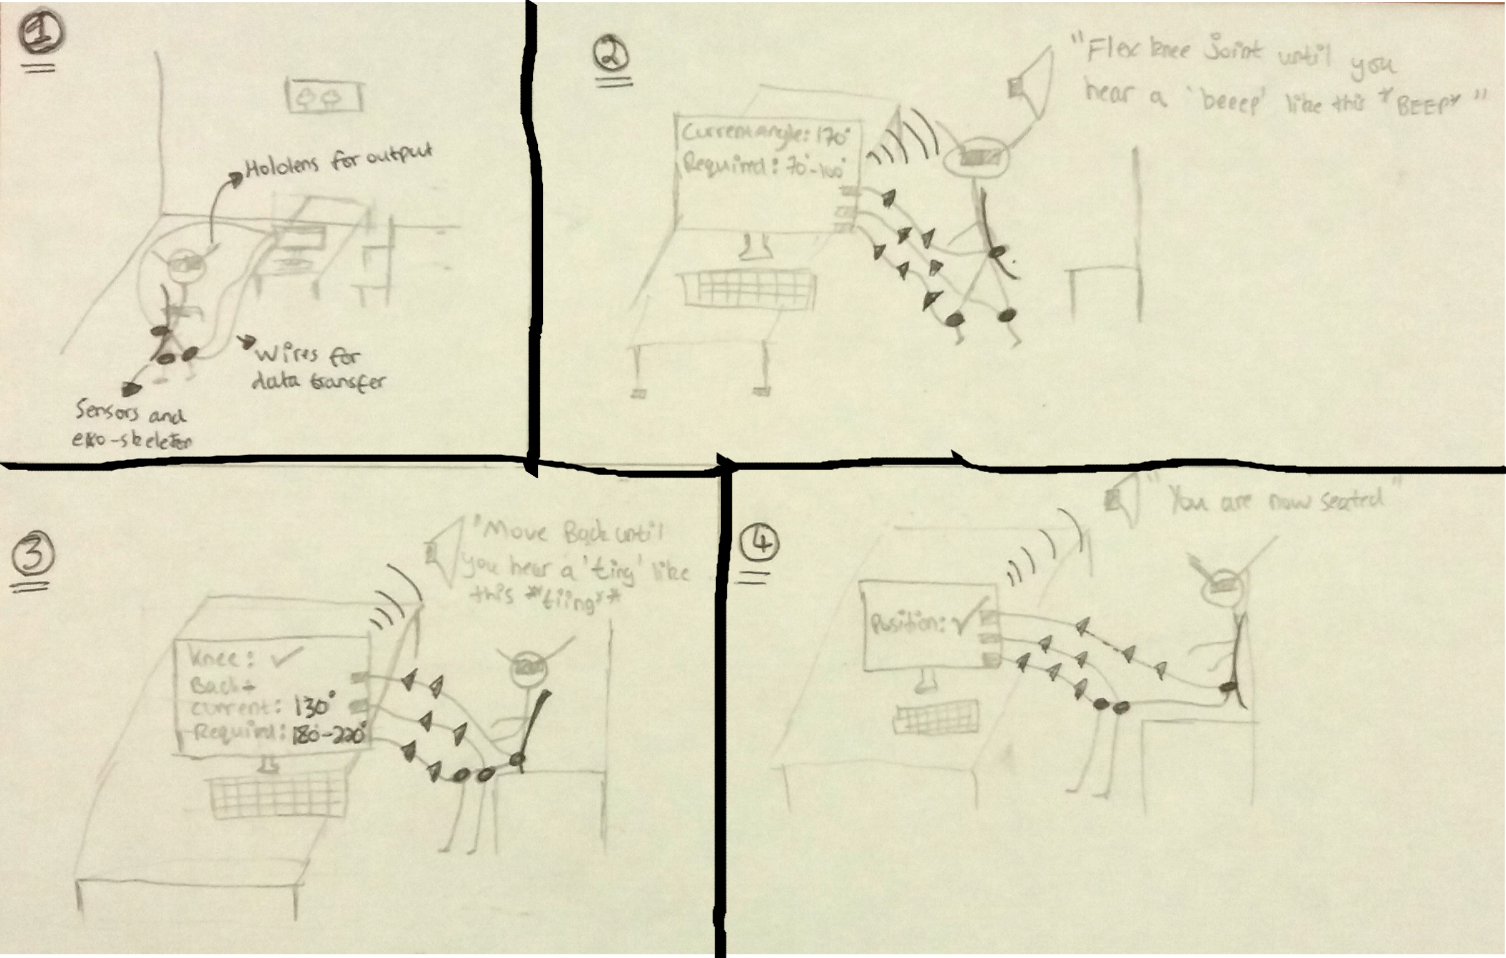
Storyboard
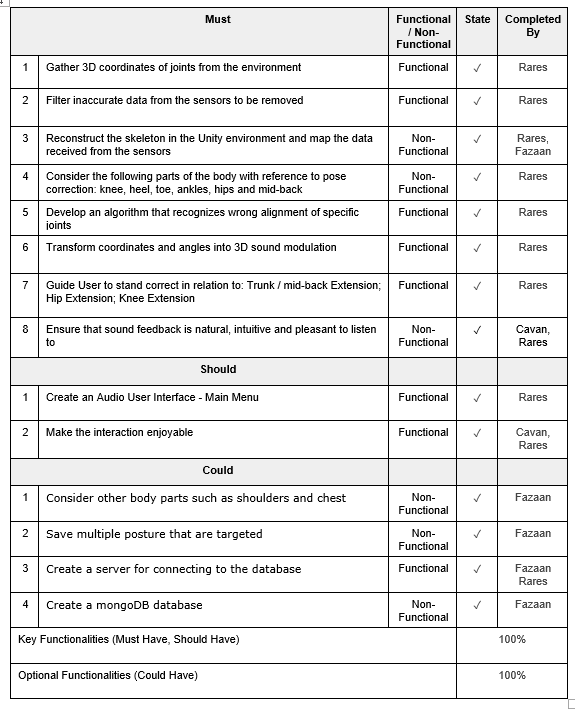
MoSCoW Requirements
| ID | Requirement | Type |
|---|---|---|
| Must | ||
| R1 | Gather 3D coordinates of joints from the environment | Functional |
| R2 | Filter inaccurate data from the sensors to be removed | Functional |
| R3 | Reconstruct the skeleton in the Unity environment and map the data received from the sensors | Non-Functional |
| R4 | Consider the following parts of the body: knee, heel, toe, ankles, hips and mid-back | Non-Functional |
| R5 | Develop an algorithm that recognizes wrong alignment of specific joints | Non-Functional |
| R6 | Transform coordinates and angles into 3D sound modulation | Functional |
| R7 | Guide User to stand correct in relation to: Trunk / mid-back Extension; Hip Extension; Knee Extension | Functional |
| Should | ||
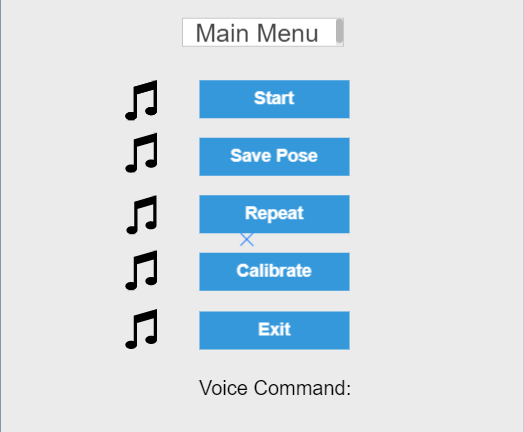
| R1 | Create a Audio User Interface - Main Menu | Functional |
| R2 | Guide the User to stand correctly in relation to: Trunk / mid-back Extension; Hip Extension; Knee Extension | Functional |
| Could | ||
| R1 | Consider other body parts such as shoulders and chest | Non-Functional |
| R2 | Save multiple posture that are targeted | Non-Functional |
| R3 | Create a server for connecting to the database | Functional |
| R4 | Create a mongoDB database | Non-Functional |
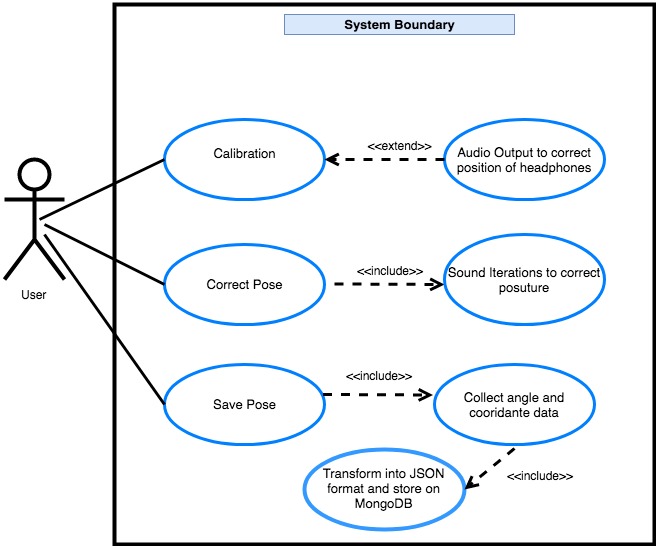
User Cases
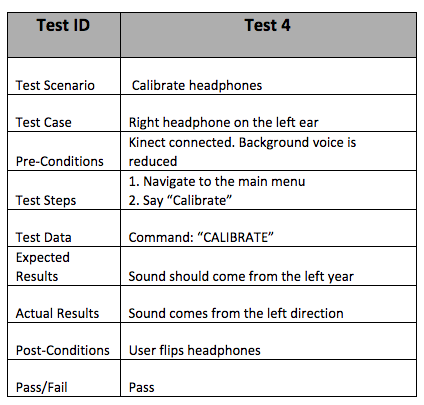
| Use Case | Calibration of the application |
|---|---|
| ID | UC1 |
| Brief Description | Ensures headphones are correctly worn and 3D sound can be heard distincly from each ear |
| Primary Actors | User |
| Secondary Actors |
|
| Preconditions | None |
| Main Flow |
1. The user runs the application on the machine 2. The system displays the main page with voice instructions guiding the user to select an option 3. Calibration is chosen (Vocally or is clicked on) |
| Postconditions | None |
| Alternative Flows | None |
| Use Case | Correct User's Posture |
|---|---|
| ID | UC2 |
| Brief Description | The user will move his joints according to sounds in 3D space until he is standing correctly |
| Primary Actors | User |
| Secondary Actors |
|
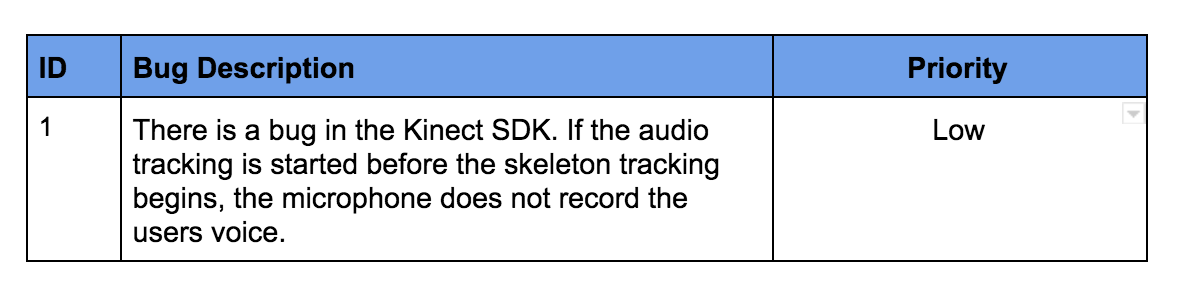
| Preconditions | The kinect sensor must be enabled/working for it to recongize movement. It must also be placed at an appropriate angle and height. |
| Main Flow |
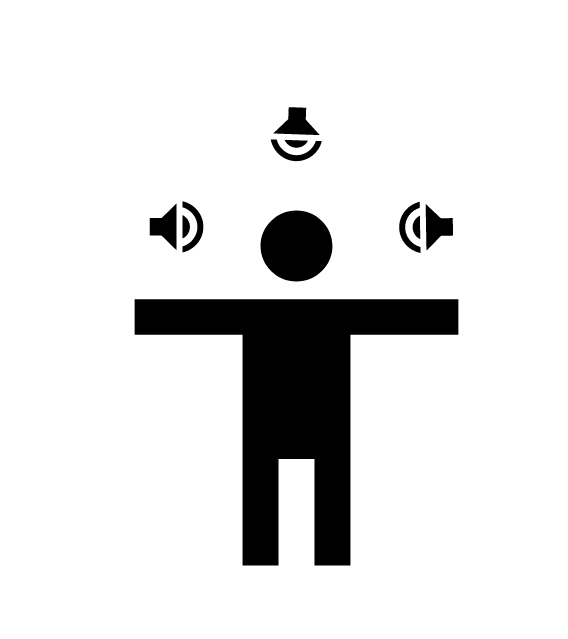
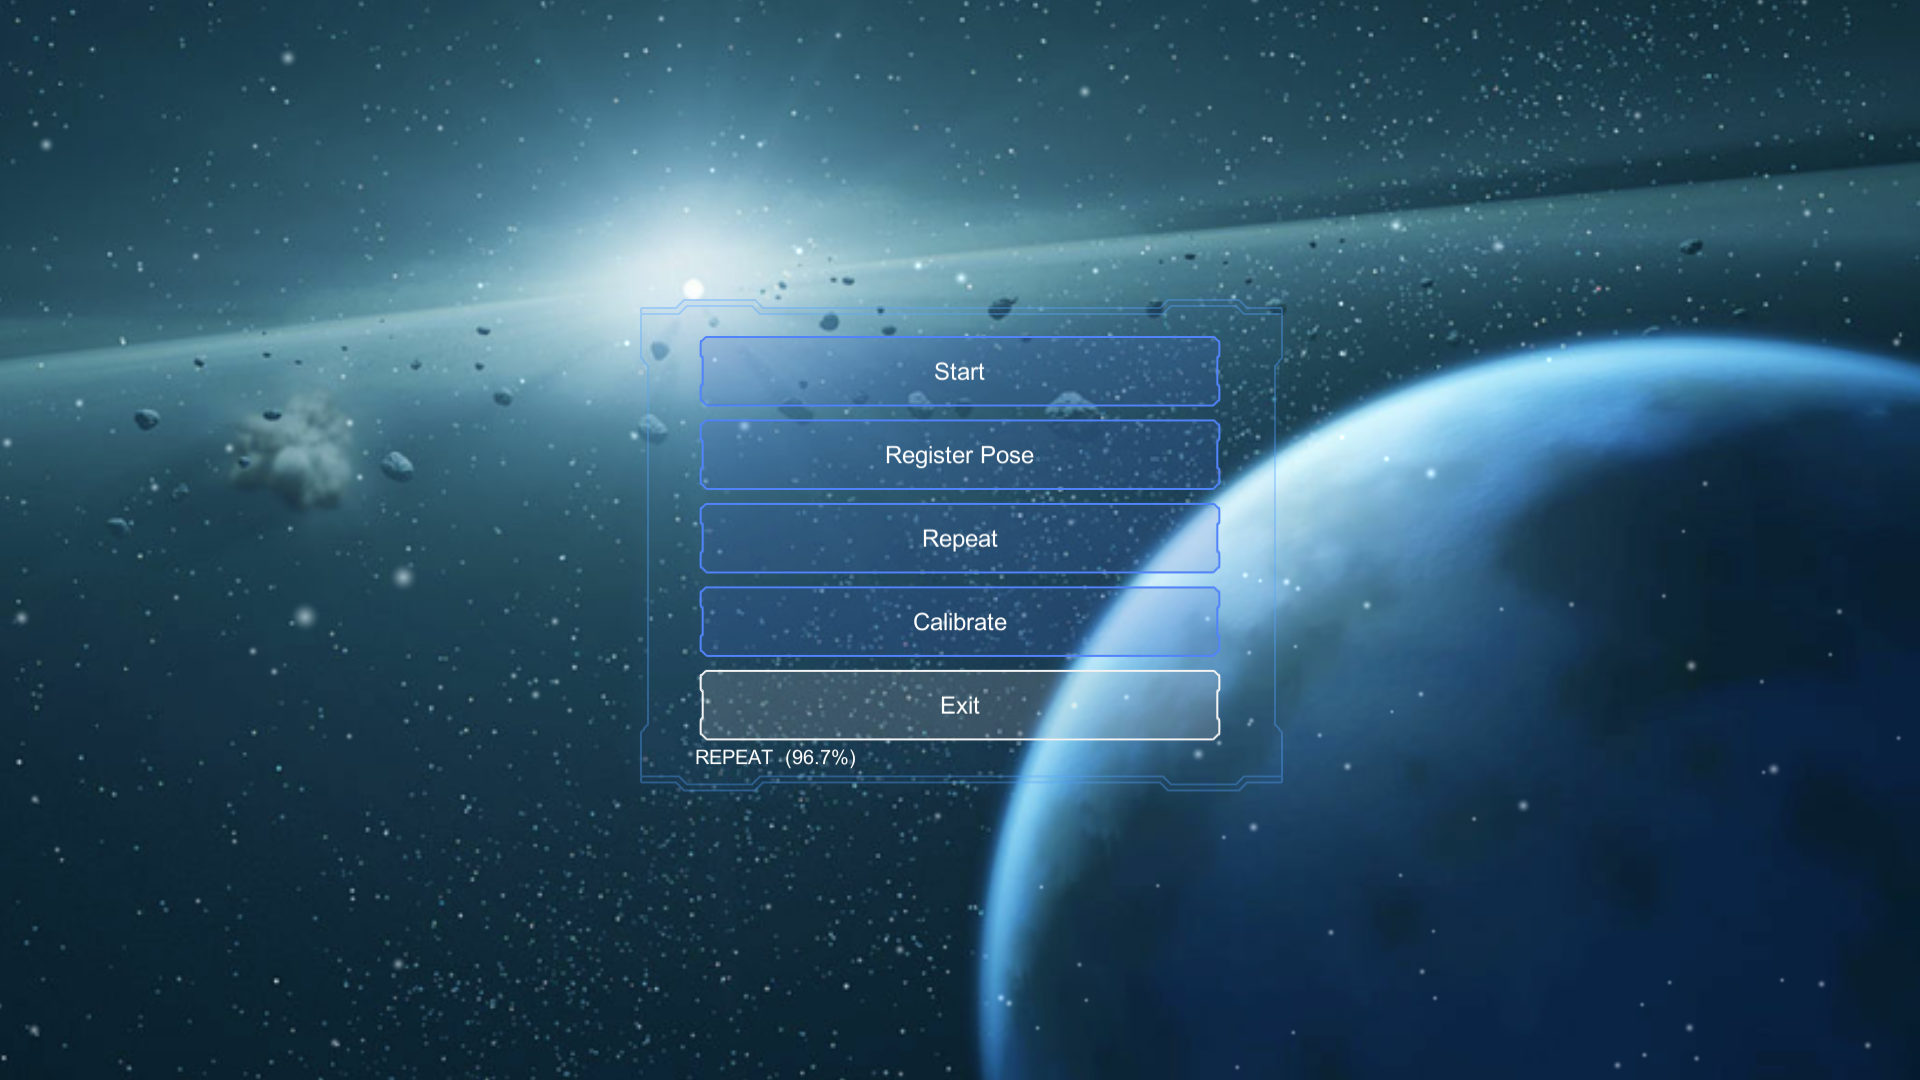
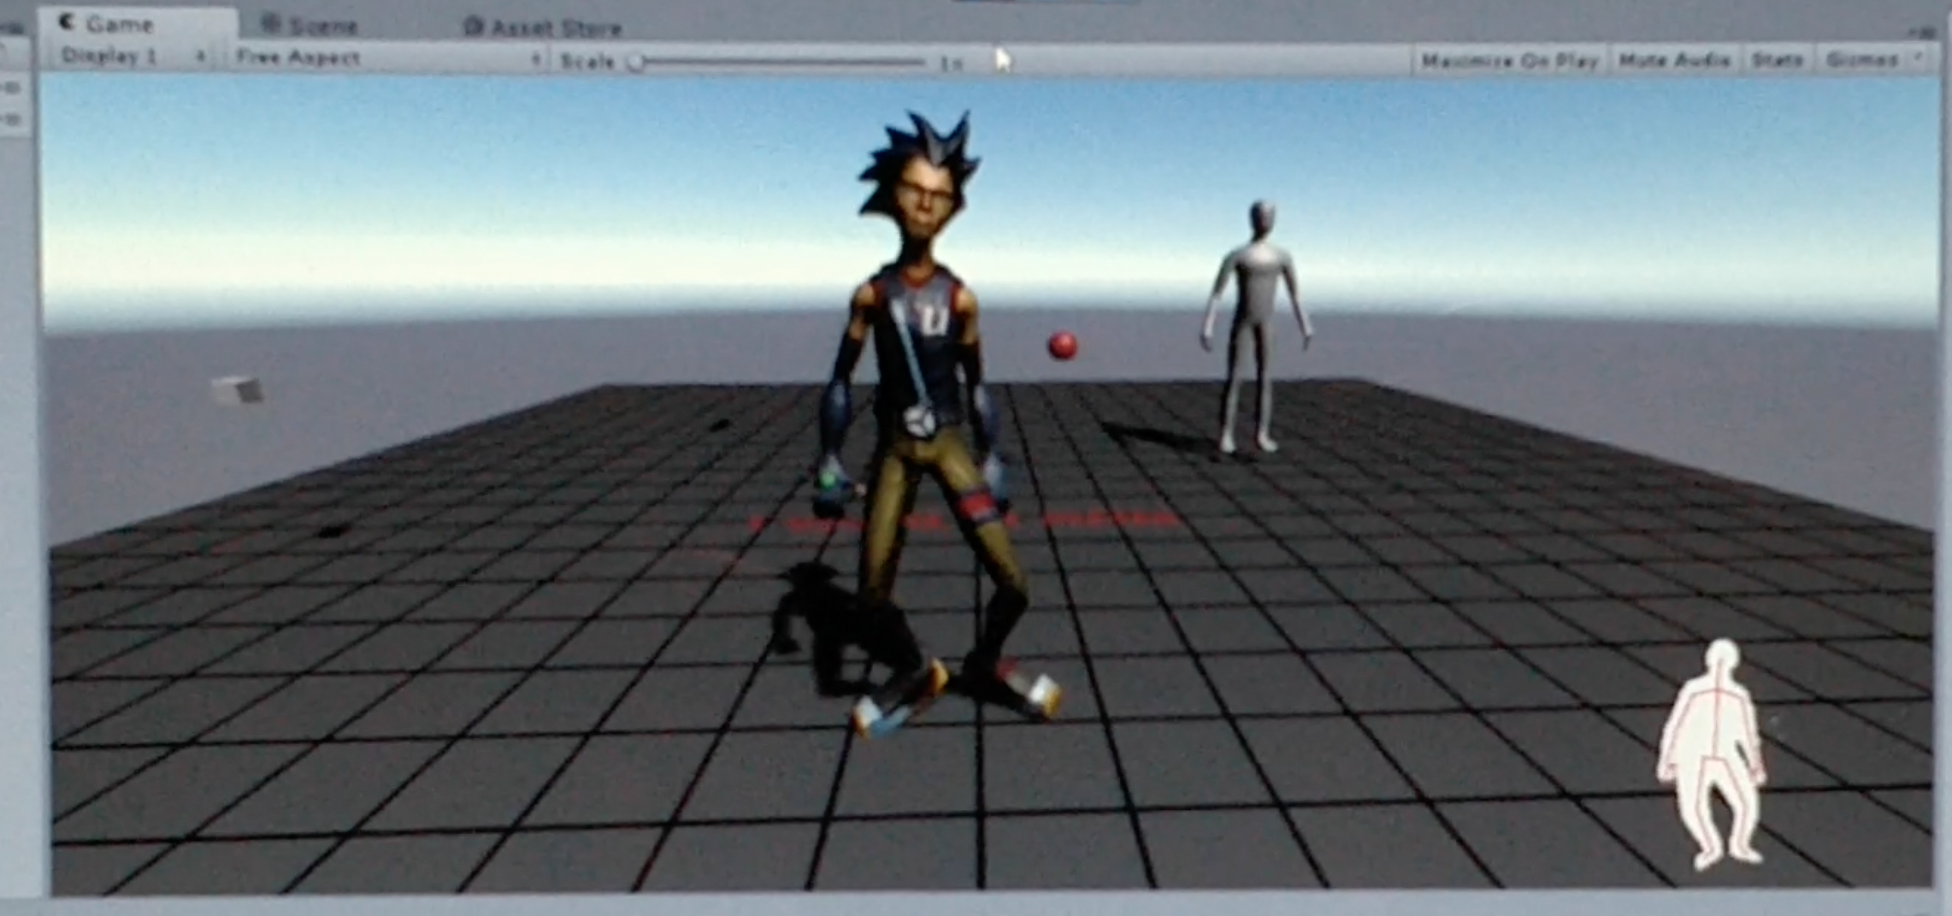
1. After the calibration process, the user says "Start" as indicated by the instructions 2. The screen changes to an avatar and smaller screen showing the image of the user's joints. This information is for the trainer/psychiatrist. 3. A quick rundown of the sounds are played. These indicate which sound is for which joint 4. The pose correction algorithm is started and the user is guided to correctly stand. |
| Postconditions | None |
| Alternative Flows | Invalid Query: Another option is selected |
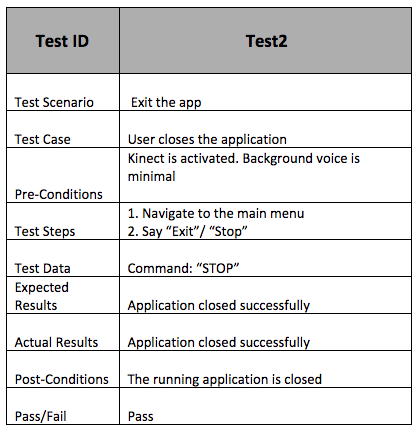
| ID | UC2.1 |
| Brief Description | The user exits the system |
| Primary Actors | User |
| Secondary Actors | System |
| Preconditions | None |
| Main Flow |
1. The user says "Exit" 2. Application closes |
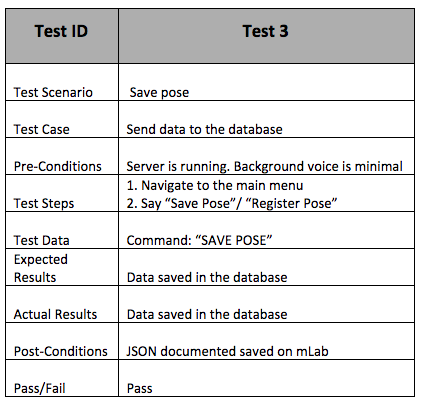
| Use Case | Store 3D coordinates of the current position |
|---|---|
| ID | UC3 |
| Brief Description | The system captures the current position of the user and stores it into a database. |
| Primary Actors |
|
| Secondary Actors | System |
| Preconditions | None |
| Main Flow |
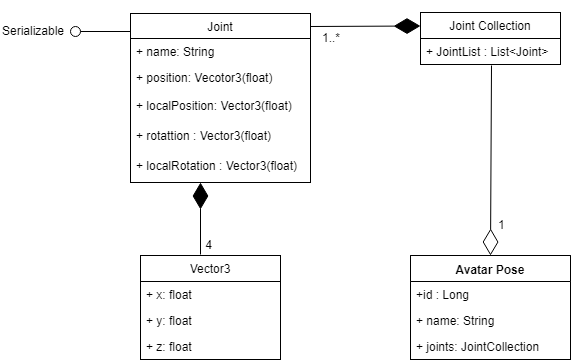
1. The user says "Save" 2. Rotation, localRotation, position and local position are captured for each joint 3. A JSON document is created for each "save" and stored in a collection on a mongoDb server |
| Postconditions | None |
| Alternative Flows | None |
Research
Potential Devices
Sensors are a key aspect of our project. We required high quality six degrees of freedom devices to get the position in 3D space of the user's joints. If the data received is not accurate enough the given feedback will have faults.
It is a promising motion track solution that uses the magnetic source to detect the position of smaller devices mounted on the user's joints. Data received from this sensor is in real time, and their experiments suggest that there is no latency. Also, the occlusion does not represent a problem in this scenario, because main joints have individual sensors. [1]
Although this is a good solution in terms of data precision, it is very expensive and exceeds our budget for the project. Furthermore, it requires a considerable amount of time to integrate it with a software that can produce 3D sounds.
It is a full body motion analysis system capable of giving 3D joint angles, the orientation of bones and centre of mass [2]. The first disadvantage is can be seen by cost; 35,350 Euro is way beyond our budget. Secondly, it has a small delay in sending data by wireless communication and using cables would not be practical for the user. Although, compared with Polhemus it has the advantage that it gives the centre of mass information.
Our supervisor Simon suggested them as they are cheap and offer reasonable results when gathering joint position. Main obstacle we faced with this sensor is that it display real-time data only using a android application. No existing API makes it considerably hard, to take a continuous flow of body segments positions and use them in our own software for producing 3D sound. Being composed of 6 sensors, it would be impossible for us to separately track all 20 joints that we need for calculating the pose of a user [3].
Kinect is a depth sensor created by Microsoft that gives the skeleton position of a user in 3D space, using infrared light and a RGB camera. It is a cheap and robust solution, with good documentation and online support. We decided to go with Kinect, because compared with all the previous solutions, it offers the possibility of connecting with Unity and because it provides a perfect balance between cost and performance. This part was vital for us because we needed a game engine or other software capable of producing mixed reality applications. Also, it provides an SDK that returns the position of up to 25 joints [4]. The device has very performant audio capturing functions as well. This is an important aspect of designing a voice command-based user interface for visually impaired persons. When compared with the first solutions it does not offer such good results for occlusion. However, we try to reduce this impact by approximating the position of interfered joints and filtering data.
Potential Frameworks
The VirtualTherapy project is a mixed reality application, so we required an editor that would facilitate the construction of such a software. This can done by different gaming engines. They are described below:
Unreal is a powerful game engine and has support for VR/AR applications. However, we have not used it because it does not offer support for integrating Kinect. This is a major downside, since Kinect needs wrapper functions to transform the raw data from the sensors.
Unity is a game engine that has a great support for virtual reality applications. The biggest advantage is that Kinect has plugins for Unity. This makes it possible to transfer data from the real world to the virtual world. We have chosen Unity, because it has great built in functions for creating immersive 3D sound feedback but also an accurate depth imager. The choice was also heavily affected by the large amount of documentation available for Unity and the support given on forums. Problems could be solved more quickly as they may have previously been encountered.
Potential Programming languages
Front End Development
- Boo
- JavaScript
- C#
The last 2 are the most popular henceforth we have chosen to program in C#. The reason being, we are familiar with object-oriented programming languages such as Java, which is similar to C#. If we had chosen to write in JavaScript, there would have been issues with script compilation for premade libraries which we will discuss later below. Apart from this, there are no performance advantages of one language over the other.
Server Side Development
- Node JS
- PHP
- Ruby
For the server part we have used Node JS. Alternatives include Django, PHP, Ruby, but node.js has multiple advantages over all. We have decided to use Node JS due to previous experience. This saved time as we did not have to learn a new backend programming language. It also allows the construction of real time web application, in which both the client and the server can initiate requests. Being an extension of javascript the documentation provided showed that connection of database drivers were can be easily implemented. Also, it can handle a huge number of simultaneous requests which means high scalability. This is important as Microsoft would like to further develop on the application in the future.
Potential DatabasesMySQL is a powerful database, known for high performance and data security. It is one of the best options for complex queries. However, data must follow the same structure. The structure of our data might change, based on the pose chosen by the user. This means the relationship between joints and their number will differ a lot [7]. Also, we have a lot of relationships between the data which will mean introducing many new tables and linking them together in the most efficient manner. Due to this, running queries on this form of data will be expensive.
This database represents an advantage for us because it allows the structure of data to change. Each pose we save is stored as a JSON styled document, making it easier to process. Also, this database scales horizontally, in comparison with first which scales vertically. This means that more traffic is handled by adding more servers. This is more appropriate for out type of data. Considering this we decided to choose Mongo Db [8].
Libraries and API's
Retrieving Joint Positions From The User:OpenNi is an API used to initialise devices, that contain depth sensors compatible with PrimeSens, form application code. We need it to start the depth sensor when the unity application is run, get data from it, and stop it on user’s command [6]. For detecting the human body and accurate joint position from Kinect depth images, NITE library is used.
This is a library that allows us to map data from Kinect to an avatar that represents the human body in unity world. It contains wrapper classes that make this transformation, using basic mathematical operations like matrix multiplications. As our application needs to initialise and stop the device, it contains drivers necessary for openNI and our sensor. Also, it provides higher level functions for using Kinect features. Currently, it does not have any other competitor libraries that use Kinect for skeleton tracking, hence why we are limited to use this one.
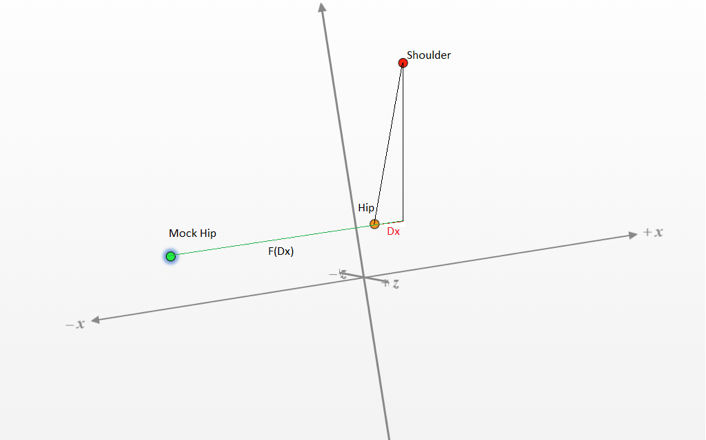
An alternative to the OpenNI, NITE and MS combination is OpenPose plus SMPL. It is a 2D machine learning, real-time pose estimation library, where up to 18 body key points [9] are determined. This library yields great accuracy, hence dealing well with occlusion. A rule-based algorithm can detect joint alignment just with 2D data, for example, detect how bent the knees are without depth data, by calculating the relative position of angle joints.
However, we have not chosen this solution, because the creation of 3D audio feedback involves applying sound on objects in 3D space. Without the third axis, it is impossible to create objects that mimic our user and apply sound towards it from different directions. A solution to this problem would be the use of SMPLify. This is a machine learning software that can create 3D realistic human models from 2D data.
A common problem with this software is its’ lack of integration with Unity. This is required for the augmented part of our project causing problems as no documentation is provided on how to connect the output of library with the game engine we use. This might be considered as an alternative solution in the future of the project because SMPLify announced that they are working on creating a Unity plugin. Therefore, the only big problem remaining is connecting the avatar to continuous data. However, this cannot be achieved as SMPLify only works on a single image [10]. It is worth mentioning that this library uses high optimisation suggesting that the computation costs for each image are high. Computing a continuous stream of images would not give real-time results as the lag in the application would be high.
Speech RecognitionThis is a known and powerful API that recognizes around 100 languages. It runs on cloud services which we considered this as a disadvantage. If no internet connection is present, then the application becomes impractical for visually impaired users, as they have no way of interacting with it.
We needed a service for speech recognition to implement the voice command functionality. A disadvantage is that the user must install them on the local device to make our app work. We have chosen this SDK because it runs directly in windows 10. It does not require any calls over the internet so the delay in response time is minimal. This is an important factor for a reliable User Interface [11].
3D Sound EffectThis plugin can be used in many game engines and has good documentation. Also, it offers the possibility to customize the effects of the sound. It has the disadvantage that it does not imitate the reflexion of sounds from walls very well. In this case, the virtual experience we are trying to achieve will not be immersive.
Unity already contains this plugin, making it easy to use and configure. We have chosen the HRTF because it offers functions to amplify and reduce noise for different room sizes. Sounds can be heard from the left and right directions with walls also reflecting noise signals. Because of this, the user can easily locate the source of a given sound. This is a clear advantage over the Oculus Rift technology making it suitable to achieve our requirements.
algorithms
Pose prediction algorithms are vital for any VR/AR application that include an avatar. Only using the current position of a user to compute new skeleton tracking images for each frame might result in desynchronization [12]. To solve this, we consider some well-known mathematical algorithms.
This is a smoothing filter used for data when a sudden change appears. It applies one exponential function to smooth the input from the Kinect. After a period of experimentation, we had observed that this filter does not perfectly follow the data trend in the abstract movement of joints in motion [13].
This method predicts various joint positions using a simple linear regression function. We try to estimate the parameters of the equation when studying the movement of the user. The difference between parameters decreases exponentially over time, prioritising the new data from sensor. This method is preferred because, by applying the exponential function twice the data follows the trend of the real input [12].
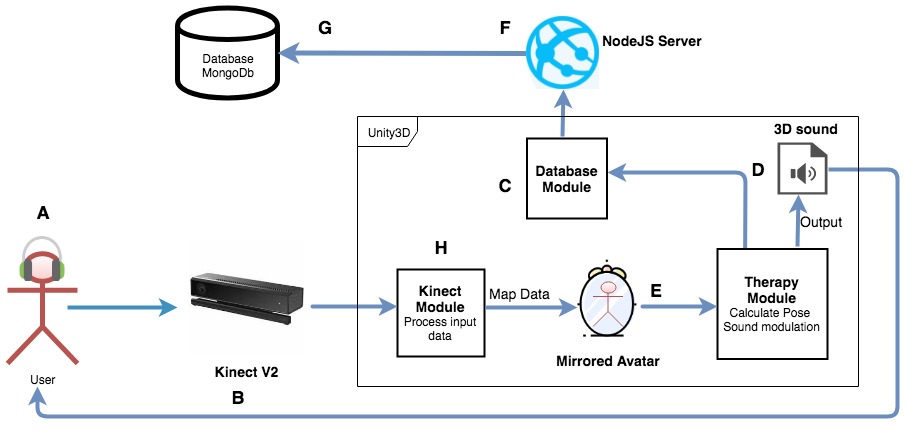
Final Decision
Our final solution consists of a Kinect V2 Sensor to get joint position from the user, and Unity for creating the 3D sound effect. Our language of choice was C# for the local application and nodeJs for the backend programming. We chose to use MS-DK Kinect from the Unity Asset Store with OpenNi to control the Kinect sensor and retrieve data from it. This library also contained wrappers for transforming input into “Unity spatial coordinates” allowing us to map to an avatar. We also decided to use the double Exponential Filter to predict the continuous flow data and reduce the phenomenon of occlusion as much as possible. We used the Microsoft HRTF spatializer to create the 3D sound effect.