System Design
This sections outlines the design of our system and looks at its seperate components individually in detail. We aim to look at the system from different perspectives, from its architecture to design principles to data storage and more.
System Architecture
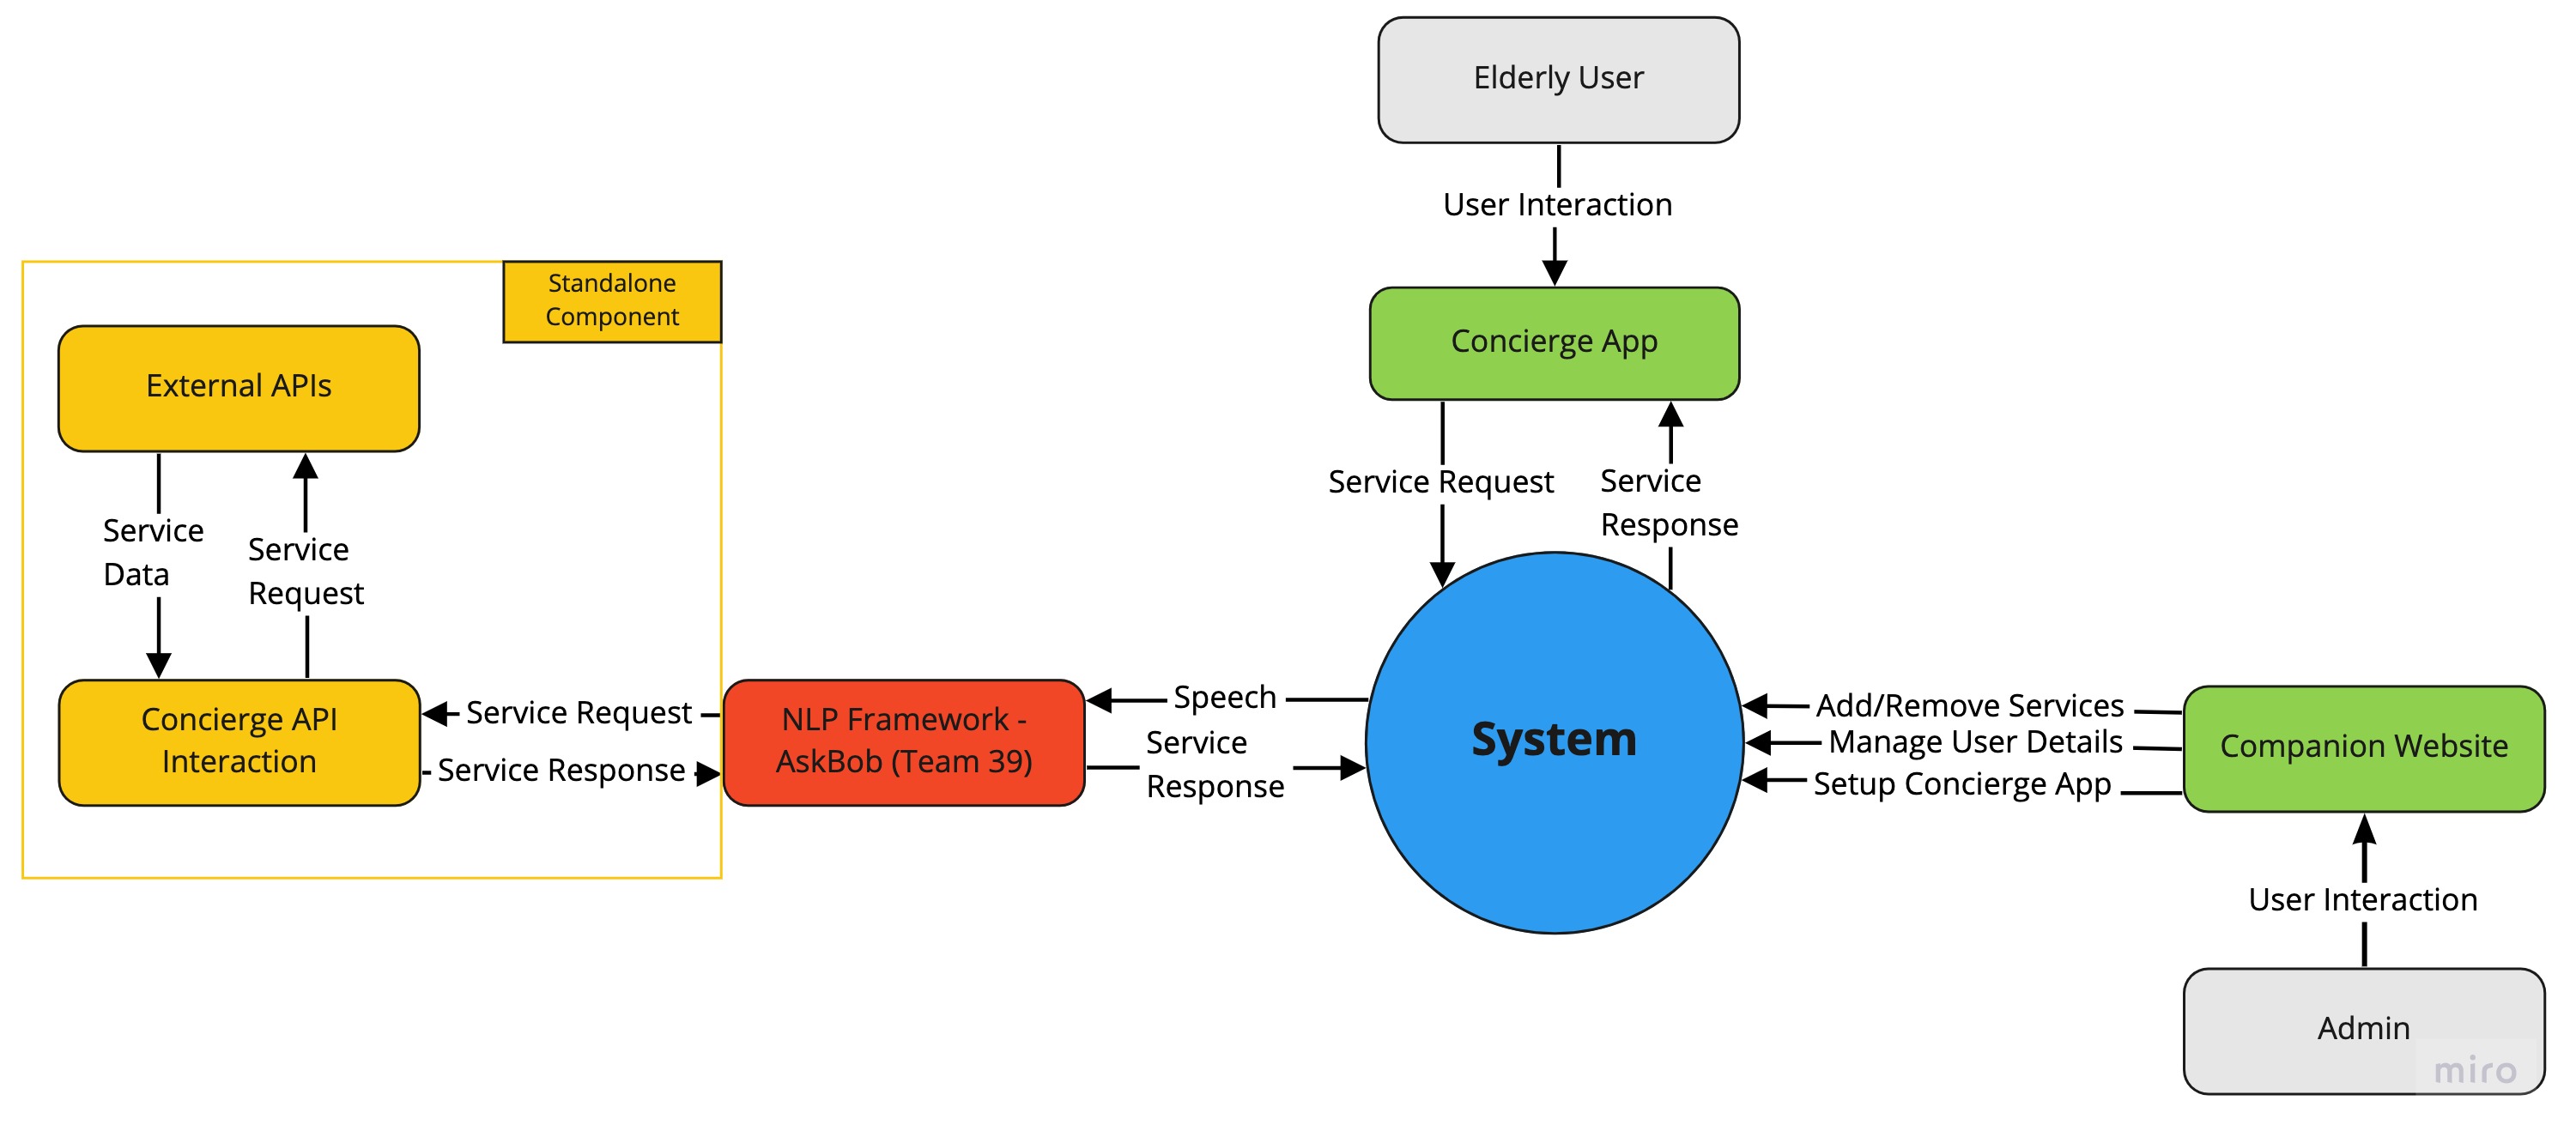
Design Principles and Patterns
Design Principles
-
MVC Design Principle
Given that the app will have a UI, database interactions and functionality, the MVC architecture was a natural fit for the app, where the UI will be managed by classes under the 'views' package, database queries and structure through classes in the 'model' package and functionality through classes under the 'controllers' package. See the architecture diagram for a visual representation of this.
The MVC architecture also makes it easier for developers to expand on and use existing functionality. For example, if they add a new feature that requires opening a URL, they can just use the openUrl method in MainController to do this without ever needing to understanding how this is done or implemented, hence abstracting away the existing complexity of the code and system.
Aside from this, no other design principle was employed. This was because code was split across over 80 classes each of which was very different from the next. Even classes within the same packages would differ widely from each other containing vastly different methods taking different parameters and returning different values. They also took different values in their constructors. This meant that the use of design patterns would only over-complicate the system, defeating the point of design patterns. However, other good programming practices were employed. See details below.
-
Separation of Concern Principle
Using this principle, all code was split into logical packages, classes and methods. Each class does one main thing. This ensures that code is cleaner, more readable and easier to understand. This also made the code easier to test, debug and fix.
Design Patterns
Creational
-
Singleton
The main controller needs to be a singleton to ensure all object references to the main controller in all parts of the app will have the same state
-
Factory
The main controller, being a singleton object, will be accessed through a factory object.
The main controller will be needed in different view controllers, as well as the service and backend interaction, all of which do not have references to each other.
Structural
-
Adapter
The data model converts data received from the backend into the form required by the main controller (and vice versa).
The service API interaction converts JSON data received from an API into a set of English sentences to be spoken aloud to the user.
Behavioural
-
Template
Each service request object will extend an abstract service request object which builds the HTTP response.
-
Command
A service request object represents a HTTP request to a service and its information is passed to a request handler object to build the URL query, perform the API request and return the JSON data, also handling any HTTP errors.
Functional
-
Stream API
Several data structures were used for the app [see implementation] such as HashMaps and ArrayLists. Rather than implementing operations for these data structures ourselves, we used Stream API to bridge the gap. This is a good programming practise as it allowed for cleaner, more readable and more reliable code (given that these stream pipeline methods are well tested and maintained).
Android App Architecture
See below for the app architecture
UI Architecture
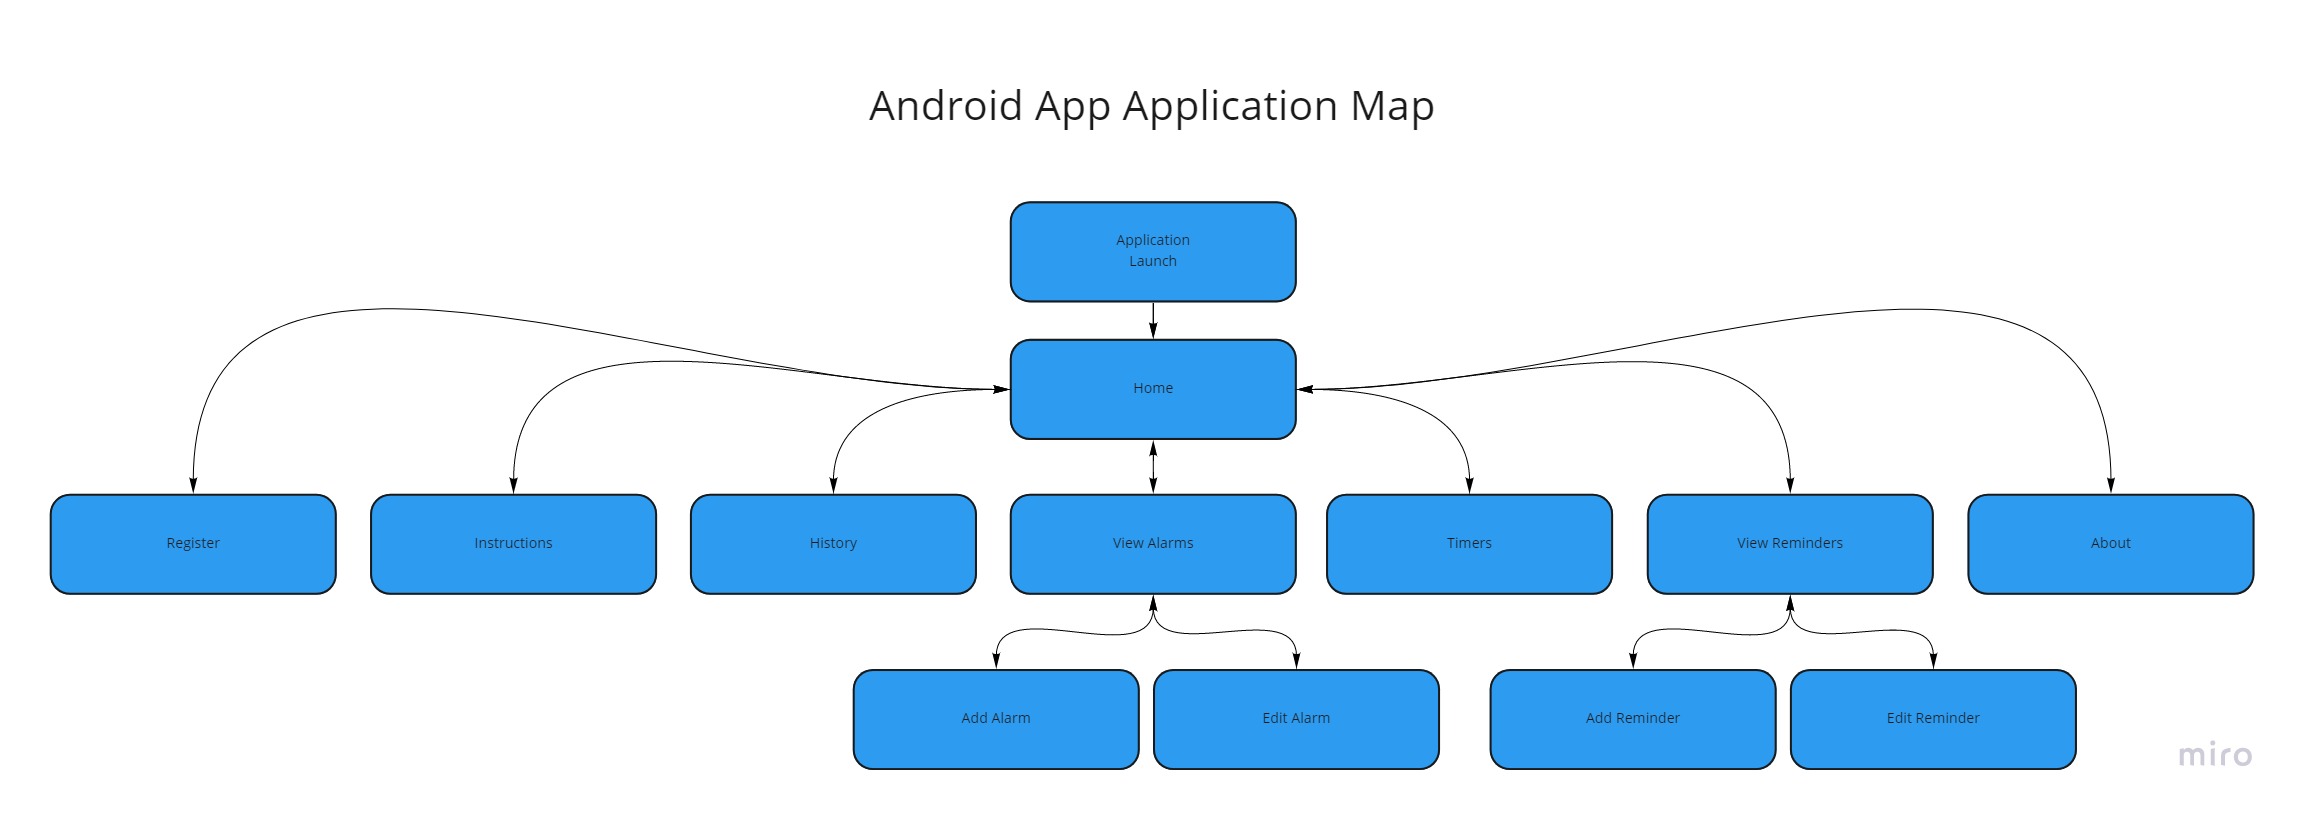
All Activities are accessible from the home page (Main Activity). See details for each Activity below.
All Activities use the constraint layout provided by Android as it provided strong control over the positioning of UI objects, more so than other layouts such as RelativeLayout. All errors on Activities were relayed to users through Toasts. Speech synthesis was also used where possible. To ensure the UI hierarchy was as clean, minimal and easy to navigate as possible, we did not provide access to Activities from other Activities unless necessary. We did provide 'BACK' buttons on each page to allows users to easily navigate back to the previous activity they were on. Each activity has a clear title to ensure the user knows which page they are on.
Main Activity
This activity was the main page where users could use the Concierge voice assisstant and navigate to all other pages. It was designed to be easy to use and allow the elderly to use the Voice Assistant easily.
The activity contains a scrollable menu of all the available activities and comes with a custom scroll bar to make it clear to elderly users that this is a scrollable menu. This has many benefits. For example, buttons and their text can be bigger as we don't have to show all the buttons on the page. It also means that developers can easily add new activities and add their buttons to the scrollable menu without disrupting the existing UI.
ViewAlarms Activity
This activity allows user to view all their alarms in one place. We used the ListView to display all alarms to the user and added a custom scrollbar which means users can add as many alarms as they want and simply scroll through them should they exceed the screen height. This activity automatically queries the local db to see the alarms currently added by the user. From here, users can click on the 'ADD NEW ALARM' button which will take them to the AddAlarmActivity.
AddAlarm Activity
This activity allows users to add a new alarm by adding an alarm message, selecting a date using the datepicker widget, selecting a time using the timepicker widget and pressing 'SAVE'. The alarm will then be added to the local storage. Users will then be automatically taken back to the ViewAlarmsActivity where their alarm will now be displayed.
EditAlarm Activity
Users can tap on an existing alarm and will be taken to this activity where they can edit the alarm details, or instead, delete the alarm completely. Whether they save or delete, they will then be taken back to ViewAlarmsActivity automatically.
ViewReminders Activity
This activity allows user to view all their reminders in one place. We used the ListView to display all reminders to the user and added a custom scrollbar which means users can add as many reminders as they want and simply scroll through them should they exceed the screen height. This page automatically queries the local db to see the reminders currently added by the user.From here users can click on the 'ADD NEW REMINDER' button which will take them to the AddReminderActivity.
AddReminder Activity
This activity allows users to add a new reminder by adding a reminder message and pressing 'SAVE'. The reminder will then be added to the local storage. Users will then be taken back to the ViewRemindersActivity automatically where their reminder will now be displayed.
EditReminder Activity
Users can tap on an existing reminder and will be taken to this activity where they can edit the reminder details, or instead, delete the reminder completely. Whether they save or delete, they will then be taken back to ViewRemindersActivity automatically.
Timers Activity
Users can use the numberpicker widgets to set a timer. There are 3 numberwidegts, one for hours, one for minutes and one for seconds. When the user starts a timer, a 'PAUSE' button appears which they can use to pause the timer. Once they pause a timer, the original 'START' button will appear again which they can use to resume the timer from where it was paused.
History Activity
Users can view their last seven day history here. Their history is only shown for Service API requests. This activity also uses a ListView with our custom scroll bar, so no matter how long a user's seven day history is, they will be able to scroll through it all.
Register Activity
This activity is where users can enter their three registration codes to connect to their admin.
About Activity
This activity provides some information about the developers, clients and the product itself.
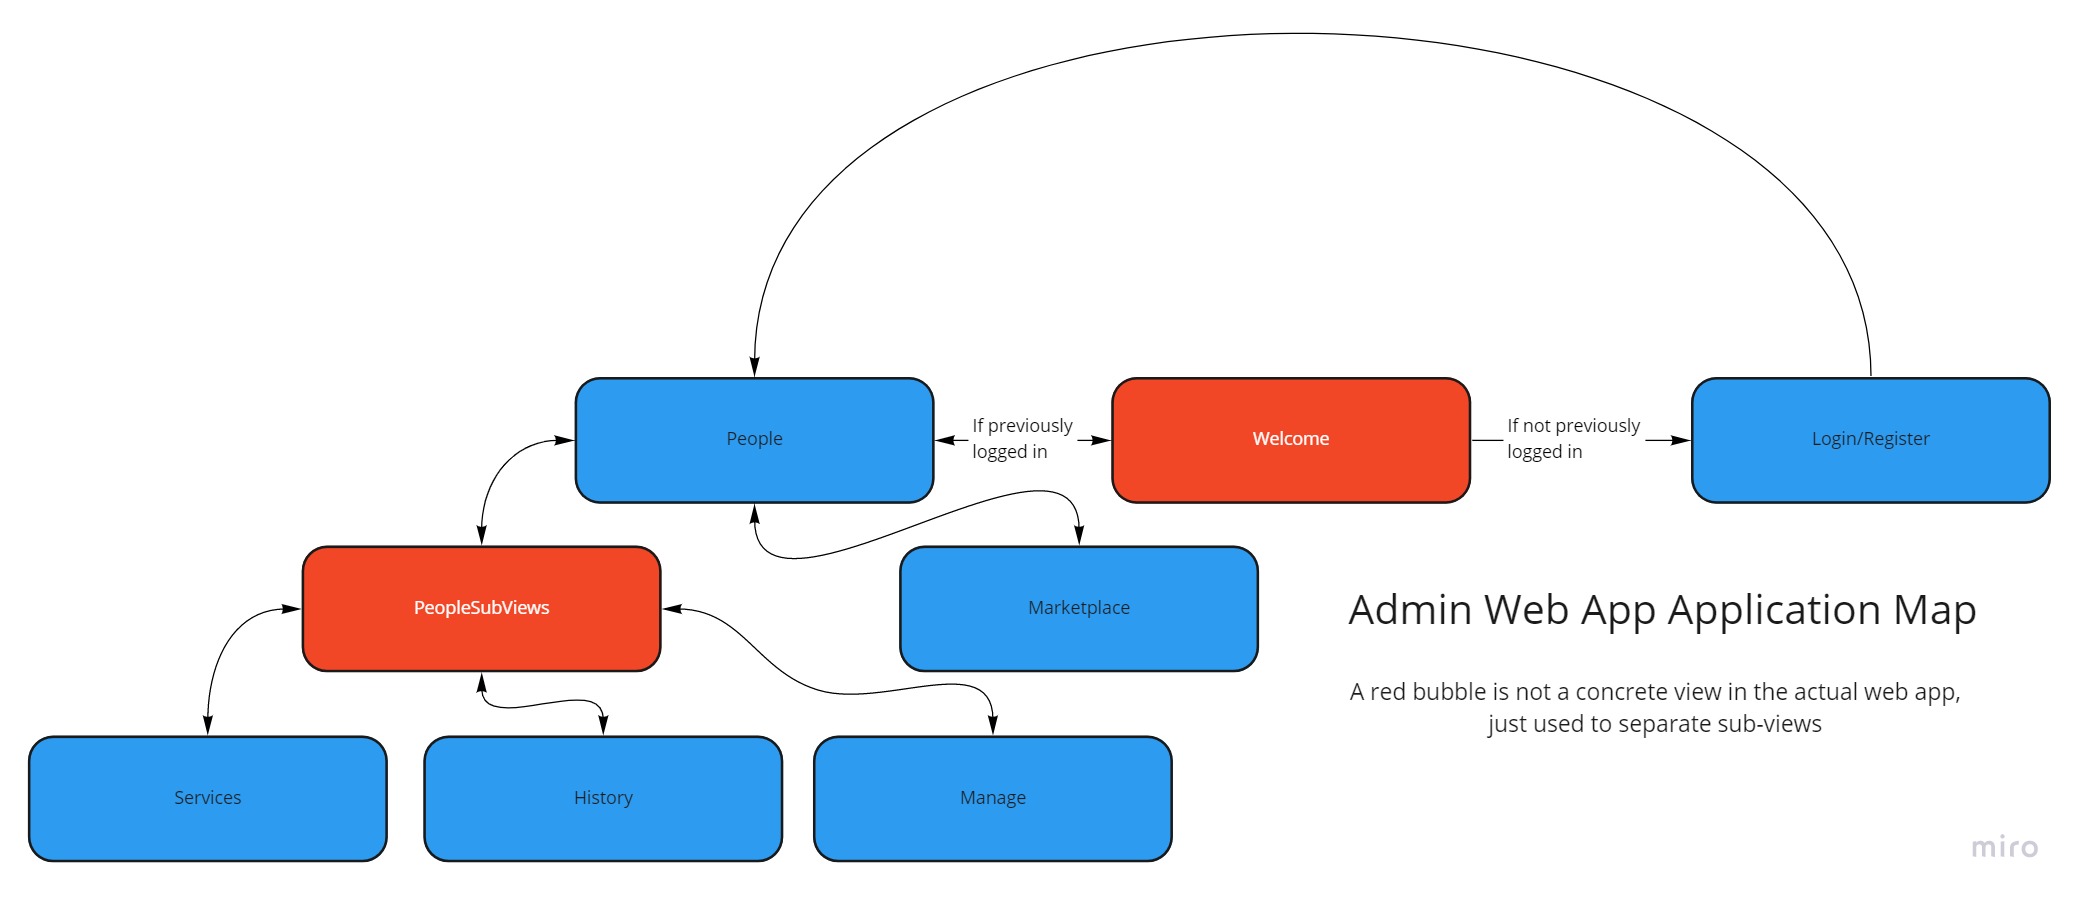
Admin Web App Architecture
Vue does away with specific view controllers in the Model-View-Controller design pattern meaning we will be following a Model-View pattern for the admin web app.
Given that websites can be accessed via mobile devices, we will be employing the Mobile-First design principle. That is, we primarily design the website for mobile devices and then apply CSS media queries to take advantage of the extra space and functionalities (e.g., a more precise mouse) granted by tablets, desktops and laptops.
Views
A view will be comprised of several components, in line with the Vue design approach where each sub-component specifies its style, physical layout and methods. A component may be as general as a page container or as specific as a button to another page. Components can be comprised of several smaller sub-components. This approach promotes the reusability of components, leading to less duplicated code as well as abstracting the functionality of components from one another to make them less coupled with each other. This also allows for the interchange of components should our functionality, or design change during the implementation stage.
Welcome
This is the first page the user will see (if not logged in) with two sub-views containing separate forms for logging into an existing account and registering for a new one.
If the user tries to access this page while signed in, they will be redirected to the people view.
Note that users will always be automatically signed in if they have not manually logged out of their account.
People
This view where the admin manages the users in their circle. It is comprised of a sidebar, allowing the user to select and focus on one user at a time, and the following sub-views:
- Manage – allows the admin to modify the stored details of the selected user – this is the default sub-view of the people view.
- Services – allows the admin to view and modify the data stored for each service currently added to the select user’s account. Services can also be removed here.
- Details – displays the (full) service usage history for the selected user.
Marketplace
This view displays a grid of all available services, allowing the admin to search/filter the services to find the one they need. In this view, the admin chooses services to add to their circle of users.
Not Found
A standard 404 not found view indicates that there is no resource located on this page. From here, the user can only be redirected to the welcome view.
Backend Interaction
The main model object provides an interface to provide the necessary functions to (safely) access and modify data stored in the cloud database. Where necessary, the interface returns a string message representing the response; this can be used to display meaningful error messages to the users such as “Your username or password was incorrect” instead of silently failing.
Since this main model is written in Java, we cannot directly call it from the Vue app. Instead, the backend will be a RESTful API, running on localhost and connected to the cloud database, and make API calls to it from both the web and Android app. The API will return the necessary responses from the main model.
Each JSON response shares the following fields:
{
    "success": Boolean,
    "message": String,
    "code": Integer
}
Along with any other field returned by a specific endpoint.
Note thatcode is the HTTP status code, defined by this
standard.
Data Models
The main model is an interface where the concrete implementation is comprised of many other models so the front-end does not need to be concerned with what model it needs to access to retrieve the needed data. These models include, but are not limited to, admin, user and service models. The models handle interaction with data regarding their corresponding entity. The functions of each sub-model will take in parameters and specify the necessary SQL commands to be performed on the database.
There is a further abstraction between the main model (and its sub-models) and the database. The database is accessed via a database model which provides functions to query and execute commands on the database. It handles the connection to the database as well as any SQL/cloud errors that may occur; this decouples the models from the database, allowing us to easily switch to a different cloud hosting service should our storage/concurrent access requirements increase.
The web app will also have its main model which provides an interface, specifying how to access the backend; this provides another layer of abstraction to allow our web app, API and backend to all work independently.
While this highly abstracted approach does add an extra layer (the need for an API to handle the interaction between the frontend and the backend) to the design, it greatly reduces the coupling between the frontend and the backend; this allows us to alter (or even completely switch out) the operation of either layer if needed as well as allowing group members to work on either component without being concerned with how the other is working.
Data Storage and Entity Relations
We had two databases: a cloud database which would be the more widely used data storage system (for the Admin site, FISE Logs etc.).
Here is our cloud database schema:
            CREATE TABLE PROFILE_PICTURE
            (
            PICTURE_ID SMALLINT NOT NULL GENERATED ALWAYS AS IDENTITY (START WITH 1 INCREMENT BY 1),
            PICTURE VARCHAR(255) NOT NULL,
            PRIMARY KEY (PICTURE_ID)
            );

            CREATE TABLE ADMIN
            (
            USERNAME VARCHAR(32) NOT NULL,
            FIRST_NAME VARCHAR(35) NOT NULL,
            LAST_NAME VARCHAR(35) NOT NULL,
            PHONE_NUMBER CHAR(11) NOT NULL,
            EMAIL VARCHAR(320) NOT NULL,
            PICTURE_ID SMALLINT,
            PASSWORD VARCHAR(32) NOT NULL,
            PRIMARY KEY (USERNAME),
            FOREIGN KEY (PICTURE_ID) REFERENCES PROFILE_PICTURE(PICTURE_ID)
            );

            CREATE TABLE USER
            (
            USER_ID INT NOT NULL GENERATED ALWAYS AS IDENTITY (START WITH 1 INCREMENT BY 1),
            FIRST_NAME VARCHAR(35) NOT NULL,
            LAST_NAME VARCHAR(35) NOT NULL,
            PHONE_NUMBER CHAR(11) NOT NULL,
            PREFIX VARCHAR(5) NOT NULL,
            PICTURE_ID SMALLINT,
            PRIMARY KEY (USER_ID),
            FOREIGN KEY (PICTURE_ID) REFERENCES PROFILE_PICTURE(PICTURE_ID)
            );

            CREATE TABLE SERVICE
            (
            SERVICE_ID INT NOT NULL GENERATED ALWAYS AS IDENTITY (START WITH 1 INCREMENT BY 1),
            NAME VARCHAR(30) NOT NULL,
            CATEGORY VARCHAR(20) NOT NULL,
            ICON VARCHAR(255),
            DESCRIPTION VARCHAR(255) NOT NULL,
            PRIMARY KEY (SERVICE_ID)
            );

            CREATE TABLE SERVICE_LOG
            (
            SERVICE_ID INT NOT NULL,
            USER_ID INT NOT NULL,
            LOG_DATE DATE NOT NULL,
            LOG_TIME TIME NOT NULL,
            PRIMARY KEY (SERVICE_ID, USER_ID, LOG_DATE, LOG_TIME),
            FOREIGN KEY (SERVICE_ID) REFERENCES SERVICE(SERVICE_ID),
            FOREIGN KEY (USER_ID) REFERENCES USER(USER_ID)
            );

            CREATE TABLE ADMIN_CIRCLE
            (
            USERNAME VARCHAR(32) NOT NULL,
            USER_ID INT NOT NULL,
            PRIMARY KEY (USERNAME, USER_ID),
            FOREIGN KEY (USERNAME) REFERENCES ADMIN(USERNAME),
            FOREIGN KEY (USER_ID) REFERENCES USER(USER_ID)
            );

            CREATE TABLE USER_SERVICE
            (
            SERVICE_ID INT NOT NULL,
            USER_ID INT NOT NULL,
            PRIMARY KEY (SERVICE_ID, USER_ID),
            FOREIGN KEY (SERVICE_ID) REFERENCES SERVICE(SERVICE_ID),
            FOREIGN KEY (USER_ID) REFERENCES USER(USER_ID)
            );

            CREATE TABLE REGISTRATION_CODES (
            FIRST_WORD VARCHAR(32) NOT NULL,
            SECOND_WORD VARCHAR(32) NOT NULL,
            LAST_WORD VARCHAR(32) NOT NULL,
            USERNAME VARCHAR(32) NOT NULL,
            USER_ID INT NOT NULL,
            PRIMARY KEY(FIRST_WORD, SECOND_WORD, LAST_WORD),
            FOREIGN KEY (USERNAME) REFERENCES ADMIN(USERNAME),
            FOREIGN KEY (USER_ID) REFERENCES USER(USER_ID)
            );

            CREATE TABLE EMERGENCY_CONTACTS (
            GP CHAR(11) NOT NULL,
            DENTIST CHAR(11) NOT NULL,
            OPTOMETRIST CHAR(11) NOT NULL,
            USER_ID INT NOT NULL,
            PRIMARY KEY (USER_ID),
            FOREIGN KEY (USER_ID) REFERENCES USER(USER_ID)
            );
And the ER diagram:
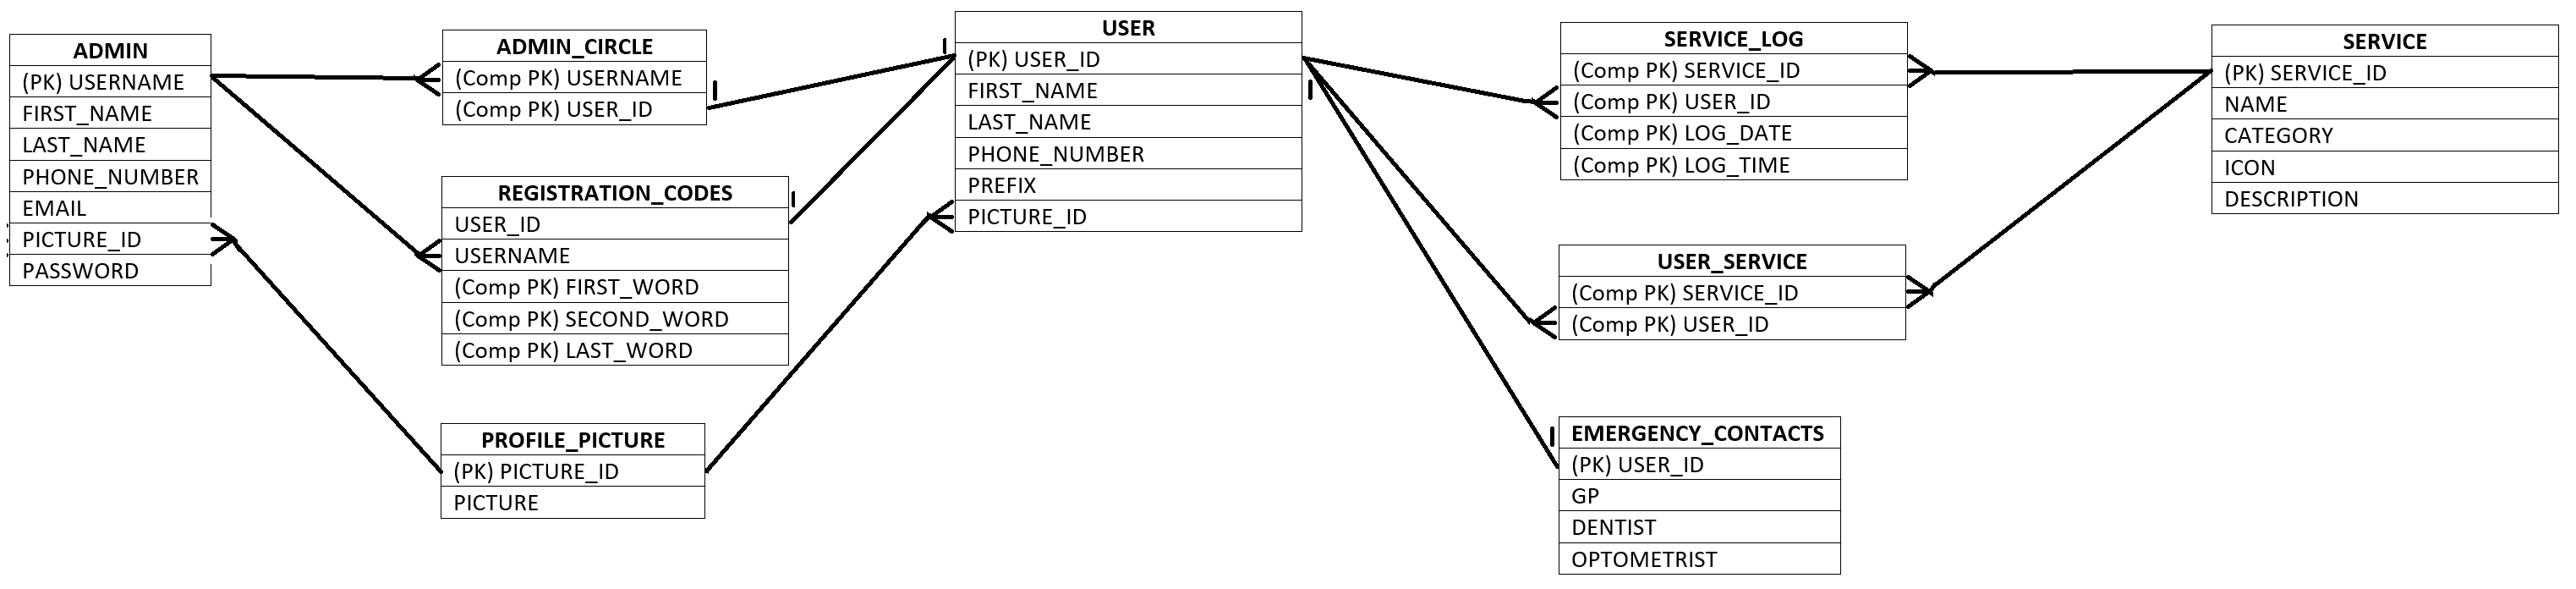
However, most of this information is not editable by the elderly user.
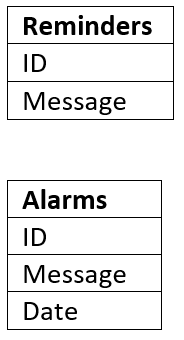
Some data will also be stored on the device, in local storage:
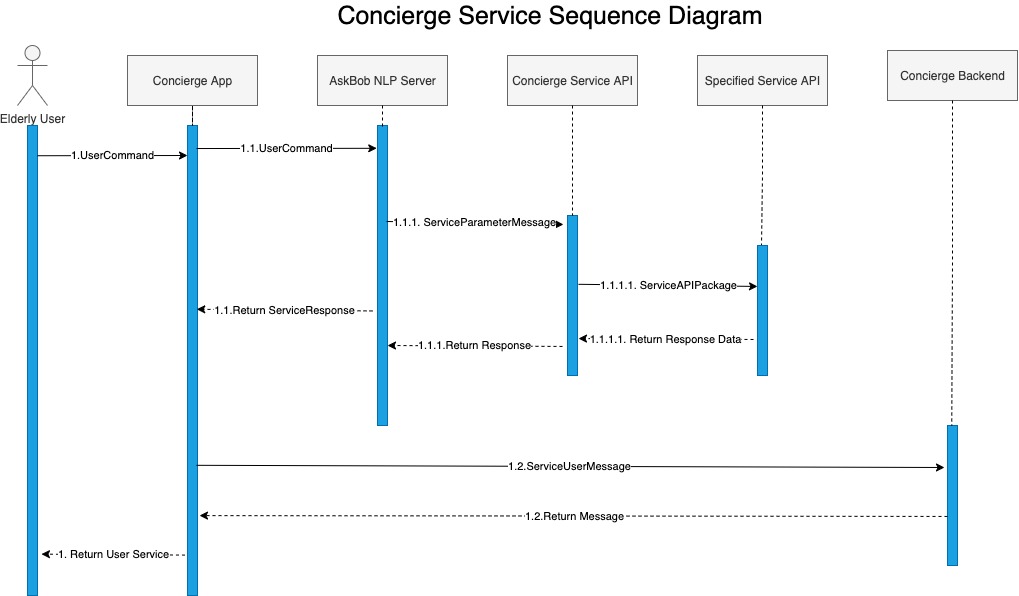
Sequence Diagram
The main feature of our Concierge app is the voice assistant which provides elderly users with an easy and intuitive way to place commands and have them fulfilled. Below is a sequence diagram demonstrating the interaction between our system's components that is required to fulfil a users request.