Pygame lesson 2
So last lesson you set up the basic script. This lesson we are going to start drawing things to the screen. So you should have a program like this:
import pygame
pygame.init()
screen = pygame.display.set_mode((468,
640))
background = pygame.Surface(screen.get_size())
background = background.convert()
background.fill((0, 0, 250))
clock = pygame.time.Clock()
while 1:
clock.tick(60)
for
event in pygame.event.get():
if event.type == pygame.QUIT:
exit()
screen.blit(background, (0, 0))
pygame.display.flip()
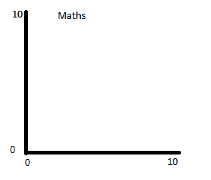
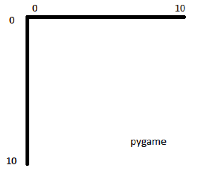
Now we want to create a rect object. However before we do this we need to talk about how pygame handles coordinates. Everything in pygame is position on a grid using its x and y position. This is similar to coordinates on graphs in maths with one slight difference. Pygame like most computer systems have the vertical axis starting with zero at the top and increasing downwards.
These coordinates are measured in pixels. These are little boxes on the computer screen. If you look really closely at your screen you might be able to spot the tiny boxes. Each box can be only one colour so any images on the screen are created by setting large numbers of them to the colour of a small area of the picture. The resolution of a screen is the number of pixels on a screen. This is why HD TV is better quality than traditional TV, it has more Pixels.
This is important in because rect objects are defined in terms of the coordinates of the top left corner and a height and width. You can create a rect object using the pygame.Rect(x, y, width, height) method. For example pygame.Rect(0, 10, 20, 30) will construct a rect object starting on the left side, 10 pixels down from the top, a width of 20 and a height of 30.
So once you've created a rect object and stored it in a variable we can start painting areas. Painting refers to the act of specifying what colours different areas should be. So the easiest way of doing this in pygame is to make use of the surface.fill method. When we originally created the background in lesson 1 we used the form of fill that didn't take take a rect. This fills the entire surface. If you use the second form with a rect parameter it only fills the rect. For example background.fill((0, 250, 0), rect). Try changing the program to draw some rectangles to the screen before the main loop.
So now we can build the background of the Tower of Hanoi render. We want to draw two rectangles for each of the stands that the discs will be drawn against.
Each of the two rectangles is highlighted in a different colour. So we can draw these rectangles onto the background to get the stands. You will need to experiment to get the coordinates. Tip: You can parse the rect object directly into the fill method rather than storing it in a variable.
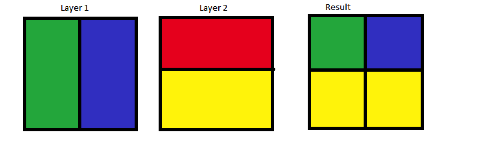
So once you have created the background we want to be able to draw discs. The discs will change every time we advance a step in the solution so we need to be able to redraw the discs. However we don't want to redraw the background every time. We can do this by creating a new Surface inside the loop. If you create a second surface we need to have some of it transparent. The standard way of doing this is to use a colour key. A colour key is a colour where if the pixel is that colour you don't draw that pixel to the screen, but draw the pixel behind it. This enables the layering of multiple surfaces easily. The colour is picked to not occur in the image. For example a lurid pink.
For example using red as the colour key:
So once you've constructed a surface object we need to first
set the colour key using surface.set_colorkey((red, green, blue)). I recommend using (255, 0, 255) which
is a lurid pink.
Next use the fill method to fill the
background with the colour you chose.
Now you need to draw the discs. Use the surface.fill command to draw them on to this surface.
Finally you need to blit
the new surface using the surface.blit method. This
needs to happen after you have blit the background
with screen.blit(background, (0, 0)) but before pygame.display.flip(). The command is the same as with the background but with the
new surface instead of the background. This should cause the discs to display
on the screen.