By Joanne Wong and Rikaz Rameez
Our project is to build a virtual assistant that can engage in natural conversations with users and connect with IoT devices (lights, speakers, monitors etc). The assistant has an avatar and should be able to answer general questions, specific questions about the company and play videos about the company as well.
Our solution is to use Amazon's Alexa built into a laptop which then has a 3D avatar on a screen. The avatar is a humanoid unity model and can play videos directly on the screen for a user to see. Using Alexa built in to the laptop allows us to still control IoT devices, and by creating our own backend for company information we have made it easily configurable.
At the end of this project, we hope to achieve creating a 3D virtual assistant, with a functional avatar equipped with mouth and face animations. We also hope that the avatar has natural language processing, some IoT connectivity and generally have the important features completed.
Video to introduce the project and demonstrate the key functionalities of our project
| Joanne Wong | zcabjhy@ucl.ac.uk | Full-stack developer, Researcher, Report editor |
|---|---|---|
| Rikaz Rameez | zcabram@ucl.ac.uk | Full-stack developer, Researcher, Report editor |
Create a digital workplace with a humanoid virtual assistant who can have a natural conversation using NLP. The virtual assistant to be able to interact with IoT devices in a digital work place, like TV, screen, telephone etc.
We conducted interviews with would-be users of the system to help gauge requirements. We decided to use a semi-structured interview when gathering our user requirements since it allows more freedom for discussion and for the user to elaborate on their views. The target user is someone who is working in the lab that would use the assistant or a visitor who is new to the lab. We have recorded their responses and some further notes:
I would like the assistant to be smart - I wouldn’t want to ask it a question and the assistant not know how to respond. I should be able to ask it questions about the working space and the company. It would be great if it was easily configurable so that someone who doesn’t know much about coding would be able to customise certain aspects to better suit their company. It should be able to connect to IoT devices so that we could ask the assistant to control the devices in the lab.
It should connect seamlessly to smart speakers or have speakers for some of the demos we run. We also have lots of screens within the lab, some of which run on Android TV and we also have smart lights - it would be great if we could control these types of devices by voice or have information displayed on them. In the lab we have a demo robot, Sota, that may also be controlled by the assistant.
The assistant should be configurable so that the user would be able to change the answers that the assistant could be answer depending on the lab or even if a different company is using it. The configuration should also be easily changable.
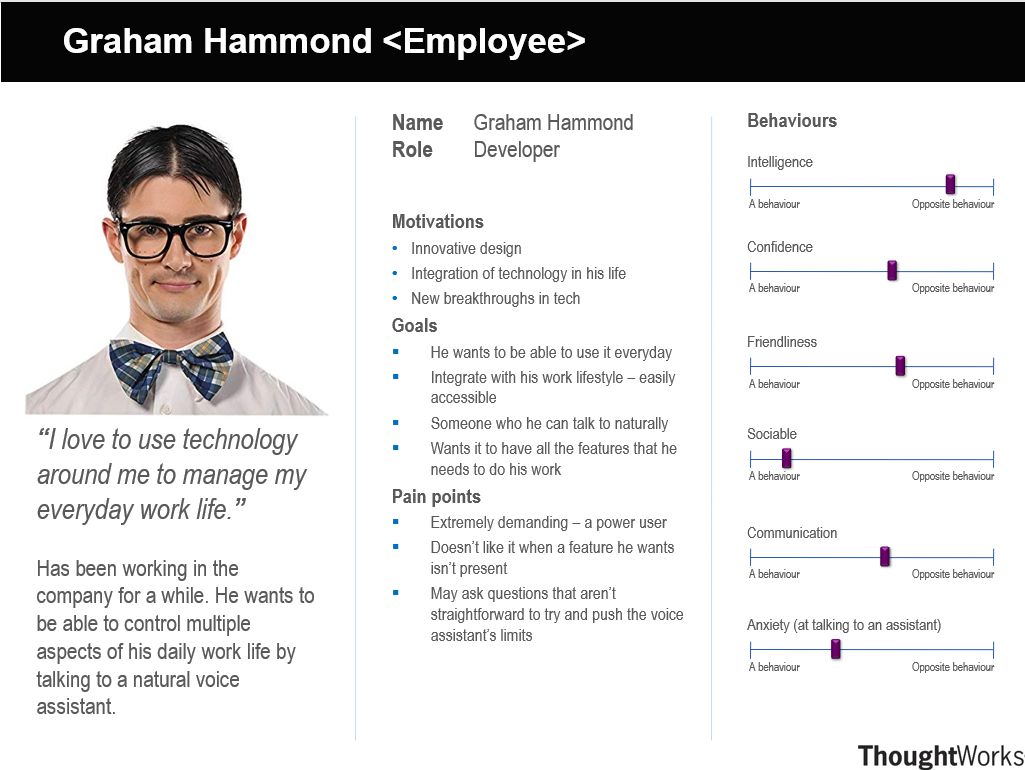
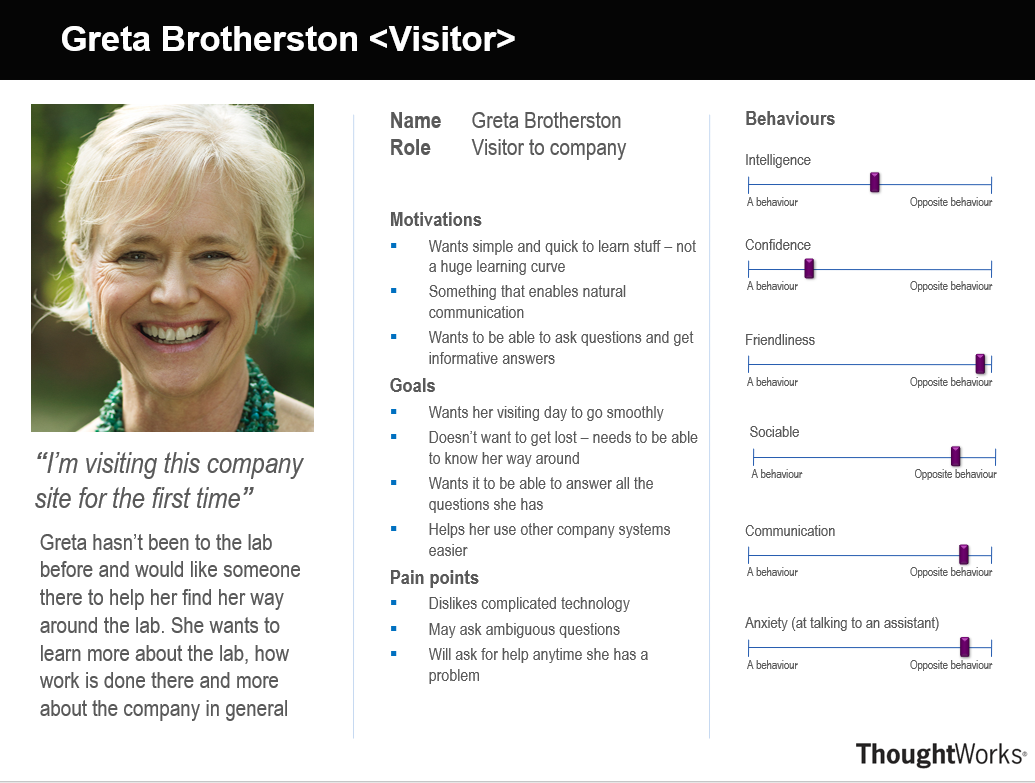
Making personas helps to represent user types, determine their needs and expectations, make designing the system less complex, and helps us during our ideation process.
Graham has been working in the development lab for a few years so has good knowledge of the company and workplace. He likes to use the assistant to help him with presentations and planning since he is able to control what shows on the presentation screen through it, including showing videos on screen. It also helps with presenting what he is working on as the assistant is able to connect to the speakers and various demo units in the lab while explaining what each demo is about. He is also able to control the lighting throughout the lab, and uses the assistant to communicate with Sota (a home robot).
Greta is visiting the lab for the day. She gets shown around the lab by an employee but there are some questions she has about the company. She uses the assistant to find out more information about the company and its products and watch videos about what the company does. She likes how she can naturally converse with the assistant and that it can answer her questions quickly and accurately - She isn’t too used to using virtual assistants but finds the one in the lab very straightforward to communicate with.
We aim to achieve these few things by the end of the project.
Here is our MoSCoW list of requirements. The list has been made and updated after thorough discussion with our client.
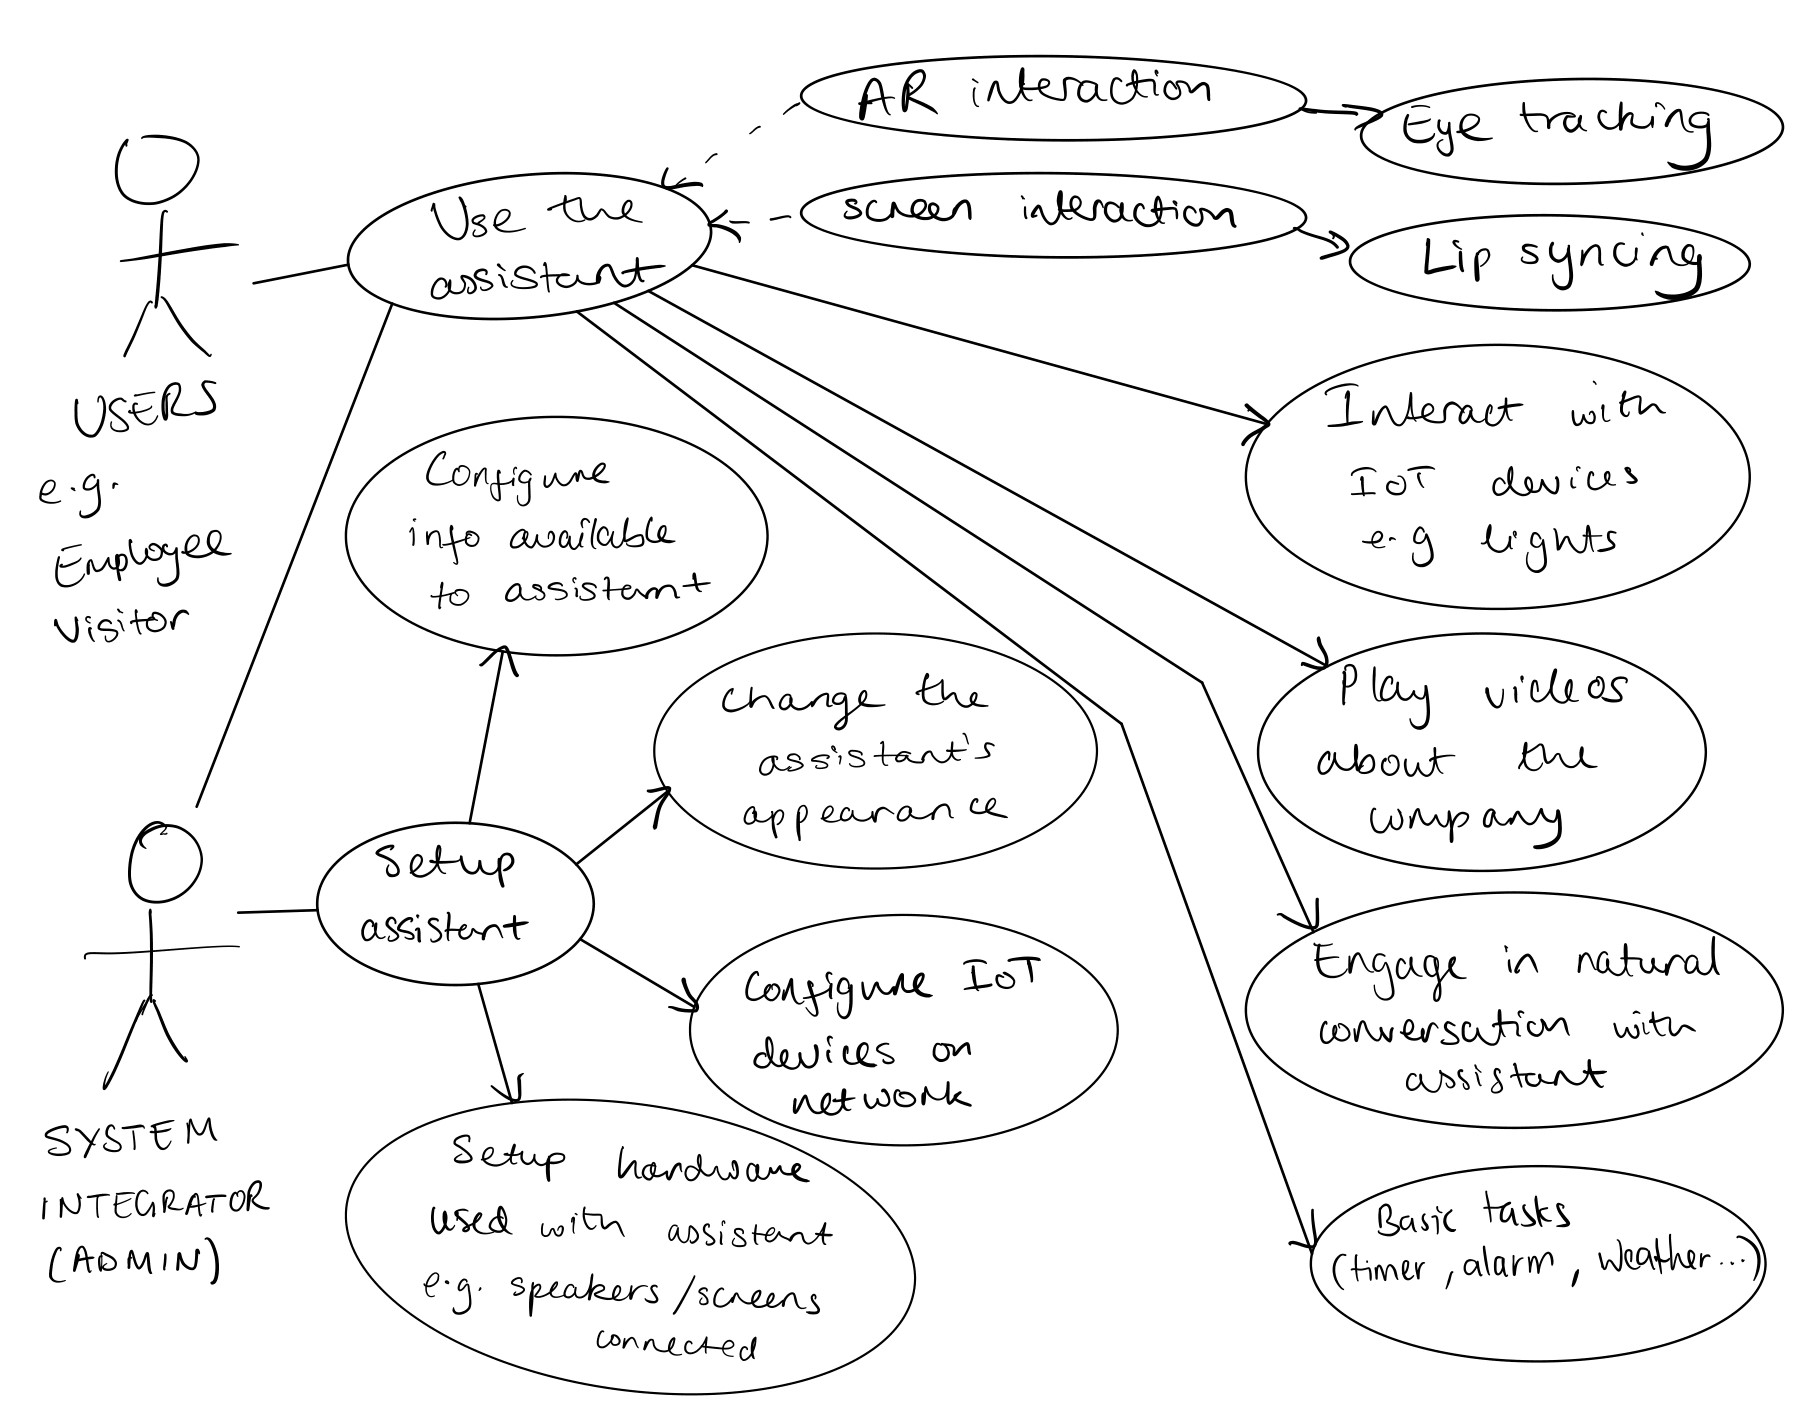
The admin is the person who incorporates and sets up the system for the lab, as well as updating and upgrading devices used with the system. They can use the system in the following ways:
A user of the system is anyone who interracts with the assistant in any capacity, whether it be an employee of the company who would use it everyday or a visitor who only uses it a few times. A user can use the assistant in many ways:
The user will interact with the assistant through a screen that has the avatar on it, or by using AR through a HoloLens/mobile phone. Both of these methods of interaction will have lip syncing with the assistant's speech and eye tracking to follow the user as they talk to the assistant (these make the experience significatly more natural).
We searched around for any other projects that could be similar to ours and we found quite a few. One of the most advanced products that is on sale is a holographic home assistant named Hikari[1]. Released on October 11th 2019 by the Gatebox company, Hikari is marketed as a lifelike character that resides within a Gatebox enclosure. The only difficulty is that Hikari only speaks Japanese, she gathers her information (weather, reminders, calendars) through the Line messaging app, the primary messaging application that is used in Japan. There was not much documentation about the technology behind Hikari, but if definitely gave us motivation to work on the possibility of creating a holographic avatar in the future.
Another similar project that we found was Ipsoft's Amelia[2]. Amelia is an AI driven virtual agents who primary function is to automate processes within a company (i.e. as a customer service agents or as an IT operations expert). Amelia is able to carry out natural conversations, set appointments and create bookings. However, Amelia does not have the capabilities to interact with IoT devices which is a key requirement for our project. Nevertheless, reading about the technology behind Amelia was very informative.
We had to do entensive research into different kinds of voice services that we could use to build our virtual assistant. We researched and read the documentation for Google Dialogflow[3], Microsoft Azure Bot Services[4] and Amazon Lex[5] and weighed the pros and cons of each service, taking into account of the price, ease of usage, flexbility and intelligence.
We realised that creating a virtual assitant from scratch is not an ideal approach due to several reasons:
Hence we decided use Amazon's Alexa as the backend of the virtual assistant. Amazon provides a lot of customisation options that we will use to build the virtual assistant. The idea is to use Alexa, build skills using Alexa Skills[6] to increase the functionality of the virtual assistant to be of greater use in a lab and project her voice through an realistic avatar.
We will use a 3D humanoid avatar as the frontend of the virtual assitant. We plan to use the SALSA LipSync v2 Suite[7] from the Unity asset store to animate the lips of the avatar. For eyetracking features, we researched into the usage of the Tobii eye tracker and the Tobii Unity SDK [8] so that the avatar seems more lifelike. However we have decided that using OpenCV plus Unity works better when it comes to face detection as the Tobii eye tracker requires additional hardware and configuration before usage.
We plan to deploy the virtual avatar onto a monitor, where the Alexa backend will be built into a computer[9] and the avatar will be running locally. Our main programming language will be Python to develop the Alexa skills and APIs as well as C# to develop our 3D avatar in Unity. We will be utilising a number of tools for our project, mainly Alexa Skills SDK, Alexa Voice Service, FAST Api and OpenCV plus Unity[10] and a Unity websocket tool[11].
We also researched (further into development) on how to implement a keyword detection system to an application that uses the Alexa Voice Service. After extensive research, we found that the Snowboy Keyword Detection Toolkit [12] would be the best way of doing this. Snowboy is a DNN based hotword and wake word detection toolkit that allows users to train their own keyword models to activate audio input. It is highly cutomisable, doesn't store any mic input to protect privacy and is also very lightweight and embedded. It also has an easy to use Python SDK.
In order to use the keyword detection engine, we researched into ways in which we could use the SDKs provided by Snowboy to make an AVS app. We found a very useful open-source library that is a Python wrapper on the AVS application. This library is called ReSpeaker[13], which uses the AVS API, supports multiple libraries for voice detection and speaker output, as well as allowing us to easily connect to the Amazon cloud using an Amazon account.
Based on the requirement list and the fact that we are a 2 man team, we decided to scale down our requirements by choosing to not focus on the holographic or AR/VR aspect of the virtual assistant. We have also moved away from using the lipsync tool as we decided to focus on getting a basic assistant functioning meeting the requirements for natural language processing and understanding, basic task control, IoT device connectivity and customised video playing/information skills.
[1]"Azuma Hikari", Gatebox.ai. [Online]. Available at: https://www.gatebox.ai/en/hikari.
[2]"IPsoft Amelia, The Most Human AI", IPsoft. [Online]. Available: https://www.ipsoft.com/amelia/.
[3] Google Cloud. Dialogflow documentation | Dialogflow Documentation | Google Cloud. [Online]. Available at: https://cloud.google.com/dialogflow/docs/.
[4] Azure Bot Service Documentation - Tutorials, API Reference - Bot Service. [Online]. Available: https://docs.microsoft.com/en-us/azure/bot-service/?view=azure-bot-service-4.0.
[5] Amazon Lex Developer Guide. [Online]. Available: https://docs.aws.amazon.com/lex/latest/dg/what-is.html.
[6] Alexa Skills Kit. [Online]. Available: https://developer.amazon.com/en-US/docs/alexa/ask-overviews/build-skills-with-the-alexa-skills-kit.html.
[7] SALSA LipSync Suite - SALSA LipSync Suite v2, Crazyminnowstudio.com, 2019. [Online]. Available: https://crazyminnowstudio.com/docs/salsa-lip-sync/.
[8] User Manual - Tobii Unity SDK for Desktop, Tobii.github.io. [Online]. Available: https://tobii.github.io/UnitySDK/manual.
[9] Alexa Smart Screen SDK, GitHub, 2019. [Online]. Available: https://github.com/alexa/alexa-smart-screen-sdk/wiki/Raspberry-Pi-Quick-Start-Guide.
[10] OpenCV plus Unity. [Online] Available: https://assetstore.unity.com/packages/tools/integration/opencv-plus-unity-85928.
[11] Native WebSocket, GitHub, 2020. [Online]. Available: https://github.com/endel/NativeWebSocket.
[12] Snowboy KittAI, GitHub, 2020. [Online]. Available: https://github.com/Kitt-AI/snowboy.
[12] ReSpeaker AVS, GitHub, 2020. [Online]. Available: https://github.com/respeaker/avs.
This project required a lot of experimentation during the research and development process since the project was very complex and it was something that neither of us had worked on thoroughly before. The following experiments were done during our project:
We utilised several different design principles when designing our prototype. This was to make sure that the user experience would be as seamless and intuitive as possible:
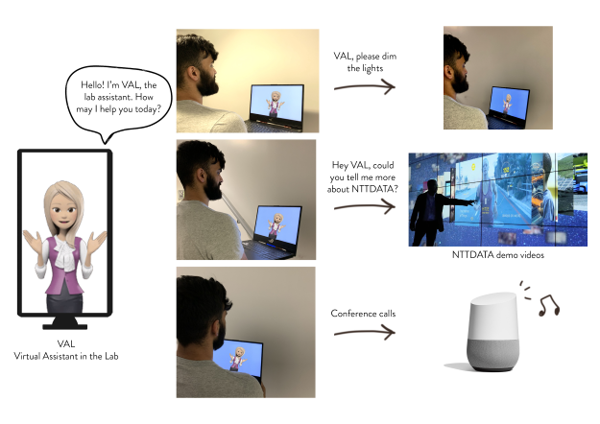
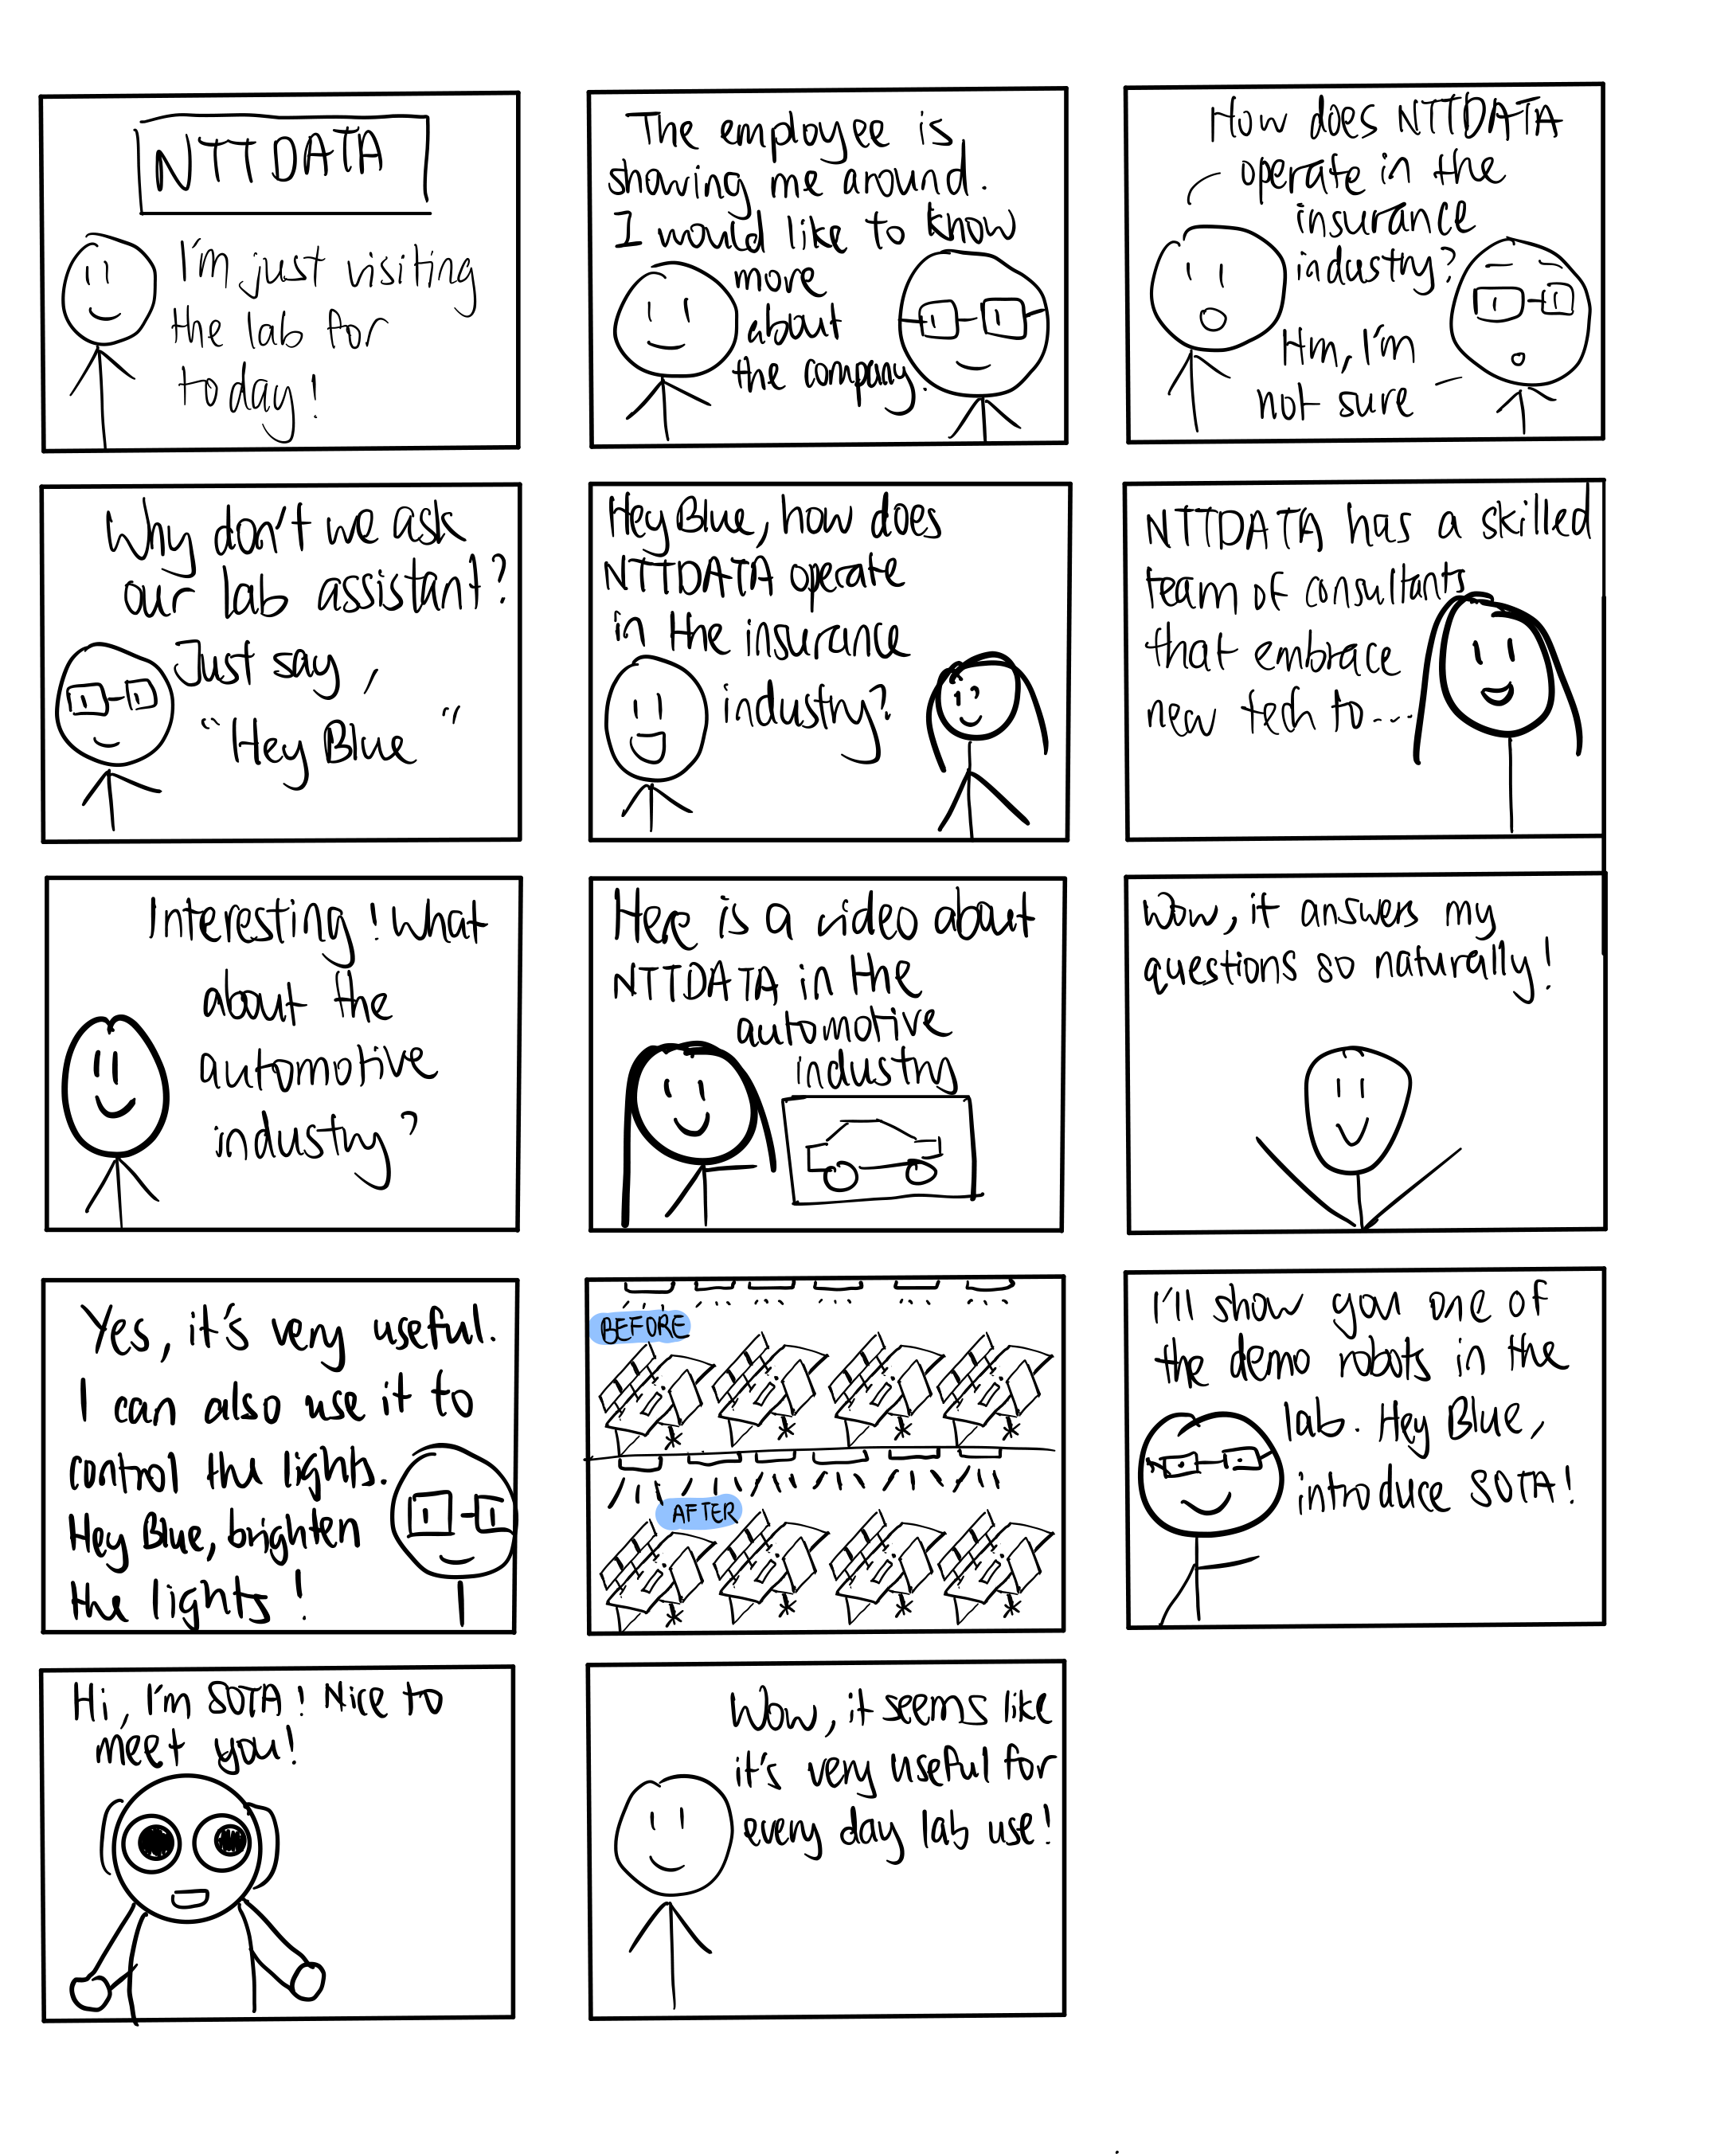
We created a storyboard for our system to illustrate the a real user experience with the assistant. We made sure to concentrate on the important interactions and give some context on the situation. It allowed us to explore the use cases for the assistant in a real world scenario.
We found it difficult to create a digital or paper prototype for our system since a virtual assistant's interactions are more auditory instead of visual. We decided that creating a Wizard of Oz prototype would be the best way to model our finished product, since it is more suited to protoypes that require voice. We created a model on a computer screen that the end user could interact with, and had a 'wizard' that simulated the responses and actions that we scripted.
We found it very useful to see how the user would react to the responses and actions of the assistant, and asked the user for feedback afterwards. This feedback, as well as observing the interactions, allowed us to iterate on our original prototype. This feedback included making the assistant look more professional and humanoid, making the interaction between the user and assistant more natural and add more functionalities to the assistant so that it was more intuitive to use. We iterated on our original protoype and did another user interaction test using this new prototype.
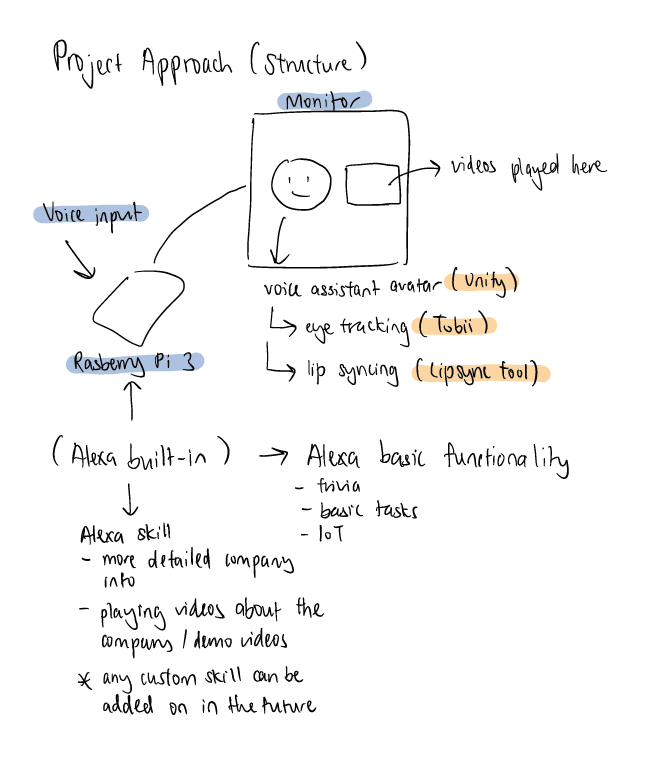
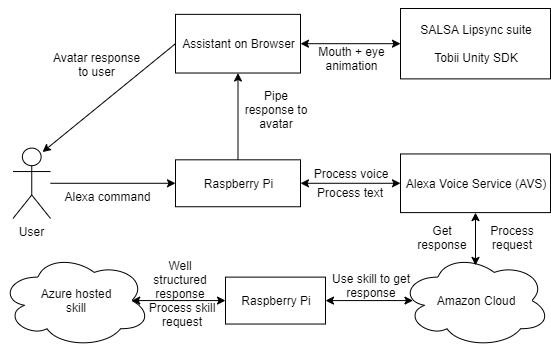
This project structure and system architecture shows how our system will function in both the backend, frontend and also the hardware used:
The front end of the system is the screen that the user will see, with the avatar and perhaps some other visual components depending on the user's request.
The devices that are used within the system allow the user to interact with the assistant and bridges the front and back ends.
The backend is the true backbone of the system. It allows the user to make requests and give back a natural response. It also gets any media that is needed by the frontend to show to the user.
Our current implementation is to use a Raspberry Pi connected to a monitor showing the avatar and have the Raspberry Pi connect this to the backend Amazon Voice Service, which utilises the Amazon Cloud and our Azure hosted skill.

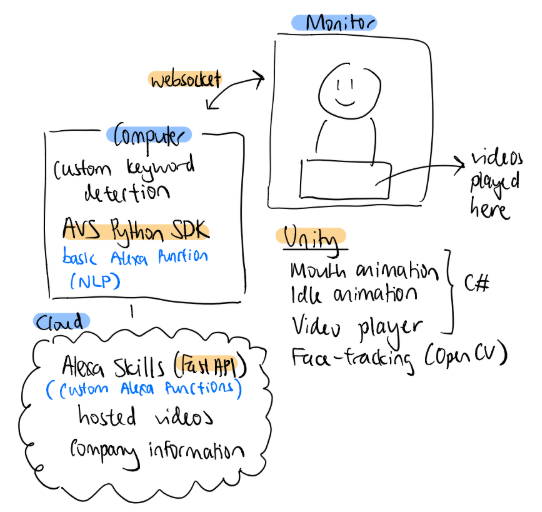
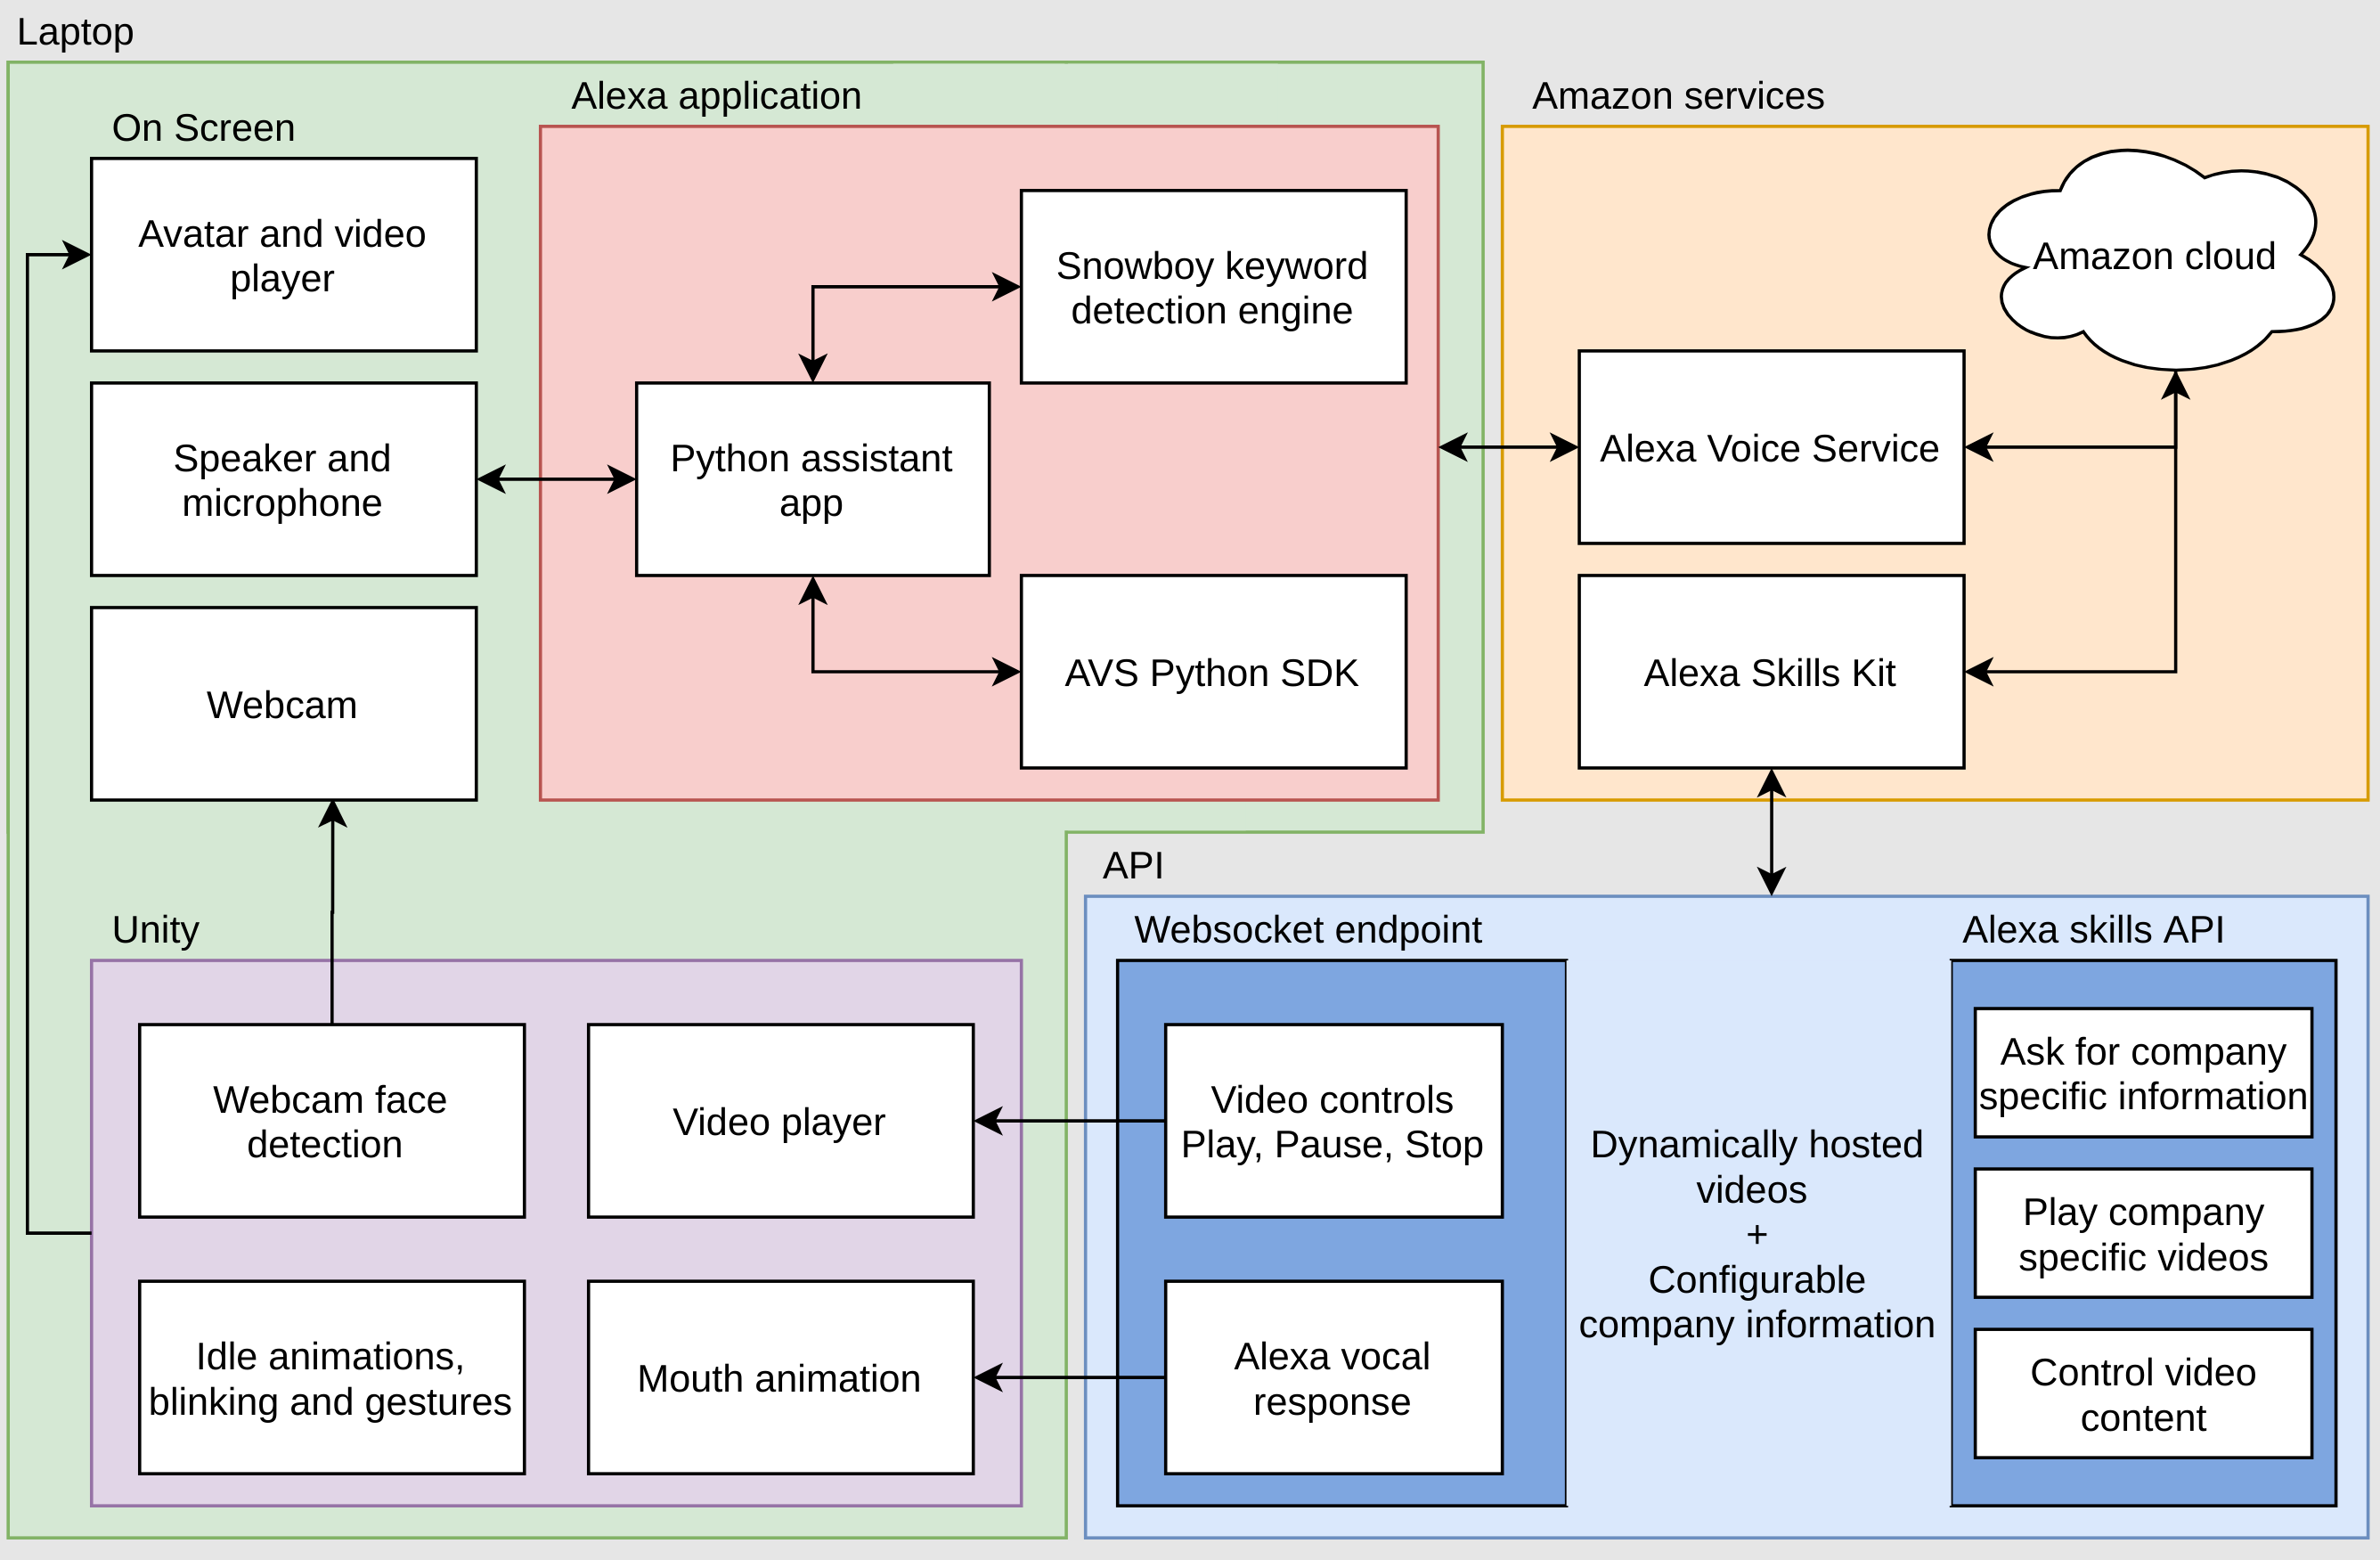
This is our final project structure and system architecture. We decided to move away from using a Raspberry Pi as it was not powerful enough host the avatar and the backend together. We decided to build the backend and the frontend into a computer instead and opting to use a virtual machine to host our APIs.
Frontend wise, we animate the avatar that we have procured using Unity and C# scripts. The avatar communicates with the backend using a websocket. Using a websocket creates less overhead compared to a HTTPS GET request and we are able to receive real-time status updates / information from the backend. The avatar's idle animation, blinking features and mouth animation are animated using C# scripts and the Unity Animation component.
The video player feature is a separate Unity game object from the avatar. When a video is to be played, the game object creates and enables a Video Player Component with the appropriate Render Texture and Material. The video player component plays a video via a URL where the video to be played is hosted on. Commands to pause and resume the video are received via the websocket and the appropriate function is called to control the video that’s being played. When the video is stopped or has finished playing, the video component is destroyed to remove the component from the user’s view.
The face-tracking feature was implemented using the OpenCV plus Unity asset. Using a webcam, we detect the user's face using the asset. We then calculate the center of the user's face-tracking and set that as the user's location. Taking the webcam's viewpoint's width and dividing it into 7 sections, we rotate the avatar based on the location of the user's face in any of the 7 segments.
On the backend, a voice assistant Python application is run locally on a laptop within an Ubuntu VM to be able to ask requests from Alexa and any Alexa skills that have been enabled. This application is connected to the speaker and microphone of the laptop using open-source libraries such as Gstreamer and PyAudio. The AVS SDK is used with this application to be able to authenticate the user's Amazon account and connect to Amazon services to stream user input from the microphone and get back standard Alexa responses.
An open-source keyword detection engine called Snowboy (by KittAI) is used to detect when the keyword that we specify is said. It is a DNN based hotword and wake word detection toolkit. Currently the keyword is set to ‘Alexa’ but this can be changed to several pre-built models, and our client can also train their own models to use if they would like but this will come with voice detection performace drawbacks (unless a lot of resources are used to train the model). The user’s voice is only sent to Amazon services once the keyword is detected to protect privacy.
Using Amazon services allows us to use their advanced natural language processing and semantic voice analysis to either return a response directly to the application or to use the Alexa skills kit which connects to our hosted API endpoint. It also handles connections with IoT devices using an Amazon account connected to them.
The Alexa skill that we have created is used to respond with company information or play a video about the company on the frontend when requested. This skill has been setup with slots which are essentially keywords that can be taken from speech that change the semantics and response expected. The intents from the user's request as well as the slots that have been detected are sent to the API endpoint. This skill can easily be imported to another account using a JSON representation of the skill.
The API is made using FastAPI which is a high performance ASGI Python web framework for building APIs. It is hosted on a cloud VM, and the endpoint is deployed using uvicorn, a minimal server/application interface. We registered a domain for our API and set up LetsEncrypt certificates so that our API could be hosted using HTTPS on a domain name. This makes our API as secure as possible, which is important when handling company information, and it also allows us to communicate with the Alexa Skills Kit. The endpoint has methods for the Alexa Skill, stores the company information and videos, and has a websocket to allow communication between the AVS Python App and the Unity backend. The secure websocket is made using Starlette WebSockets and sends messages to the Unity backend to notify when a change in the application state has been made.
We carried out several different types of testing throughout the development of our project. We worked according to the agile/XP software development model and test driven development was a key part of this process. This meant that we had continuous short development cycles that allowed for very specific testing to be carried out at each cycle.
We used unit testing throughout development to test every section of our code after writing it. This allowed us to verify that a specific section of code was working as intended. This helped us detect defects in our code well before it becomes a synchronized part of the application, allowing us to reduce development risks and time spent debugging at later stages.
Integration testing was primarily done when we were integrating all of the components of the system into one cohesive package. This testing is used to verify that the interfaces between the components of the system are in accordance to how we planned and designed it. We intergrated our components in a more iterative manner so that we could test the interaction between a pair of components instead of having to test the intergration of all of our components. This allowed us to locate and patch issues significantly quicker.
User acceptance testing was carried out after every major achievement in our project to ensure that the project was on track and usable for the people who would use the system. Complete user acceptance testing was carried out mainly at the prototype stages of the project with our client also giving us regular feedback and advice during our meetings on how to move forward. We organised fornightly meetings with our client, often over Skype and occasionally in-person. We'd show our progress and prototype to our client and take notes on his feedback. Questions about implementation were often discussed, mainly on what hardware is being used and the cost of any servers that are in use.
Our client always gave us useful advice on how we should proceed with our project, and he would let us know if there are any changes or improvements he would like to make. Furthermore, our client told us clearly on the key features of the project that he places importance on, and allowed us to scale down some of our requirements (such as the lipsync feature) so that more time could be spent on the more important requirements.
Achievement table
| Requirements | Priority | State | Contributors |
|---|---|---|---|
| Natural Conversation Basic Trivia Basic Tasks (Alarms, Timers, Reminders) Company Information Knowledge |
Must | 100% 100% 100% 100% |
All |
| IoT device interaction Light control Speaker control Playing videos |
Must | 100% 100% 100% |
All |
| Virtual assistant face tracking Detect user face position Follow user's face |
Must | 100% 100% 100% |
All |
| Virtual assistant mouth animation Detect response output Animation sync to audio playback |
Must | 100% 100% 100% |
All |
| Humanoid virtual avatar Procure full body avatar Rigged on Unity |
Must | 100% 100% 100% |
All |
| Ability to play videos on Iot devices Play demo videos |
Must | 100% 100% |
All |
| Configurable to user Company information can be customised |
Must | 100% 100% |
All |
| AR capabilities Avatar in AR on mobile phone |
Should | 0% 0% |
All |
| Avatar has smooth animation and natural gestures Facial expressions Hand gestures |
Should | 100% 100% 100% |
All |
| Mobile phone integration Avatar in phone application |
Could | 0% 0% |
All |
| Assistant lip syncing Avatar mouth shape animation matches real life speech |
Could | 0% 0% |
All |
| Holographic projection Avatar can be projected in lab |
Could | 0% 0% |
All |
| Interaction with Sota Avatar triggers Sota to introduce himself |
Could | 0% 0% |
All |
A list of known bugs
Individual contribution table
| Work packages | Joanne | Rikaz |
|---|---|---|
| Client liaison | 50% | 50% |
| Requirement Analysis | 50% | 50% |
| Research and Experiments | 50% | 50% |
| UI Design | 50% | 50% |
| Coding | 50% | 50% |
| Testing | 50% | 50% |
| Fornightly Reports | 50% | 50% |
| Report Website | 50% | 50% |
| Poster Editing | 50% | 50% |
| Video Editing | 50% | 50% |
| Overall contribution | 50% | 50% |
| Main Roles | Full-stack developer, Researcher, Report Editor | Full-stack developer, Researcher, Report Editor |
The user interface of the project is fairly simple. On a monitor the assistant's avatar is rendered, and using the camera the assistant faces the user waiting for a command or interaction. The assistant has natural blinking features and will occasionally move about as part of her idle animations so that the assistant does not seem too rigid. This leads to a more natural and comfortable user experience. When a video plays not too much of the screen is taken up so that the avatar can still be seen, but the video is big enough to still be easily visible.
The assistant has a wide range of functions. Ranging from holding a natural conversation with the user, such as "Tell me a joke" or "When is the Queen born" to handling basic tasks such as setting a timer, setting an alarm and handling basic calculations. The assistant can also relay more information about the company, and even play videos as requested. Not only so, the assistant can control IoT devices like the Philips Hue lights and speaker volume.
The assistant is stable as the backend is powered by Amazon's Alexa which has been consistently online and functioning, however a slow internet connection will result in a slower response from the assistant. The APIs are hosted on a virtual machine so as long as that is the virtual machine runs with a good internet connection that APIs should have no stability issues. The frontend only has one game object to render so there is no concern over the loss of frame rate for at least a mid-spec PC.
Our system solution has been optimised to be as efficient as possible. Initially, our first prototype was to host the Alexa Voice Service and the 3D-assistant on a Raspberry Pi. However, this caused issues with the Raspberry Pi overheating as it was not powerful enough to suit our needs as the setup process was complicated and the Pi frequently crashed. We then decided to move forward from the Raspberry Pi, relocating our project’s backend on a virtual machine instead. We aimed to minimise the resources that we use for our project, hence why we opted to use a more powerful virtual machine.
Currently we are using a private server on DigitalOcean to host our FastAPI endpoint, costing at about £40 per month as we had free credits to use, however a virtual machine that costs around £20 per month is sufficient for our project’s demands. Our client has also stated that the company has existing powerful virtual machines so there are no concerns over the project’s performance after the handover. To transmit status updates to the frontend, we use a websocket to establish a connection with the backen. A websocket is the most efficient communication channel that is best suited to our needs as it uses less overhead compared to a GET or POST request and is more reliable overall. We created API methods to send and host information fetched from the backend such as controlling the video content to be played, the company information to be displayed and the playing of a demonstration video.
In the aspect of 3D rendering, the assistant’s avatar is the largest game object in the scene, apart from a few smaller game objects used for video rendering and face-tracking. As there is minimal 3D rendering required, we omit the need for a powerful graphic processor. Our backend components are also integrated seamlessly and centralised to one account to keep it simple.
The frontend is only Windows and macOS compatible due to the Webcam library only being compatible with these OS's. The API server can be run on any server OS, but our instructions are for Ubuntu 18.04LTS. The AVS application code is only compatible with Unix based OS's due to the libraries and dependencies used.
The project is rather complex however maintenance could bring some complications. Some open source libraries are currently being used in our project, for example the Unity websocket library and the custom keyword engine. If there are any future works on this project at a later stage, some of the libraries may no longer be applicable due to compatibility issues with newer Unity versions. However, the current frontend should pose no problems as the project has been built. The Alexa skill API would need to be changed depending on the use case that is needed for it, and the API server would need to be maintained to ensure communication between the front and back end. HTTPS certificates may need to be refreshed periodically in order for the endpoint to work in the long term.
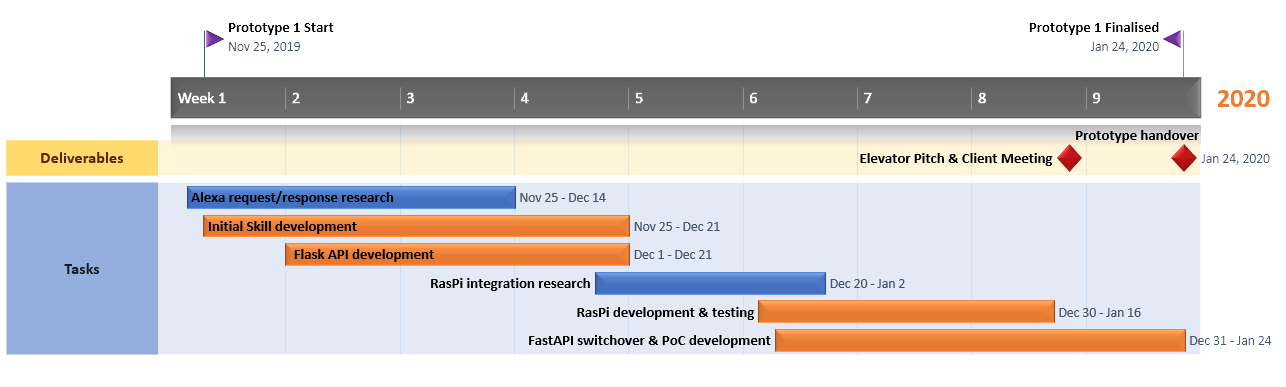
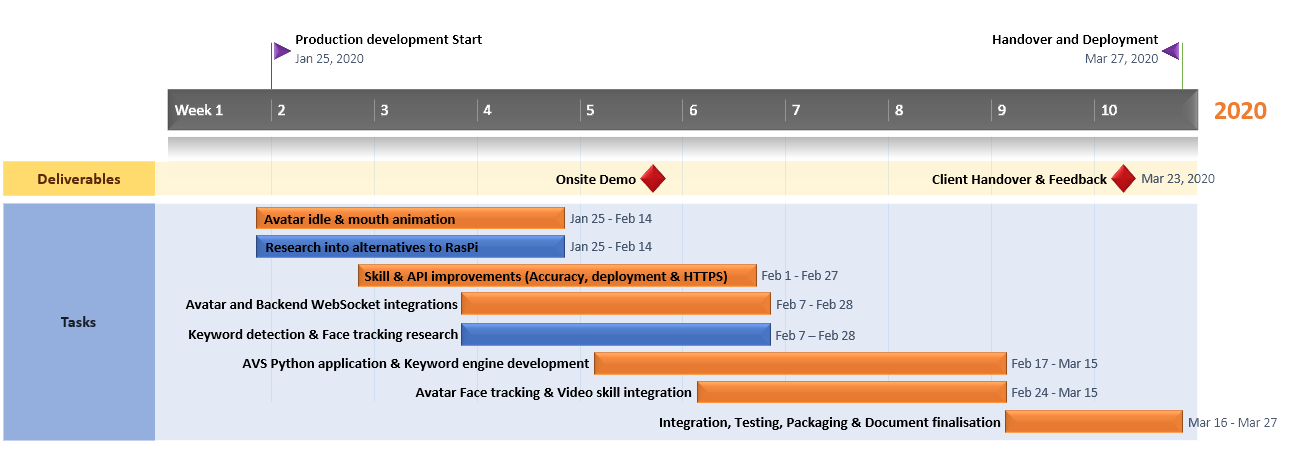
Our project is developed using the agile software development strategy. We work in sprints to acheive small milestones in our project, such a implementing a basic feature or finishing a component's functionality. We also created a roadmap to outline the development process of our project, this roadmap can be seen in one of our fornightly reports. We used test driven development throughout the project to reduce development risk and make much more reliable and secure code. (See testing)
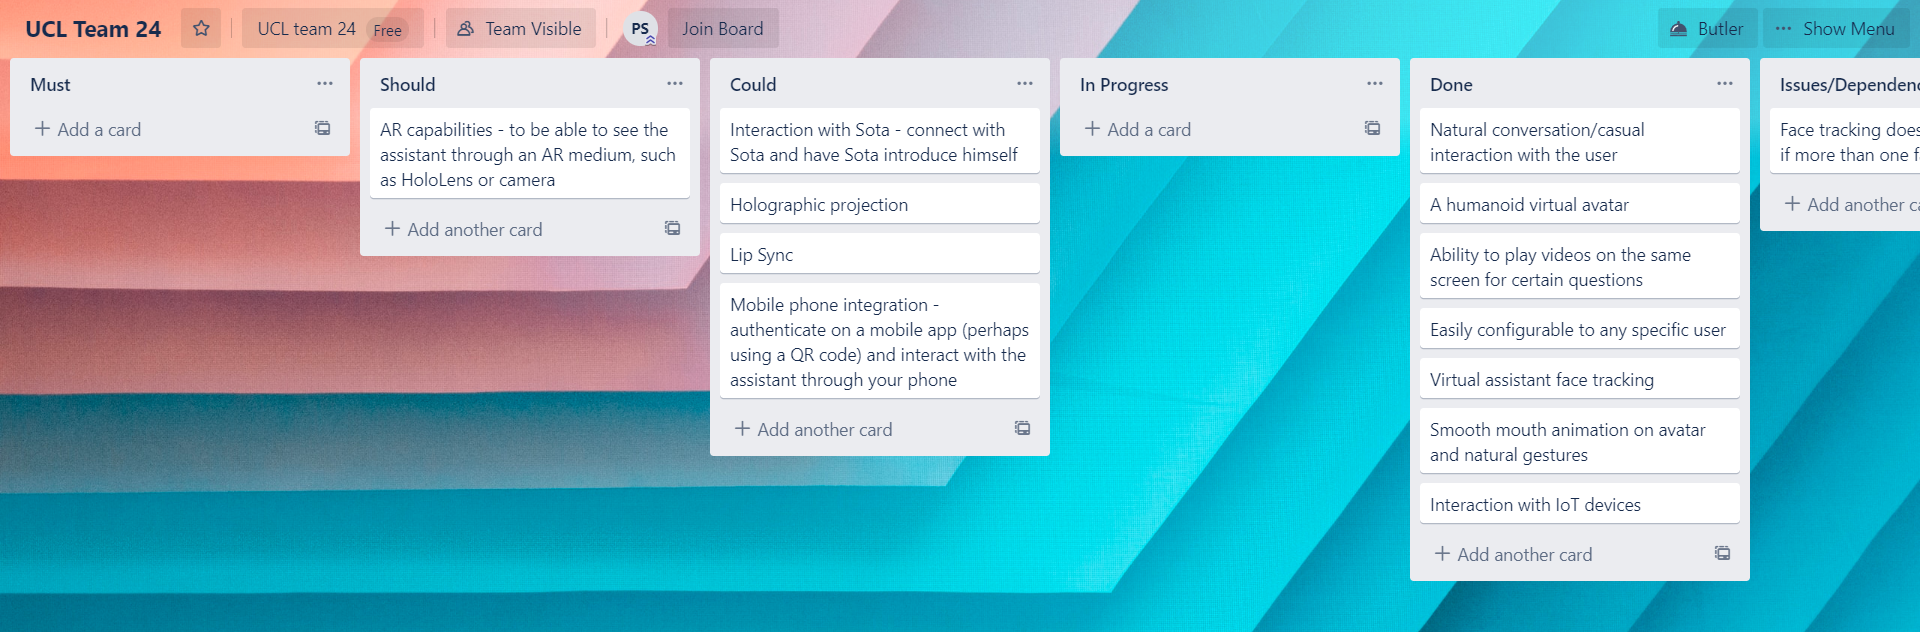
In addition to that, we also have created a Trello board that's shared with our client to track our progress. Our client can see our status and what tasks we are currently working on. In addition to that he can also change the level of priority of certain requirments on the board too. We use the Trello board to track what tasks has been completed, pending and to log any bugs/issues that we are facing at the time.
During development we started to make progress on other requirements in our project. For adding lip sync functionality to the avatar, we researched into and created an application that could extract the Alexa speech response text before it was outputted on the AVS application. This text could be used to add lip sync functionality to the avatar using a text to lip sync tool such as the SALSA lipsync suite for Unity. We could not procure this tool in time for our project, but this would make the avatar much more natural.
We also made progress on AR and VR environments for the avatar. Since we built the avatar in Unity, there would be means to recreate the application in an AR setting, such as in a mobile application, with some tweaking to the scripts and scenes. Something similar could’ve been done if we used the Unreal Engine to create our avatar. We also researched into using Sumerian, an Amazon tool that makes web based AR and VR applications, and allows services such as Amazon Lex to be built in to it.
There is also a possibility of a custom skill where the assistant could guide users around the office building by using the geographical beacons that are in the office building. Interaction with the Sota home robot could also be done through a skill.
When you would like to chat with the assistant, simply invoke her custom name (for example "Alexa") and tell her your request. Example requests are listed below.
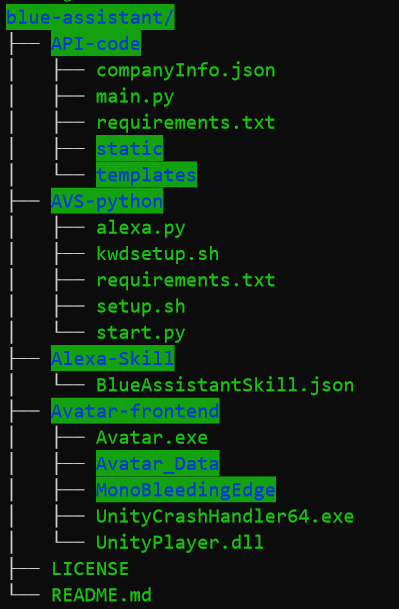
The contents API-code is the only code used outside of the local device, so this should be transferred to the VM when it is set up. The AVS-python directory is used on the Ubuntu VM that will be run locally - it cannot be run directly on Windows. The Alexa-Skill directory contains the JSON file needed to easily set up the Alexa Skill correctly on your account. The Avatar-frontend directory contains the built 3D model files that can be run directly on Windows.
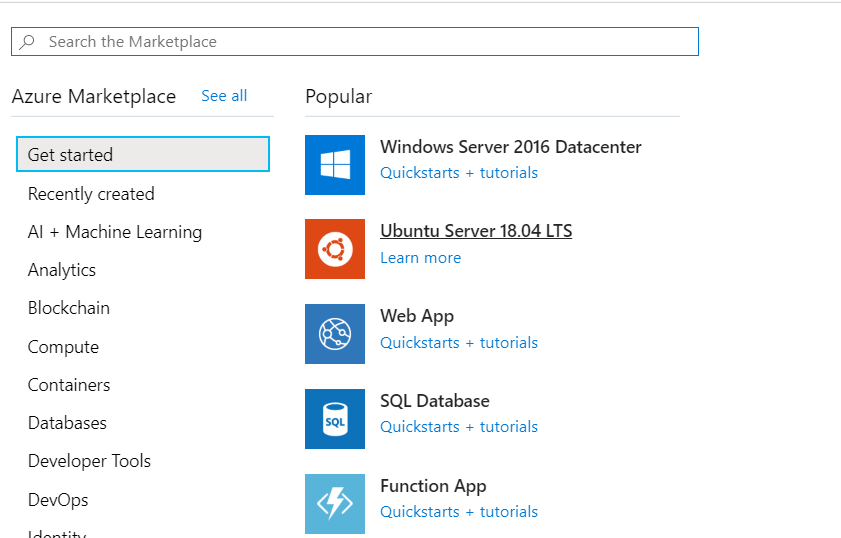
Log into portal.azure.com and click create a resource.
Create a new Ubuntu 18.04 LTS Server
Change the settings according to your preference of naming. The image must be Ubuntu 18.04 LTS and the size must be at least the following:
Choose your preferred means of accessing the VM and make sure that SSH and HTTPS are selected for inbound ports.
The rest of the options can be kept to default or can be changed to your preference.
SSH into the server.
You will need to reserve a domain on a domain name service for the API to work as intended. Currently the API is hosted on https://alexaapi.compositegrid.com but this will not stay up for much longer.
Follow the instructions for setting up certbot and it’s dependencies on this website https://certbot.eff.org/lets-encrypt/ubuntubionic-other
On step 4, use
sudo certbot certonly --standaloneInput your contact email and, agree with the ToS and then enter the domain name that has been reserved. Key files will automatically be made after the handshake with the domain inputted.
In the user's home directory, create a directory keys
mkdir keysCopy the key files from letsencrypt for your {domain} to this directory.
sudo cp -r /etc/letsencrypt/archive/{domain}/ keys/Go to the copied files.
cd keys/{domain}Change the permissions on these keyfiles using
sudo chown $USER *sudo chmod 755 *sudo chgrp $USER *We will need to port forward any incoming traffic from the HTTPS port (443) to the server port open on the VM. Any arbitrary non-reserved port can be used but for this example we will use port 4430.
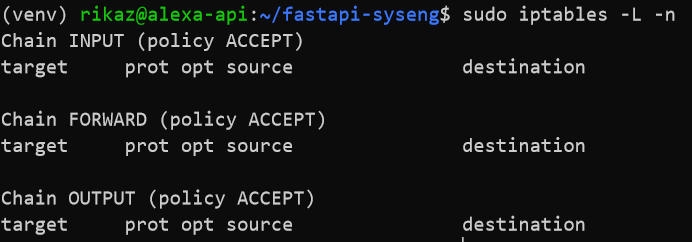
Run
sudo iptables -L -n You should see the following output.

Now run
sudo iptables -I INPUT 1 -p tcp --dport 443 -j ACCEPTThis will allow traffic through port 443
Now we must forward port 443 to our server port on the VM (4430).
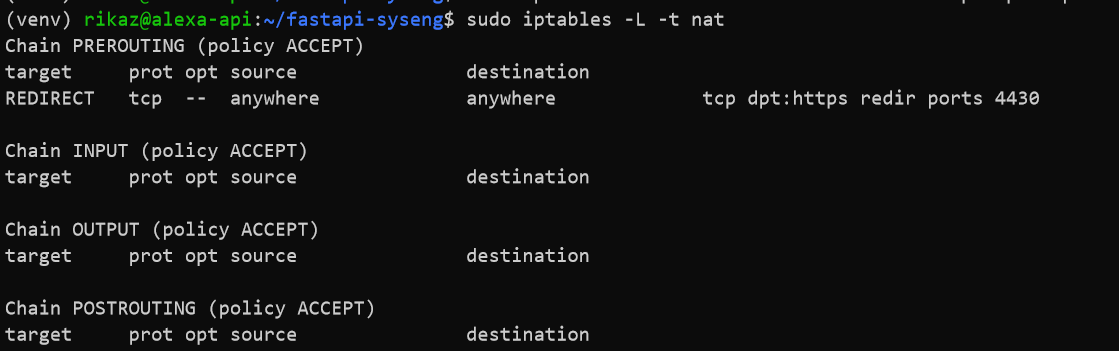
sudo iptables -A PREROUTING -t nat -i eth0 -p tcp --dport 443 -j REDIRECT --to-port 4430Running
sudo iptables -L -t nat should give the following output

To make these changes persistent between restarts of the iptables service we need to do the following
sudo sh -c "iptables-save > /etc/iptables.rules"
sudo apt-get install iptables-persistentThen save the current IPv4 and IPv6 rules
Add the API-code directory to the root directory of the VM and go to this directory
sudo apt-get updatesudo apt-get install python3-pipsudo apt-get install python3-venvIt is highly recommended to install screen at this point (if not installed already).
sudo apt install screenCreate a new screen.
screen -RMake a new venv in the API server code.
python3 -m venv venvEnter the venv.
source venv/bin/activateInstall python dependencies.
python3 -m pip install -r requirements.txt to Run uvicorn
uvicorn main:app --host 0.0.0.0 --port 4430--ssl-keyfile=/home/$USER/keys/{domain}/privkey1.pem--ssl-certfile=/home/$USER/keys/{domain}/fullchain1.pemThis will run the server on your designated domain name with https enabled

An Ubuntu VM will be required to run the Alexa Voice Service code on Windows. This is very easy to setup using the VMware Workstation Player.
Download the Ubuntu 18.04 LTS iso from the Ubuntu website https://ubuntu.com/download/desktop.
Download and install the VMWare Workstation Player for Windows https://www.vmware.com/uk/products/workstation-player/workstation-player-evaluation.html
On the Workstation application, click Player -> File -> New Virtual Machine
Under Installer disc image file (iso) select the Ubuntu 18.04 iso that was downloaded. This should allow Easy Install of the VM. Then add the user credentials for the OS, choose a name for the VM and reserve 20GB for the VM on your system. Store the virtual disk as a single file. Click finish, and the Ubuntu VM will be automatically set up for you.
Transfer the AVS-python directory to your Ubuntu VM.
Go to the directory.
cd AVS-pythonUpdate your apt packages.
sudo apt updateInstall pip and virtual environments. Then create a virtual environment called venv.
sudo apt install python3-pip python3-venvpython3 -m venv venvActivate venv.
source venv/bin/activateMake setup.sh executable.
sudo chmod +x setup.shRun the setup script.
./setup.shYou will be redirected to a webpage - click on amazon alexa, sign into the alexa dev account and then allow the application access.
Make kwdsetup.sh executable.
sudo chmod +x kwdsetup.shRun the keyword setup script.
./kwdsetup.shOpen the alexa.py file in a text/code editor and change the ENDPOINT variable on line 40 to the address of the API endpoint that has been setup, followed by ‘/api/v1/speechLogs?text=’ like so
ENDPOINT = "https://{DOMAIN}/api/v1/speechLogs?text="Run the application code.
python3 start.pyYou can test the application without a GUI by saying ‘Alexa’ and asking a question. You should see the keyword being detected on the terminal and the application playing the audio files that are being outputted by the speakers.
Navigate to https://developer.amazon.com/alexa/console/ask and sign in to the alexa account used when setting up Alexa on the Ubuntu VM.
Click create skill and enter in a name for the skill, use a custom model and provision your own method to host the skill’s backend resources. Start the skill from scratch.
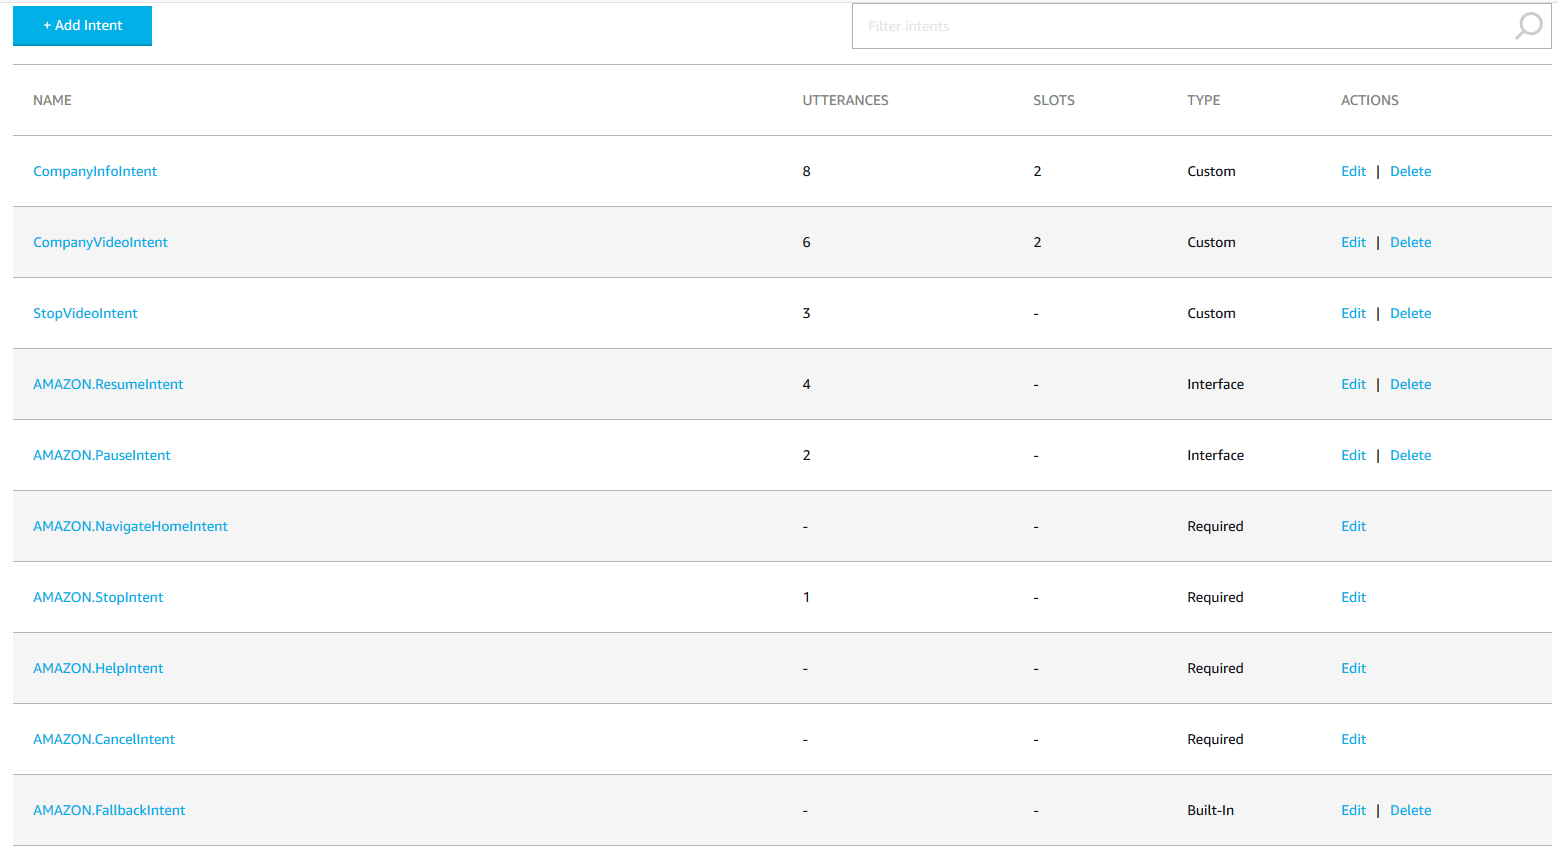
Go to the JSON editor then drag and drop the BlueAssistantSkill JSON file into here. Navigate to Endpoint, select HTTPS and add the API domain into the Default Region field followed by /api/v1/blueassistant. Select “My development endpoint has a certificate from a trusted certificate authority” as the SSL certificate type.
Click save endpoints and navigate to intents. The page should look like this
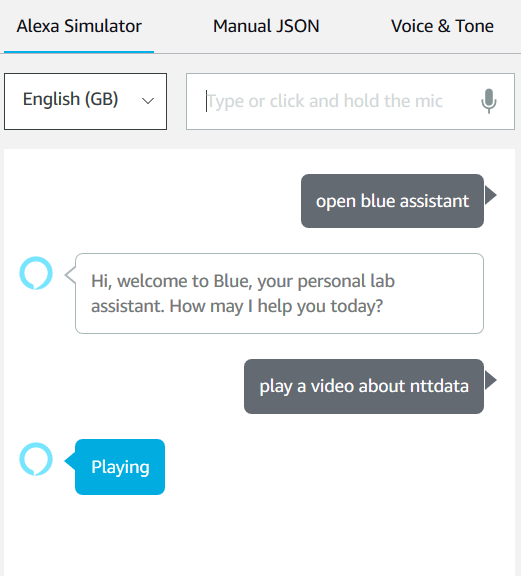
Click build model to start building the Alexa skill model. The skill can be tested by going to the Test tab, enabling testing on Development and then typing utterances. The skill can be tested like so. If the responses are the same then the API endpoint is working as intended.

Go to https://alexa.amazon.co.uk/spa/index.html and sign in using the Amazon account used for the skill.
On the left tab, head to skills, then click on ‘Your Skills’ on the top right.
Under Dev Skills, the skill that has been created should be present.

Click on this skill and enable it. This should allow any Alexa device connected to your account to be able to use this skill.
Alternatively this can be done using the Alexa app. On the left pane, click Skills and Games, navigate to ‘Your Skills’ and the skill should be present under ‘Dev’.
Now that your IoT device is connected through the Alexa app it should be controllable through the application.
In Unity, File -> Open Project and select the unzipped Avatar.zip folder.
To escape compatibility issues, the project runs on Unity Version 2019.2.18f1
There are 2 endpoints that need to be configured. In scripts/player.cs line 40, change the websocket endpoint to be
websocket = new WebSocket("wss://{YOUR_ENDPOINT_WITHOUT_HTTPS}/ws");In script/videoPlayerScript.cs line 53, change the video player URL.
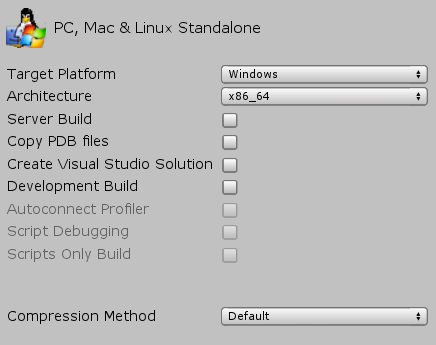
videoPlayer.url = "{YOUR_ENDPOINT}/companyVideo";File -> Build Settings -> Player Settings -> Other settings and allow ‘unsafe’ code under configuration.

Set your build settings to be like this

Build the project and run the .exe file.
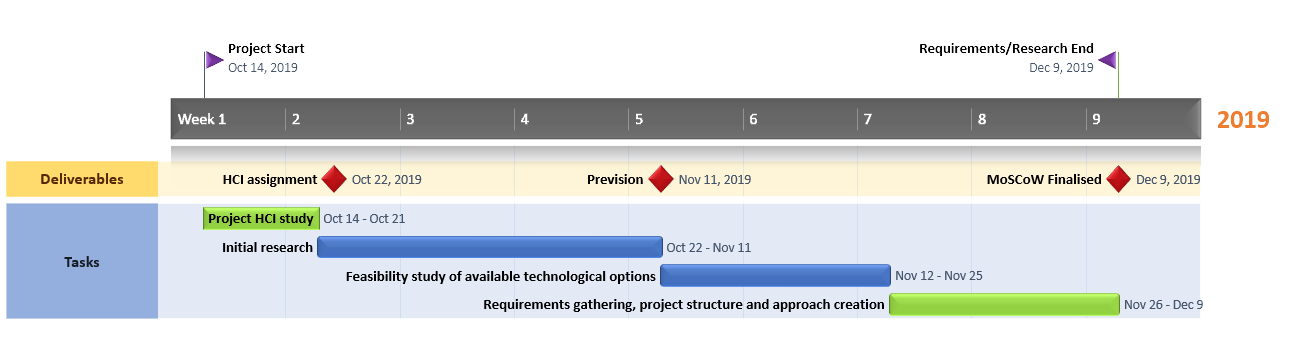
Our Gantt chart is split into three sections with key deliverable milstones highlighted.
1. Requirements and Research
2. First prototype
3. Final production development


Please use think link to access the folder which contains all the fornightly reports written.