Blue Assistant User Manual
This manual contains instructions for setting up all the components of blue assistant and integrating them into a final working product. There will be links to pre-compiled and pre-packaged zip files that will greatly simplify the setup process, but is not suitable for development. Developers working on this project should follow the setup instructions in README.md instead.
In this manual:
Agree to the Let’s Encrypt terms of use
Setting the endpoint URL of your skill
Applying the floor plan to Unity
Before you start
Agree to the Let’s Encrypt terms of use
The skill server setup and start-up scripts use Let’s Encrypt to get https certificates for your cloud server. By using those scripts, you acknowledge that you have read and agree to the Let’s Encrypt usage policies, which can be found at https://letsencrypt.org/repository/ .
Hardware requirements
To run the Blue Assistant you would need a Windows 10 machine with sound and microphone. Face tracking feature also require a front-facing webcam. You would also need a Debian-based Linux virtual machine with a public IP address.
Prepare a domain name
The skill server must have a publicly accessible domain name. In this document we use “skill-server-install-test.mww.moe” as an example.
Download resources
· Clone the git repository on your Windows machine.
· Download and extract https://mw-public-data.s3.eu-west-2.amazonaws.com/e3b0c44298fc1c149afbf4c8996fb92427ae41e4649b934ca495991b7852b855/avs.zip into a new folder “avs”.
· Download and extract https://mw-public-data.s3.eu-west-2.amazonaws.com/e3b0c44298fc1c149afbf4c8996fb92427ae41e4649b934ca495991b7852b855/unity-build.zip into a new folder “unity-build”.
· Go to https://www.java.com/en/download/windows_offline.jsp and download and install Java.
Install necessary software
Firstly, remove any existing versions of python which you have installed. Later versions of Python works as well but will require some tinkering.
Run the two installers in the “AVSClientFiles” folder of the git repository, which will install Python and MinGW (MSYS2), which will be used by the AVS client. Note that:
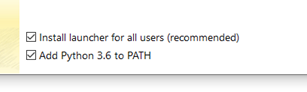
· When installing Python, you must select “Add Python 3.6 to PATH”:
· When installing MinGW (MSYS2), you must install it to the default location:

MinGW might also be useful for ssh-ing into your cloud server, if you want to perform the skill server setup on Windows and do not have another ssh client.
Amazon account
You will need access to an Amazon account with administrator rights to the Alexa skill.
Show file name extensions
Since this document will be referring to files with their extension, make sure this is checked:

Skill server setup
Setting up the cloud server
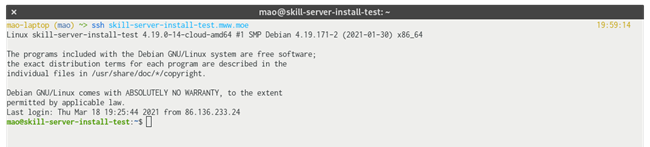
First, check if you can ssh into your cloud server. You can use the ssh command in the MinGW shell to do this if you are on Windows. Keep this window open.
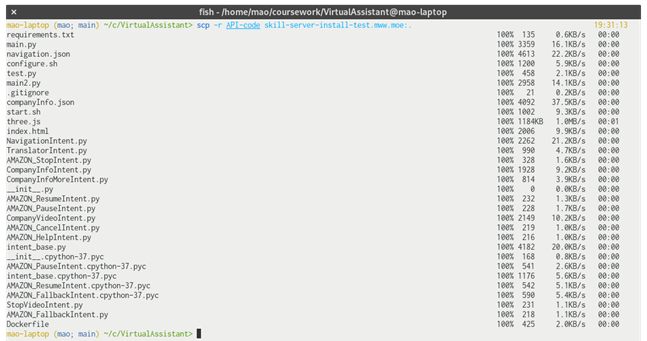
Then, copy the “API-code” folder onto your server. In Linux and MinGW, this can be done with the “scp” program. For example:
scp -r API-code your-server-domain:.
will copy the API-code folder to your home directory on the server.
Now, on the previous ssh window, run the following commands to start the config script:
cd API-code
./configure.sh your-server-domain
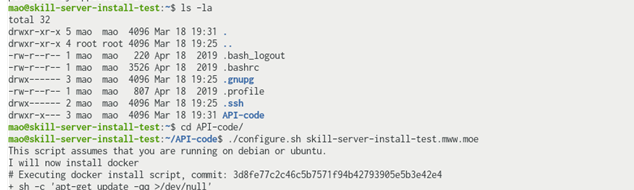
This might take a while, but your API server will be fully ready after the script is finished, and the skill server will keep running even if you close your ssh connection, and will also start up automatically when your cloud server boots.
Setting the endpoint URL of your skill
With your Amazon account logged-in, go to https://developer.amazon.com/alexa/console/ask/ and click on your skill. Then, navigate to the “Endpoint” page:
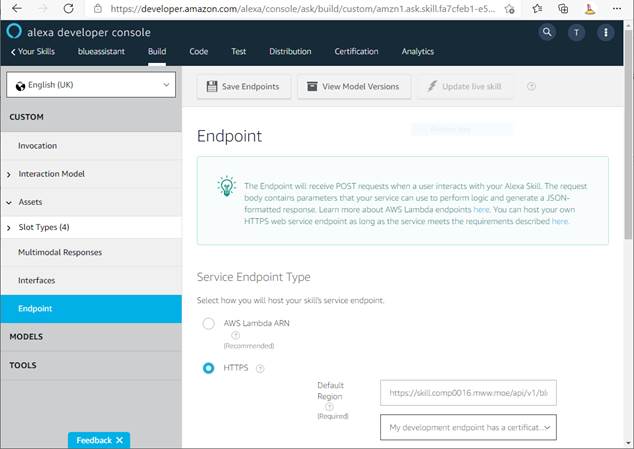
Make sure that “HTTPS” is selected, and under “Default Region” enter “https://your-server-domain/api/v1/blueassistant” and make sure “My development endpoint has a certificate from a trusted certificate authority” is selected.
AVS client setup
Install runtime dependencies
Open the folder “AVSClientFiles” and locate the “mingw-setup.sh” file. Open a MinGW window and drag-and-drop the file into it, then press enter.
This process can take a very long time. You can close the window after it’s done.
Authorize the client
Run “startsample.bat” under your extracted “avs” folder. Wait for a while, then scroll up until you see this:
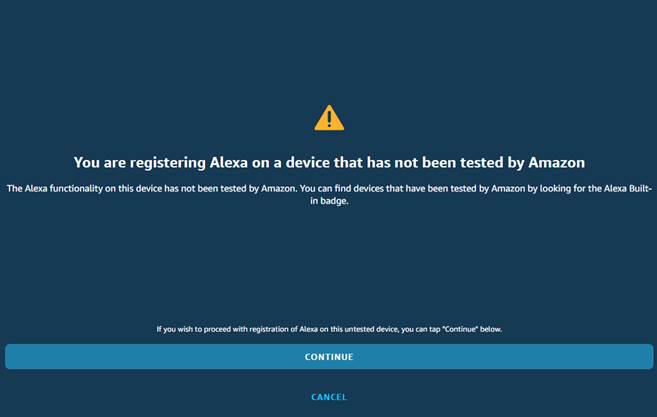
Copy the code, go to https://amazon.com/us/code and enter it (you might have to login to your Amazon account first). Click “continue” on this page:
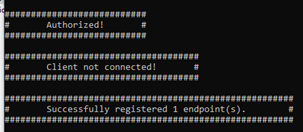
If this is successful, you will then see this from your client:
You can then close the client and your browser tab. Then, run “startapp.bat”. After a while you should see two windows, one is the Alexa client and another is the python bridge, which is used to connect the client with Unity. These need to be kept open while running the unity client.
Unity client setup
Open Avatar/ConfigGen/index.html in the git repository with your browser, then follow the instruction. Do not check “Use test client”. Once you’re done, click “Generate config.json” and save (copy) the file into the Avatar/avatar_Data folder under your extracted “unity-build”, overriding the existing “config.json”.
At this point all setup procedure has completed. If you have kept the two windows spawned by the Alexa client earlier open, then simply run “Avatar/Avatar.exe” under “unity-build” to run the assistant. In case you have closed the Alexa client, run “startapp.bat” again to reopen.
You can use Alt+F4 to exit the unity client.
Navigation configuration
The assistant comes with a default set of rooms which you can test by asking, for example, “(ask Blue Assistant) how to get to the conference room”, without the need to do this configuration process. Nevertheless, here are the steps to customize it to your building.
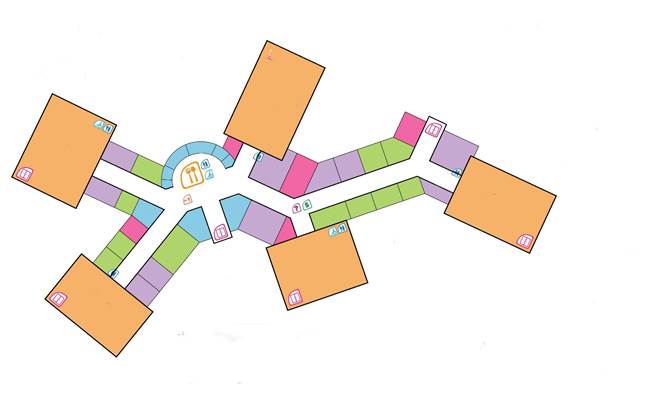
Preparing floor plan image
Before running the configurator, you need to have a top view image of each floor of the building (or each floor which contains some places you want the user to be able to navigate). All the black pixels in the image should represent walls, but it can otherwise contain other colours. An example image suitable for this purpose is shown below:
Running the program
Run “Navigation/run.bat”, and click “upload” in the graphical interface to select a floor image, then enter the floor number. It will hang for a while to process the rooms, and then you shall see something like this:

The program will iterate through all the rooms and highlight one at a time. You should give a name for each room. It will also highlight the hallway and lift area, and you must press “Hall” or “Lift” for those. Each floor must have exactly one Hall and exactly one Lift. At the end of this, click “Upload another” to repeat this process for another floor, or “Quit” to finish off.
After you click “Quit”, please wait for the command window to close before continuing with…
Applying the floor plan to Unity
Copy the entire “Navigation” folder to the “unity-build” folder, overriding any existing files. Afterward the unity client should be able to show video of the new floor plan.
Applying the floor plan on the skill server
You would also need to change the skill server in order for the Alexa skill to recognize any queries for the rooms you created. For this you would need to manually edit the JSON files in the API-code folder of the repository and re-deploy the skill server (just scp the files again and run sudo systemctl restart skill-backend). Follow the instructions in Navigation/README.md for how to modify the JSON files.