Testing
Testing Strategy
Our project consists of many different components which requires testing in different ways. For our core server, we performed unit tests using pytest and done manual integration testing with the various system components which communicate with it to ensure that it functions correctly. For our frontends (IBM Proximity Agents Desktop App and Registration Site), we carried out compatibility testing, and responsive design testing. This ensures that they can run on different systems/browsers, and are displayed correctly regardless of window sizing. Finally, we also carried out user testing where we got clients to use our system to judge the feasibility and reception of our project in practice.
Our testing can be divided into automated testing and manual testing. Automated testing involves using scripts and tools to quickly verify the functionality of individual components, making it ideal for repetitive and large-scale tests. In contrast, manual testing allows us to assess parts that require human judgment, such as user experience, or to verify the functioning of our system without spending a large amount of time developing comprehensive testing scripts.
Testing Scope
Taking into account our personas, we developed our tests so that we can fairly judge the functionality of our application for a given user. The registration website and proximity agents application had to be as user-friendly and usable as we could make it, due to the fact that it was to be interacted with by people of all ages and physical abilities.
On the other hand, components such as the Raspberry Pi and Server were not going to be exposed to the average user, meaning that we could focus less on the "user-friendliness" of these components and more on the functionality and perfomance that they could provide.
Unit Testing

PyTest
Unit Testing Framework
Our unit tests are performed utilising a comprehensive suite of unit tests for the API endpoints defined in our server, using PyTest. Having a large and critical part of our project like the core server being unit tested allows us to easily improve functionality in future iteration without the worries of additional bugs and vulnerabilities being introduced. The tests verify core functionality including device registration, credential management, and preferences handling - all protected by encrypted communications. Each test follows a consistent pattern of setting up test data on our database, performing different API operations through a test client, and verifying the expected responses.
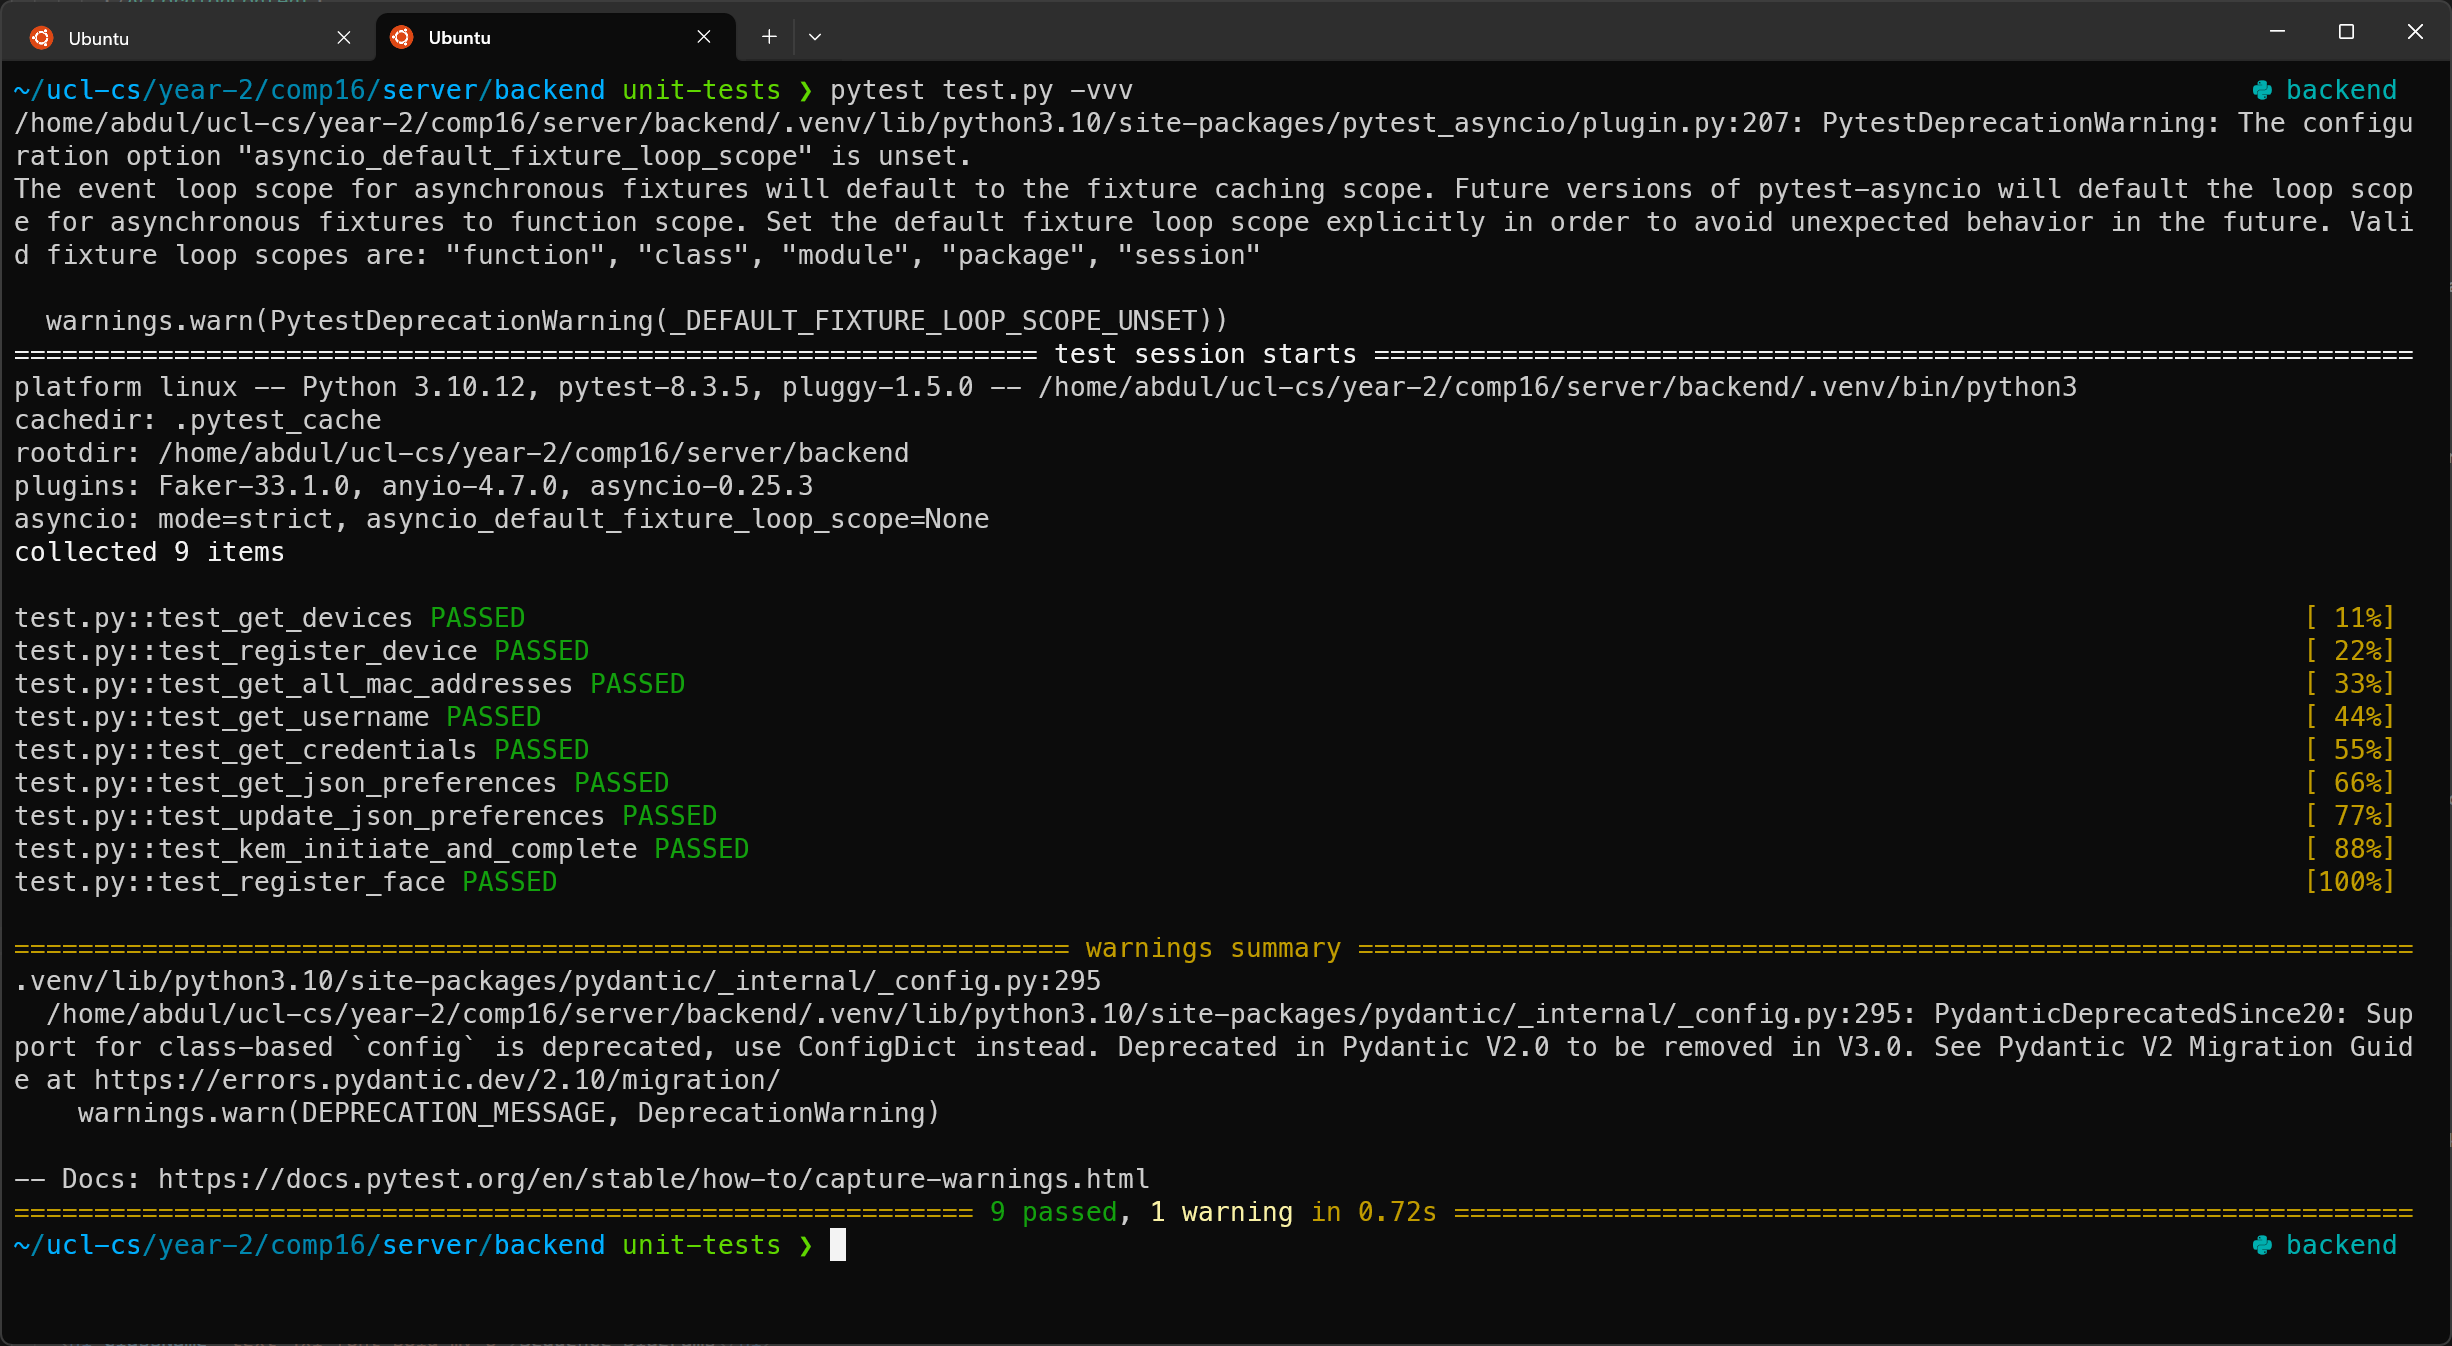
Figure 1: Unit Tests
100% of the unit tests on our server API endpoints successfully pass!
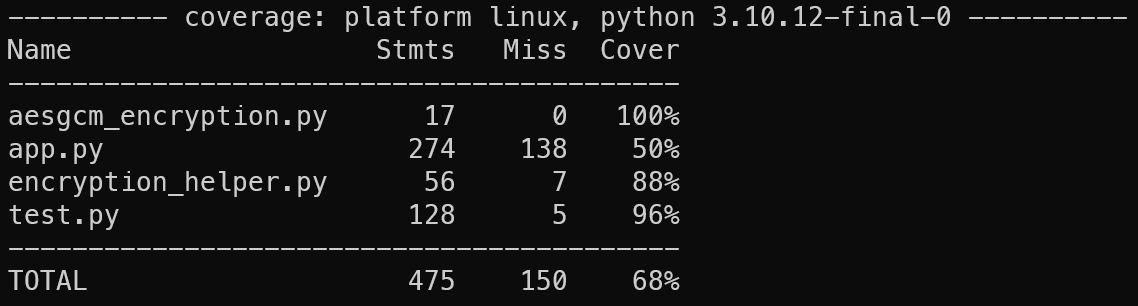
Figure 2: Test Coverage
Even though the test coverage shows only 50% coverage on the app.py server, this is not accurate as it was discoverd that there was an issue where the coverage tool used stops coverage detection in a function from the point a database access is made.
Our test suite uses PyTest's fixture mechanism for dependency injection, which helps us easily create test clients for our server before every test, inject them into the test function as a dependency, and automatically run the test cleanup - which ensures test isolation by removing the test database after each test run, and consistency across test runs. Whenever a test requests this fixture, it automatically creates a new test client which is connected to our application and then yields it to the test function. After the test finishes, it cleans up by removing the test database file.
@pytest_asyncio.fixture(scope='function')
async def test_client() -> AsyncIterator[AsyncTestClient[Litestar]]:
    async with AsyncTestClient(app=app) as client:
        yield client

    # Delete test database after each test
    os.remove(TEST_DB_FILENAME)
The most sophisticated part of these tests focuses on the key encapsulation mechanism (KEM) using quantum-resistant cryptography via the OQS library with ML-KEM-512. These tests validate the server's ability to initiate secure key exchange, generate appropriate public keys, and successfully complete the key exchange process by decapsulating client-provided ciphertexts to establish shared secrets. The comprehensive test coverage ensures the API provides secure device management capabilities while maintaining data confidentiality through end-to-end encryption - critical for a system that stores sensitive credentials and device information.
TEST_CLIENT_ID_1 = '1'
TEST_SHARED_SECRET_1 = b'½´é÷óÁiâÉ
£5¬Ë<®ÖÈÙFRG?'
encryption_helper.shared_secrets[TEST_CLIENT_ID_1] = TEST_SHARED_SECRET_1
@pytest.mark.asyncio
async def test_kem_initiate_and_complete(test_client: AsyncTestClient) -> None:
# Get public key
data = {'client_id': TEST_CLIENT_ID_1}
response = await test_client.post('/kem/initiate', json=data)
public_key_b64 = response.json().get('public_key_b64')
if not public_key_b64:
assert False
assert encryption_helper.kem_sessions.get(TEST_CLIENT_ID_1) != None
# Encapsulate a shared secret
with oqs.KeyEncapsulation('ML-KEM-512') as client_kem:
try:
public_key = base64.b64decode(public_key_b64)
ciphertext, shared_secret = client_kem.encap_secret(public_key)
except Exception as e:
assert False
# Send encapsulated shared secret
ciphertext_b64 = base64.b64encode(ciphertext).decode()
data = {'client_id': TEST_CLIENT_ID_1, 'ciphertext_b64': ciphertext_b64}
response = await test_client.post(f'/kem/complete', json=data)
if response.status_code != 201:
assert False
assert shared_secret == encryption_helper.shared_secrets.get(TEST_CLIENT_ID_1)Integration Testing
Manual
Integration testing allowed us to keep validating the functionality of our codebase as we added on more features. We constantly conducted end-to-end tests to ensure that the core server, proximity agents, ESP32 devices, and Raspberry Pi gateways communicated correctly and maintained secure data transfer across the entire authentication flow. These tests revealed several edge cases where components failed to handle certain error conditions gracefully, particularly during request failures (Raspberry Pi → Server) or when an ESP32 moved out of range during the authentication process, causing us to add a 3 strike system. Finally, we also performed full end-to-end tests to verify the entire process, from registering a new ESP32 device, to logging in via proximity and facial recognition, to updating preferences via the proximity agent app.
One integration test we done was to check that our encryption when communicating between the Raspberry Pi and server works correctly. This is the example Raspberry Pi client code which simulates an API call that may be made:
if __name__ == '__main__':
    # Example usage

    # Generate shared secret
    # (generate once, use whenever communicating between this client and server)
    try:
        shared_secret = generate_shared_secret()
    except KEMException as e:
        raise RuntimeError(f'KEM failed, could not generate secret: {e}')

    # Encrypt request data
    request_text = 'Hello, Litestar!'
    nonce_b64, ciphertext_b64 = aesgcm_encrypt(request_text, shared_secret)

    # POST request
    data = {
        'client_id': str(CLIENT_ID),
        'nonce_b64': nonce_b64,
        'ciphertext_b64': ciphertext_b64
    }
    response = requests.post(f'{SERVER_URL}/example-endpoint', json=data)

    if response.status_code != 201:
        raise RuntimeError(f'Error {response.status_code}: {response.text}')

    response_data = response.json()
    nonce_b64 = response_data.get('nonce_b64')
    ciphertext_b64 = response_data.get('ciphertext_b64')
    if not nonce_b64 or not ciphertext_b64:
        raise RuntimeError('Missing parameters in response.')

    # Decrypt response data
    try:
        plaintext = aesgcm_decrypt(nonce_b64, ciphertext_b64, shared_secret)
        print(f'Client received: {plaintext}')
    except Exception as e:
        raise RuntimeError(f'Error: {e}\nFailed to decrypt response data.')
We also utilised physical environments to simulate scenarios where the QPG would be deployed, one such place was the Tech for Good lab in Malet Place 1.05. This approach helped us identify signal interference issues with the Raspberry Pi in places where there are many BLE devices around. We also integrated a manual testing framework, where as a team we would re-test the entire workflow, from registration to authentication once a big feature was added to the codebase.
Initial Integration Tests in Lab
Continous Integration (CI)
For our proximity agents desktop application, we made use of continuous integration (CI). It is widley used in modern software development, ensuring code changes integrate smoothly and function correctly. GitHub Actions was used to automatically trigger predefined workflows to build, test, and deploy our desktop application after commits were done. The workflow logs and status indicators provide immediate feedback on whether the integration was successful or if errors need to be addressed. This automated process helps us to catch issues early, improving reliability and streamlining development.
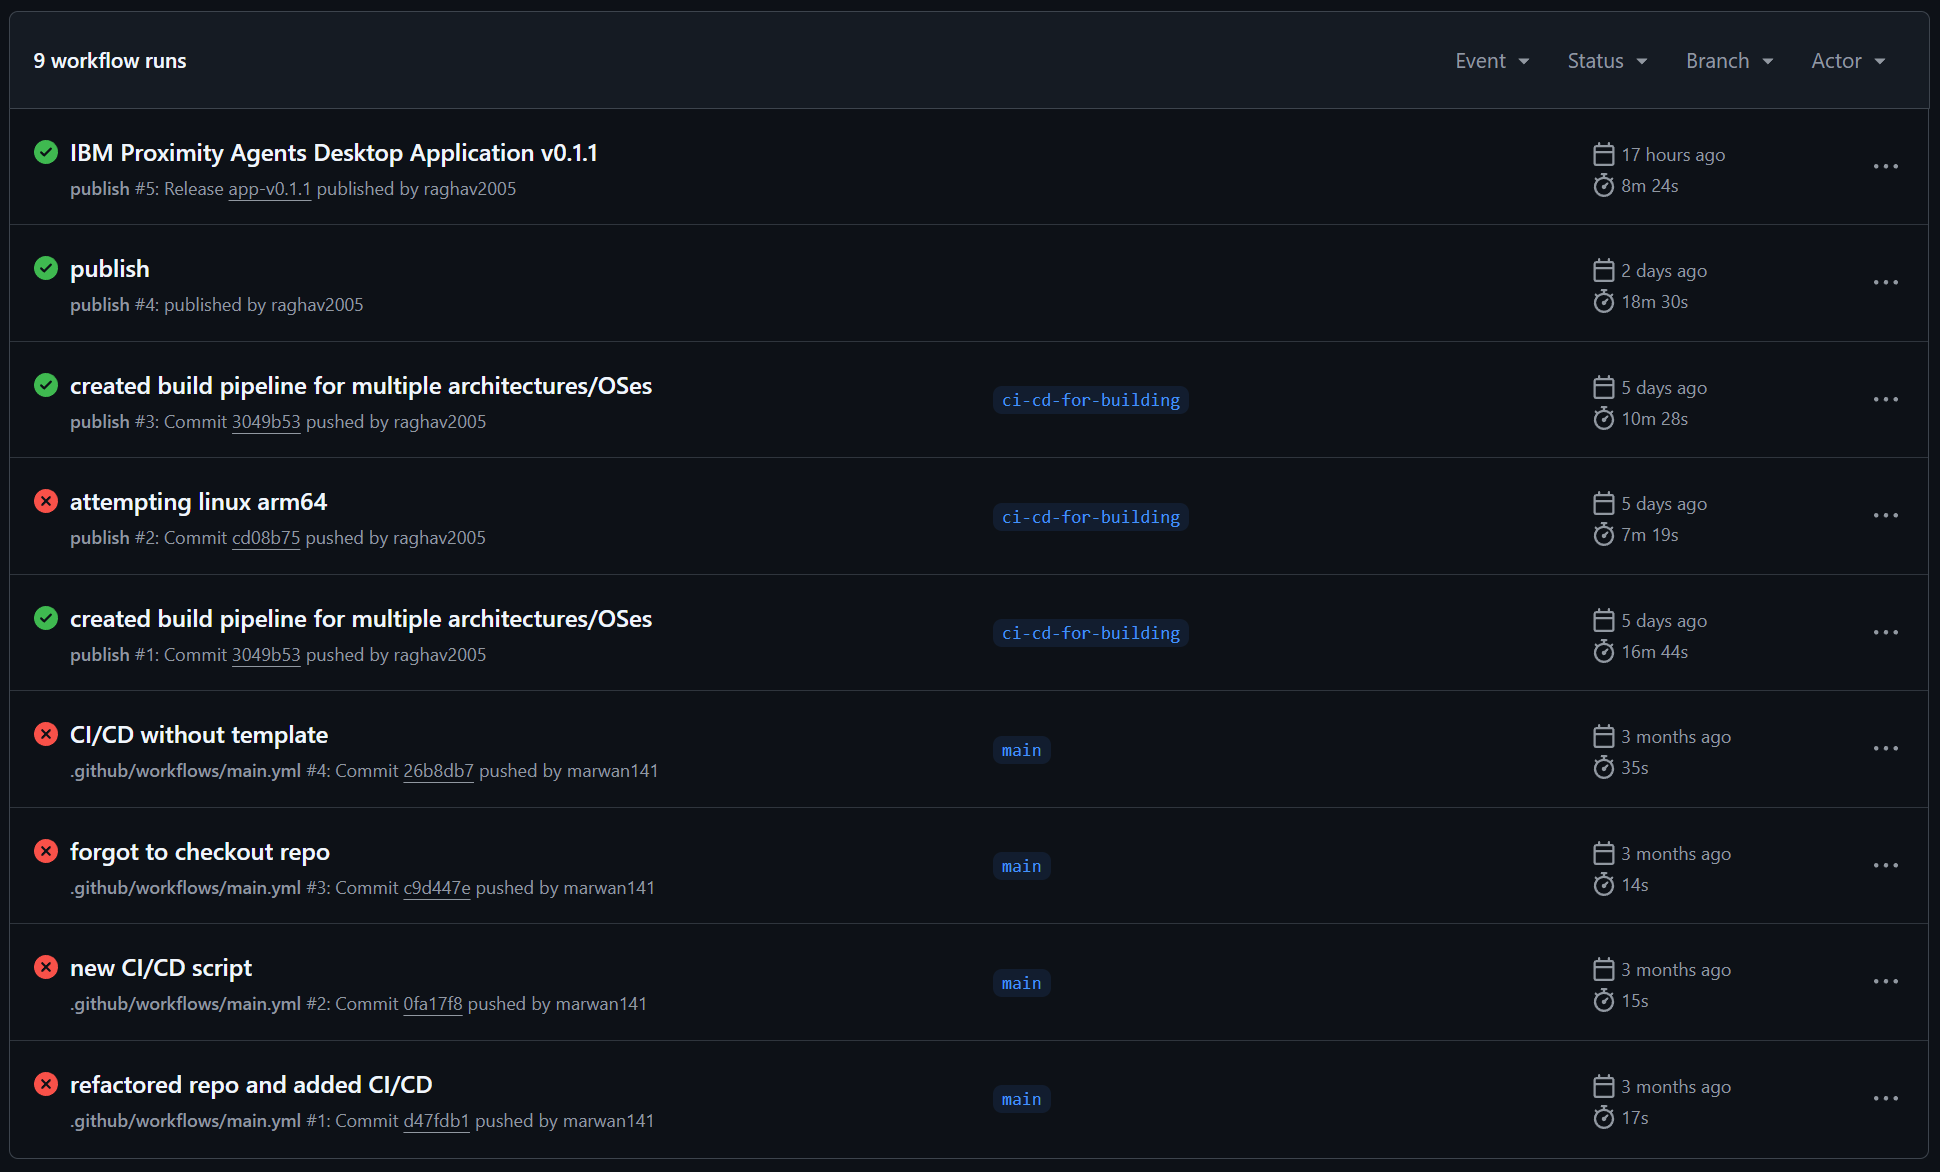
Figure 3: Continuous Integration
Compatibility Testing
IBM Proximity Agents
Our IBM Proximity Agents application was tested across multiple operating systems to ensure broad compatibility, although due to the limitations and restrictions of some operating systems, some features are not fully avaliable. However, the core functionality of the proximity-based agent is retained on all operating systems.
The high rate of compatibility was enabled by Tauri, which allowed us to easily create native applications on all platforms leveraging one single codebase.
| Operating System | Compatibility | Notes |
|---|---|---|
| MacOS | ✅ Compatible | Accessibility commands not available |
| Linux | ✅ Compatible | Full functionality utilising gsettings |
| Windows | ✅ Compatible | Accessibility commands not available |
Registration Site
We have also tested our registration site across multiple different environments. However, there are some issues regarding certain out-of-date browsers not natively supporting the Web Serial API, which is a core functionality of our website. This API allows us to directly communicate with the ESP32 during the registration process to share secret keys for TOTP and to read the MAC address of your device.
Fortunately, there are simple solutions available by using widely available extensions that expose the Web Serial API. For example, for Firefox users, we recommend using the WebSerial for Firefox extension.
| Browser | Compatibility | Notes |
|---|---|---|
| Chrome | ✅ Compatible | Full functionality utilising Web Serial API |
| Edge | ✅ Compatible | Full functionality utilising Web Serial API |
| Firefox | ⚠️ Lacking functionality | Communication using Web Serial API not natively supported. Extensions are available to fix this. |
Responsive Design Testing
As all of our frontends have been designed with accessibility in mind, the choice of utilising frameworks like Next.js have allowed us to keep a consistent design throughout multiple platforms and devices. We've implemented responsive layouts that automatically adjust to different screen sizes, from large desktop monitors to mobile devices. This approach ensures that both of our applications remain usable and visually coherent regardless of the device being used.
Responsively App
Responsive Design Testing
During development, we regularly tested our interfaces across various viewport sizes using development tools like ResponsivelyApp and other browser emulation tools. For our IBM Proximity Agents desktop application, we ensured the interface scaled appropriately with different window sizes, while our registration site was tested on multiple physical devices to verify its responsiveness in real-world conditions.
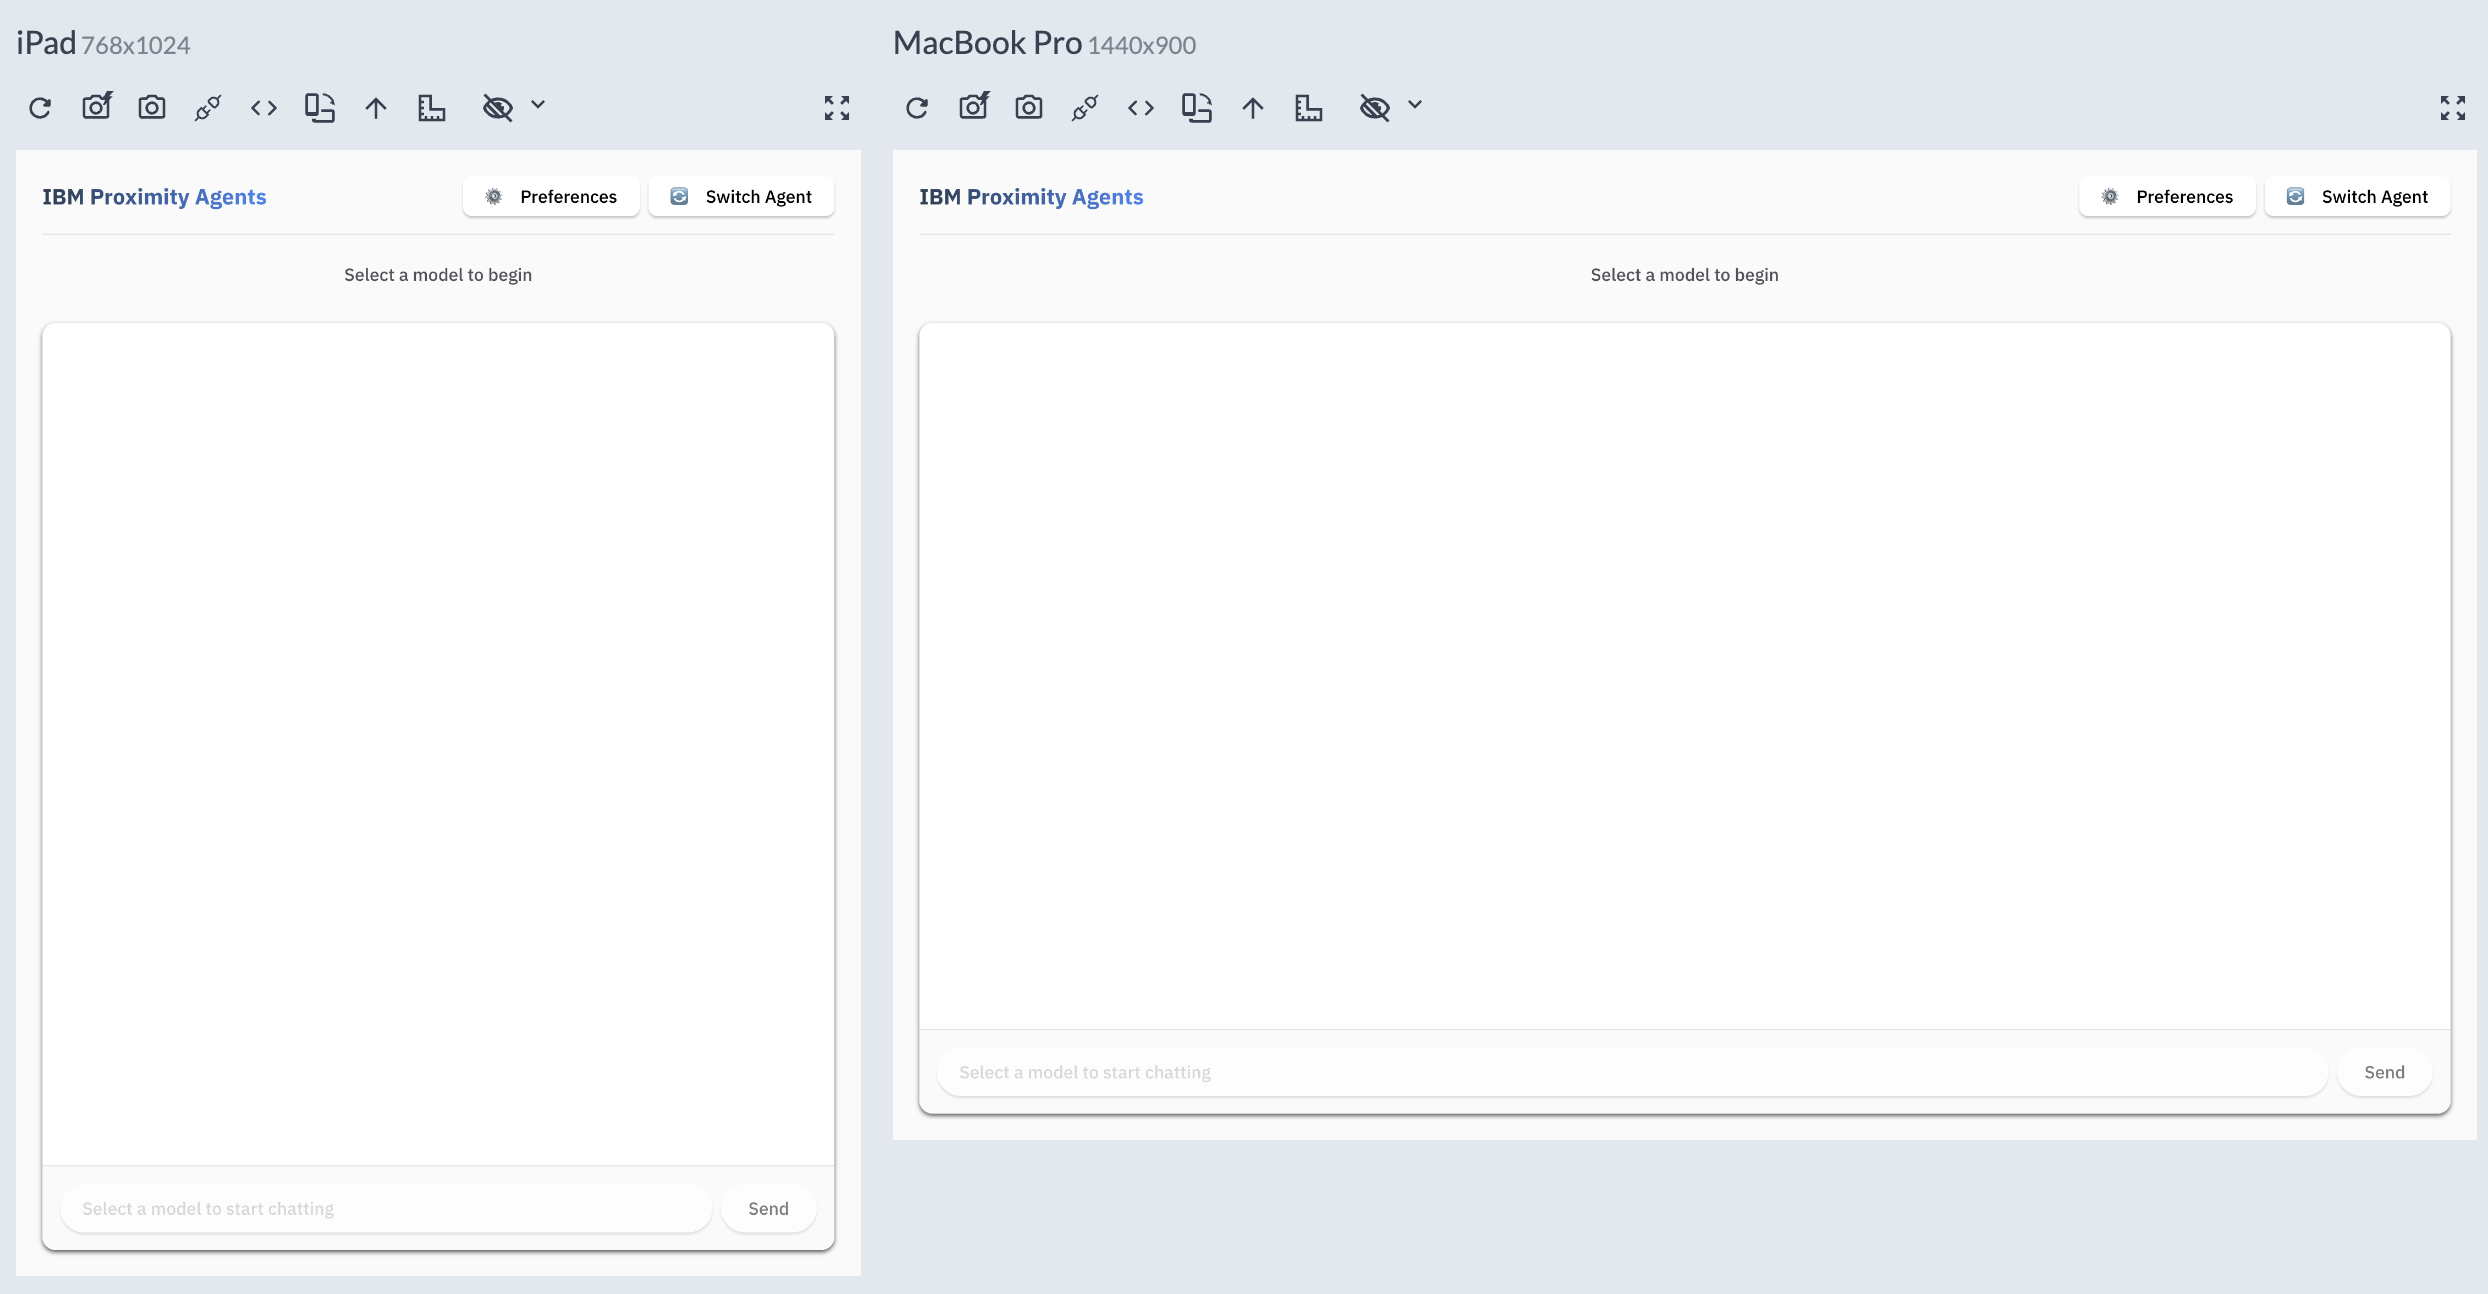
Figure 4: IBM Proximity Agents - Responsive Design Test
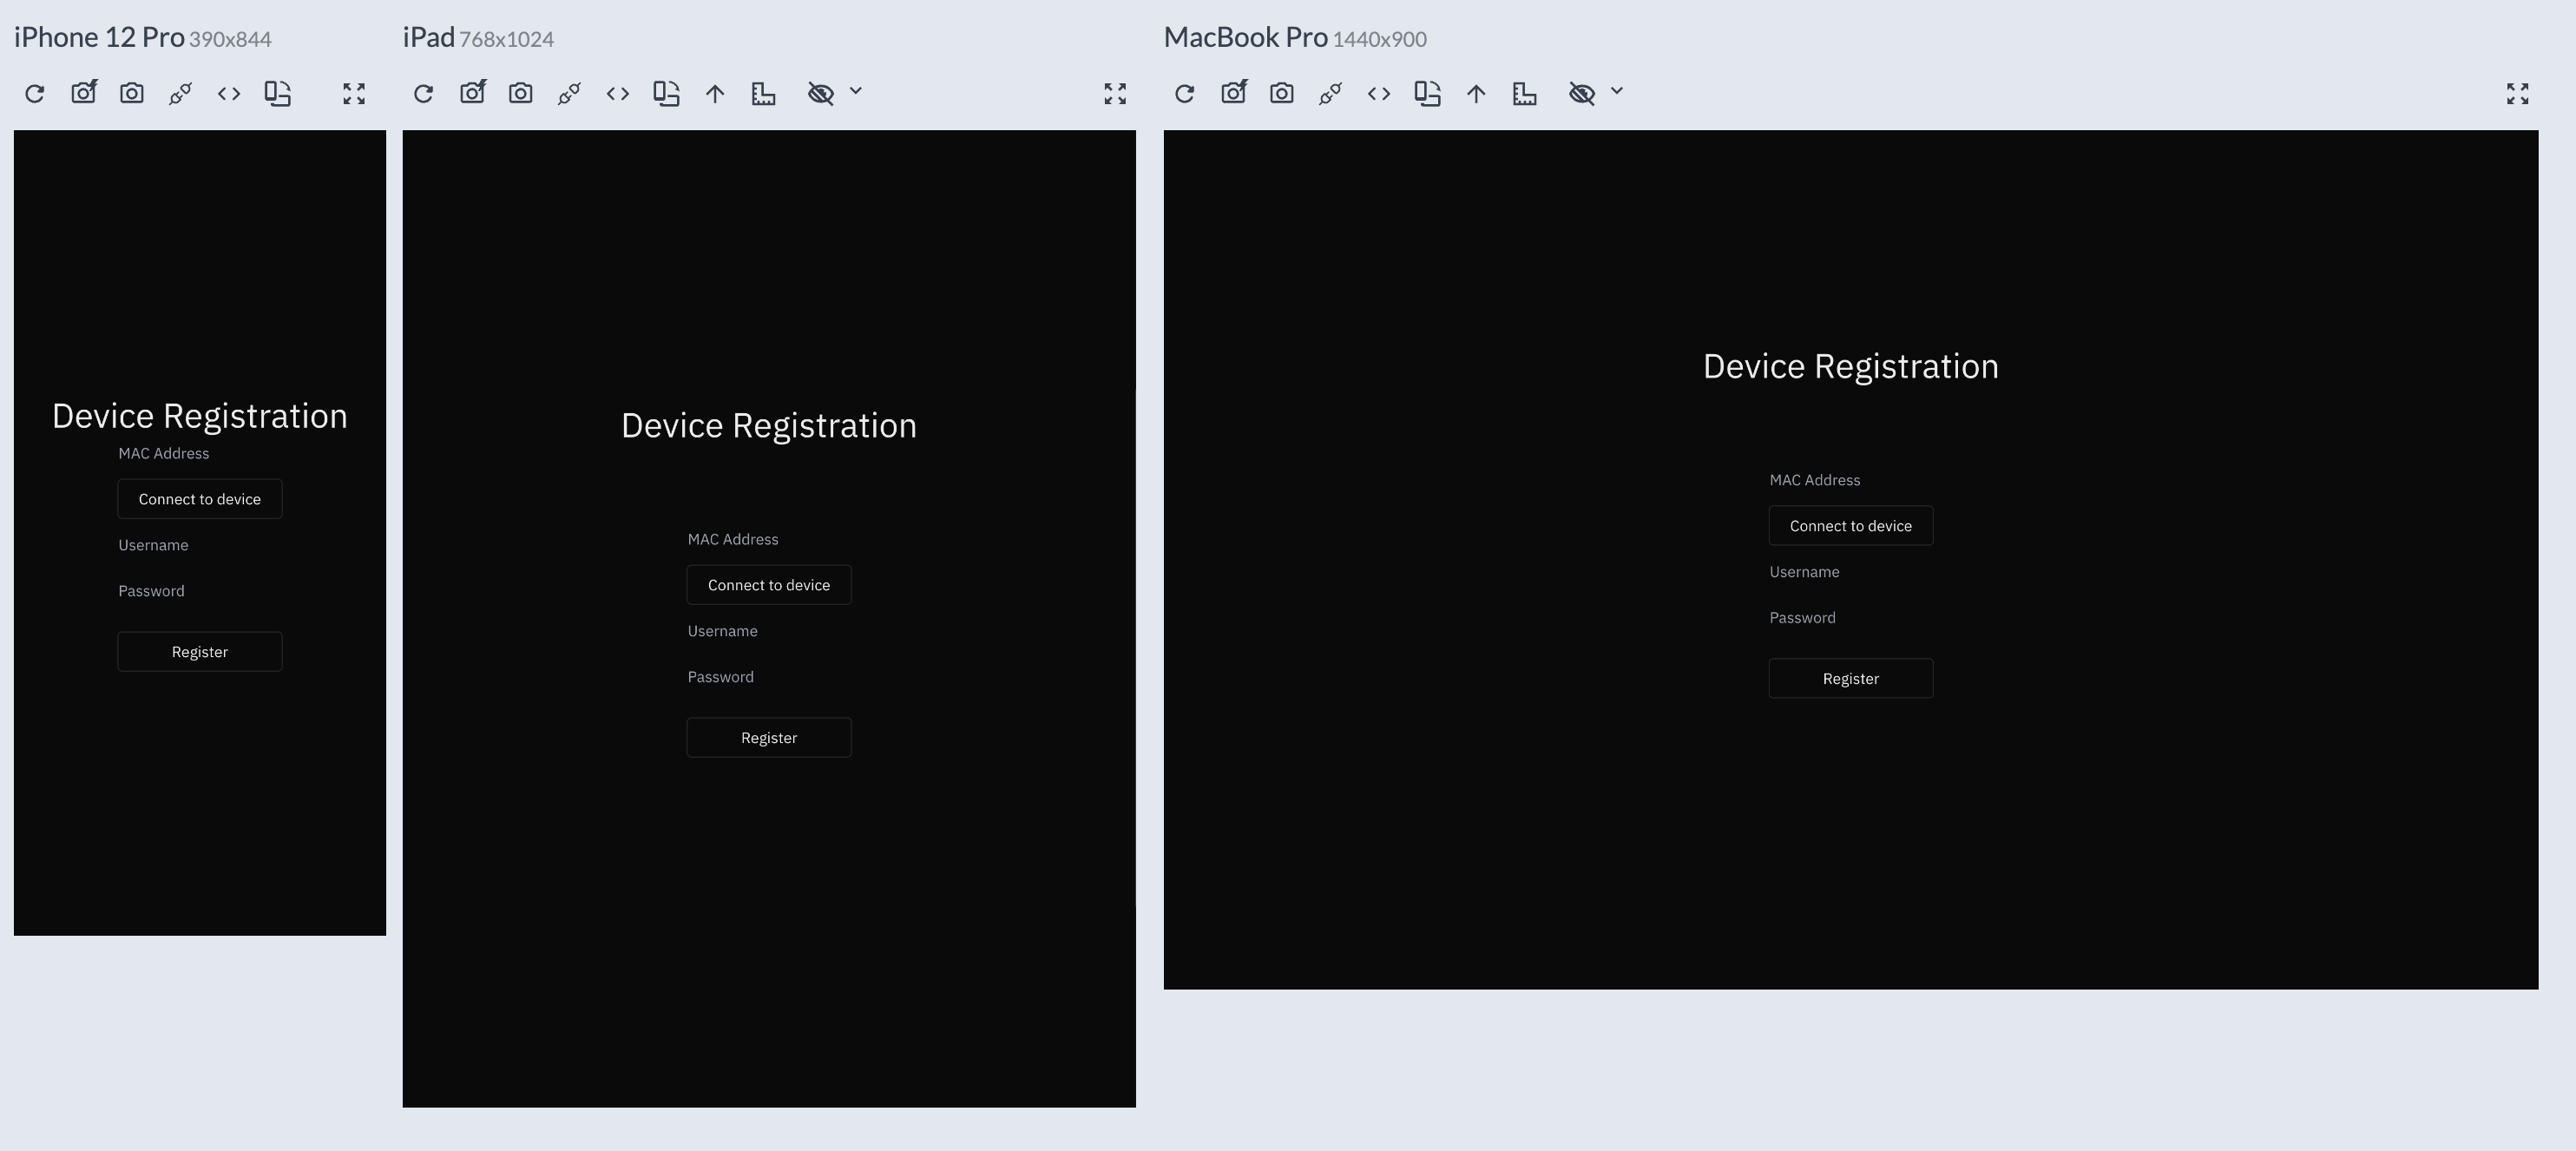
Figure 5: Registration Site - Responsive Design Test
Performance Testing
Ensuring that perfomance stayed optimal in our application was a priority we took as a team, specially considering the hardware we were using. As it is such a complex project, we needed to ensure that our code remained optimal and that we caught out any bottlenecks that may arise from unoptimized code. This applies more to the Raspberry Pi, which is a lot less powerful than the hardware the core server is meant to run on.
Initially, we were really concerned with the idea of "Post-Quantum Cryptography" running on limited hardware like the Raspberry Pi or the overhead it would add to typical operations on the server. So, as an experiment we created a performance test script which allowed us to view the overhead that such encryption mechanism would introduce to our codebase.
Post-Quantum Cryptography Performance Benchmarks
| Metric | Time (ms) |
|---|---|
| Minimum | 0.067 |
| Maximum | 3.354 |
| Mean | 0.078 |
| Median | 0.069 |
| 95th Percentile | 0.083 |
Complete KEM cycle operations (key generation, encapsulation, and decapsulation)
| Operation | Mean (ms) | Median (ms) |
|---|---|---|
| Encrypt | 0.015 | 0.009 |
| Decrypt | 0.009 | 0.008 |
Time to encrypt and decrypt messages using our EncryptionHelper
Overall, our results confirm that utilsing the liboqs implementation of the ML-KEM-512 key encapsulation algorithm alongside AES-GCM adds minimal overhead to the system, making it entirely feasible to deploy on resource-constrained devices like the Raspberry Pi.
In addition to small performance tests like the Encryption/Decryption test-suite, we also added middleware to our server that allows us to monitor bottlenecks in different functions on production code, which is done by a profiler that we have defined utilising the cprofile and pstats libraries in Python.
Desktop Application System Usage
Finally, our choice of using Tauri for a cross-platform application development ensured that our application size stayed low, and that the application was performant. Our final build for the Proximity Agents application on MacOS ended up being 14.3MB, whereas a simple application at a much smaller scale than ours made using other frameworks like Electron usually have a larger size of around 85MB, so using Tauri was definitely a good choice when it came reducing our performance footprint [1].
Testing the performance of the application on a Macbook Pro M2 Pro, revealed that the app was very usable on everyday devices such as a consumer-grade laptop, the only bottleneck the app has is the Ollama inferencing, which is to be expected as LLM inferencing is quite a big task that relies on dedicated GPU hardware. When the user is prompting the model, GPU utilization goes up to 94% and RAM utilization to 1.4GB, this was tested with Granite 3.2.
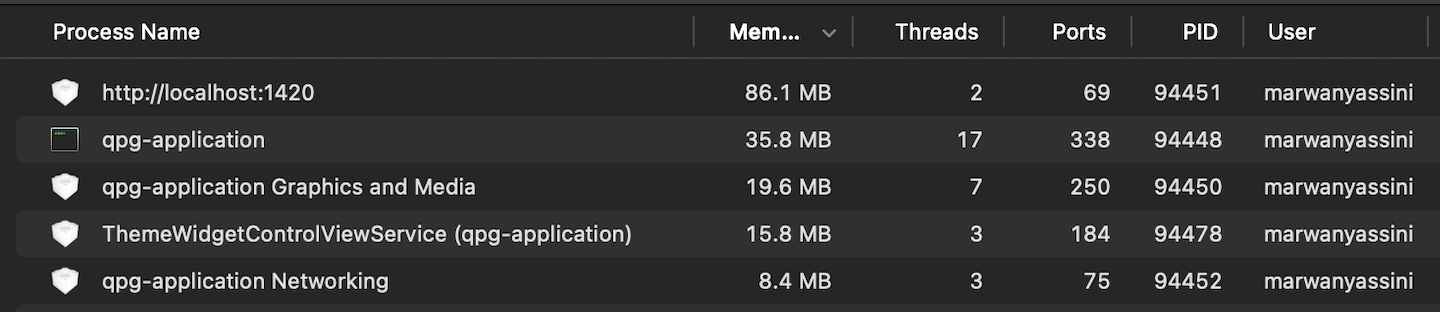
Tauri App Memory Usage

Tauri App CPU/GPU Usage
Ollama Memory Usage

Ollama CPU/GPU Usage
Performance monitoring of Proximity Agents and Ollama
User Acceptance Testing
Throughout the project, we have prioritised ease of use to ensure our system remains as user-friendly as possible. To achieve this, we involved multiple stakeholders in the development process, utilising different opportunities provided by outreach events to carry out structured testing sessions where we could gather actionable feedback and iteratively improve our designs.
We ensured our testing groups encompassed a diverse range of participants, from secondary school students to industry professionals, providing us with perspectives from both technical and non-technical users across different age groups and experience levels. This also allowed us to gain a wide range of perspectives on the usability of our project in different enviroments.
User Testing Sessions
User Testing Methodology
We employed a structured approach to user testing that combined task-based evaluation with qualitative feedback collection:
- We gave a quick overview of the project to participants to ensure they were given minimal instructions.
- We observed participants as they attempted to complete tasks with our system, such as registering their device, logging in, and interacting with the offline model.
- This approach helped identify different interaction patterns and unexpected obstacles users face.
- We tracked the time users required to complete each task and noted where users got stuck.
- This data really helped identify the most problematic areas of our interface and allowed us to gain insight into the issues with our UI design.
- We encouraged participants to verbalize their thoughts and expectations as they navigated the interface.
- This revealed mental models and assumptions that influenced how users approached our system.
- We debriefed with users and conducted short interviews after testing sessions.
- We gathered detailed insights on user experience and satisfaction with specific features.
- This helped us prioritize improvements based on user impact and expectations.
This methodology allowed us to identify both obvious usability issues and more subtle pain points that we may have missed with our perspective as technical users.
User Feedback
Key insights from our user testing sessions revealed both positive aspects and areas for improvement, we took a sample of 4 different users from different testing session, allowing us to get a wide range of opinions.
| Acceptance Requirement | Strongly Disagree | Disagree | Agree | Strongly Agree | Comments |
|---|---|---|---|---|---|
| Authentication process was seamless | 0 | 0 | 1 | 3 | ✅ Overall system often worked flawlessly |
| Registration process was intuitive | 0 | 1 | 2 | 1 | ❌ ESP32 pairing was buggy for some users |
| Bluetooth communication was reliable | 0 | 1 | 2 | 1 | ✅ Some interference issues in crowded environments, but reliable most of the time |
| Raspberry Pi setup was straightforward | 0 | 2 | 1 | 1 | ❌ Only technical users found it manageable, which was expected |
| Error messages were clear | 0 | 2 | 1 | 1 | ❌ Too much technical jargon in error messages |
| Would use this over passwords | 0 | 0 | 0 | 4 | ✅ Unanimous preference for proximity-based auth |
| Overall security perception | 0 | 0 | 0 | 4 | ✅ Users felt more secure with quantum-resistant methods and TOTP verification |
| ✅ Positive Feedback | ❌ Areas for Improvement |
|---|---|
Impressive integration of technologies, "Straight out of Star Trek" | ESP32 registration process was confusing and buggy during first-time setup |
Strong perceived security benefits that users appreciated | Error messages were cluttered and difficult to understand |
Convenient authentication once properly configured | Technical terminology confused non-technical users |
Time-saving capabilities praised |
Overall, users were impressed by the innovative technology, praising it's ease of use and seamlessness once installed on computers. Our main focus for improvements was making the system more intuitive and user-friendly, especially for non-technical users.
Closing the Feedback Loop
Based on user feedback, we implemented several significant improvements in the last weeks of development:
A few users found workarounds the registration website, which allowed them to sign up with an empty MAC address. We implemented stricter rules on the registration website and instructions to explain these restrictions.
We cleared up a lot of unnecessary debugging information on the Raspberry Pi and improved the logging framework by utilising the ColoredLogs library.
The proximity agents application got a complete redesign, making it look more modern and pleasing to users.
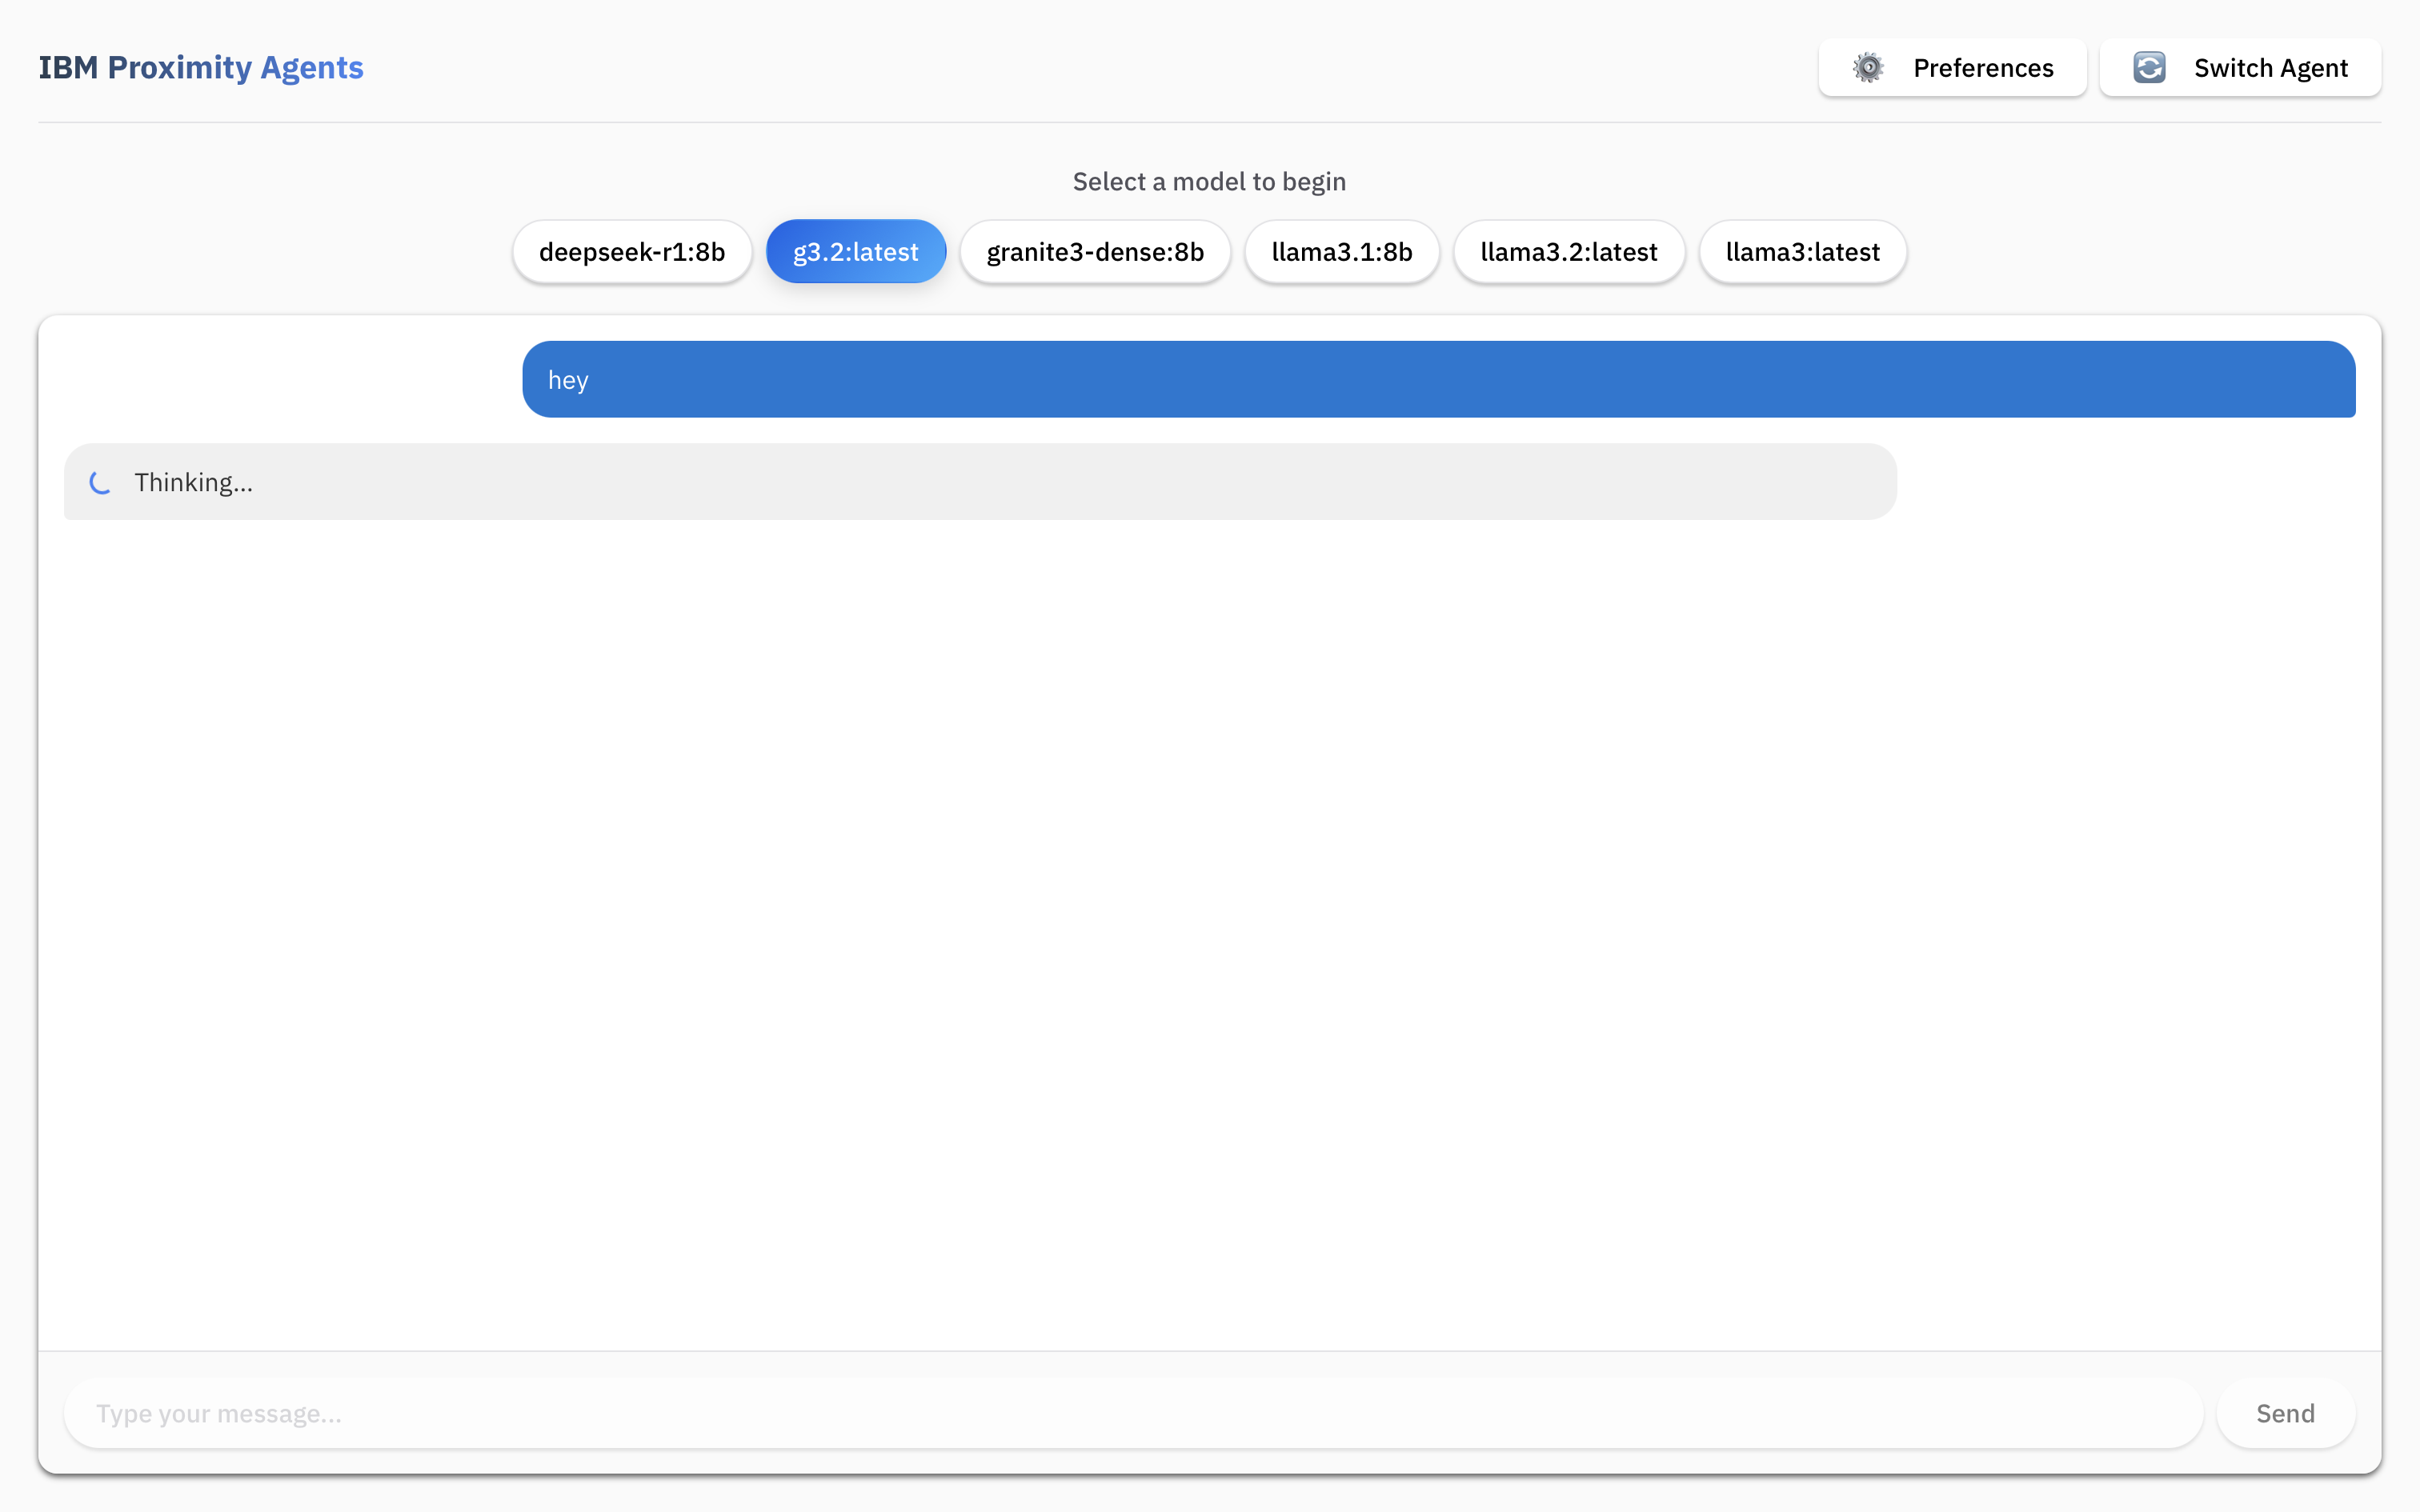
Figure 6: Redesigned IBM Proximity Agents UI with improved layout and visual clarity
After implementing these changes, follow-up testing showed significant improvements in task completion rates and user satisfaction scores, specifically users stopped finding workarounds the registration website and our UIs were received more positively overall.
References
- [1]Lőrik Levente, "Tauri VS. Electron - Real world application", Aug. 22, 2022. [Online]. Available: https://www.levminer.com/blog/tauri-vs-electron. [Accessed March 27, 2025].