PEACH Reality Webapp
Author: Laura Foody.
Screenshots


Completed Features
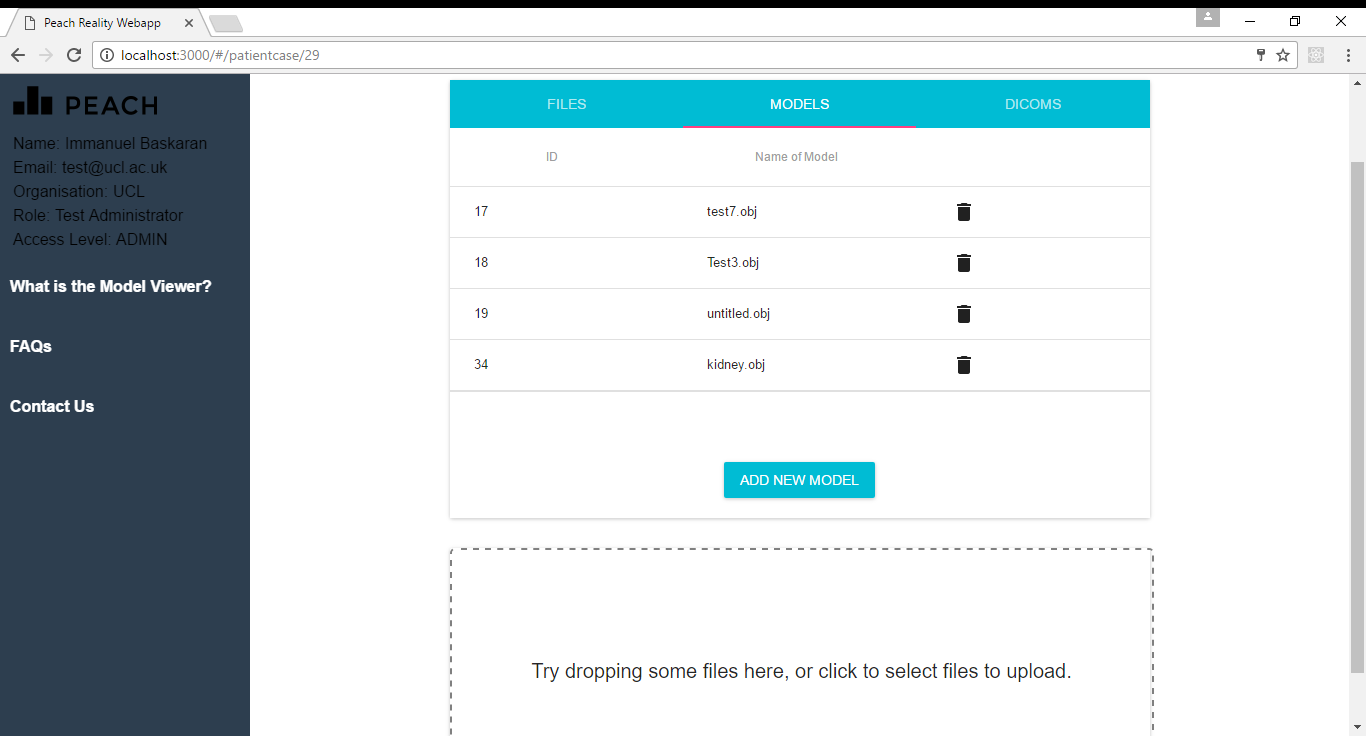
The required functionality of the webapp is essentially for all api endpoints to have requests made to them and the corresponding fucntionality to exist in the web app. Currently approximately 50% of the app is complete. A user is able to log in, and their user details will be displayed in the sidebar. They are then able to view all of their patient cases and also create a new patient case. Clicking on the button "View Case" will take them to a new page where they can view all the files, models, and DICOMs associated with that case and they can upload a new DICOM image. Additionally, if the user is an ADMIN, they are able to create a new user.
Incomplete Features + suggestions
Remaining to be implemented are all delete and edit functions. Currently a user cannot edit their details, or a patient case. They are also not able to delete patient cases, or the objects contained within it. Also there is currently no block to the "create a new user" page if you are not an admin, the ajax request will simply not execute correctly but the user would not be able to see that.
Once the other 50% of the functionality has been implemented there are a few different ways the app could be improved to enhance the quality of the user experience. The first way would be to be able to view the 3D model on the webapp itself as a user may not always have access, or time to access, a HoloLens and may therefore want to quickly view the model on their laptop. I also think it might be a useful feature for a user to be able to see changes being made by other collaborators to a patient case. So, in a similar way to Google Docs for example, a user would be able to see changes being made in real time by another collaborator and they would be highlighted in a colour.
Expansion
Besides adding the incomplete functionality there is very little room for expansion in the webapp. If new api endpoints were added (perhaps due to the addition of a new neural network dealing with different types of CT scans) then the webapp could be expanded to display new data. Additionally, full documentation could be added to the webapp; but otherwise most oppourtunity for expansion lies within the api itself.
Implementation Overview
Technologies Used
The app was built using react.js which is technically not a framework but a JavaScript library that works by changing the state of components [1] in order to change what the user sees. To deploy the app locally I used webpack which is a file bundler that "takes modules with dependencies and emits static assets representing those modules" [3]. In essence, it bundles your files together and packs them ready for the browser[4]. After bundling files togehter I used nodemon-browsersync-webpack-plugin to allow hot reloading when editing the app; meaning I didn't have to redeploy everytime I made changes. React is better written using jsx (complex JavaScript) instead of standard js (JavaScript) code but since browsers can only read js I needed to use Babel to translate my jsx into js [2]. I used babel-preset-react so that babel would correctly read and translate my code and then used webpack to ensure that all my code was translated my babel before being bundled. Another react library I used was react-router which allows for navigation between components without necessarily changing state; this in effect makes the webapp multipage. Since the webapp doesn't have a server I used hashHistory to make all the rendering happen client side instead of both client and server side. This meant that URLs were accessible directly instead of having to be accessed via a link. The downside to this is that the webapp appears to be a single page application to the browser and only the root page is bookmarkable.
All of the users' data is stored on the api because, as mentioned above, the webapp itself doesn't have a server; this means that http requests must be made to the api in order to retrieve data. I used the standard http library to make requests and then displayed the data by updating the state of the component. Since user sessions are not enabled on the api, the user must be re-authenticated every time a request is made. In order to abstract this from the user I stored the user's login details in local storage and retrieved them before making another request. The second request is made inside the callback of the authentication request and the Authorization header is set to include the authentication token.
I used three main libraries to design the how the webapp looked. The first of these is material-ui which is "a set of react components that implement Google's material design" [5]. I used this to make professional looking tables, forms, and the tab layout in image 3 for models, DICOMs, and files. It made designing the webapp much easier as it abstracted a lot of the css styling and meant I had to spend less time working on the webapps' appearance and could spend more time on the functionality. The other two libraries I used were react-sidebar and react-dropzone. I used react-sidebar for, obviously, the sidebar. I chose to use it over creating one using react-bootstrap because it meant the sidebar was it's own separate component which I could render separately from the rest of the page. The other technology: react-dropzone, was used to create a space where users can drag and drop files they wish to upload. Again, this helped to make adding the file upload functionality easier and also more professional looking; but it also improved user experience by making it easier for users to upload their files as dropzones are implemented on most sites where one can upload a file.
Design Patterns
Like all react.js webapps the user interface is made up of several (child) components which are then rendered in a parent component which is the entry point of the webapp. I then split those "child" components into two categories: containers and components. The containers contained all functional aspects of the child, and the component part contained the content of the child (page layout built using html tags). Each container would have one or more components rendered in it's render() function. For example: the container which displays a user's patient case contains the http request which requests the patient cases. When the patient cases are retrieved from the api the state "cases" is updated to store that data. "Cases" is then passed to the component "patientcases.js" via props where it is mapped into a table. I then also had a base component which rendered the header links and the sidebar component as a "wrapper" for the rest of the webapp.
Architecture Diagram
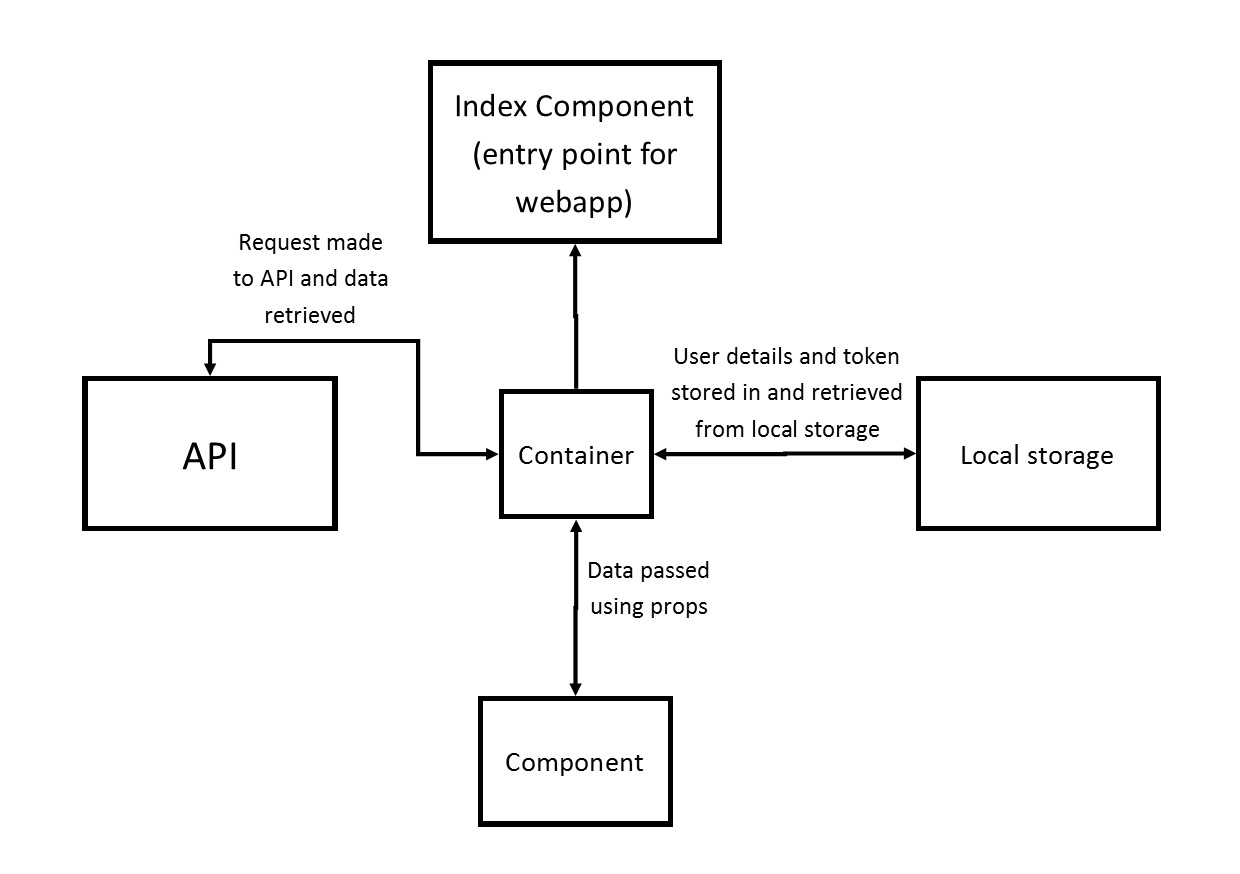
Diagram showing design pattern and exchange of data between webapp and API.
Instructions on how to Deploy
In order to deploy the webapp you must first initialise your direcory with npm using "npm init" and then install all the appropritate dependencies and dev-dependencies. The app requires two consoles to deploy. Assuming you have webpack installed globally, run "webpack" in the first console, and run "npm start" in the other. The webapp will then be available at localhost:3000.
User Manual
The first page a user will see is the login screen where they are prompted to enter their username and password. After clicking "login" they will be taken to their dashboard page which will list all their current patient cases and their user details will be displayed in the sidebar. A subtitle tells the user to scroll down to the "Add a new Case" form which is especially helpful if it is currently off screen. A user can create a new case by filling out the form and clicking "create patient case" which will then load an alert which prompts the user to refresh the page to view their changes. A user can then view the content of a case by clicking "View Case" next to the case they wish to view. This will load three tabs each containing either files, models, or DICOMs respectively. Clicking on each tab will load its corresponding data. They can upload a new DICOM by clicking "Add new DICOM" and then dragging and dropping the DICOM into the dropzone (a prompt in the dropzone tells the user how to do this). As within creating a case, an alert will prompt the user to refresh the page to view their changes. Lastly, if the user is an admin, they are able to create a new user by using the sign up form. This will create a new user that will also be able to use the system.
How we Tested & Evaluated
In order to evaluate the webapp I looked for an heuristic evaluation checklist for websites so that I could check my webapp against the criteria [6]. I picked five criteria, which have been pasted below, and then looked to see if the user interface met that criteria. My evaluation of those five criteria is:
Match between system and the real world: the system should speak the users' language, with words, phrases, and concepts familiar to the user.
MET: webapp will be deployed on the NHS system which is based in the UK therefore it makes sense that the webapp is in English. Buttons and tables are concepts familiar to all users.
Recognition rather than recall: minimise the user's memory load by making objects, actions, and options visible. The user should not have to remember information from one part of the dialogue to another.
MET: webapp contains layout and functionality that should be recognised by even unexperienced website users but also contains informative button labels, prompts, and alerts to assist the user at all points of site.
User control and freedom: users often choose system functions by mistake and will need a clearly marked "emergency exit". Support undo and redo.
NOT MET ENTIRELY: links are available for users to return to previous page however delete functionality hasn't been implemented therefore if they were to upload an incorrect file they would not be able to delete it.
Help users recognise, diagnose, and recover from errors: error messages should exist in plain language
NOT MET: error messages have not been added yet to the webapp therefore if an error occurs a user would not be able to identify it
Aesthetic and minimalist design: dialogues should not contain information which is irrelevant or rarely needed
MET: the webapp has a very minimalistic design and the material-ui library makes it aesthetically pleasing. Information given is straight to the point and always useful to the user.
So to conclude evaluation, as you can see, the webapp meets most criteria and the criteria it doesn't meet is mostly due to incomplete functionality. Better communication between the state of the system and the user is clearly required so that users are able to see when an error has occured and why that is so that they are able to change what they did wrong (if it was their fault). Otherwise the webapp does well in the heuristic evaluation.