Testing
Overview
There are several testing stages throughout the development of this project, namely Unit tests, integration testing and system testing. An example of the test would be checking whether the console and a simply UI works well.This requires the manual test to be performed by the developer. But as the system grows, there will be a need for a more systematic and organised way to test our data. So we have planned some of the testing strategies for future use.
Experiment Log
| Number | Date | Title | Details | Outcome | Participants |
|---|---|---|---|---|---|
| 1 | 10/11/2016 | Setup a cloud server | To create a server on Digital Ocean to start our app | Successful | Nancy |
| 2 | 15/11/2016 | Building the UI using HTML and CSS | To create a neat and clear UI for testing and prototyping | Successful | Angela |
| 3 | 20/11/2016 | Generating Archetypes | Using OpenEHR Archetype Editor to generate archetype | Successful | German |
| 4 | 02/12/2016 | Create an operational template | Generate opt file from template generator to be used for testing the form generator | Successful | German |
| 5 | 03/12/2016 | Parser Prototype | Using Javascript to parse the data of the template and assign them to variables | Successful | German |
| 6 | 04/12/2016 | Markup Generator Prototype | To generate a markup file based on given a sample operational template | Successful | Angela |
Integration Testing
For this project, we are using GitHub as our version control system (VCS). Our Gitlab repository has several branches for experimental purposes. Integration testing will be performed every time we merge the branches to ensure that each of the components are integrated perfectly. It points out conflicts so that nothing important will be replaced and cannot be reverted. While we are building the same system, there will be some code overlapping with each other and VCS prevents the damage of code. We each work on our branches when the basic UI is finished and each trying to finish our own functionalities.Then we merge the branches to see if the code works and any other modifications is needed.

Functional Testing
Functional testing will be performed towards the end of the project to ensure that the final delivery of product meets the requirement from our client. We uploaded different types of files to make sure only opt files get accepted. Then we choose a few templates with different field types to check if it is rendering properly. Also for the fetching templates functionalities, we print the object being fetched in the console to show if it is correct.
User Acceptance Testing
When the system is deployed to the azure server, we asked Navin, our client, to test it, in order to compare the functionalities our system has with the ones listed on the requirment specifications. Also he can give further suggestions on the future development which we can added to the system mannual for future maintanence.
Composition API Calls testing
1. Open EHRScape Session with a Postman tool.
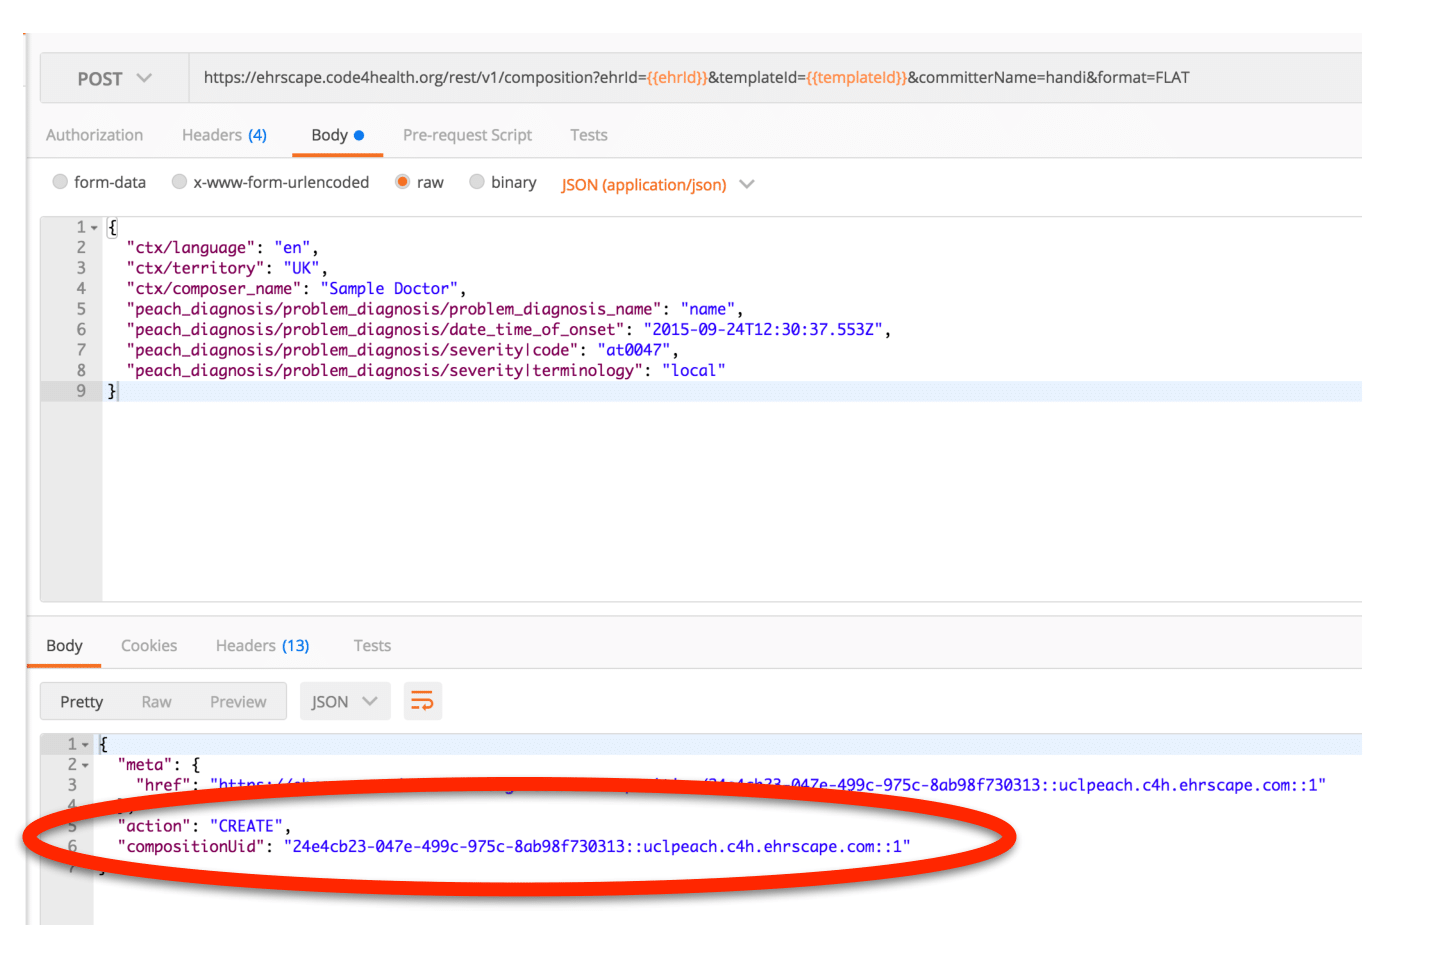
2. Paste the API body call generated by the Form Builder into the “POST Template request”, press “Send”. The API request is performed successfully and the record is added to the database
Original Prototype Testing
1. Set up Cloud Server
We build a test server on Digital Ocean just to check if it would work. We choose Digital Ocean because it is easy to use and we have credit from github student pack so that we don’t have to pay extra. The final server will be azure sponsored by UCLH.
Digital Ocean allows us to generate automatic backup and private server which makes the whole project more secure as it is relate to some confidential information.
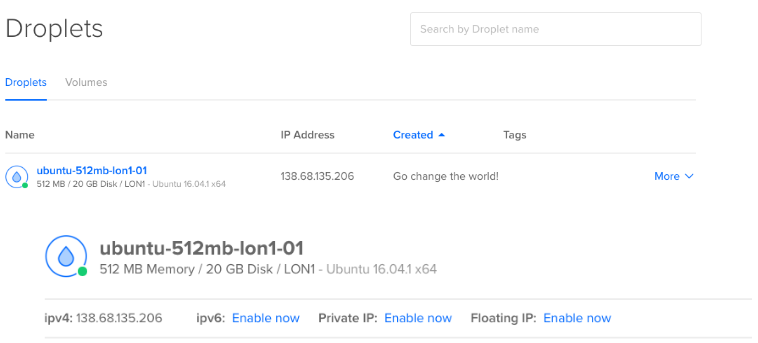
We tried to bind the IP address to a domain so that we can get access to the domain by url. Overall, the whole server end and domain end is functioning so when the client gives us the official server, we can move our project to that one later.
2. Building UI using HTML and CSS
One of the core objectives of our team is to deliver an enjoyable and comfortable user experience. A key facilitator of that is a clear and attractive user interface. The code below demonstrates the structure we use in constructing frontend HTML and CSS in this prototype. Not that usually CSS is stored in a separate file.
<!DOCTYPE>
<html>
<head>
<script type="text/javascript" src = "parser.js"></script>

<style type="text/css">
.form-style-9{
    max-width: 450px;
    background: #FAFAFA;
    padding: 30px;
    margin: 50px auto;
    box-shadow: 1px 1px 25px rgba(0, 0, 0, 0.35);
    border-radius: 10px;
    border: 6px solid #305A72;
}
.form-style-9 ul{
    padding:0;
    margin:0;
    list-style:none;
}
.form-style-9 ul li{
    display: block;
    margin-bottom: 10px;
    min-height: 35px;
}
.form-style-9 ul li  .field-style{
    box-sizing: border-box;
    -webkit-box-sizing: border-box;
    -moz-box-sizing: border-box;
    padding: 8px;
    outline: none;
    border: 1px solid #B0CFE0;
    -webkit-transition: all 0.30s ease-in-out;
    -moz-transition: all 0.30s ease-in-out;
    -ms-transition: all 0.30s ease-in-out;
    -o-transition: all 0.30s ease-in-out;


}.form-style-9 ul li  .field-style:focus{
    box-shadow: 0 0 5px #B0CFE0;
    border:1px solid #B0CFE0;
}
.form-style-9 ul li .field-split{
    width: 49%;
}
.form-style-9 ul li .field-full{
    width: 100%;
}
.form-style-9 ul li input.align-left{
    float:left;
}
.form-style-9 ul li input.align-right{
    float:right;
}
.form-style-9 ul li textarea{
    width: 100%;
    height: 100px;
}
.form-style-9 ul li input[type="button"],
.form-style-9 ul li input[type="submit"] {
    -moz-box-shadow: inset 0px 1px 0px 0px #3985B1;
    -webkit-box-shadow: inset 0px 1px 0px 0px #3985B1;
    box-shadow: inset 0px 1px 0px 0px #3985B1;
    background-color: #216288;
    border: 1px solid #17445E;
    display: inline-block;
    cursor: pointer;
    color: #FFFFFF;
    padding: 8px 18px;
    text-decoration: none;
    font: 12px Arial, Helvetica, sans-serif;
}
.form-style-9 ul li input[type="button"]:hover,
.form-style-9 ul li input[type="submit"]:hover {
    background: linear-gradient(to bottom, #2D77A2 5%, #337DA8 100%);
    background-color: #28739E;
}
</style>

</head>
<body>

<form class="form-style-9">
<ul>

<li>
<textarea name="field5" id = "fileinput" class="field-style" placeholder="OTP file"></textarea>
</li>
<li>
<input  type="button" onclick="uploadXML()" type="submit" value="Generate form" />
</li>
<li>
	<textarea  id = "fileoutput" class="field-style" placeholder="markup file"></textarea>
</li>

</ul>
</form>
</body>
</html>
3. Generating Archetypes
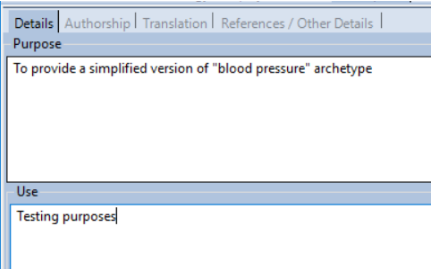
1. Launch Archetype editor. Choose the type of component and provide a label for the new archetype.
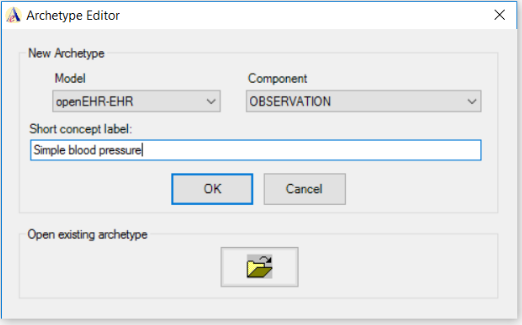
2. Fill in the rest of information about the new archetype.
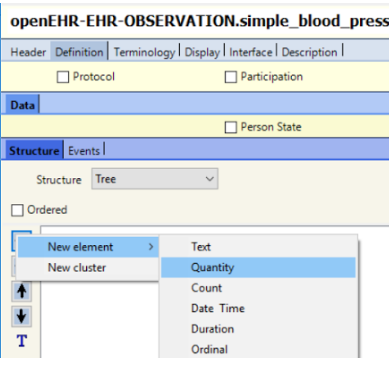
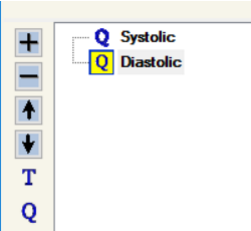
3. Switch to “Definition” tab. In the left-hand menu press the “+” icon to add a new element to the archetype. Select “New element” -> “Quantity” type.
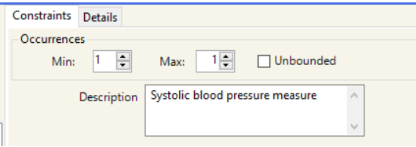
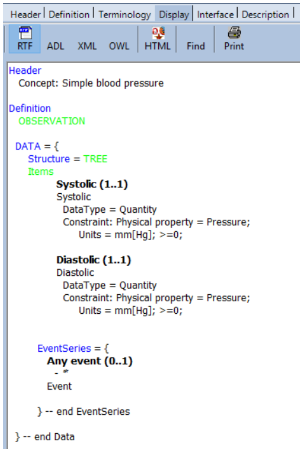
4. Set the name of archetype to “Systolic”. Provide description of data the element will hold. Make the field compulsory and unique - set the number of minimum and maximum occurrences to 1.
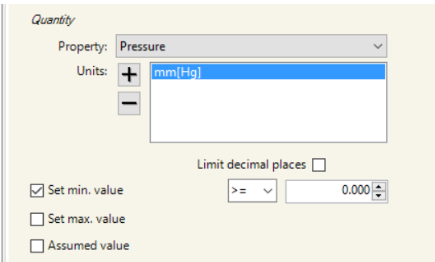
5. Set the type of data for the field to millimeters of mercury. Set minimal value to zero.
6. Repeat steps 2 to 5 to create “Diastolic” field.
7. Switch to “Display” tab and check that the structure of the
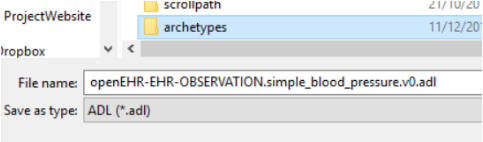
8. In the top menu, press “File” -> “Save as” and save the archetype in a directory of your choice.
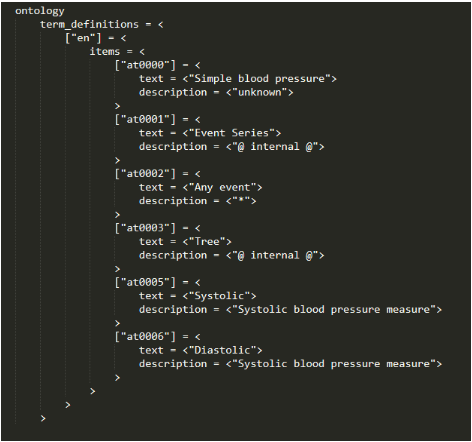
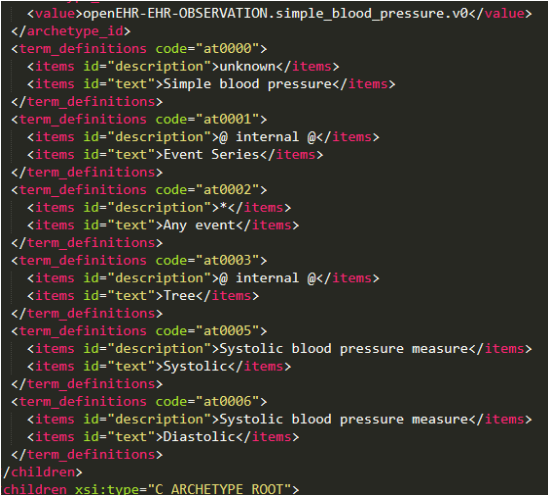
9. Open the archetype file with a text editor of your choice. As it can be seen, the file has appropriate ontology structure, containing fields for systolic and diastolic blood pressure.
4. Create an operational template
1. Create an archetype for simple body temperature containing only one field - “Temperature”. The field is mandatory and is expressed in degrees Celsius. Place it in the same directory with simple blood pressure.

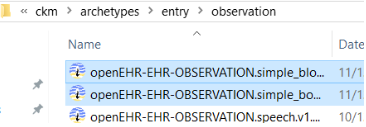
2. Move the archetypes to the “entry/observation” directory of archetype repository which chosen on Designer install.
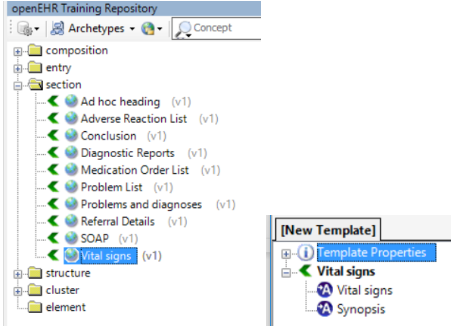
3. Launch Template Designer. From the left-hand side menu, drag and drop “Section” archetype into template area. It will serve as a placeholder for other archetypes.
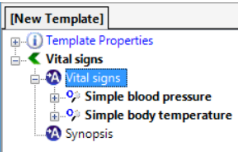
4. One by one, drag and drop simple blood pressure and temperature to the “Vital signs” placeholder. They can be found in “entry/observation” directory.
5. In the top menu, choose “File” -> “Export” -> “as Operational Template”. Set name for the new template and a location where it will be saved. Press “Export”.

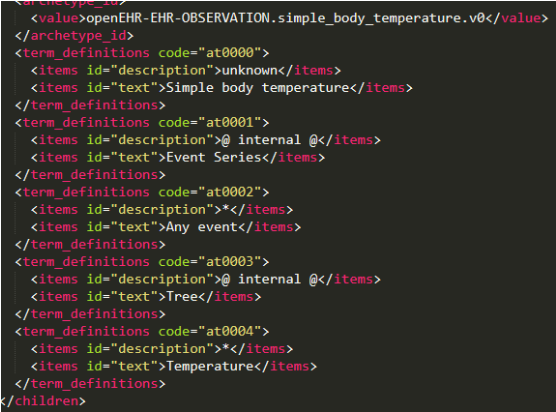
6. An .opt file is created which is created using XML structure. Open the file with a text editor of your choice. The file contain definitions for both of the archetypes that were added to it.
5. Parser Prototype
Configuring running environment
In order to successfully develop and run the application, we needed to set up an appropriate environment for it. The core requirement for successfully using HTTP requests on XML template is to set up a local HTTP server, as HTTP requests cannot access local files. The solution we used is an http-server provided by npm. Npm is a package manager that is installed together with Node.js. Then, to install http-server, run the following command in terminal:
After the installation process, to launch the server in a certain folder, navigate to the folder through terminal and type:
After this, the server can be accessed on http://localhost:8080
The Prototype
This prototype demonstrates an approximation of how an actual Operational Template file is going to be parsed before a markup is created. Note that in this example Electrode library is not used yet, as a sole purpose of this prototype is to demonstrate an approach which will be taken in the future
First of all, an XML template that resembles a simplified version of an Operational Template is requested via an HTTP request. Here, it contains the two archetypes that were created in previous experiments - “Blood Pressure” and “Body Temperature”.
<!--Sample Template File-->
<?xml version="1.0"encoding="UTF-8"?>
<template>
    <archetype>
        <name>Blood pressure</name>
        <elements>
            <element>
                <name>Systolic</name>
                <type>Integer</type>
            </element>
            <element>
                <name>Diastolic</name>
                <type>Integer</type>
            </element>
        </elements>
    </archetype>
    <archetype>
        <name>Body temperature</name>
        <elements>
            <element>
                <name>Temperature</name>
                <type>Integer</type>
            </element>
        </elements>
    </archetype>
</template>
function uploadXML() {


    var request = new XMLHttpRequest();


    request.onreadystatechange = function() {
        if (this.readyState == 4 && this.status == 200) {
            parser(this);
        }
    };


    request.open("GET", "sample_template.xml", true);
    request.send();
}
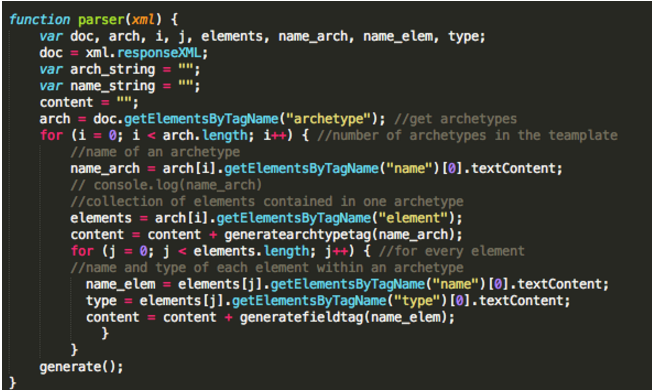
If the file was received successfully, then parsing begins. As a core of the prototype standard JavaScript XML DOM library is used. First, an array of all archetypes in a template is created:
doc = xml.responseXML;
arch = doc.getElementsByTagName("archetype");
Then, for each array its name is saved:
name_arch = arch[i].getElementsByTagName("name")[0].textContent;
As well as an array of elements that are contained in this archetype:
elements = arch[i].getElementsByTagName("element");
And then, for each element its name and type are extracted.
 name_elem = elements[j].getElementsByTagName("name")[0].textContent;
 type = elements[j].getElementsByTagName("type")[0].textContent;
Later on, data from these variables will be used to determine, which markup elements need to be constructed in order to successfully create a new form.
6. Markup Generator Prototype
For the generation of the mark up file, we choose HTML language because it can automatically be browsed by a browser which makes the testing part easier. Also it is the mostly used so we are more familiar with the language itself.
As we are using agile development, we will show the markup file to our client to see it is good enough and we can make alterations based on that but so far HTML is our choice.
Inside the code, we have validation part and the generation part. Generation part is to generate all tags and add attributes. All the archetypes will first be stored in an array which is sending by the parser method. The array will focus on the name and the type of the attributes. Then the HTML input form will be based on the array with certain format that allows the user to post data into database of the openEHR.
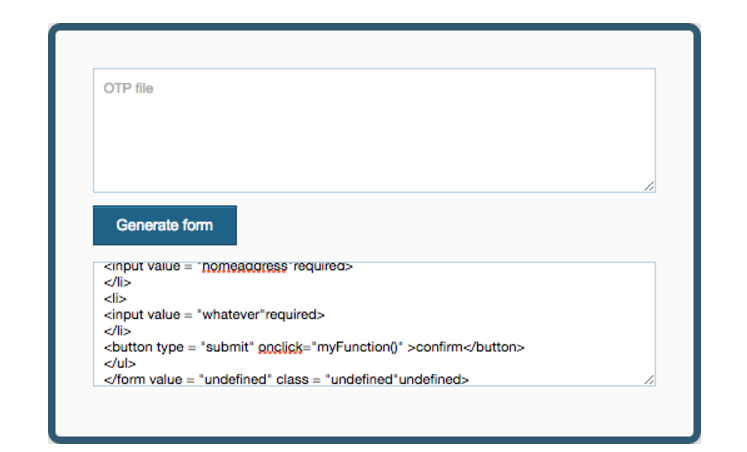
The template which needs to be parsed is labelled as OTP file and all the template content goes to that. Then the user can click generate form to obtain an HTML file.
In the future, those two text areas will be changed into upload and download but so far for the prototype, we will just use pure text to make everything clearer.
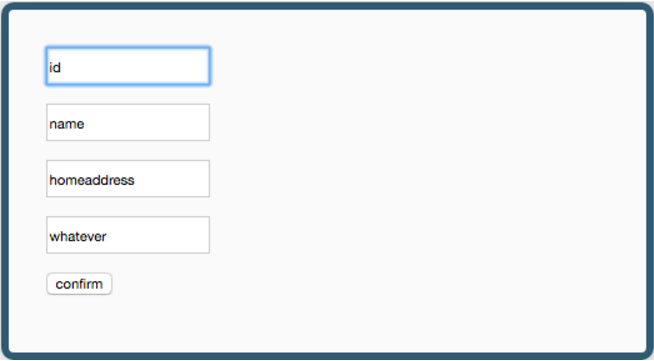
The output file will look like below in the google chrome browser. It has fields that allows the user to input data and if they click submit, it will be automatically stored into the database.
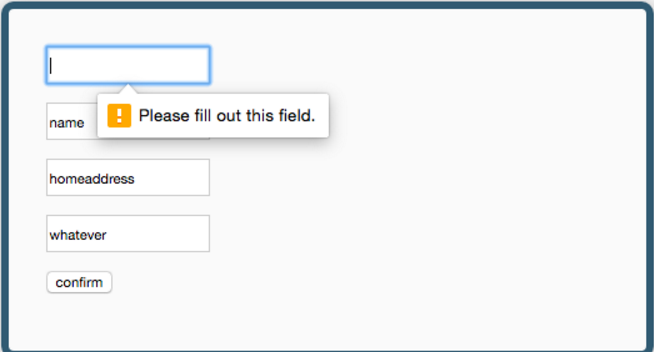
Data validation part is to make sure the user input his information in the way openEHR wants. Here is a simple example. If the user leave one input box blank, there will be an error alert and the form will not be stored until the user make any changes.
Conclusion
In our prototype, we reached the goal of parse the template and generate markup files out of it in the meantime. We’ve manage to put two prototype together by generating tags while parsing. Then it allows us to dynamically generate forms according to different amount and types of archetypes and fields.