Implementation

User Interface

Tools

Main class for loading UI is written in Python.

PySide2 widgets and Qt style sheets used to design UI for app.

Explanation

The main class that loads the UI is the MainWindow class seen below. It sets up all the separate pages. The actual code for these is in their own individual files. The MainWindow class is instanced which loads in the app starting with the sign in page.

                        
    class MainWindow(QMainWindow, Ui_SignInPage):
        def __init__(self):
            Ui_SignInPage.__init__(self)
            Ui_RegisterPage.__init__(self)
            Ui_HomePage.__init__(self)
            QMainWindow.__init__(self)
            self.ui1 = Ui_SignInPage()
            self.ui2 = Ui_RegisterPage()
            self.ui3 = Ui_HomePage()
            self.lowerFilePath = None
            self.upperFilePath = None
            self.sextantFilePath = None
            self.imageViewer = ImageViewer()
            self.startSignInPage()
            
        def startSignInPage(self):
            ...
        
        def startRegisterPage(self):
            ...
        
        def startHomePage(self):
            ...


The actual UI code for each page has its own class that inherits the MainWindow class from above. This works as the base window for each page. The UI consists of PySide widgets and layouts. For example, here is how we created a register button with PySide2.

                        
    self.register_button = QtWidgets.QPushButton(self.centralwidget)
    self.register_button.setObjectName("register_button")
    self.register_button.setFixedWidth(300)
    self.register_button.setFixedHeight(60)
    self.register_button.setFont(text_font)
    self.register_button.setStyleSheet("QPushButton {\n"
                                    "    border-radius: 5px;\n"
                                    "    background:#8DCBE6;\n"
                                    "    color: #111111;\n"
                                    "}\n"
                                    "\n"
                                    "QPushButton::hover {\n"
                                    "    background:#AEE2FF;\n"
                                    "    color: #111111;\n"
                                    "}")


Besides, we use custom widgets provided by the library called QT-PyQt-PySide-Custom-Widgets to simplify the UI development process. To be specific, we used the QStackedWidget and QCustomSlideMenu instance. QStackedWidget allows us to integrate home page, view page and analysis page in the same window. Whereas QCustomSlideMenu lets us implement the add patient details function as a side bar in the window. This is how QStackedWidget is used in our app.

                        
    "QStackedWidget":[
    {
        "name":"pages",
        "transitionAnimation":[
            {
                "fade":[
                    {
                        "active": false,
                        "duration":1000,
                        "easingCurve": "Linear"
                    }
                ],
                "slide":[
                    {
                        "active":true,
                        "duration": 100,
                        "direction": "horizontal",
                        "easingCurve": "Linear"
                    }
                ]
            }
        ],
        "navigation":[
            {
                "navigationButtons":[
                    {
                        "homeButton": "homePage",
                        "viewButton": "viewPage",
                        "analysisButton": "analysisPage"
                    }
                ]
            }
        ]

    }
]



Image Processing

Tools

Class and functions to integrate image viewing tools into UI.

Processing and displaying STL and PLY files is done with Open3D.

Win32GUI library allows for Open3D to function with PySide2 on Windows.

Explanation

Our app renders 3D STL and PLY files using the Open3D library. We implement these capabilities in a single ImageViewer class. This is mainly done through the Visualizer class which lets us render 3D point cloud models. In the viewing page, we provide dentists with the ability to hide part of the teeth model (ie. hide upper jaw or lower jaw) for clearer observation of the teeth model.

                        
    def initialise_viewer(self, ui):
        self.mainWindow = ui
        self.widget = ui.widget_3
        self.layout = ui.widget_3_layout
        self.vis = o3d.visualization.Visualizer()
        self.vis.create_window(visible=False)
        if self.meshLower:
            self.vis.add_geometry(self.meshLower)
            self.lowerPresent = True
        if self.meshUpper:
            self.vis.add_geometry(self.meshUpper)
            self.upperPresent = True
        hwnd = win32gui.FindWindowEx(0, 0, None, "Open3D")
        window = QWindow().fromWinId(hwnd)
        windowcontainer = self.createWindowContainer(window, self.widget)
        self.layout.addWidget(windowcontainer, 0)
        self.layout.setContentsMargins(0, 0, 0, 0)
        timer = QTimer(self)
        timer.timeout.connect(self.update_vis)
        timer.start(1)
    
    def update_vis(self):
        ...
    
    def load_mesh(self, lowerFilePath=False, upperFilePath=False):
        ...
    
    def reset_view(self):
        ...


We create a window in the background within which we load in the point cloud models if specified. Then we get the window ID using Win32GUI library to merge it into a PySide2 widget and make the window visible again. This begins the timer that runs the update_vis function that renders the models.

Communication

Tools

Back-end logic for data requests processing and storage is in Python.

Remote database is stored using an Azure Virtual Machine.

Handles HTTP requests from front-end. Provides flexible routing system. Helps create RESTful APIs.

Python Requests library used to make client-side requests to server for data transformation.

Overview

Once the user opens our application and interacts with the UI, the front-end will record the input information and send HTTP requests to the back-end server to store or retrieve the data from the database (eg. dentist adds a patient and views patient's teeth model). The back-end server will then process the data and send the result back to the front-end to display.

In order to provide maintainability and scalability, we deployed our database and inference module (which includes the deep learning model) onto an Azure cloud platform. We used the Flask framework to build the back-end server. It provides a flexible routing system and helps create RESTful APIs.

Back-end Structure

                            
back-end/app
├── dentist_module/
|  ├── __init__.py
|  ├── dentist.py
|
├── inference_module/
|  ├── model/
|  |  ├── dataset.py
|  |  ├── model.py
|  |
|  ├── trained_model/
|  |  ├── reg_model_99.pth
|  |  
|  ├── training/
|  |  ├── train_reg.py
|  |
|  ├── __init__.py
|  ├── inference.py
|  ├── main.py
|
├── patient_module
|  ├── __init__.py
|  ├── patient.py
|
├── __init__.py
└── app.py


The back-end is organised into three modules: dentist_module, inference_module and patient_module. The dentist_module and patient_module are responsible for manipulating user and patient information in the database. The inference_module contains a deep learning model and handles the prediction requests from dentists when they want to see patient tooth wear degree. The app.py file is the entry point of the back-end server. It is used to create the Flask app object and register the blueprints.

Explanation

We used Flask Blueprints to organise our back-end code. It is a way to organise the app into modular and reusable components which allows us to define a set of related routes in separate modules.

                                
    # Create an app object using the Flask class
    app = Flask(__name__)

    app.register_blueprint(inference_bp, url_prefix='/inference')
    app.register_blueprint(dentist_bp, url_prefix='/dentist')
    app.register_blueprint(patient_bp, url_prefix='/patient')


    patient_bp = Blueprint('patient', __name__)

    @patient_bp.route('/add', methods=['POST'])
    def add_patient():
        conn = create_connection(dbFolder)
        data = json.loads(request.form['json'])
        ...      


Data Storage

Tools

Back-end logic for data requests processing and storage is in Python.

SQLite is used to construct and mantain the actual databases.

Remote database is stored using an Azure Virtual Machine.

Explanation

We host a SQLite database stored on an Azure virtual machine. In the database, we store the recorded patient data along with their 3D tooth scans and the login credentials of the clinicians. All authorised clinicians have access to all the stored patient data.

Both the upstream and downstream system from the client to the server use the Python Requests library to send and recieve data. Below is an example of storing a new patient data in the database.

                        
    def addDentist(self):
        username = self.ui2.username_input.text()
        password1 = self.ui2.password_input.text()
        password2 = self.ui2.confirm_password_input.text()
        encrypted = encrypt(password1)
        payload = {'username': username, 
                'password': password1,
                'confirm_password': password2,
                'encrypted': encrypted.decode("utf-8")}

        url = '...'
        response = requests.post(url, json=payload)
        signup_status = response.json()['result']

        if signup_status == 'success':
            self.startSignInPage()
        elif signup_status == 'fail':
            print("Could not insert dentist data")             
        elif signup_status == 'invalid':
            msg = QMessageBox()
            msg.setWindowTitle("Invalid")
            msg.setIcon(QMessageBox.Warning)
            msg.setText("Password and confirm password are different. Please try again")
            msg.exec_()


When dealing with the 3D models there is an extra step of pre-processing the data before sending it. We first convert the model into a binary file before sending it to the server. Similarly, when making a request for a tooth scan we have to convert from binary back to a point cloud model that can be displayed.

Tooth Wear Evaluation

Tools

All the peripheral logic for the key evaluation algorithm written in Python.

Neural network algorithm implemented using PyTorch.

Data pre-processing and other numerical tuning handled with NumPy.

Explanation

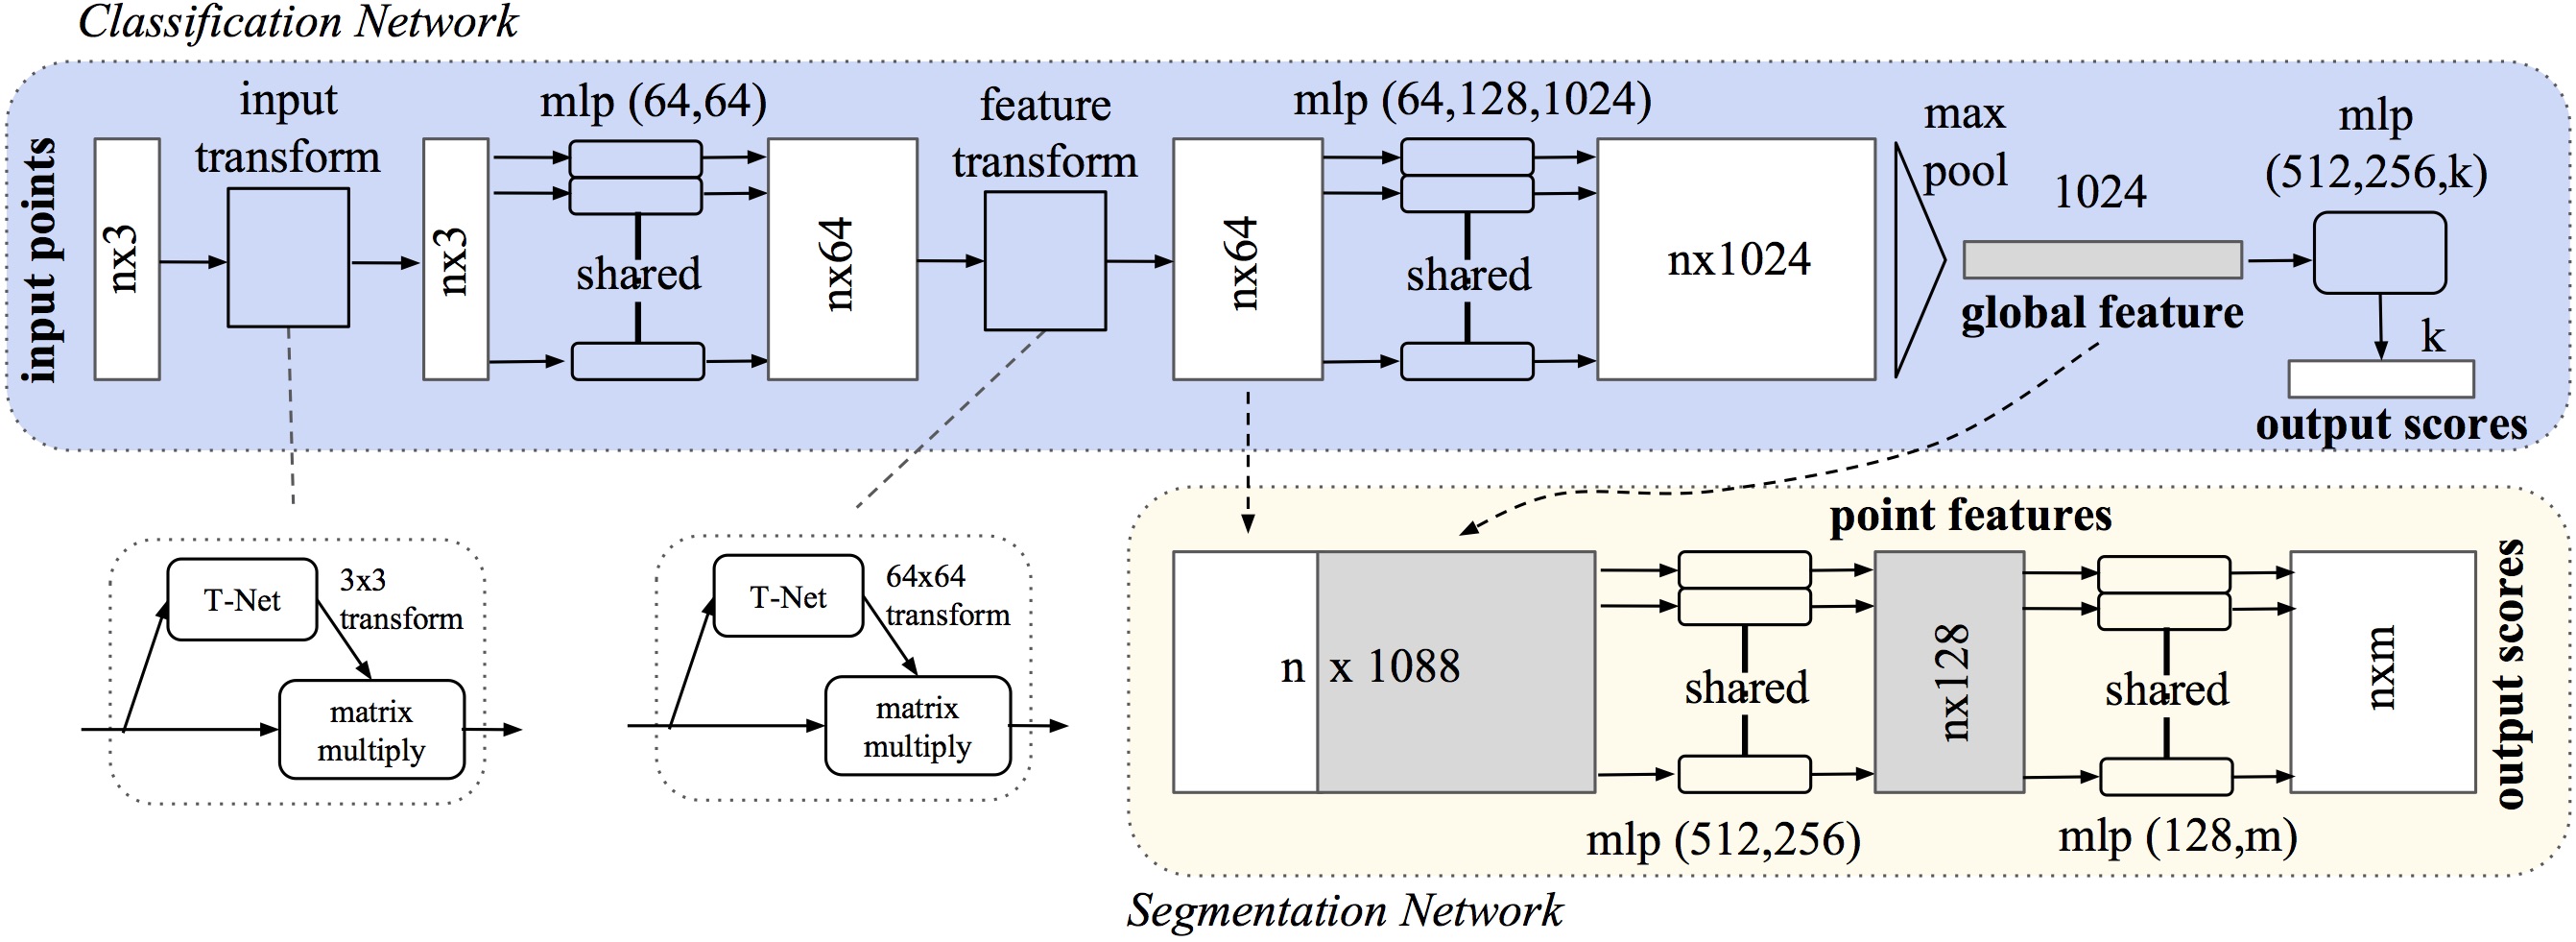
Please visit the Algorithms tab for more detailed algorithms explanation, how to implement the algorithm step by step, and result evaluation. The image below is the general structure of PointNet that we used to implement our deep learning model.

The pre-trained model is mantained on the Azure virtual machine from where any specific tooth model can be accessed. When a user wishes to perform analysis, a request is made using Flask to access this file. Then the file is read with the Plyfile library and fed in the pre-trained model which produces a result. Then the result is retrieved and returned to the front-end to be displayed. Below is the code for such a request.

                        
    @inference_bp.route('/predict', methods=['POST'])
    def predict():
        result = {}
        if request.json['id'] is not None and request.json['id'] != '':
            patientID = request.json['id']
            conn = create_connection(dbFolder)
            toExecute = "SELECT PATIENT_SEXTANT_SCAN FROM Patients WHERE PATIENT_ID = :id"
            crsr = conn.cursor()
            crsr.execute(toExecute, {"id": patientID})
            sextant = crsr.fetchall()[0]

            with open('prediction.ply', 'wb') as f:
                f.write(sextant[0])
            
            plydata = PlyData.read('prediction.ply')
            os.remove('prediction.ply')
            label = get_prediction(plydata)
            result =  {'result': 'Your tooth wear grade is: {}'.format(label)}
        else:
            result = {'result': 'fail'}
        return result