
Android App Implementation
App Requirements
The mobile application is a fundamental component of our solution. Therefore, before we even started working on its implementation, we had to make sure that its requirements were very well established:
P0 (Essential product features - cannot launch without them):
- The app must be able to detect nearby Bluetooth Low Energy (BLE) devices along with their MAC-addresses and relative signal strength indicator value (RSSI) which is a measure of how close a beacon is to a phone.
- The app must be able to transmit all beacons detected to the web-application, so that porters can be tracked.
- The app must allow a porter (user) to respond to delivery requests made.
- The app must allow a porter to indicate that they have completed a delivery.
- The app must be easy to use for porters so that their daily tasks are not slowed down by trying to navigate it.
- The app must be able to be re-used on the same device by multiple porters with distinct identities, to enable re-usability of NHS work phones.
Main Tools & Dependencies


Team Background
As mentioned previously, the mobile application is a core requirement of our project set out by Apian. Unfortunately, prior to this project, no one from the team had experience building mobile applications, so our project partners suggested that we design an Android app solution, and pointed out various resources that we could use to get started on our implementation, including Android Developers and LinkedIn Learning.
Initial Approach

The first step was to successfully implement a foundational part of our Android application,
which was the ability to scan for
BLE devices. This was a difficult task to implement, as we were just getting used to the Android
environment and were still
learning how fragments, activities and services interact in the Android development ecosystem.
Another obstacle that we had to overcome was that a lot of resources and tutorials that we found
online on BLE scanning,
provided classes and methods that were deprecated, so in the end we also had to implement our
own version of a method to
deal with BLE scanning callbacks.
After many hours of time and effort, we had our first sample application, which was just a
single-fragment app that scanned
for and displayed the nearest Bluetooth devices (including BLE beacons) along with their MAC
addresses:
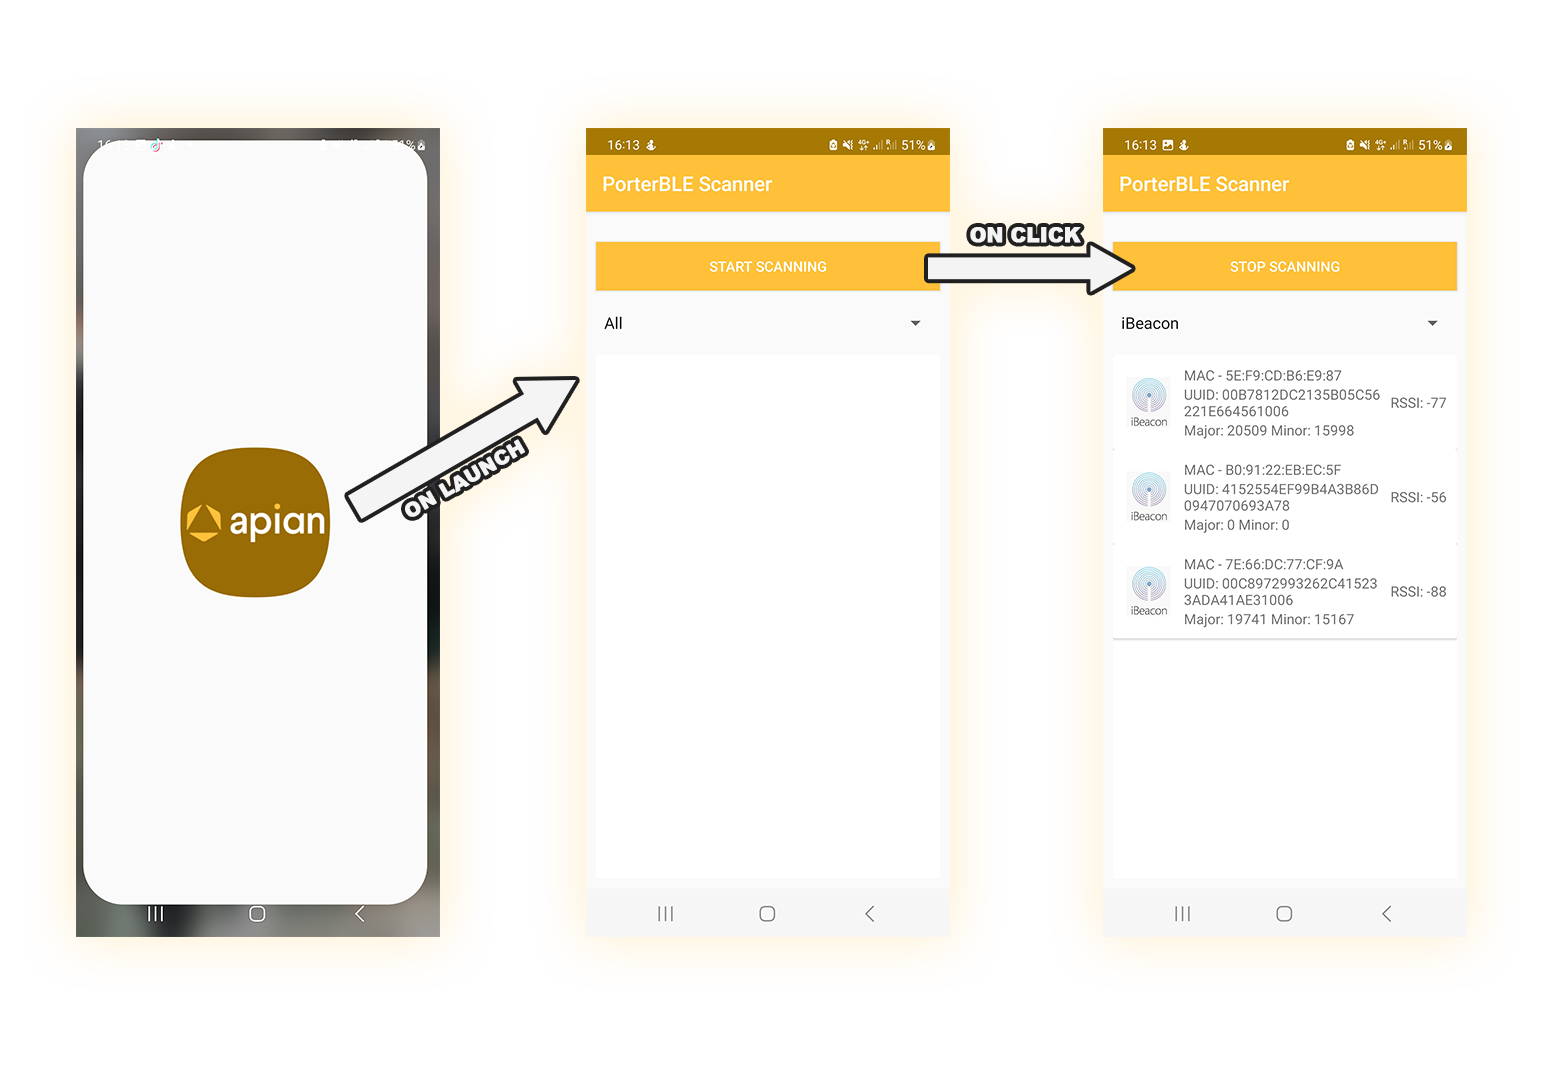
Figure 1: First app implementation, allows user to start and stop scanning for BLE devices. Also able to distinguish and filter between BLE beacons and regular Bluetooth devices.
The first implementation provided a great learning experience and an important step towards designing the desired product.
Next Steps: Fulfilling other Core App Requirements
After presenting the initial prototype to our clients in one of our weekly meetings and obtaining positive feedback from them, we felt confident moving onto the next step, which was to tick off some other essential requirements (P0) of our application, such as (1) allowing porters to respond to requests and (2) identify themselves while using the app.
Requirement 1: Allowing porters to respond to requests
The main task at hand here was to decide via which method porters would communicate with our web
application. The obvious choice in this
case would be to use some form of HTTP-based communications.
However, after discussing this with our clients, we were able to obtain some very valuable
insights about why using SMS-based communication
instead for a start, could be much more practical:
- Firstly, when considering the way requests are currently fulfilled by porters, we observed that this is done using SMS devices called pagers. Thus, moving forward with an SMS-based solution would make product adoption smoother.
- Another key consideration we observed was that not every corner of a hospital has strong enough bandwidth and thus, HTTP requests may not deliver in such scenarios where hospital basements or remote locations experience poor connectivity. This also makes our solution more scalable as it could be even adopted in hospitals located in rural or underdeveloped regions where internet infrastructure is limited.
- One of, if not the most important consideration, that needs to be made when designing a product to be used in hospitals, is how well that product responds to emergencies. Our solution must be robust and efficient. This is something we took very seriously as a team, and through research we found that "Just 15% of hospitals across UK are on the official 'protected sites' list, meaning they would qualify for power during a national blackout."[1] As a result, we need to design a solution that can respond to situations where power - through backup generators for example, may be very limited and can only be used to power essential equipment, leaving hospitals without any bandwidth. Furthermore, this doesn't just apply to the very rare cases of national power outages, as we also observed that, last year during winter, hospitals had to make emergency plans in response to limited gas supplies and winter power loss fears.[2]
To conclude our case study, we decided that the first implementations of our solution would make use of SMS responses handled by a central Twilio service, and moving forward, we would migrate this service to a Firebase Messaging implementation, keeping SMS as the fallback system in case of emergencies causing network or power disruptions, ensuring that delivery requests can still be received and processed promptly. We felt that this was the right way to move forward, as most hospitals in the UK have the power capability and technology infrastructure to benefit from a web-centred solution which can provide significant improvements in request efficiency, potentially saving human lives.
Requirement 2: Allowing porters to identify themselves
Whilst we acknowledge that UK hospitals have access to significant technology, we recognize the importance of minimizing excess technology and redirecting funds to invest in more critical equipment. With this consideration in mind, we believe hospitals should only provide enough devices to cover the maximum number of porters on shift at the same time, rather than investing in one work phone for each porter. By allowing porters to reuse the phones with a unique identity on our app, we can reduce excess technology and save funds for more critical equipment.
Implementing requirements 1 & 2

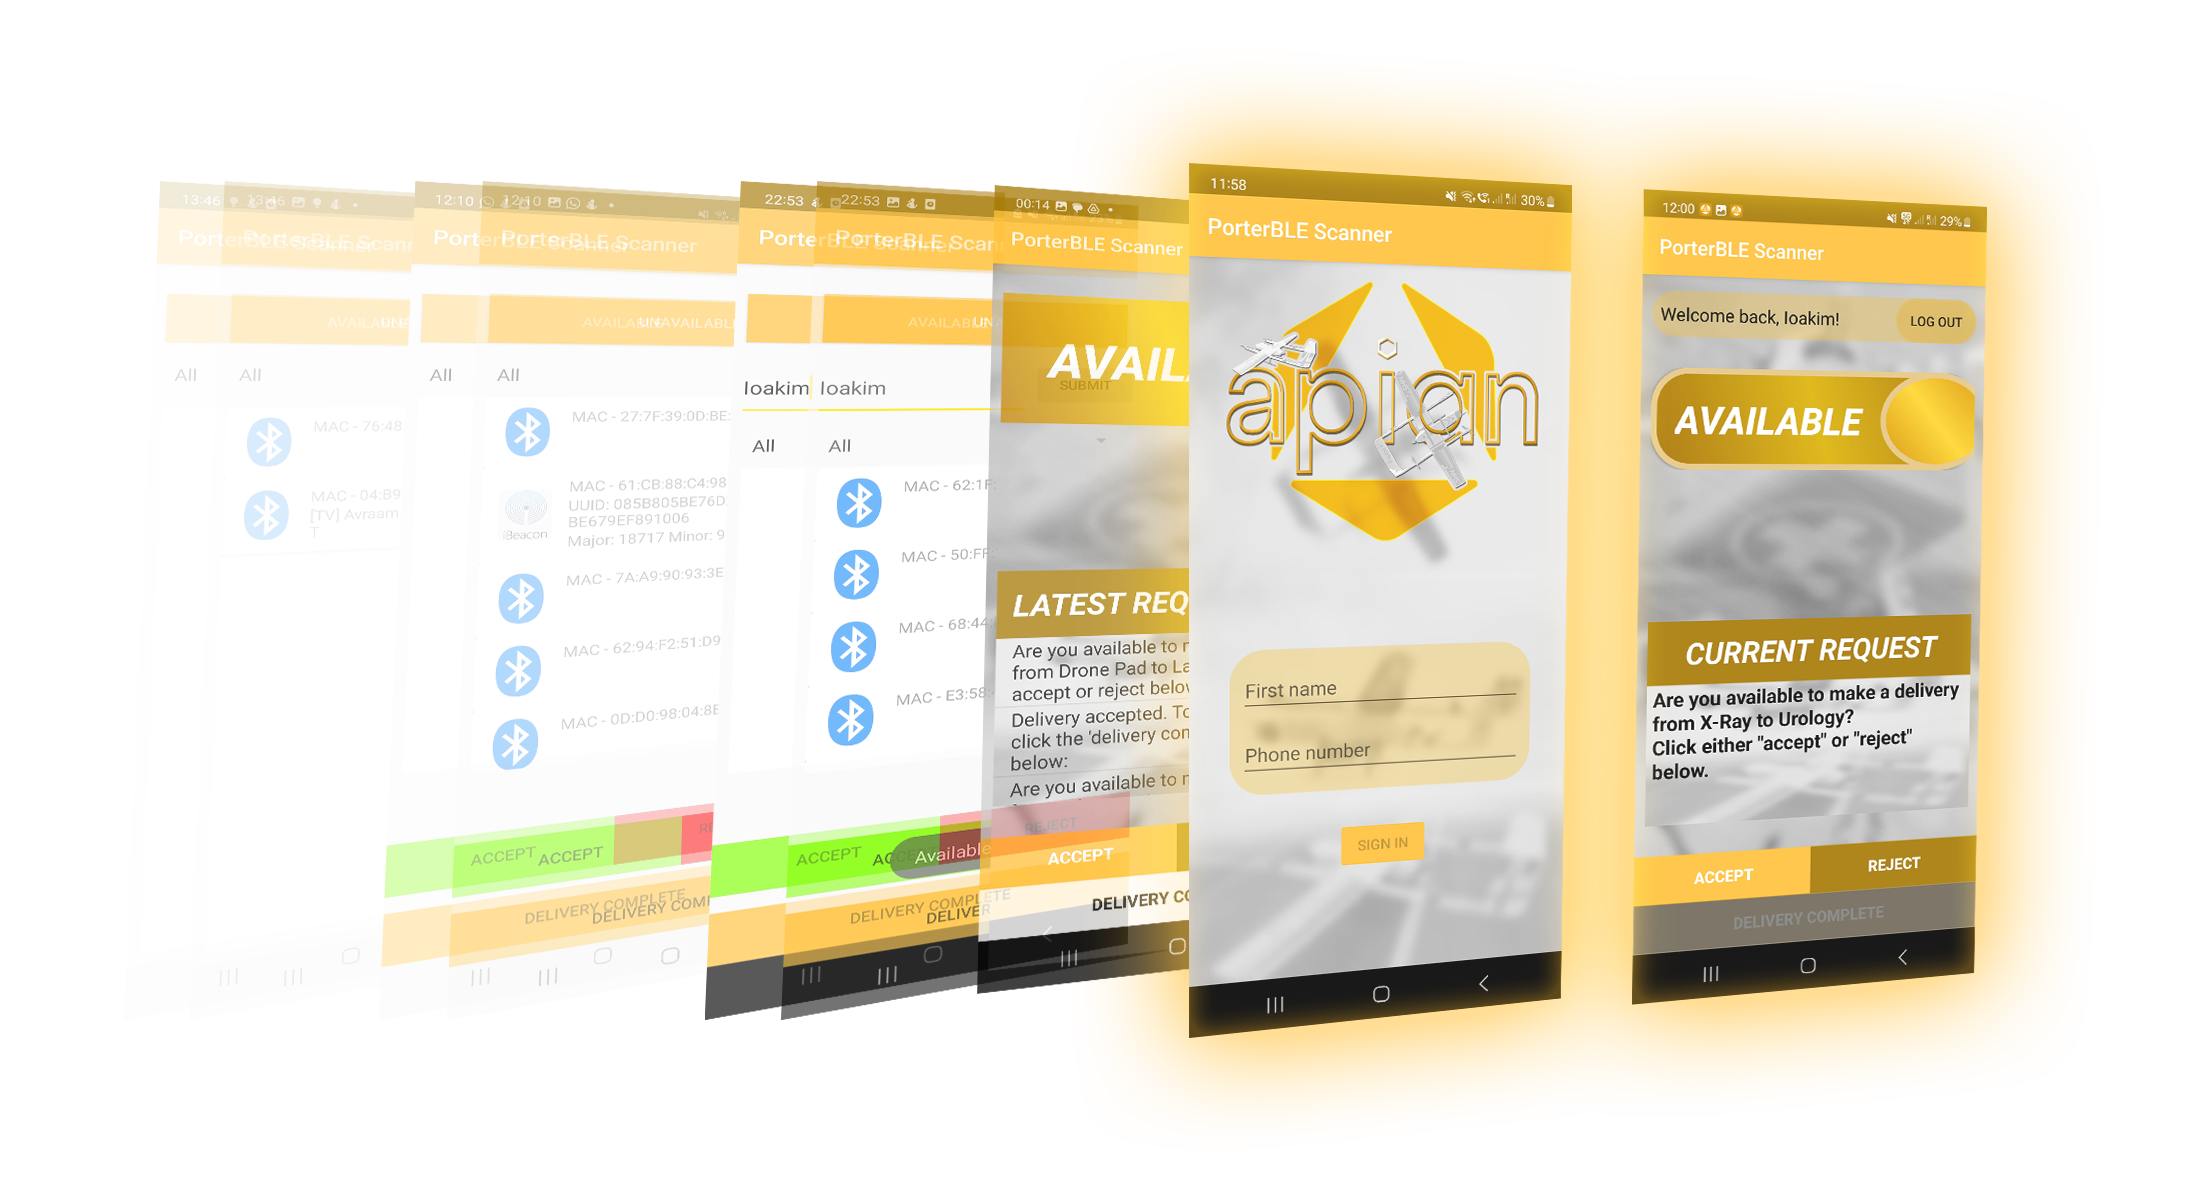
To design our application, we followed an iterative design approach. We felt that this would be the right approach as we were fortunate enough to participate in weekly meetings with our client, where we could obtain constructive criticism on our solutions and iterate over them until we reach a product that both parties were happy with. As you can observe below in Figure 2, our first iteration involved a name box for porters to enter their name and press 'Submit' to validate their identity. Furthermore, the three buttons observed in the bottom half of the screen each triggered a unique message that was interpreted by our Twilio SMS service to determine what a porter had responded to the delivery request. This implementation also made it easy to fulfill another core requirement (P0) which stated: " The app must allow a porter to indicate that they have completed a delivery. " This was easily achieved by adding a 'Delivery Complete' button with the same functionality as the 'Accept' and 'Reject' buttons.
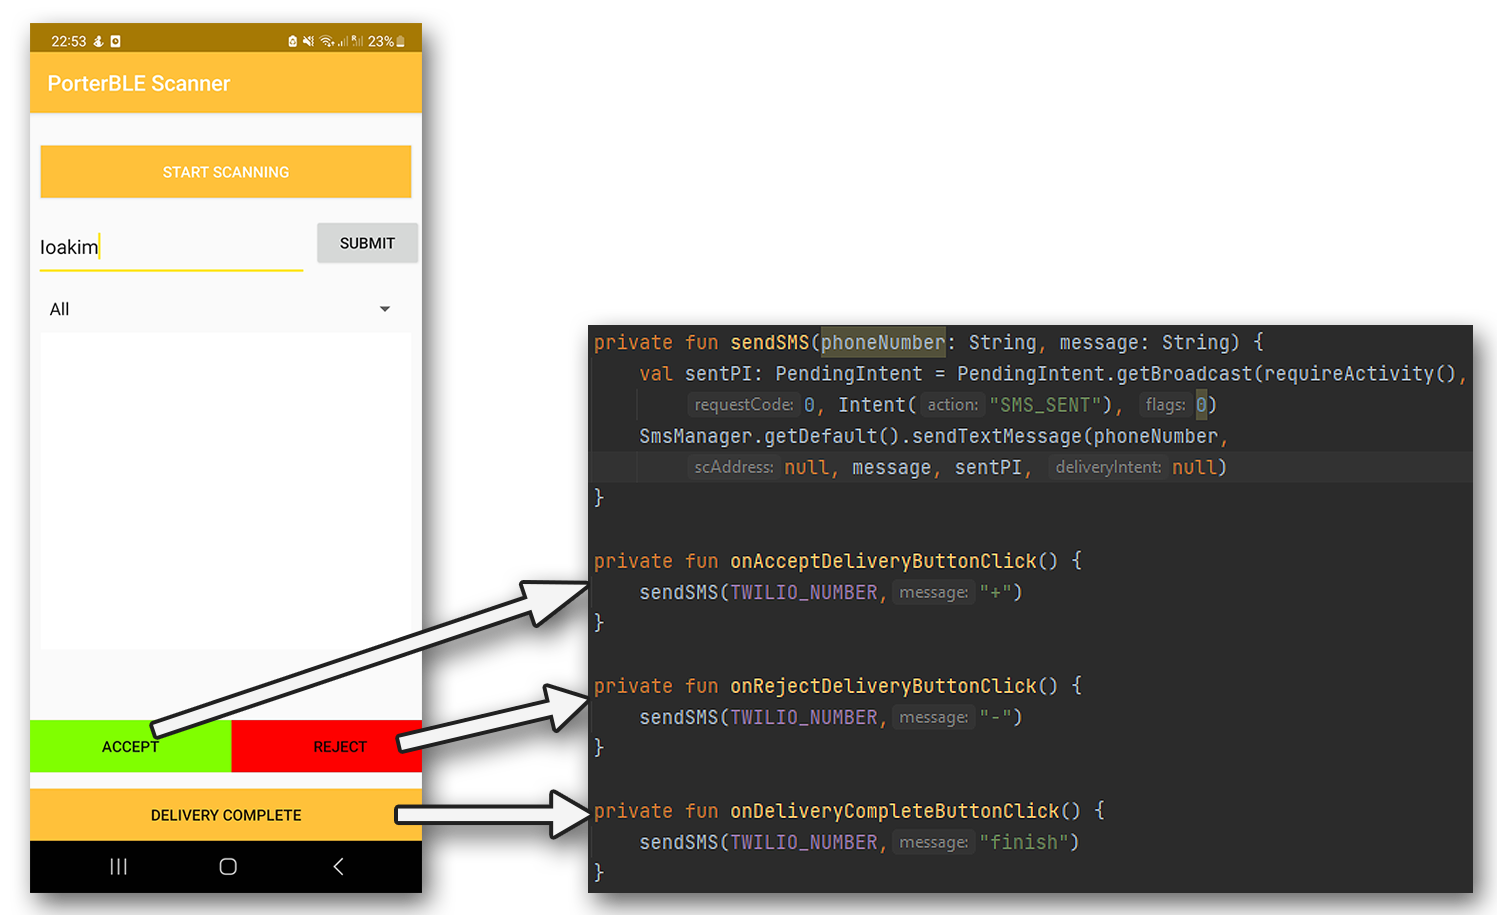
Figure 2: Second app implementation, allows user to identify themselves via the name text box, whereby the submit button verifies that the name corresponds to a valid porter name in the backend. Each button in the bottom of the screen triggers a different SMS message sent to our Twilio phone number.
To further explain the functionality of the 'sendSMS' Kotlin function above, firstly, a
PendingIntent object was created. A PendingIntent is essentially a token
that is used when an external function is called (in this case a function of the SMSManager
class) which allows a user to be notified as to whether the function was
successful. In our case, the Pending Intent was passed onto the function 'sendTextMessage' which
obtained an instance of the mobile phone's SMS Manager to send a
text message. Having objects like the intent described above, made testing the application much
easier for us.
For this initial iteration, the way a porter was verified was through a HTTP POST to the
backend that was triggered every time a user clicked on 'Submit'.
The HTTP response code of this POST was observed, and if the relevant code was received, i.e.
verification was successful, a pop-up message welcoming the user was
displayed. If the verification was unsuccessful, a pop-up message informing the user of this was
displayed, and the messages including beacon info that were transmitted
to the backend would be ignored.
This implementation also fulfilled another core requirement (P0): "The app must be able to be
re-used on the same device by multiple porters with distinct identities, to enable
re-usability of NHS work phones." However, this was only the initial step into getting a porter
verified and we knew we could improve a lot in this scenario.
Implementing final core requirements
By this stage, the only core requirements that were left to fulfill were transmitting identified
Bluetooth beacons to the backend, whilst also keeping the app simple to use, so
it doesn't slow down porters trying to navigate it.
Since beacon data would be transmitted via HTTP POST, it was crucial for us to limit the number
of requests sent to the backend, so as to keep server traffic low and enhance
performance, which in turn would mean porters can receive and respond to requests swiftly. A
naive approach would be to send a HTTP request whenever a beacon was identified,
however this raises two great concerns:
- A phone that is constantly scanning for BLE beacons is likely to pick up multiple Bluetooth devices per second, especially in a hospital setting where there are thousands of specialised equipment. As a result, the aforementioned implementation would lead to multiple HTTP requests sent per second, creating unnecessary web traffic.
- If the signal strength picked up by a specific beacon changes, then that is considered a new scan result, so a phone could potentially transmit the same beacon multiple times within a few seconds if a user keeps walking around; which is very much the case for porters who have to move constantly around a hospital to fulfill deliveries.
Our next concern revolved around potential duplicate scan results, upon change in beacon signal strength. To overcome this, we stored detected beacons inside a HashMap, where the key was a beacon's MAC-Address. As a result, whenever a beacon that was already in the HashMap was detected, its value was overwritten by the latest entry. This HashMap also acted as a buffer to hold beacons detected for 5 seconds, and was emptied whenever its contents were transmitted.
A more technical explanation with snippets of code can be observed below in Figure 3:
Figure 3: Description of how beacons are identified and transmitted to the backend.
With this implementation, we had also ticked off our final P0 requirement, which aimed to make the experience of using the app straightforward for porters. All they have to do is enter their name, click on the scan button to start tracking themselves, and respond to requests by clicking the buttons in the bottom-half of the screen. Overall, all core app requirements had been completed at this stage.
Separation of Concerns - Splitting Fragments
After informing our clients that we had met the core app requirements that were essential for the first launch, we then looked to iterate over our current implementation to make it more robust whilst also implementing other important (P1) features.
Login Screen
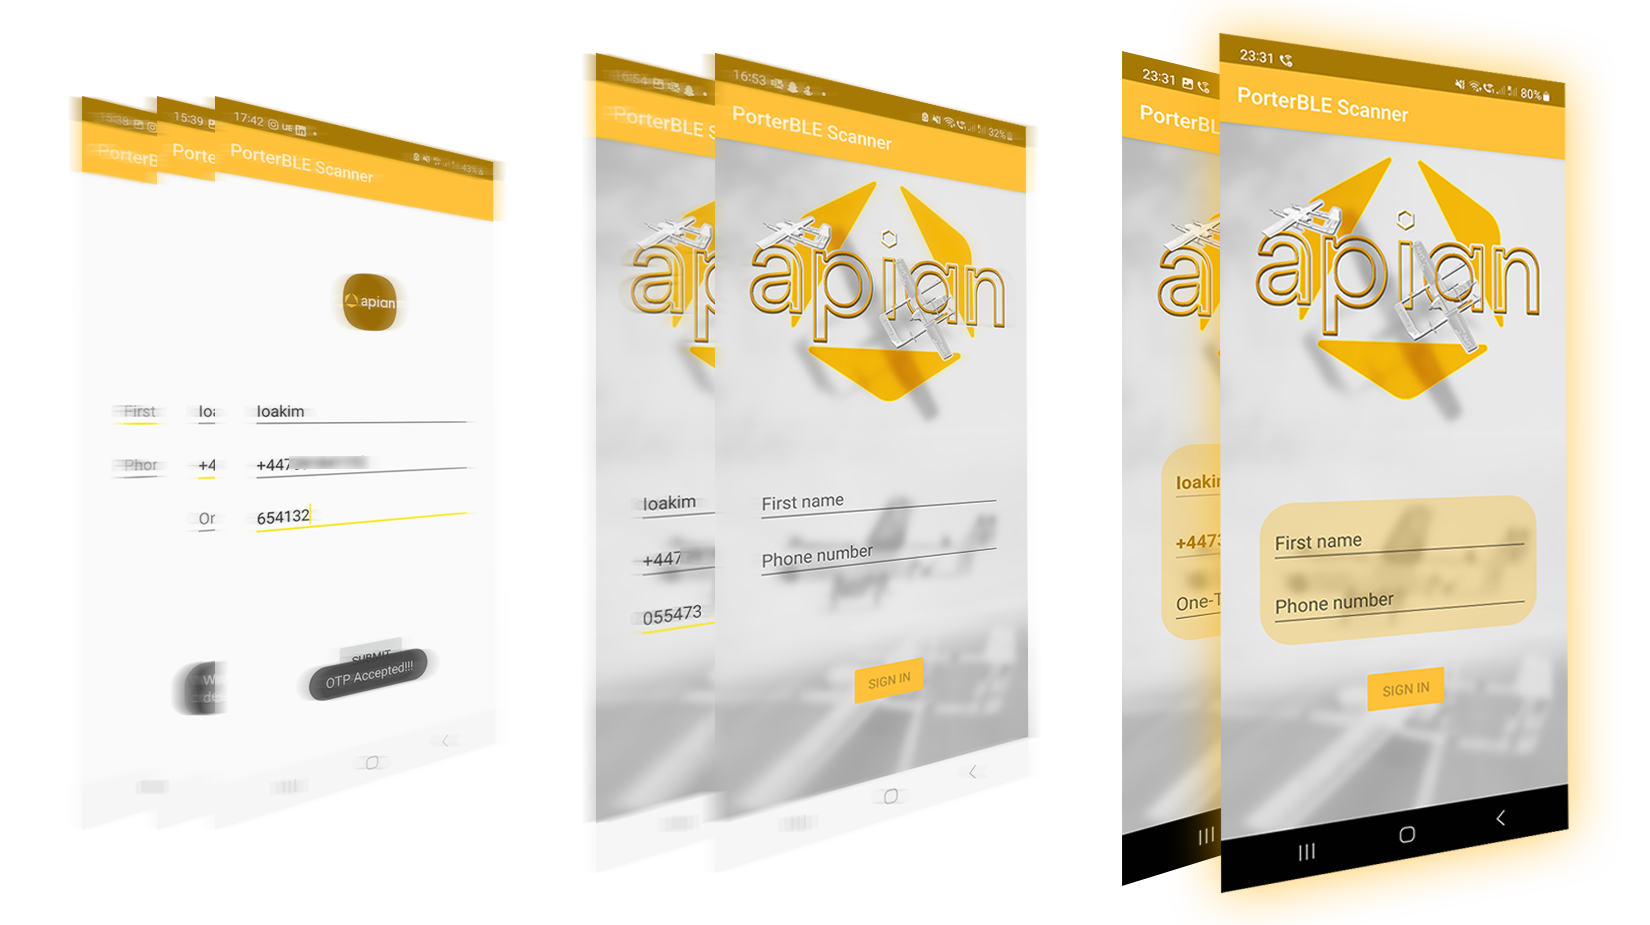
Figure 4: Login screen iterations.

The most obvious improvement which could be made based on our previous implementations was the
login functionality, which was not up to industry standards. Especially when it
comes to hospitals, privacy is key; hospital records should be kept confidential, and no one
should be able to pretend that they are a porter.
As a result, we created a new Login Fragment, which would act as a page allowing porters to
login and verify themselves before being allowed to perform other work-related
operations. This fragment was supported by the Login template provided in Android Studio, which
allowed us to create a robust login functionality, with a LoginViewModel class
to handle data input by the user through the fragment, and would make the relevant requests to
the server to authenticate a user through the LoginDataSource class. The UML diagram
for the login functionality can be found below:
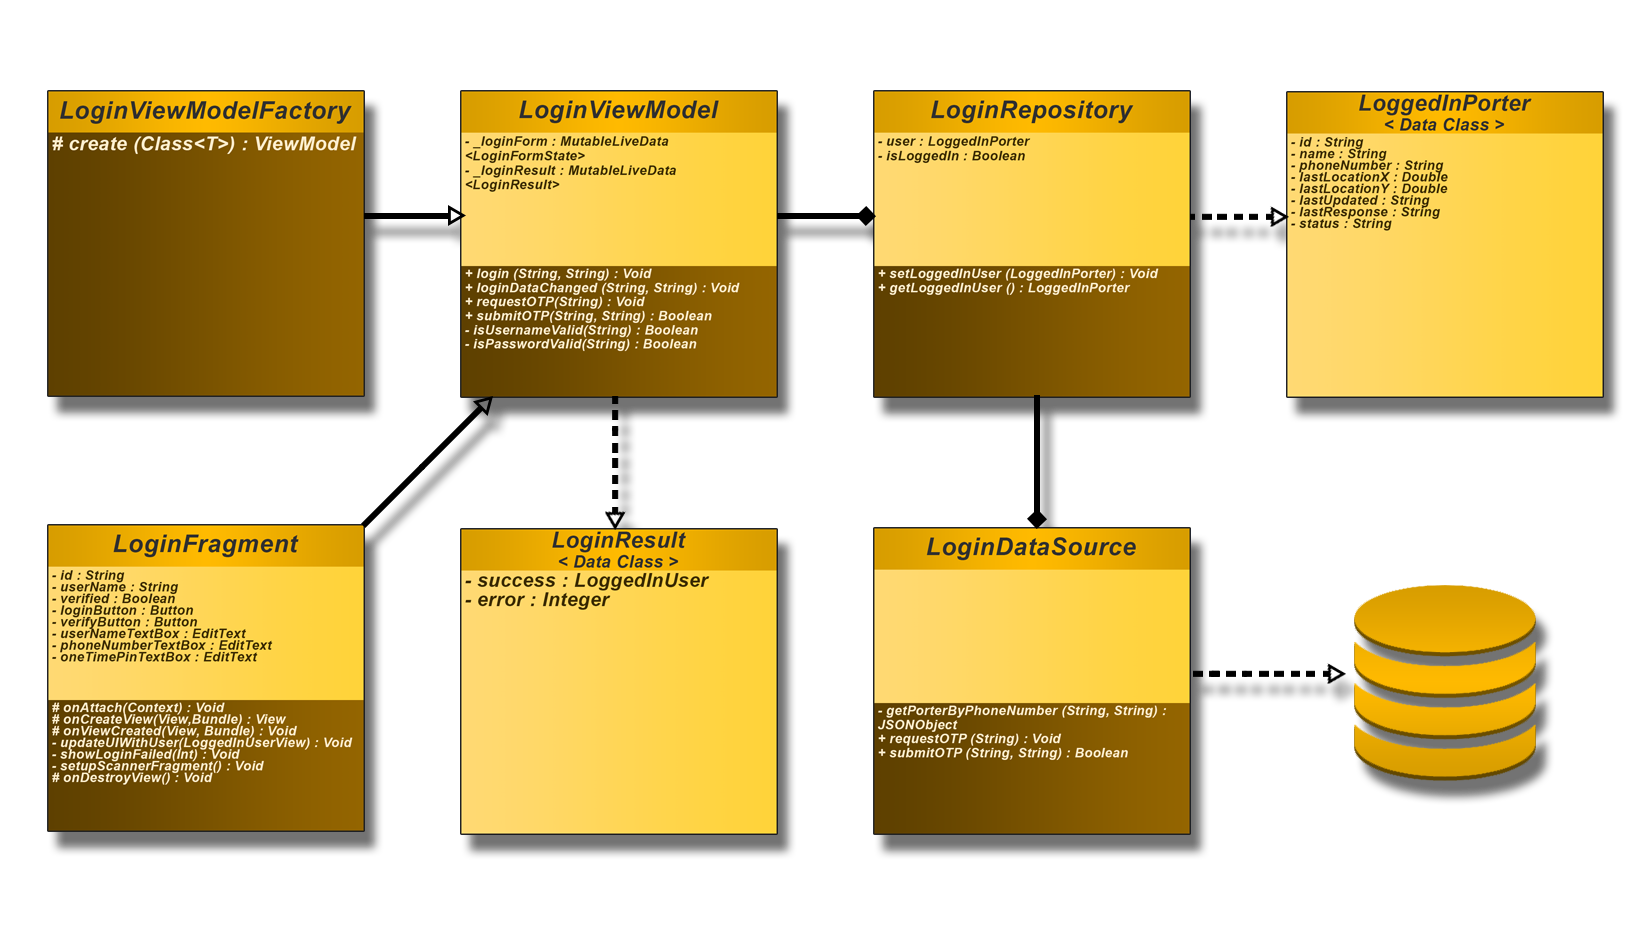
Figure 5: Unified Modelling Language (UML) diagram overview of Login functionality.
As you can observe from the 'LoginFragment' class, there are a few protected functions called onCreateView, onViewCreated, onDestroyView etc. These are some fundamental functions which run during the lifecycle of a fragment, which android developers have to override a lot of times to add functionality to their applications. For further clarification as to what each function does in a fragment's lifecycle, please refer to the image below:
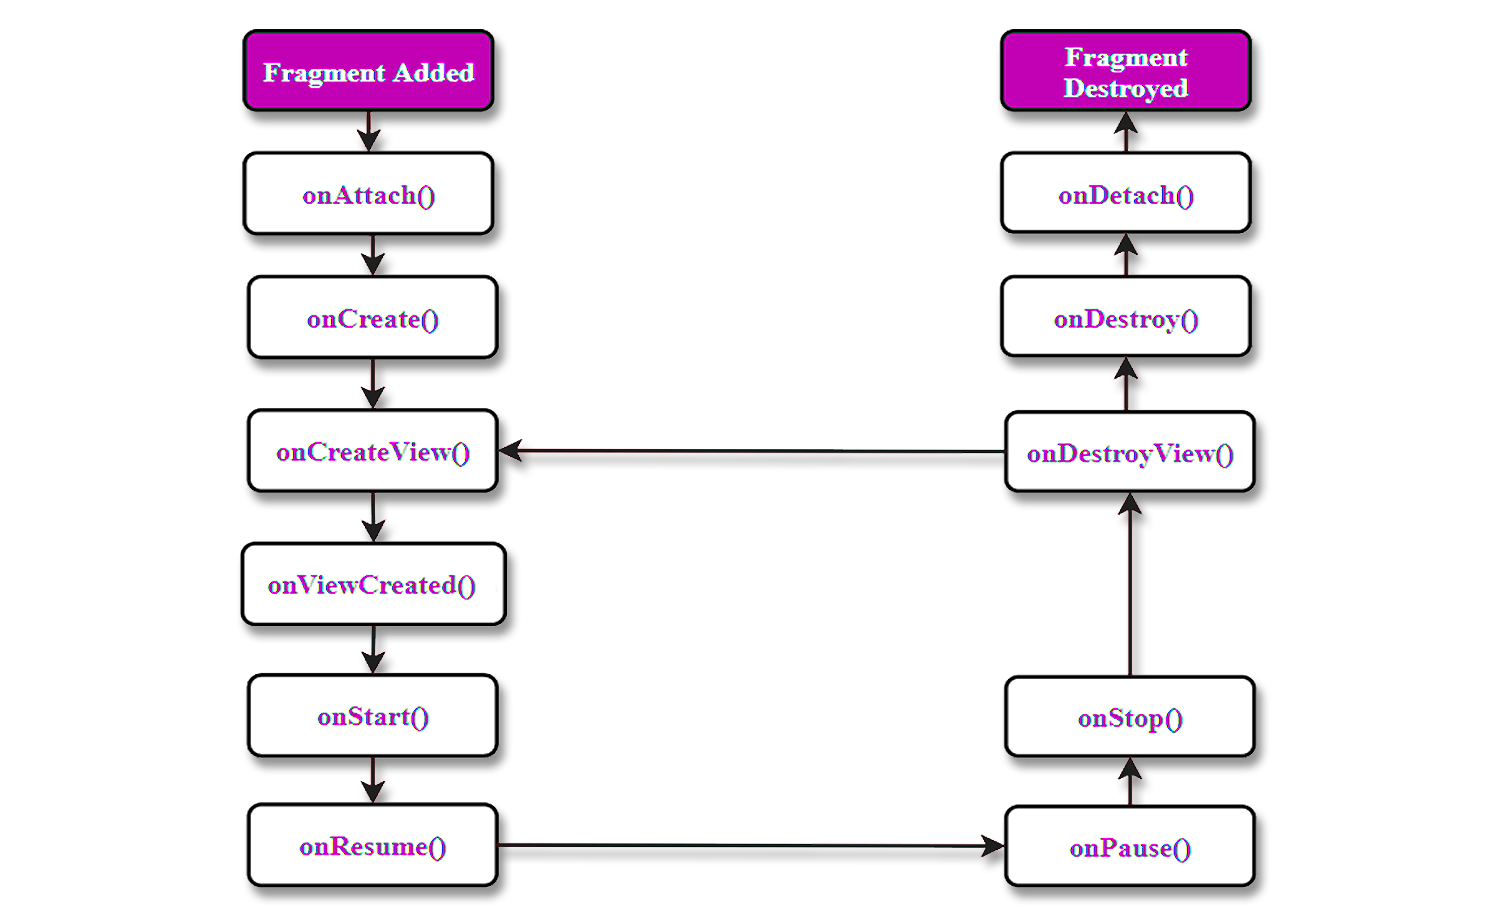
Figure 6: Android Fragment Lifecycle Overview. [5]
The table below describes what each function is responsible for: [5]
| Method | Description |
| onAttach() | The very first method to be called when the fragment has been associated with the activity. This method executes only once during the lifetime of a fragment. |
| onCreate() | This method initializes the fragment by adding all the required attributes and components. |
| onCreateView() | System calls this method to create the user interface of the fragment. The root of the fragment’s layout is returned as the View component by this method to draw the UI. |
| onViewCreated() | It indicates that the activity has been created in which the fragment exists. View hierarchy of the fragment also instantiated before this function call. |
| onStart() | The system invokes this method to make the fragment visible on the user’s device. |
| onResume() | This method is called to make the visible fragment interactive. |
| onPause() | It indicates that the user is leaving the fragment. System call this method to commit the changes made to the fragment. |
| onStop() | Method to terminate the functioning and visibility of fragment from the user’s screen. |
| onDestoyView() | System calls this method to clean up all kinds of resources as well as view hierarchy associated with the fragment. |
| onDestroy() | It is called to perform the final clean up of fragment’s state and its lifecycle. |
| onDetach() | The system executes this method to disassociate the fragment from its host activity. |
To give an example of how these functions were implemented in our application, below you can observe how we coded the 'onViewCreated' function. This is called after the 'onCreateView' function, by which point, the view of our application has been initialised, including text boxes and buttons, so in the 'onViewCreated' function our task was to bind these text boxes to private class String variables and also bind the buttons on screen to the relevant class Buttons which trigger their own private method when clicked.

Figure 7: Login 'onViewCreated' code
Making Login More Secure
At this point, we had a fully functional login page, where porters' login credentials were
verified against our backend server database records to check whether there was
a match. If this authentication process was successful, the backend would then generate a
one-time pin and trigger the Twilio service to send this PIN via SMS to the phone number
associated with
the porter's account. Finally, if this one-time pin was entered correctly, the LoginFragment
notified the MainActivity to set up and switch to the Scanner Fragment, which
holds the remaining functionality of our application. However, while this approach provided some
degree of security, we have already established in this article that SMS should
not be considered a secure method of communication due to the inherent vulnerabilities of the
SMS protocol. As such, we decided that additional layers of security were required
to protect the hospital data we were working with and ensure secure communication between the
server and our application.
This is where Firebase's secure token authentication system addressed our concerns by giving our
mobile application the ability to generate a token for robust server communications.
We decided to use this as our website and database were already being hosted on Firebase, as per
our clients' request, so instead of searching for some other external tool which
could cause compatibility issues, we made use of the Firebase Authentication SDK, which provided
us with a rich set of libraries; specifically Firebase Cloud Messaging (FCM); to manage
user authentication and authorization.
Overall, Firebase's token authentication system offered a much needed upgrade to our login
system, by generating a unique and secure token for each user, which is used to
authenticate subsequent requests to protected resources within the application.
Setting up and connecting Firebase to our mobile application
Connecting our mobile app to our Firebase project was quite simple. It involved supplying our app's SHA Certificate to our Firebase project, which generated a custom JSON file that was placed in our app's project directory to gain access to all relevant Google Firebase libraries we wanted to use. To import the necessary libraries, we then just added a few lines of code to our app's dependencies which specified that we wanted to use Firebase's messaging and token services.
Firebase Messaging Implementation Steps
Now that we had access to all the necessary resources, we moved on to implement the new feature.
Upon launching our app and specifically the Login Fragment, our Firebase Messaging
Service must be called and supplied with our app's current context. In android development,
context acts as an interface to global information about the application environment.
It is an abstract class whose implementation is provided by the Android system and allows access
to application-specific resources and classes, as well as up-calls for
application-level operations, [6] which the service needs. More specifically, it
needs to access system services like the NotificationManager, to create push notifications
when a delivery request is received and LocalBroadcastManager to flag a request via an internal
broadcast while the app is running. It is also essential to supply the app's context to the
service
to prevent any potential crashes due to memory leaks.
Thankfully, it is fairly simple to pass on context between classes in Android:
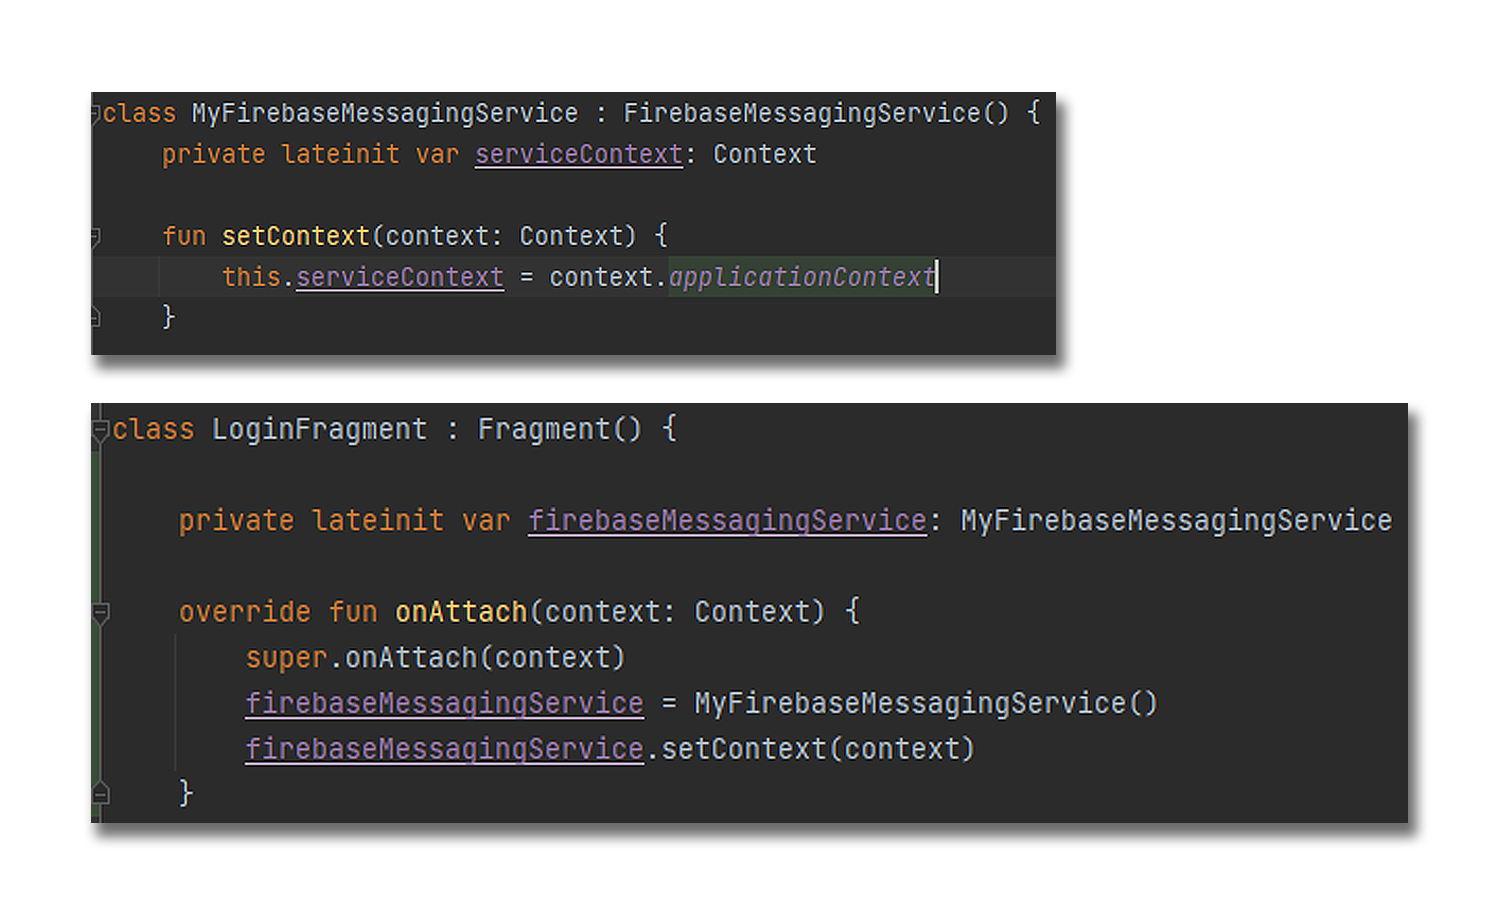
Figure 8: Obtaining context from 'onAttach' method which is called first in a Fragment's lifecycle and passing it onto our Firebase Messaging Service
Moving onto how we defined our service, we had to tailor Firebase's Messaging System to fit our
application's data flow.
In our service implementation, we defined a method called generateToken() which obtains the
Firebase Instance of the app that is running and retrieves its corresponding FCM
token. We call this method when a user successfully enters the correct one-time pin in the login
page.
The token will be used to provide a secure messaging channel for Firebase to send delivery
requests to our application. However, we also needed to ensure that our backend
had this token, so we overrode the service’s ‘onNewToken’ method, which is triggered
automatically whenever there is a request to generate a new FCM token:
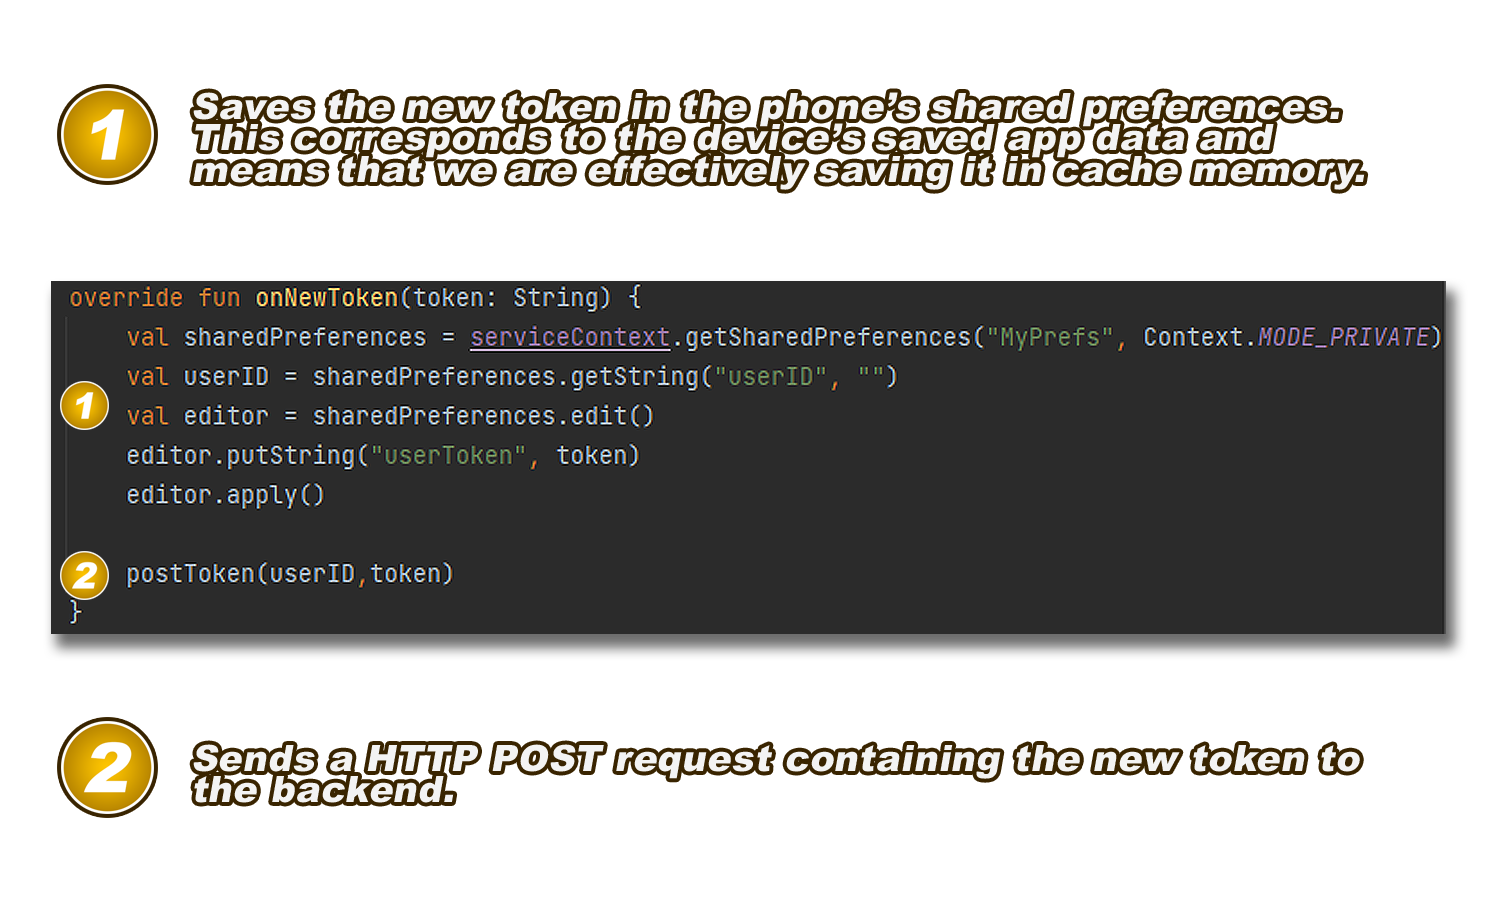
Figure 9: How our Firebase Messaging behaves whenever a new token is generated.
Now that we were sure that a token could be generated and distributed successfully, we moved on
to define what actions our application would take upon receiving a Firebase
message i.e. a delivery request. For this, we overrode another service method, called
'onMessageReceived' which is triggered whenever Firebase uses a device's FCM token to
send a message to it.
In the method, we retrieved a message's title and body and obtained an instance of the
NotificationManager class to generate and push a notification with the contents of the
received message. We also created a local broadcast to inform our Scanner Fragment of this
request, so it could update its user views to allow a porter navigating the app
during the request to be able to view and respond to it.
This is what a delivery notification request looks like from our app:
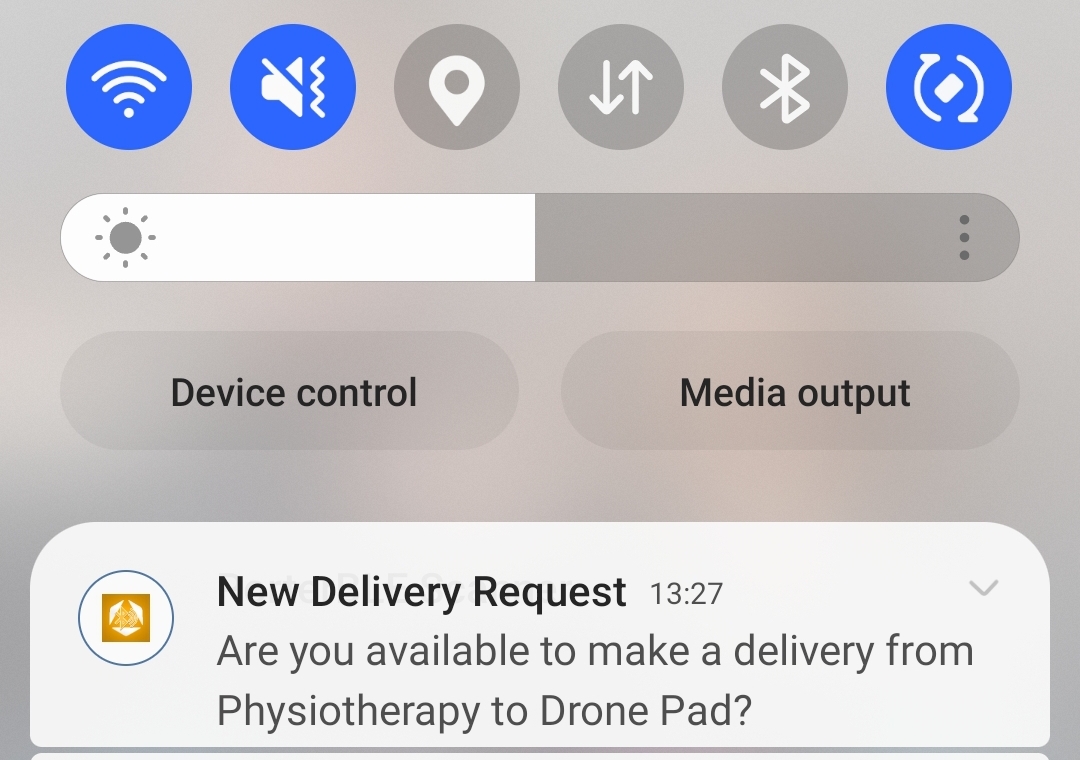
Figure 10: Sample notification request
After successfully implementing Firebase token authentication and messaging, we were able to tick off some important (P1) product requirements:
- The app should allow porters to login to the hospital servers securely with their credentials.
- The app should authenticate users who successfully login, to ensure that they are real porters.
- The app could display the latest request made along with the delivery locations that need to be reached.
- The app could trigger a notification every time a request is made.
Improving Porter (User) Experience
As we have already stated, user experience was a top priority for our mobile application, as we
didn't want to slow down porters trying to perform their daily tasks.
As of the current implementation seen so far, whenever a porter launched our application, they
had to sign in with their name and phone number, enter the one-time pin
received and the app would then trigger a new FCM token for them and send it to the backend.
During a normal work day, however, a porter may need to launch our app
multiple times, and having to log in every single time would be both tiring and expensive.
Caching login
The solution to this problem would be to save a porter's credentials whenever they log in whilst also allowing them an option to log out, which would preserve the core requirement of phone re-usability between multiple porters.
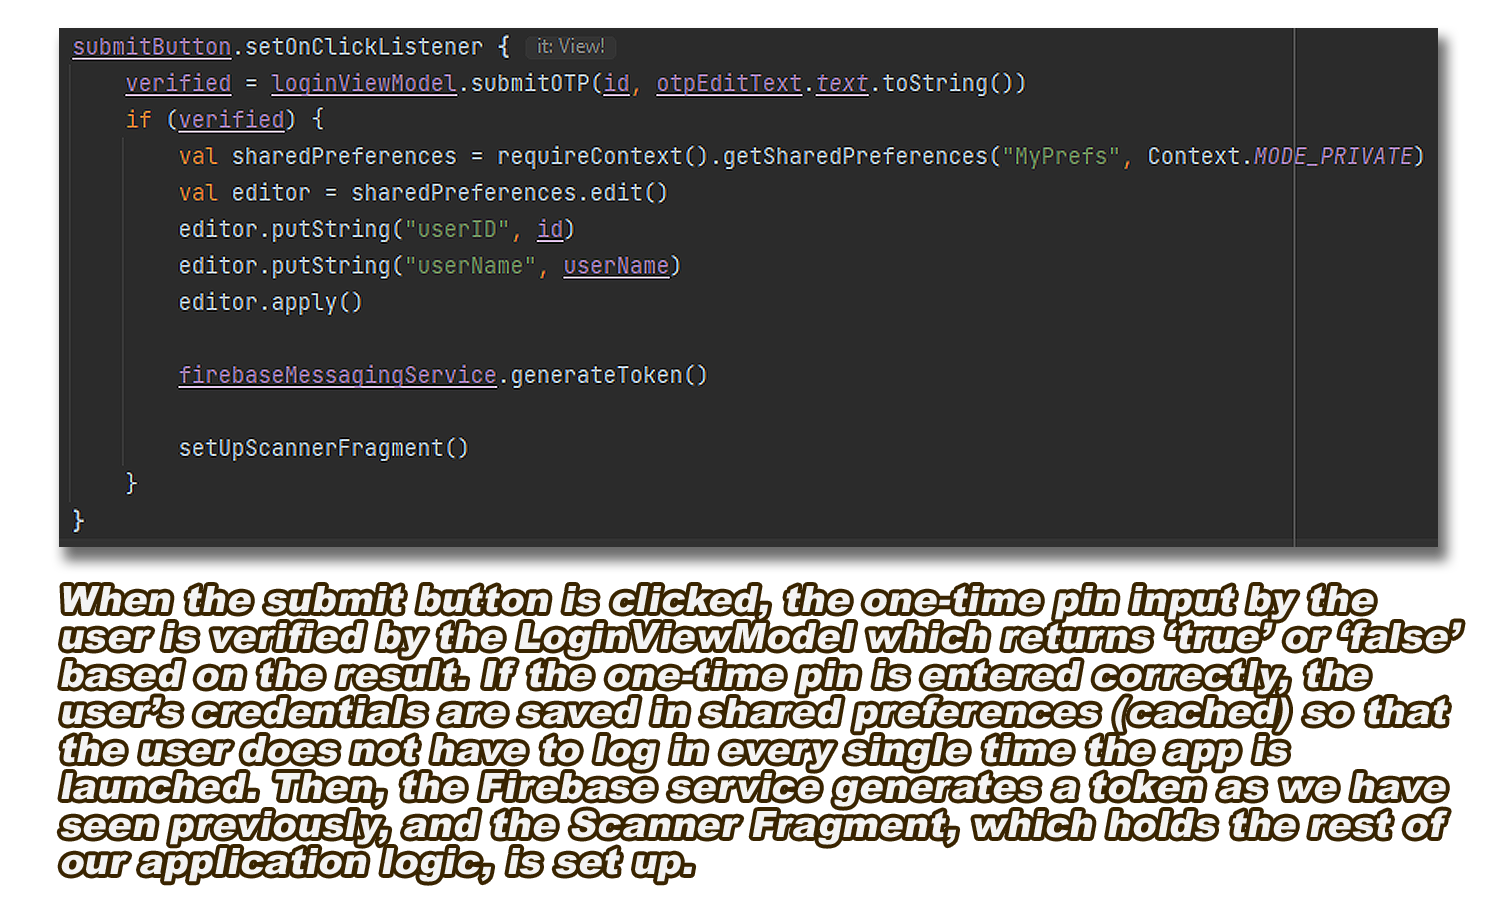
Figure 11: How user credentials are cached upon successful verification
As you can see in the figure above, we were able to save user credentials in cache app memory.
The next thing we did was add code to our Login Fragment which attempted
to gain access to shared preferences upon launch of the fragment. If it was successful, the
login process was skipped and the Scanner Fragment was setup straight away,
whereas if it obtained null from trying to access these preferences, that meant that no
one was signed in, so it would display the login page as normal.
This implementation made it easy to code the log out functionality, as all we had to do was add
a button to our Scanner Fragment, which cleared the shared preferences of
the app and took the user back to the Login Fragment.
Caching login allowed us to fulfill two more P1 requirements which stated:
- The app should allow porters to stay logged in by caching their login details, so they don't have to login again every time it is launched.
- The app should allow porters to log out, so it can be re-used on the same device by other porters.
Indicating availability
As you will have read in our 'Research' section, when speaking to porters and our partner
company, Apian, one of the biggest problems we discovered when it comes to the
current request system used in hospitals, is that whenever there is a delivery request, all
porters are notified on their pagers, regardless if they are on break or even
fulfilling another delivery.
Therefore, we felt it would be very useful for porters if they had the option to indicate via
the app whether they are available or not to serve delivery requests.
We thought of a neat way to achieve this which was to replace the buttons for 'Start Scanning'
and 'Stop Scanning' to 'Available' and 'Unavailable' respectively:
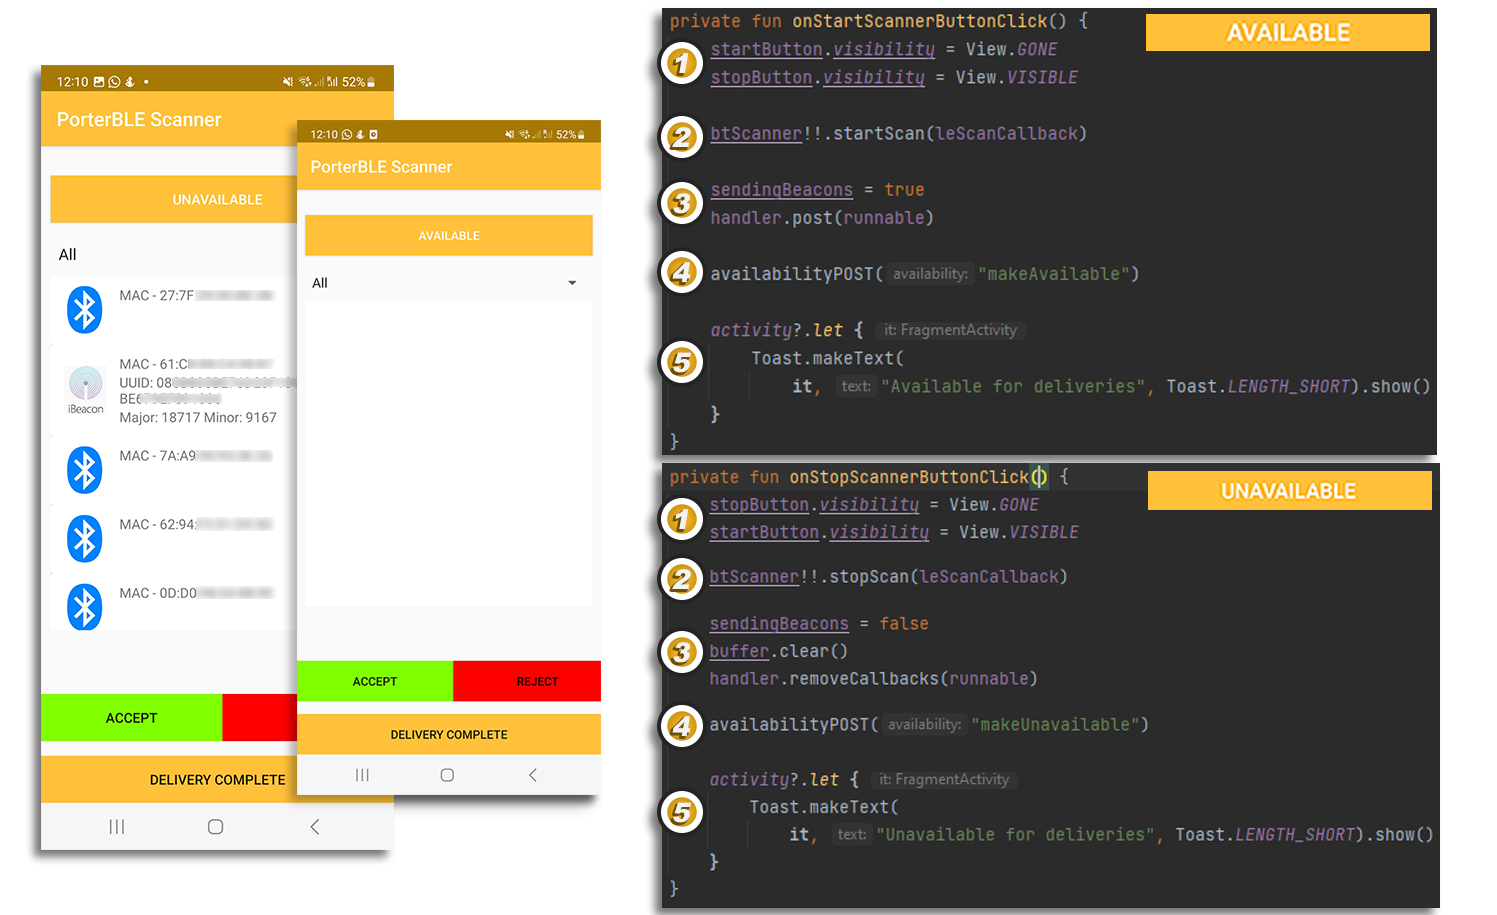
Figure 12: New button labels to match availability status and their corresponding code
As you can observe in Figure 12 above, the code snippets are labelled 1-5 so that we can further explain their functionality:
- When a button is clicked, it must be hidden and the other must be shown.
- Starts / Stops the scan process for BLE beacons.
- Manages the functionality seen in Figure 3 which handles the sending of beacons every 5 seconds to the backend. When the 'Available' button is clicked, the handler is called to start executing the HTTP posts to the backend, whereas when the 'Unavailable' button is called, the buffer of currently detected beacons is cleared and the handler stops transmitting.
- Sends a HTTP POST to the backend to indicate a porter's availability, depending on which of the two buttons was clicked.
- Creates the relevant Toast (pop-up message) to reflect whether a porter is available or not to make deliveries.
Revamping Scanner Fragment User Interface
In terms of functionality, most requirements had been implemented by this point. However, the
Scanner Fragment was not looking very appealing to use, especially compared
to the Login Fragment. Furthermore, there was no way for a porter to view the current (if any)
request they were meant to respond to on the Fragment view.
Our next step, therefore, was to make use of the local broadcast transmitted by our Firebase
Messaging Service so as to retrieve the request in our Scanner Fragment and
display it in a 'TextView' object:
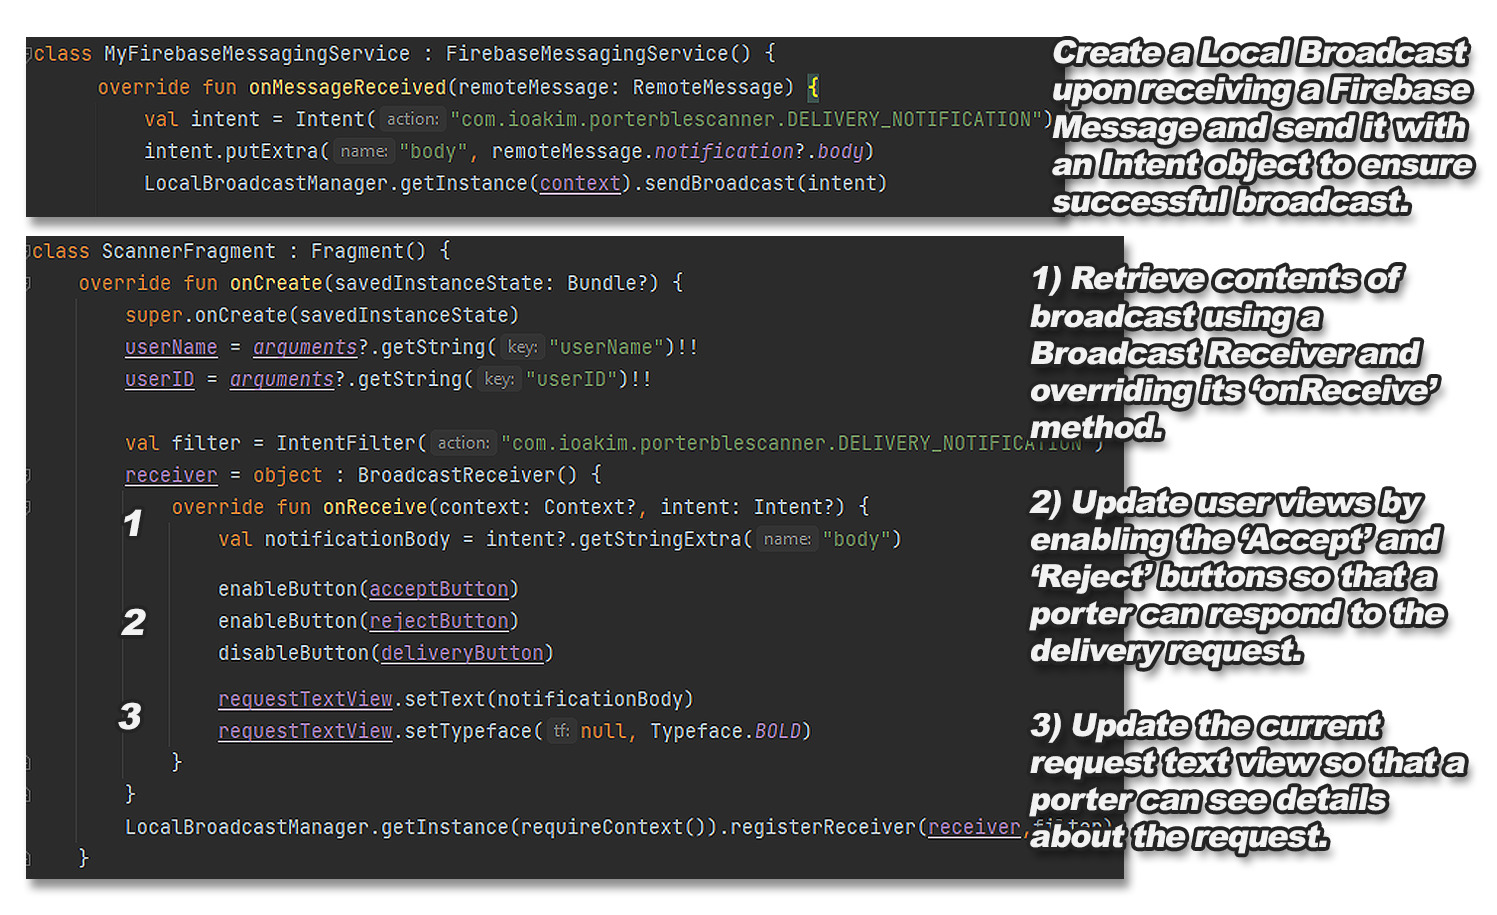
Figure 13: Sending local broadcast from Firebase service and retrieving it in Scanner Fragment
Again, we made use of a fundamental fragment method, this time the 'onCreate' method, to ensure
that the broadcast receiver is setup and listening for requests before
the views of the fragment are even initialised.
Moving on to the final step of the revamp, it was now time to focus on the design of our Scanner
Fragment since all other features were working end-to-end. Our main goal
for this was to have a fragment screen that was intuitive to use, whilst also looking neat and
tidy with the Apian colour scheme. We are proud to say that our final design
met all these targets.
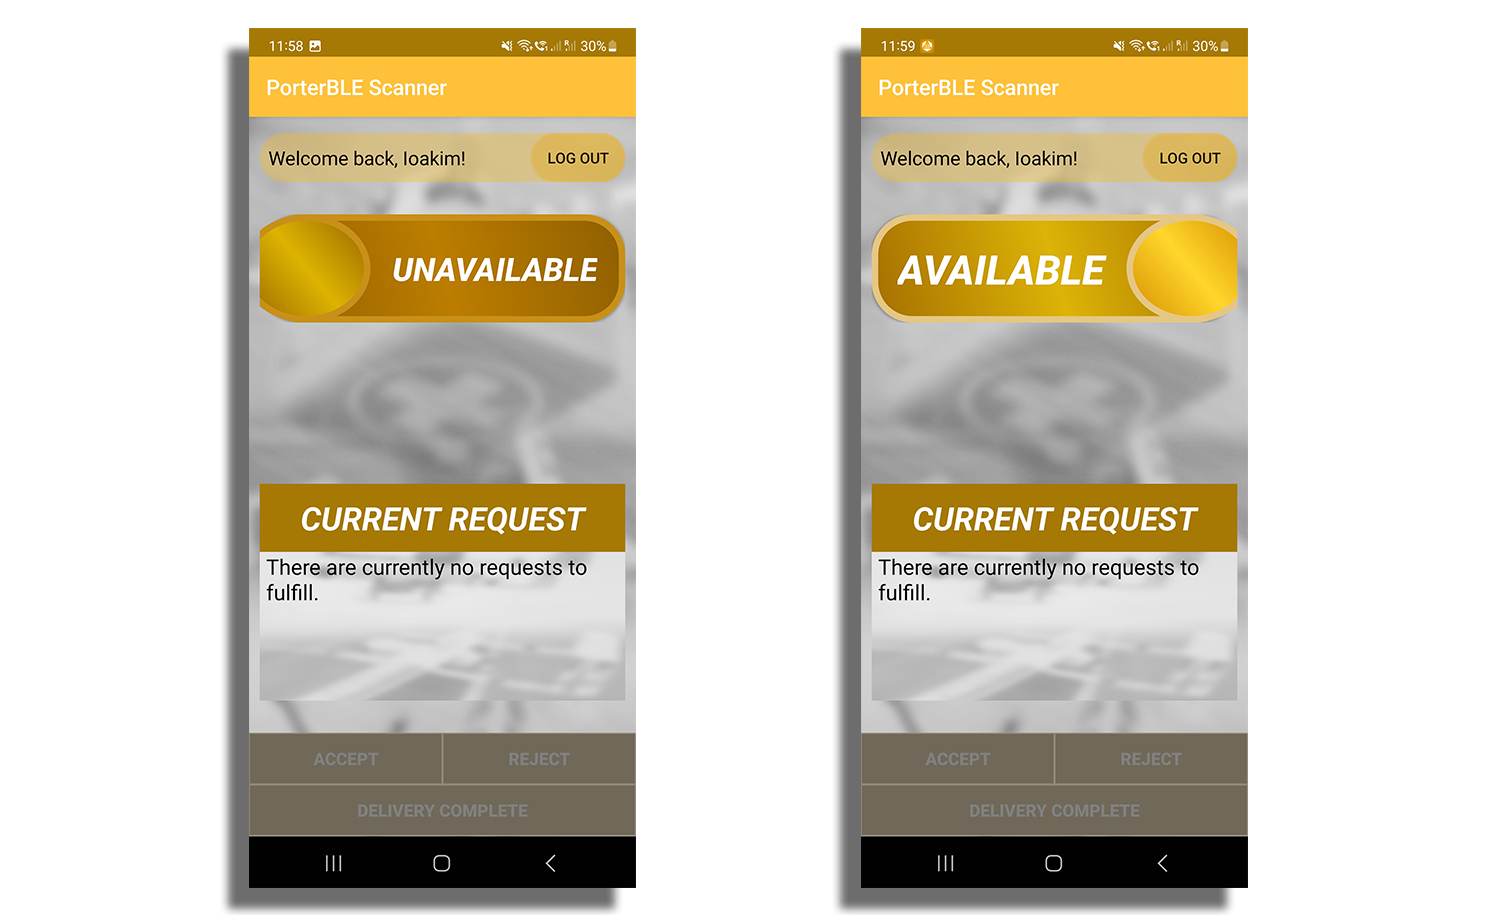
Figure 14: Final Scanner Fragment screen design
As you have noticed, there is no longer a view of the nearest BLE devices. This was only a debugging mechanism that we intended to use during development which we ultimately got rid off because porters do not care to see which beacons are near them or their MAC-addresses.
Packaging the app
Now that we were happy with how the app looked and behaved, we exported it as an APK through Android Studio and distributed it to our client, as a sample app, so we could get their thoughts on the user interface and experience. Being able to export the app as an APK with professional branding also ticked off our penultimate app requirement.
Figure 15: Our Apian branded app icon
Implementing the Final Requirement


We were now approaching the end of our implementation process, with the only requirement left to
meet being: The app should scan in the background for BLE beacons and
transmit them to the backend, without the screen having to be switched on. Evidently,
porters should not have to be on their phones, making sure the app is active all
the time to ensure that their location is being updated. They should only have to indicate that
they are available, triggering the app to start scanning, and they should only
have to interact with the app when they receive a notification request. All the rest should be
taken care of by the app while the porters' devices are in their pockets as they
are fulfilling their day-to-day tasks and deliveries.
In android development, this is not a difficult task to achieve as essentially what we had to do
was keep our Scanner Fragment active in a foreground service. A foreground service is
a service that performs operations even when a user is not interacting with the application that
launched it. It is a service that the user is actively aware of and isn’t
a candidate for the system to kill when low on memory.[7] This is crucial for our
application and is the reason we chose to run our app on a foreground rather than
background service which can get terminated at any time by the operating system, especially with
the latest versions of Android that constantly try to optimize battery
performance.
To implement our final requirement, we coded the Scanner Fragment to launch the service when the
'Available' button is clicked and stop the service to preserve battery when
the 'Unavailable' button is clicked. We also implemented the service to acquire a WakeLock as
shown below in Figure 16:
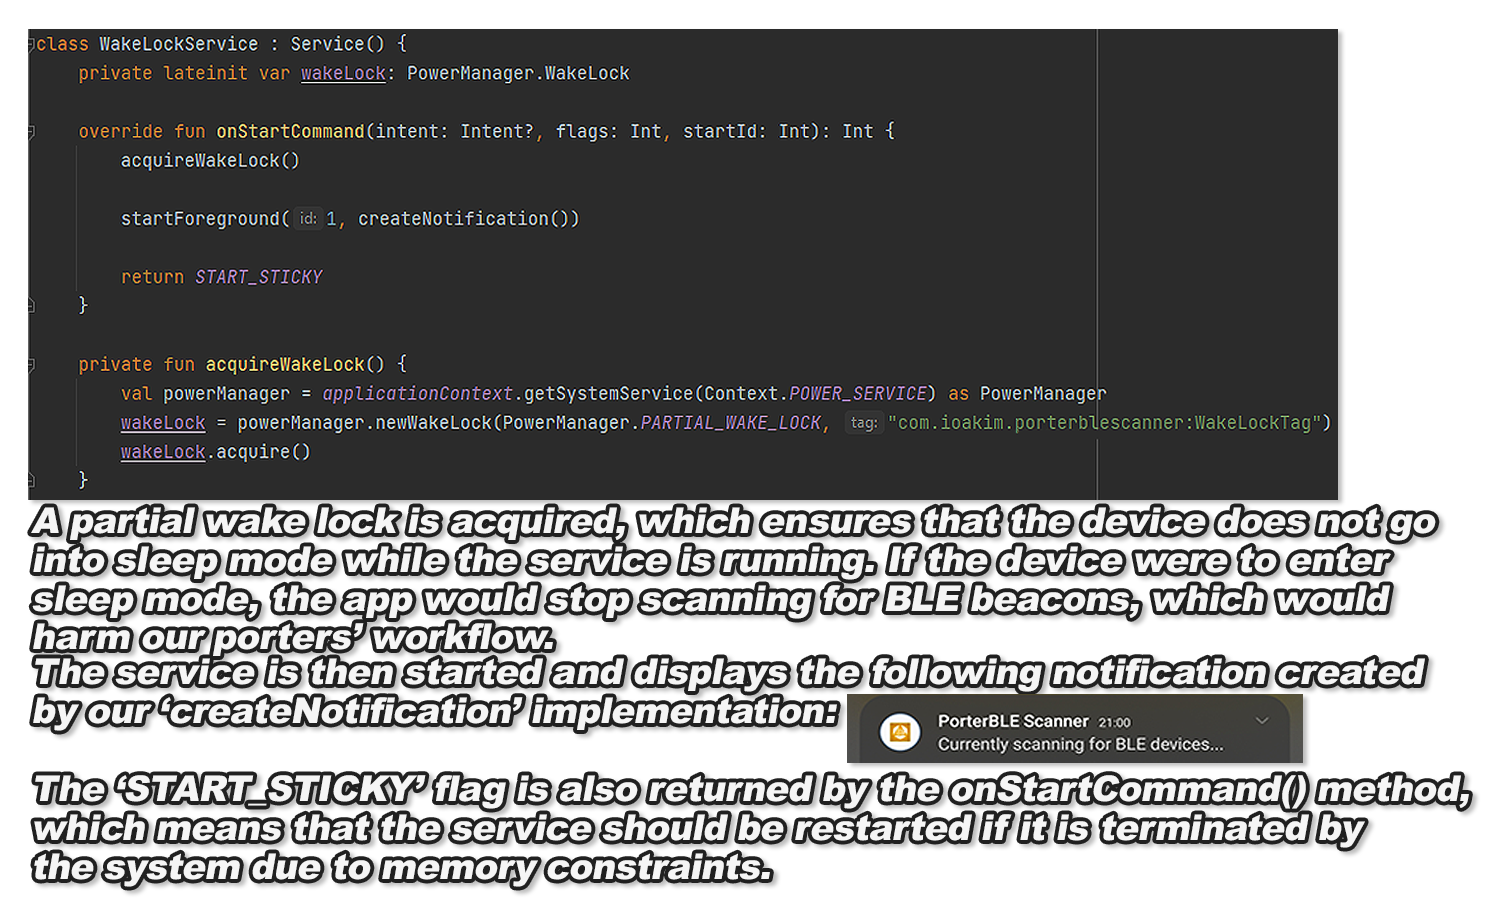
Figure 16: Foreground 'Wake Lock Service' implementation
This was the final and crucial component of our solution which ensured that the app could continue to scan for BLE beacons in the background without being interrupted by the device's operating system. We demonstrated this implementation to our clients, showing that a porter's location kept being updated on our web application's frontend every 5 seconds without us having to navigate the app, and they were very pleased with this implementation, which wrapped up multiple months of learning android development, coding and debugging.
Final App implementation
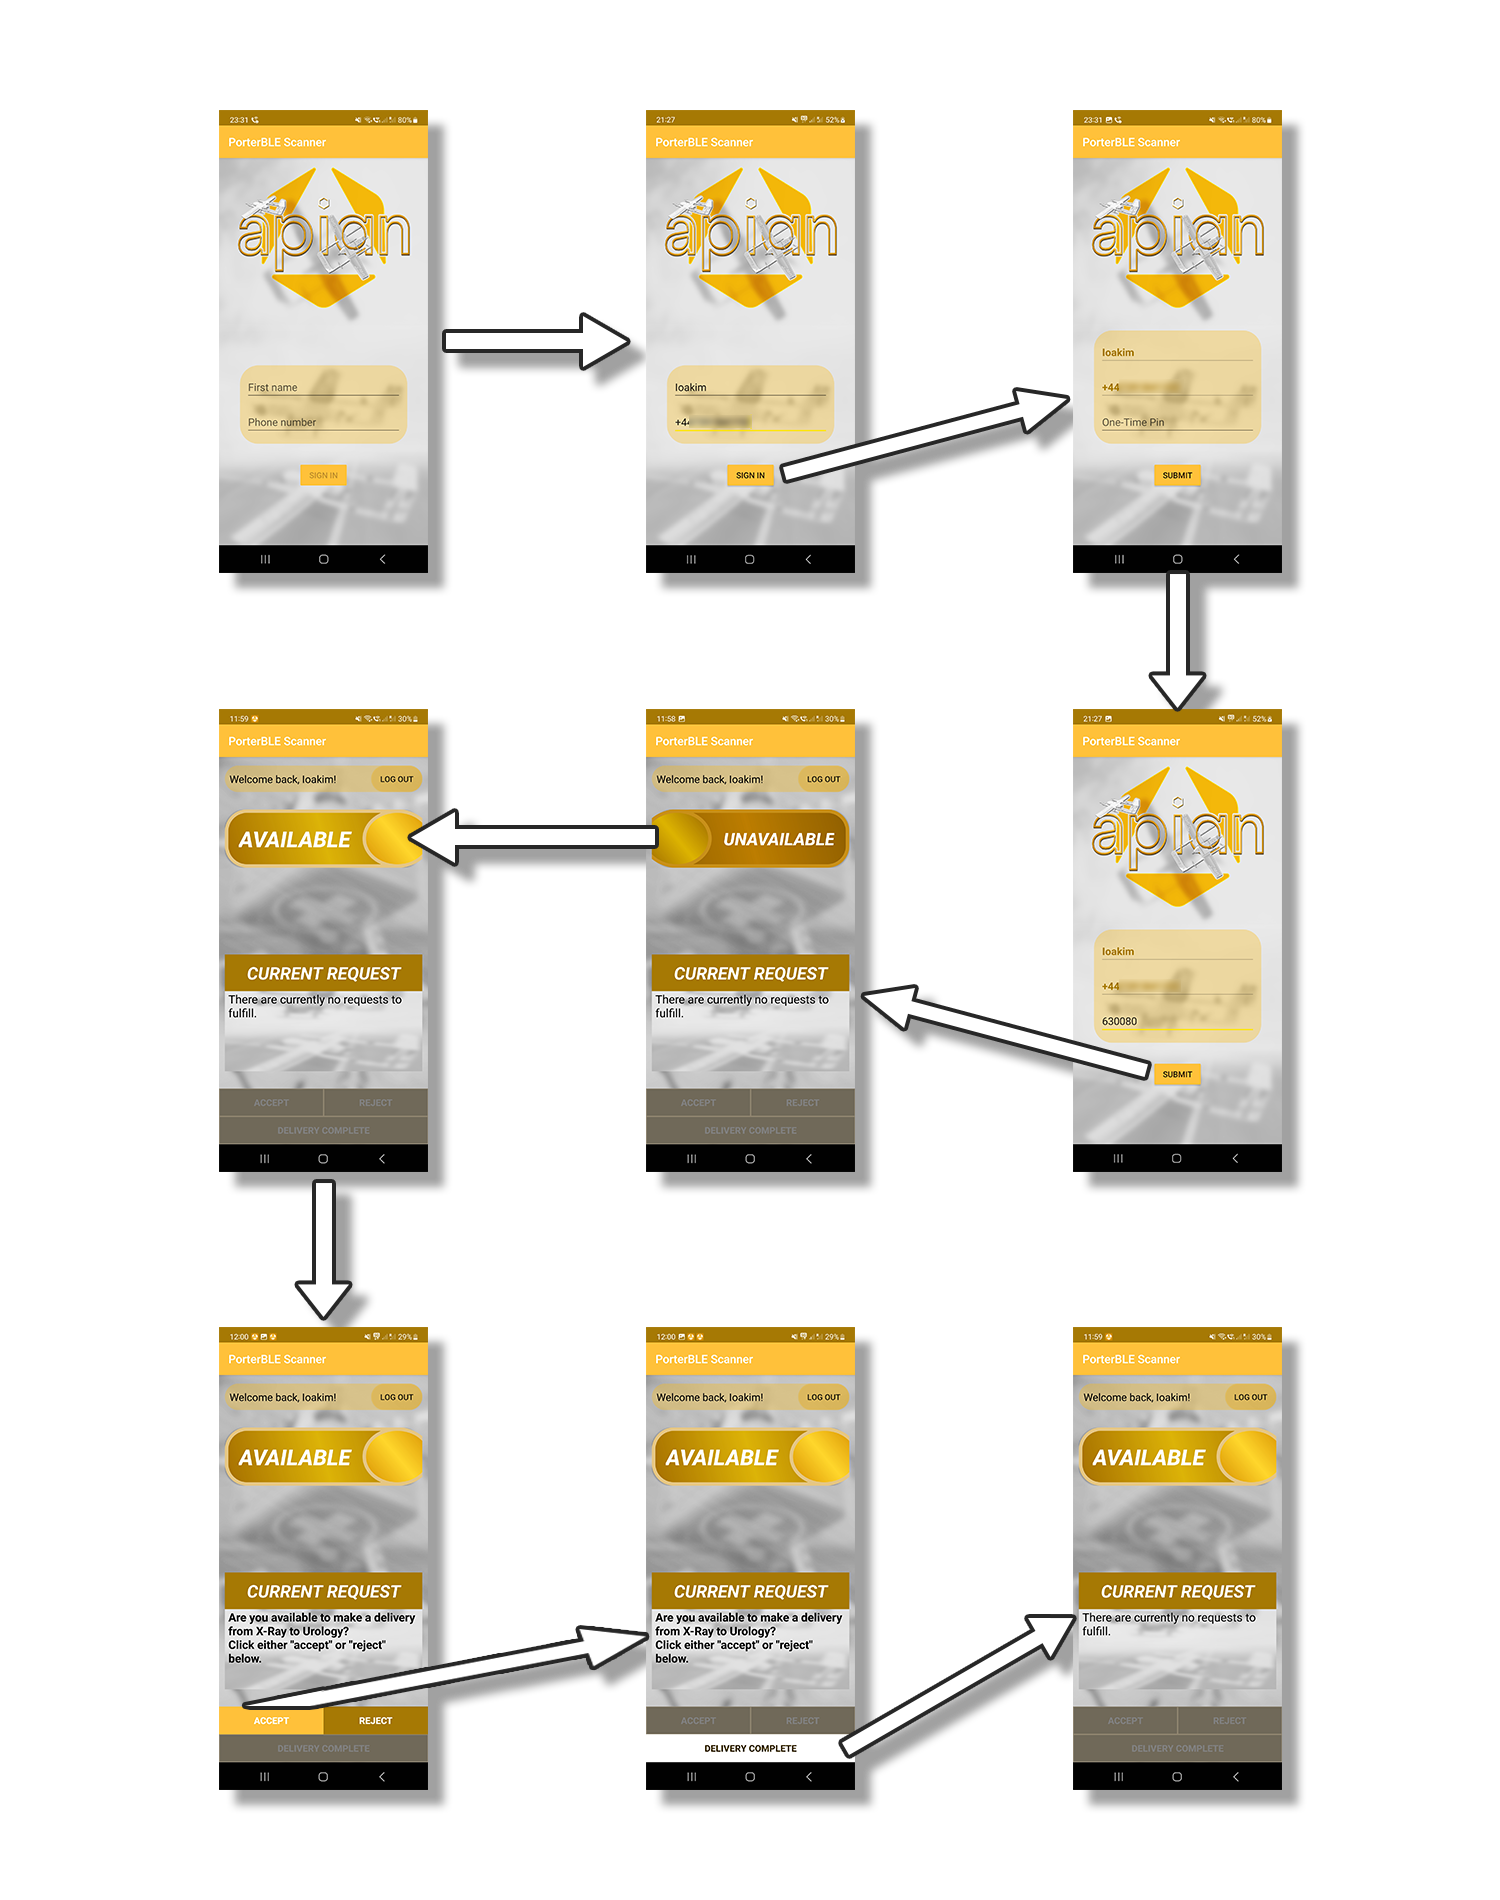
Figure 17: Final App Implementation Data Flow
Bibliography
- Turner, C. (2023). Majority of hospitals not protected by the emergency power plan. The Telegraph. [online] 17 Feb. Available at: https://www.telegraph.co.uk/politics/2022/12/14/majority-hospitals-not-protected-emergency-power-plan-energy/ [Accessed 5 Mar. 2023].
- Lawson, A. and correspondent, A.L.E. (2022). English hospitals make emergency plans amid winter power loss fears. The Guardian. [online] 12 Dec. Available at: https://www.theguardian.com/business/2022/dec/12/english-hospitals-emergency-plans-power-nhs-trusts [Accessed 5 Mar. 2023].
- Hoffman, C. (2022). Why SMS Text Messages Aren’t Private or Secure. How-To Geek. [online] 10 Nov. Available at: https://www.howtogeek.com/709373/why-sms-text-messages-arent-private-or-secure/ [Accessed 5 Mar. 2023].
- Fletcher, J. (2022). Average walking speed: Comparisons by age, sex, and walking for health. [online] Medical News Today. Available at: https://www.medicalnewstoday.com/articles/average-walking-speed [Accessed 13 Mar. 2023].
- Mishra, R. (2020). Fragment Lifecycle in Android. [online] GeeksforGeeks. Available at: https://www.geeksforgeeks.org/fragment-lifecycle-in-android/ [Accessed 14 Mar. 2023].
- Android Developers. (2023). Android Developers > Docs > Reference > Context. [online] Available at: https://developer.android.com/reference/android/content/Context [Accessed 14 Mar. 2023].
- Dholakia, J. (2020). Foreground Services in Android. [online] Medium. Available at: https://medium.com/@engineermuse/foreground-services-in-android-e131a863a33d [Accessed 15 Mar. 2023].