Implementation
Android Development Introduction
This section gives a brief overview of the tools and components using within Android development and the Android application lifecycle. Then we give a detailed account of the backend architecture, UI and Bluetooth implementation.
Project Structure
When you create a new project in Android Studio, it generates a project structure containing directories and files. The key directories include:
- app: Contains the source code and resources specific to the app module.
- res: Contains resources such as layout files, drawable images, strings, and more.
- manifests: Contains the AndroidManifest.xml file, which describes essential information about the app.
- java: Contains the Java/Kotlin source code for the app.
Within the Java directory, packages are organised based on the application's package name, and classes are structured accordingly.
Activities
An activity represents a single screen with a user interface. It is a fundamental component of an Android app. Activities are typically defined by extending the Activity class (or in our case its subclasses like AppCompatActivity). All activities have their own lifecycle methods (onCreate(), onStart(), onResume(), onPause(), onStop(), onDestroy(), etc.), which are called at different stages of the activity's lifecycle. Our application is structured around one singular mainActivity, and uses fragments to switch between pages and modify the UI.
public class ExampleActivity extends AppCompatActivity {

    @Override
    protected void onCreate(Bundle savedInstanceState) {
        // Initialisation tasks here
    }

    @Override
    protected void onStart() {
        super.onStart();
        // The activity is about to become visible
    }

    // ... Other lifecycle methods

}
Fragments
Fragments represent a portion of the user interface or behavior in an activity. Fragments allow for a more modular and flexible UI design, enabling developers to create reusable components. Fragments have similar lifecycle methods (onCreateView(), onActivityCreated(), onStart(), onResume(), onPause(), onStop(), onDestroyView(), onDestroy(), etc.), which are synchronised with the hosting activity's lifecycle.
public class ExampleFragment extends Fragment {

    @Override
    public View onCreateView(LayoutInflater inflater, ViewGroup container, Bundle savedInstanceState) {
        // Inflate the layout for this fragment
        return inflater.inflate(R.layout.fragment_layout, container, false);
    }

    @Override
    public void onViewCreated(View view, Bundle savedInstanceState) {
        super.onViewCreated(view, savedInstanceState);
        // View setup and initialisation tasks here
    }

    @Override
    public void onStart() {
        super.onStart();
        // The fragment is about to become visible
    }

    // ... Other lifecycle methods

}
Activity Lifecycle Management
Activities go through various lifecycle states as they are created, started, resumed, paused, stopped, and destroyed. Understanding and managing the activity lifecycle is crucial for proper resource management, UI updates, and handling user interactions. For example, when an activity is first created, the onCreate() method is called. As it becomes visible to the user, onStart() and onResume() are called. When it loses focus, onPause() is called, and so on. You can override these lifecycle methods to perform specific tasks, such as initialising UI components, saving/restoring instance state, releasing resources, etc.
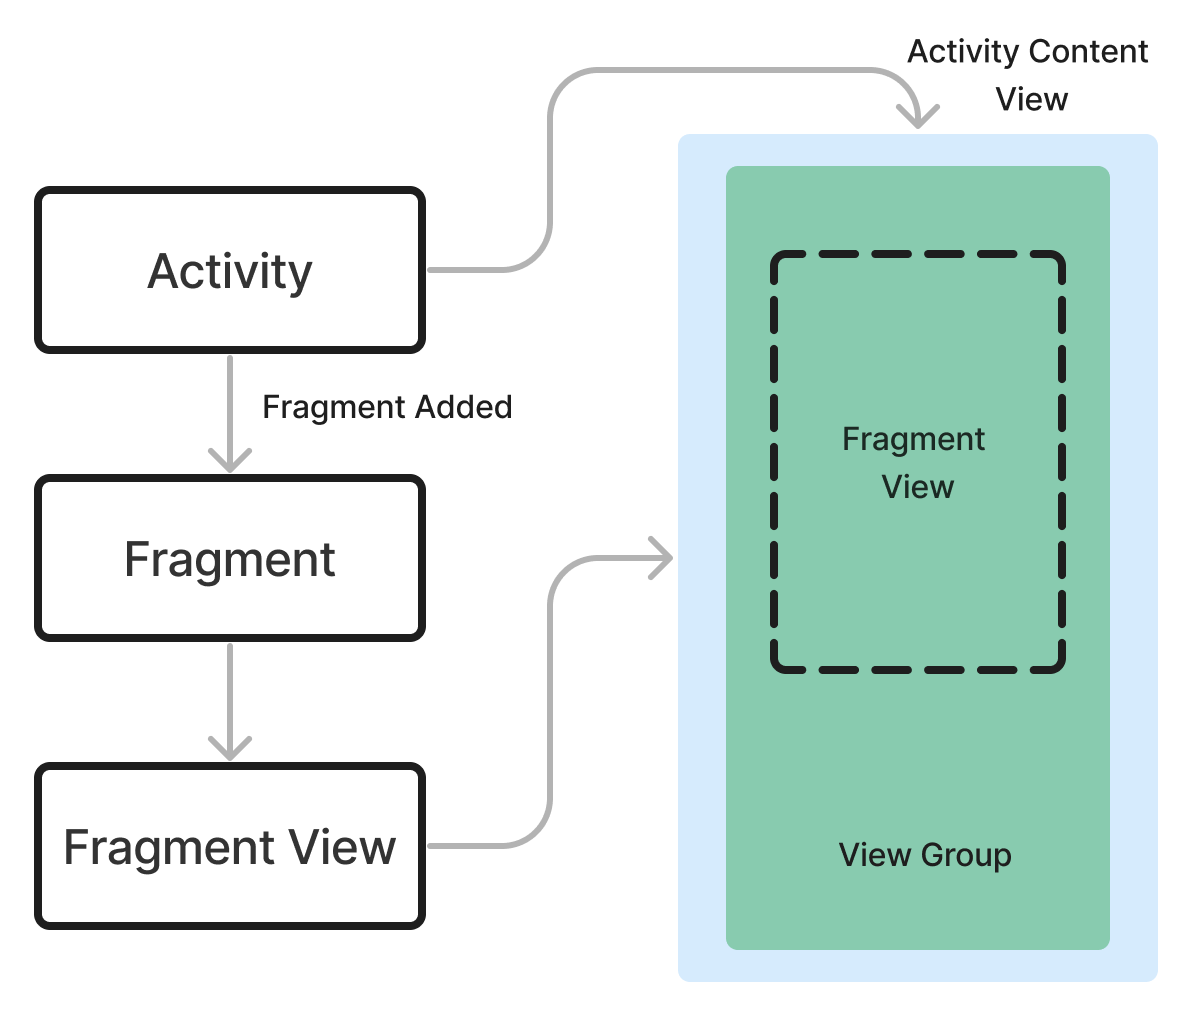
The MainActivity's layout defines various UI components such as the MotionInput switch, settings and help buttons, and the navigation bar. The layout also contains a container responsible for displaying fragments. Each screen within the app is encapsulated within fragments. For instance, all components related to the Trackpad functionality are contained within the TrackPadFragment.
Whenever the user navigates to a different screen, the loadFragment method is invoked to update the fragment displayed in the container. This approach ensures modularity and flexibility within the app's UI structure, making it easier to manage and maintain.
private void loadFragment(Fragment fragment) {
        currentFragment = fragment;
        FragmentTransaction transaction = getSupportFragmentManager().beginTransaction();
        transaction.replace(R.id.container, fragment);
        transaction.commit();
}
The diagram below shows an overview of the fragment lifecycle within an activity. [1]
User Interface (UI) Design
Android provides various UI components and layouts (e.g., TextView, Button, EditText, RecyclerView, ConstraintLayout, LinearLayout, etc.) for building the user interface. In order to build a page/component, UI layouts are designed using XML files (stored in the res/layout directory) or programmatically in Java code. Our XML layouts are primarily developed and edited visually in Android Studio's layout editor.
Bluetooth Connectivity
The Bluetooth connectivity setup is handled primarily by the BluetoothMain class. This class implements the BluetoothProfile.ServiceListener interface, which is a part of the Bluetooth API and is used to monitor the state of a specific Bluetooth profile. It provides a way to receive callbacks when the state of a Bluetooth profile changes, such as when it becomes connected or disconnected.
BluetoothMain initialises the Bluetooth adapter and checks if the device supports the Bluetooth HID (Human Interface Device) profile using adapter.getProfileProxy(main, this, BluetoothProfile.HID_DEVICE). If supported, an instance of the HidDevice class is created when the Bluetooth HID service is connected (onServiceConnected()). The HidDevice manages the connection with the HID device and handles sending/receiving HID reports, which will be discussed in more detail in later sections.
Throughout the codebase, BluetoothMain is accessed using the BluetoothManager class which uses the singleton design pattern. This ensures there is only a single instance of BluetoothMain created throughout the lifetime of the program, and it provides a global point of access to that instance using the getInstance() method.
To connect to a Bluetooth device, the HidDevice instance obtained from BluetoothMain.getHost() is used. The HidDevice.connect(TargetDevice) method initiates the connection process with the specified TargetDevice instance.
TargetDevice targetDevice = ...;
BluetoothMain bluetoothMain = BluetoothManager.getInstance(context);
HidDevice hidDevice = bluetoothMain.getHost().connect(targetDevice);
Bluetooth Scan
Scanning for nearby Bluetooth devices is performed by the Discovery class, which can be obtained from BluetoothMain.getDiscovery(). The Discovery.startScan() method initiates the scan process, and discovered devices are reported through the DeviceFoundListener interface.
BluetoothMain bluetoothMain = ...;
Discovery discovery = bluetoothMain.getDiscovery();
discovery.setDeviceFoundListener(device -> {
    // Handle discovered device
});
discovery.startScan();
The Discovery class is responsible for searching for nearby Bluetooth devices that are discoverable for Bluetooth connections. When the startDiscovery() method is called, it first checks if the Bluetooth adapter is not already discovering devices. If not, it registers a broadcast receiver (receiver) to listen for the BluetoothDevice.ACTION_FOUND intent filter and then starts the discovery process using adapter.startDiscovery().
public void startDiscovery() {
    ...
    if (!adapter.isDiscovering()) {
        IntentFilter filter = new IntentFilter(BluetoothDevice.ACTION_FOUND);
        context.registerReceiver(receiver, filter);
        adapter.startDiscovery();
    }
    ...
}
The broadcast receiver (receiver) is an instance of BroadcastReceiver (from the Android SDK) that overrides the onReceive method. This method is called whenever a Bluetooth device is found during the discovery process. Inside the onReceive method, the code checks if the received object is a desired BluetoothDevice object (not null and has not been encountered before) using the foundAddresses set. If the device name, address, and address uniqueness conditions are met, it saves the device and posts a DiscoveryUpdateEvent to the EventBus, which can be used by other components to handle the updated list of discovered devices.
private final BroadcastReceiver receiver = new BroadcastReceiver() {
    @Override
    public void onReceive(Context context, Intent intent) {
        ...
        if (found device is valid and not a repeat)
            results.add(new TargetDevice(address, name));
            EventBus.getDefault().post(new DiscoveryUpdateEvent(results));
        }
        ...
        }
    }
}
In summary, the code uses the Android Bluetooth API to start and stop the Bluetooth device discovery process, registers a broadcast receiver to listen for discovered devices, and maintains a list of unique discovered devices. It also uses the EventBus library to post events whenever the list of discovered devices is updated, allowing other components to react to the changes.
Bluetooth Direct Connect
The user is also able to directly connect to a bluetooth device if their device is not showing up in the bluetooth scan. The bluetooth fragment enables the user to manually input their Bluetooth MAC address and the BluetoothMain connectivity code will be run straight away.
After a user pairs their device directly or using the Bluetooth scan, they can then simply click on their device in the Homescreen UI to disconnect or reconnect. More devices can also be added and the user can easily switch between them without having to repeat the pairing process.
Bluetooth Autoreconnect
The BluetoothMain.AttemptAutoReconnect() method attempts to reconnect to a previously saved Bluetooth device address. It retrieves the saved address from the Settings class and attempts to connect to the corresponding TargetDevice after a 1.5 second delay, allowing for Bluetooth setup to complete.
BluetoothMain bluetoothMain = ...;
bluetoothMain.AttemptAutoReconnect();
The AttemptAutoReconnect function checks if the auto reconnect feature is turned on from settings and if a valid device to reconnect to exists. Then it goes through the cache of devices stored to find the most recently connected device, and attempts to connect with the aformentioned delay.
public void AttemptAutoReconnect() {
    ...
    if (auto reconnect is on and the MAC address exists) {
        return;
    }

    for (TargetDevice device : devices.getAllDevices()) {
        if (previously connected device is found) {
            ...
            handler.postDelayed(() -> getHost().connect(device), 1500);
        }
    }
}
HID Devices
The HidDevice class is responsible for managing the connection and communication with a Bluetooth HID device. It handles various types of input, including mouse, keyboard, and gamepad input, and sends the appropriate HID reports to the connected device.
HID reports define the specific information that is sent with each packet in an HID report, and in our program they are defined in the Descriptor class. For example, this is the report structure of the mouse descriptor.
Report structure:
   7 6 5 4 3 2 1 0 |
   ----------------|---
   0 0 0 0 0 a b c | 1st byte (3 1-bit buttons, for left-click, right-click, & middle-click)
   <    x pos    > | 2nd byte (8 bit integer for x coordinate of cursor)
   <    y pos    > | 3rd byte (8 bit integer for y coordinate of cursor)
   <    scroll   > | 4th byte (8 bit integer for scroll)
As you can see, reports are formatted in little endian, meaning the bits go from largest to smallest. Using descriptors, we can write code in the HidDevice class to construct bluetooth reports based on inputs from the user on the android app. Inputs from the user are streamlined through the BluetoothInput class to HidDevice to be used in creating reports. We will break down what descriptors actually look like in more depth in each devices section.
Mouse Input
The mouse HID descriptor is composed of 5 distinct sections.
Section 1: Identifying the Device Type
0x05, 0x01,        // USAGE_PAGE (Generic Desktop)
0x09, 0x02,        // USAGE (Mouse)
(byte) 0xa1, 0x01, // COLLECTION (Application)
(byte) 0x85, 0x01, //   REPORT_ID (1)
This section identifies the device type as a mouse and specifies that it belongs to the Generic Desktop usage page. It also starts a new collection (group of input/output data) for an Application and sets the report ID to 1. The report ID part is important, as it can be used to combine multiple reports, enabling both the mouse and keyboard to be used at the same time.
Section 2: Mouse Buttons
0x09, 0x01,        //   USAGE (POINTER)
(byte) 0xa1, 0x00, //   COLLECTION (Physical)
0x05, 0x09,        //     USAGE_PAGE (Button)
0x19, 0x01,        //     USAGE_MINIMUM (Button 1)
0x29, 0x03,        //     USAGE_MAXIMUM (Button 3)
0x15, 0x00,        //     LOGICAL_MINIMUM (0)
0x25, 0x01,        //     LOGICAL_MAXIMUM (1)
0x75, 0x01,        //     REPORT_SIZE (1)
(byte) 0x95, 0x03, //     REPORT_COUNT (3)
(byte) 0x81, 0x02, //     INPUT (Data,Var,Abs)
This section defines the mouse buttons. It specifies that there are three buttons (left, right, and middle/scroll), and each button is represented by a single bit (0 or 1) in the report.
Section 3: Padding
0x75, 0x05,        //     REPORT_SIZE (5)
(byte) 0x95, 0x01, //     REPORT_COUNT (1)
(byte) 0x81, 0x01, //     INPUT (Const,Var,Abs)
This section adds 5 bits of padding to make the total report size a multiple of 8 bits (1 byte). Byte alignment allows us to put the x and y coordinates that follow in their own bytes and makes our life easier when writing HidDevice code, but is not 100% necessary.
Section 4: Mouse Movement
0x05, 0x01,        //     USAGE_PAGE (Generic Desktop)
0x09, 0x30,        //     USAGE (Y)
0x09, 0x31,        //     USAGE (X)
0x09, 0x38,        //     USAGE (WHEEL)
0x15, (byte) 0x81, //     LOGICAL_MINIMUM (-127)
0x25, 0x7f,        //     LOGICAL_MAXIMUM (127)
0x75, 0x08,        //     REPORT_SIZE (8)
(byte) 0x95, 0x03, //     REPORT_COUNT (3)
(byte) 0x81, 0x06, //     INPUT (Data,Var,Rel)
This section defines the mouse movement data, including the X and Y coordinates, and the scroll wheel. Each of these values is represented by a single byte (8 bits) in the report, with a range of -127 to 127.
Section 5: End Collections
(byte) 0xc0,       //   END_COLLECTION
(byte) 0xc0        //   END_COLLECTION
This section simply ends the two collections that were started earlier (Physical and Application).
In summary, the mouse descriptor defines a report structure that includes:
- 3 bits for the mouse button states (left, right, middle/scroll)
- 5 bits of padding
- 1 byte for the X coordinate
- 1 byte for the Y coordinate
- 1 byte for the scroll wheel movement
This report structure allows the HidDevice class to construct and send mouse input reports to the connected Bluetooth HID device.
The sendMouseInput method in the HidDevice class is used to send mouse input to the connected HID device. It takes five parameters: leftClick, rightClick, x, y, and scroll, which are passed from the BluetoothInput class. These parameters represent the state of the left and right mouse buttons, the X and Y coordinate movements, and the scroll wheel movement, respectively.
The method constructs a 4-byte report where the first byte encodes the mouse button states, and the remaining three bytes represent the X, Y, and scroll wheel movements. The report is then sent to the HID device using the service.sendReport method from the Bluetooth API.
public void sendMouseInput(boolean leftClick, boolean rightClick, int x, int y, int scroll) {
    // ...
    byte[] report = new byte[4];
    report[0] = (byte) ((leftClick ? 1 : 0) | 0 | (rightClick ? 2 : 0));
    report[1] = (byte) x;
    report[2] = (byte) y;
    report[3] = (byte) scroll;
    try {
        service.sendReport(device, 0x01, report);
    } catch (SecurityException e) {
        Log.e("MyApp", "Permission was not granted: ", e);
    }
}
Keyboard Input
The Keyboard HID descriptor also consists of 5 sections.
Section 1: Identifying the Device Type
0x05, 0x01, // USAGE_PAGE (Generic Desktop)
0x09, 0x06, // USAGE (Keyboard)
(byte) 0xa1, 0x01, // COLLECTION (Application)
This section identifies the device type as a keyboard and specifies that it belongs to the Generic Desktop usage page. It also starts a new collection for an Application.
Section 2: Modifier Keys
0x05, 0x07, // USAGE_PAGE (Keyboard)
0x19, (byte) 0xe0, // USAGE_MINIMUM (Keyboard LeftControl)
0x29, (byte) 0xe7, // USAGE_MAXIMUM (Keyboard Right GUI)
0x15, 0x00, // LOGICAL_MINIMUM (0)
0x25, 0x01, // LOGICAL_MAXIMUM (1)
0x75, 0x01, // REPORT_SIZE (1)
(byte) 0x95, 0x08, // REPORT_COUNT (8)
(byte) 0x81, 0x02, // INPUT (Data, Variable, Absolute)
This section defines the modifier keys, such as Ctrl, Shift, Alt, and GUI (Windows/Command key). It specifies that there are 8 modifier keys, each represented by a single bit (0 or 1) in the report.
Section 3: Reserved Byte
(byte) 0x95, 0x01, // REPORT_COUNT (1)
0x75, 0x08, // REPORT_SIZE (8)
(byte) 0x81, 0x01, // INPUT (Constant)
This byte is reserved by the protocol and therefore always remains constant.
Section 4: Key Arrays
(byte) 0x95, 0x06, // REPORT_COUNT (6)
0x75, 0x08, // REPORT_SIZE (8)
0x15, 0x00, // LOGICAL_MINIMUM (0)
0x25, 0x65, // LOGICAL_MAXIMUM (101)
0x05, 0x07, // USAGE_PAGE (Key Codes)
0x05, 0x01, // USAGE_MINIMUM (Reserved (no event indicated))
0x05, 0x01, // USAGE_MAXIMUM (Keyboard Application)
0x05, 0x01, // INPUT (Data,Array)
This section defines the key arrays, which are used to report the pressed keys. It specifies that there are 6 key arrays, each containing a single byte (8 bits). The bytes in the key arrays represent the key codes for the pressed keys, with values ranging from 0 to 101 (decimal).
Section 5: End Collection
(byte) 0xc0 // END_COLLECTION
This section simply ends the Application collection that was started earlier.
In summary, the keyboard descriptor defines a report structure that includes:
- 8 bits for the modifier keys (Ctrl, Shift, Alt, GUI)
- 8 reserved bits
- 6 bytes (8 bits each) for the key arrays, representing the pressed keys
This report structure allows the HidDevice class to construct and send keyboard input reports to the connected Bluetooth HID device.
The sendKeyboardInput method is used to send keyboard input to the connected HID device. It takes four parameters: key, isPressed, modifier, and convert. The key parameter represents the character or HID usage code to send, isPressed indicates whether the key is being pressed or released, modifier represents any modifier keys (e.g., Shift, Ctrl, Alt) that should be applied, and convert specifies whether the key parameter should be converted from a character to its corresponding HID usage code.
The method constructs an 8-byte report where the first byte represents the modifier keys, the second byte is reserved, and the remaining bytes contain the key code(s) to be sent. If the convert parameter is true, the convertKeyToHIDCode method is used to convert the character to its corresponding HID usage code.
public void sendKeyboardInput(char key, boolean isPressed, byte modifier, boolean convert) {
    // ...
    byte[] report = new byte[8];
    report[0] = modifier;
    report[1] = 0;
    if (isPressed) {
        if (convert) {
            report[2] = convertKeyToHIDCode(key);
        } else {
            report[2] = (byte) key;
        }
    } else {
        // Clear key codes for key release
        for (int i = 2; i < 8; i++) {
            report[i] = 0;
        }
    }
    try {
        service.sendReport(device, 8, report);
    } catch (SecurityException e) {
        Log.e("MyApp", "Permission was not granted: ", e);
    }
}
The convertKeyToHIDCode method is a helper method that converts a character to its corresponding HID usage code using a predefined mapping. It returns the HID usage code as a byte value, or 0 if no mapping exists for the given character.
Gamepad Input
The sendGamePadInput method is used to send gamepad input to the connected HID device. It takes several parameters representing the state of various gamepad controls, such as joystick positions, buttons, and mapping characters for different inputs.
The method combines the joystick positions and button states into mouse and keyboard inputs, which are then sent to the device using the sendMouseInput and sendKeyboardInput methods, respectively.
public void sendGamePadInput(int right_joystick_x, int right_joystick_y, int left_joystick_x, int left_joystick_y, boolean left, boolean up, boolean right, boolean down, boolean a, boolean b, boolean x, boolean y, char upMap, char leftMap, char downMap, char rightMap, char aMap, char bMap, char xMap, char yMap) {
    // ...
    if (aMap == '~' && bMap == '`') {
        this.sendMouseInput(a, b, right_joystick_x, right_joystick_y, 0);
    } else {
        this.sendMouseInput(false, false, right_joystick_x, right_joystick_y, 0);
        ab = true;
    }

    if (left || up || right || down || x || y || ((a || b) && ab)) {
        // Send keyboard input for pressed buttons
        if (left) {
            sendKeyboardInput(leftMap, true, (byte) 0x00, true);
        }
        // ... (similar code for other buttons)
    } else if (left_joystick_y == 0 && left_joystick_x == 0) {
        this.sendKeyboardInput(' ', false, (byte) 0x00, true);
    }
}
The Gamepad input method demonstrates the flexibility of the HidDevice class in handling various types of input and mapping them to appropriate HID reports for the connected device.
The HidDevice class provides a convenient interface for managing the connection and communication with a Bluetooth HID device. It offers methods for sending mouse, keyboard, and gamepad input, as well as helper methods for converting characters to HID usage codes and handling modifier keys. This class plays a crucial role in enabling the application to interact with HID devices and provide a seamless user experience.
BluetoothInput
The BluetoothInput class is responsible for triggering the transmission of data reports. It runs on a seperate thread to the main app thread and consistiently loops at a set interval. The class contains variables which indicate the state of each input component, for example, the mouse's left click buttons state is tracked using private boolean leftClick. These state variables are then updated in the respective fragments using setter methods, for example, when the left click button is pressed on the UI, its setter method is called:
...
if (id == R.id.left_click_button){
    bluetoothInput.setLeftClick(isPressed);
}
...
The sendMouseInput, sendKeyboardInput, and sendGamepadInput methods are called at each iteration of the loop with the current state of each variable. This method allows for the implementation of features such as click and hold by manually updating the click states to true or false, and also ensures smooth mouse movement.
To maximise efficiency, this loop runs only once a device is connected and is then stopped once a connection is lost. The loop rate is calculated to send inputs at 150Hz. This ensures smooth mouse movement on all device screens, minimising laggy movements.
public void start() {
    if (running) {
        return;
    }
    Thread thread = new Thread(this::run);
    running = true;
    transmissionRate = PreferenceManager.getDefaultSharedPreferences(context).getInt("CommunicationTransmissionRate", 100);
    thread.start();
}

private void run() {
    long lastTime = System.nanoTime();

    while (running) {
        long current = System.nanoTime();
        float NANO_TO_FULL = 1e9f;
        if (current - lastTime >= NANO_TO_FULL / transmissionRate) {
            if (isTrackPad) {
                sendTrackPadUpdate();
            }
            if (isKeyboard) {
                sendKeyboardUpdate();
            }
            if (isGamePad) {
                sendGamePadUpdate();
            }
                lastTime = current;
        }
    }
}
To facilitate sending long strings, a queue is utilised. When a string needs to be sent as keyboard input, its characters are added to the queue. During each iteration, the keyboard report is filled with any characters remaining in the queue until it's emptied. This approach allows for sending strings longer than the number of characters that fit into the keyboard HID report. However, given our use of threading, we took extra care to prevent race conditions. Synchronisation blocks are applied to all methods accessing the queue, coupled with the utilisation of a thread-safe queue implementation. This ensures smooth operation without the risk of data corruption or inconsistency due to concurrent access.
public synchronized void queueString(String input) {
    for (char ch : input.toCharArray()) {
        charQueue.add(ch);
    }
    keyPressFlag = true;
    sendKeyboardUpdate();
}
Key Fragments
Mouse Fragment
The mouse fragment uses a trackpad to convert user finger movements on screen into relative (x,y) mouse movements. This is done by calculating the relative difference in position between the new touch event and the previous touch event. This results in an (x,y) value that can be sent as mouse movement to the BluetoothInput instance.
switch (action) {
    case MotionEvent.ACTION_DOWN:
        previousX = currentX;
        previousY = currentY;
        addCircleView(currentX, currentY);
        break;

    case MotionEvent.ACTION_MOVE:
        float deltaX = currentX - previousX;
        float deltaY = currentY - previousY;

        // Deal with invert Y axis setting
        deltaY = settings.isInvertTrackpadEnabled() ? (deltaY * -1) : deltaY;

        previousX = currentX;
        previousY = currentY;

        trackPadInput.changeXPosition(deltaX);
        trackPadInput.changeYPosition(deltaY);

        updateCirclePosition(currentX, currentY);
        break;
}
The same method is used with the scroll bar, except, we only consider movement's in the Y-axis in this situation and both left and right click are dealt with using simple on-screen buttons.
Keyboard Fragment
The keyboard fragment lanuches the devices soft-keyboard when the fragments view is created:
...
InputMethodManager imm = (InputMethodManager) getActivity().getSystemService(Context.INPUT_METHOD_SERVICE);
imm.showSoftInput(inputField, InputMethodManager.SHOW_IMPLICIT);
...
This is set to write to an empty text input field that has been removed from view. When the user presses keys on the keyboard they are added to this field which we can then send to the character code they entered to BluetoothInput to transmit over Bluetooth. This is done by adding it to the queue defined earlier in the BluetoothInput class.
@Override
public void onTextChanged(CharSequence s, int start, int before, int count) {
    int currentLength = s.length();
    if (currentLength > previousLength) { // Text was added
        char key = s.charAt(s.length() - 1);
        if ((key != nonVisibleChar) && ((currentLength - previousLength) == 1)) {
            keyboardInput.queueCharacter(key);
        } else if ((key != nonVisibleChar) && ((currentLength - previousLength) > 1)) {
            String newText = s.toString();
            String addedText = newText.substring(start, start + count - before);

            keyboardInput.queueString(addedText);
        }
    } else if (currentLength < previousLength) { // Text was removed (backspace)
        keyboardInput.queueCharacter('\b');
    }
}
We utilise toggle buttons to manage keyboard modifiers like Control and Command. Upon the user pressing these keys, we update the modifier key in BluetoothInput, which is transmitted as part of the report. Subsequently, when a user clicks a key, the toggle is automatically deactivated, releasing the modifier. It's crucial to ensure the release of all modifiers to prevent unexpected Bluetooth input in subsequent interactions. Therefore we release modifers after every key that is sent.
if (isCtrlPressed) {
    getActivity().runOnUiThread(() -> {
        isCommandPressed = false;
        isAltPressed = false;
        MaterialButton commandCheckBox = getView().findViewById(R.id.commandButton);
        MaterialButton altCheckBox = getView().findViewById(R.id.altButton);
        commandCheckBox.setChecked(false);
        altCheckBox.setChecked(false);
        keyboardInput.setModifier((byte) 0);
   });

    keyboardInput.setModifier((byte) 1);
} else {
    keyboardInput.setModifier((byte) 0);
}
The arrow keys and volume buttons are all modelled as simple buttons and are handled in the same way as buttons in the mouse fragment.
Gamepad Fragment
The gamepad fragment implemetes a games controller. It uses simple on-screen button components to deal with buttons, then when clicked their respective listener triggers a call to BluetoothInput where the button event state is updated. The joystick's of the gamepad are created by drawing two circles on screen, then when the user touches the inner circle a touch event is observed on screen. The difference between the location of the touch event and the origin of the joystick is calculated and used to move the location of the inner circle on the screen. This enables us to model the movment of a joystick.
private void updateJoystickPosition(int touchX, int touchY) {
    // Limit the joystick movement to the outer circle
    double angle = Math.atan2(touchY - (float) getHeight() / 2, touchX - (float) getWidth() / 2);
    double distance = Math.min(Math.sqrt(Math.pow(touchX - (float) getWidth() / 2, 2) + Math.pow(touchY - (float) getHeight() / 2, 2)), Math.min(getWidth(), (float) getHeight()) / 3);

    joystickPosition.x = (int) (getWidth() / 2 + distance * Math.cos(angle));
    joystickPosition.y = (int) (getHeight() / 2 + distance * Math.sin(angle));
}
Next we notify the joystick listener that a joystick move event has occured with the angle and strength of the movement. This is then used to calculate an (x,y) value for the movement which is then used as input for the joystick movement.
private void handleRightJoyStickMovement(int angle, int strength) {
    // Conversion from polar to cartesian coordinates
    double radians = Math.toRadians(angle);
    double xValue = (strength * Math.cos(radians)) / 3;
    double yValue = (strength * Math.sin(radians)) / 3;

    // Update input
    gamePadInput.changeRightXPosition(xValue);
    gamePadInput.changeRightYPosition(yValue);
}
MotionInput Integration
MotionInput for Android was a collaborative effort involving several teams of master's and final-year students. We worked together to integrate their individual contributions into our app. A toggle switch is displayed on the top-left corner of the screen. Activating this switch updates the app's state in the main activity, setting motionInputEnabled to true.
Upon navigating to mouse, keyboard, or gamepad functionalities, the corresponding MotionInput fragment is invoked. Our team introduced a BaseMotionInputFragment, for other teams to inherit and extend upon during the integration process. This base fragment facilitated the setup of a dropdown menu on the screen, allowing users to seamlessly switch between MotionInput input modes, such as Hands, Face, or Eyegaze. When displaying the actual MotionInput fragment, this dropdown is overlayed ontop of it's view, ensuring smooth transition and usability.
Speech Mode
One of the master teams implemented the speech mode component, which was then integrated into the app. With this integration, our team established a set of speech commands enabling users to navigate the app using their voice. When the speech component detects the user's voice, it converts it into a string. This string is then parsed to identify the command given by the user. Once the command is recognised, we manually trigger the corresponding event. For instance, if the user says "open settings," we call the method responsible for opening the settings page, simulating the action typically triggered by a button event.
@SuppressLint("SetTextI18n")
@Override
public void executeLastCommand(String lastCommand) {
    String cmd = lastCommand.toLowerCase();
    switch (cmd) {
        case "open settings":
            openBottomSheetSettings();
            return;
        ...
    }
}
Miscellaneous
Settings Pages
The app's user settings and preferences are managed using a singleton design pattern implemented in a Settings class. This class ensures there's only one instance throughout the app's lifecycle. User settings are stored as key-value pairs, with each setting having a constant acting as its unique key. The Settings class provides methods for setting and getting individual settings. These methods interact with system preferences to store and retrieve settings, ensuring that user preferences are remembered even when the app is closed and reopened.
public class Settings {
    private static Settings instance;
    private final SharedPreferences preferences;
    private static final String KEY_AUTO_RECONNECT = "autoReconnect";

    private Settings(Context context) {
        preferences = context.getSharedPreferences(PREF_NAME, Context.MODE_PRIVATE);
    }

    public static synchronized Settings getInstance(Context context) {
        if (instance == null) {
            instance = new Settings(context.getApplicationContext());
        }
        return instance;
    }

    public boolean isHighAutoReconnectEnabled() {
        return preferences.getBoolean(KEY_AUTO_RECONNECT, false);
    }

    public void setAutoReconnect(boolean enabled) {
        preferences.edit().putBoolean(KEY_AUTO_RECONNECT, enabled).apply();
    }
}
In the apps backend calls to the getter methods are needed when we need to apply different logic depending on what settings the user has done configured. For example, we set apply a multiplier to mouse input depending on what sensitivity the user has configured:
private void sendTrackpadUpdate() {
    ...
    float sensitivityMultiplier = defaultMultiplier + (settings.getMouseSensitivity() - 5) * stepMultiplier;
    int x = (int) (xPos * sensitivityMultiplier);
    int y = (int) (yPos * sensitivityMultiplier);
    ...
}
Users modify settings using settings fragments which are displayed on the UI when they click the settings icon on the top-right of the screen. Each input mode has it's own settigs fragment which displays all it's respective settings. When the user clicks the settings icon the MainActivity determines which fragment to launch depending on the apps currentPageState
private void openBottomSheetSettings() {
    switch (currentPageState) {
        case STATE_HOME:
            bottomSheetHomeSettings.show(getSupportFragmentManager(), bottomSheetHomeSettings.getTag());
            currentDialog = bottomSheetHomeSettings;
            break;
        ...
    }
}
Then each settings fragment contains a combination of switches, sliders, and drop-down menus based on the format of the corresponding setting. When a user interacts with any of these UI elements, the listener method associated with it is triggered. This listener method, in turn, calls the relevant setter method in the Settings class. This mechanism ensures that whenever a user adjusts a setting, the corresponding value is updated in the settings storage instantly.
Dark Mode
Dark mode is toggled in the general settings. When enabled the global app theme is switched from res/values/themes.xml (light) to res/values/themes.xml (dark):
...
settings.setDarkMode(isChecked);
if (isChecked) {
    AppCompatDelegate.setDefaultNightMode(AppCompatDelegate.MODE_NIGHT_YES);
} else {
    AppCompatDelegate.setDefaultNightMode(AppCompatDelegate.MODE_NIGHT_NO);
}
...
In the application, the color palette for both dark and light mode themes is predefined in the layout file rather than being set programmatically in the code. This approach allows for easier management of theme changes, as adjustments can be made in a single file, which is then applied globally throughout the app. By separating theme-related styling from the code logic, we can streamline the process of customising and maintaining the app's visual appearance.
References
[1] R, Mishr, "Fragment Lifecycle in Android" geeksforgeeks.com, Oct. 11, 2023. [Online]. Available: https://www.geeksforgeeks.org/fragment-lifecycle-in-android/ [Accessed on 23 March 2024]