Appendices
User Manual
Homepage
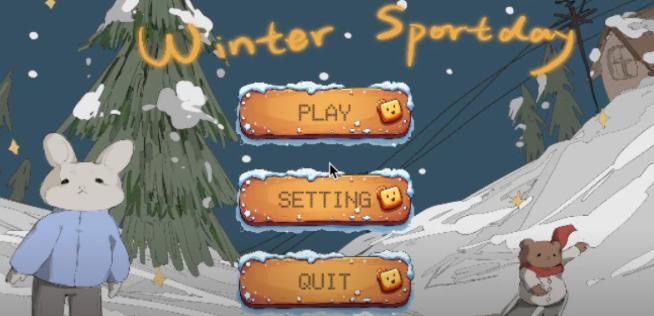
Upon opening the homepage, you will see 3 core functionalities: 1) Play, 2) Settings, and 3) Quit. And a 4) Credit button which opens the credit page.
Select and Start a Game
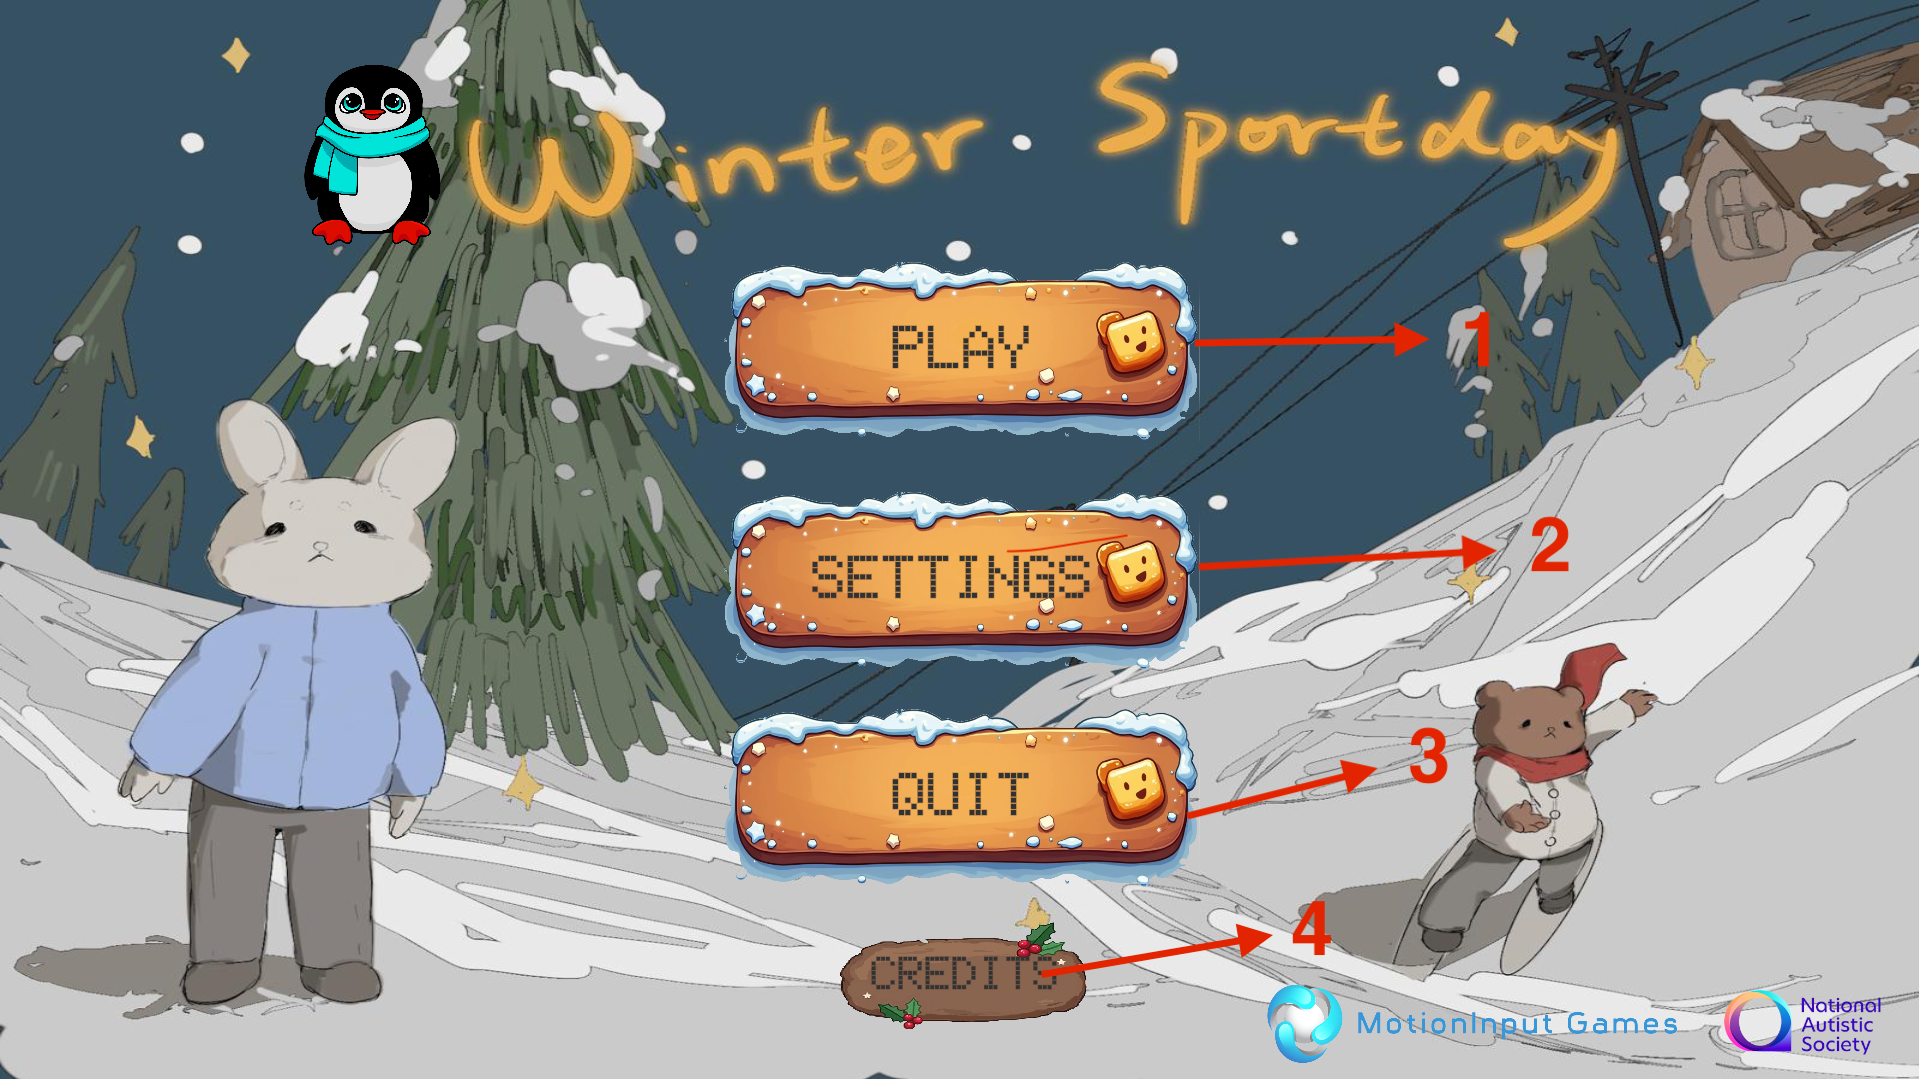
The level selection window pops up when the Play is clicked.
It contains the following elements:
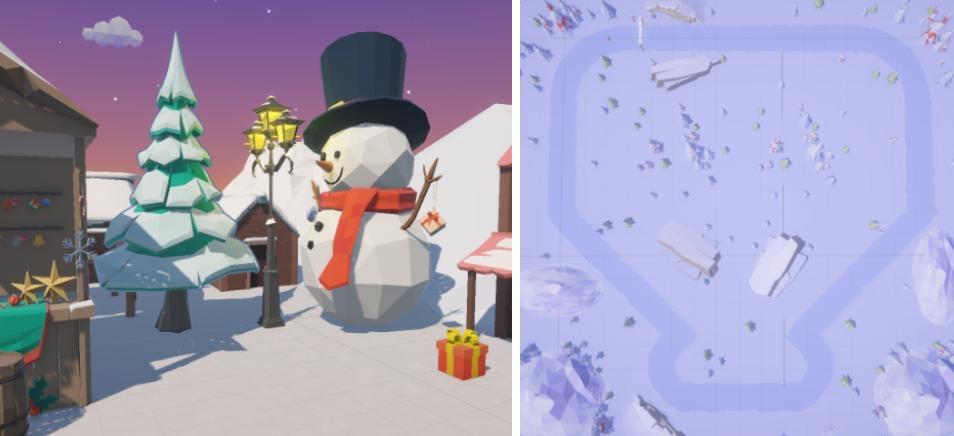
1.1) Level name
1.2) Level preview
1.3) Close button: returns to homepage
1.4) Left Navigator: navigates to the previous level
1.5) Right Navigator: navigates to the next level
1.6) Play: proceed to confirm setting and start the game
1.7) Tutorial: open tutorial window
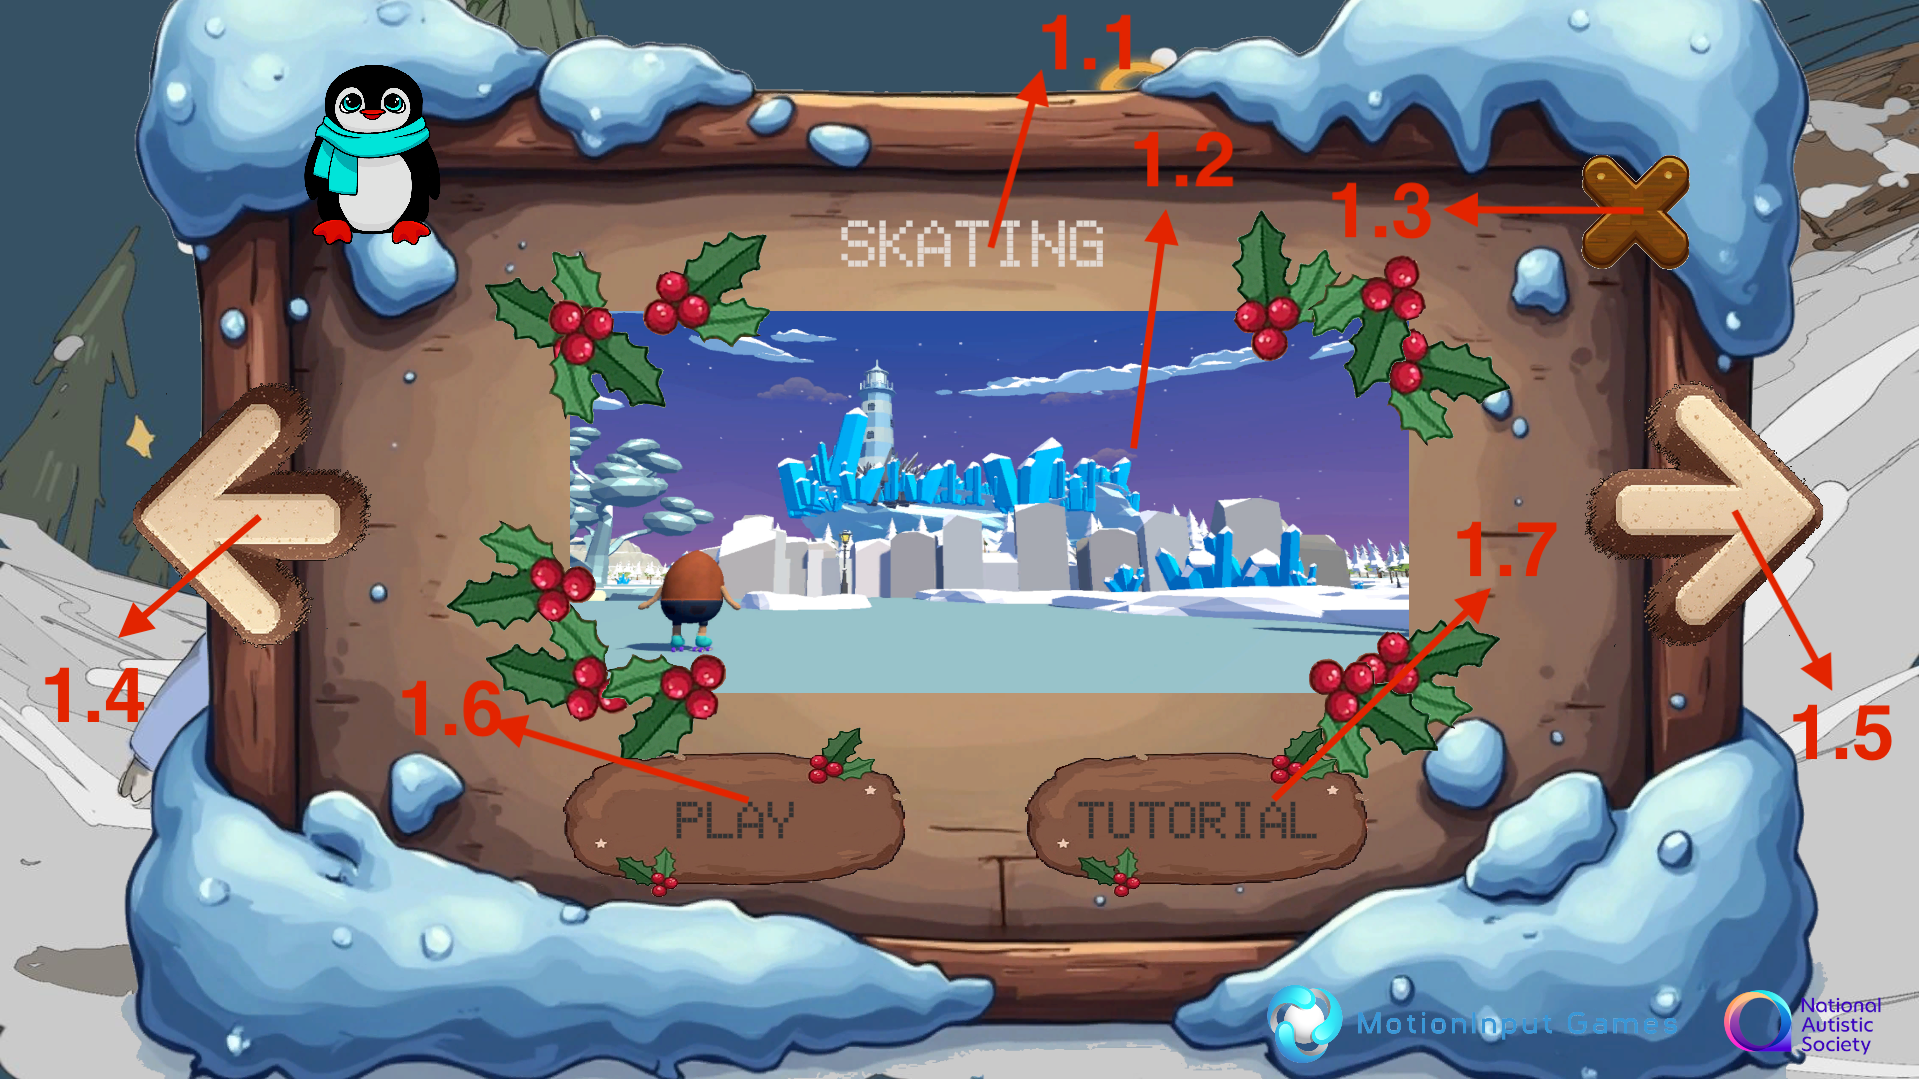
You can click 1.6) Play to proceed to confirm setting and start the game, before starting, a game configuration window will pop up and ask you to confirm the game settings for the selected game.
The game configuration window contains the following elements:
1.6.1) Game parameters to be adjusted
1.6.2) Close button: returns to the level selection window
1.6.3) Confirm Settings: Start the game
When 1.6.3) Confirm Settings is clicked, the game starts with the configured settings.
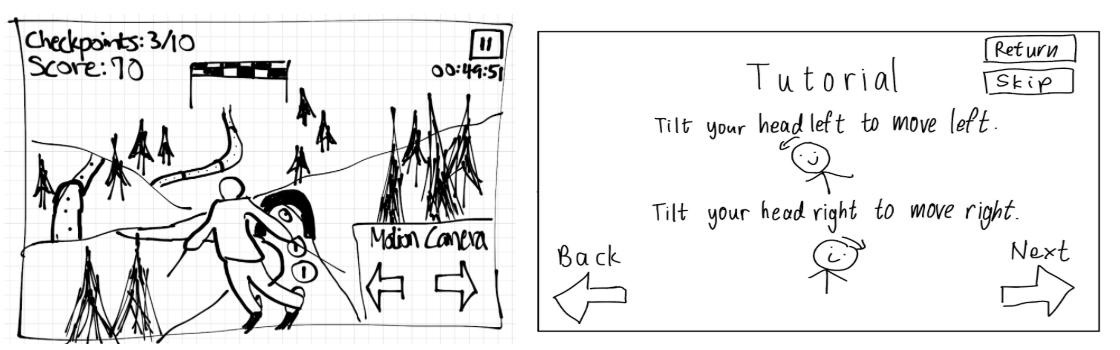
Going back to the level selection window, you can also click 1.7) Tutorial to open the tutorial window and view the tutorial images of the selected level.
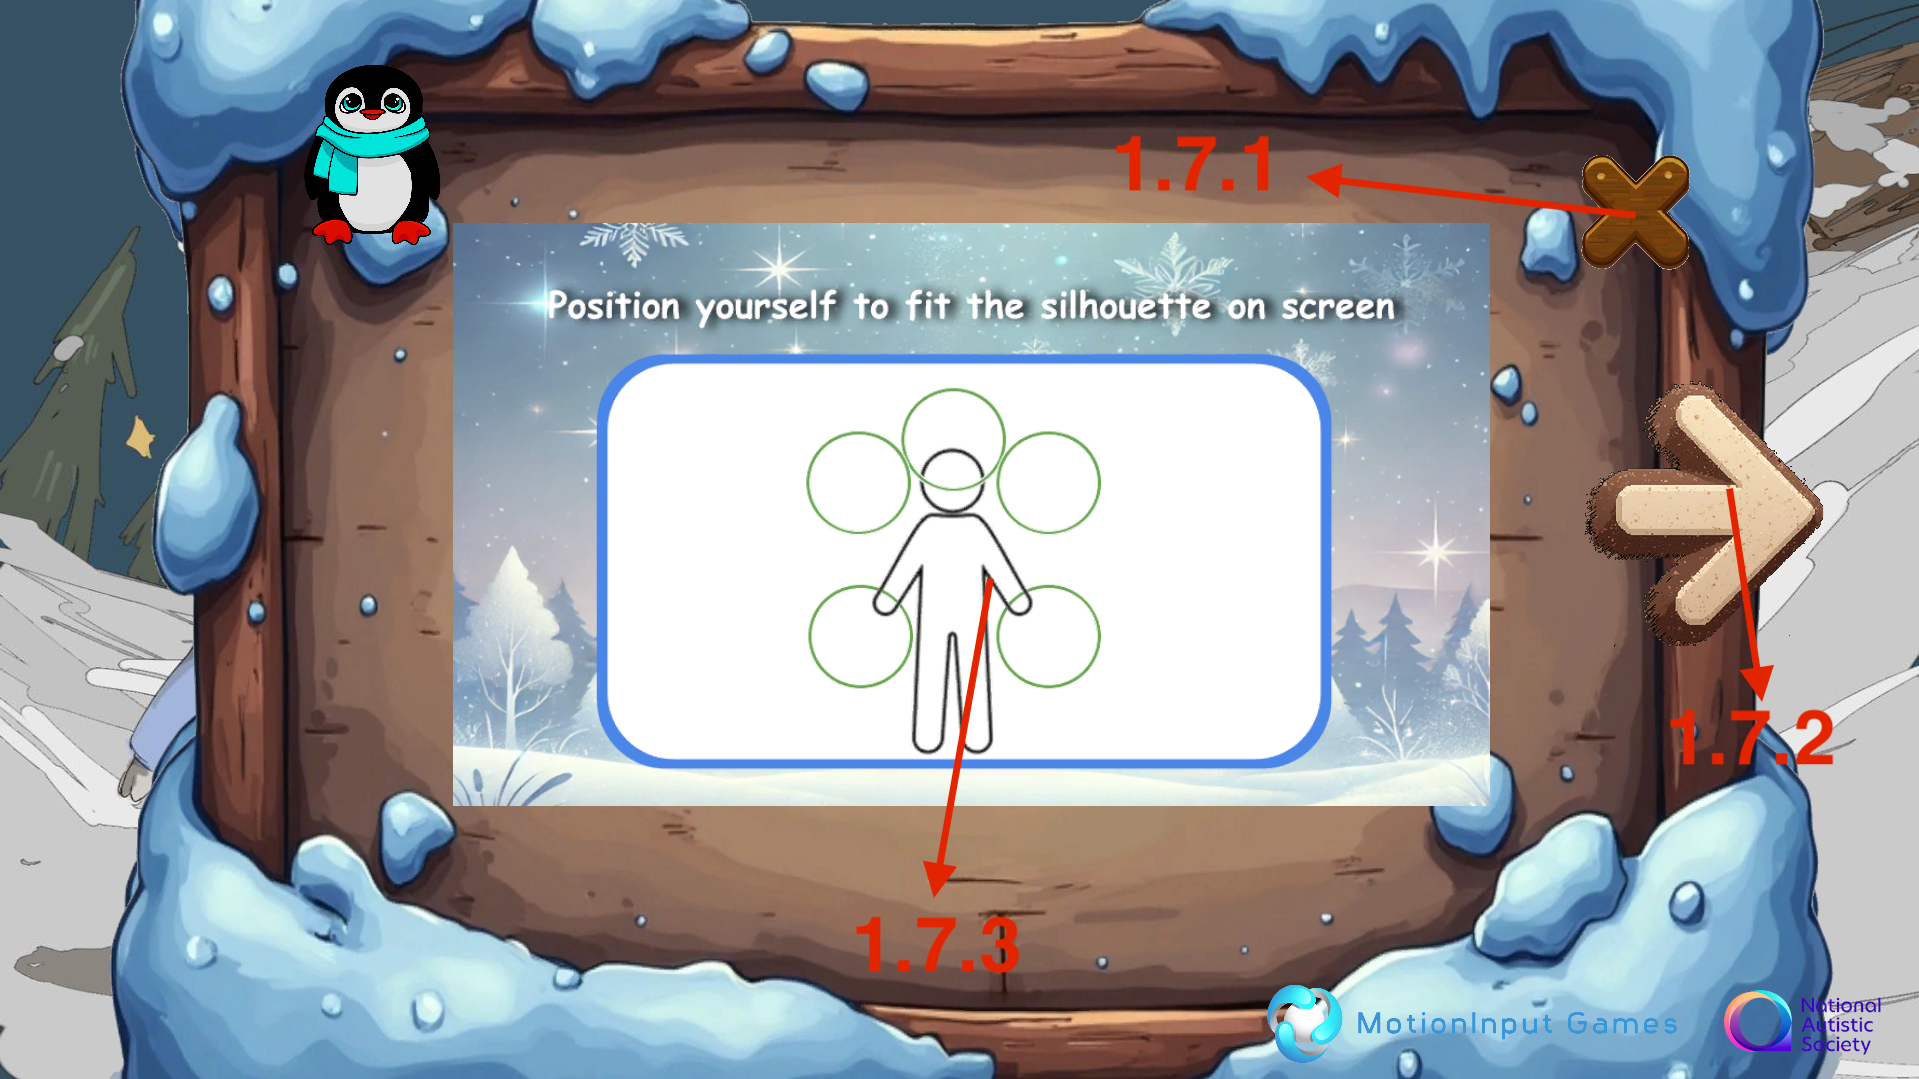
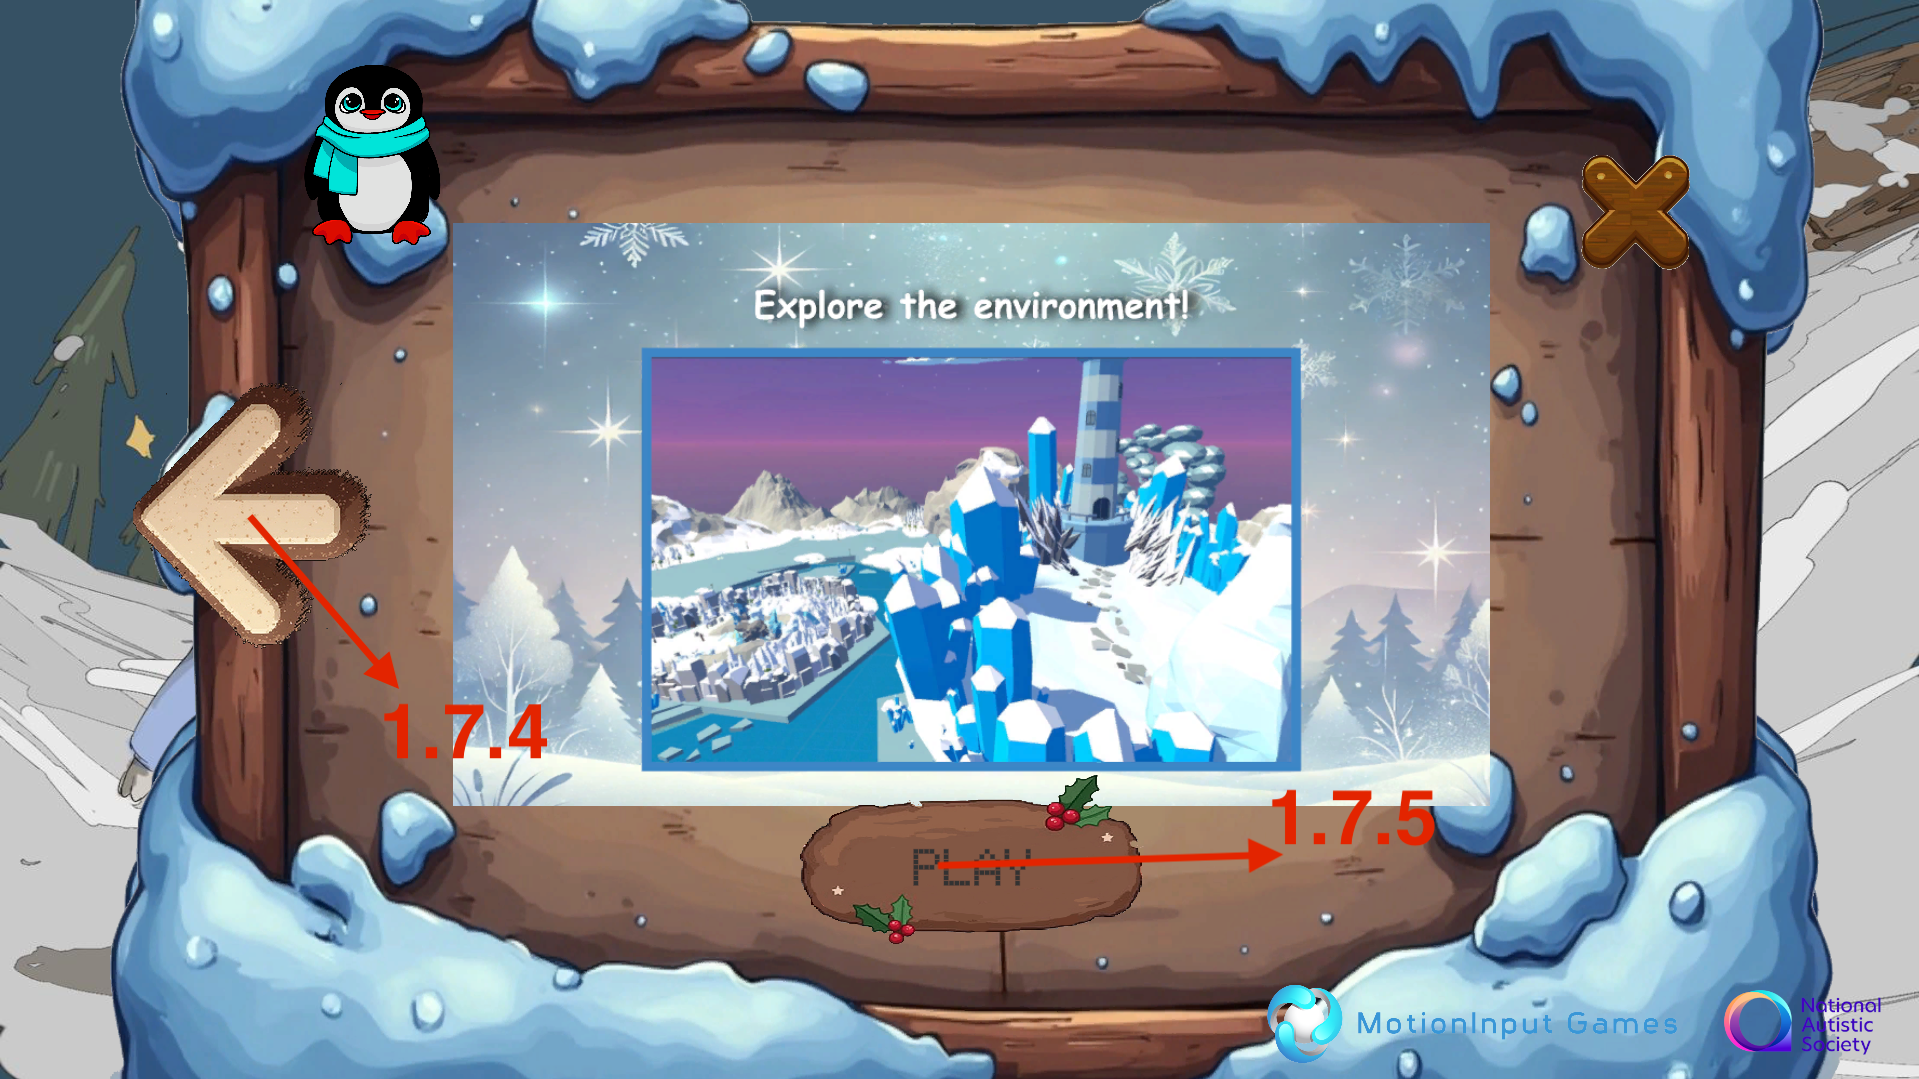
The tutorial window contains the following elements:
1.7.1) Close button: returns to the level selection window
1.7.2) Right Navigator: navigates to the next slide of tutorial
1.7.3) Tutorial image
1.7.4) Left Navigator: navigates to the previous slide of tutorial/p>
1.7.5) Play: enters the game
When 1.7.5) Play is clicked, the game starts.
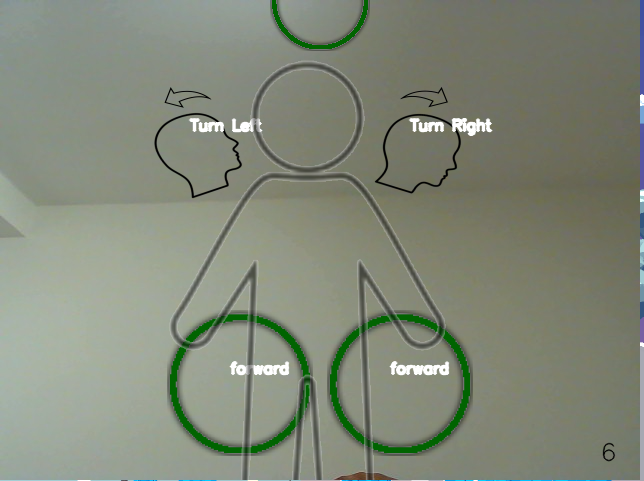
MotionInput Silhouette Adjustment
Once entered the games, you can adjust the detect area on the MotionInput window by using mouse cursor to drag the detecting icons around.
Universal Settings
You can configure the universal settings that are shared by all games by clicking 2) Settings. The universal settings window will then pop up:
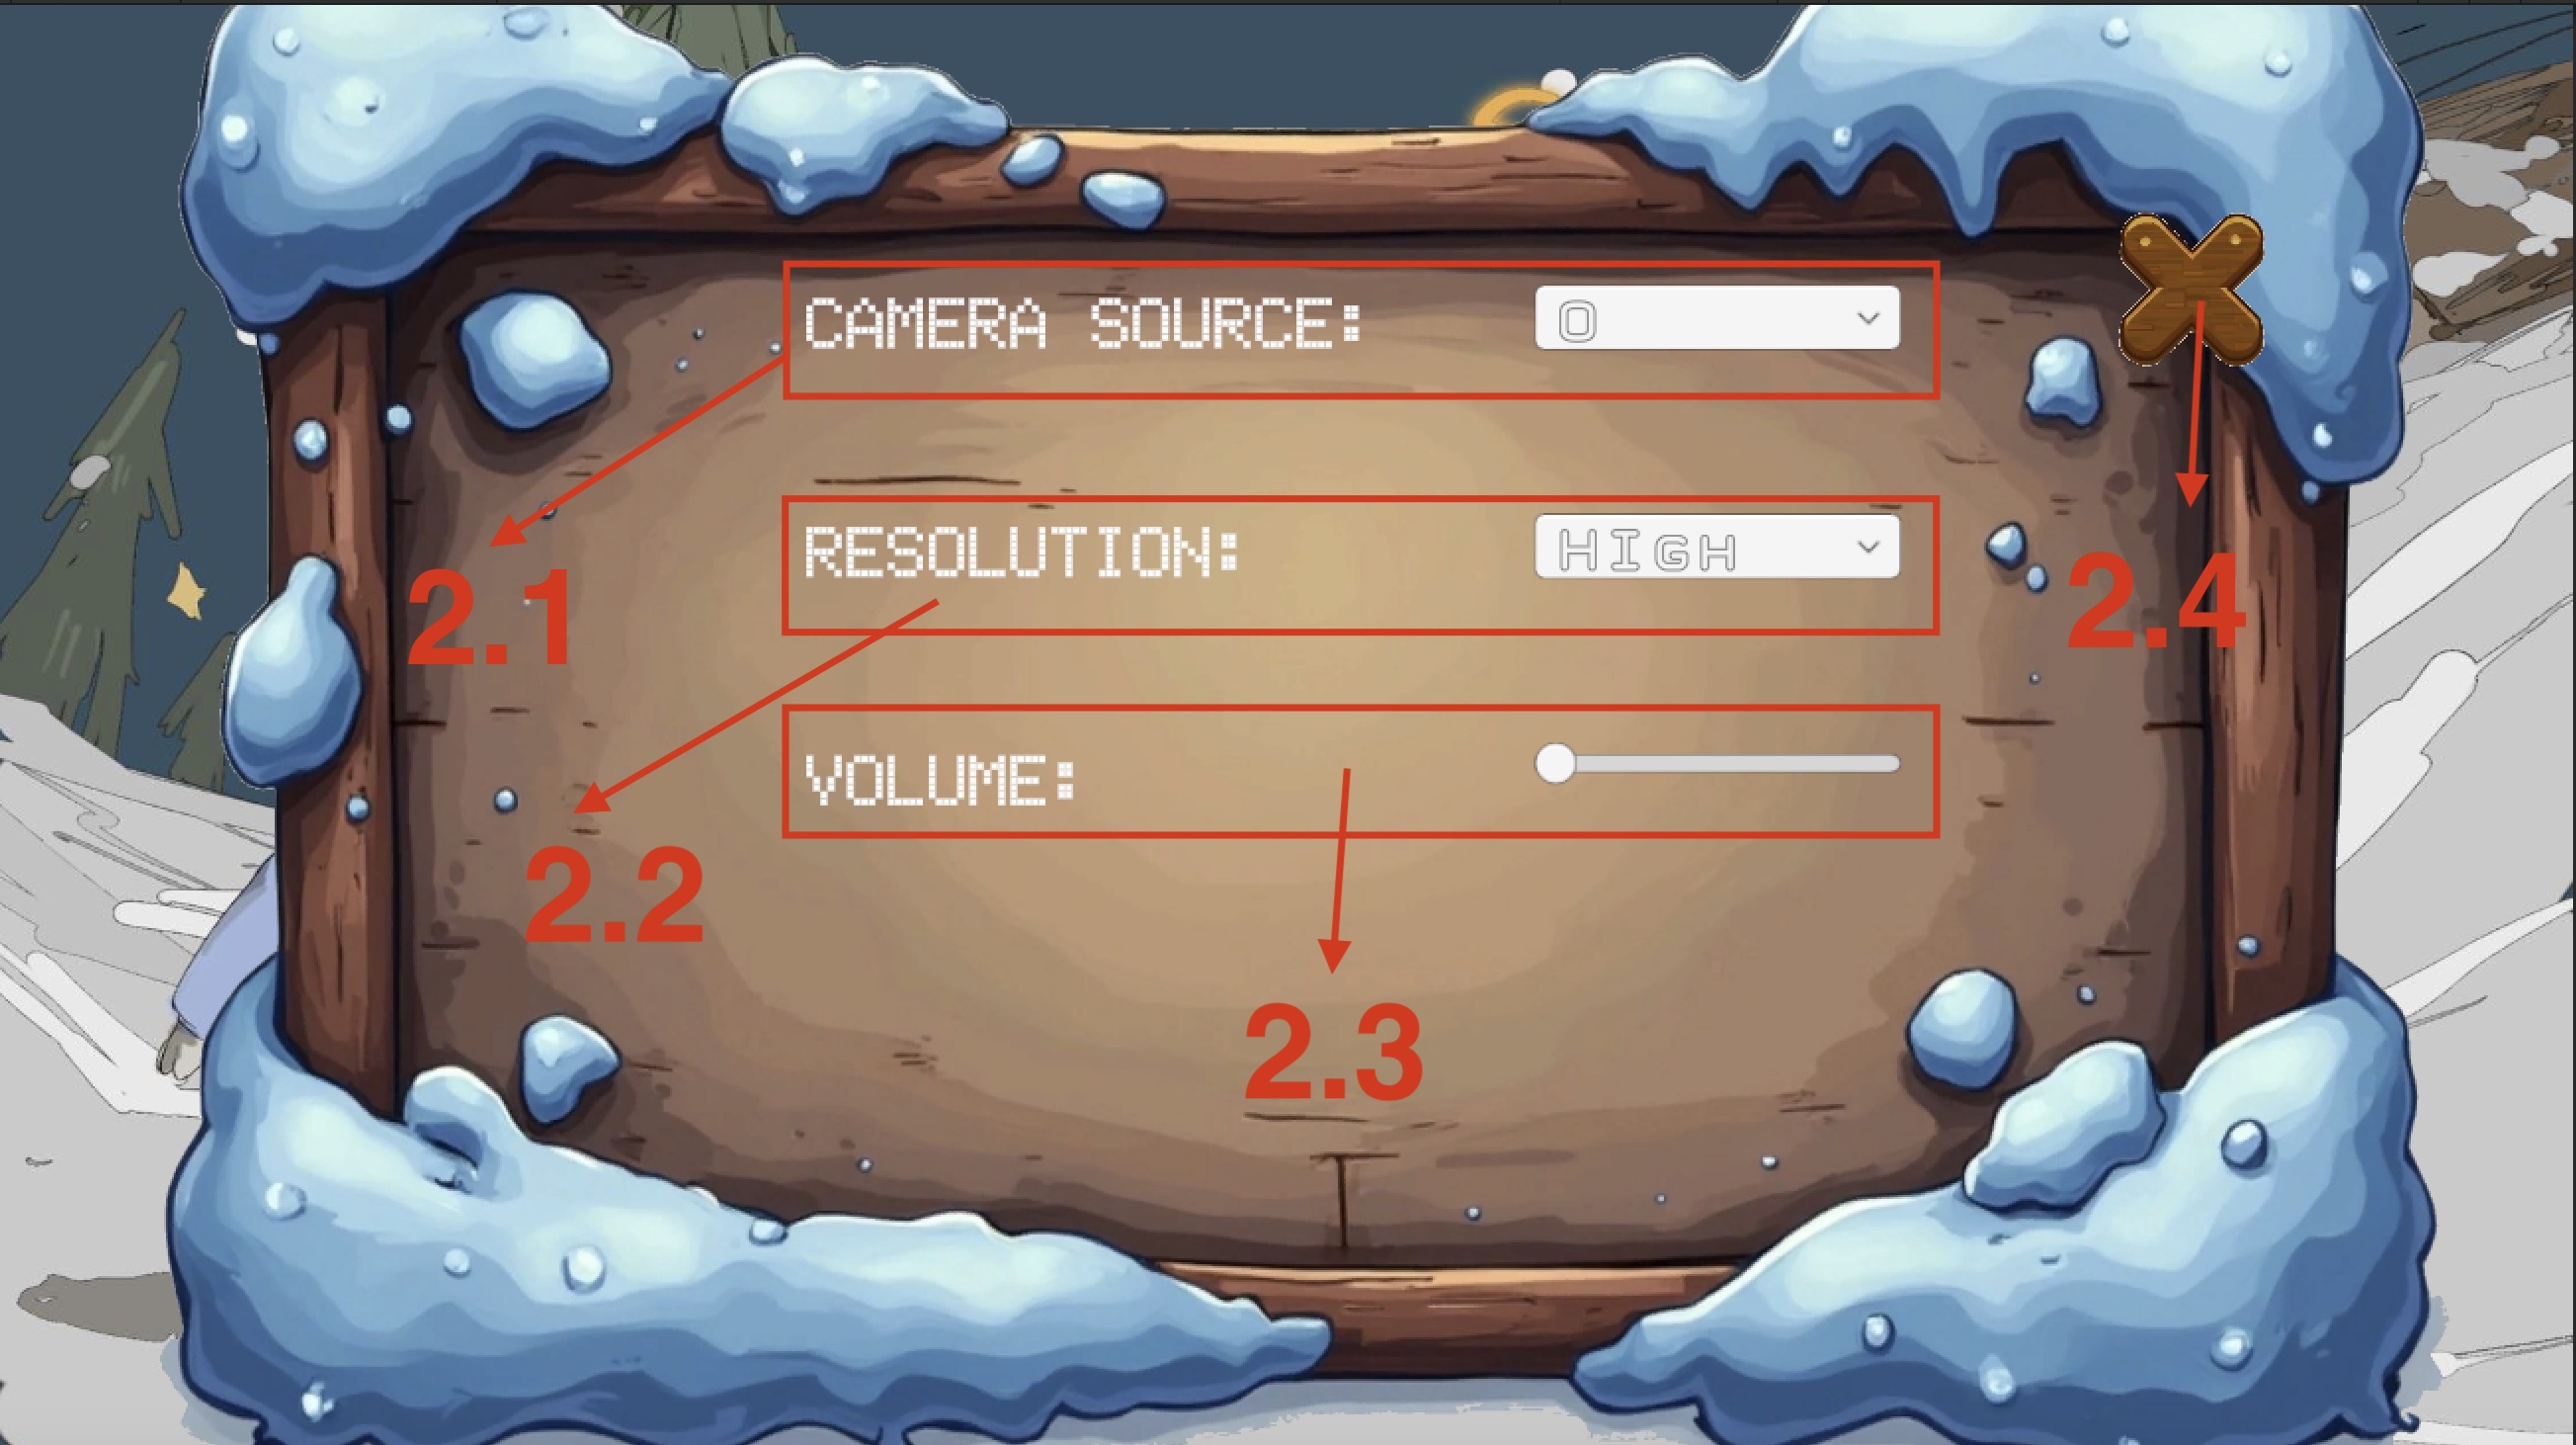
It contains the following elements:
2.1) Options to config camera source (default 0)
2.2) Options to set the screen resolution to High, Medium, and Low
2.3) Slider to adjust volume
2.4) Close button: returns to homepage
Quit the Application
Simply click 3)Quit will close the application.
Deployment Manual
Prerequisites
GitHub
Unity Editor Version 6000.0.41f1
Operation System: Window 10/11
Camera: integrated camera>
Keyboard: integrated keyboard
Mouse: integrated mouse
Memory: minimum 4 GB, recommended 8 GB
Clone the Repository
Clone the repository to your computer using following command:
git clone https://github.com/Looney03/winter-sports.gitOpen the Project in Unity
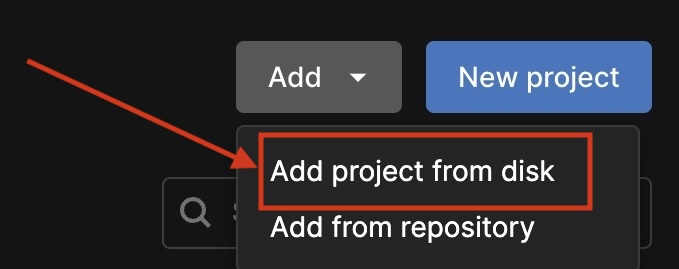
Launch Unity Hub
Click Add, then select Add project from disk
Open the project

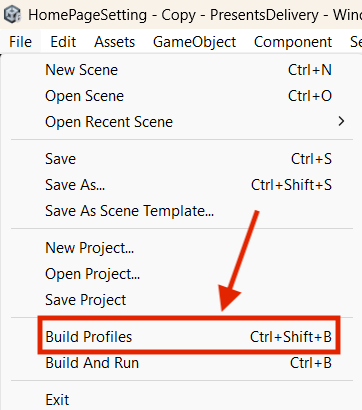
Config Build Settings
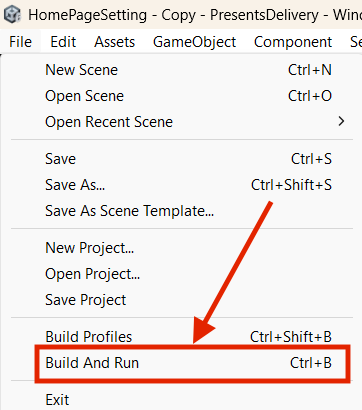
Navigate to File > Build Profiles
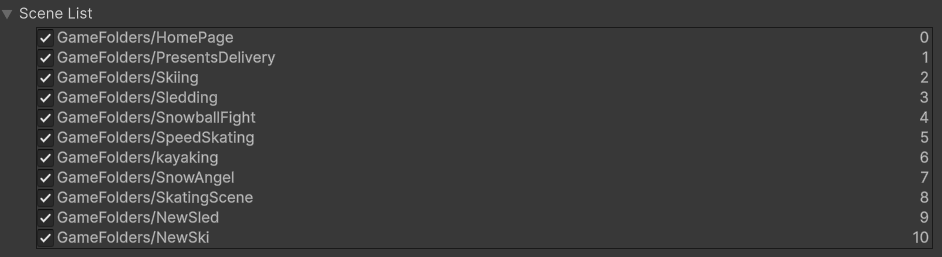
In the Platform list, select Scene List
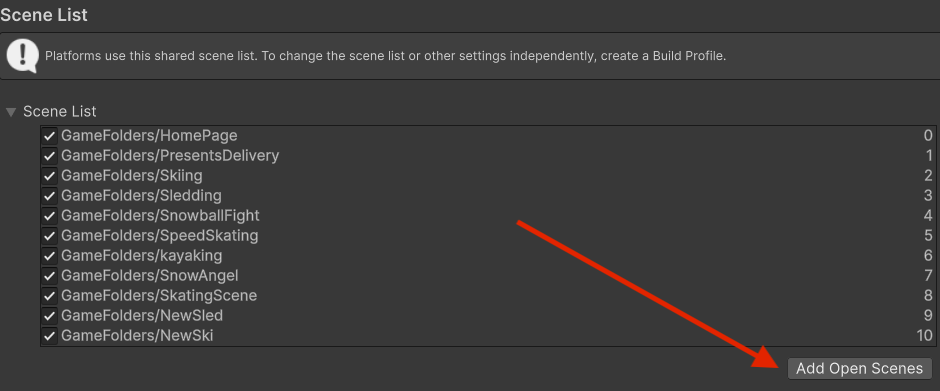
Ensure all game scenes are added to the Scene List
Game scenes can be found in the folder Assets > GameFolders
Open unadded scenes and select Add Open Scenes in Build Profile

Build the Game
Navigate to File > Build And Run
Choose a location to export the game
Wait for Unity to compile the build
Run the Application
Double click the executive file to run
Enjoy the games!
Legal Issues and Processes
GDPR and Data Protection
Our game does not collect, store, or process any personal data. Although MotionInput uses webcam input, it only performs local pose estimation and does not transmit, save, or log any video or biometric data. Therefore, GDPR concerns are minimized, and we also ensured the following precautions:
No facial recognition or identity tracking is used.
All processing is done client-side and in real-time.
In any live testing with children, informed consent was obtained from schools or guardians.
Copyright and Asset Licensing
We ensured all assets used within our project were properly sourced and licensed:
3D Models, Textures, and Sounds: Most of the visual and audio assets were sourced from Unity Asset Store or free asset libraries (such as Kenney or OpenGameArt) under open-source or Creative Commons licenses. Where necessary, attribution was provided in the README file or within the game credits screen.
Any assets not created by us were only used if:
The license allowed for non-commercial and educational use
We obtained explicit written permission or terms allowing reuse.
We avoided using any copyrighted content (e.g., commercial character likenesses, proprietary logos) without valid permission.
Ethical Considerations
Our target users include neurodivergent children, and accessibility was a central focus of the design. We made efforts to:
Use clear and consistent UI patterns
Provide visual feedback that is easy to interpret
Support alternative interaction methods (motion-based input)
Ensure low cognitive load in gameplay
User testing was conducted both in UCL labs and in local schools, always with prior approval and with full transparency.
END USER LICENSE AGREEMENT (EULA)
By using this software, you agree to the terms of this agreement:
License: This game is provided for educational and non-commercial use only. You are permitted to use, play, and distribute this software for personal or academic purposes. Commercial use is strictly prohibited without written permission from the developers.
Intellectual Property: All assets, code, and designs in this software are either original or used under proper licensing. You may not extract or reuse any part of this project in other works without explicit permission.
Data and Privacy: This application does not collect, store, or transmit any personal data. MotionInput is used locally and does not record video or user data.
Disclaimer: This software is provided without warranty of any kind. The developers are not responsible for any damages resulting from its use.
Termination: The license is terminated if you breach any of these terms. Upon termination, you must delete all copies of the software.
If you do not agree with these terms, do not use this software.
Development Blog
October
Before diving into development, we took a step back to understand what kind of game we wanted to build and how we would approach it as a team. This began with research. We looked into similar games, identified the mechanics we liked, and studied how they were implemented. We also explored the tools and technologies we might need, including game engines, asset pipelines, and collaboration platforms.
One of the first things we did was assign roles, who will be in charge of which because there are 8 different levels. We also began experimenting with creating rough models for the game. These early prototypes weren’t polished, but they helped us visualize our ideas and test out initial concepts. It was less about getting things perfect and more about figuring out what works and what does not.
Most importantly, we asked ourselves: Why are we making this game? We wanted to create a meaningful and fun experience, and to grow as developers by tackling something from start to finish.
This phase was all about laying the foundation, understanding the game we wanted to make, what we needed to do, and why it mattered to us.
November
As we stepped into a new month, we started moving from planning to actual development. Our main goal was to create a rough version of the game — not polished, but enough to get a feel for how the core mechanics would work.
We decided how each level would receive input, how the game would respond, and how the flow would continue after each stage. Since each team member was responsible for two levels, we made sure that everyone had a clear and detailed plan for at least one level.
We also talked with the MotionInput team to figure out how motion and interaction should work. This led to a lot of discussion and testing, especially as we explored different ways to integrate user movement into gameplay.
At the same time, we focused on becoming more comfortable with Unity, understanding its features, getting used to the workflow, and building confidence in using it as our main development tool.
December
In December, our team grew more aligned. As we spent more time working together, our ideas started to converge, not just on what we were building, but also on how we wanted to build it.
We focused more on Unity, and through constant discussions and shared problem-solving, we began to understand each other’s styles and strengths better. Communication became smoother, and our individual pieces started to come together with more consistency.
Most importantly, we were able to talk about our project with more confidence. The goals we once discussed in abstract terms were now backed by clearer plans and stronger teamwork.
January
In January we finally had parts of the game up and running, and we were able to share a working version with our first group of clients. Hearing their feedback gave us a fresh perspective. Some things worked as expected, while others needed improvement, which helped us refocus and prioritize.
At the same time, we received the assets and adding this meant we had to revisit parts of what we’d already built. Some mechanics and layouts needed to be adjusted to fit the new visuals. It was a challenge, but one that helped us think more carefully about how gameplay and design come together.
February
In February, we continued improving the game based on earlier feedback. We also made a big step forward by fully integrating motion input. Using files from the MotionInput team, we connected the motion from camera to our Unity project, so the game could now be played not only with a keyboard but also through body motion.
This added a new level of immersion and brought us closer to the experience we originally envisioned.

March
We gathered feedback from real users and carefully analyzed their responses. Based on that, we made improvements and finalized the game.
We also built a website to showcase the project and packaged everything into a single .exe file for easy access. The website now serves as a hub where people can learn about the game, see visuals, and download the final version.