1.0 Before we go into the details…
Our team is in charge of building on top of the backend of the Placed website. Hence, we have very limited user interface to showcase here. Our team built a Django test website to test the features we will be implementing in the actual Placed website before integrating our codes with the actual backend codes. What you will see below are mockups or user interface of the test website.
2.0 Building the Django test website
Our client has pre-made the Placed website using the Django framework. Logically, we set up our test website using the same framework. Our test website runs on localhost (127.0.0.1) and on port 8000.
3.0 Integration of LinkedIn API with Django
In order to extract the data from LinkedIn, we created and implemented LinkedIn API as it is the heart of all programmatic interactions with LinkedIn.
3.1 Authentication and Authorisation with LinkedIn
LinkedIn relies on the industry standard OAuth 2.0 protocol for granting access to anyone who wants to access LinkedIn member data through an application. The application of accessing the member’s data must be authenticated by the LinkedIn user himself.
Step 1: Configuring the LinkedIn Application
We filled in a new application form on the LinkedIn developer’s page and set the redirect URL to http://127.0.0.1:8000/complete/linkedin-oauth2/. We then acquired the API Key and API Secret Key from the page and added them to our codes.
Step 2: Request for an Authorisation Code
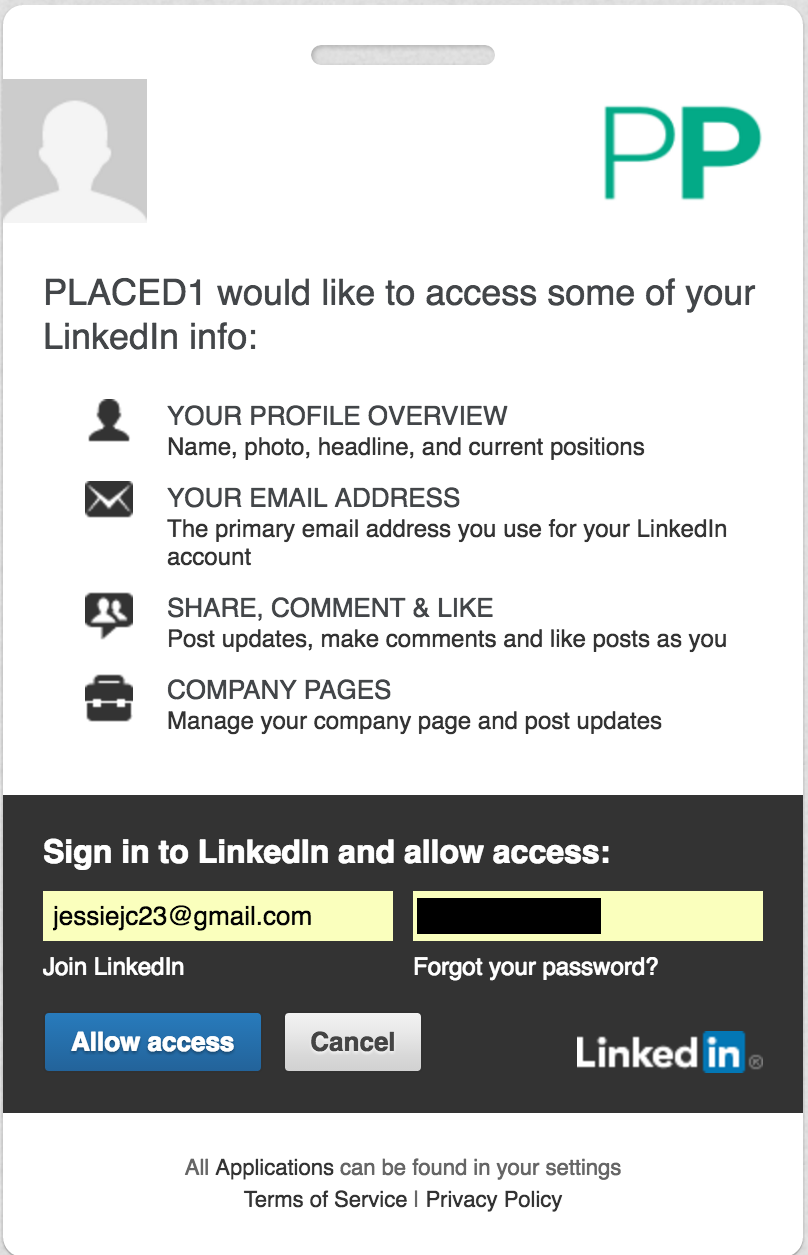
The authorisation code is then requested to exchange for an actual access token. This is done by redirecting the user’s browser to LinkedIn’s OAuth 2.0 authorisation endpoint. This authorisation code provides assurance directly from LinkedIn to the user that permission is being granted to the correct application. An authorisation screen will appear and by clicking on ‘Allow Access’, the LinkedIn user allows the application (in this case, our Django test website) to access to their basic profile fields.
The sample call consists of:
- response_type: the value for this field is always ‘code’
- client_id: the API key generated earlier
- redirect_uri: the URI the users will be sent back to after authorisation. This must match the defined OAuth 2.0 Redirect URL. In our case it will be http://127.0.0.1:8000/complete/linkedin-oauth2/
- state: a unique string value to prevent Cross-Site Request Forgery (CSRF)
- scope: the LinkedIn user’s fields which will be extracted.
Step 3 - Exchange Authorisation Code for an Access Token
Now we need to ask for an Access Token using the Authorisation Code we just acquired from Step 2. We make the following “x-www-form-urlencoded” HTTP POST Request:
http://www.linkedin.com/uas/oauth2/accessToken
If an Access Token request is successful, a JSON object will be returned containing the access token and the expiry time of the access token (all access tokens have a 60 day lifespan).
3.2 Extracting the LinkedIn data, displaying them in JSON and save it in MySQL database
This is easily done by making the following API calls. Below is a breakdown of the API calls.
r = requests.get("https://api.linkedin.com/v1/people/~:(first-name,last-name,email-address,
location:(name),industry)?format=json", headers=header)
Extracting data which we want from LinkedIn and display it in the form of JSON.
target = open('/path/to/your/file/r.json', 'w')
target.write( json.dumps(r.json()).strip())
target.close()
Saving the extracted data in a JSON file.
subprocess.call("php /path/to/your/folder/json2mysql.php", shell=True)
Run a PHP file which saves the JSON file in MySQL database.
$jsondata = file_get_contents('/path/to/your/file/r.json');
In the PHP file, this line reads the JSON file contents.
$data = json_decode($jsondata, true);
Converting JSON object to PHP associative array.
 $firstname = $data['firstName'];
$lastname = $data['lastName'];
$emailaddress = $data['emailAddress'];
$location = $data['location']['name'];
$industry = $data['industry'];
For each basic profile field, it is saved in one variable each.
$sql = "INSERT INTO User(l_firstname, l_lastname, l_emailaddress, l_location, l_industry)
    VALUES('$firstname', '$lastname', '$emailaddress', '$location', '$industry')
    ON DUPLICATE KEY UPDATE
       l_firstname = VALUES(l_firstname),
       l_lastname = VALUES(l_lastname),
       l_location = VALUES(l_location),
       l_industry = VALUES(l_industry)";
The MySQL query is called to save each variable into the MySQL database.
3.3 Posting Project Details in the form of Certificates to the student’s LinkedIn profile
LinkedIn Developers provides the “Add to Profile for Certifications” feature and we implemented it in our codes. Our client set up a company page for Placed (https://www.linkedin.com/company/project-placed) to allow the generation of “Add to LinkedIn Profile button
https://www.linkedin.com/profile/add?_ed=0_J-NtUVlVYfNiR6SooVQi0Ap_d3DGV_0UEtLvmMPe2Ei9IgkW
G1GIYj-OWMiTCDniaSgvthvZk7wTBMS3S-m0L6A6mLjErM6PJiwMkk6nYZylU7__75hCVwJdOTZCAkdv&pfCertifi
cationName=Project%20X&pfCertificationUrl=https%3A%2F%2Fwww.linkedin.com%2Fcompany%2Fproje
ct-placed&pfCertStartDate=201510&pfLicenseNo=15042016TAN1&pfCertFuture=201604&trk=
onsite_html
An example of an encoded URL. The string behind the /profile/add is unique for every LinkedIn user and it is generated manually on this website (https://addtoprofile.linkedin.com/). The parameters in the URL include the Certification Name, Certification URL, start and end date and license number. The license number for each completed project is generated as below.
15042016TAN1

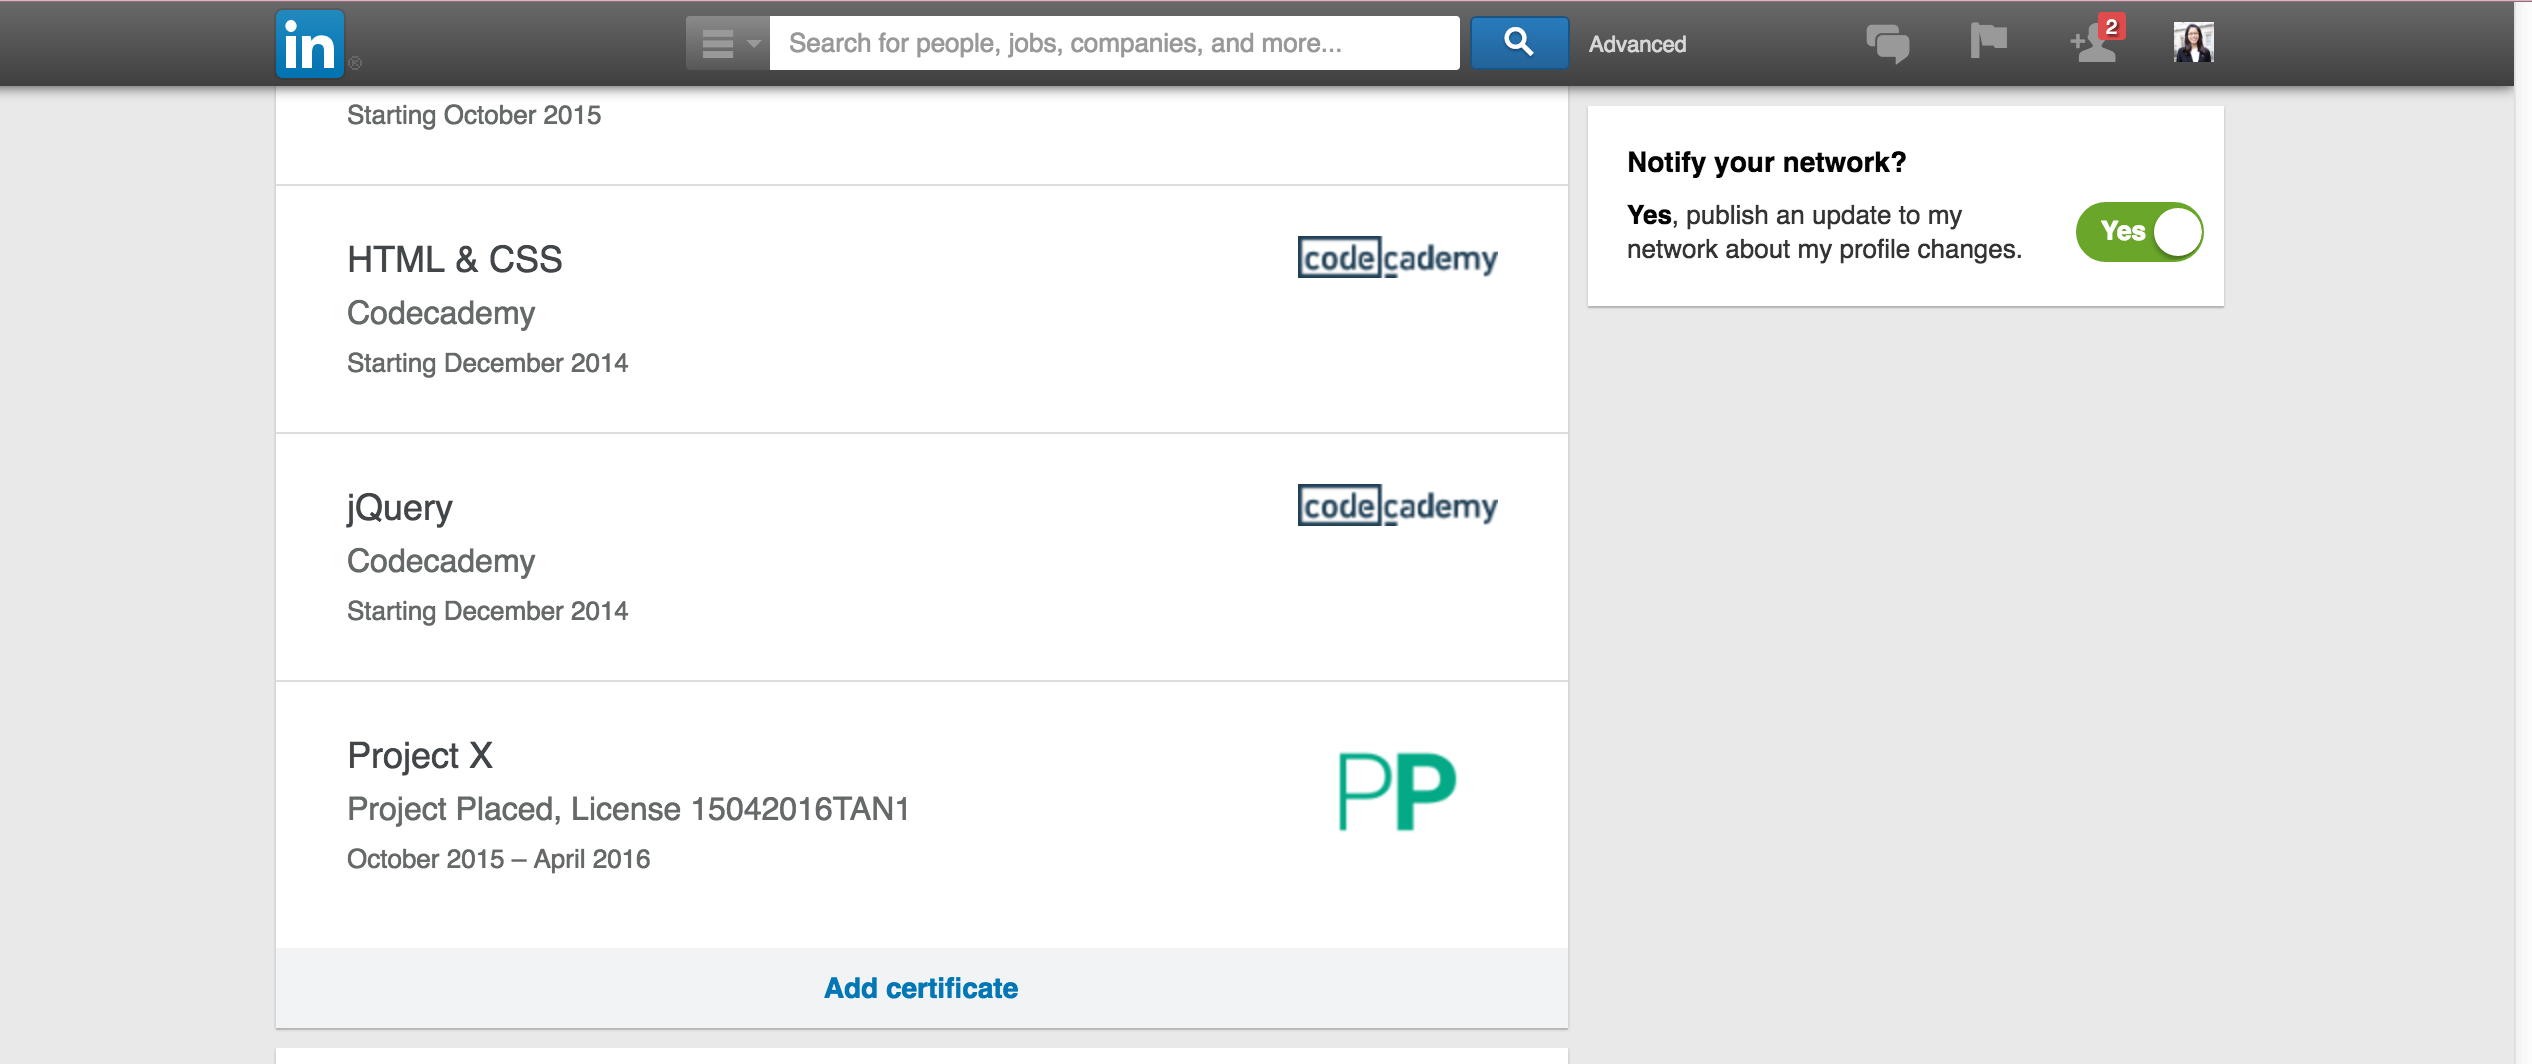
This “Add to Profile” button will be provided beside each completed project by a student.
After clicking on the button, the student will be redirected to his/her LinkedIn profile with the pop-up screen shown.
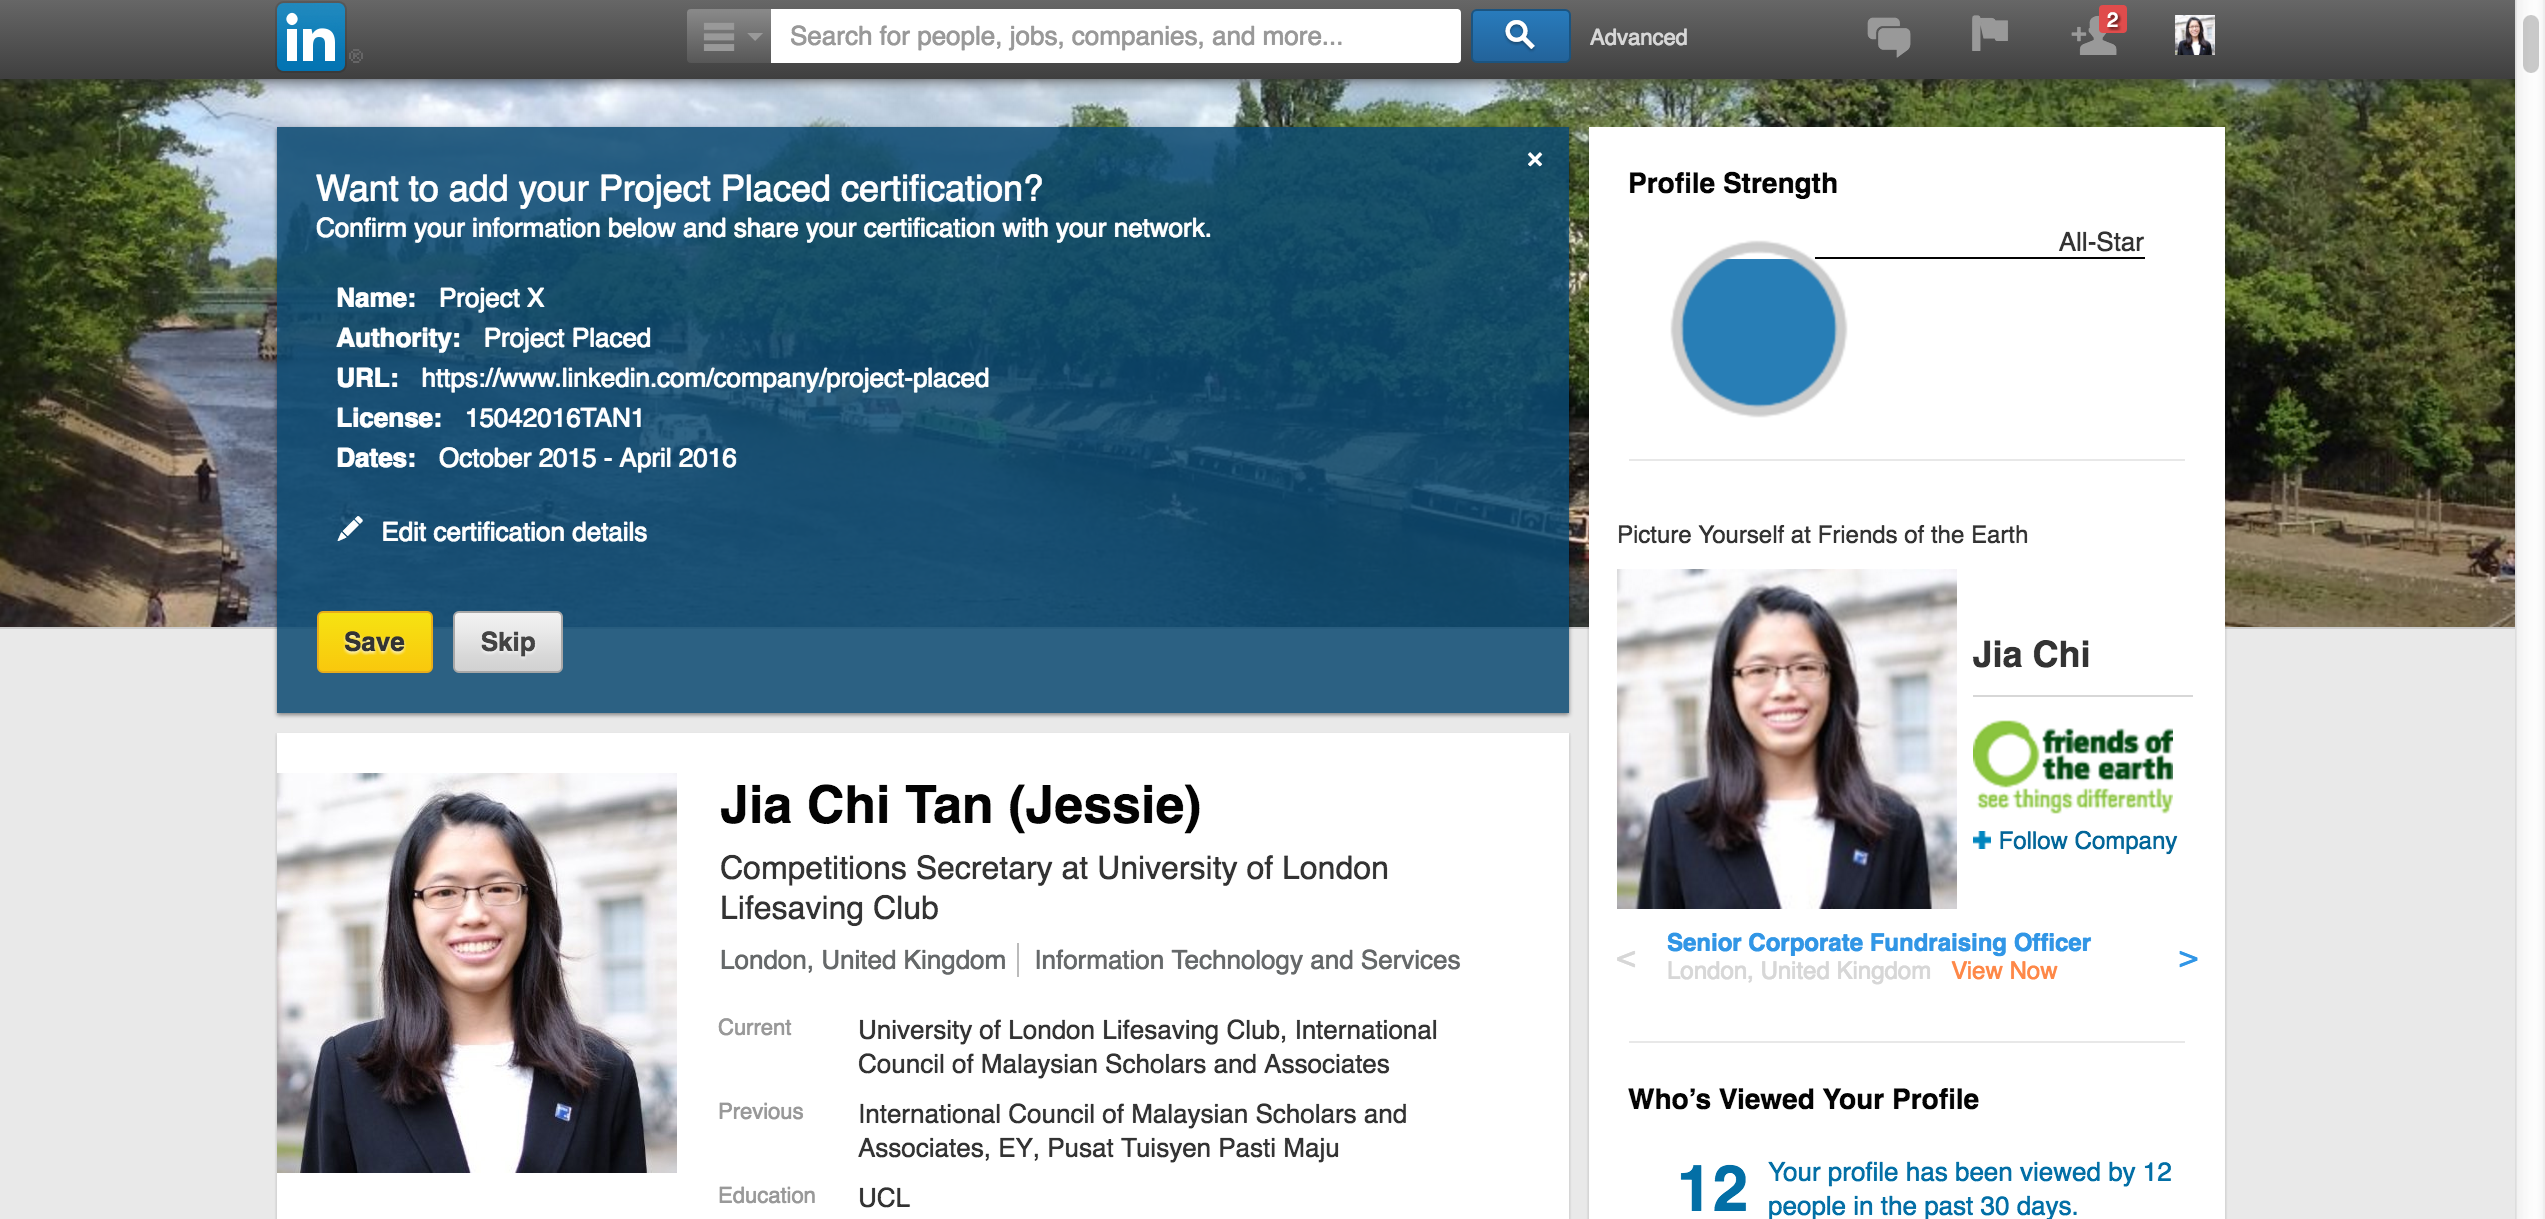
The project details then appear as a Certification issued by Placed on the student’s LinkedIn profile.
4.0 Connecting MySQL database to localhost
The Django test website is connected to the MySQL database by including the following codes in settings.py.
DATABASES = {
    'default': {
            'ENGINE': 'django.db.backends.mysql',
            'NAME': '(name of database)',
            'USER': '(username)',
        'PASSWORD': '(password)',
        'HOST': '127.0.0.1',
        'PORT': '9092',
     }
}
The localhost is connected to MySQL database on port 9092 as it cannot be connected to the default port 3306 due to technical errors.
5.0 Upload CSV to save in MySQL
By the click of a button, this feature enables the academics and companies to upload data such as project details, list of skills and student data.
$sql = "LOAD DATA LOCAL INFILE '/path/to/your/csv/file'
    INTO TABLE <>
    FIELDS TERMINATED BY ','
    ENCLOSED BY '\"'
    LINES TERMINATED BY '\r'
    IGNORE 1 LINES";
Snippet of codes showing MySQL query to read CSV files and save them into MySQL database. This piece of code is also written in a PHP file and is called from a python file by running subprocess.call.
Exporting Data from MySQL to either CSV or JSON
By the click of a button, academics and companies are able to download the data which they need from the database. Similar to the above scripts, the MySQL queries are written in PHP files and they can be called from python files by running subprocess.call.
$sql = "SELECT * INTO OUTFILE '/destination/of/your/csv'
FIELDS TERMINATED BY ','
OPTIONALLY ENCLOSED BY '\"'
LINES TERMINATED BY '\r\n'
FROM table";
Snippet of codes showing MySQL query to export the data in the form of CSV.
$emparray = array();
    while($row =mysqli_fetch_assoc($result))
    {
        $emparray[] = $row;
    }
An array is created and each row from MySQL data is input into the array.
 $json_data = json_encode($emparray);
    file_put_contents('/path/to/json/file', $json_data);
The JSON function json_encode returns a string containing the JSON representation of the array and it is stored in a JSON file.
7.0 Design the calculation of Placed Score
Placed Score is the final mark given to a student by the company and academics upon completion of a project. Placed Score is calculated based on the following factors:
- Consistency (15%)
- Completion of Project (50%)
- Project Based Score (15%) - Communication, Organisation, Teamwork
- Technical Skills (20%)
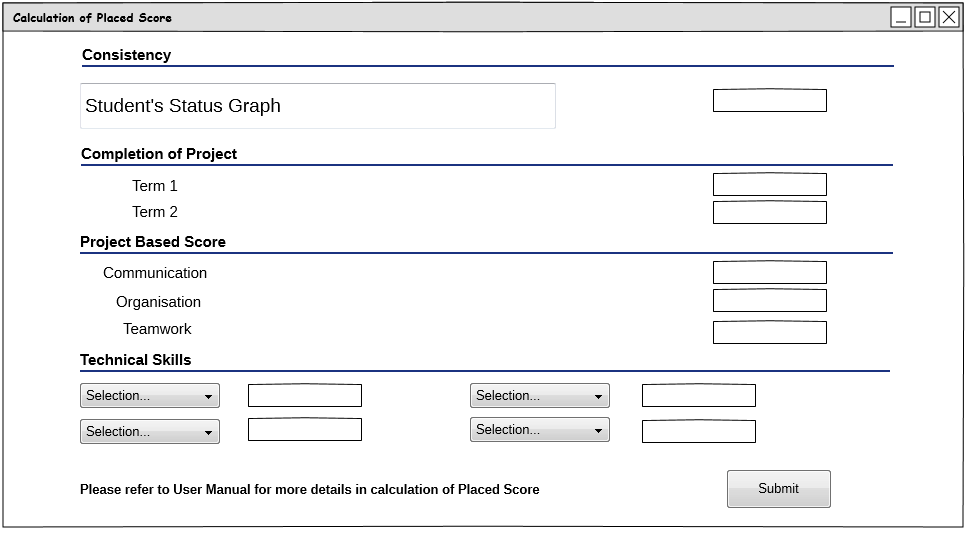
A mockup UI of how the page for calculating the Placed Score looks like.
Further information on how to calculate the score for each factor can be found in the User Manual.
8.0 Conceptual Design of MySQL Database
Our client designed the entire MySQL structure for Placed and it is worth mentioning here to see the correlation of all the database tables.
