Design
This page highlights the overall system design of our web application. This is includes a system architecture diagram, a class diagram representing the properties of individual classes and thier relationship with each other and finally a entity relation diagram for out database. There is also details about how we implemented our matching algorithm.
System Architecture Class Diagram Database Design Design Patterns Key Implementation Details Development Tools
System Architecture Design
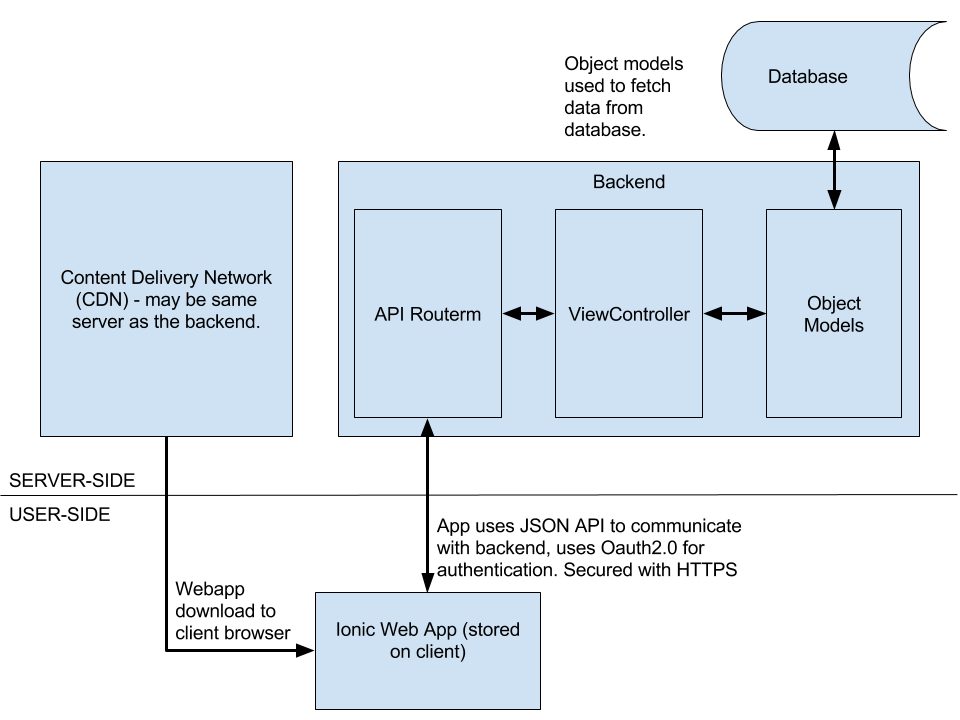
The above diagram is an conceptual illustration that defines the structure of the overall system of the web application. When designing the system architecture, we focused on identifying the key components that will be used for the client side and server side and also the communication between the client side and server side.
For the client side, we have decided to produce an ionic web application which is stored on the client’s device. The application will be developed using AngularJS and also Cordova plugins with the Ionic Framework. For authentication, we have decided to use the Oauth2.0 Implicint Grant flow to generate tokens which will be used to authorize users. The client side will be communicating and obtaining data from the server side using HTTP Requests.
For the server side, we have decided to use the Django REST Framework which allows us to develop a REST API. Django also allows us to develop object models which are used to fetch data from the database. The database we are using is PostgreSQL.
Class Diagram
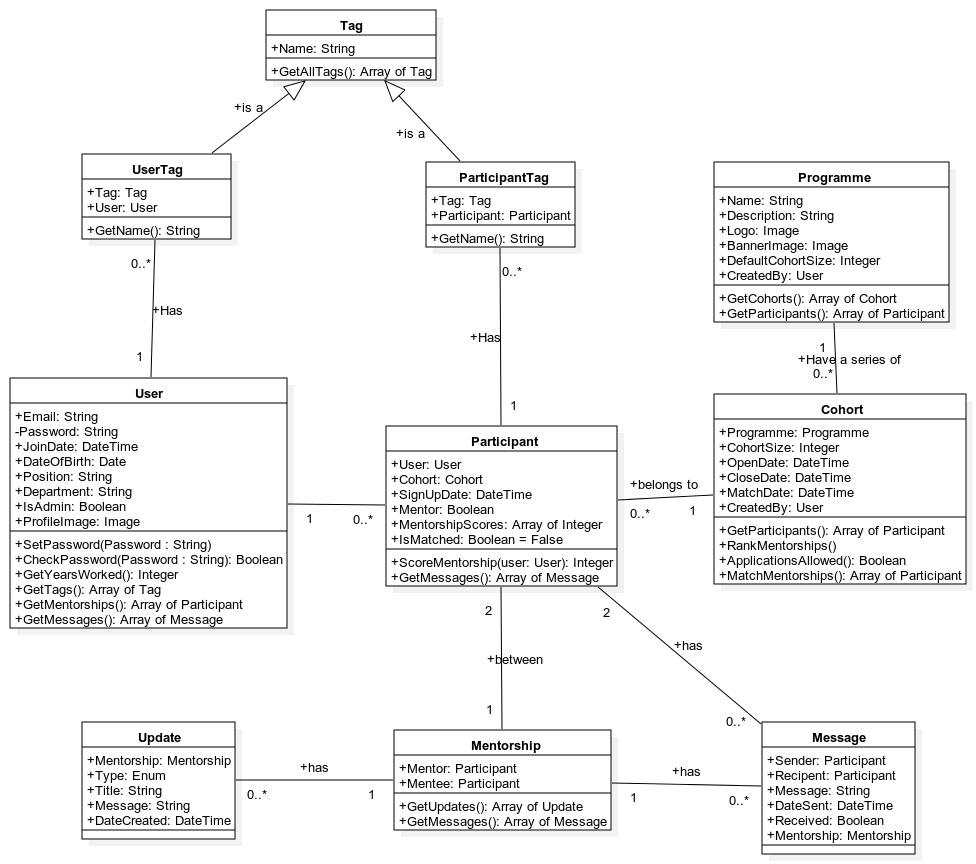
Above is a class diagram which is a static structured diagram that describes the overall structure of the models in the database. It shows the individual classes of the models along with their attributes, methods and also the relationship with other classes. This model will then be translated into actual code which will be written in python using the Django Framework.
Database Design (Entity Relationship Diagram)
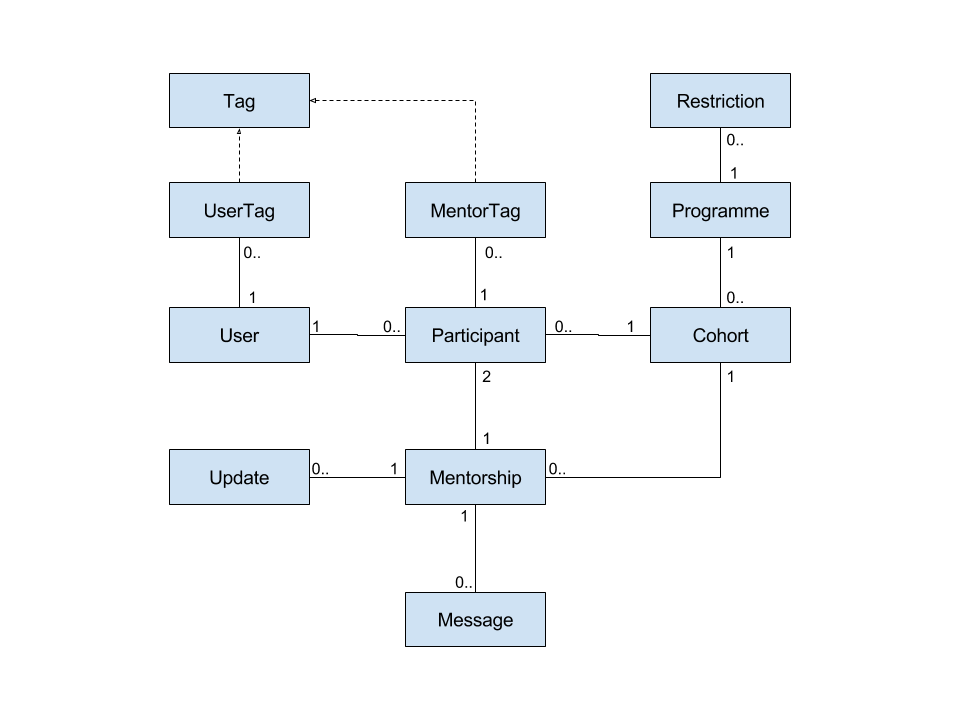
The above entity relationship diagram illustrates the relationships of entity sets which are stored in the database. This diagram acts as a guide to aid us in developing the PostgreSQL database. Below is a table providing short descriptions of individual entity sets.
| Entity | Description |
|---|---|
| User | Users are registered using an email address and also has an individual profile which contains details such as First and Last Names, position in ATOS, a short biography, join Date etc |
| MentorShip | This is a list of users which are registered in a mentor program and are mentors and mentees of ther users. |
| Cohort | This is the size of the mentor program which acts as a restriction to prevent too many users from registering in a single program. |
| Programme | This illustrates the mentor program itself. Details such as program description, program banner and also the admin responsible for creating the program is stored. |
| Tags | This is a list of "tags" which are used to match mentors and mentees. |
| Updates and Messages | These acts as updates for the user regarding the status in the mentor program they are registered in or are choosing to register in. |
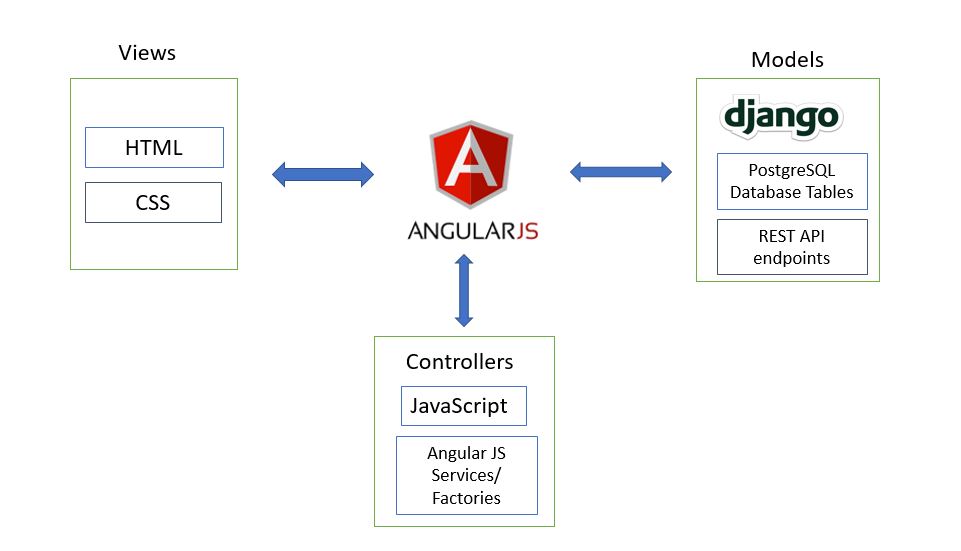
Design Patterns
The structure of our web application was primarily designed in a Model-View-Controller manner. When developing the web application, we used AngularJS to design and develop the views and controllers of the web application and the Django REST Framework to design the models. Below is a diagram that is a simple illustration of the MVC design pattern we used
Views
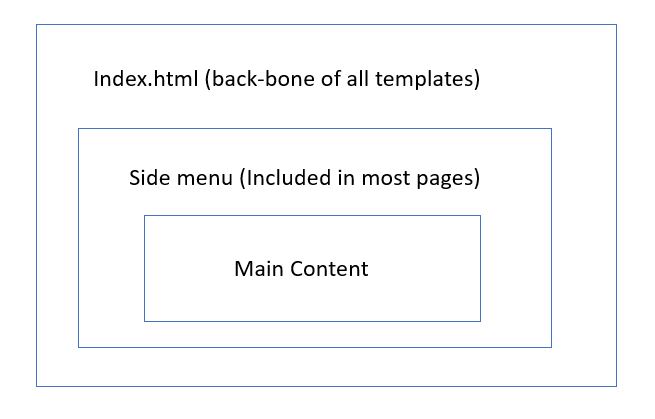
Views are essentially what gets displayed on the client side. It consists of html pages which consists of Ionic UI components, CSS style sheets and variables bound from the controller. AngularJS also allows data binding in views, which is very useful in linking our templates with data in the controller. We also have an index.html which is essentially the back-bone of all the html pages. We have also designed a side menu which is included in most pages (except login and register and some other pages). Finally, every individual template will have its main content.
Controller
The controller acts as a link to the model which fetches data from the models and binds them to the templates which are written in Javascript. For every template, a controller is designed to store variables which are displayed to the client and define functions which are called in the templates. There is also some logic implemented with the data obtained from the models to improve user interaction in the client side.
Services and Factories
We use AngularJS services and factories as one of the key methods to manage the flow of data between controllers. Some Javascript classes are also designed here which are used to represent data obtained from the models (For example user data, programme data, cohorts etc). We have also designed a factory which acts as an injector to concatenate the currently logged in user authentication token whenever a http request is made. This makes code cleaner, readable, consistent and reduces redundancy.
Directives
We also designed some custom directives to extend the functionality of our HTML template pages. The functions written in the directives can be called and binded in to the HTML templates. One example of a function was the “Read More” function which allows users to toggle long text and display/hide them.
Model
Our model is responsible for managing the data of the application. Our model is written in python using the Django REST Framework and PostgreSQL is used to implement the database tables. The server side logic is also implemented on the model for example our matching algorithm and management of programme and cohorts. The model also responds to request from the controller to updates itself.
Implementation details of key functionalities
Matching Algorithm
This section highlights the approach that we used to implement the main matching algorithm that matches mentors and mentees automatically based on their interests. For the input, the algorithm will accept two lists, Mentors and Mentees, containing users. Users have a name, as well as a list of tags. The output would be a list of matches between a mentee and their top three mentors with similar interests.
For every cohort created by an admin, there will be an open and closed date specified which is essentially when the programme is ‘open’ for registration. After the closing date, a ‘Match Date’ is specified and matching will begin at this day. Mentees will be invited to choose their top 3 mentors at this point. Below is a walkthrough of the different stages of our matching algorithm.
Stage 1
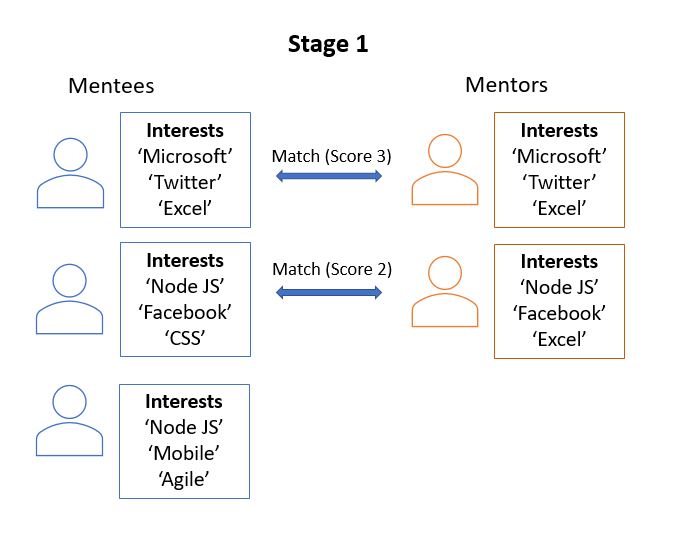
The algorithm will iterate through each mentee in turn. It will look at each mentor, and pair them based on how many similar tags both individuals have. A score will be assigned to each mentor based on how many similar tags they have with the mentee. By the end of this process, for each mentee, there should be a list of mentors and their scores. These should be sorted by the highest score first and the top three mentors with the highest score is chosen.
Stage 2
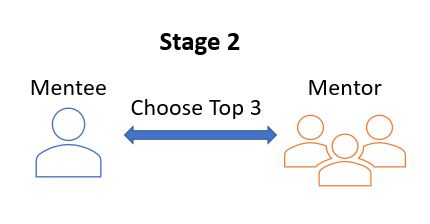
Each mentee then will be presented with their top three mentors. They will be invited to sort these according to preference and once these have all been completed, the next stage will begin. Mentees will have 1 day to choose their top 3 mentors which is the “Matching Date” specified when a cohort is created by an admin.
Stage 3
The algorithm will now implement a version of the Gale-Shapley Algorithm to find an optimal set of matches given the mentee’s preferences. Pairs with highest scores are matched and algorithm will iterate until all mentees have found a suitable match with a mentor. Once this algorithm is run, the matches are then sent to the database to be saved.
Development Tools
This section includes all of the tools we have used to manage our project. This includes communication, file storage, UI Design, version control and others and others.

Facebook Messenger
During our first meeting we decided to set up a facebook messenger group as the main tool for communication between each other. We used Facebook Messenger as the main platform to share our ideas and help each other with any problems.

Trello
Trello is a collabration tool that organizes our projects on several boards. In our team we divided boards into three parts: Backlog, In progress and Completed. We create tasks by making boards and then add it into the Backlog section, for every task we assign a due date, members responsible for that task and add labels on it to indicate urgency. Once we start working on a task the card would be moved into the in progress section. The team agreed to take a maximum of 6 tasks in progress every week.
Github
Github is a version-control service based on git. Our team built three github repositories: one for documentation, main code repository, one repository for the project website. Through github each team member could work separately on same project simultaneously by making branches of master branch and send pull requst to merge each one’s work. Also the version control through github could help us to review our work thus find problems in previous work.
Google drive and Google docs
All of the documentation we have completed so far (which includes bi-weekly reports, research, design) are shared in google drive before converting it into Latex for submission or adding the content to the project website.

Ionic Creator (UI Design)
We used Ionic Creator to create the first prototype of our web application. This prototype was presented to our client at the start of term 2. Upon the approval of our client, we have used this prototype as the basis of our UI design. We did make some minor change based on feedback from our client. The purpose of Ionic Creator was to create light-weight simple prototypes that acts as a guide for UI development for the final product.