System Architecture

Components

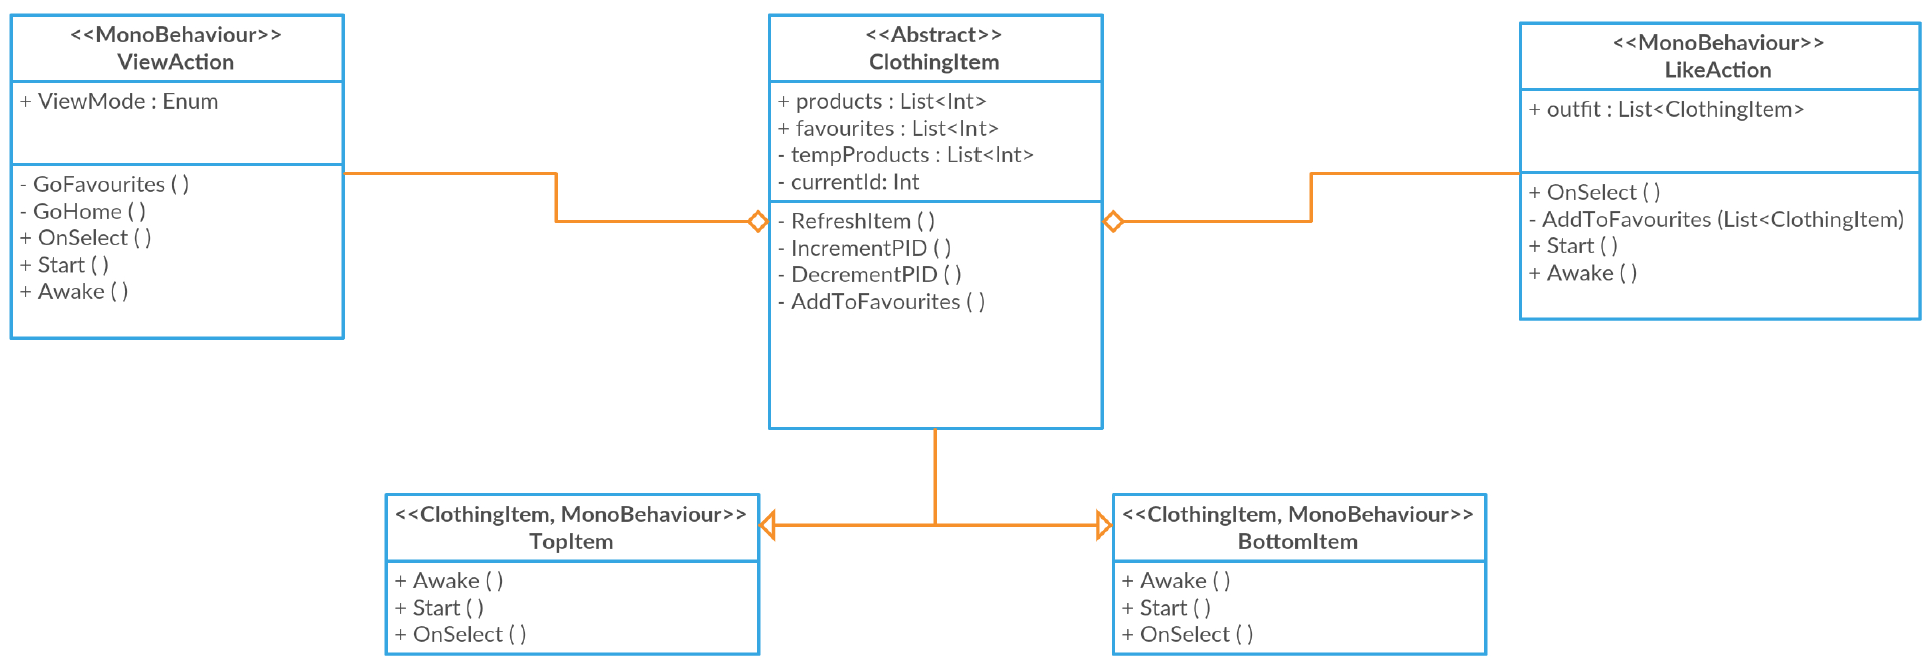
  • ClothingItem - An abstract class representing a single item of clothing. Contains methods for updating the favourites list, calling the API and updating the currently displayed item.
  • TopItem - A MonoBehaviour class inheriting from ClothingItem, and attached to the gameObject being displayed as the Tops.
  • BottomItem - A MonoBehaviour class inheriting from ClothingItem, and attached to the gameObject being displayed as the Bottoms. This allows for scalability in creating outfits from a larger set of items
  • GazeGestureManager - A MonoBehaviour class for managing where the user is gazing (using ray casting). Contains methods for returning the gameObject currently being gazed at, and updating the gaze cursor in 3D space.
  • ViewAction - A MonoBehaviour class for handling the 'view favourites' action. Contains methods for managing the applications functionality in the transition to the view screen, and back to the home screen.
  • LikeAction - A MonoBehaviour class for handling the 'add to favourites' action. Contains methods for adding the currently displayed outfit to the respective favourites lists, and animating the add-to-favourites button on selection.

Hardware

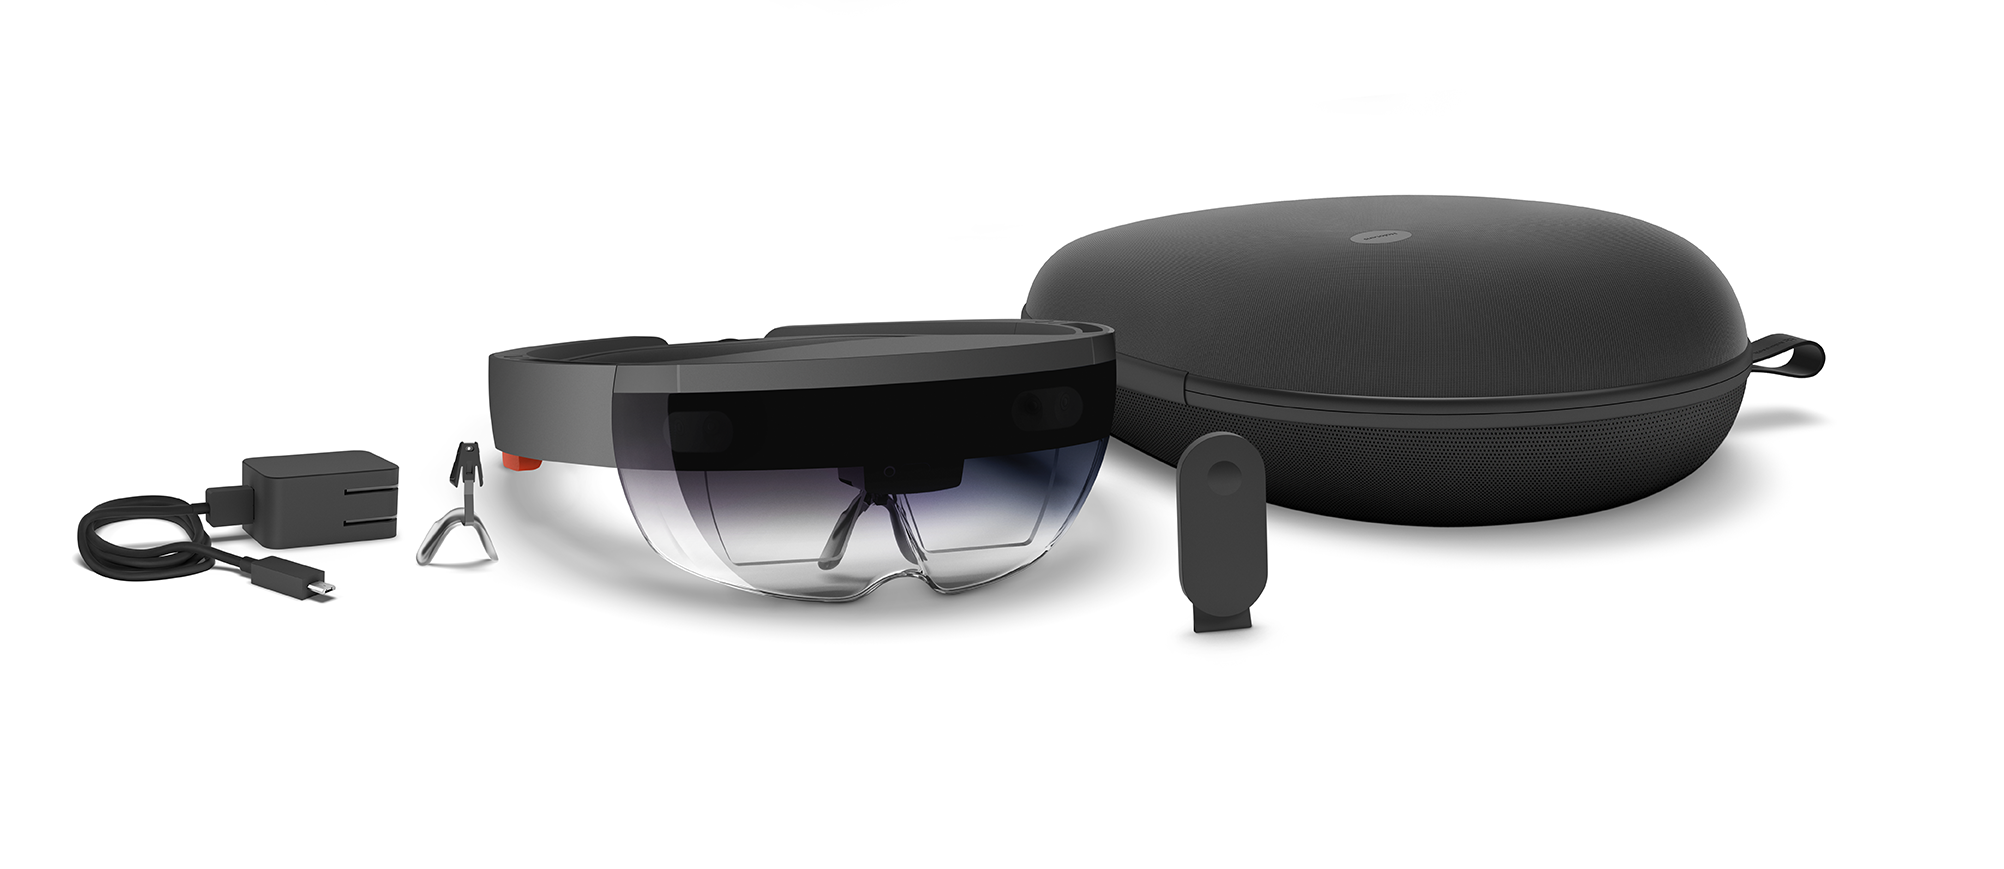
Microsoft HoloLens


[image source and read more]

The Microsoft HoloLens is a holographic computer designed with mixed reality in mind. In order to build our application to its full potential, we had to be aware of not only the hardware capabilities but also hardware limitations of the HoloLens.


Capabilities

  • Input: Gaze, gesture and voice (mostly from the intertial measurement unit and the 120°×120° depth camera).
  • Output: 2.3 megapixel widescreen stereoscopic head-mounted display, and spatial sound speakers.
  • Memory: 1GB HPU RAM (specifically dedicated to image processing) and 2GB RAM (for allocation to the remainder of the processes).
  • Storage: 64GB solid state memory.
  • Network: 802.11ac Wireless network adapter.
  • Battery Life: Internal rechargeable battery, average life rated at 2–3 hours of active use.

Limitations

  • Movement: As the device is mixed reality with no controller, movement inside the virtual world is defined by real world movements. This is a limitation as it meant our application had to either implement spatial mapping to allow movement or be fixed screen.
  • Environmental: The device proved to not last particularly long when running applications, however this ended up to be sufficient for the requirements of a virtual wardrobe which could be done mostly indoors. The HoloLens isn't designed for outdoor use in the first place, as direct sunlight interferes with its infrared light meters which are used for measuring distances in the surroundings.
  • Spatial: The Hologram "comfortable" viewing distance is limited to ~ 0.85m - 2.00m which proved to be a limiting factor in how large the models could be displayed. It was found that moving the Hologram too far or too close meant the strain of trying to focus each eye became unsettling for the user.
  • Processing: Despite the HoloLens having dedicated graphics processing unit, there is a memory restriction of 900MB set to each app which constrains the power of the device. This proved to be problematic when developing a custom UnityShader which (in some of our iterations) caused serious throughput issues and even RuntimeExceptions.

Class Diagram

Before implementation we designed the following class diagram based on Unity C# principles:


Design Patterns

Singleton

In terms of creational design patterns, our application demonstrates use of Singleton as no class is ever instantiated with more than one instance. We implemented this simplicity by adding a public static property to each class called 'instace' which gets set on initialisation so we could easily access each instance of every object we needed, at runtime. This meant that our application never became bloated with too many instances and classes of ClothingItems which could have led to unnecessary complexity in the development process.

Object Pool

Although we did not follow this design pattern in its entirety, it formed the basis of our ClothingItem class which acts as a Pool of items which can be cycled through, allowing us to reuse the same instance of TopItem and BottomItem for multiple outfits, and even for multiple views (ie favourites view and home view). This allowed the application to run as efficiently as possible, which was critical as the shader implementation was sure to have quite a large overhead.

Chain of Responsibility

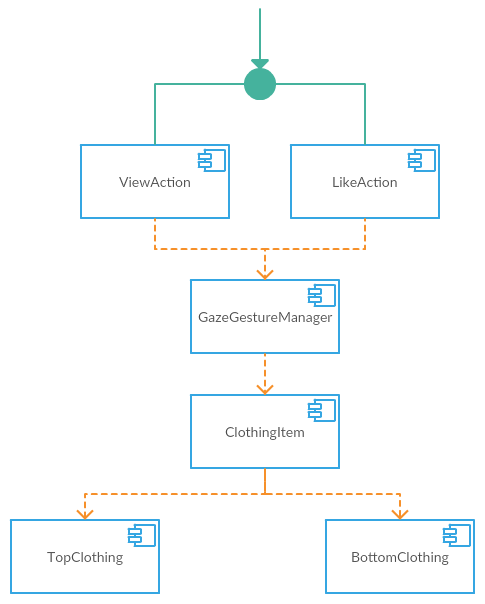
As far as behavioural design patterns go, the ray casting mechanism in GazeGestureManager uses Chain of Responsibility to send messages to the gameObjects being gazed on, and also for sending OnSelect() triggers. This allows GazeGestureManager to send a command upwards through the object chain without knowing which object will receive and handle the command.

Composite

We decided to obey the composite design pattern for the structure of our application. Each of the classes are instantiated on a tree of gameObjects at runtime, which meant we were able to partition our code and gameObjects together. This tree structure came to be useful as we were implementing the gaze functionality in which the ray casting would only hit objects that were instantiated as children of the GazeGestureManager instance.

Composite Tree Diagram


[Note how chain of responsibility can flow to root and to leaves from GazeGestureManager.]

Development Tools

IDE

Our application was developed inside Visual Studio (Community Edition), using Unity (5.5) as the build IDE. Code would be written in Visual Studio, before being loaded and attached to the scene in Unity. Next it would be built from Unity into a C# Visual Studio project after which it would be opened in a separate instance of Visual Studio for compiling onto the device/emulator.

UI Design

In the first few iterations of our application, we mostly used default Unity geometries as placeholders for future UI elements. Later on we used Blender to build 3D models for importing into Unity, but these did not end up making it into the final product. In the latter iterations we used Adobe Illustrator CC for creating the vector graphics which filled the placeholders as UI elements.


[Example final graphics we used]

Version Control

Throughout the duration of the project, we made full use of a shared GitHub repository containing our most recent working build. We ensured to follow a simple guideline before pushing to the code repository, outlined below:

  1. Code would not be pushed to the repository before substantial testing had been done.
  2. All code would have to first be thouroughly unit tested and integration tested for inconsistencies.
  3. Any new iterations of the application following changes would need to be compiled onto the device or the emulator for functional testing.
  4. After agreeing with the rest of the team, code is now safe to push into the repo to be merged.
We purposefully decided to keep this consistent with similar policies used for moving code from a DEV environment into a UAT environment as it allowed us to be sure our repo stayed 'clean'.
Impementation Details of Key Functionalities

Functonality 1: Intuitive gaze and hand gesture controls for Input/Output

Initially, our application simply pulled a distinct set of images from an API and rendered one of each (top and bottom) in 2D in front of the user. This stage of development was followed by implementing a gaze cursor which was able to return the item the user was gazing at, as the hand gestures are seemingly useless without gaze. A later iteration then introduced HoloToolkit [see the GitHub] which allowed us to add an OnSelect() method to the item being gazed at, being triggered by an air tap gesture. In aim of exceeding our requirements, we considered replacing the air tap gesture with a more natural swipe like that you might find on a touch screen device, however this ended up being a whole challenge in itself due to the lack of documentation and limited support for custom hand gestures on the HoloLens.

Functonality 2: Outfit mappings in the Virtual Environment

This was probably the more challenging functionality, as it proved to be very difficult to render a 2D (JPEG) image with a white background in 3D space without it appearing like an entirely 2-dimensional application. We put extensive effort into trying different techniques to achieve this task such as pre-processing a set of images to transparent PNG's before loading them into the HoloLens, but this proved to be too slow required a much larger load-up time. We attempted also to convert the JPG's to PNG's "on-the-fly" at runtime, but this gave a significant delay when wanting to navigate through multiple items. We then developed an algorithm using the C# .getPixel() and .setPixel() methods for removing the white backgrounds at run-time. This algorithm demonstrated to be most effective at making the white backgrounds transparent whilst still preserving the quality of the original image, but again resulted in a substantial lag/delay at runtime, and so we abandoned it entirely in favour of a custom Unity Shader. The Unity Shader we developed worked in a similar fashion to our getPixel()/setPixel() technique, but allowed the process to be applied to an entire image at once, instead of to each individual pixel. Although it showed to not be as effective in removing the white backgrounds, it was a time complexity trade-off we were forced to make.

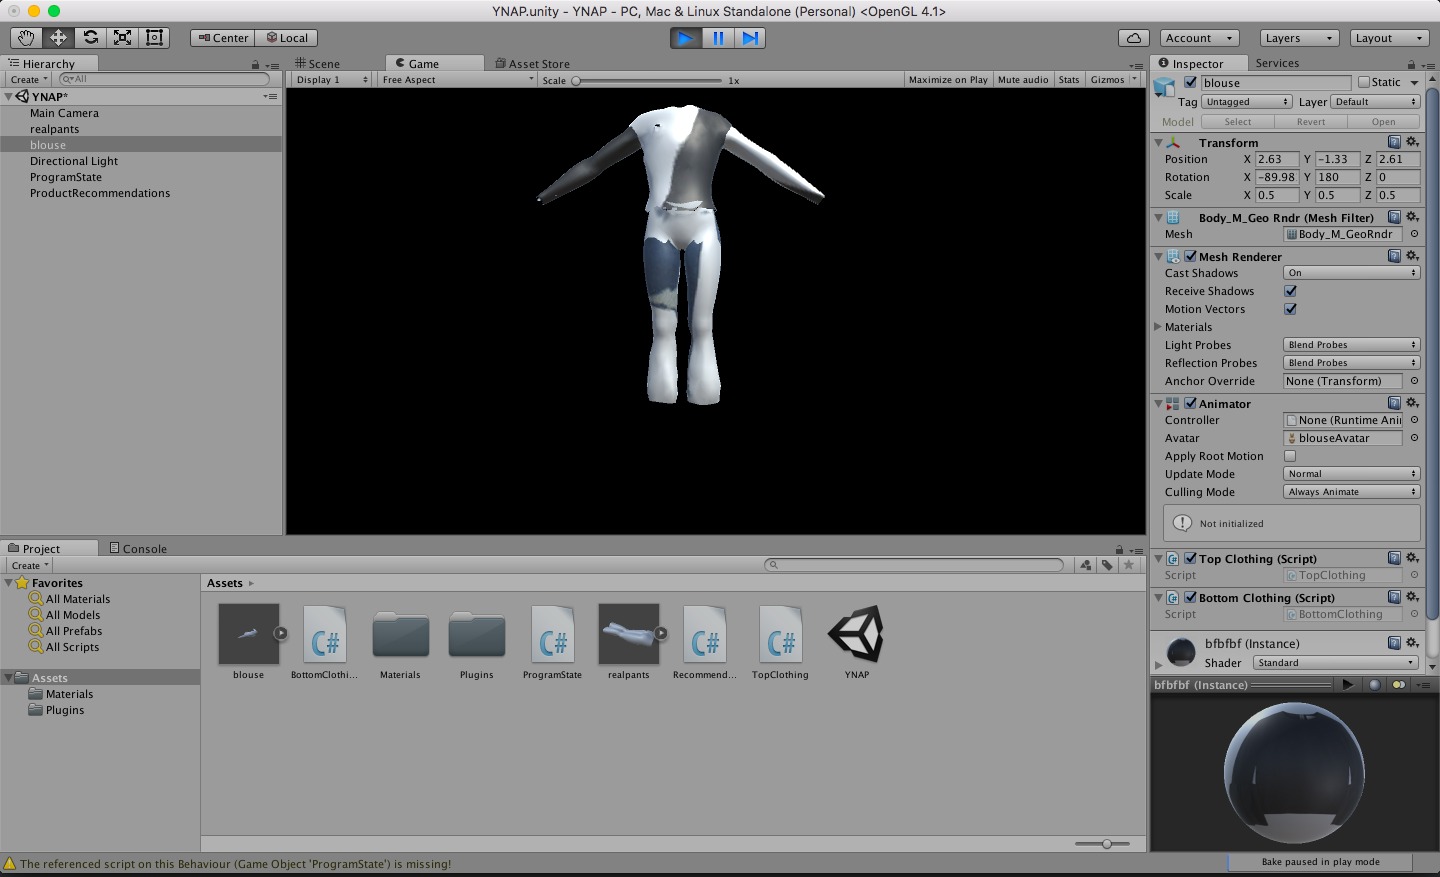
In order to achieve a more 3D effect, we first ventured into the building of 3D models, and spent a significant amount of time trying to build generic models for 'Tops' and 'Bottoms' on which we could map our textures. These models were very time consuming and put unwanted strain on the development process, thus we relinquished them for a simpler solution. We decided to overlay the newly generated transparent texture on a 3D cylinder-shaped object. Although this wasn't preferable, it simulated depth and shade on the models which we considered sufficient for the proof of concept and with such tight time constraints we had to focus on other areas of the application.


[An example issue we discovered with custom 3D models]

Functonality 3: Live updates of user clothing preferences in-app

In order to achieve a working recommendation engine, we initialise every ClothingItem with a random seed, from which it generates a list of product identification numbers (PIDs) to be browsed through. These are considered the 'base' PIDs, and will include no intelligent recommendations until an outfit is added to the favourites. Upon favouriting an outfit, each PID of the ClothingItem in the newly favourited outfit is sent to our clients YMAL(You May Also Like) API which returns a list of similar products in the same category, based on frequently purchased together items. The base outfits which had already been viewed by the user are then discarded and replaced with the ones recommended by the API. This process can be repeated for multiple outfits being favourited, so the user is constantly being displayed new items similar to those they had favourited.

Functonality 4: Intuitive voice controls for Input/Output

As the HoloLens has no controller or method of input other than hand gestures, we found it necessary to implement voice commands to perform some of the tasks. The implementation of voice commands inside a HoloLens is considered a fairly trivial task thanks to HoloToolkit's KeywordManager, we were able to create Keywords and attach them to already existing methods in our application. It later became necessary for us to add multiple rewordings of similar voice commands to minimise the need for users to learn voice commands and to allow more intuitive and natural voice control. Finally, in an attempt to integrate our application with another team we implemented a set of voice commands (such as "show me just trousers" and "show me red tops") which could be sent to their chatbot for processing. This was a very desireable feature as it tackles a real world issue of natural language e-shopping, however we faced an issue with handling the response due to how late we gained access to the chatbot API. Unfortunately time did not permit us to finish that specific functionality, but as it was not even in our MoSCoW requirements we are not too disappointed.