Management
System manual, User manual, Client meetings, Client feedback System Manual
Login and RBAC System
We have used Keycloak as our main framework for the authentication system and we deployed a solution to an Azure VM (accessible via browser at http://peach-auth.uksouth.cloudapp.azure.com:8080/auth/ ). To use our solution for further integration or development, you need access to our customized code – either from our repo or Google Drive or directly from our Azure VM’s Desktop if you have access to it.
To run the Keycloak server, you first need to install Java on your computer ( http://www.oracle.com/technetwork/java/javase/downloads/jdk8-downloads-2133151.html ).
After this you need to open Command Prompt (on Windows) or Terminal (MAC OS/ LINUX). Then go inside the source code folder and type “bin/standalone.bat -b 0.0.0.0” (Command Prompt) or “bin/standalone.sh -b 0.0.0.0” (Terminal) and press ENTER. Now, after several seconds you can open up your browser and access the tool at http://localhost:8080 .
Now, you should have an up and running solution. You can go to the admin console and login in using the admin credentials (you can request them from us or from our client; we won’t provide them here due to security reasons).
To change preferences and settings, you have 2 ways to do it. First of them, you can access the admin console and use the user interface to change every feature available in Keycloak. The interface is easy to use and does not require technical knowledge. Then, you can actually access the different Keycloak files and modify them manually in an editor, but this is very tricky, as there are a large number of files and changing something without properly knowing what you are changing might result in damages to the overall platform.
Finally, if you want to change the appearance, you can simply go to “themes/keycloak” and change the CSS / HTML files or the images. You can also extend an existing theme. For further information on how to do this or other changes, refer to the Keycloak documentation: http://www.keycloak.org/documentation.html .
Internal Messaging System
Developing the app:Download the repository, either fresh one from GitHub/Rocket.Chat or the one is being developed. Change to the directory that you downloaded. Run “meteor npm start”. You need to download and install meteor if you do not have it on your machine by running “curl https://install.meteor.com/ | sh”.
Deploying the app:
One of the hardest part of internal messaging system development process was deploying Rocket.Chat to Azure. Due to time limitations, currently there is not any automation for deploying the app. The following tutorial will take you through the deployment process and should be followed in order, to properly deploy the app. There has been multiple occasions where deployment failed because of malfunctioning of the latest build of the project, problems with node packages, Azure connectivity errors, server configuration errors and database connection errors.
Creating the Virtual Machine
1) Create an Ubuntu 16.04 LTS (the version used for the deployment but the use of higher versions is also recommended) VM on Azure. This can be done by typing Ubuntu into Azure’s search bar.2) Choose the VM with the publisher stated as Canonical. Choose “Resource Manager” for deployment model and click create.
3) Give your VM whatever name you want. You can choose any disk type but SSD is recommended. 4) Choose anything you want for username, authentication type and source group.
5) Choose “UK South” for location and click ok.
6) Choose an appropriate size for the machine (the machine that the current version uses is DS2_V2 standard). Click select.
7) In the next screen choose anything you want only pay attention to not to choose any virtual network or subnet with extra limitations which might prevent the app from getting accessed by external users.
8) Click ok and Azure will create the VM for you.
Configuring the Server and Deploying the App
1) Download and install Azure CLI (command line interface) tools to access the VM on Azure from your computer.
2) Connect to your VM by using the SSH key or the password that you created while setting up the VM (4) in the section above).
3) Once connected, run the following commands in order:
• sudo apt-key adv --keyserver hkp://keyserver.ubuntu.com:80 --recv 7F0CEB10
• echo "deb http://repo.mongodb.org/apt/ubuntu trusty/mongodb-org/3.0 multiverse" | sudo tee /
• etc/apt/sources.list.d/mongodb-org-3.0.list
• sudo apt-get update
• sudo apt-get install -y mongodb-org curl graphicsmagick
4) After this basic configuration install npm:
sudo apt-get install npm
5) If you encountered any errors try this first:
sudo apt-get install nodejs
6) Run this:
sudo apt-get install build-essential
7) This tool is going to help us to choose the node version:
sudo npm install -g n
8) We are going to use version 4.5, therefore:
sudo n 4.5
9) Run this command if you want to get it from GitHub, GitLab vice versa:
git clone INSERT_YOUR_LINK_HERE
Run this command if you want to get the default and latest stable version of Rocket.Chat:
curl -L https://rocket.chat/releases/latest/download -o rocket.chat.tgz
10) Untar the release:
tar zxvf NAME_OF_THE_REPOSITORY_THAT_YOU_JUST_DOWNLOADED
If you are unsure about the name find out by running “ls” command.
11) Rename your directory:
mv YOUR_UNTARRED_DIRECTORY_NAME Rocket.Chat
If you are unsure about the name find out by running “ls” command.
12) Run these to install node modules for the app:
cd Rocket.Chat/programs/server
npm install
13) Move back to Rocket.Chat directory:
cd ../..
14) Set your ROOT_URL variable to your domain name:
export ROOT_URL=https://yourdomainname.com/
15) Set MongoDB’s connection URL to MONGO_URL variable:
If you want to set it to a MongoDB separate from your Ubuntu server follow the next section to set up MongoDB on Azure and then use this command:
export MONGO_URL=YOUR_MONGO_DB_CONNECTION_STRING
If you want to use it on Ubuntu server run this command:
export MONGO_URL=mongodb://localhost:27017/rocketchat
16) Set PORT variable to 3000:
export PORT=3000
17) Run this command to run Rocket.Chat:
node main.js
You should not get any errors if it is correctly deployed. You still will not be able to access it from browser.
Adding Security Rule
None of the online tutorials cover this step as the time of writing. Therefore, even if you follow a tutorial other than this one make sure you do this.
1) Click on your VM on Azure Dashboard and select “Network Interfaces” from the navigation bar on the left.
2) Click on the security group that appears on the screen then click on “Network Security Group” on the left.
3) Click on inbound security rules then, click add.
4) Give it a name as you like and priority but the rest should be set to source: any, service: custom, protocol: any, port range: 3000, action: allow.
5) Then click ok.
Adding Extra Configurations
Nginx
Now, we need to set up Nginx to make access to Rocket.Chat easier and to encrypt all your communications with your SSL certificate.
1) Install Nginx:
sudo apt-get install -y nginx
2) Delete the current private key of your certificate file:
sudo rm /etc/nginx/sites-enabled/default
3) Create a new one:
sudo nano /etc/nginx/sites-enabled/default
4) Add the following and save the file:
server {
listen 443;
server_name example.com;
error_log /var/log/nginx/rocketchat.access.log;
ssl on;
ssl_certificate /etc/nginx/certificate.crt;
ssl_certificate_key /etc/nginx/certificate.key;
ssl_protocols TLSv1 TLSv1.1 TLSv1.2; # don’t use SSLv3 ref: POODLE
location / {
proxy_pass http://example.com:3000/;
proxy_http_version 1.1;
proxy_set_header Upgrade $http_upgrade;
proxy_set_header Connection "upgrade";
proxy_set_header Host $http_host;
proxy_set_header X-Real-IP $remote_addr;
proxy_set_header X-Forward-For $proxy_add_x_forwarded_for;
proxy_set_header X-Forward-Proto http;
proxy_set_header X-Nginx-Proxy true;
proxy_redirect off;
}
}
5) Restart Nginx:
sudo service nginx restart
6) Check if Nginx is running:
sudo service nginx status
You should see this:
* nginx is running
7) Run Rocket.Chat by:
node main.js
Configuring Rocket.Chat as a Service
This is going to keep the service running so we will be able to make changes without stopping the server.
1) Install forever:
sudo npm install -g forever
2) Install forever-service
sudo npm install -g forever-service
3) Create a service using forever-service
sudo forever-service install -s main.js –e "ROOT_URL=https://yourdomain.com/
MONGO_URL=your_mongo_connection_string PORT=3000" rocketchat
4) Start Rocket.Chat
sudo start rocketchat
Rocket.Chat is now available at yourdomain.com:3000
Collaborative Document Editing Tool
For the implementation of the Collaborative Editing Tool functional, we have used Etherpad as a main framework. In the current version, a pad admin exists and pads can be created from a main window. The following steps have to be followed in order to make the tool functional.
1. In order to customise the pad or make different changes to the general settings - as changing the type of the database used, users or history details, open the settings.json file in UCLH_CollaborativeEditingTool.
2. Use MAMP or XAMP and turn on the MySQL database server.
3. To continue the set up of the tool, the next steps are different, based on the operating system of the admin.
- Windows OS -
a. Run start.bat [2]
- MAC OS -
a. Install node.js and npm (could be useful to have Homebrew installed before and use it for these installations)
b. In the terminal, go to the UCLH_CollaborativeEditingTool folder
c. Run nano etherpad-lite/settings.json (or vi instead of nano) [1]
d. To launch the collaborative editing tool, run etherpad-lite/bin/run.sh
4. Open the browser and access http://localhost:9001
* Unless the admin modifies the port number in the settings.json file, one should access the collaborative editing tool at the previous address locally
** In the submitted version, we have deployed it on Microsoft Azure, by using a Microsoft Windows 2016 server
User Manual
Login and RBAC System
To access the current Keycloak server, you can use the following link: http://peach-auth.uksouth.cloudapp.azure.com:8080/auth/ (might change in the future, if needed; if this happens do not hesitate to contact us). There you can access the admin console (if you have the admin login details) by clicking “Administration Console” or you can access the login authentication realm or your account (if you have a created user account) at the link: http://peach-auth.uksouth.cloudapp.azure.com:8080/auth/realms/auth_trial_realm/account (this might change as well; contact us if nothing shows up at that link.
As an admin, you can add new users from the “Users” section, or new roles from the “Roles” section. You can also create new authentication realms or customize every aspect of the server. Everything is available in the admin dashboard. As a normal user, from the “Account” dashboard you can change different aspects of the account, including passwords and others.
In general, everything else is self-explanatory through the user interface and you can modify things easy with just some button clicks.
Internal Messaging System
Users need to login to start using the app. Registration is not allowed, only the admin can create new users. Admin enters a username and a password to register a user and sends it to the person who is going to use the account. The first time that user logs in the app asks him/her to change his/her password so that nobody other than that user has access to the password.
There are 5 predefined users for PEACH internal messaging system:
• Administrator
• Senior Clinician
• Junior Clinician
• Clerical
• Patient
The permissions of these users can be edited and new user roles can be created from the admin console which only admin account have access to.
The following test users have been created and for development and testing you can be log in using their accounts:
• username: test.account password: 123456 role: Administrator
• username: peachadmin password: supersecret role: Administrator
• username: test_senior_clinician password: seniorpwd role: Senior Clinician
• username: test_junior_clinician password: juniorpwd role: Junior Clinician
• username: test_clerical password: clericalpwd role: Clerical
• username: test_patient password: patientpwd role: Patient
Chat GUI is the same for all users except for some users such as admins and senior clinicians have extra permissions such as deleting the chat group, creating new direct messages and because of this reason they have some extra buttons.
New chat groups and new direct messages can be created by clicking on the “+” sign in the navigation bar on the left. The direct messages and chat groups that a user have joined can be seen in the navigation bar as well. Users can click to the names of people or chat groups to access these chats. When the users access these chat the chat history gets automatically loaded and the users can send new messages, images and other files through the bar at the bottom.
The internal messaging system is very similar to other very common chat platforms such as Slack and WhatsApp in this manner. Users can also send emojis by clicking on the emoji icon on the left side of the bottom bar and start a Videochat by clicking on the camera icon on the right. Just like Slack, users can send bold, italic vice versa customised messages by adding some extra characters which are shown below the message bar at the bottom. On the right of the screen there is a set of menu icons which have the following functions from top to bottom respectively:
• Information about the chat
• Search past messages
• User info (direct chat), group info (group chat)
• Notification settings for this particular chat
• Previously sent files list
• Starred messages
• Pinned messages
• Off the record conversation
• Videochat
PEACH Internal Messaging System provides a clean GUI for admin console where users who have admin permissions can log in and make necessary changes to the app. The most significant changes that the admins can make are adding and deleting users, creating and assigning new roles, changing app’s assets and texts and ability to see all channels and users.
Collaborative Document Editing Tool
1. Access the link for the collaborative note created by the admin
2. Start using the collaborative tool
More details:
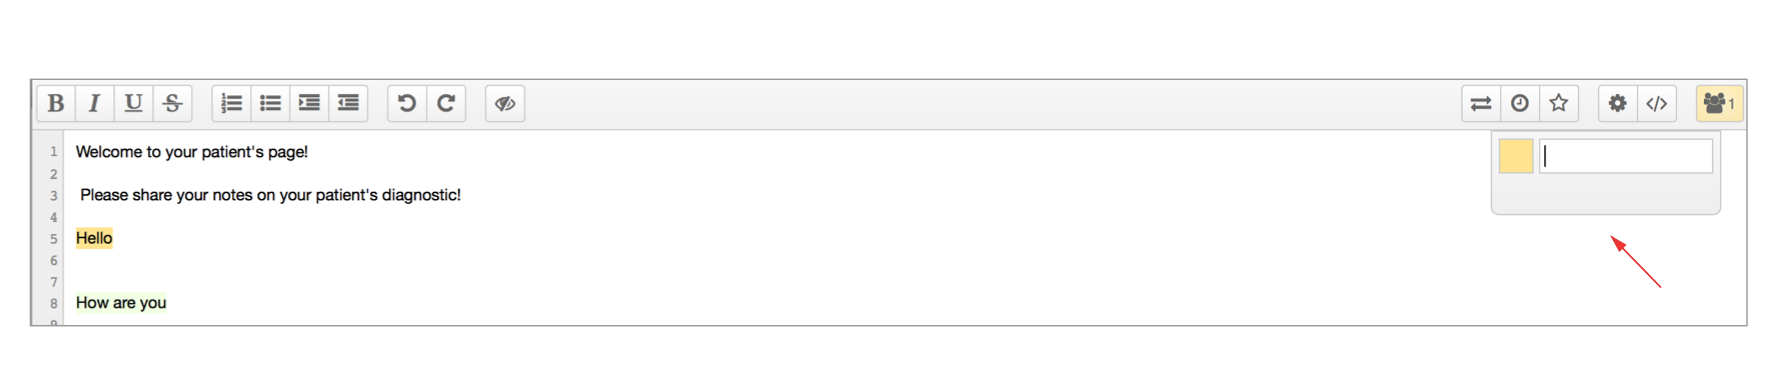
a. Setting up your name
- To set up your name on the real time collaborative pad, click on the persons icon located on the top right side of the window and fill in the name field
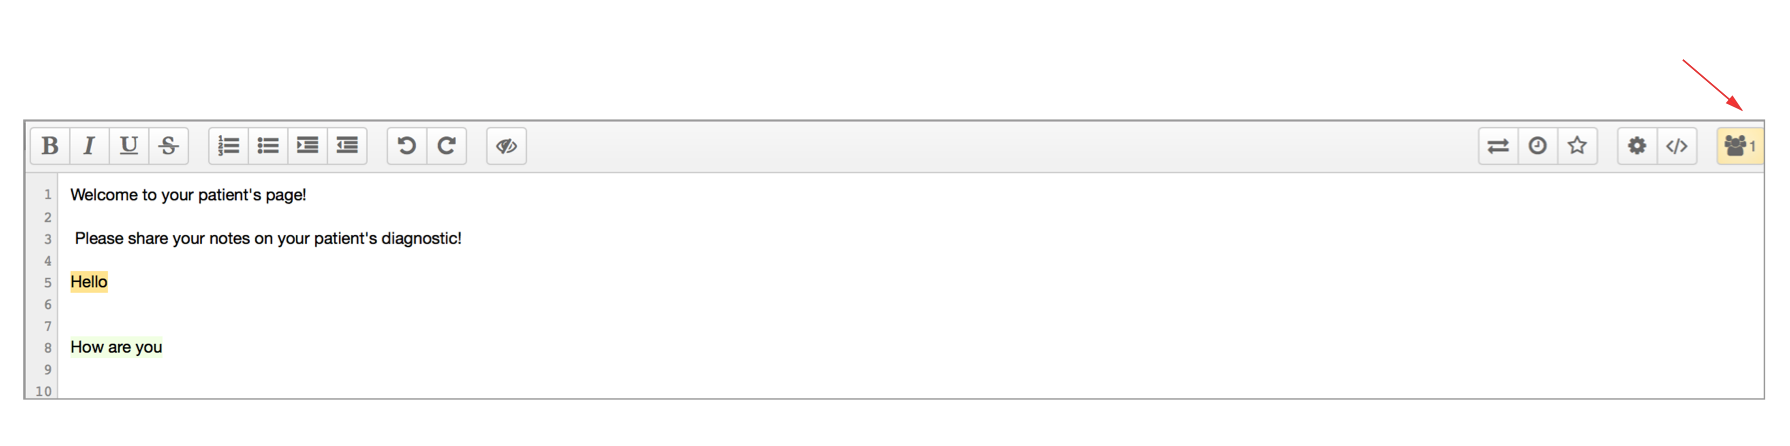
- Update the colour associated with your user by clicking on the settings button and choose one of the many available colours from the colours spectre.
- The text contribution will be marked by your chosen colour
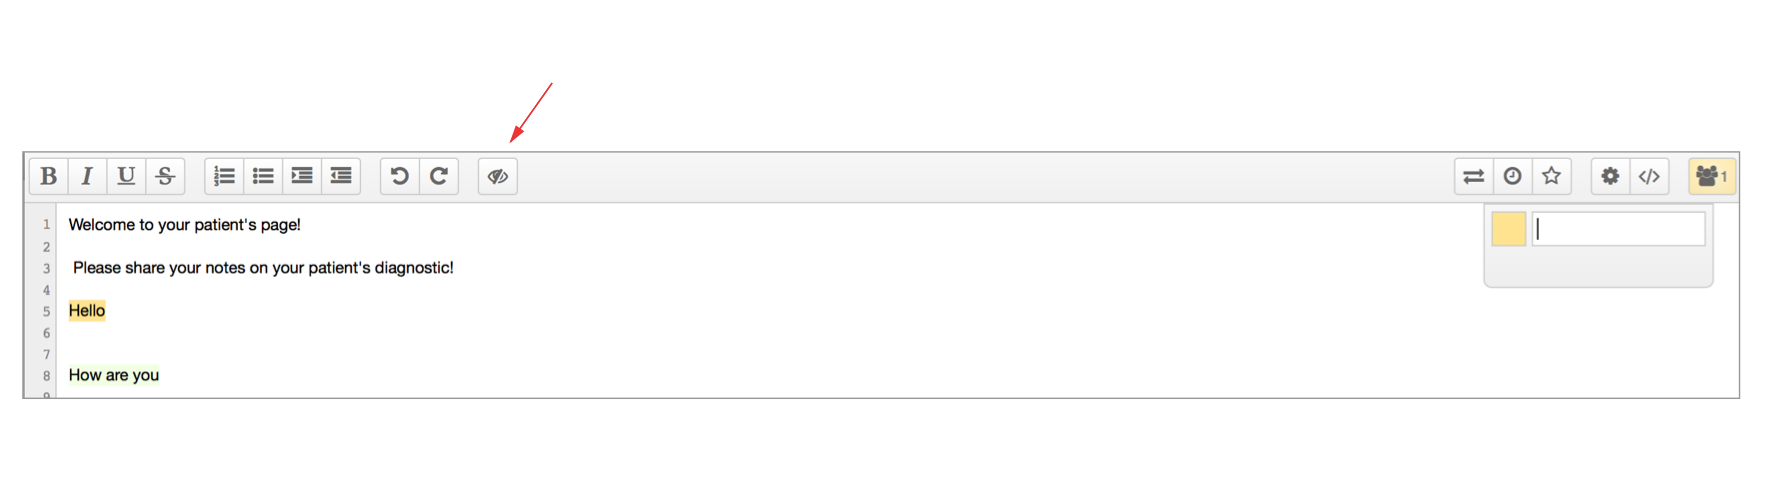
- By simply clicking on the hide formatting button
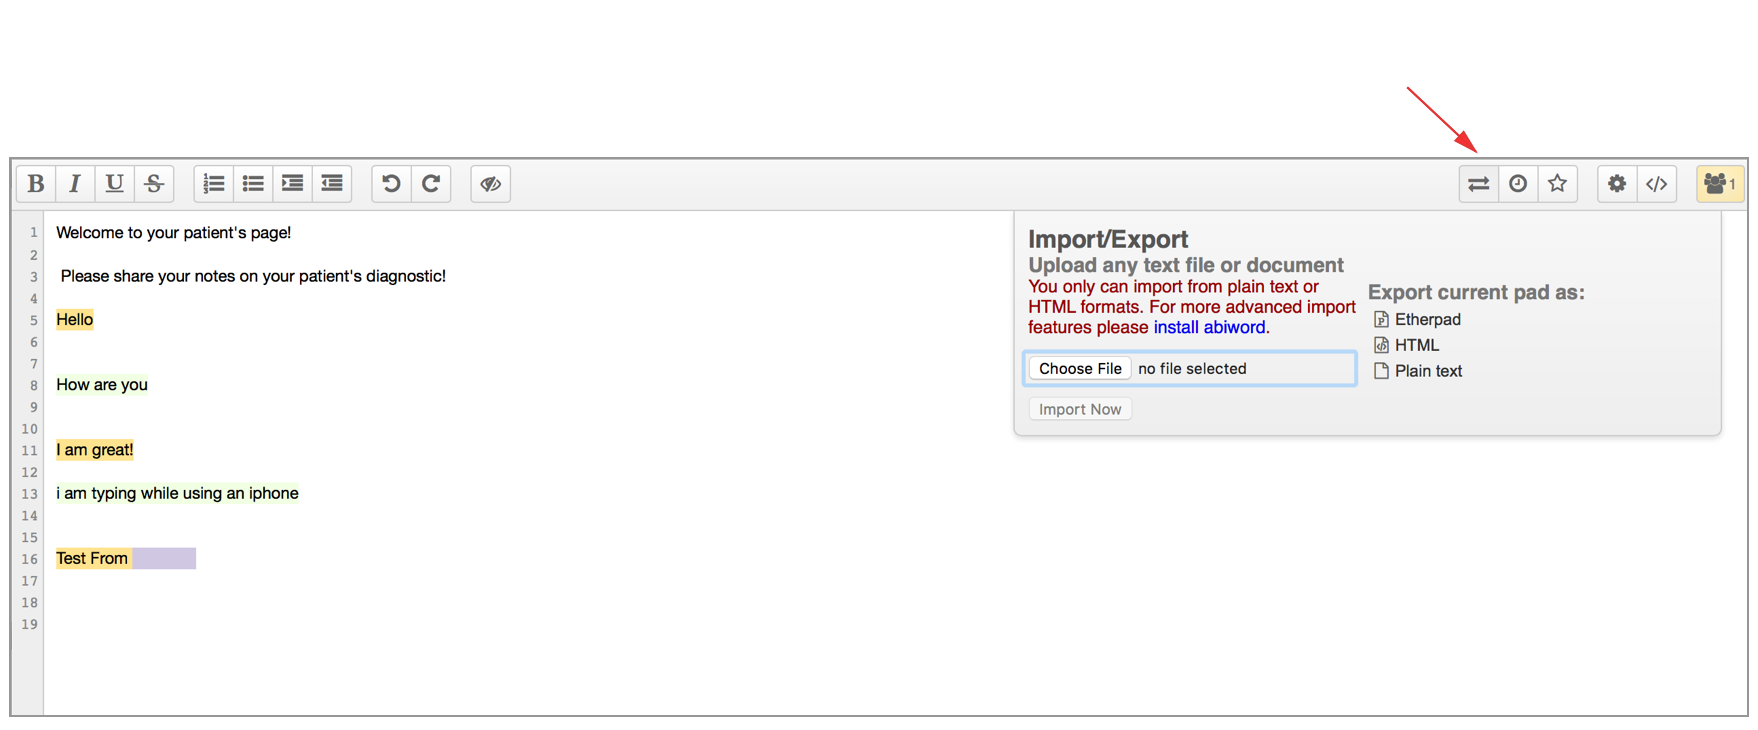
d. Exporting and importing previous pads
- Users can import and export pads also on their own by accessing the following button
References:
[1] K. M. Lawson. The Chronicle of Higher Education T. Collaborative Writing with Etherpad-Lite on Mac OS X. Available on: http://www.chronicle.com/blogs/profhacker/collaborative-writing-with-etherpad-lite-on-mac-os-x/45487 [Accessed 20th February 2017]
[2] Github Etherpad-lite. Available from: https://github.com/ether/etherpad-lite [Accessed 14th February 2017]
Client feedback
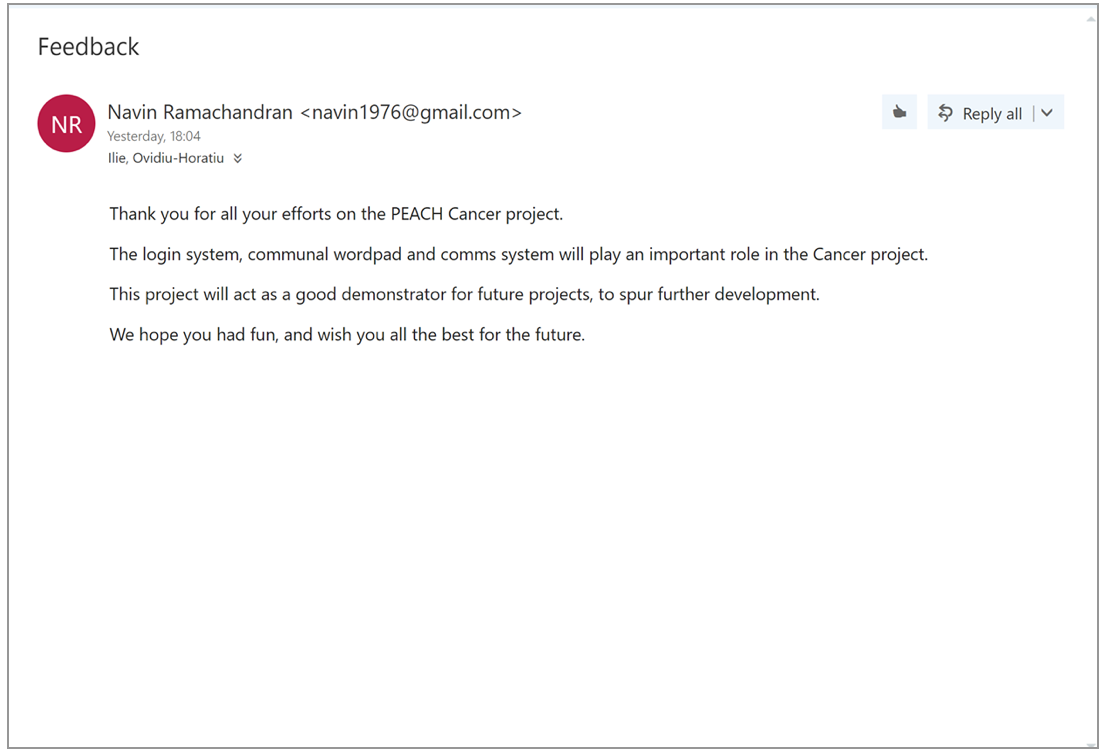
Our client, Dr. Navin Ramachandran, has provided us the following feedback:
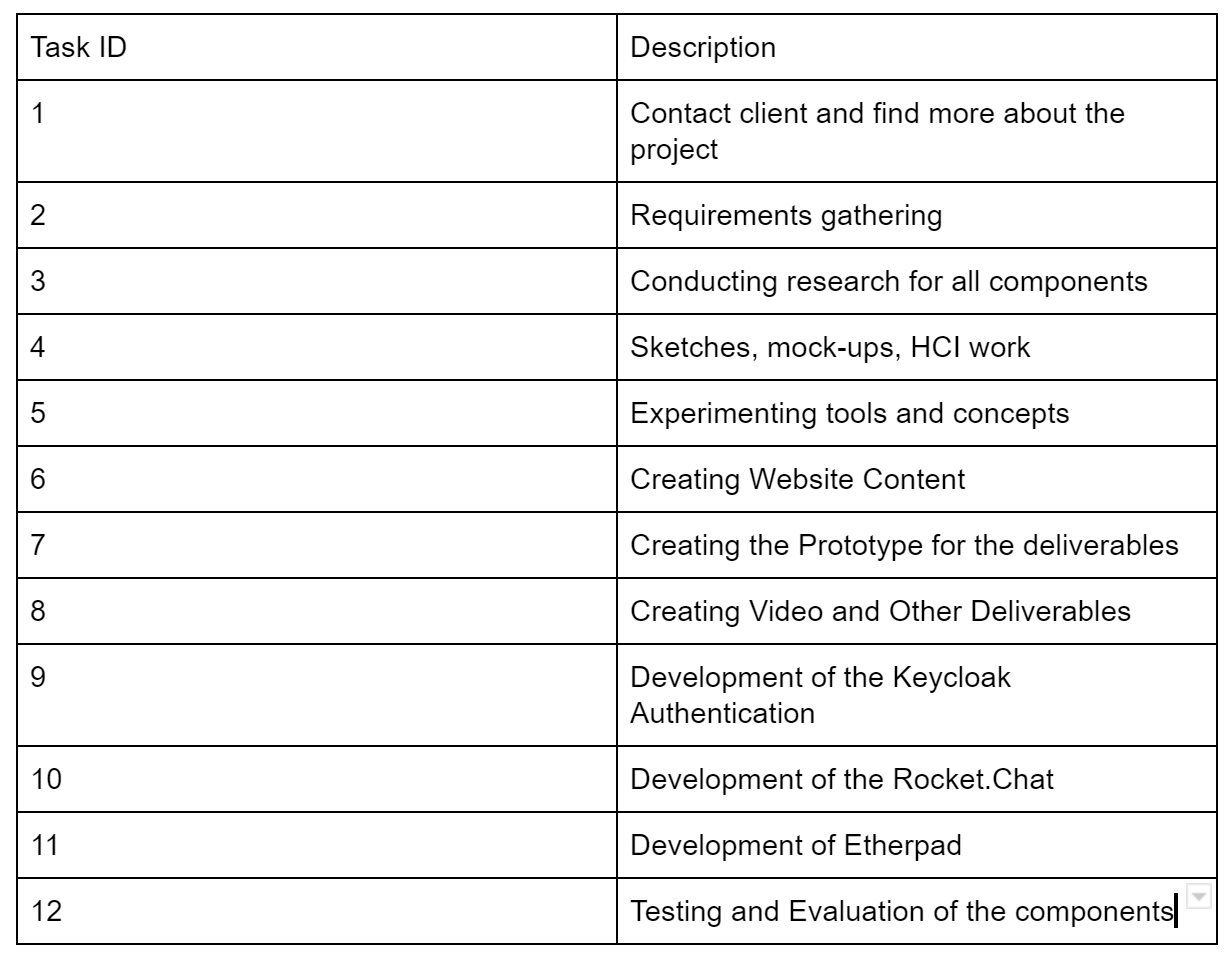
Gantt Charts
Our team's Gantt Chart: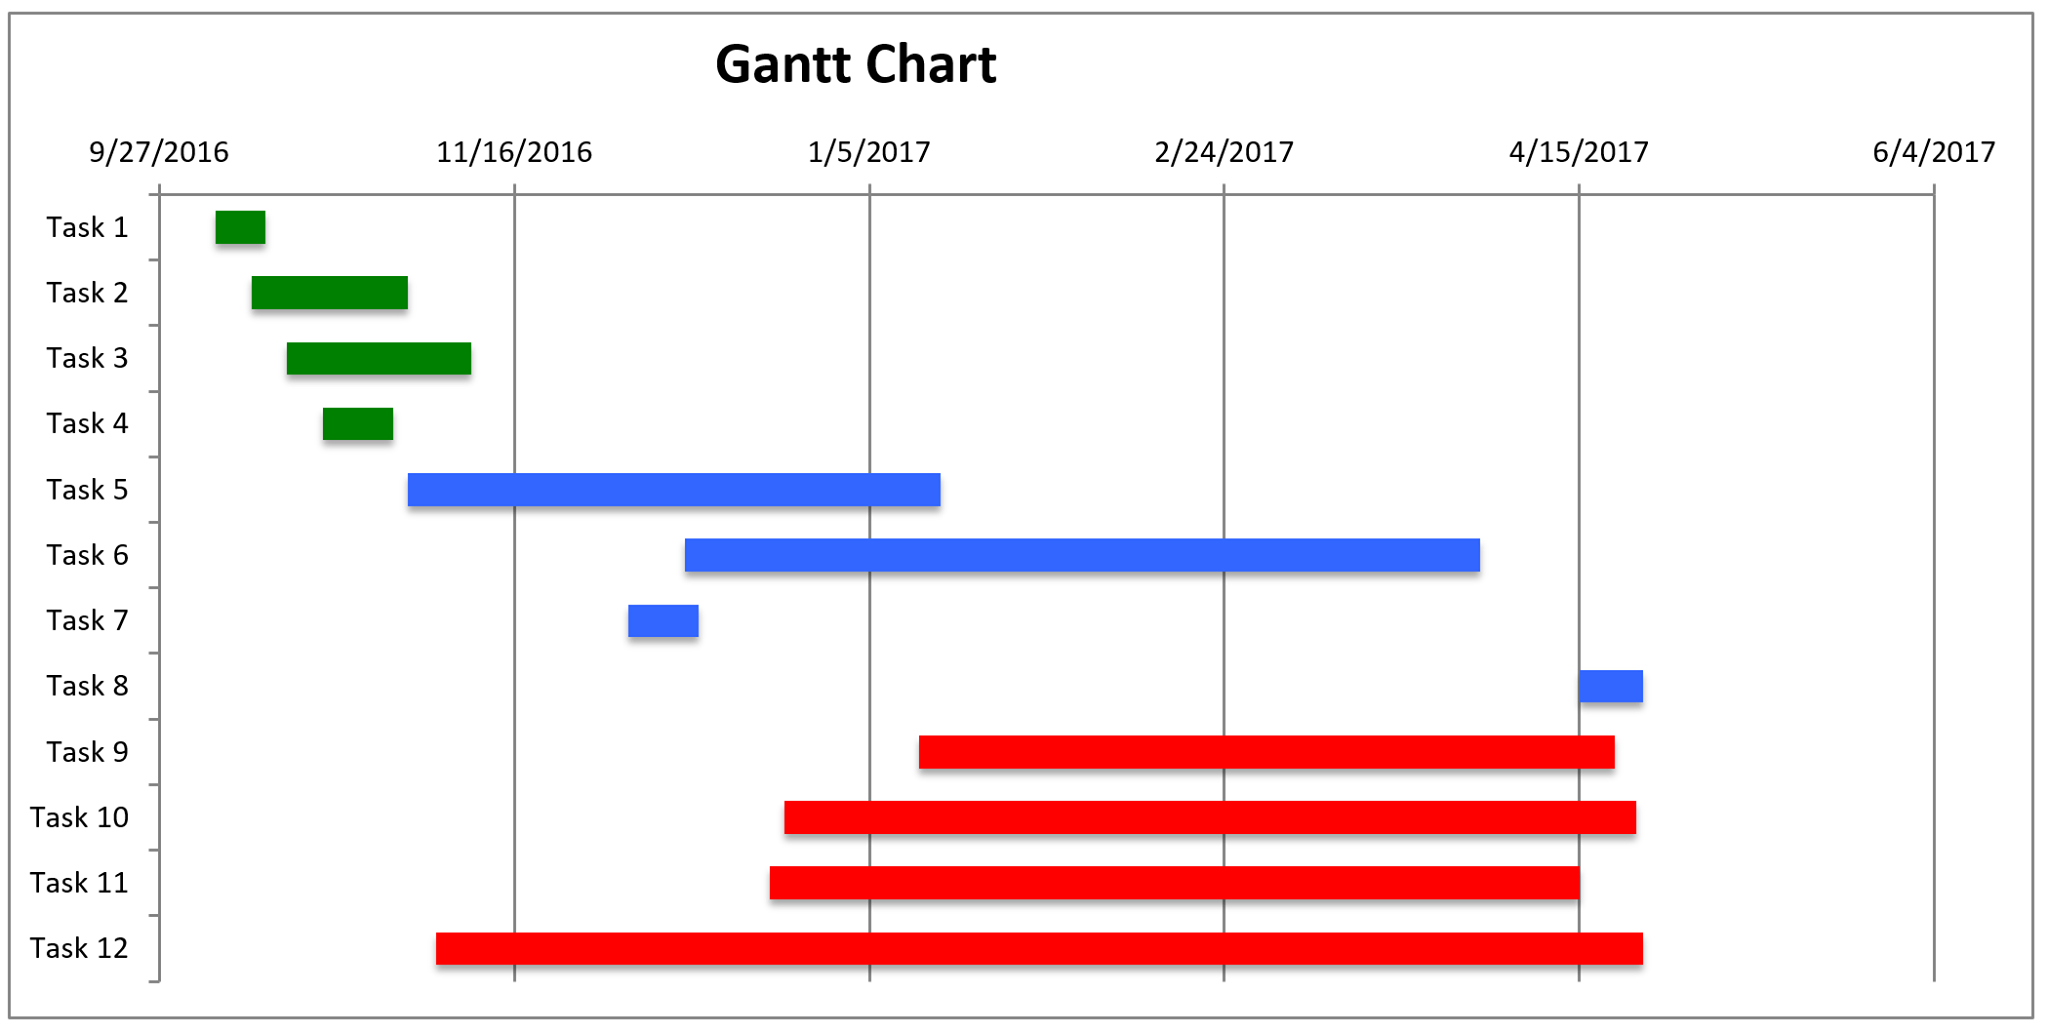
Bi-weekly reports
All our team's bi-weekly reports can be accessed here.
Client meetings
| 1. | 7th October 2016 | The client shortly introduced us into the project and arranged a following meeting and we all registered on GitLab and Ryver (communication and management tool), since the client requested using these specific apps for collaborating with him. |
|---|---|---|
| 2. | 10th October 2016. | We met with Dr. Navin at UCLH. He explained more precisely what previous students have done and what each team should work on and build on. He also created some links between the UCLH Peach teams, since the outcome of the teams should be blended into one big project. Then, he had a short talk with each team separately and granted access to more documentation. Finally, we clarified a set of initial requirements that he is expecting. |
| 3. | 17th October 2016 | Had a meeting with Dr Navin in order to present him the decisions we had about the subtasks and dividing them. He gave us a positive feedback and came up with some suggestions on where to look for available technology that might help in our subtasks. At the end we created a document with everything discussed, in order to have a plan for what is next. |
| 4. | 21st October 2016 | Met again with the client and presented him the outcome of the research and what we thought the system should be like. We also discussed with other teams about how our design should come together in one. |
| 5. | 17th of November 2016 | We discussed and evaluated the finalist open source chat platforms with the client to decide which one to use. We decided on Rocket.Chat as our base platform. |
| 6. | November- December 2016 | After several team meetings, we kept in touch for a few weeks with our client in order to ask his opinion about the requirements/MoSCoW scheme. Following the meeting, the client confirmed that they are ok, with slightly small changes from him. |
| 7. | 27th January 2017 | We met our client after a long break and told him what we have discussed since the start of the second term. We also met our TA and showed him our progress. Finally, we decided to stick to the plan we had so far and to implement what we want until the next report. |
| 8. | 1st of February | We met at the lab during the our team’s lab session. We had a talk with our client to ask our questions about our components and show him the stage that we were in at the time. We also solved some minor issues with our parts and arranged the next meeting. |
| 8. | 3rd of February | We met at the lab during the our team’s lab session. We had a talk with our client to ask our questions about our components and show him the stage that we were in at the time. We also solved some minor issues with our parts and arranged the next meeting. |
| 9. | 4th of March | We discussed about tools how Keycloak can be customized to provide outstanding admin functionality. Moreover, we decided how the overall system should be integrated and made available in cloud. |
| 10. | 23th of March | We met Yun Fu and our client, Dr Navin, for the last time on this term. We evaluated the project so far and what it has to be done in the next period. We also worked for our integration of the components. |
| 11. | 28th of March | We discussed about the difficulties that we had had with Rocket.Chat deployment and decided to build a chat app that we can deploy instead of having an undeployable Rocket.Chat app. |
Table with client meetings.
We can confirm that apart from meeting in person with the client we have been constantly keeping in touch with Dr. Navin Ramachandran on Ryver, where he has set up a great environment to discuss about all the components of the project.