Legal issues

Liabilities of the project:

It was a prerequisite to consider any potential liability this project may have, due to the fact that we would need to be well prepared for any disfunction of the system. Starting with, as a major part of the system works autonomously, there is a potential liability that the system will alert doctors unreasonably. This could happen for a number of reasons. For example, the temperature sensor might get covered with dirt, or someone may move a bookcase covering up the sensor resulting in not getting accurate measurements of temperature from the sensor. As stated earlier, this system needs to work seamlessly, in the way that if no abnormal event a particular doctor shouldn't be notified. Through the process of receiving incorrect data from sensors, the system may alert doctors that an irregular event occurred with the outcome being that a considerable amount of time will be wasted from the doctors, figuring out what has gone wrong. To deal with this liability, we would encourage the user to shield the hardware to prevent any damage. The second liability is to be cautious when using the sensors and the sensor hubs around the patients. Not all parts of the hardware are protected and insulated as it is just a prototype used for a proof of concept. As the hardware will likely be used around patients, the wires and electrical components need to put away out of reach to prevent any hazards of electrocution or tripping. Last but not least, data from our sensors should only be used as a reference. Instead, professional equipment should be in place to monitor a surgical event. However, the data received from them is accurate enough to be used for analysis and to base the alerts on. The data is about the environment of the room not the patients themselves hence it should not be used as a reference to well-being of the patient.


Intellectual property including all open source usage of materials, what components I have derived and what source code agreement we have in place

We have used a variety of open source materials in our project including: Django, to create the back end for our application, which requires Copyright notice to be included. All following materials use MIT license: React is a JavaScript library that simplifies the development of single page web apps, ChartsJs is a JavaScript library that creates good looking graphs, Create react app creates the initial project directory for react, Django rest framework used to create the API, Redux simplifies complex state management, bootstrap and react-router- dom. These materials are all under new BSD license: GitPython, Numpy and pandas. These libraries were used to create the algorithm that is used to learn from the sensor data. The components that we have derived are the layout and logic of the dashboard, which were created with the help of react, bootstrap and chratsJs. The graphs that are shown in the dashboard are part of chartsJs and the grid view was made with bootstrap. The dashboard is populated using API calls from Django Rest Framework. The logic of the dashboard was implemented with JavaScript and React. React also help to make the transition between states and tabs quick and seamless. The algorithms for learning the normal are using numpy and pandas, which are very flexible python libraries that provide great data analysis functions. These functions have been used to autonomously work out the range of the normal target and extreme boundary after which an alert will be sent out to the medical staff. API calls from backend to frontend and vice versa, were defined by using Django Rest Framework which send, receives and serializes the data.


Data privacy considerations of the software system, including GPDR requirements

Data privacy is a very important aspect of our software system and we ensured that data gathered are stored securely. We do not store or ask for a lot of personal data. The only pieces of personal data we store is patient ids and doctor ids. The actual data about them is being handled by the hospital. This data will be stored on the virtual machine and only used as reference when looking for entries in archives. Personal data is not used for any automatic processes and can be deleted if requested. The patient id is entered by the medical staff in the hospital so, if required, the staff may need to notify the patients prior to including this data. Moreover, passwords are stored in a hashed form, so if someone gains unauthorized access to the database it won’t be able to retrieve the password of every user in the system. Consequently, only personal data which are needed will be stored in compliance with GDRPR by design. Furthermore, data stored from the sensors (temperature, humidity etc.) will be kept private to the doctors and stored securely in the database and will only be associated with the doctor and the patient.

User manual

  1. Loging In and Adding New Users
  2. The users can log in with their login credentials. If a user doesn’t have the login credentials they will need to sign up. The signup button is below the login fields on the login screen. Users will no be able to use the dashboard until logged in.


  3. Main Dashboard View
  4. Once you log in to the dashboard this is the screen you are greeted with. Here you can navigate to different pages of the dashboard and view live data coming from the sensors via graphs.

    1. Adding Graphs
    2. To add new graph press the ‘+’ button on the left hand side of the navigation bar. You will be prompted with a form that asks you to specify what sensor from what room would you like to add to the dashboard. You can specify a name to that graph, if you don’t it will call it the sensor name as default. You can also choose a colour to further help to distinguish the graphs.

    3. Changing Theme
    4. Clicking on the ‘theme’ button in the top right corner of the navigation bar will change the theme from dark to light and vice versa.

    5. Using Voice commands
    6. By pressing the ‘microphone’ button in the top right corner of the navigation bar, the browser (limited to google chrome) will listen to your commands and respond to them. It has a limited understanding and only works with a hand full of the commands listed below:
      “What is the ( temperature / light intensity / humidity ) in the ( room name )?”
      “Is everything ok?”

  5. Recording Medical Events
  6. The dashboard also allows you to record medical events in the rooms with the sensor hubs. You will be able to view the summary of the event in the Archive page.

    1. Starting Event
    2. To record a medical event you will need to click “start event” button in the center of the dashboard, and you will be prompted with a modal form. There you will be asked to choose which doctor and patient will be participating in the event, what room it will be happening in and what is the title of the event. Once the form is submitted the data will begin to record.

    3. Ending Event
    4. It can be terminated in the “stop event” dropdown . There you can see which room is being recorded and how long the event was on. By pressing the room you want to terminate the recording will be stopped and you can rate the event. The rating is used in the learning but it is not required.

  7. Viewing Archive
  8. The archives are of the previously recorded events. In them you can view the data about the event and summary of the collected data.

    1. Opening Archive
    2. To view an archive simply click the archive button in the navigation bar and choose the required event, you can use the search bar to narrow the list. When you click open there will data about that event.

    3. Getting CSV
    4. After opening the desired archive you can find a button ‘download CSV’ , by clicking it you will download CSV for that specific archive.

  9. Controlling Sensor Hubs (Raspberry Pies)
    1. Adding Sensors Hubs
      1. Setting up the raspberry pi
      2. The first thing you will need to do is to burn the copy of the latest Raspbian operating system onto an micro SD card. Before the raspberry pi can be used with the Healthcare sensor fusion system it will need to be connected to the establishment’s wifi. Raspbian is a very user friendly operating system so you can just click the wifi icon in the top right corner and connect like any other computer. Once this is done you can download the executable file and run it. More specific instructions can be found in the deployment manual.

      3. Adding Sensor Hub on the Dashboard
      4. When the Raspberry Pi is up and running in the location you want to collect the data, you will need to refer to the dashboard and set up the sensors. By going to “sensor hubs” section of the dashboard you will be able to see all known and unknown sensor hubs. If you have set up the raspberry correctly you should be able see a new entry in the ‘unknown’ section. By click on add you will need to add some information about the raspberry pi and add the required sensors. After the sensors are added, their pin numbers can be viewed in the edit section of the known sensor hub. With the known pin number you will need to attach it accordingly to the raspberry pi.

    2. Editing Sensors Hubs
    3. To edit what sensor are attached to the sensor hub you will need to go to the edit menu of the desired sensor hub and delete/edit sensors to the required form. After you confirm the changes the sensor hub will relocate the pins if needs be and start collecting data with the new settings. You will need to change the sensors attached to raspberry pi.

Deployment manual

  1. Creating Virtual Machine
  2. The easiest way to deploy this project is to a Virtual Machine. There are various provides for cloud computing such as Microsoft Azure, Amazon AWS or Digital Ocean. The Microsoft Azure option will be discussed in this case.

    1. Azure Virutal Machine
    2. In the Azure Dashboard navigate to Ubuntu Server option. Select the Subscription and Resource Group you would like to use. Then type in the name of the Virtual Machine and pick the region you would like it to be hosted from. Following that pick the size of VM, there are a lot of different options so take you time to familiarise yourself with couple of them. This project requires fairly high CPU usage so keep that in mind when choosing the set up. This option will not be final and can be changed later to a better one if needs be. Next you have an option of choosing the authentication type: password or ssh. Both of them are valid option but SSH will inevitably speed up the logging in process. In the inbounds Ports Rules pick ports 80 and 22. The following page will query you to create storage for the VM, choose as you feel needed. The next pages can be left as default and you can finish the creation of the VM.

  3. Downloading and Installing
  4. When you have created the VM log into it via SSH or the password using the terminal. Install all of the new updates using sudo apt update && apt install. You can then create the directory for the project. This step doesn’t make a lot of difference if done differently. We have used this structure:
                                    
        -Project-name
            -site
                -logs
                -public
            -django
            -auth
    Now to retrieve files from github, git needs to be installed using sudo apt install git. After the installation is complete navigate to django directory and clone the repository from github using sudo git clone /github location/. This assumes that the code is stored in github.With this done we can start downloading the dependencies. Using sudo apt install python3-pip will install pip3 which is the package manager for python. Then using pip3 install virtualenv with sudo pip3 install virtualenv which we will use to create virtual environment in which we will download all of the python frameworks and libraries. Using source venv/bin/activate will activate the virtual environment. To deactivate it simply use the command deactivate. Now if you navigate to your project folder where requirements.txt resides.Using pip3 install -r requirements.txt will install all required frameworks and dependencies for the backend. Then navigate to settings.py file add your ip address into allowed hosts. Then navigating to the frontend folder we will download all of the frontend related dependencies. Here we will install nodejs and npm via sudo apt install nodejs npm. After that is complete simply run sudo npm install to install all required dependencies.

  5. Setting Up Apache
  6. Now that we have finished downloading everything we need to make it work with apache. To do so we need to download it first with this command sudo apt install apache2 libapache2-mod-wsgi-py3. Then relocate into sites-available folder cd /etc/apache2/sites-available/ and open 000-default.conf with nano, sudo nano 000-default.conf. Change it to look like the example below.
                                        
        <VirtualHost *:80>
                ServerAdmin webmaster@localhost
                DocumentRoot /var/www/html
                
                ErrorLog /project_name/site/logs/error.log
                CustomLog /project_name/site/logs/access.log combined
            
                <Directory /path to directory containing wsgi.py/>
                    <Files wsgi.py>
                        Require all granted
                    </Files>
                </Directory>
            
                WSGIDaemonProcess projectname python-path=<abs path to directory containing manage.py is> python-home=/project_name/venv
                WSGIProcessGroup projectname
                WSGIScriptAlias / /path to directory containing wsgi.py/wsgi.py
            </VirtualHost>
    Restart apache server with sudo service apache2 restart.

  7. Configuring React
  8. Navigate to config folder in the frontend directory and open webpack.dev.js file with Sudo nano webpack.config.dev.js. Change the ip address of public path and public url to the ip address of your server but leave the port number ‘3000’.

  9. Starting Up all of the Services
  10. Now that everything has been set up we can start all of the services. There are 4 services to start: Django, ReactJs, Celery worker and Celery Beat. Use the commands below to start each service.
    Django:- python manage.py runserver
    React:- sudo npm start
    Celery worker:- celery -A tasks worker -l info
    Celery beat:- celery -A tasks beat -l info

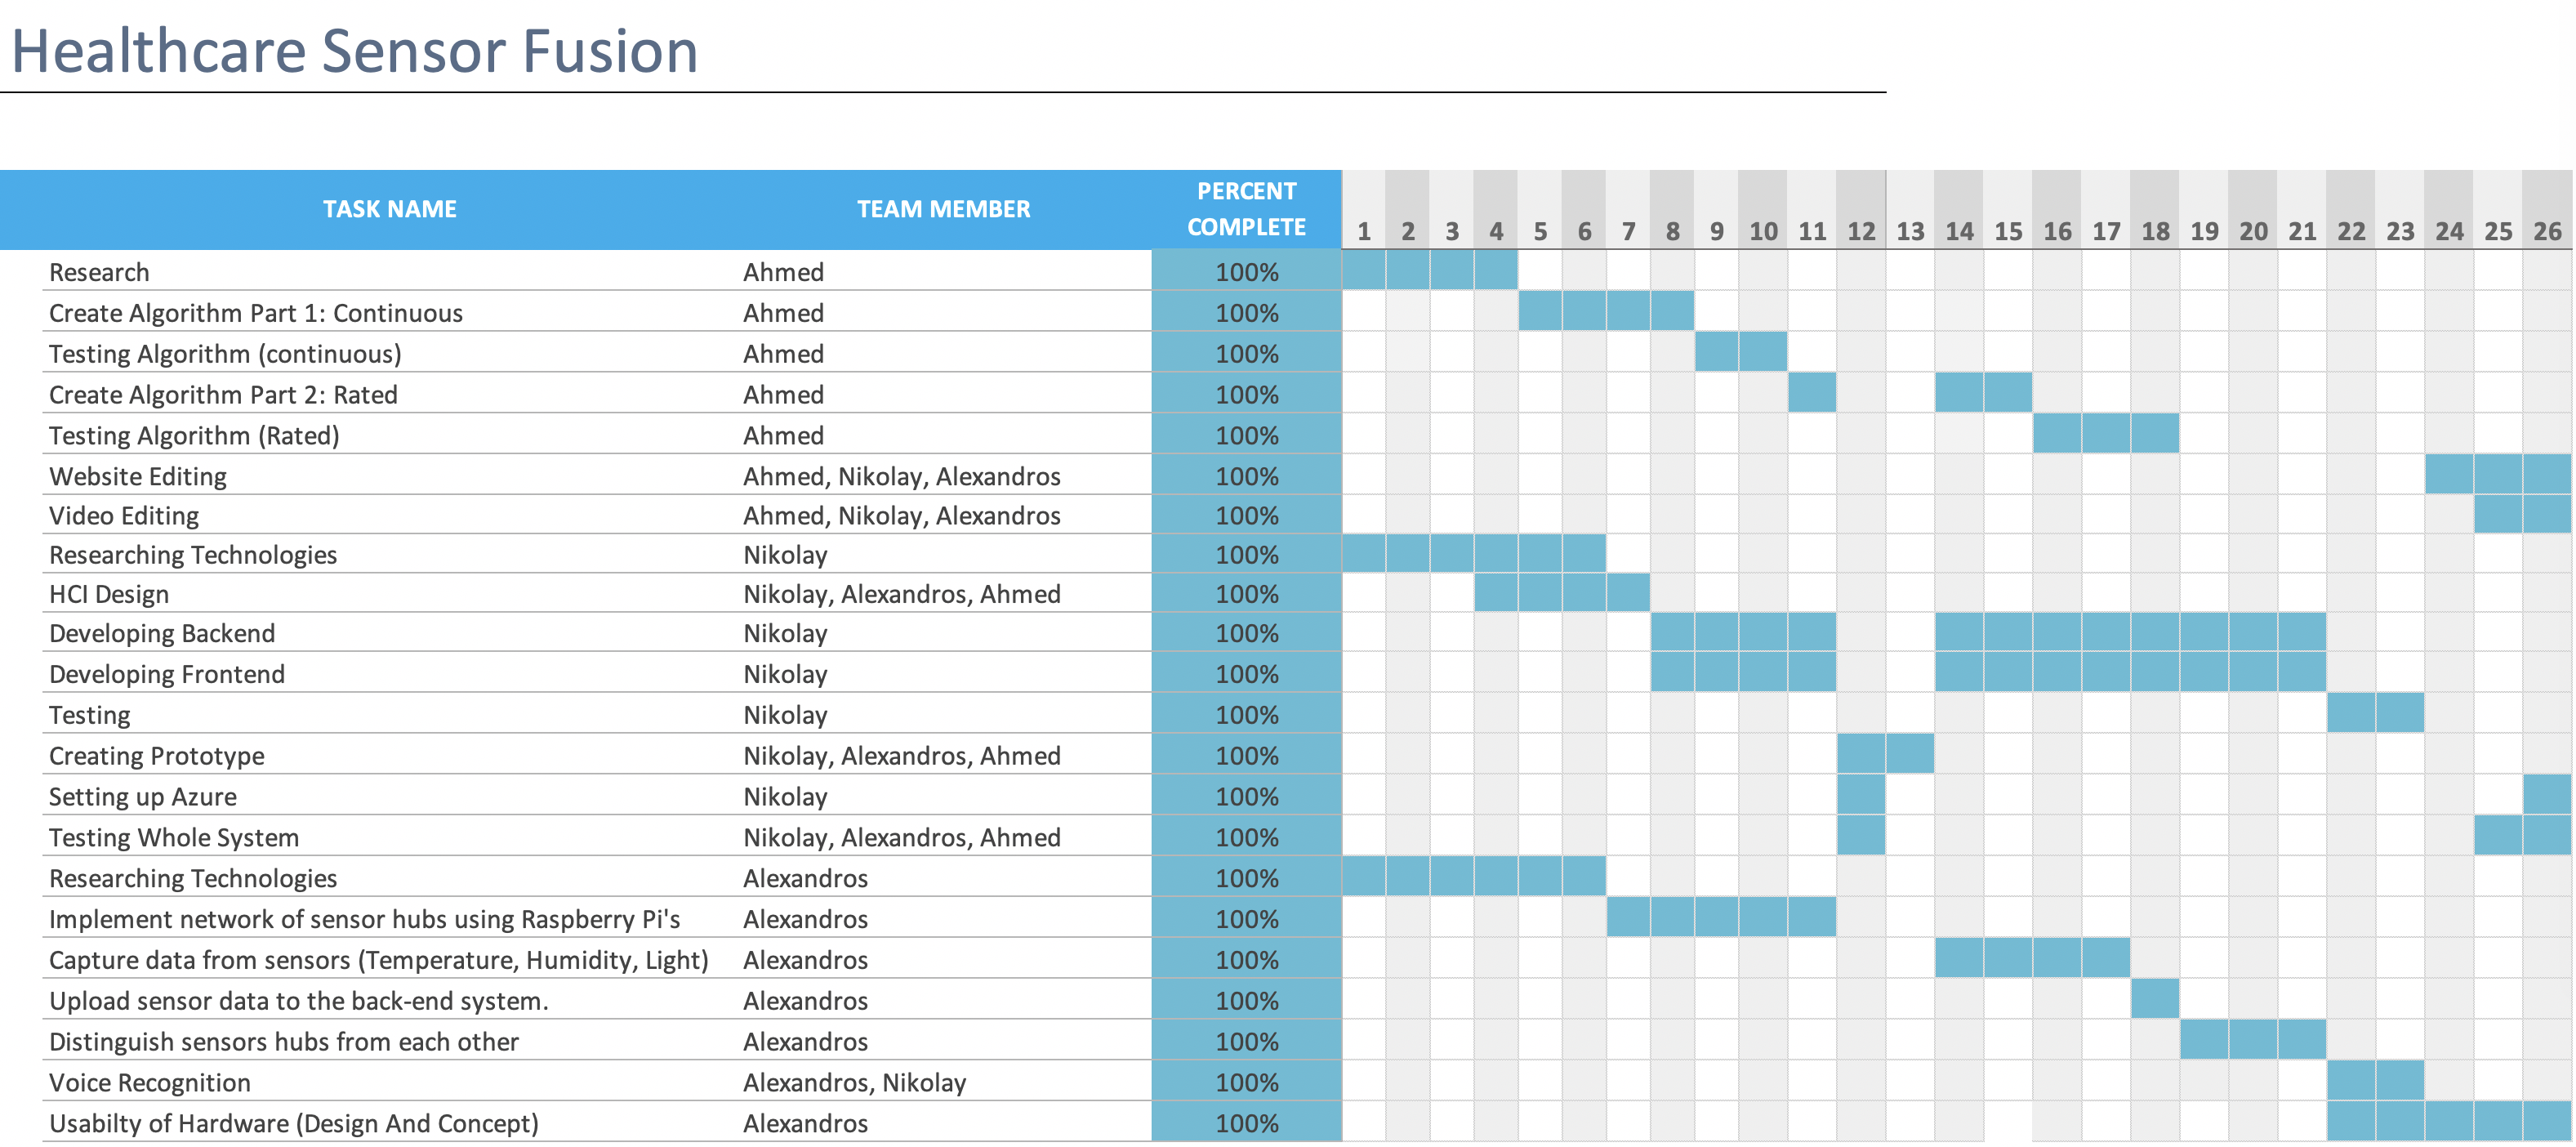
Gantt Chart