Our webapp can be accessed using the link www.uclproject.co.uk. You will be welcomed with
a login
screen, for which you can either sign up to an account or login using a test account we have
made for you:
Normal user- username: testaccount, password: SecureAccount123
Admin- username: testadmin,
pasword: SecurePassword123
Once you log in, you should see a list of categories, and clicking these will reveal tables
which are
meant to hold transactional data.
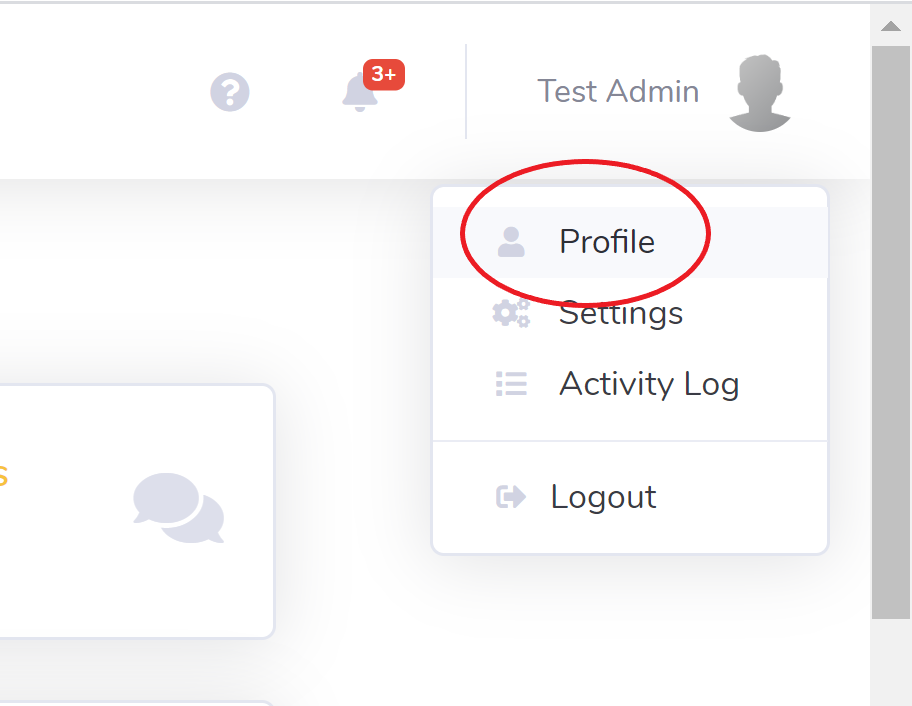
Since your account will likely not have a bank account connected to your user, you will need
to click
the profile icon on the top right, and then click "Profile" to be taken to the profile page.
Scroll to the bottom and enter your unique userID, for demonstration purposes enter the id
"10567" and
hit save.
If you now navigate back to the home page by clicking the "Icy Bank" badge on the top right,
the
categorical tables should now be populated with data as required!
There is a lot more functionality available which you can see demonstrated in the latter
half of the
video on the home page
We deployed our django web-app using Apache, on an Ubuntu virtual machine. So if you would like
to manually
deploy the webapp on your own virtual machine, you will need to create one, transfer all the
Django code onto
the virtual machine, and then set up an Apache web server.
You will also need to heavily edit the "settings.py" file in the webapp folder, this will
include changing the
"ALLOWED_HOSTS" from localhost:8000 to the IP address of your virtual machine, and some other
minor changes.
This is a very helpful tutorial which teaches you how to deploy a Django app from scratch: Click here
To deploy the webapp on your local machine to test the code, simply follow the instructions
below (these have
been written assuming you use a Unix based terminal and therefore works for Mac, Linux and WSL-
if you are
operating Windows without a Linux subsystem, then please find the replacement commands
accordingly):
1. Extract the zip file into your desired location, navigate into this new created folder and then go into the "webapp" directory, the directory should look like this:
Open a new terminal in this folder If you dont have it already, then run the command
to get the python package installer
Now run
to get the python virtual environment installed and then create one by running the command
This command creates a virtual environment called "env"
To activate your virtual environment, run the command
you should now see the name of your virtual environment (env) at the beginning of each line in the terminal
Now you can run
This will install all the dependencies, including the correct version of Django that you need for this project
Once this is done, your Django webapp should be ready to run!
Simply run the command
and then on your browser, if you visit the url: "http://localhost:8000/", then you should be working with the full webapp. For more information on how to use the webapp, take a look at the user manual above, or even the demo in the latter half of our video on the home page!
Click on the image for a larger picture.
Note: It make take awhile to load
Agile Practices was adopted for this project as our client, NTT DATA, uses this practice.
We actively update our plan for the next sprint according to our clients feedback.