NodeJS
- ip.js
This is a function that gets the public IP address of the network the system is on. We use it to add into the Firebase at the ID that is given by the result of this function. It uses the “public-ip” package to do that.
- coordinates.js
A function that converts the given location (the one that is given when typing “node start_static.js <latitude,longitude>). We are doing this because Firebase does not allow having “.” or “,” inside the components of a path. The way it works is simple. We go through the array with the locations and when finding either “.” or “,”, we change it to “-” or “+” respectively. After that we concatenate the path (which is a string that contains the beginning of the path - in this case, “locations/”) and the string we created before, giving us a result that should look like this: “locations/45-2357+23-79856”.
- ip_path.js
A function that converts the given IP address (calculated by ip.js) into a path that can be used by Firebase. The way it works is easy. We go through the String using a for loop and when we find a “.”, we replace them with “-” and then we concatenate the path (in this case is “users/”) and the resulting string. The final result should look like this: “users/85-96-12-123”.
- location.js
Here, the Firebase is initialized. Also, we get the coordinates from the terminal and convert them, using coordinates.js, into a usable path. The function “writeDb” will be used to add data into the firebase (the data is given by argument: msg, name, priority).
- service.js
It does pretty much the same thing as the location.js. It adds the data into the Firebase at the ID given by the IP address that it is given by ip.js. It uses ip_path.js to get the usable path.
- start_remote.js
This one is where we use the Websocket. To do this we use the package named “websocket”.

Firstly we connect the server and the client between them. When they are connected we receive messages from the server. The server is made to send lots of information, but we only need the name, priority and the message for now. We will parse them and we will write them into the database using writeDb function (from service.js).
- start_static.js
It is basically the same thing as the start_remote.js, but instead of using the writeDb function from services.js, it uses the function from location.js.

!!! The reason for not merging services.js & location.js or start_remote.js & start_static.js and creating only one for each function is that we wanted the 2 parts of the system (remote & static) to be as separate as possible. We have decided to do that because when the system will be implemented in real life and will become more than a proof of concept, there is no need to have both the static and the remote parts on a computer. The computer will either be carried by a person or placed inside a building or in a zone, so the same computer will never use both parts. In this way, it’s way easier to get rid of the useless part.
Flutter APP
- records.dart
Model class used when adding to the SQLite local database.
- convert_coordinates.dart
Class that helps to convert the coordinates that will be retrieved from the Firebase. It converts them into real coordinates so that we can calculate the distance from the location of the user to the point those coordinates represent. It is a basic replacement of some characters. When a “-” is found it will be replaced with a “.” and when a “+” is found it will memorize the index of its position so it can just eliminate that character as is not needed anymore. The function will return an array that will contain the latitude and longitude extracted from those coordinates.
- custom_route.dart
It only has an aesthetic purpose. It makes the transition between the loading screen and the “Tap to listen” screen look better and be smoother.
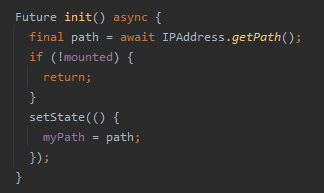
- ip_address.dart
getAddress() function is used to get the IP address of the phone. It parses the content of a website that only displays the IP address. The gatPath() function converts the IP address into the format that is into the Firebase so that it can be searched.
- loading.dart
This one is quite important. It displays a loading indicator, but “behind” it calculates the IP path (using the functions from ip_address.dart) that will be searched into the Firebase so that, when the user will use it, he/she will not have to wait for the app to get the IP address.
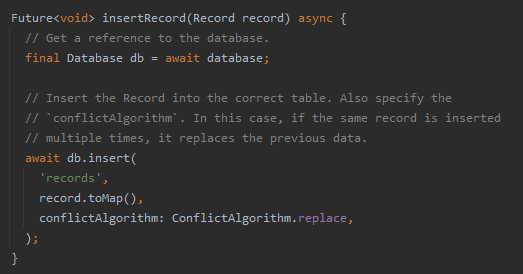
- objects_db.js
This is where the reports are added to the SQLite local database. It creates the table, creates the object and adds it into the database. In case of conflicts, the old record will be replaced by the new one.
- routes.dart
A basic class to use routes. As it is very simple as there are only 2 screens in the whole app.
- system.dart
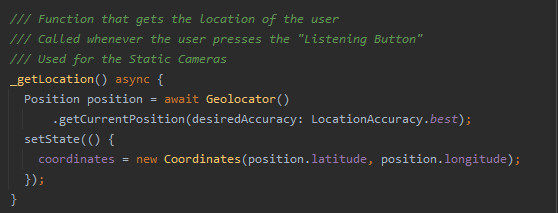
Here things are starting to get complicated. Most of the app and its functionalities are located here. We tried to add many comments so that the code will be easily understood. Let’s start by talking about the _getLocation() which is an asynchronous function that uses the geolocator package to get the location of the phone. Sets the state of the coordinates variable with the coordinates of the device.
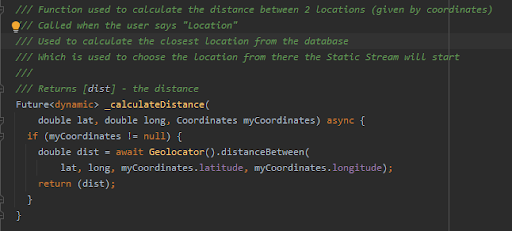
The next one should be the _calculateDistance() which we use to calculate the geographic distance between 2 coordinates. It uses both geocoder and geolocator packages to do that. It uses the function of geocoder to do that. It returns the distance (in meters).
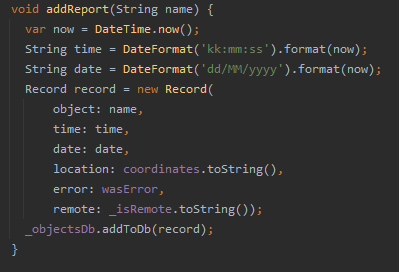
Arguably one of the most important functions in the whole app, the _speak() function. It is used to speak a message (text to speech). Firstly, it sets the setting that it will use (volume, speed, pitch) and if the text is not null, it will tell it. The addReport() function is the one used to add reports into the SQLite database. It also calculates the date and the time and creates a Record object which will be added into the database using the addToDb() function from the ObjectsDb class.
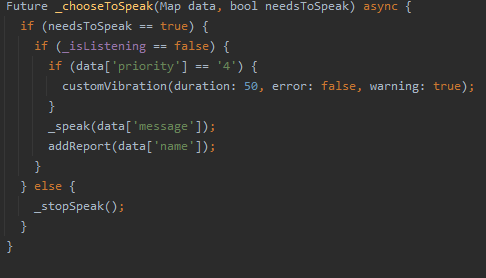
_chooseToSpeak the function in which the system decides if it’s the time to speak or not. For that, we use the variable needsToSpeak which will be seen many times during this code. When it is true means that the system needs to “talk”. Also here, if the priority of the object seen is 4 (meaning is very close) we will start a vibration that will warn the user that there might be a danger. Also here we use the addReport function to add into the database. If the needsToSpeak variable is false, then we stop the text to speech system.
The onRecognition() function is important as well. It is used by the voice recognition system. It basically sets the recognized text to a variable.
correctString() function is used to correct the voice recognition system. When it recognizes an integer, it will use it as a word, not a number (one instead of 1).
This causes many problems when changing settings. So we use this piece of code to convert the word into a number. We only need the numbers from 0 to 2 because this
is the range our settings are using, so it will be useless to calculate something less than 0 or greater than 2. If the number is not 0, 1 or 2, it only returns
the number. The functions changePitch(), changeSpeed() and changeVolume() work the same. They update the setting with a new value. changeVibration() also does that,
but it can only take 2 values (on/off) so we verify if the value specified for that is one of them. You can see that when comparing the word “off” we also try the
word “of”. In this case, if the system does not recognize one that we meant “off”, we are still covered. It sets the state of the vibration with the new setting.
chooseAction() gets a String as parameter. The first thing we do here is splitting the text into words. We verify then the first word. We do that because this one
should be unique (e.g. START, STOP, PITCH 0.6, SPEED 1). For each case, the system does something special for that case. For example, for START, it means that the
system is remote, so we set that to true, the system needs to speak so we set _needsToSpeak to true as well, and we don’t have to use location so locationSelected
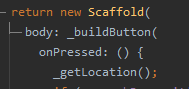
will be null. The _buildButton is the widget for the big button seen on the “Tap to listen or /”Listening” pages. It gets as child a new widget, named showButton()
which actually is the button and the content from the screens (the green or and the red one). If listening, the button is red, it is green otherwise.
You can also see that the colour of the button can be black. It is black when double-tapping (which means that an error is reported).

For this, we also use the errorOccured() function. It sets the state of the wasError, so the system will know if it needs to update the error status into the local
SQLite database. As we use vibration quite a lot we created a customVibration() function that automatically selects the vibration depending on the context.
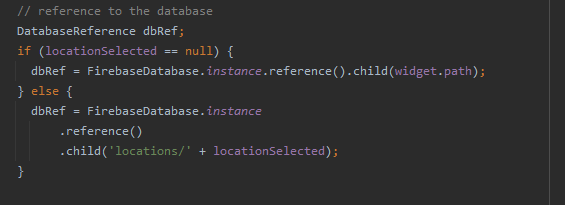
The build widget is very important too. There, we call chooseAction() every time so the system can choose the command needed. We also initialize the reference to
the Firebase Realtime Database. It can be initialized either for the static feature or for the remote one, so it depends on the setting.
Next, we use a SteamBuilder which is great when needing realtiming. We create a map with the data from the Firebase (the data from a certain path) and we pass it to the _chooseToSpeak() function which will handle it from now on. We get the location of the user every time the “Tap to listen” button is pressed so that everything will be accurate.
Also there, we either start or stop the listening for commands.
- main.dart
Here, we just call the first screen, which in our case is loading and generate the routes.Key Feature
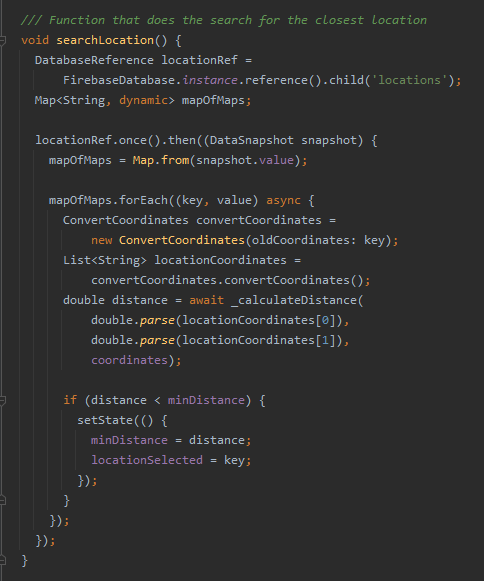
We think that one of the key features of our app is the way it finds the place from which it will start the static system. We thought that the best way to do that is using locations. The way it works is the following: the system (C++ Server and NodeJS Client) will run on certains locations. There, when running the Client, it will be specified the coordinates of the place where the system is (e.g. the coordinates of a bank in which the system is working). Then, when the user wants to use this feature, he/she needs to say “location”.when doing that, the system enters in this case:
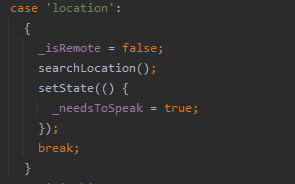
Then _isRemote becomes false and the searchLocation() function is called. There, the application will search through all the entries in the database from the “locations” child. It converts the weird coordinates from the Firebase in real coordinates and calculates the geographic distance from that point to the one the user is. It does a basic “find the minimum” algorithm and memorize the coordinates from the location which is the nearest. Continuing, the system will start getting data from that path from the Firebase Realtime Database.