IMPLEMENTATION
- Home
- Implementation
Overview of Implementation
We developed the sampling tool in close contact with Rachel Yales, senior officer, and other members of the IFRC team. Our objective was to accommodate both their non-technical and technical needs, for example, with the use of certain frameworks and technologies. As a result, we did not use any external libraries or frameworks that the IFRC does not already use. As also explained on the Systems Architecture page, the sampling tool web application consists of two main parts, the backend and the frontend. In this section, we are providing an explanation of how these parts make up certain features of the sampling tool and how they work together to deliver a great user experience with accurate sampling results.
UI components

Footer.js solely serve a graphical purpose and are unambiguity even without types. For the sake of simplicity, these components were kept in Javascript. Below is the tree structure of the components that act as the building blocks for the sampling tool.
Decision Tree
Component structure
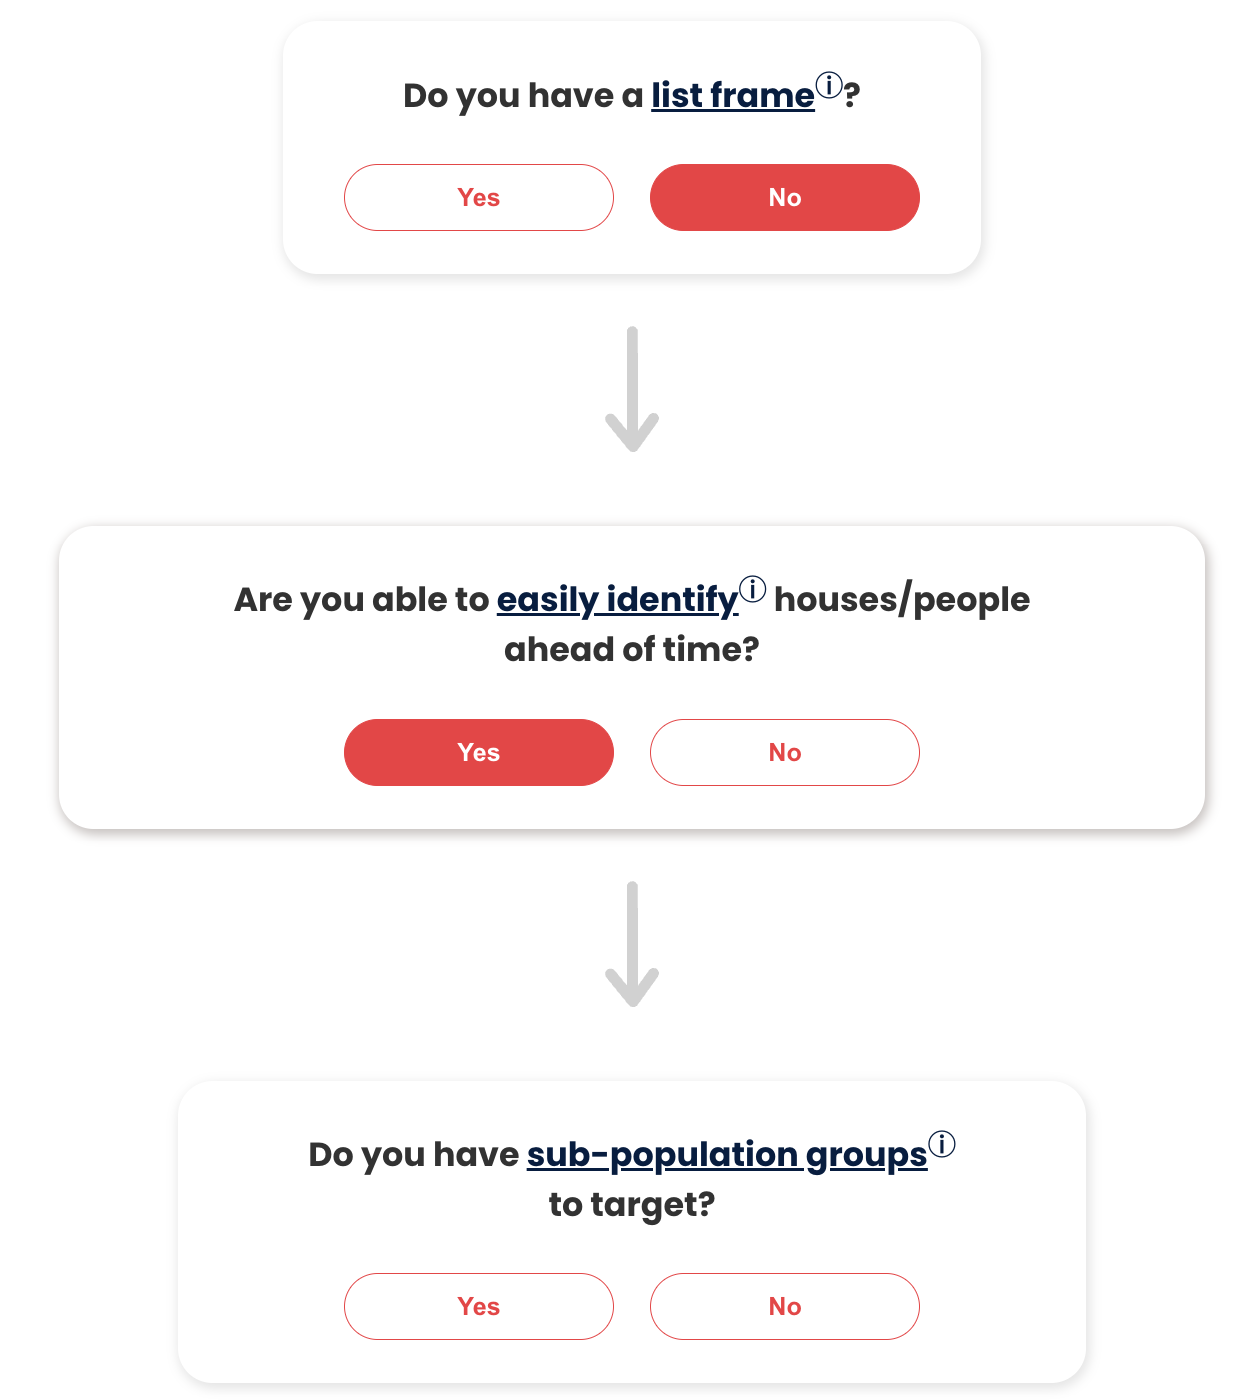
The DecisionTree component is the foundation of the UI. It models the decisions a person who wishes to do sampling would go through in the real-world with a sampling expert. The tree of decisions is constructed from questionCards, an array of numbers.
Each number in the array equates to an ID which is associated with a certain question in the decision tree. To learn more about the implementation of the individual questions go to Question cards below. The DecisionTree component looks at these IDs and determines what element to render next on the UI. If the ID is not associated with one of four sampling calculators, the UI renders a question card.
User flow
An important functionality of the tool is the user’s ability to go back to previous questions. const handleOption is a callback function which is called whenever the user selects an option in the question cards. Although the event of clicking on an option happens in the QuestionCard component, handleOption in the DecisionTree component is triggered too. This is a result of using the useCallback hook in React. Learn more about React hooks and the useCallback hook
here. handleOption checks if the ID of the answer is already in questionCards array. If so, we know the user wants to go back as he clicked on an option that we have already rendered. In this case, we remove the IDs from questionCards that appear after the answer’s ID. When the state of questionCards is modified (i.e., elements are added, removed or edited) the DecisionTree component re-renders itself, so questions are automatically removed from the UI.
Because the sampling size calculators take in information from the question cards certain parameters must be updated accordingly when a user goes back to a previous question. These parameters include hasSubgroup, hasHouseholds and hasIndividuals. backwardsStateUpdate and forwardsStateUpdate make sure that these variables are up-to-date after every user interaction.
Question Cards
Component logic
Each question card in the decision tree is rendered by calling the QuestionCard component. A question card is first generated on the backend by accessing the State and Option table in the database. See the one-to-many relationship of these tables in the ER diagram below and check out the Systems Architecture page for more technical information on the backend implementation of the database.
API request/response
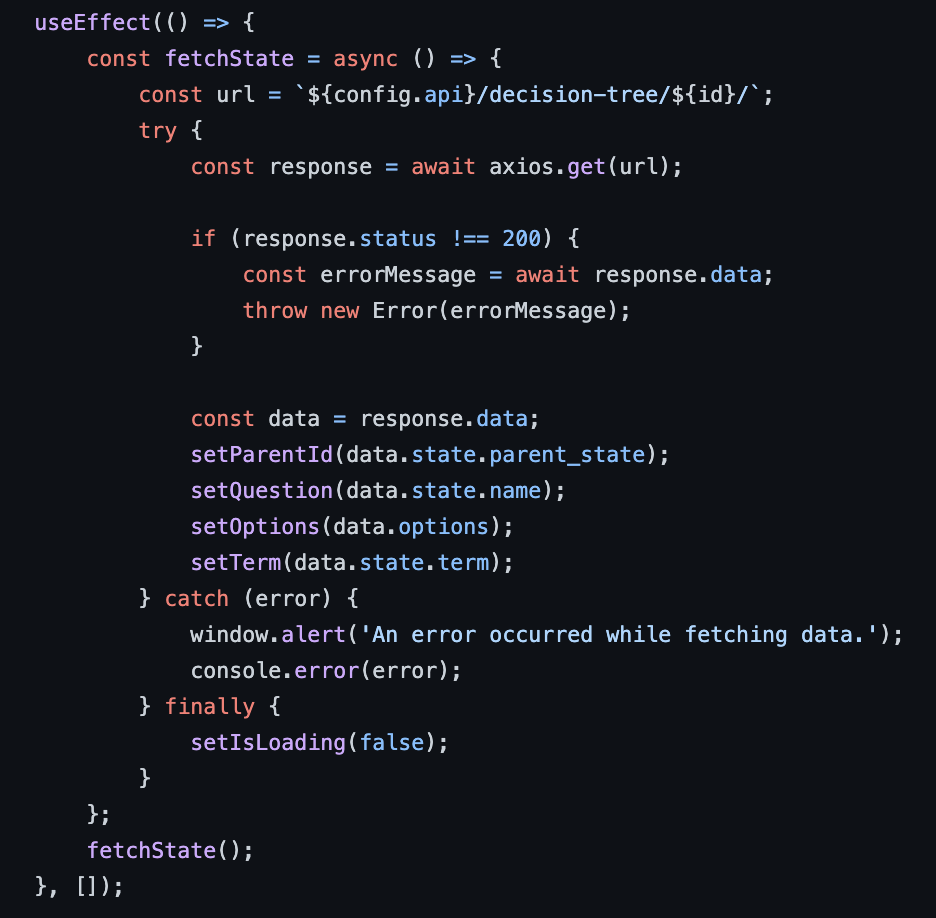
The QuestionCards component receives the ID of the question (or state) it has to display as a prop and calls our sampling API to obtain the necessary information.
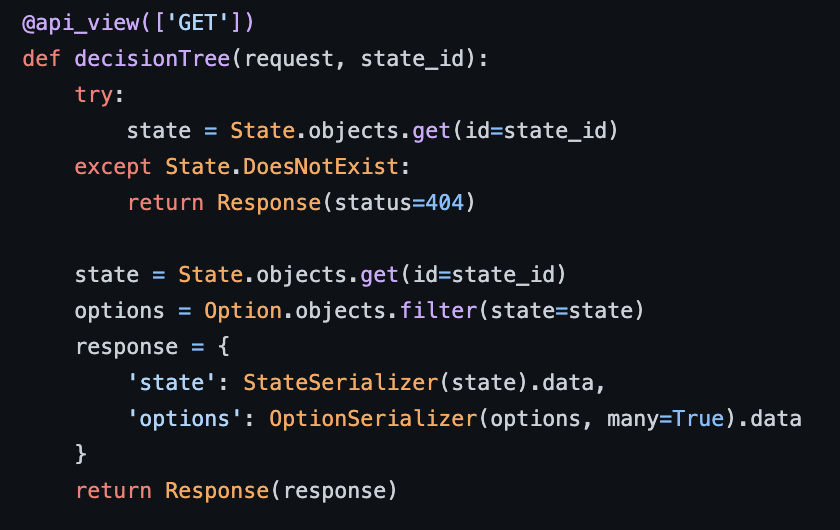
When the backend receives a request to its api/decision-tree/ endpoint it compiles the necessary data from the two tables, serialises it, then returns it to the frontend in JSON format.
Finally, the graphical question card is rendered with the question and clickable buttons for the options. The DecisionTree component, discussed above, receives this card and displays it as part of the existing decision tree.
Sampling API
The Sampling API is implemented with the Django REST frameworks and its primary goal is to serve data to the fronted via API calls. The design of the API follows the standard way of creating REST APIs. There are three files that are worth covering, urls.py, views.py, and models.py.
urls.py
urls.py contains the URL patterns for sampling API endpoints. In other words, it defines the paths that users can access to interact with your API via https://ifrc-sampling.azurewebsites.net/api/. For example api/decision-tree/1 is a possible path. Each of the URL patterns in urls.py is then associated with a view in views.py.
views.py
views.py contains the underlying logic of the API endpoints. Each view is responsible for handling a specific HTTP request (which come from specific URL patterns we saw above) and returning data. For example, the decisionTree view that we also discussed under Question cards returns a JSON file.
Sampling Size Calculators
See the API Documentation here or on the Appendix page for the full specification of the sampling size calculators.
Simple Random
Simple random is a type of sampling process that implements methods for calculating the sample sizes based on various parameters. The SimpleRandom class contains all the necessary calculations for generating the sample sizes. It is the parent class for the other three calculators.
The SimpleRandom class accepts six parameters:
• margin_of_error is the maximum margin of error allowed for the sample
• confidence_level is the confidence level for the sample, as a percentage
• individuals and households are the number of individuals and households in the population, respectively
• non_response_rate is the percentage of non-response rate expected for the sample
• subgroups is a list of dictionaries representing the subgroups to be sampled from, with each dictionary having the keys name and values size. The format of the subgroups is the following: [{‘name’: ‘A’, ‘size’:100}, {‘name’: ’B’, ‘size’:200}]
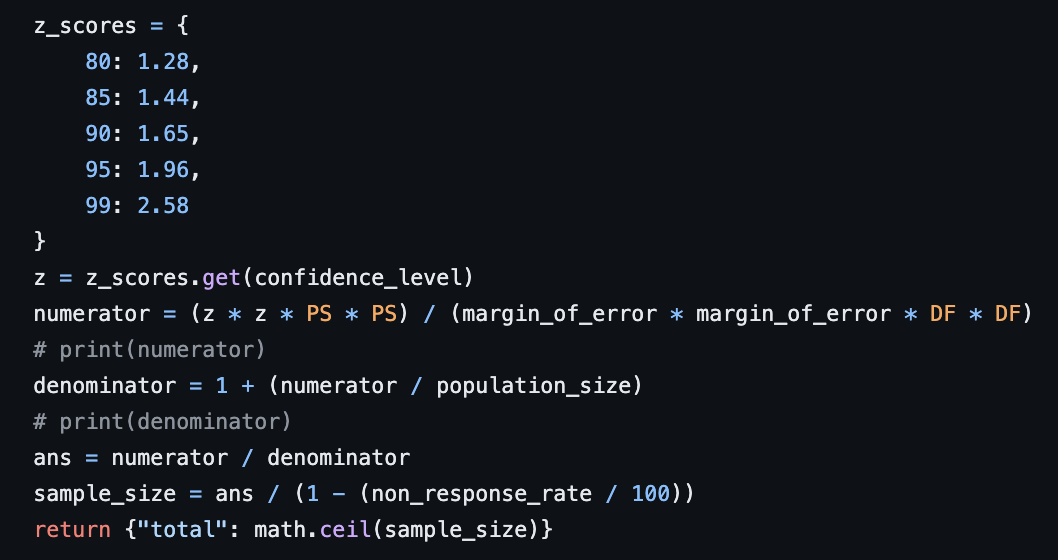
Calculating the sample size is then done via the calculate_sample_size function.
where PS = 0.5 and it stand for estimated proportion of success. The default value of 0.5 for the estimated proportion of success is often used in sample size calculations when there is no prior information or data available to estimate the true proportion. This is because when there is no prior knowledge, the most conservative approach is to assume that the proportion of success is 0.5, which is the proportion that maximizes the variance of the sampling distribution.
The sampling size calculation is derived from the following formula
where p is the estimated proportion of success, e is the margin of error (in decimal form), N is the population size and z is a predefnied value based on the confidence level. The calculated sample size from this formula has to be adjusted with the non-response rate accordingly.
Systematic Random
The Systematic Random Sampling method is a sampling process used when the user does not have a list frame of the population but can easily identify the number of individuals or households. The class inherits from the SimpleRandom class and adds functionality for calculating the intervals of sample sizes for a single group or when subgroups are involved.
The intervals are calculated by first determining the sample sizes required based on the given parameters. Then, the population size of the group is divided by the sample size of the group to derive a step count. Finally, the intervals dictionary is initialized with the respective intervals of each subgroup.
Time-Location
The Time-Location Sampling method is a type of sampling method where the population is divided into time-location units, and then a random sample of units are selected, and all individuals in the selected units are included in the sample. The TimeLocation class contains all the necessary calculations for this sampling method. It inherits from the SimpleRandom class to calculate the sample sizes of each community. But it also takes in additional parameters:
• locations is the number of different locations where interviews will be conducted.
• num_working_days is the variable represents the number of working days available for conducting interviews. For example, if num_working_days is set to 5, it means that interviews will be conducted for 5 days.
• interviews_per_session is the variable represents the number of interviews that can be conducted per session. A session is defined as a block of time during which interviews are conducted. For example, if interviews_per_session is set to 11, it means that a maximum of 11 interviews can be conducted in a single session. The minimum number of interviews per session is 10.
The following function selects a random subset of time-location units for the survey based on the parameters passed to the class. The time_location_units parameter is a list of tuples representing all possible time-location combinations. The function first calculates the required sample size based on the population size, margin of error, confidence level, and non-response rate. Then, it calculates the number of units to be selected by dividing the sample size by the number of interviews per session and rounding up to the nearest integer.
Next, the function selects a random subset of time-location units of size num_units_to_select from the time_location_units list using the random.sample function. It then checks whether the sum of interviews per session in the selected subset is equal to the sample size. If it is, the selection is valid and the function returns the selected subset. Otherwise, it adjusts the selection by removing tuples from the end of the selection until the sum of interviews per session is equal to or less than the sample size. The final selected subset is then returned by the function.
Other functions in the code take in the selected_subset returned by the select_random_units function as a parameter and generates the desired result in a format which can be displayed on the website.
Cluster Random
Cluster random sampling is a type of sampling function where the population is divided into clusters, and then a random sample of clusters is selected, and all individuals in the selected clusters are included in the sample. The ClusterRandom class contains all the necessary calculations for this sampling function. It inherits from the SimpleRandom class to calculate the sample sizes of each community. It takes additional parameters such as the number of communities and its respective population size.
The following, assign_number_of_clusters function is the most important part of the cluster random sampling process. This function takes in the communities in the population, the calculated sample size for each community, and the total number of clusters to assign. It then assigns the number of clusters for each community based on the sample size and returns a dictionary containing the assigned number of clusters for each community. After assigning the clusters, If the total number of assigned clusters is not equal to the total number of clusters specified, the function adjusts the number of clusters for each community.
If the total number of assigned clusters is greater than the total number of clusters specified, the function randomly reduces the number of clusters for some communities until the total number of assigned clusters is equal to the total number of clusters specified to avoid bias.
If the total number of assigned clusters is less than the total number of clusters specified, the function randomly assigns the remaining clusters to the communities in proportion to their population size.
The assign_list_of_culsters function takes in the dictionary containing the number of clusters for each community and assigns a list of clusters to the clusters attribute of the ClusterRandom object. The function returns a dictionary that maps each community to a list of cluster numbers. The keys of the dictionary are the same as the keys of community_clusters, and the values are lists of integers starting from 1 and ending with the number of clusters specified for each community. This dictionary makes up the result that you see on the sampling web application.
PDF Report
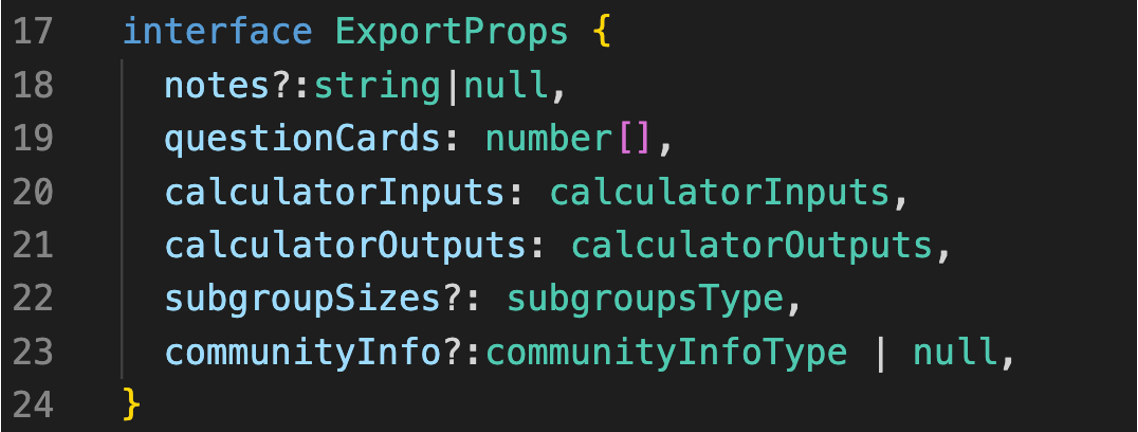
The exportNowButton component aims to gather all the information of the survey input by the user and render them in a PDF document. It takes 6 attributes:
• notes: the notes about the survey that input by the user
• questionCards: an array of question IDs by which the program uses to fetch the question name and corresponding answer for each question card from the server
• calculatorInputs: an object whose property keys are parameter’s names in strings and property values are user inputs for a parameter in numbers. For example {“Margin of error (%)” : 5}
• calculatorOutputs: the result of the sample size calculator.
• subgroupSizes (optional): an array of name and size of each subgroup
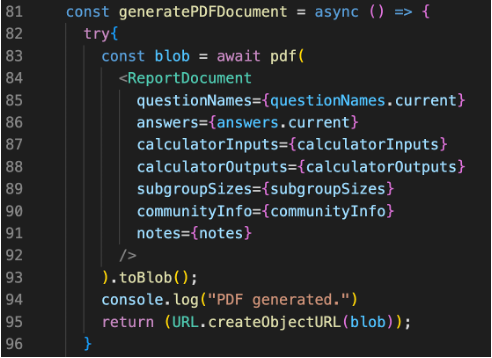
The question names and corresponding answers are fetched from the server, passed to ReportDocument component together with all for other attributes. It can then dynamically render a ReactPDF.Document using the @react-pdf/renderer library, which can then be used to generate a ready-to-open blob url.
For example here the component renders the communities’ information to the PDF. Text is a React component imported from the @react-pdf/renderer library and it is used to render a piece of text to the PDF.
Language Support
Setup
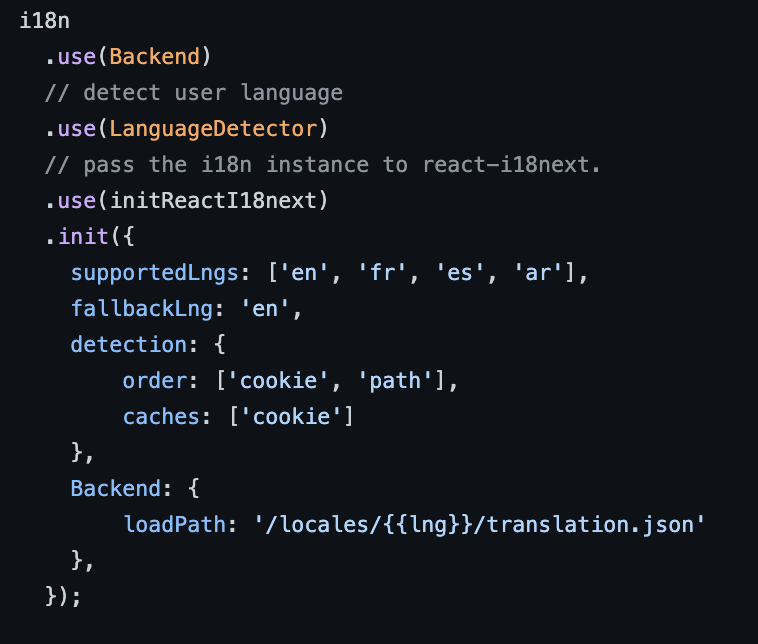
To add multi-language support to the sampling web application we used an internalization framework called i18next. We set up the framework by specifying the languages we wanted to translate to and most importantly to path to the JSON files where these translations live. Each key-value pair in these JSON files represents the original text in our application and its translation in the target language.
Example
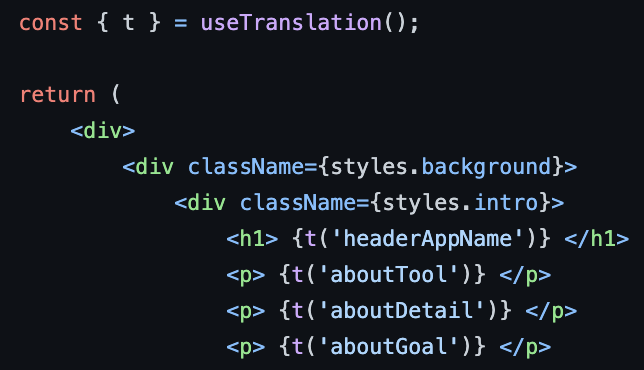
To enable translation we can use the useTranslation hook provided by i18next-react to embed text in the desired language into the UI. For example the JSON translations for “IFRC Community Sampling Tool” are
"headerAppName": "IFRC Community Sampling Tool"
"headerAppName": "Herramienta de muestreo comunitario de IFRC"
"headerAppName": "Outil d'échantillonnage communautaire de la IFRC"
and an example translation with the useTranslation hook looks like this:


