1. Using the blinking light on Arduino
We can use Touch Develop, to activate the LED light on Arduino platform. To do this, we need to follow some easy steps.
1. Add new action by pressing +
2. Tap to add function

3. Imagine a name for your function, e.g. “setup”
This function will setup the blinking light, so that it will turn on and add delays afterwards, depending on what we program it to do.
4. Add a line for function and press arduino button.
All the action are done on arduino platform, so we need arduino based commands
5. Press -> pin mode (13,0), where 0 is back pin
6. Change 0 value, by pressing arduino again and ->OUTPUT button after, this will make the light to blink
Now , we are able to add a loop. To do this we should repeat steps 1, 2, 3, 4 or just continue our previous code. By adding,
1. -> digital write (13, 0)
2. Change 0, By pressing arduino and ->HIGH (You can also change it for LOW, if you want the light to blink less bright.
In order to run and upload your code on arduino platform find arduino upload, on loop section in the scripts and press arduino upload.

Lets add delays and continue previous loop function. To do this:
1. Add a new line,
2. Press Arduino
3. Press -> delay, change delay value to 200, 300 or else, depending on how fast you want the LED light to blink.

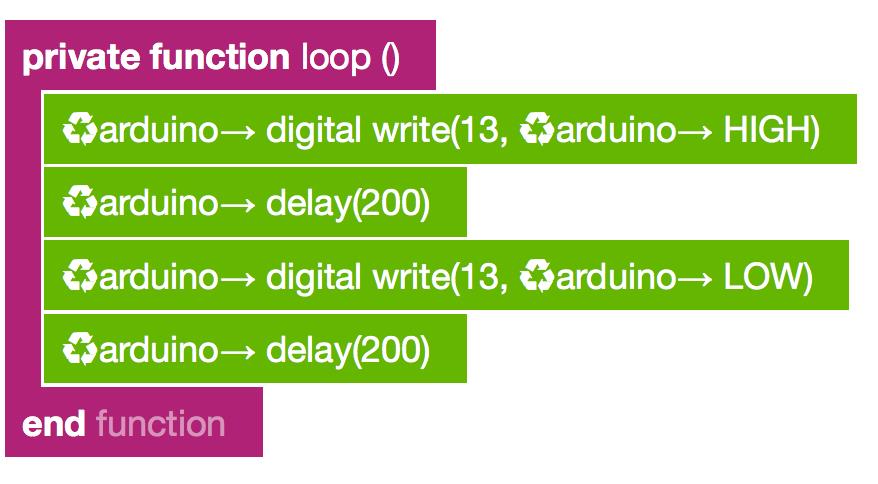
The final version of your blinking light code, might look like the code below.
2. Reading the temperature sensors from the Engduino
1. Start with reading and saving temperature value in a variable, by using the following syntaxes. Here are easy steps:
- Create a function
- Tap on “do nothing” and choose Engduino
- Insert temperature. This is ready function on arduino’s library, we can just access it, by using engduino
- Tap to store the value in a variable. This will store the sensor readings, in the variable
- Tap ‘ + ‘ button to add a line
- Insert t . This is the name of your variable
- Tap show more options
- Post to wall. Display your readings
- Finally, run the code
*Your code must look like this :
var t := ♻ engduino → temperature
t → post to wall
2. Now, we can use loops to read sensor values and see how they change. We will add a loop which allows to infinitely take all sensor values and print them for us.
- Create a new function
- Insert “while” statement
- Choose “true” statement
- Tap to line, and add Engduino
- Insert temperature
- Store in variable
- Insert t
- Add "Post to wall"
- Finally, run the code
Note that insert t in both codes, is just a name for your variable. It could be any other letter, which you set the variable to be.
The final version of your temperature sensors code, might look like the code below.
