Main Tools

Python was the language that we used for the backend to program the flow of data through the model, view and the template.

Django framework was the main tool to implement the webapp. We used its built in methods to implement our application including the authentication system and admin site.

Bootstrap is a CSS framework containing HTML and CSS base design templates. It was used for our front-end development.

SQLite is used as for our embedded database.
Implementation Overview
Authentication
In Django, LoginRequiredMixin is an inheritance class that only allows
requests
to
a view
class from logged-in users. In this class, any unauthorised user will be redirected to
the
log-in page.
This system implements a view class called UserView which can be found in
UserView.py. It inherits
LoginRequiredMixin. All other
view
classes extend UserView, therefore, all successful HTTP requests to our
application
require the user to be logged in.
                                class UserView(LoginRequiredMixin, View):
                                    '''A base class for the rest of the views
                                        to extend and utilise, automatically fetches
                                        username and firstname for logged in user
                                        N.B. restrict what is returned to the webpage'''

                                    username = None
                                    first_name = None

                                    def fetch_details(self, request):
                                        self.first_name = request.user.get_short_name()
                                        self.username = request.user.username
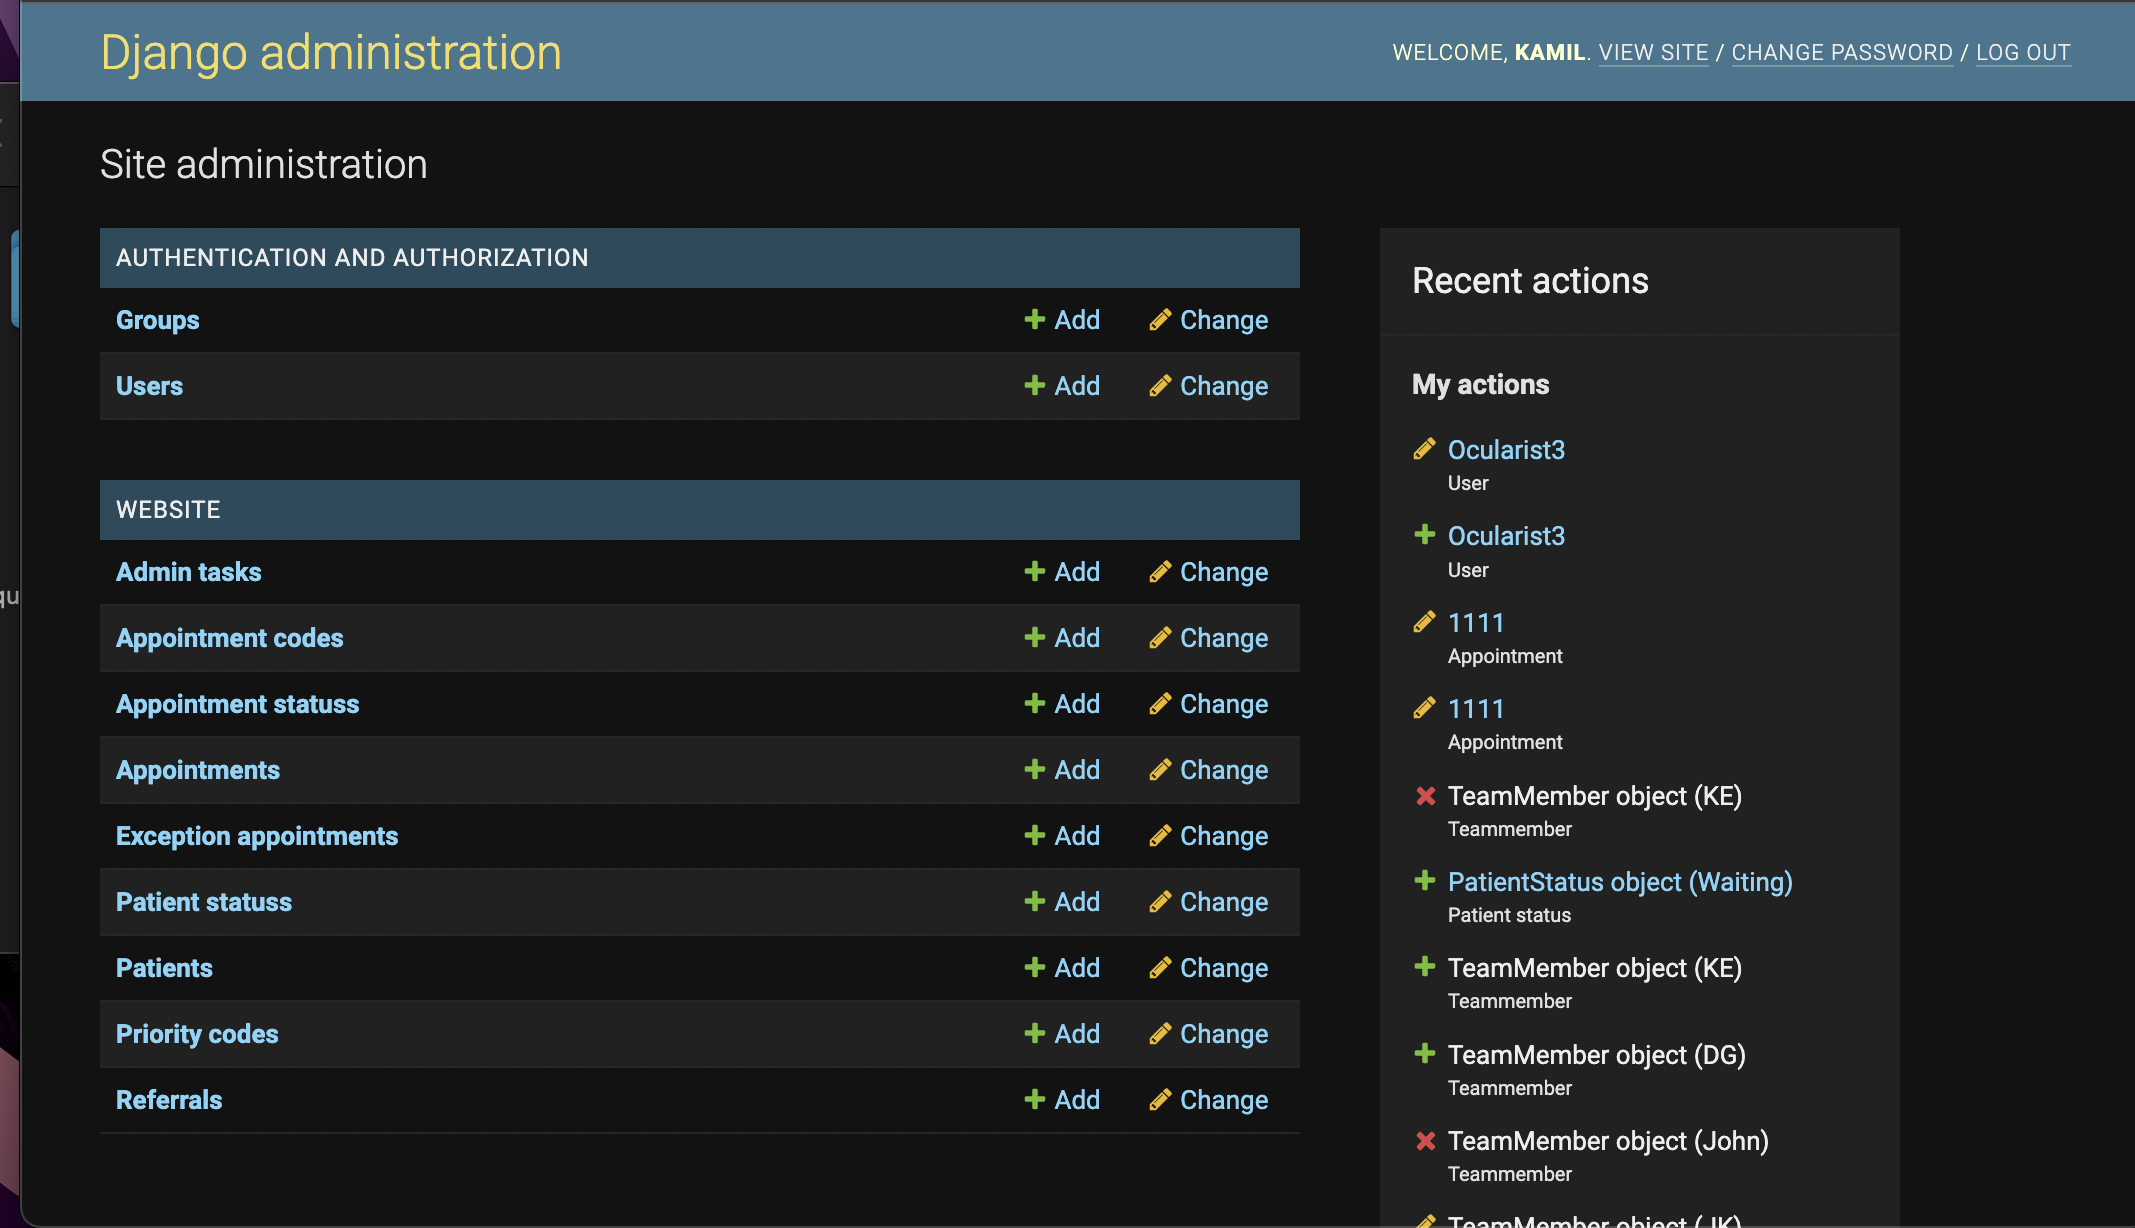
Admin Responsibilities
Django's built-in admin site allows admins to manage users as well as user groups and
permissions.
At admin.py, admin.site.register(model) functions are used to
register data
models to the admin site so that these models can easily be created, destroyed and
modified
through the user interface.
Database Connection
SQLite it used as the database in this system.
Django has a built-in ORM system which means database tables are directly mapped to
model
classes. Each instance of one of these classes represents a particular record in the
database.
In settings.py there exists a dictionary that contains the settings for the
databases
that
would be used in the web app.
NAME specifies the name of the database and ENGINE specifies
the type of database.
                                DATABASES = {
                                    'default' {
                                        'ENGINE': 'django.db.backends.sqlite3',
                                            'NAME': os.path.join(BASE_DIR, 'db.sqlite3'),
                                    }
                                }
If connecting to another type of database, other parameters may be required, such as username, password and host.
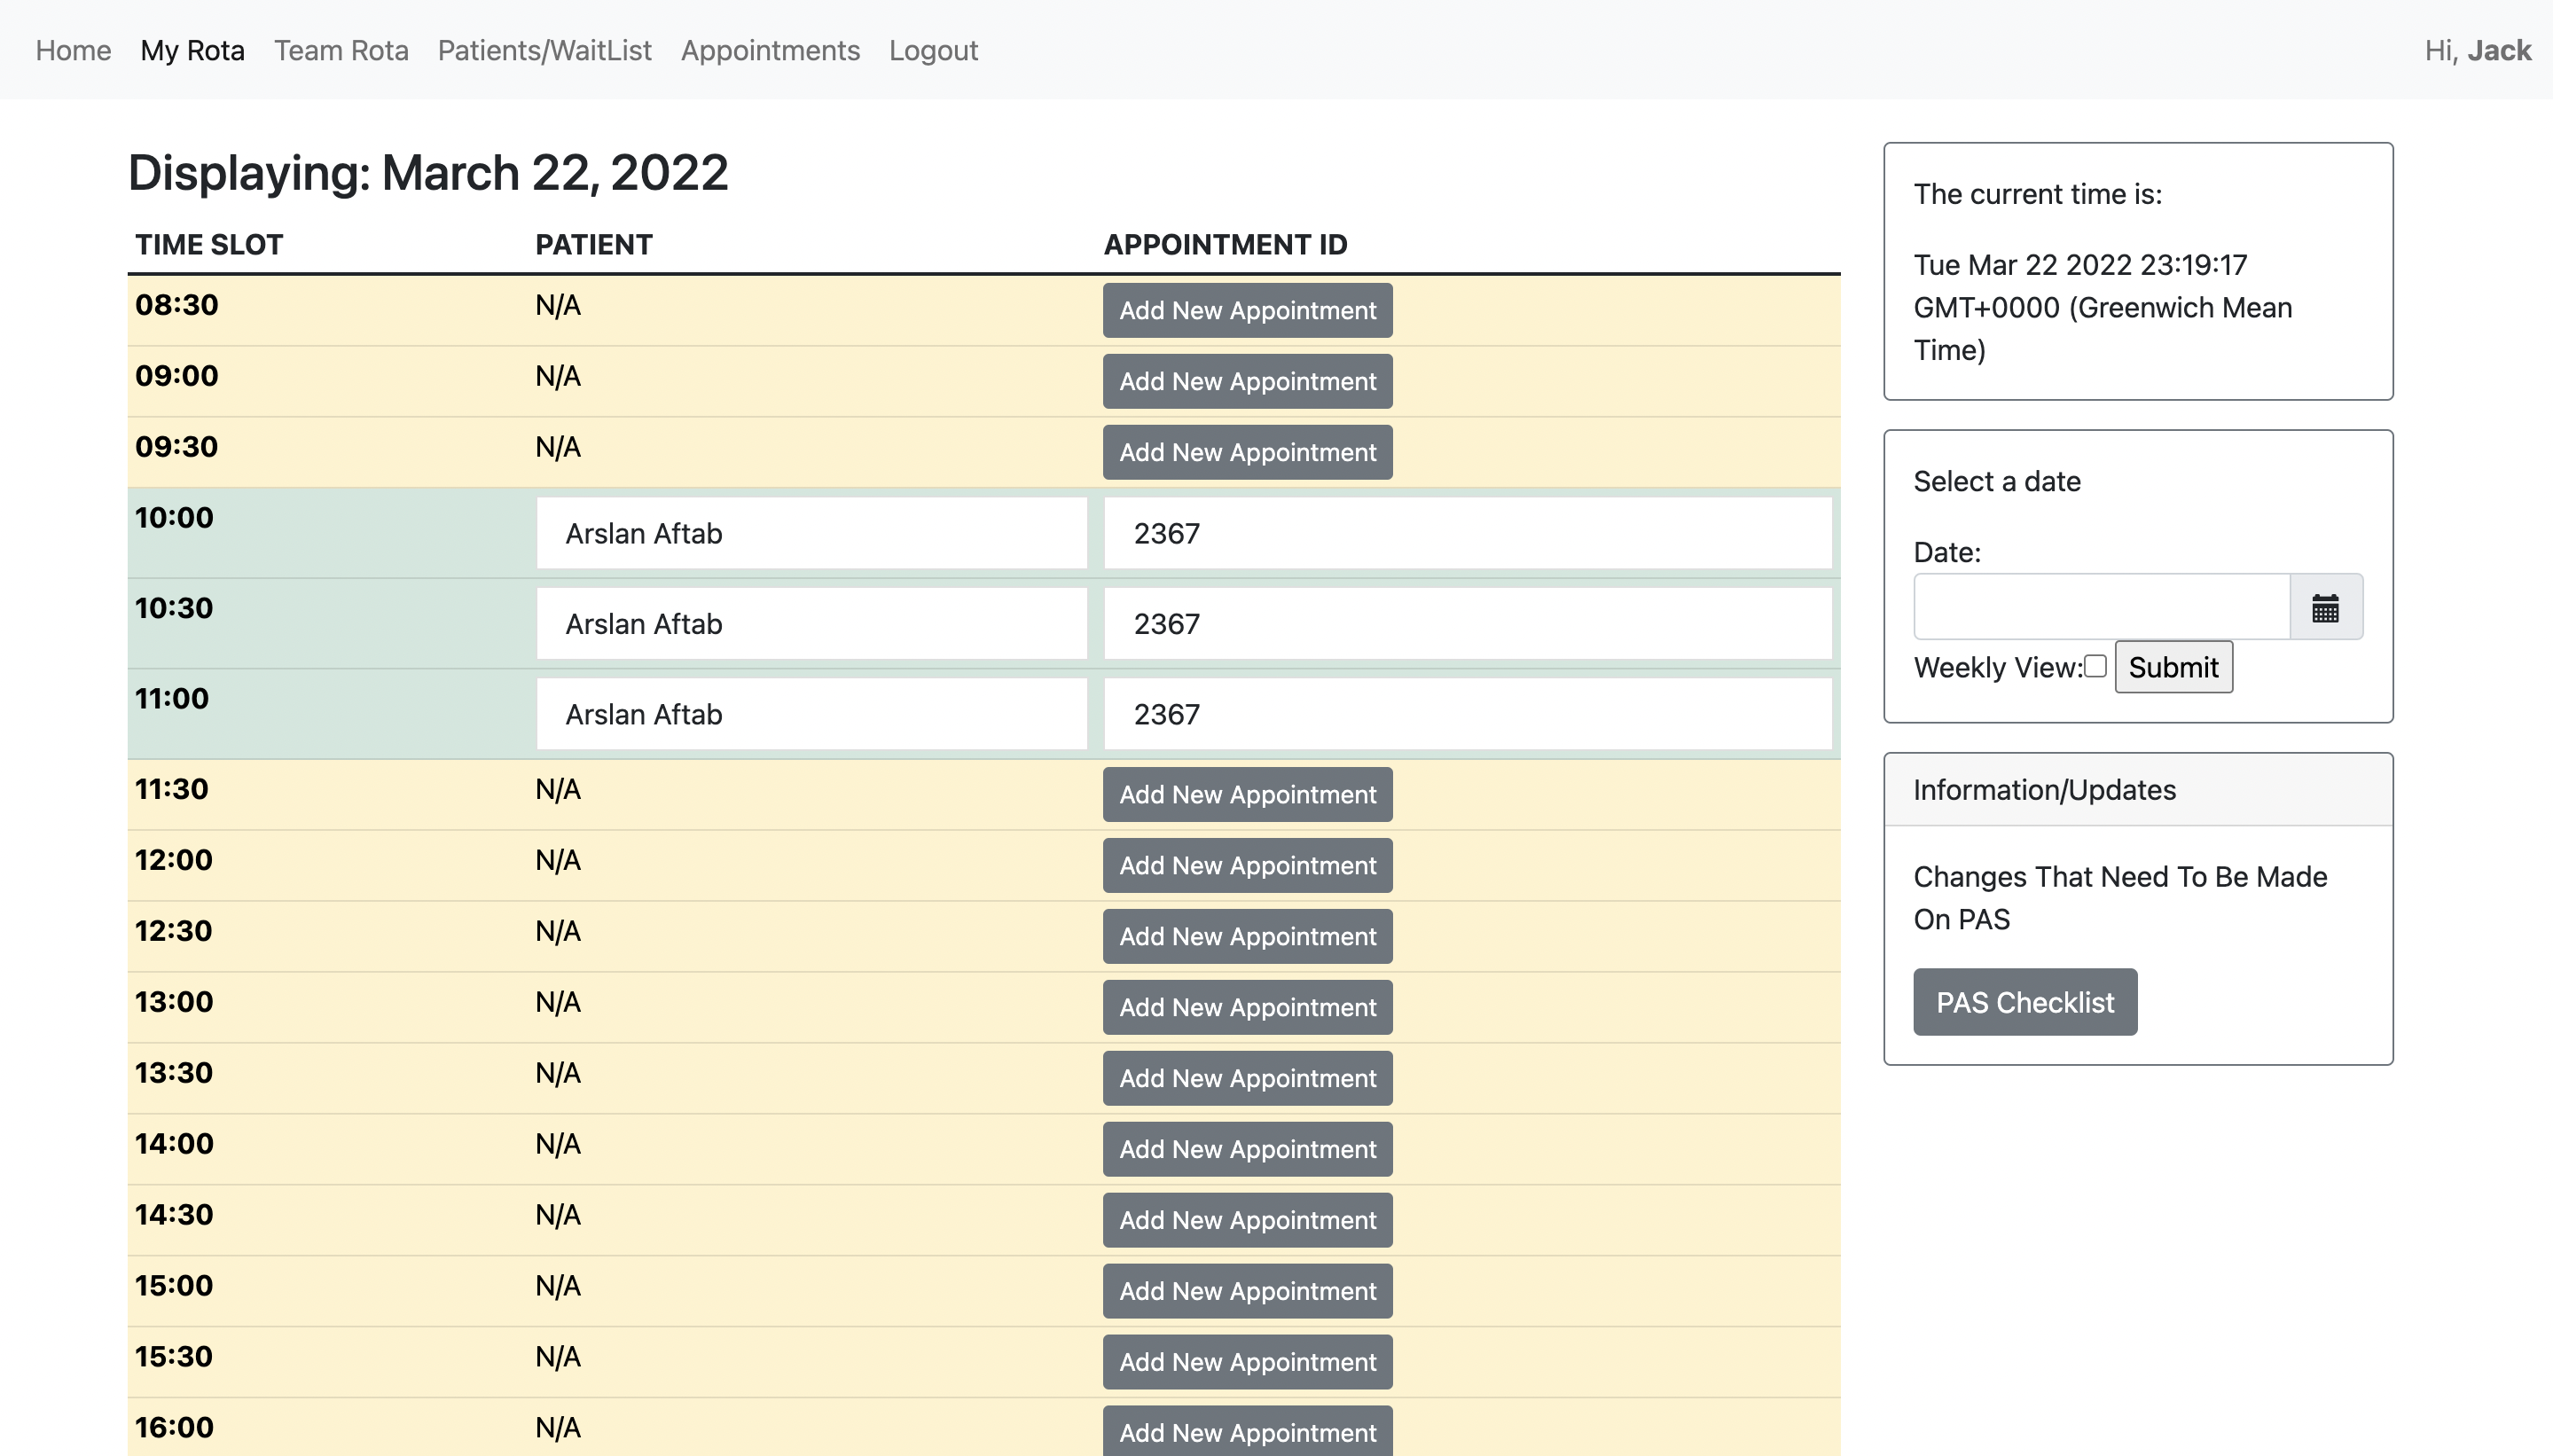
Display Daily Rota
This section describes how the user's daily rota on
my_rota.html is implemented. It is
necessary
to understand this process as generating the weekly rota on the same page and the team
rota
on team_rota.html are variations of
this process.
Displaying the daily rota is handled by RotaView in
RotaView.py.
1. Identify logged in user
The UserView class has a fetch_details(self, request) function
which
automatically fetches the username and the first name for logged in users.
It is a base class and is extended by RotaView.
At RotaView, the user object can be queried as the user's
username has been identified.
The user object is stored in the variable user.
2. Identify the required date
A datetime picker is imported from bootstrap_datepicker_plus.widgets. It
works
alongside jQuery and Django forms to provide the functionality
to select a particular date on a GUI.
When the user sends a valid form, either by entering the date manually or clicking on
the
graphical calendar, urls.py directs the request to RotaView.
The variable selected_date (set to the current date if no user
input)
is used to store the user input.
3. Generate appointments for the rota
Nearly all of the information to generate the rota (user and
selected_date) has been obtained. The appointments for the rota still need
to be retrieved.
All non-cancelled appointments with this user on selected_date are
retrieved and ordered
by
start time with the lines of code below.
As seen below w Django's built-in .filter() and
.exclude() functions are used to query the database.
                            def generate_rota_appointments_ordered(self, selected_date, user):
                                cancelled = AppointmentStatus.objects.all().filter(
                                    status='Cancelled')[0]
                                rota_appointments_ordered = list(Appointment.objects.all().filter(
                                    appointment_date=selected_date, team_member=user).exclude(
                                        appointment_status=cancelled))
                                rota_appointments_ordered.sort(
                                    key=lambda x: (x.appointment_start_time))

                                return rota_appointments_ordered
The generate_day_rota(self, appointments, tmp_rota) function is
called
to assign each appointment to its time slots. This is done by looking at the start time
of
each appointment and the appointment type. The appointment type determines the number of
slots taken
up.
Each appointment is filled into its timeslots on tmp_rota, which is an
empty dictionary
with
time
slots as keys and
appointment objects as values.
tmp_rota is a duplicate of DAY_ROTA which can be found in
constants.py.
RotaView then renders the template my_rota.html and returns
this filled in rota in the response.
                            def generate_day_rota(self, appointments, tmp_rota):
                                for appointment in appointments:
                                        appointment_code = (
                                            appointment.appointment_code.appointment_description)
                                        appointment_length = SLOTS[appointment_code]
                                        start_time = str(appointment.appointment_start_time)[:5]
                                        start_index = DAY_ROTA_KEYS.index(start_time)

                                        for i in range(start_index, start_index + appointment_length):
                                            key = DAY_ROTA_KEYS[i]
                                            tmp_rota[key] = appointment

                                return tmp_rota
my_rota.html receives the rota from the RotaView. The
rota is displayed graphically by using a loop and a table. Looping through the
dictionary creates the rows in the table.
If statements are used to determine how the row should look, depending on whether
the dictionary
value is populated or empty; the different row colours are implemented using
Bootstrap.
The 'Add New Appointment' button is implemented using Bootstrap, it is embedded with a
link
and clicking the button will
take the user to an AppointmentForm.
The patient name and appointment ID are displayed on the table, they are embedded with a
links to other
templates which show more details to the user.
Clicking the the patient name takes the user to patient_detail.html,
clicking the appointment id will take the user to appointment_detail.html.
Display Weekly Rota
This section explains how the weekly rota is displayed. This process is nearly identical
to displaying a daily rota as above in the 'Daily
Rota' section. Please read 'Daily
Rota' section before reading this section.
Displaying the
weekly rota is handled by RotaView in RotaView.py.
1. Identify logged in user
*The same case as the 'Daily Rota' section.
2. Identify required dates
As above, in the 'Daily Rota' section, the user
selects a date manually or through the GUI.
To add to this, an array of 7 consecutive days is generated from this date, this
is the week that will be
displayed on the rota.
It is stored under the dates variable.
dates = [str(selected_date + timedelta(days=x)) for x in range(0, 8)]3. Generate rotas
Step 3 is very similar to above in the 'Daily Rota'
section. Instead,
generate_day_rota() is called for
each date and it stores these rotas in an array, called weekly_rota. This
behaviour is
handled
by generate_weekly_rota(self, weekly_rota, dates, user).
                            def generate_weekly_rota(self, weekly_rota, dates, user):
                                cancelled = AppointmentStatus.objects.all().filter(
                                    status='Cancelled')[0]
                                for d in dates:
                                    rota_appointments_ordered = list(Appointment.objects.all().filter(
                                        appointment_date=d, team_member=user).exclude(
                                            appointment_status=cancelled))
                                    rota_appointments_ordered.sort(
                                        key=lambda x: (x.appointment_start_time))
                                    tmp_rota = DAY_ROTA.copy()
                                    rota = self.generate_day_rota(rota_appointments_ordered, tmp_rota)
                                    date_rota_tuple = (d, rota)

                                    weekly_rota.append(date_rota_tuple)

                                return weekly_rota
RotaView passes this weekly_rota to the template
(my_rota.html) in the
response.
4. Display
Step 4 is very similar to above in the 'Daily Rota' section. Instead, the array of rotas is looped through and each one is displayed side by side. Each rota is displayed in an identical fashion as described in the 'Daily Rota' section.
Display Team Rota
This section explains how the team rota is displayed. This process is nearly identical
to displaying a daily rota as above in the 'Daily
Rota' section. Please read the 'Daily
Rota' section before reading this section.
Displaying the
team rota is handled by TeamView in TeamView.py.
1. Identify selected users
Users are stored in the database as models. Users selected in the form (stored in
members_selected) are saved to a
variable called team_members this is done with the following lines of code.
We are left with an array of user objects.
                            if len(members_selected) == 0:
                                team_members = list(User.objects.filter(
                                    groups__name='Ocularist'))
                            else:
                                team_members = []
                                for member_key in members_selected:
                                    team_members.append(User.objects.get(
                                        pk=int(member_key)))
2. Identify required date
Similar to above, in the 'Daily Rota' section, the
user
selects a date manually or through the GUI.
Their choice is stored under the selected_date variable.
3. Generate rotas
Step 3 is very similar to above in the 'Daily Rota'
section. Instead,
generate_rota() is called for
each user and it stores these rotas in an array, called team_rota. This
behaviour is
handled
by generate_team_rota(self, selected_date, team_rota, team_members).
                            def generate_team_rota(self, selected_date, team_rota, team_members):
                                cancelled = AppointmentStatus.objects.all().filter(
                                    status='Cancelled')[0]
                                for user in team_members:
                                    rota_appointments_ordered = list(Appointment.objects.all().filter(
                                        appointment_date=selected_date, team_member=user).exclude(
                                            appointment_status=cancelled))
                                    rota_appointments_ordered.sort(
                                        key=lambda x: (x.appointment_start_time))
                                    tmp_rota = DAY_ROTA.copy()
                                    rota = self.generate_rota(rota_appointments_ordered, tmp_rota)
                                    name_rota_tuple = (user.first_name +  ' ' + user.last_name, rota)
                                    team_rota.append(name_rota_tuple)

                                return team_rota
TeamView passes this team_rota to the template
(team_rota.html) in the
response.
4. Display
Step 4 is very similar to above in the 'Daily Rota' section. Instead, the array of rotas is looped through and each one is displayed side by side. Each rota is displayed in an identical fashion as described in the 'Daily Rota' section.
Display Patient List
This section describes how the patients are displayed on
wait_list.html
Displaying the patients is handled by WaitingListView in
WaitingListView.py
1. Fetch data
In WaitingListView, patients are separated into
bookedPatients
and waitingPatients. These queries are passed to
wait_list.html in the response.
                                bookedPatients = Patient.objects.all().filter(patient_status=booked)
                                waitingPatients = Patient.objects.all().exclude(patient_status=booked)
2. Display
Bootstrap cards are used as content containers in the wait_list.html page.
For loops are used to generate a card and to dynamically fill in a patient's data to
that
card.
Display Appointment List
This section describes how the appointments are displayed on
appointments.html
Displaying the appointments is handled by AppointmentView in
AppointmentView.py
1. Fetch data
In AppointmentView, appointments are separated
into past (past appointments), appointments (upcoming
appointments) and cancelled (cancelled appointments). This is done so
through a simple for loop which can be seen in the code snippet below.
All non-cancelled appointments are looped through. For each appointment, if
appointment_date is before today it goes into past
otherwise it goes to appointments.
                                    temporaryAppointments = Appointment.objects.all().exclude(
                                        appointment_status=cancelled)
                                    appointments = []
                                    past = []
                                    for appointment in temporaryAppointments:
                                        if appointment.appointment_date < today:
                                            past.append(appointment)
                                        else:
                                            appointments.append(appointment)
Cancelled appointments are collected with a query.
                            cancelledAppointments = Appointment.objects.all().filter(
                                appointment_status=cancelled)
These queries and arrays are passed to appointments.html by
AppointmentView in the response.
2. Display
Bootstrap cards are used as content containers in appointments.html.
For each array/query given to the template, a separate loop is executed.
The loops generate a card for each appointment and dynamically fill in the appointment's
data to that card.
The loop will also add buttons, such as cancel and update, to the card if necessary.
PAS Checklist
This section describes how the PAS checklist is implemented on
checklist.html.
The PAS checklist is used by admin staff. Appointments that
haven't been confirmed on PAS
are displayed on this page. Once an admin staff has input the changes into PAS, they can
tick of the
appointment from the checklist.html page.
The PAS checklist is handled by ChecklistView which can be found in
ChecklistView.py.
Fetch Appointments
In ChecklistView appointments that aren't confirmed on PAS are retrieved
from the
database and returned to the template (checklist.html) in the response.
                            def get(self, request):
                                super().fetch_details(request)
                                appointmentsn = Appointment.objects.filter(
                                    status_confirmed_on_pas='n')
                                appointmentsN = Appointment.objects.filter(
                                    status_confirmed_on_pas='N')

                                appointments = appointmentsn | appointmentsN
                                return(request, 'website/checklist.html',
                                                {'appointments' appointments,
                                                'first_name' self.first_name})
These appointments are displayed with a Bootstrap card. They are displayed in a very similar fashion to how patients are displayed on the patients page (described in the 'Display Patient List' section), and appointments on the appointments page (described in the 'Display Appointment List' section). Each appointment has a button to tick it off.
Tick Appointments
When a user clicks the button to tick the appointment the following actions are taken:
1. User is taken to /tick_appointment/pk.
2. urls.py sends to user to TickAppointmentView in
TickAppointmentView.py.
3. TickAppointmentView sets status_confirmed_on_pas to 'Y' and
sets changes_to_be_confirmed_on_pas to '', effectively deleting the
contents.
4. User gets redirected to checklist.html.
This appointment will no longer appear on the checklist as its
status_confirmed_on_pas
is 'Y' and neither 'N' nor 'n'.
Update Patient
This section describes how updating a patient is implemented on
update_patient.html.
Updating an appointment is very similar to this process.
Updating an appointment is handled by UpdatePatientView in
UpdatePatientView.py
Model Forms
It is necessary to understand how the Django ModelForm class works in order
to understand this section along
with the following sections of this document, 'Add
Patient', 'Update Appointment' and 'Update Patient'.
This class creates a form from a Django model.
These forms are defined in forms.py, each attribute in the model is given a
field to
enter information. The code snippet below doesn't show all of the fields but it
illustrates how the code is laid out.
                                class PatientForm(ModelForm):
                                    class Meta
                                        model = Patient
                                        fields = ('PAS_number', 'first_name', 'middle_name',
                                                'surname', 'DOB', 'priority_code',
                                                'patient_information', 'patient_status')

                                        widgets = {
                                            'PAS_number': forms.NumberInput(
                                                attrs={'class': 'form-control'})
                                                ...
                                        }
is_valid()
It is also necessary to understand how the .is_valid() function works to
understand this section along
with the following sections of this document, 'Add
Patient', 'Update Appointment' and 'Update Patient'.
By default, this function checks the data input into the fields. If and only if there is
a violation regarding the type of data input to the field, then .is_valid()
returns False.
For example, using the code snippet above, if 'hello' is input to the
PAS_number field then .is_valid() will return
False.
However, if 123 was input to the field, then .is_valid() would
return True.
Get Method
If the user is getting the update patient page, the functionality works as
follows:
1. User clicks update patient button which brings them to the URL,
/update_patient/pk.
2. urls.py sends the user to UpdatePatientView in
UpdatePatientView.py.
3. UpdatePatientView uses this pk to fetch the patient object
with this primary
key.
4. UpdatePatientView creates a PatientForm and fills in the
form with the
patient's information.
5. UpdatePatientView renders this form in the template
(update_patient.html).
                                class UpdatePatientView(UserView):
                                    def get(self, request, patient_id):
                                        super().fetch_details(request)
                                        patient = Patient.objects.get(pk=patient_id)
                                        form = PatientForm(request.POST or None, instance=patient)
                                        return render(request, 'website/update_patient.html',
                                                    {'patient' patient, 'form' form,
                                                    'first_name' self.first_name})
If the user is posting to the update patient page the functionality works as
follows.
1. UpdatePatientView receives the form and checks if it is valid using
.is_valid()
2. If it is valid then the form is saved to the database and the user gets
redirected to /wait_list.html.
3. Else, the user cant submit the form and an error message will explain what is wrong
with the form.
                                class UpdatePatientView(UserView):
                                    ...

                                    def post(self, request, patient_id):
                                        super().fetch_details(request)
                                        patient = Patient.objects.get(pk=patient_id)
                                        form = PatientForm(request.POST or None, instance=patient)
                                        if form.is_valid():
                                            form.save()
                                            return redirect('/wait_list')
                                        return render(request, 'website/update_patient.html',
                                                    {'patient' patient, 'form' form,
                                                     'first_name' self.first_name})
Update Appointment
This section describes how updating an appointment works is implemented on
update_appointment.html.
Updating an appointment is very similar to updating a patient. Please fully read the
'Update Patient' section before reading this
section.
Updating an appointment is handled by UpdateAppointmentView in
UpdateAppointmentView.py
Clean Functions
It is necessary to understand how the clean functions work
to understand this section along
with the 'Add Appointment' section.
Clean functions are used by .is_valid() to check the data. If a clean
function isn't defined, for example in our implementation of a patient form, then
.is_valid()
works as described in the 'Update Patient' section.
However, when updating appointments the system should
also check for appointment clashes so a clean function is defined which performs the
checks
that are performed by the default
is_valid() function and also checks for appointment clashes.
Effectively, we define our own way to check if a form is valid or not.
This function raises validation errors if there are any problems with the inputs.
These validation errors will be displayed to the user if they cant submit
the form.
*This code snippet is quite large, however, it can be found in forms.py.
Get Method
If the user is getting the update appointment page, the functionality works as
follows:
1. User clicks update appointment button which brings them to the URL,
/update_appointment/pk.
2. urls.py sends the user to UpdateAppointmentView.
3. UpdateAppointmentView uses this pk to fetch the appointment
object with this primary
key.
4. UpdateAppointmentView creates an AppointmentForm for an
appointment and fills in the
form with the
appointment's information.
5. UpdateAppointmentView renders this form in the template.
*This works identically to updating a patient.
Post Method
If the user is posting to the update appointment page the functionality works as
follows.
1. UpdateAppointmentView receives the form and checks if it is valid using
.is_valid(), this is_valid() function uses the clean function
that that has beendefined. So it also checks for appointment clashes.
2. If it is valid then the end time is calculated, the form is saved to the database and
the user gets redirected to appointments.html
3. Else, the user cant submit the form and an error message will explain what is wrong
with the form.
                            def post(self, request, appointment_id):
                                super().fetch_details(request)
                                appointment = Appointment.objects.get(appointment_ID=appointment_id)
                                form = AppointmentForm(request.POST or None, instance=appointment)

                                if form.is_valid():
                                    start_time = form.cleaned_data['appointment_start_time']
                                    appointment_code_obj = form.cleaned_data['appointment_code']
                                    appointment_type = appointment_code_obj.appointment_description
                                    timing = APPOINTMENT_TIMING[appointment_type]
                                    end_time = datetime.combine(date.today(), start_time) + timing

                                    form.instance.appointment_end_time = end_time
                                    form.instance.status_confirmed_on_pas = 'N'
                                    form.save()

                                    return HttpResponseRedirect('/appointments')
                                return render(request, 'website/update_appointment.html',
                                            {'appointment' appointment, 'form' form,
                                            'first_name' self.first_name})
Add Patient
This section describes how adding a patient is implemented on
add_patient.html.
Updating a patient's record is very similar to this process, please read the 'Update Patient' section before reading this
section.
Adding a patient is handled by AddPatientView in
AddPatientView.py.
Get Method
If the user is getting the update patient page, the functionality works as
follows:
1. User clicks update patient button which brings them to the URL,
/add_patient.
2. urls.py sends the user to AddPatientView.
3. AddPatientView creates an empty PatientForm.
4. AddPatientView renders this form in the template
(add_patient.html).
Post Method
If the user is posting to the add patient page the functionality works as
follows.
1. AddPatientView recieves the form and checks if it is vaild using
.is_valid(). .is_valid() works as described in the Update
Patient' section.
2. If it is valid then the form is saved to the database and the user gets
redirected to appointments.html.
3. Else, the user cant submit the form and an error message will explain what is wrong
with the form.
Add Appointment
This section describes how adding an appointment is implemented on
add_appointment.html.
Updating an appointment is very similar to updating a patient. Please fully read the
'Update Appointment' section bnefore reading this
section.
Adding an appointment is handled by AddAppointmentView in
AddAppointmenttView.py.
Get Method
If the user is getting the add appointment page, the functionality works as
follows:
1. User clicks add appointment button which brings them to the URL,
/add_appointment.
2. urls.py sends the user to AddAppointmentView.
3. AddAppointmentView creates an empty AppointmentForm.
4. AddAppointmentView renders this form in the template.
*This works identically to the get method in AddPatientView.
Post Method
If the user is posting to the add appointment page the functionality works as
follows.
1. AddAppointmentView receives the form and checks if it is valid using
.is_valid(), this .is_valid() function uses the clean function
that has been defined in AppointmentForm. So it also checks for appointment
clashes.
Read about the clean method in the 'Update
Appointment' section.
2. If it is valid then the end time is calculated, the form is saved to the database and
the user gets
redirected
3. Else, the user cant submit the form and an error message will explain what is wrong
with the form.
Delete Patient
This section explains how deleting a patient is implemented.
Deleting a patient is handled by DeletePatientView in
DeletePatientView.py.
1. Delete a patient if they exist.
This functionality is accessed by the URL /delete_patient/pk. To check that
a patient
with this pk exists, patient with this pk are queried for. If
an error is thrown then
they don't exist. If an error is not thrown then they exist and the patient is deleted.
A message is also created for the user, this message will be displayed in the
notification panel on the interface.
This message is stored in the variable msg.
DeletePatientView sends msg to the template
(wait_list.html). This template will display all of the patients that still
exist on
the database. msg is displayed in the notification panel.
Cancel Appointment
This section explains how cancelling an appointment is implemented.
Cancelling an appointments is handled by CancelAppointmentView in
CancelAppointmentView.py.
Get Method
1. Cancel the Appointment
This functionality is accessed by the URL cancel_appointment/pk, a user can
get to this URl if they click a 'Cancel Appointment' button.
This appointment object is queried with this pk.
appointment_status is set to 'Cancelled' and
status_confirmed_on_pas is set to
'N'.
If it is less than 2 days before the appointment, a message is added to the appointment,
this message can be viewed on the PAS checklist.
Variables for appointments are generated and appointments.html is rendered
with these variables.
Filtering
This section explains how filtering is implemented on the appointments.html
and
wait_list.html pages.
This functionality is implemented with AppointmentView and
WaitingListView respectively.
*filter functionality for appointments and patients is implemented identically. for
simplicity's sake, this document will only discuss appointment filtering.
Filter functionality for the appointment page is implemented using a Django
form. This is a form but it is not a model form. The form used is
called
SearchAppointmentForm in forms.py.
It is a series of search bars with a single submit button. The below code snippet shows
one
of the search bars on the form.
                                class SearchAppointmentForm(forms.Form):
                                    appointment_ID = forms.CharField(
                                        label='Search by ID',
                                        max_length=100, required=False)
                                    ...
User inputs to the forms are used to filter objects using processQuery()
function which is defined in AppointmentsView.
Below is a section of code for filtering appointments.
The parameter dic is defined by dic = form.cleaned_data.
dic contains the user's input.
For each key:value pair in dic, if the value is not None then
appointment objects are filtered to
find the particular appointments that match the search request.
These appointments are sent to the appointments page to be displayed.
                                def processQuery(self, dic, appointments):
                                    appointment_ID = dic['appointment_ID']
                                    PAS_number = dic['PAS_number']
                                    ...
                                    if appointment_ID:
                                        appointments = appointments.filter
                                            (appointment_ID=appointment_ID)
                                    if PAS_number:
                                       appointments = appointments.filter
                                            (PAS_number=PAS_number)
                                    ...
                                    return appointments