Loading...
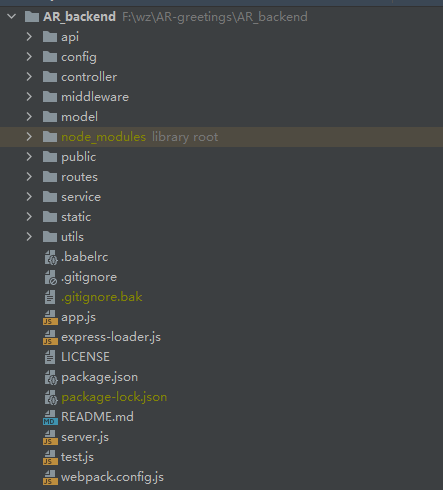
We use Node.js and Express.js to implement our backend API, building the application in the Model-Route-Controller-Service structure that expresses.


This app starts a server and listens on port 10086 for connections. It will then initialize the generator for config, controller, router and service.
const Server = require('./server')
const server = new Server({port: 10086})
server.start()
const express = require('express')
const {
    initConfig,
    initController,
    initRouter,
    initService,
} = require('./express-loader.js')

class Server {
    constructor(conf) {
        this.$app = express()
        this.$models = []
        this.$model = {}
        this.$routers = {}
        this.conf = conf || {}
        initConfig(this)
        this.$ctrl = initController(this)
        this.$service = initService(this)
        initRouter(this)
        require('./service/genService').init(this)
        require('./controller/genController').init(this)
        require('./routes/genRouter').init(this)
        require('./api/genFE').init(this)
    }

    start(port) {
        this.$app.listen(port || this.conf.port || 3000, () => {
            console.log('The server started successfully, the port:', this.conf.port || 3000)
        })
    }
}

module.exports = Server
Services that make our code cleaner by encapsulating operations(add,update,del,findByID...) into functions that controllers can call. It imports the MySQL database connection and will use the MySQL query method to find and edit data.
const {STRING, BOOLEAN, INTEGER} = require('sequelize')
const {find, getWhere} = require('../utils/db')

function getService(model, app) {
    const curModel = app.$models[model]
    const service = {
        add: async (data) => await app.$model[model].create(data),
        update: async ({id, ...data}) => await app.$model[model].update(data, {where: {id: Number(id)}}),
        del: async ({id}) => await app.$model[model].destroy({where: {id}}),
        findById: async ({id}) => await find(
            app,
            model,
            await app.$model[model].findOne({where: {id: Number(id)}, raw: true}),
        ),
    }
    if (curModel.options) {
        .......
        }
    } else {
        .......
    }
    return service
}
Controllers that use services to process the request before finally sending a response to the requester.
The controller only needs to know what to do with the actual request by validating the request body and parameter. The controller will then call the respective service of each request that it will be handling.
function getController(model, app) {
    const curService = app.$service[model]
    const curModel = app.$models[model]
    const controller = {
        add: async (ctx) => ctx.res.send({code: 200, data: await curService.add(ctx.req.body)}),
        update: async (ctx) => ctx.res.send({code: 200, data: await curService.update(ctx.req.body)}),
        del: async (ctx) => ctx.res.send({code: 200, data: await curService.del(ctx.req.body)}),
        findById: async (ctx) => ctx.res.send({code: 200, data: await curService.findById(ctx.req.body)}),
    }
    if (curModel.options && curModel.options.isTree) {
        controller.tree = async (ctx) => ctx.res.send({code: 200, data: await curService.tree(ctx.req.body)})
    } else {
        controller.all = async (ctx) => ctx.res.send({code: 200, data: await curService.all(ctx.req.body)})
        controller.list = async (ctx) => ctx.res.send({code: 200, data: await curService.list(ctx.req.body)})
    }
    return controller
}
This is the most important feature for our Backend API. Because we have two front-end projects that share the single backend server, in order to ensure the unity of the apis and for convenience of development, we decided to use the code generator to generate the api files and the front-end files of the admin dashboard.

Generated files
This saves us a lot of development time, as the following code generates local files based on the defined models. Its operational logic is to iterate through the entire consant array which contains the names, schema and variables to be displayed on the front end
function initApi(routers) {
    rmDir('api')
    console.log(chalk.yellow(`******Start generating API templates******`))
    Object.keys(routers).forEach(model => {
        const apiModelTemp = `
 import request from '@/utils/request'
 export default {
 ${routers[model].map(router => getName(router)).join(',\n')}
 }
`
        console.log(chalk.yellow(`${model.padEnd(20, ' ')}Success`))
        fs.writeFileSync(path.join(__dirname, `./api/${model}.js`), apiModelTemp)
    })
    const apiIndexTemp = `
  ${Object.keys(routers).map(key => `import ${key} from './${key}'`).join(';\n')}

  export default {
    ${Object.keys(routers).join(',\n')}
  }
  `
    console.log(chalk.yellow(`******Finish generating API template******`))
    fs.writeFileSync(path.join(__dirname, `./api/index.js`), apiIndexTemp)
}

function initViews(app) {
    Object.keys(app.$models).forEach(model => {
        const {schema, views, options} = app.$models[model]
        if (views) {
            mkdir(model)
            fs.writeFileSync(path.join(__dirname, `./views/${model}/index.vue`), require('./genPage')(model, schema, views, options ? options.mapping : {}))
            views.add && fs.writeFileSync(
                path.join(__dirname, `./views/${model}/actionModal.vue`),
                require('./genAction')(model, schema, views, options ? options.mapping : {}),
            )
            views.detail && fs.writeFileSync(
                path.join(__dirname, `./views/${model}/detailModal.vue`),
                require('./genDetail')(model, schema, views, options ? options.mapping : {}),
            )
        }
    })
}
The following code is the content in the model we need to define for backend.
function init(app) {
//show 1List 2Edit 3Detail
const models = {
user: {
schema: ['name', 'username', 'password', 'avatar', 'desc', 'roleId', 'weight|FLOAT', 'age|INTEGER'],
views: {
name: 'User', add: true, del: true, update: true, detail: true, fields: [
{prop: 'name', label: 'Username', query: true},
{prop: 'username', label: 'Username', query: true},
{prop: 'password', label: 'Password', type: 'password', show: [2]},
{prop: 'avatar', label: 'Avatar', type: 'img'},
{prop: 'desc', label: 'Description'},
{prop: 'age', label: 'Age', type: 'number'},
{prop: 'roleId', label: 'Role', type: 'select', query: true},
],
},
},
role: {
....
],
},
},
category: {
schema: ['name', 'date|DATEONLY'],
views: {
name: 'Category', add: true, del: true, update: true, detail: true, fields: [
{prop: 'name', label: 'Category Name', query: true},
{prop: 'date', label: 'date', type: 'date-picker', query: true},
],
},
},
article: {
name: 'Article',
schema: ['name', 'content', 'desc', 'userId', 'avatar', 'categoryId', 'type', 'imgs', 'frameID'],
views: {
add: true, del: true, update: true, detail: true, fields: [
{prop: 'name', label: 'Article Title', query: true},
{prop: 'desc', label: 'Description'},
{prop: 'content', label: 'Content', type: 'html'},
{prop: 'userId', label: 'Author', type: 'select', query: true},
{prop: 'avatar', label: 'Head Image', type: 'img'},
{prop: 'categoryId', label: 'Category Id'},
{prop: 'type', label: 'File Type'},      // 1.Image;2.Video;
{prop: 'imgs', label: 'image'},      //
{prop: 'frameID', label: 'PlugID'},

})
})
}
At first, the user's files were uploaded to the local server, so we wrote the file names of windows and linux, and later we stored all the files in the cloud (Aliyun OSS), so we made changes to the code to support asynchronous uploads. The following code generates the file name and suffix with regularity, the generated file name will be like upload_2e458c23dc09c7f84b131d669bfd352e,upload.jpg
upload: async (ctx) => {
        const form = new Formidable.IncomingForm()
        form.parse(ctx.req, async (err, _, files) => {
            console.log(files)
            let data = []
            await Promise.all(Object.keys(files).map(async index => {
                    const file = files[index]
                    // const fileName = /\/(upload\w*)/.exec(file.path)[1]      //MacOS
                    const fileName = /(upload)\w+$/.exec(file.path);              //Windows
                    const suffix = /\.\w+$/.exec(file.name)[0]
                    const url = path.join(__dirname, `../static/file/${fileName}${suffix}`)
                    fs.writeFileSync(url, fs.readFileSync(file.path))
                    const res = await put(`/file/${fileName}${suffix}`, url)
                    data.push(`https://files.ucl.jaobsen.com/file/${fileName}${suffix}`)// OSS Public Link
                }),
            )
            ctx.res.send({
                    code: 200,
                    data: data.join('|'),
                },
            )
        })
    },
After running the server, the api and views files will be generated first, and then the sql query will be performed to initialize the MySQL database
Mapping addresses POST /api/user/add
Mapping addresses POST /api/user/update
Mapping addresses POST /api/user/list
........................................
Mapping addresses POST /api/common/register

******Start to deleteAPITemplate Directory******
./api/article.js               Delete
........................................
./api/role.js                  Delete
./api/user.js                  Delete
******Finish to deleteAPITemplate Directory******
******Start generating API templates******
user                Success
******Start to deletecollectionModel Template Directory******
./views/collection/actionModal.vue Delete
........................................
./views/collection/index.vue   Delete
******Start to deletelikeArticleModel Template Directory******
./views/likeArticle/actionModal.vue Delete
........................................
./views/likeArticle/index.vue  Delete
******Start to deletecommentArticleModel Template Directory******
./views/commentArticle/actionModal.vue Delete
./views/commentArticle/detailModal.vue Delete
./views/commentArticle/index.vue Delete
The server started successfully, the port: 10086
Executing (default): CREATE TABLE IF NOT EXISTS `user` (`id` INTEGER NOT NULL auto_increment , `name` VARCHAR(255), `username` VARCHAR(255), `password` VARCHAR(255), `avatar` VARCHAR(255), `desc` VARCHAR(255), `roleId` INTEGER, `weight` FLOAT, `age` INTEGER, `createdAt` DATETIME NOT NULL, `updatedAt` DATETIME NOT NULL, `deletedAt` DATETIME, PRIMARY KEY (`id`)) ENGINE=InnoDB DEFAULT CHARSET=utf8;
................................................................................
Executing (default): CREATE TABLE IF NOT EXISTS `commentArticle` (`id` INTEGER NOT NULL auto_increment , `content` VARCHAR(255), `userId` INTEGER, `articleId` INTEGER, `createdAt` DATETIME NOT NULL, `updatedAt` DATETIME NOT NULL, `deletedAt` DATETIME, PRIMARY KEY (`id`)) ENGINE=InnoDB DEFAULT CHARSET=utf8;
Executing (default): SHOW INDEX FROM `commentArticle` FROM `testing-database`
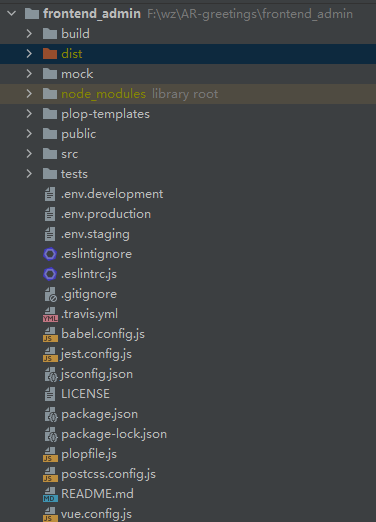
We use Vue.js to implement our frontend Admin dashboard API, and develop based on a template called vue-admin-template.


vue-admin-template is a minimal vue admin template with Element UI & axios & iconfont & permission control & lint.
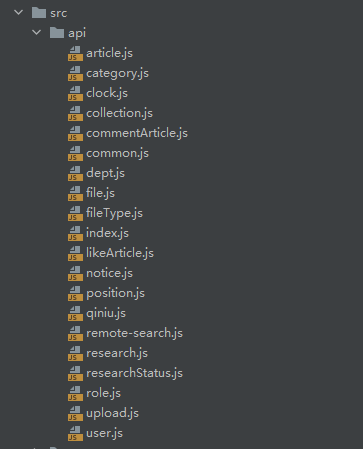
The API folder contains the APIs that come with vue-admin-template and the API files generated by the backend.

All API files

Generated API files
The following is the generated API file for user, it contains some methods of operation
import request from '@/utils/request'
export default {
  add: (data) => request.post('/user/add', data),
  update: (data) => request.post('/user/update', data),
  del: (data) => request.post('/user/del', data),
  findById: (data) => request.post('/user/findById', data),
  all: (data) => request.post('/user/all', data),
  list: (data) => request.post('/user/list', data),
}
The following is the API file that comes with the template, which contains the user's API such as login and registration
import request from '@/utils/request'

export default {
  upload: (data) => request.post('/common/upload', data),
  getPublicKey: (data) => request.post('/common/getPublicKey', data),
  login: (data) => request.post('/common/login', data),
  logout: (data) => request.post('/common/logout', data),
  getLoginInfo: (data) => request.post('/common/getLoginInfo', data),
  register: (data) => request.post('/common/register', data),
}
In our frontend-admin-dashboard, a complete front-end UI interacts to the server-side processing flow as follows:
Router and Nav are the key skeleton for organizing a management system.
This project router and nav are bound together, so we only have to configure the route under @/router/index.js and the sidebar nav will be dynamically generated automatically. This greatly reduces the workload of manually editing the sidebar nav. Of course, so we need to follow many conventions in configuring the route.
The following is configuration items that are provided config route
// if set to true, lt will not appear in sidebar nav.
// e.g. login or 401 page or as some editing pages /edit/1 (Default: false)
hidden: true

// this route cannot be clicked in breadcrumb navigation when noRedirect is set
redirect: noRedirect

// when you route a children below the declaration of more than one route,
// it will automatically become a nested mode - such as the component page
alwaysShow: true

// set router name. It must be set,in order to avoid problems with keep-alive.
name: 'router-name'

meta: {
  // required roles to navigate to this route. Support multiple permissions stacking.
  // if not set means it doesn't need any permission.
  roles: ['admin', 'editor']

  // the title of the route to show in various components (e.g. sidebar, breadcrumbs).
  title: 'title'

  // svg icon class
  icon: 'svg-name' // or el-icon-x

  // when set true, the route will not be cached by keep-alive (default false)
  noCache: true

  // if false, the item will hidden in breadcrumb(default is true)
  breadcrumb: false

  // if set to true, it can be fixed in tags-view (default false)
  affix: true // this is very useful in some scenarios, // click on the article to enter the article details page,

  // When you set, the related item in the sidebar will be highlighted
  // for example: a list page route of an article is: /article/list
  // at this time the route is /article/1, but you want to highlight the route of the article list in the sidebar,
  // you can set the following
  activeMenu: '/article/list'
}
The following is an Example route
{
  path: '/permission',
  component: Layout,
  redirect: '/permission/index',
  hidden: true,
  alwaysShow: true,
  meta: { roles: ['admin','editor'] }, // you can set roles in root nav
  children: [{
    path: 'index',
    component: _import('permission/index'),
    name: 'permission',
    meta: {
      title: 'permission',
      icon: 'lock',
      roles: ['admin','editor'], // or you can only set roles in sub nav
      noCache: true
    }
  }]
}
There are two types of routes : constantRoutes and asyncRoutes
ConstantRoutes:represents routes that do not require dynamic access, such as login page, 404, general page, and so on.
asyncRoutes:represents pages that require dynamic judgment permissions and are dynamically added through addRouters.
The vue-admin-template integrates a lot of features that we may not use, it will cause a lot of code redundancy, so we have removed unnecessary pages.
Since most of the features are native to the template, we won't go into too much discussion.
We use uni-app with vue.js to implement our frontend H5 app, uni-app is a front-end framework for developing cross-platform applications.
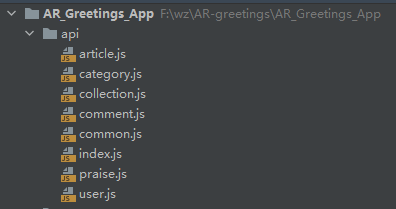
This is the file structure of the H5 App
<


The API folder contains the APIs the API files generated by the backend.

All API files
The following is the generated API file for user, it contains some methods of operation
import request from '@/utils/request'
export default {
  add: (data) => request.post('/user/add', data),
  update: (data) => request.post('/user/update', data),
  del: (data) => request.post('/user/del', data),
  findById: (data) => request.post('/user/findById', data),
  all: (data) => request.post('/user/all', data),
  list: (data) => request.post('/user/list', data),
}
The template page is one of the key features for our H5 App, if you look at our site map, you can see many pages will jump to this page.
The famous features of Vue - Conditional Rendering and Dynamic Components are used extensively in our projects. For example, in <banner>, it will first determine whether the banner is a video or an image to select the content to be displayed. And most of the variables shown below are all obtained from the database and populated dynamically.
In order to display the model interactively, we referenced the PlugXR model link using the <iframe> tag which represents a nested browsing context, embedding another HTML page into the current one.
In order to make it easier for users to share greetings card, we provide QR code and save button for it. And we also add gradient color rendering for QR code
Users can also share to thier friends through the Share to Friends button to four different social software with a single click.
And we also use the open-end method, so we can easily add more social platforms here in the future. Nevertheless, we package this button into a component to use in other pages if needed.
Another major feature of our app is the comment, saved and like system, users can operate in the template page, and see them in the profile page
And we also use the open-end method, so we can easily add more social platforms here in the future. Nevertheless, we package this button into a component to use in other pages if needed.