General Driving Games MFC
The following driving games were implemented: Rocket League and Forza, as well as an experimental option. This MFC application lets the user choose any driving game they want to play from a dropdown menu.
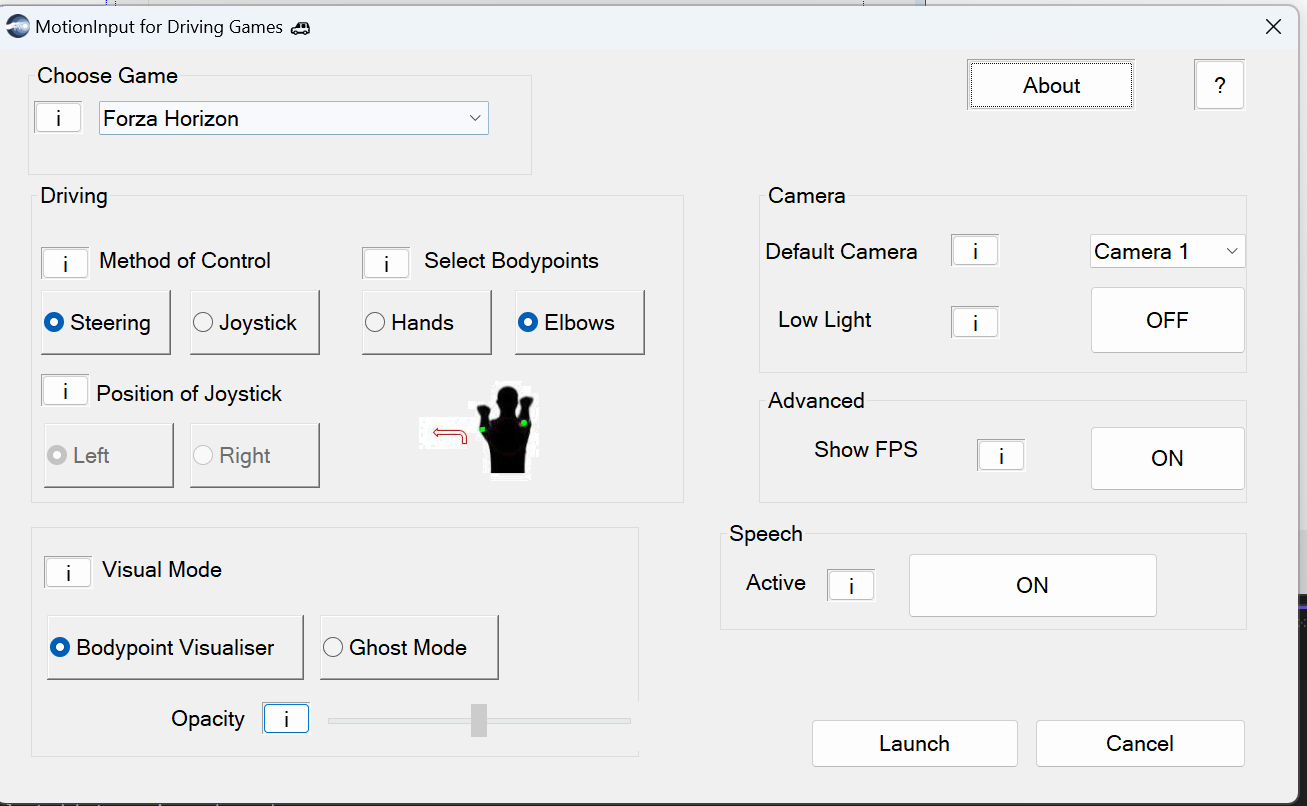
Select the game to be played from the drop-down menu - Currently it supports Forza Horizon, Rocket League and an Experimental option.
The Experimental option provides 4 controls - Left mouse click, Right mouse click, Shift and Space.
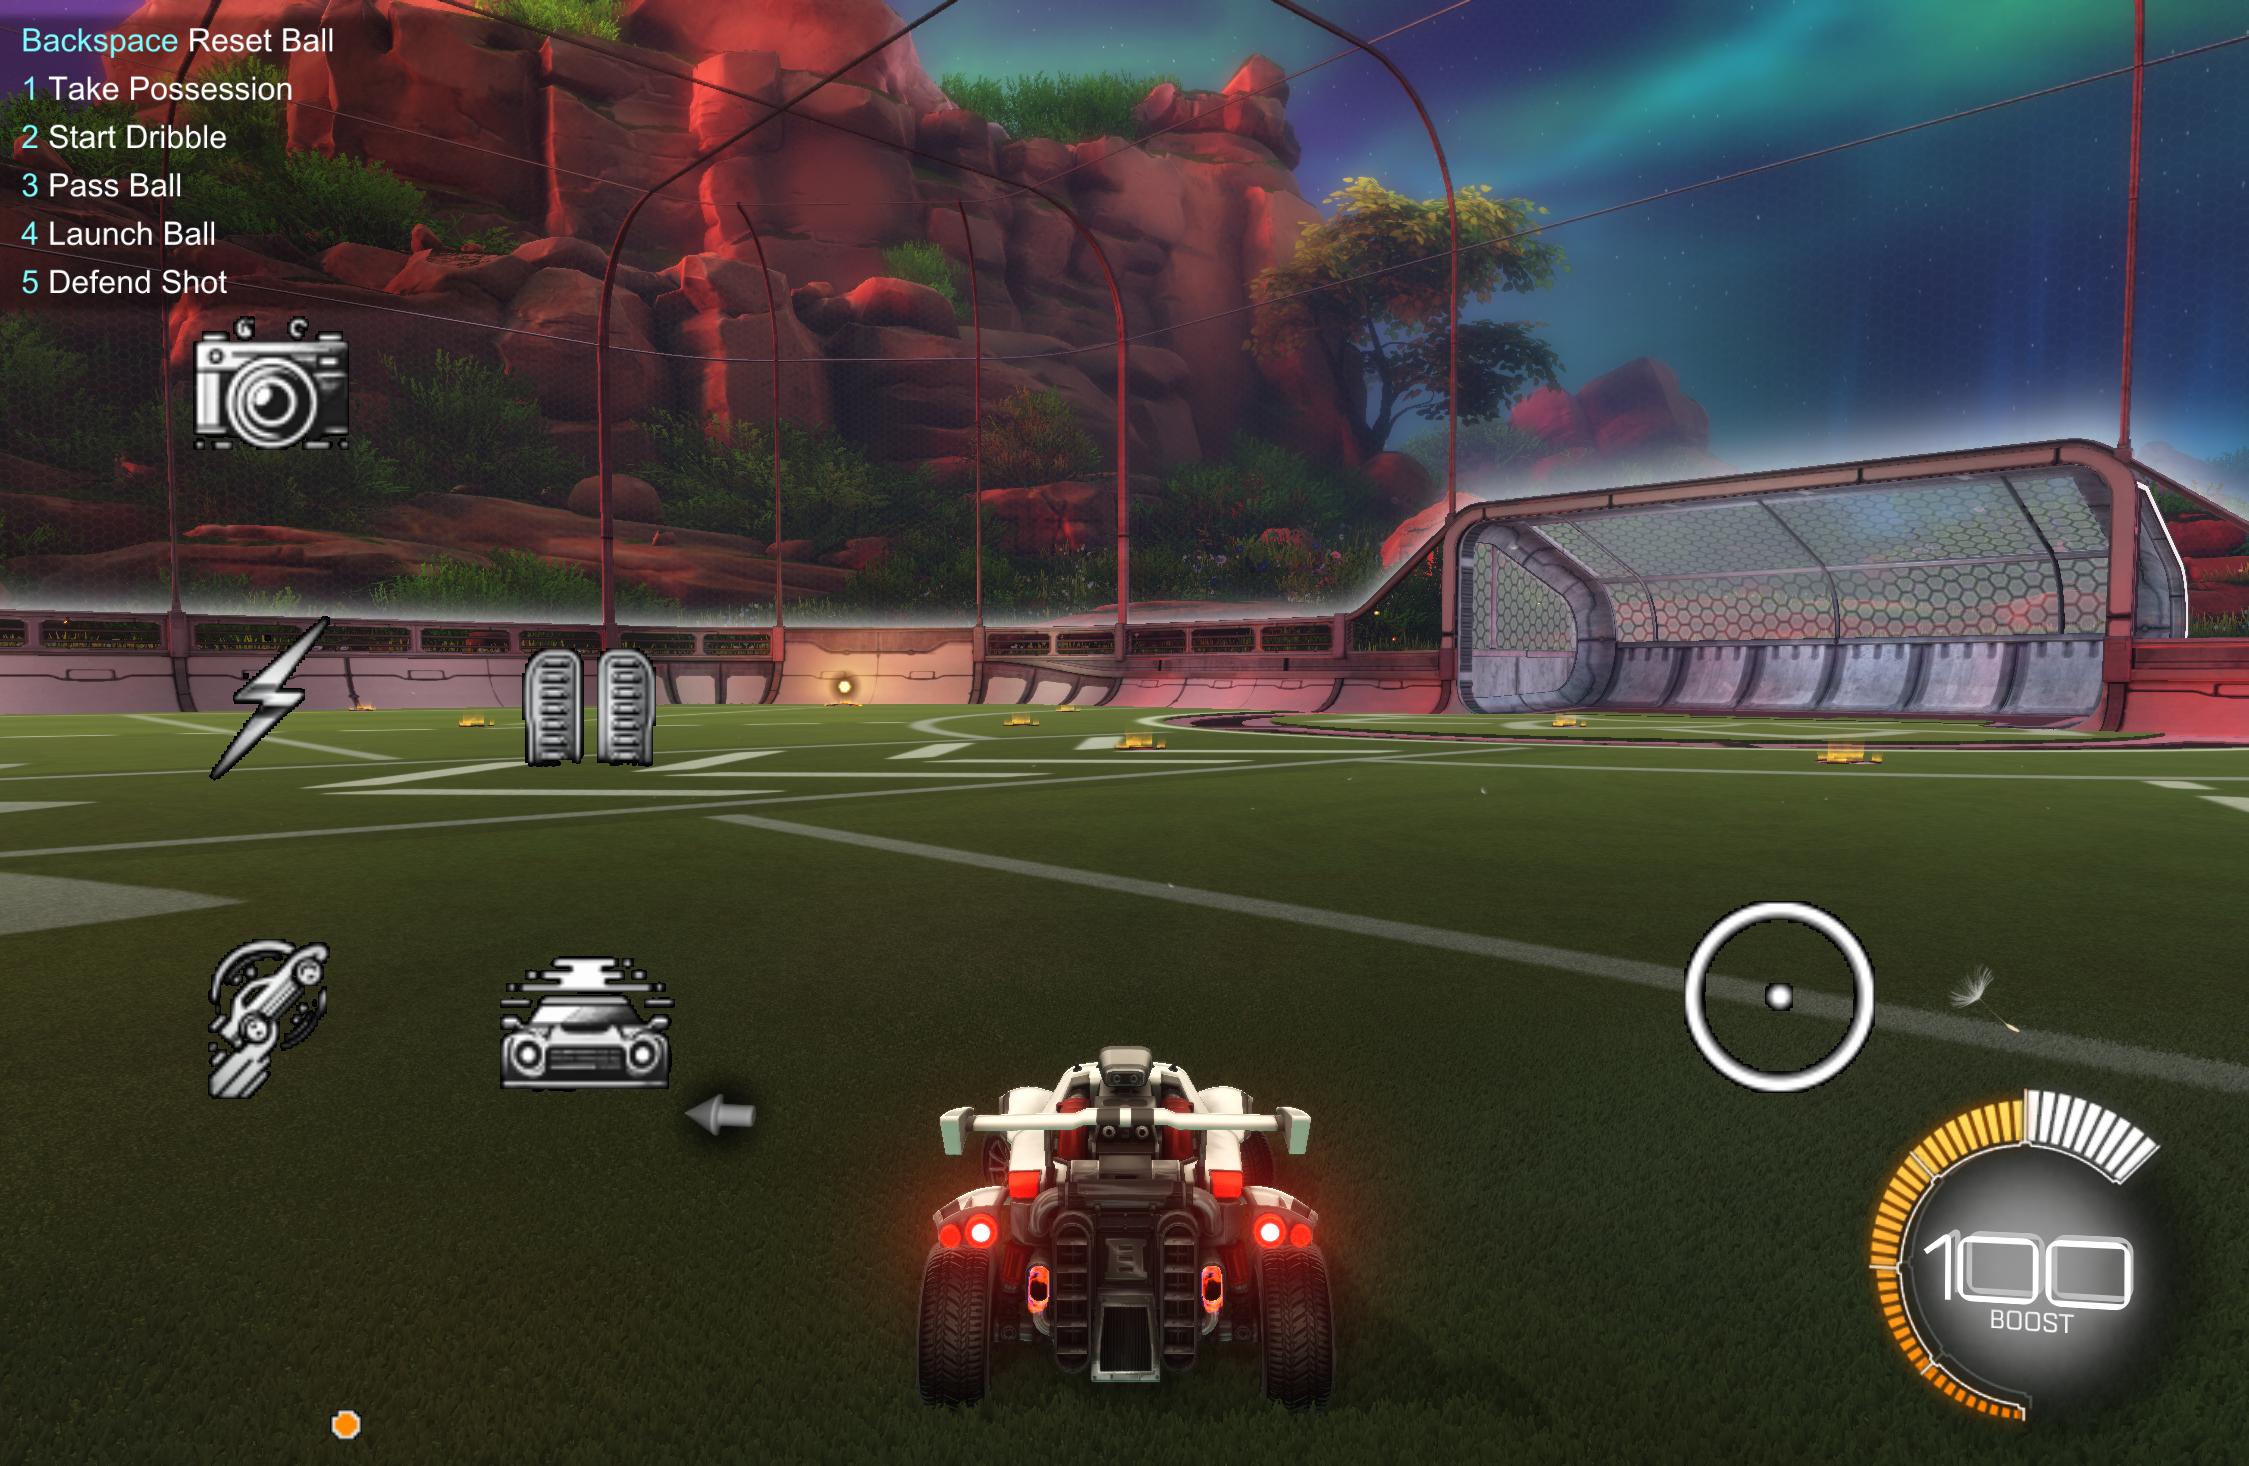
In Steering Mode, Left click is the topmost virtual trigger button located on the left side of the screen; Right click is the button right below this; Shift is the topmost virtual trigger button located on the right side of the screen; Space is the button right below this.
In Joystick mode (assuming joystick position has been set to "Right" via the MFC UI), Right click is the topmost button located on the left side of the screen; Left click is the button right below this; Space button is located to the right of Right click; Shift is the button below Space.
The user may choose to drive the car in two ways.
1. Steering uses a pair of bodypoints and emulates a real-life steering wheel. Steer left and right to move the car left and right. Keep both bodypoint levelled to drive straight. To stop driving, lower both bodypoints until they are out of the screen or press the brake control.
.png)
2. Joystick supports using hand, elbow or shoulder as a joystick. Move the selected joystick bodypoint anywhere around the screen to control the car. Move up = up; down = reverse/ brake ; left = left ; right = right
1. Steering uses a pair of bodypoints and emulates a real-life steering wheel. Steer left and right to move the car left and right. Keep both bodypoint levelled to drive straight. To stop driving, lower both bodypoints until they are out of the screen or press the brake control.
2. Joystick supports using hand, elbow or shoulder as a joystick. Move the selected joystick bodypoint anywhere around the screen to control the car. Move up = up; down = reverse/ brake ; left = left ; right = right
The user may select a pair of bodypoints presented as radio buttons (hands or elbows).
Buttons will be on both sides of the screen, to be triggered by the bodypoint on that side.
Buttons will be on both sides of the screen, to be triggered by the bodypoint on that side.
This does not affect Steering mode. In Steering mode, triggers are on both sides of the screen.
1. Left: Triggers will be on the right, to be pressed by the right selected bodypoint. Joystick will be controlled by the left selected bodypoint.
2. Right: Triggers will be on the left, to be pressed by the left selected bodypoint. Joystick will be controlled by the right selected bodypoint.
1. Left: Triggers will be on the right, to be pressed by the right selected bodypoint. Joystick will be controlled by the left selected bodypoint.
2. Right: Triggers will be on the left, to be pressed by the left selected bodypoint. Joystick will be controlled by the right selected bodypoint.
1. Bodypoint Visualiser: Two dots are displayed on screen representing the selected bodypoints.
2. Ghost mode: A semi transparent overlay of the user is displayed. Control the opacity by adjusting the slider, a higher value means the overlay is more visible.
.png)
2. Ghost mode: A semi transparent overlay of the user is displayed. Control the opacity by adjusting the slider, a higher value means the overlay is more visible.
For each possible combination of driving mode and bodypoints, this MFC provides GIFs highlighting the manner in which the user is going to play.
If the user has multiple cameras to take input from, then the user can select which camera they want to use. If the user is playing in a dimly-lit environment, the low-light button can be toggled ON for an enhanced experience.
The FPS option is set to ON by default. It displays the FPS rate at the bottom-right corner. If the user wishes, it can be set to OFF.
When the speech button is toggled ON, the user can use speech commands to play their games. Speech commands available for Rocket League is "JUMP" to jump and "CAMERA" to toggle ball camera; speech commands available for Forza Horizon are "MENU" for menu and "CAMERA to switch camera.
Click on the ¡ buttons next to each option for information. The help button ? on the top right provides more detailed description of each option.
No customisation of Gestures by the user is needed. The available gesture for Rocket League is raise eyebrows to jump.
The trigger positions are not hardcoded in this version. The positions are automated based on the mode of driving and position of joystick selected. These positions were fine-tuned via code after user testing.
To add a new game:
Write 2 JSON files in the same format as the available driving games JSONs for the game you would like to add - one for steering mode and one for joystick mode.
Name them "some_game.json" for steering and "some_game_joystick.json".
Include these files in data/modes and data/modes/driving_games. Run MFC-General-Driving-Games again. The new game is now available on the drop down menu.
In the future, uers may download JSONs for newly supported games they would like to play from the Motion Input website and add them to the appropriate folder, after which that game will be available in the drop down menu in our General MFCs. The user may then play these games with Motion Input without any MFC software updates or code changes.
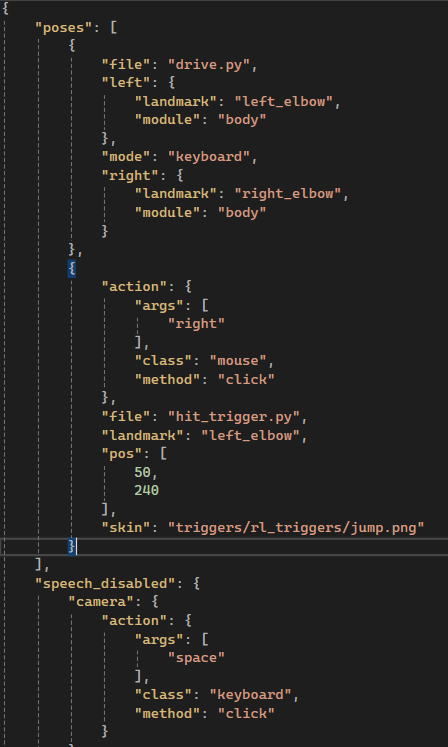
All of the above perferences get updated in either the config JSON file or mode JSON file when Launch is clicked. The JSON files follow a specific structure. Each trigger has a particular format to store keybinds, corresponding bodypoint and other information. Each driving game has two JSON files, one for steering and one for joystick.
Below are a list of configurations that developers may customise.
The JSON structure is as follows and the JSON files can be found in the directory: data/modes/2d_side_Scroller_games
Below are a list of configurations that developers may customise.
- Change which mode JSON file MotionInput uses
This can be done by changing the "mode" dictonary's value in data/config.json and data/configMFC.json. - Change positions of virtual buttons
Positions of virtual buttons (hit trigger) may be adjusted in the mode JSON files in data/mode. [0,0] is the top left of the screen. For example, if the current mode is "some_game", the position of a virtual button can be changed by accessing data/mode/some_game.json. In the "poses" array, virtual buttons are dictionaries in which the "file" key has value "hit_trigger.py". In this dictionary, the on-screen coordinates of the virtual button may be changed via the "pos" dictionary - Add Gestures
Gestures may be added in the "poses" array in the mode JSON files.
- file: the filename of the gesture (for virtual buttons it will be hit_trigger.py). The gesture must be in the data/gestures/json or data/gestures/python directory.
- action: specifies a dictionary encoding the output function to be performed when the gesture is detected.
- class: the class of the output function.
- method: the method to be called of the class.
- args: an array of arguments to be passed to the method.
-
Add Speech
New speech commands may be added to the value of the "speech" key in "some_game.json", outside the "poses" array. - Add Skins
Skins may be added to each button by adding corresponding PNG images to data/assets/triggers/rl_triggers. Two images are needed for each button: "some_action.png" and "Some_action_triggered.png", for example "jump.png" and "jump_triggered.png". Then, add "skins":"some_action.png" in "some_game.json". "some_action_triggered.png" does not need to be added.
The JSON structure is as follows and the JSON files can be found in the directory: data/modes/2d_side_Scroller_games