User and Deployment Manual
Contents with quick links
Phase 1: Offline-LLM Powered Literature Review Tool
Introduction
The Offline-LLM Powered Literature Review Tool is designed to enhance small-scale LLMs with RAG-based improvements. This manual provides a step-by-step guide to setting up and using the system.
Getting Started
System Requirements:
- Operating System: Windows, macOS(Apple Silicon, M1 or later)
- Memory: 16GB recommended
- Storage: 30GB free space
- GPU: NVIDIA with CUDA support or Apple Silicon (for MPS acceleration) is preferred
- Python: 3.10, 3.11 or 3.12 - UCL CS Hub Setup Guide
- For apple mps acceleration debug - Accelerated PyTorch on Mac
Running Steps (CPU and Apple MPS accelerated):
- Download the software executable package of your OS.
- Extract files and navigate to the directory.
- Run the executable. (you will see a terminal window open up first. Please wait for the application to load as this may take some time, depending on your device)
For mac exec and windows exe, if you have problem running, please refer the steps below
Deployment Steps from sourcecode (CPU and Apple MPS accelerated):
- Clone the project repository:
git clone https://github.com/nigelm48/COMP0016_Group27_2024-25.git - Navigate to the project directory:
cd COMP0016_Group27_2024-25 - Manually download the required models from Hugging Face(if you use the code from onedrive, the models may have included in the folder):
- Place the downloaded model directories inside the project root directory, maintaining the following structure:
COMP0016_Group27_2024-25/ ├── multilingual-e5-small/ # Directory containing the multilingual-e5-small model files ├── Qwen2.5-1.5B/ # Directory containing the Qwen2.5-1.5B model files - Install required Python libraries -please do this in clean environment or venv:
pip install -r requirements.txt - Compile the code:
ORpyinstaller build.specpython -m PyInstaller build.spec - Run the executable file in the dist folder.
Running Steps (CUDA Accelerated):
- Download and install the latest NVIDIA driver and CUDA toolkit compatible with your GPU from: https://developer.nvidia.com/cuda-downloads
- Clone the project repository:
git clone https://github.com/nigelm48/COMP0016_Group27_2024-25.git - Navigate to the project directory:
cd COMP0016_Group27_2024-25 - Manually download the required models from Hugging Face(if you use the code from onedrive, the models may have included in the folder):
- Place the downloaded model directories inside the project root directory, maintaining the following structure:
COMP0016_Group27_2024-25/ ├── multilingual-e5-small/ # Directory containing the multilingual-e5-small model files ├── Qwen2.5-1.5B/ # Directory containing the Qwen2.5-1.5B model files - Install required Python libraries-please do this in clean environment or venv:
pip install -r requirements.txtMake sure you install CUDA-powered torch
if not, uninstall torch (pip uninstall torch)and
pip install torch torchvision torchaudio --index-url https://download.pytorch.org/whl/cu121 - For CUDA: Ensure your system uses a Python version >= 3.10 and your environment supports CUDA.
- Run the main application:
python main.py
Deployment Steps (CUDA accelerated):
- After completing installation, proceed to compile the code:
- Compile the code:
ORpyinstaller build.specpython -m PyInstaller build.spec - Run the executable file in the dist folder.
Sample data:
Sample data can be found in the sample_data folder of the OneDrive.
Features
- RAG-enhanced LLM responses.
- Offline functionality for privacy.
- RAG with Chroma Database.
Usage
- Load documents from the User Folder.
- Manage and remove the database as needed.
- Ask questions and receive LLM-generated responses.
- Export chat history for future reference.
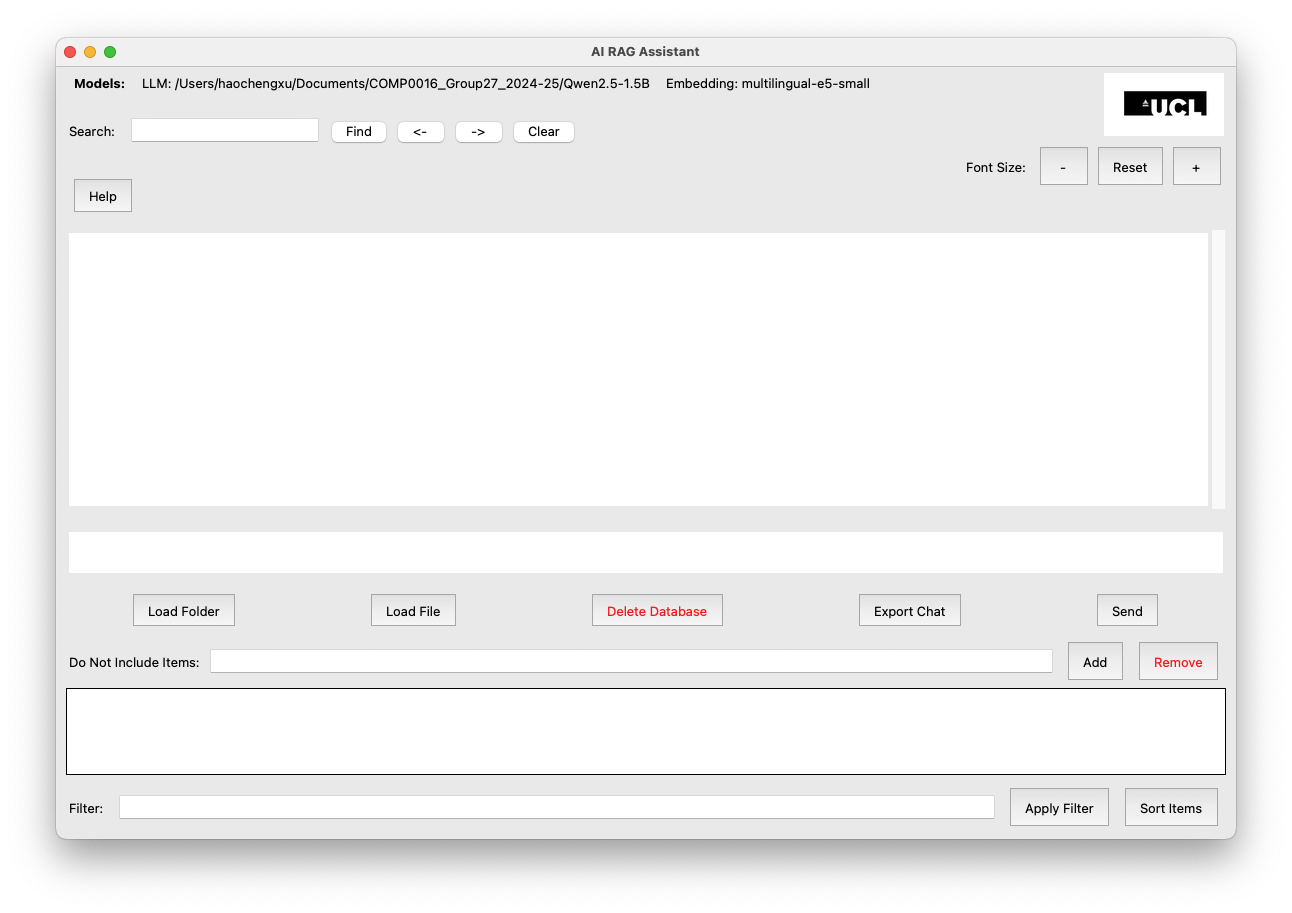
Figure 1: Screenshot of the Literature Review Tool interface showing the document query and response system
AI RAG Assistant Interface Explanation
The GUI (Graphical User Interface) of the AI RAG Assistant includes the following elements:
-
Model Information (Top Bar)
- Shows the LLM path and the Embedding model used.
- In this case:
- LLM: Located in /Users/haochengxu/Documents/COMP0016_Group27_2024-25/jids/AI_RAG_Assistant/_internal/Qwen2.5-1.5B
- Embedding model: multilingual-e5-small
-
Settings of Font (Top Bar)
- Allows users to adjust the AI assistant's font size.
-
Main Text Display Area
- The large blank space is where responses and interactions appear.
-
Input Box (Below the Text Display)
- Users type their queries here before clicking Send to get AI responses.
-
Control Buttons (Below the Input Box)
- Load Folder: Import a directory of documents.
- Load File: Import a single document.
- Delete Database: Remove the stored vector database.
- Export Chat: Save the chat history.
- Send: Submit a query to the AI assistant.
-
Filtering and Exclusion Options
- Do Not Include Items: Users can specify documents or terms to be excluded from responses.
- Filter Field: Allows users to refine the Do Not Include Items based on keywords.
- Apply Filter and Sort Items: Help manage Do Not Include Items efficiently.
-
Helper (Top left)
- Displays introduction to software and example usage.
-
Search (Top left)
- Search within main display area
- <- previous result
- -> next result
- clear - remove all search mark and results
Workflow
The typical workflow of the AI RAG Assistant involves the following steps:
- Document Loading: Import documents from the User Folder or single file.
- Add do-not-include items: Ensure data safety.
- Query Submission: Ask questions and receive AI-generated responses.
- Export Chat History: Save the chat history for future reference.
- Database Management: Remove or import more to database the database as needed.
- Close app: The app will automatically release resources.
Workflow guide video
Troubleshooting
Q: How do I reset the database?
A: Use the "Remove Database" option in settings.
Q: Can I add new document sources?
A: Yes, PDFs, markdowns and word files can be added.
Q: Is my data stored online?
A: No, the entire workflow remains offline for privacy.
Q: I have trouble compiling,
A: please add magic to excludes=[] in build.spec.
Q: I have trouble running on mac,
A: please refer to https://developer.apple.com/metal/pytorch/ to install mps powered pytorch.
Phase 2: Offline LLM with Ossia Voice
Introduction
Ossia Voice is an accessibility tool for Augmentative and Alternative Communication designed to help people with significant speech and motion difficulties, such as those with Motor Neurone Disease. This offline version eliminates the need for API keys or internet connectivity.
Getting Started
System Requirements:
- Operating System: Windows 10/11, macOS 12+
- Memory: 16GB recommended
- Storage: 20GB free space
- GPU: NVIDIA with CUDA support or Apple Silicon (for MPS acceleration), standard x86 CPU is also ok
- Chrome browser
- Internet speed: recommended at least 100 Mbps
- Node.js: latest version
Installation and deployment Steps:
- Download the Ossia Voice offline package from our GitHub repository
- Extract the downloaded archive to your preferred location
- Install Node.js from https://nodejs.org/en
- Choose the version that fits your needs:
Standard Version
git clone https://github.com/Rainy-Day04/OssiaVoiceOffline.git
cd OssiaVoiceOffline
npm install
npm run dev
Diarization Version
git clone https://github.com/Rainy-Day04/OssiaVoiceOffline.git
cd OssiaVoiceOffline
git checkout stt-diarization
git pull
npm install
npm run dev
Realtime STT Version
git clone https://github.com/Rainy-Day04/OssiaVoiceOffline.git cd OssiaVoiceOffline git checkout stt-realtime-whisper git pull npm install npm run dev - Follow the on-screen instructions to complete setup
Features
- Offline LLM generation without upload to external partners
- Multiple voice input experimental options
- Accessible interface for users with MNDs
- less than 1 words typed per chat
- Integration with assistive devices and switches
- No API costs or usage limits
UI
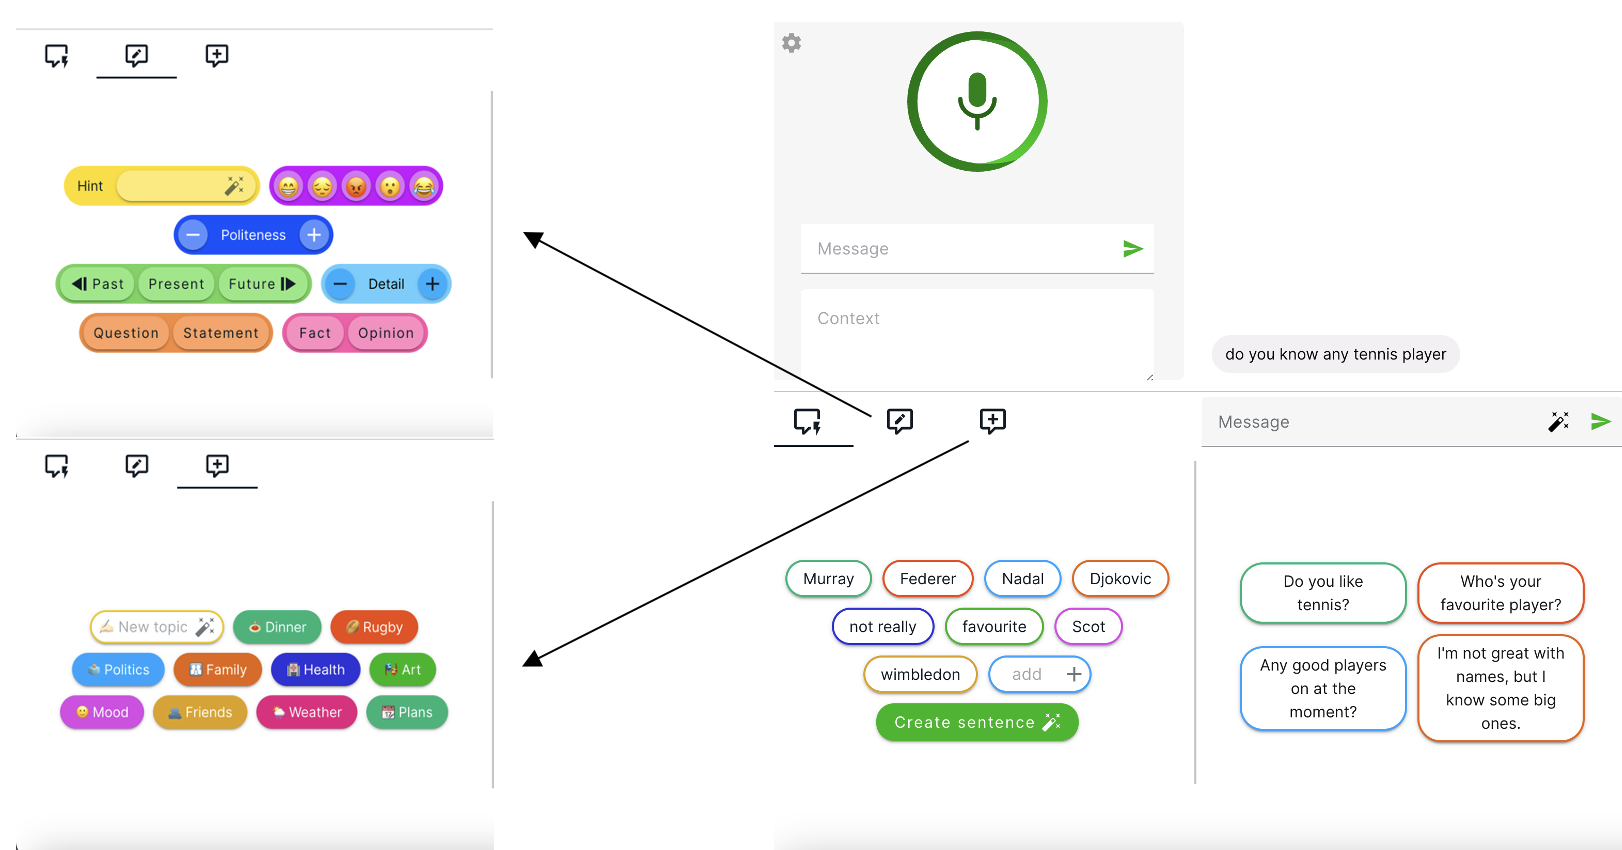
Figure 2: Screenshot of the Ossia Voice UI
Interface Controls:
- Main input area(top left): enter message or voice input the message
- Saved phrases panel(bottom left): set the keywords(first option), tone (second option) and topic(third option) and generate sentences
- Message center(bottom right): choose generated words to submit
- Settings menu(top left gear icon): Initial Setups
Usage
- Initial Setup: Finish the settings and backstory
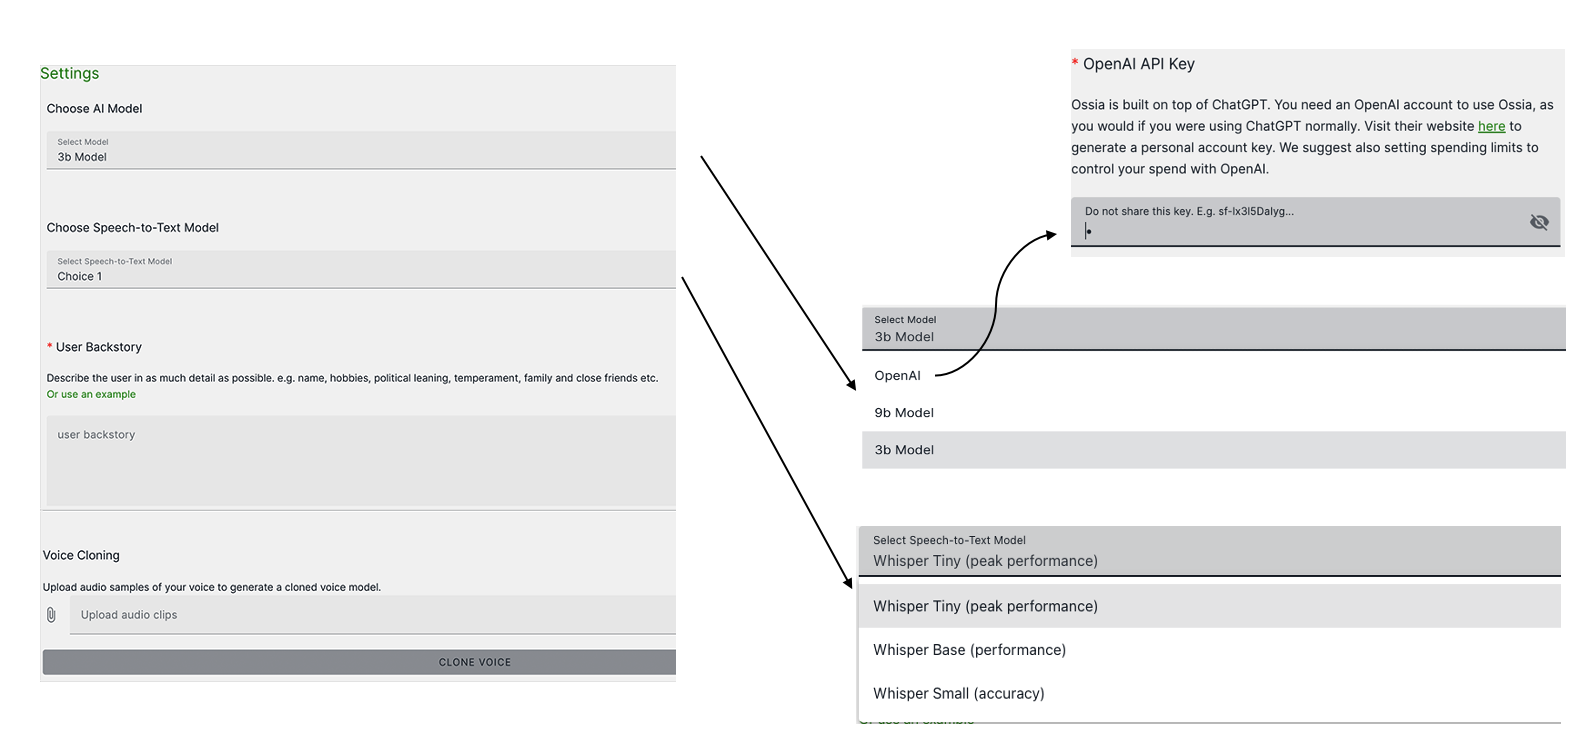
Figure 2: Screenshot of the Ossia Voice setup screen where users can configure voice settings and backstory
- Usage:
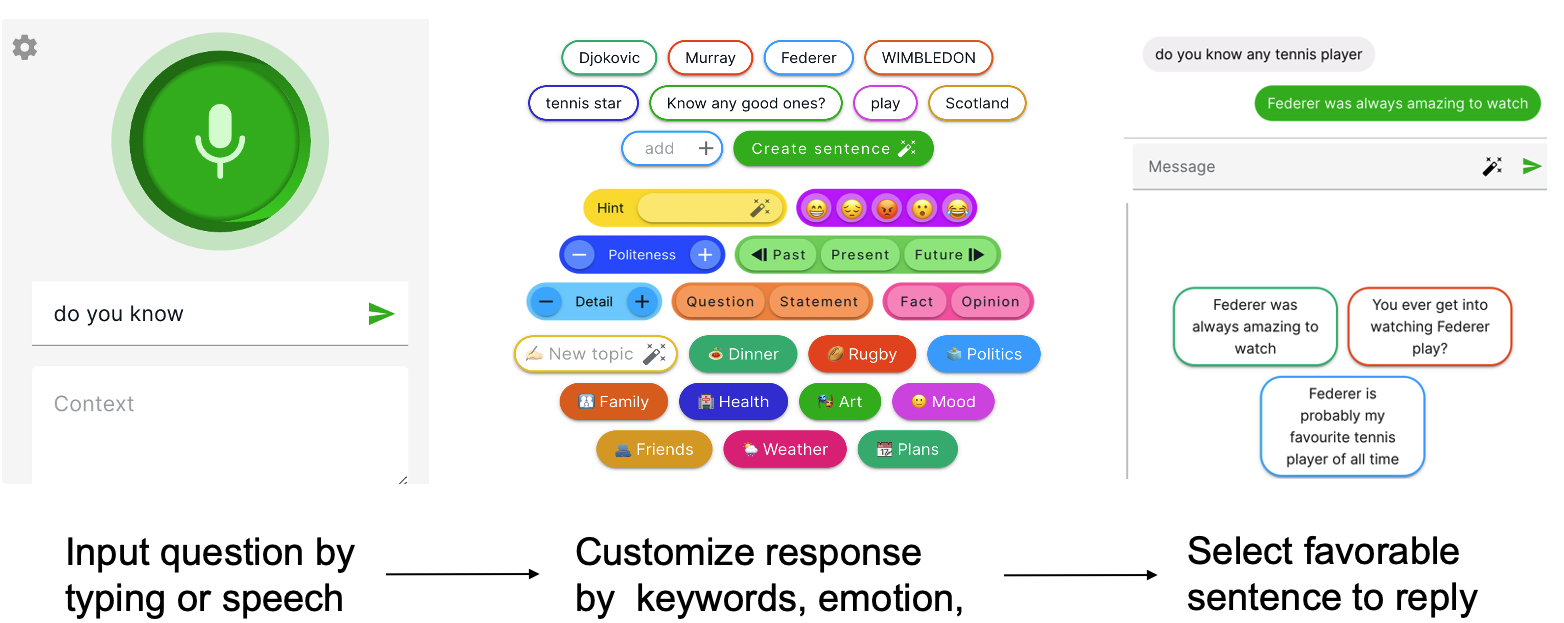
Figure 3: Usage flow of the Ossia Voice
Workflow guide video
Troubleshooting
Q: Why is the voice output not working?
A: Check your microphone and browser microphone permission settings.
Q: How do I change the voice settings?
A: Use the settings menu.
Q: What happens if the UI shows fails loading a model
A: Please check your internet and browser privacy settings.
If this is still unsolved, please switch to Google Chrome.
Support
For additional support or to report issues, please contact us through the GitHub repository.