
Implementation
Game Engine
Unity is the game engine for Superhero Explorers because it supports 3D game development while offering an intuitive interface, a huge community and the versatile assets store. It uses C# for programming, which is ideal for our Windows-targeted games. C# allows seamless integration with Windows APIs, which makes implementing all the features needed with ease.
MotionInput
MotionInput provided by MotionInput Games is utilized. It detects body movements and gestures and use them as the input of Super Explorers. Offering players a more immersive and fun experience.
Starting MotionInput
MotionInput itself is a standalone application which cannot be embedded into Unity. Hence, we have to
utilize the C# System.Diagnostics.Process.Start function to start MotionInput in the game.
    // Open a new MotionInput instance
    void OpenInputSystem()
    {
        // Check if MotionInput instance exists
        this.gameHandle = GetForegroundWindow();
        this.ChangeSettings();
        _hWnd = FindWindow(null, windowText);
        if (_hWnd != IntPtr.Zero)
            // Change the mode of the existing instance
            SendShiftRKeystroke();
        // Get the window handle of the Unity game
        gameHandle = FindWindow(null, title);
        if (gameHandle == IntPtr.Zero)
        {
            gameHandle = GetForegroundWindow();
        }
        // Change the mode
        ChangeSettings();
        this._setWindow = false;
        // Start MotionInput window
        ProcessStartInfo startInfo = new ProcessStartInfo
        {
            FileName = app,
            WorkingDirectory = motioninputPath,
            Arguments = $"--config \"{configPath}\"",
            UseShellExecute = true,
            CreateNoWindow = true
        };

        try
        {
            using Process process = new();
            process.StartInfo = startInfo;
            process.Start();
        }
        catch (Exception ex)
        {
            UnityEngine.Debug.LogError($"An error occurred: {ex.Message}");
        }
    }
When the game is started, a MotionInput instance will be created and will exist until the players close the
game or explicitly tell the instance to be closed.
Each time a scene is loaded, it will check whether a MotionInput instance exists. A new instance will be
opened if none is found. Otherwise, the existing instance will remain.
Translating MotionInput into computer readable input
Each body movement or gesture detected by the MotionInput application will be translated to either a keyboard input or a gamepad controller input. The mapping is defined in a JSON file for each motion.
    {
      "action": {
        "args": ["e"],
        "class": "keyboard",
        "method": "press"
      },
      "color": [255, 200, 200],
      "file": "hit_trigger.py",
      "skin": "common/default_trigger.png",
      "landmark": "right_wrist",
      "pos": [520, 300],
      "radius": 80,
      "text": "interact"
    }
The motion to detect, the corresponding input and the trigger method are specified in the json file. Above is an example JSON definition for detecting players raising their right arm and pressing E.
Capturing Inputs in Unity
Unity offers the Unity Input System to capture both keyboard and controller inputs. There are several capturing mode available:
- Input.GetKey - Triggers when a key is held down
- Input.GetKeyDown - Trigger at the moment a key is pressed
- Input.GetKeyUp - Trigger at the moment a key is released
- Input.GetAxis - Capture directional movement, especially for controller joysticks. Returns an analog value between 0 and 1 based on the joystick movement.
During the exploration, player movement is controlled by pressing down W to move forward. In this
case, Input.GetKey is used to capture the input. Player needs to move forward continuously
while W is held down.
During wipeout, only the moment when the players jump needs to be captured, in which
Input.GetKeyDown is used.
Game Management
As the game is composed with multiple Unity scenes, a method is required to share data across them. A
singleton class is utilized, which is created at the start of the game. This class stores all necessary
information that must be shared across scenes, such as game settings.
A singleton class is chosen because only one instance of the game runs at a time, and a singleton class persists
throughout the entire game lifecycle. The structure of the singleton class is as follows.
GameManager
+ IsMotionInputEnabled
+ IsSimplifiedControlEnabled
+ IsTutorialEnabled
+ IsMinigameMode
+ MotionInputWindowSize
+ MotionInputCameraSource
+ SelectedSeason
+ WipeoutResult
+ RacingResult
+ PotionResult
+ GolfResult
+ MasterAudioVolume
+ MusicAudioVolume
+ FxAudioVolume
+ PlayerLastPosition
+ PlayerLastRotation
+ IsNewGame
+ GetInstance(void)
+ Clear(void)
Settings
Audio Settings
SceneAudioManager is a script that manages all audio sources in a scene. The audio sources are
manually divided into two categories, music and sound effects. The volume of each category can be adjusted
individually or adjusted together with the master volume control. This script is attached to each scene.
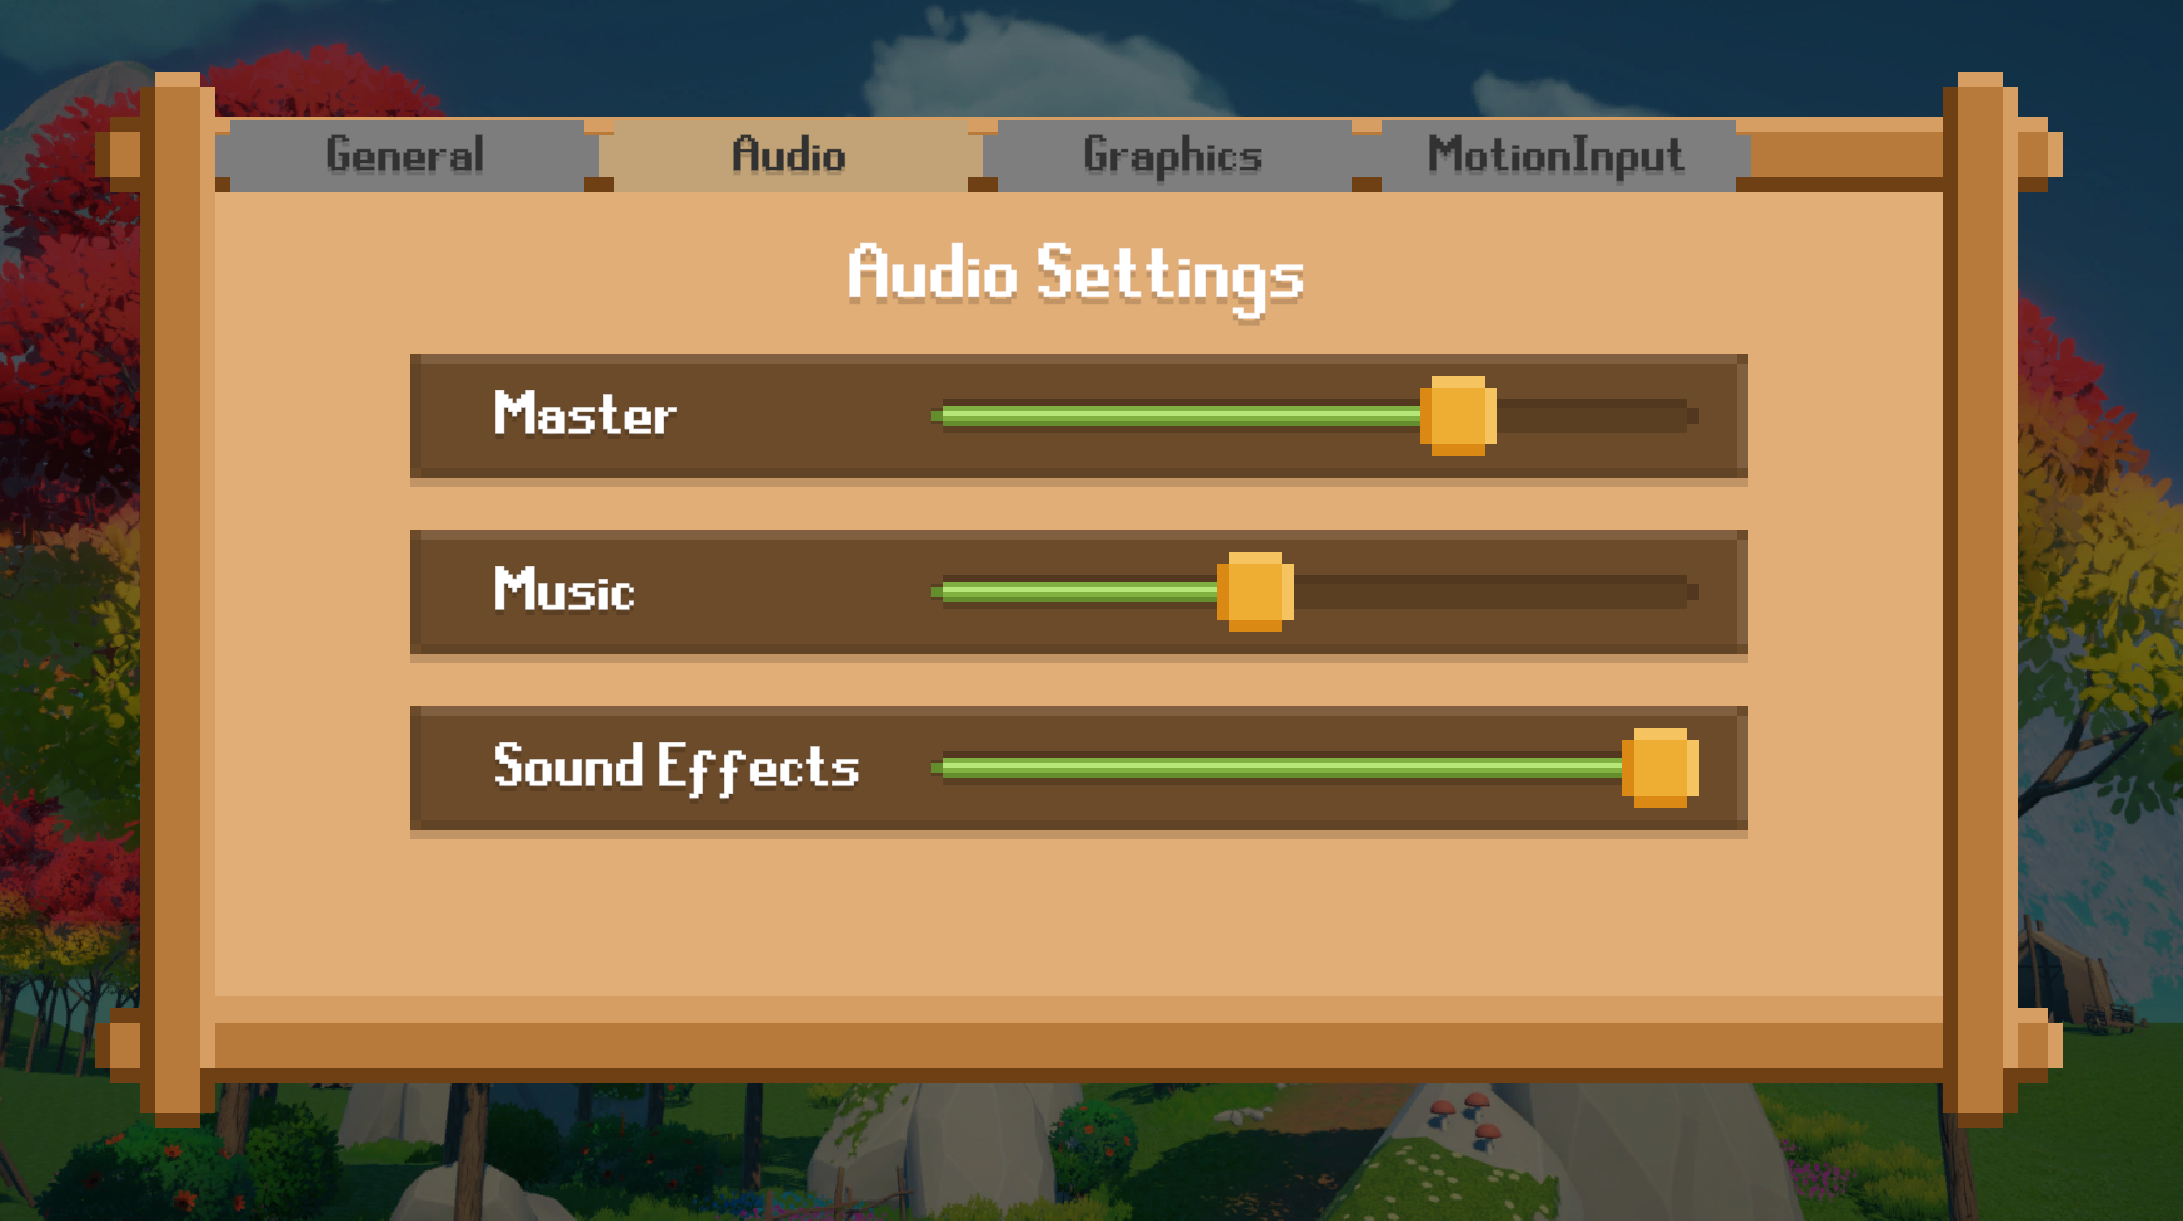
Audio Settings Menu (Click to enlarge)
    public void SetMasterVolume(float volume)
    {
        this.masterVolume = volume;
        this.gameManager.MasterAudioVolume = volume;
        this.SetMusicVolume(this.musicVolume);
        this.SetFxVolume(this.fxVolume);
    }

    public void SetMusicVolume(float volume)
    {
        this.musicVolume = volume;
        this.gameManager.MusicAudioVolume = volume;
        foreach (AudioSource source in musicAudioSources)
        {
            source.volume = volume * this.masterVolume;
        }
    }

    public void SetFxVolume(float volume)
    {
        this.fxVolume = volume;
        this.gameManager.FxAudioVolume = volume;
        foreach (AudioSource source in fxAudioSources)
        {
            source.volume = volume * this.masterVolume;
        }
    }
To change the volume of a category, it will iterate through all assigned audio sources to that category and change the volume of the audio sources one by one.
Graphics Settings
Graphics settings allow players to change the resolution and graphics quality of the game.
There are three default graphics quality in each Unity game, performant,
balanced and high-fidelity.
    // Game Quality
    this.gameQualityDropdown.ClearOptions();
    this.gameQualityDropdown.AddOptions(QualitySettings.names.ToList());
    this.gameQualityDropdown.value = QualitySettings.GetQualityLevel();
The available graphics qualities are retieved by Unity API QualitySettings.names and are added
to a dropdown menu.
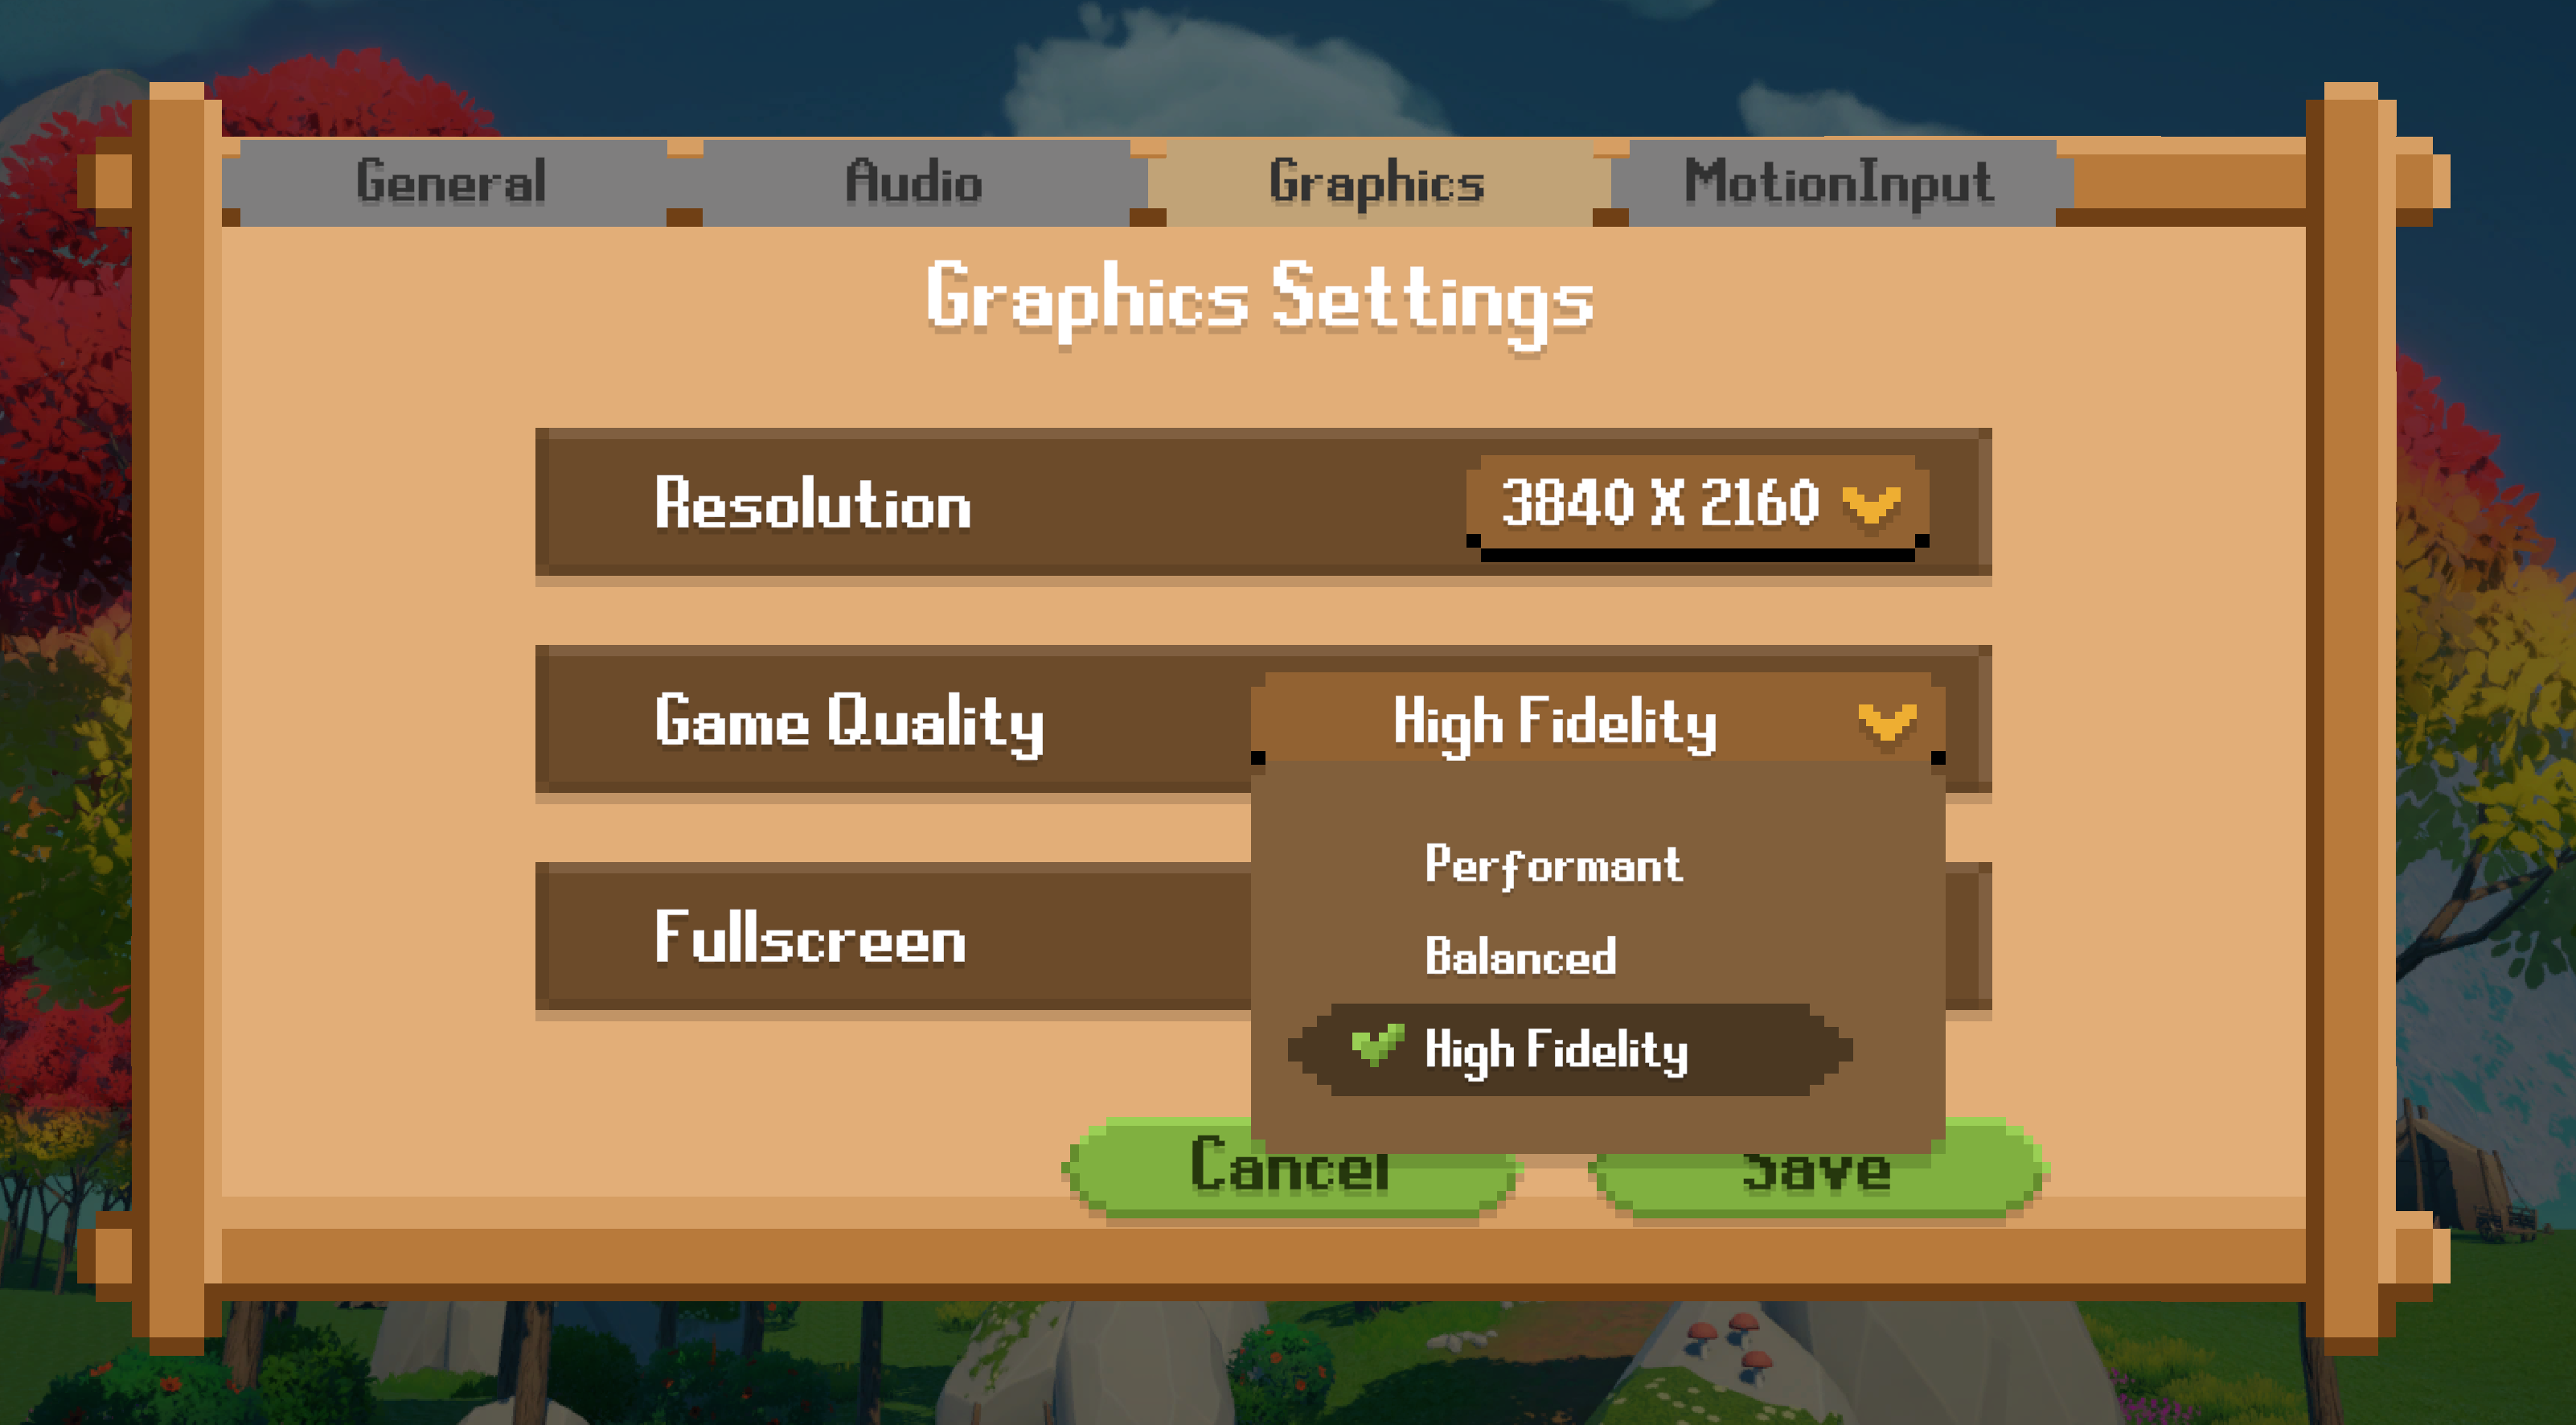
Game Quality Dropdown Menu (Click to enlarge)
    private void SetGameQuality()
    {
        int qualityLevel = this.gameQualityDropdown.value;
        if (qualityLevel == QualitySettings.GetQualityLevel()) return; // Return if the game quality does not change
        QualitySettings.SetQualityLevel(qualityLevel);
        if (QualitySettings.GetQualityLevel() == 0)
        {
            QualitySettings.vSyncCount = 2; // Limit to half of monitor supported FPS
        }
        else
        {
          QualitySettings.vSyncCount = 1; // Limit to monitor supported FPS
        }
    }
After the player selected a graphics quality and saved the settings, it is set by using the Unity API
QualitySettings.SetQualityLevel and also limit the maximum frames per second according to the
quality.
MotionInput Settings
MotionInput settings allow players to adjust the size of the MotionInput window and select the camera to use with it.
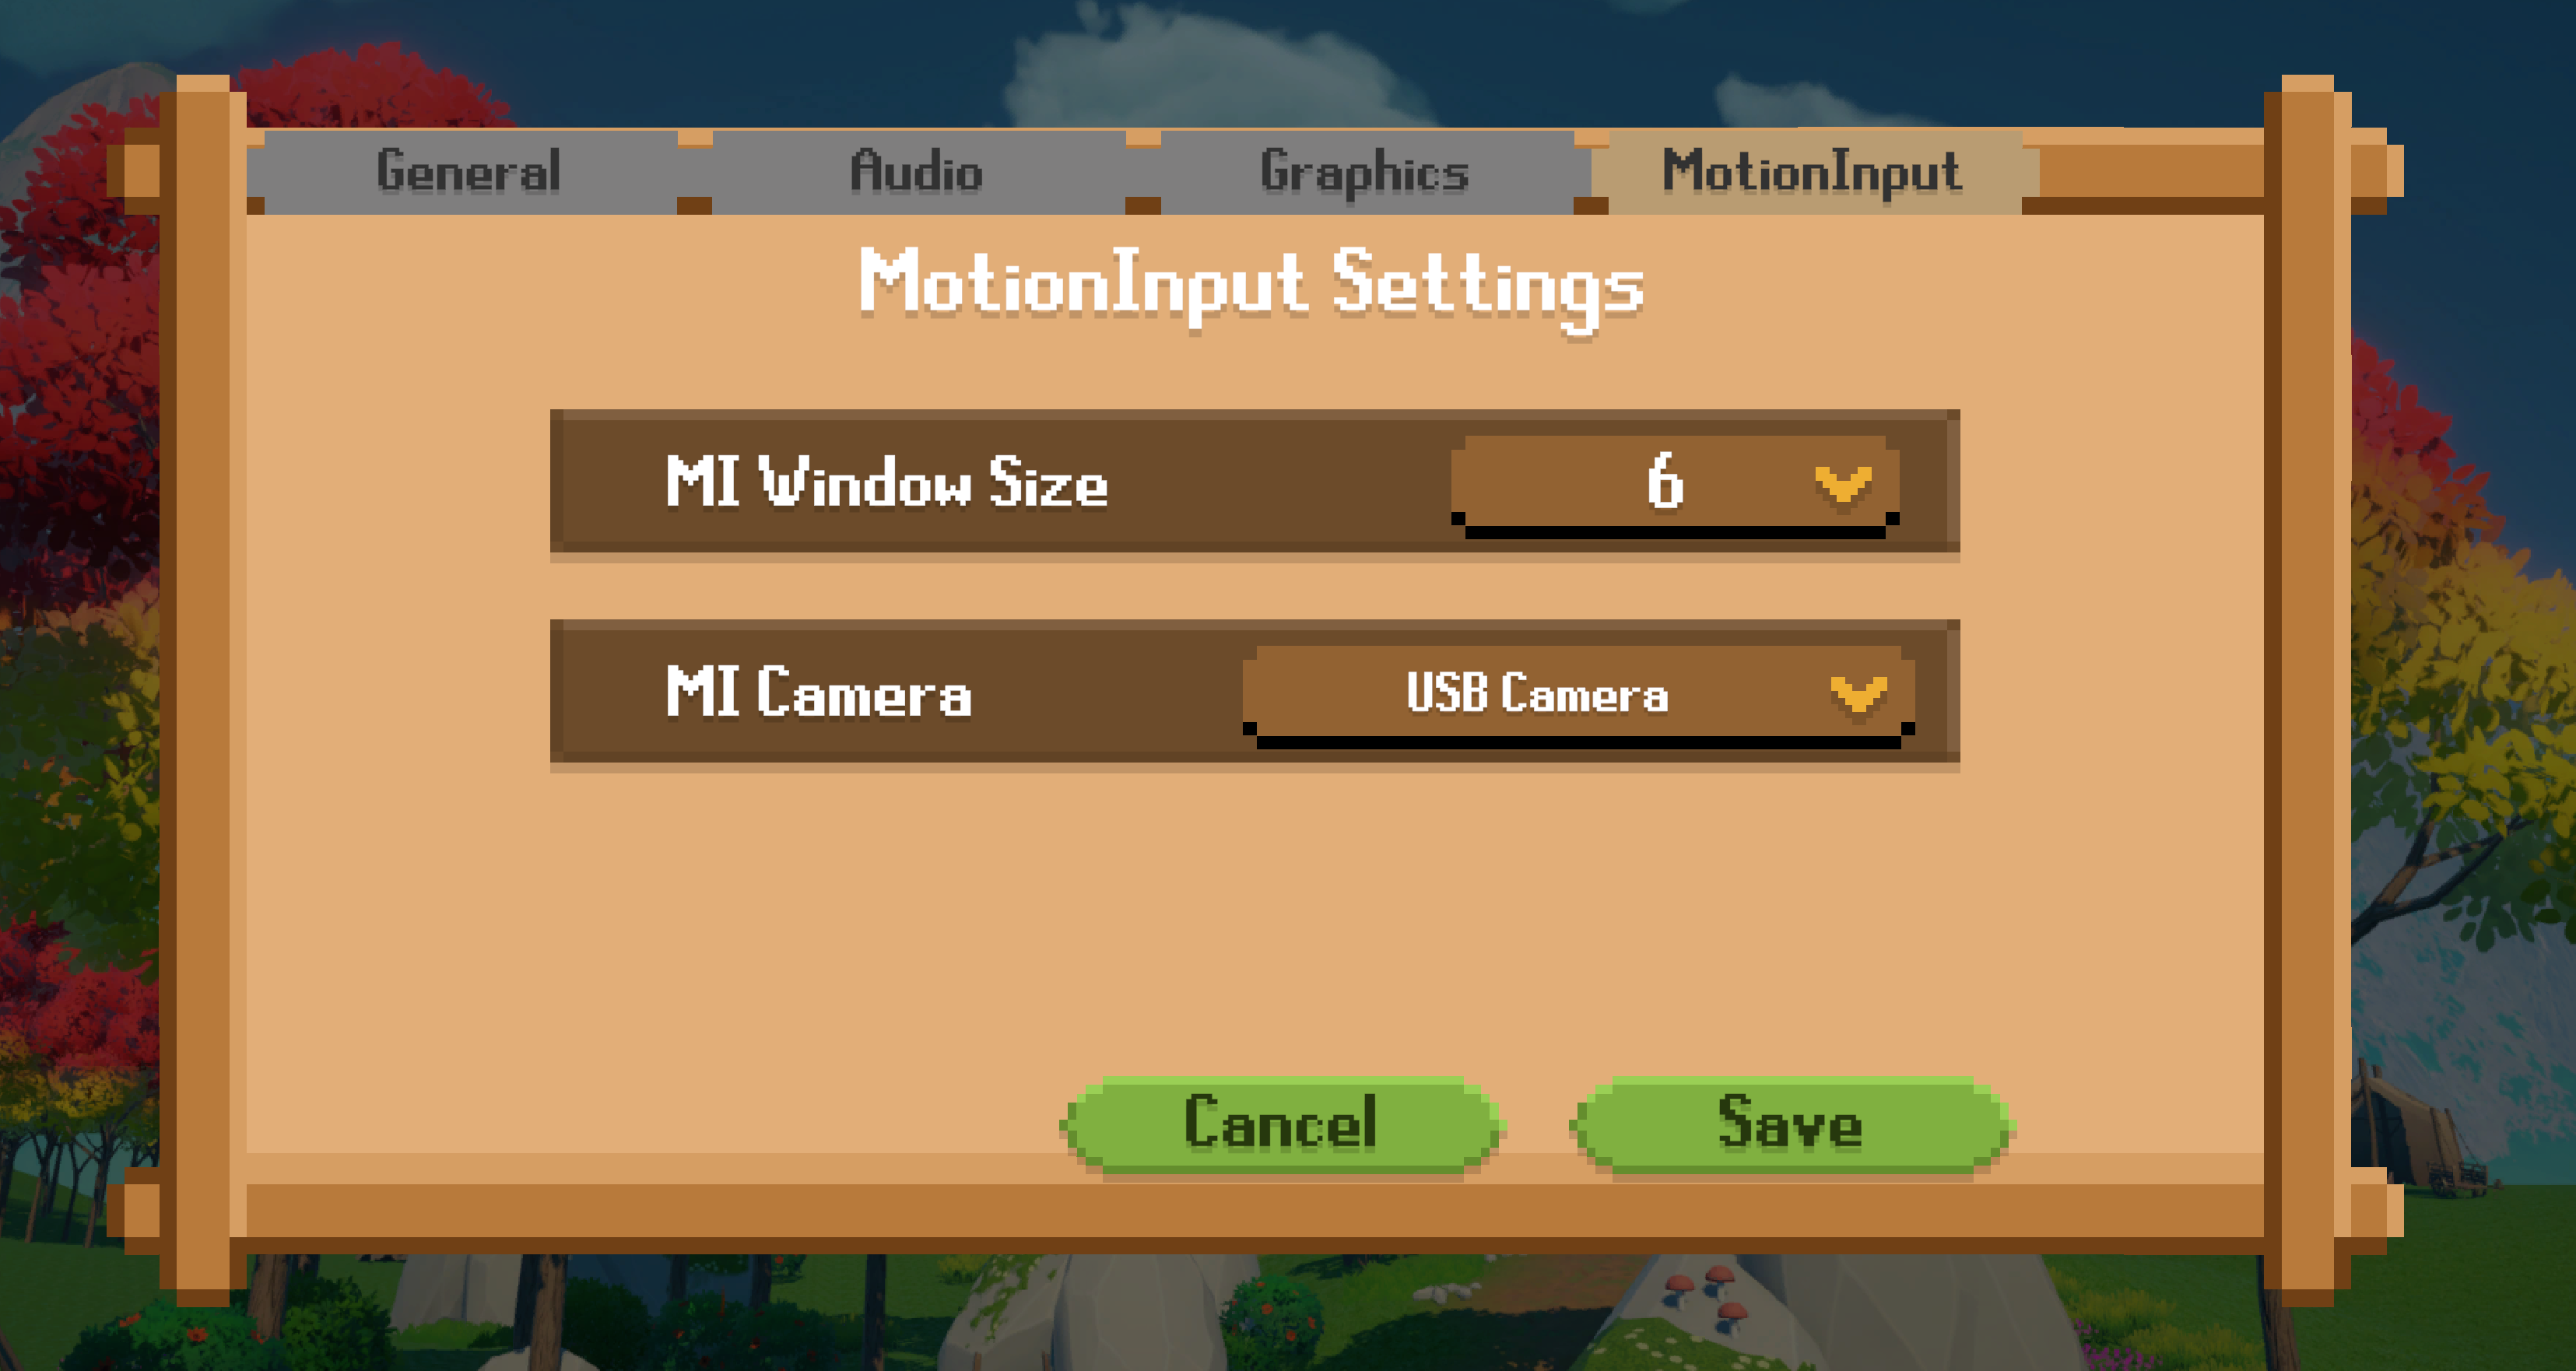
MotionInput Settings (Click to enlarge)
Window Size Adjustment
Windows API is utilized to resize the window, specifically the SetWindowPos
function from the user32.dll. It directly modifies the position and size of a window at the
operating system level.
    int targetWidth = Mathf.RoundToInt(this.windowSizeInteval * windowSize * this.baseWindowSize[0]);
    int targetHeight = Mathf.RoundToInt(this.windowSizeInteval * windowSize * this.baseWindowSize[1]);
    // Check current position
    int currentX = windowRect.Left;
    int currentY = windowRect.Top;
    int width = windowRect.Right - windowRect.Left;
    int height = windowRect.Bottom - windowRect.Top;
    // If position/size is not correct, set new position/size
    if (currentX != targetX || currentY != targetY || width != targetWidth || height != targetHeight)
    {
        SetWindowPos(hWnd, HWND_TOP, targetX, targetY, targetWidth, targetHeight, SWP_NOACTIVATE | SWP_SHOWWINDOW);
        UnityEngine.Debug.Log($"Window position adjusted to ({targetX}, {targetY}) with dimension ({targetWidth}, {targetHeight}).");
        this.RemoveMotionInputHeader();
    }
    else
    {
        UnityEngine.Debug.Log("Window is already in the correct position.");
    }
Players can select the window size using a scale from 1 to 10, where a scale of 1 corresponds to a base size of 200 x 150 pixels. The final size of the window is determined by multiplying this base size by the selected scale factor.
Camera Selection
Some systems may have multiple cameras. To ensure players can select the correct camera to use, a dropdown
menu is provided for camera selection.
    public MotionInputCamera[] GetAvailableCameraSources()
    {
        WebCamDevice[] devices = WebCamTexture.devices;
        return devices.Select((x, i) => new MotionInputCamera(i, x.name)).ToArray();
    }
The list of available cameras is first retrieved from the Unity API WebCamTexture.devices and
then added to the dropdown menu.
    void ChangeCameraSource(int source)
    {
      this.TerminateMotionInput();
      if (File.Exists(configPath))
      {
          originalJsonContent = File.ReadAllText(configPath);
          JObject jsonObj = JObject.Parse(originalJsonContent);
          jsonObj["camera"]["source"] = source; // Update camera source

          modifiedJson = jsonObj.ToString();
          File.WriteAllText(configPath, modifiedJson);
      }
      this.StartMotionInput();
    }
The camera used by the MotionInput instance is defined in the configuration file.
After the players select a new camera and save the settings, the configuration file is updated with the new
camera source. The MotionInput instance is then restarted to apply the changes with the updated
configuration.
Exploration
Tutorial
The exploration tutorial is managed using a recursive function. When players first enter the exploration scene, the game checks whether it is a new game and if the tutorial is enabled. When both conditions are met, the recursive function is called.
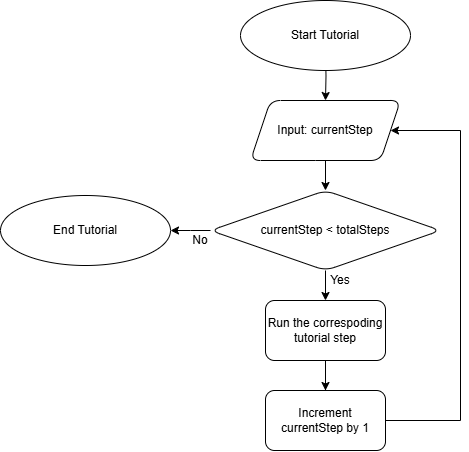
Flow diagram showing process of exploration tutorial (Click to enlarge)
    private void RunTutorial()
    {
      ... // Check if tutorial is being skipped or disabled
      switch (currentStep)
      {
          case 0:
              this.tutorialObject.SetActive(true);
              StartCoroutine(this.UpdateDialog(dialogs[0]));
              break;
          case 1:
              StartCoroutine(this.UpdateDialog(dialogs[this.gameManager.IsMotionInputEnabled ? 1 : 2]));
              break;
          case 2:
              KeyCode[] directionKeys = new KeyCode[4] { KeyCode.LeftArrow, KeyCode.UpArrow, KeyCode.RightArrow, KeyCode.DownArrow };
              StartCoroutine(this.CheckInput(directionKeys));
              break;
          ... // More tutorial steps
          default:
              break;
      }
      this.currentStep++;
    }
This core of this function is a switch statement, which keeps track of the current step and display the corresponding tutorial. The current step is incremented until it exceeds the number of cases in the switch statement.
There are mainly two types of functions of the tutorial executes
- Displaying dialogs - Show a tutorial message to guide the player
- Waiting for inputs - Wait until the player performs a required action, such as keyboard inputs before proceeding. After the function is executed, the recursive function is then being called again to proceed to the next tutorial step.
Interaction with NPCs
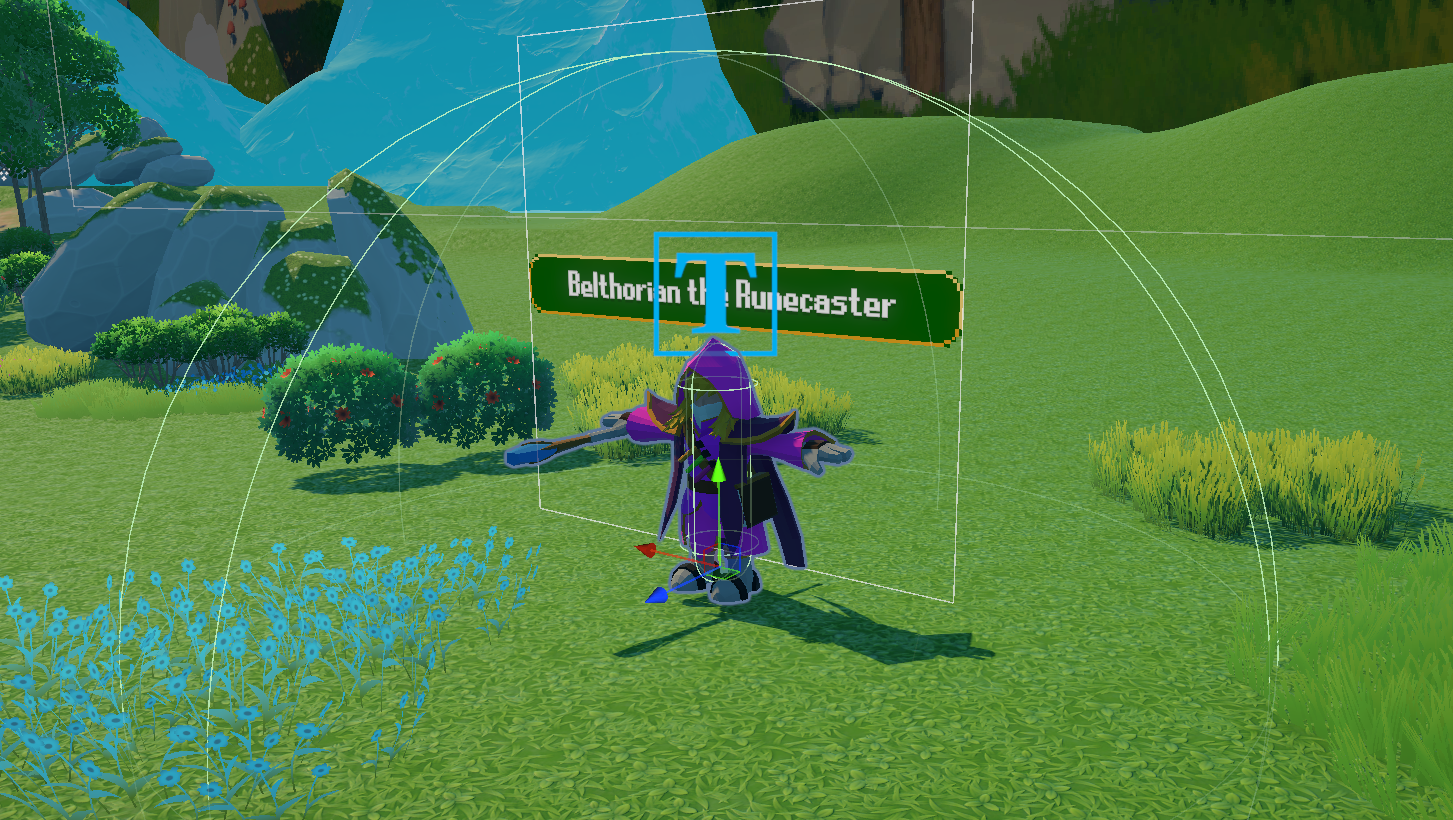
Collider surrounding the NPC (Click to enlarge)
Each NPC is surrounded by a spherical collider. When a player enters the collider, an event will be emitted and a flag is set to true to indicate the player's presence. After the player leaves the collider, the flag is set back to false.
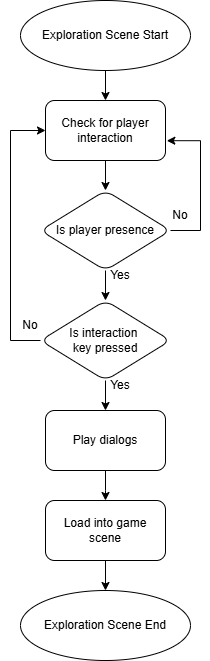
Flow diagram of the NPC interaction process (Click to enlarge)
The NPC will then check for player input to determine whether to play the dialog or not.
Loading into Games
After interacting with the NPC, players will then be loaded into the games.
    this.gameManager.PlayerLastPosition = this.player.transform.position;
    this.gameManager.PlayerLastRotation = this.player.transform.rotation;
    string sceneToBeLoaded = this.gameManager.IsTutorialEnabled ? this.tutorialSceneName : this.sceneName;
    this.sceneLoadingManager.LoadScene(sceneToBeLoaded);
Before loading into the game, the current position and rotation of the player will first be stored into
GameManager.
    this.playerObject.transform.position = this.gameManager.PlayerLastPosition;
    this.playerObject.transform.rotation = this.gameManager.PlayerLastRotation;
After players finish playing the minigame, the exploration scene will be loaded and players will be put back at the position before they enter the games.
Game Results
this.gameManager.GolfResult = new GameResult(totalScore.ToString(), Time.time - startTime);
After each minigame is completed, the result of the game will be stored into GameManager. This result include a
score and the time to finish the game.
    if (this.gameManager.RacingResult != null && this.gameManager.GolfResult != null && this.gameManager.PotionResult != null && this.gameManager.WipeoutResult != null && !this.finishScreenShowed)
    {
      ... // Set the scores and times in the result panel
      this.finishScreenObject.SetActive(true);
    }
Each time players are loaded back into the exploration scene, it will check whether the players have completed all the games and display the result panel.
Wipeout
Event Management
The wipeout game has numerous deeply interconnected components and scripts that require communication with one another:
WipeoutGameManager: In charge of starting the game, ending the game, and providing level settings.PlayerGameManager: Oversees the game for each individual player. It handles what happens whenever the player dies or when the player should proceed to the next level.WipeoutPlayerController: Responsible for the player movement controls (jumping and crouching) and also communicating when the player is ready to start the game.SpinningObstacle: Controls which beams of the spinning obstacle are activated, what speed it should be spinning at, and whether the obstacle is active and spinning.
These components are all tightly coupled. For example, when the game starts, each component has certain
designated procedures that have to be done. The WipeoutGameManager has to keep track of how
long the game has run.
The PlayerGameManager has to increment and keep track of the score, while also keeping track of
the time
that has passed for the level. The WipeoutPlayerController will need to be enabled to allow the
player to
jump and crouch. The SpinningObstacle will have to be enabled so it starts spinning.
As a result of this deep interconnectivity, an EventManager was made to allow all these
components to listen
for specific events such as CountdownCompleteEvent. Put simply, this event tells the game when
to start like
what is described above. It occurs once the countdown timer ends, indicating that the level should
start/resume. This should trigger everything mentioned previously.
Subscription
Event Manager
    public void AddListener(IGameEventListener listener) where T : GameEvent
      {
          System.Type eventType = typeof(T);

          if (!eventListeners.ContainsKey(eventType))
              eventListeners[eventType] = new List();

          if (!eventListeners[eventType].Contains(listener))
          {
              eventListeners[eventType].Add(listener);
          }
      }
This method registers components as listeners for specific game events using a dictionary to track event-to-listener relationships. This allows for efficient updating to listeners whenever an event is triggered.
Scripts that require subscription
    EventManager.Instance.AddListener(this);
    EventManager.Instance.AddListener(this);
    EventManager.Instance.AddListener(this);
    EventManager.Instance.AddListener(this);
    EventManager.Instance.AddListener(this);
Components must call AddListener() to subscribe to relevant events, which adds them to the
EventManager's tracking system for notification when those events occur.
Triggering Events
EventManager
    public void TriggerEvent(GameEvent gameEvent)
    {
        System.Type eventType = gameEvent.GetType();

        if (!eventListeners.ContainsKey(eventType))
            return;

        foreach (var listener in eventListeners[eventType])
        {
            listener.OnEventRaised(gameEvent);
        }
    }
This method is made public to allow all components to call it. It iterates through all listeners that have subscribed to that specific event and updates them.
Scripts that trigger events
    private IEnumerator StartGame()
    {
        Debug.Log("Starting game");
        yield return new WaitForSeconds(1f);
        gameStartTime = Time.time;
        _isGameRunning = true;
        EventManager.Instance.TriggerEvent(new StartCountdownEventMultiplayer(1, 3));
        EventManager.Instance.TriggerEvent(new StartCountdownEventMultiplayer(2, 3));
    }
This is an example from the WipeoutGameManager. The event being triggered here is the
StartCountdownEvent which is the event that occurs when the players are ready to play and the
countdown should start.
This event-driven approach allows for efficient and flexible communication amongst all components, while maintaining specific functionality within components.
Listening to Event
Scripts that need to execute something upon an event being raised
public void OnEventRaised(GameEvent gameEvent)
{
    if (gameEvent is StartCountdownEventMultiplayer startCountdownEvent)
    {
        if (startCountdownEvent.PlayerNumber == playerNumber)
        {
            Debug.Log("Starting Countdown");
            this.countdownTimeLeft = startCountdownEvent.CountdownTime;
            startCountdown(startCountdownEvent.CountdownTime);
        }
    }
    if (gameEvent is ReinitializeGameEvent reinitializeEvent)
    {
        this.countdownTimeLeft = 0;
        if (countdownCoroutine != null)
        {
            StopCoroutine(countdownCoroutine);
            countdownCoroutine = null;
            countdownDisplay.enabled = false;
        }
    }
}
The OnEventRaised method in CountdownController demonstrates the event response
pattern. When subscribed components receive events through the EventManager, this method
will:
- Identify the event type (e.g.
StartCountdownEvent,ReinitializeGameEvent) - Execute the relevant code based on event parameters if applicable
StartCountdownEvent specifically, it will start the countdown timer based
on which player it is being called for.
Racing
Game Management
The racing game consists of multiple scenes and is controlled by a singleton class called
RacingGameManager. This class keeps track of the game's current stage to ensure that scene
transitions are in the correct order.
All player selections and scores are stored within RacingGameManager and retrieved by other
scripts when needed. Once the race ends, the final scores are passed back to the GameManager.
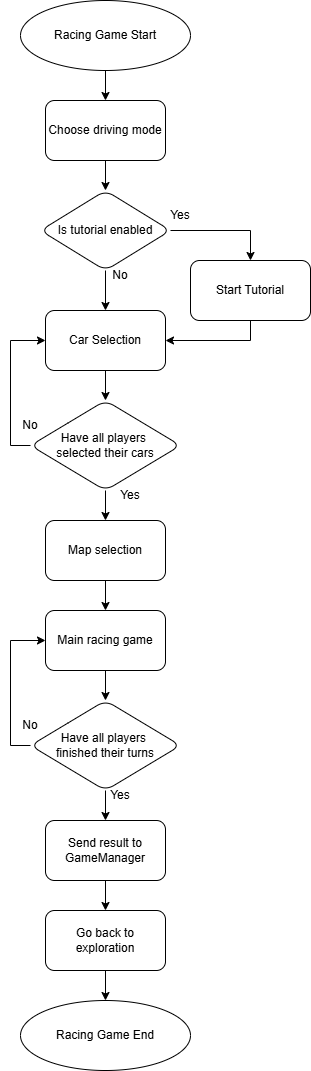
Flow diagram showing the process of racing (Click to enlarge)
Checkpoints
To prevent players from getting stuck on the track, checkpoints are placed at regular intervals along each track.
    private void CheckStuck()
    {
        if (this.carController.isShutdown) return;
        if (!this.carController.isBraking && this.carController.currentSpeed < this.stuckSpeedThreshold)
        {
            if (this.carController.drivingMode == DrivingModes.Auto || (this.carController.drivingMode == DrivingModes.Manual && this.carController.isAccelerating))
            {
                this.stuckTimer += Time.deltaTime;
            }
        }
        else
        {
            this.stuckTimer = 0;
        }
        if (this.stuckTimer * 1000 >= this.resetTimeout)
        {
            Vector3 position = Quaternion.AngleAxis(-90, Vector3.up) * this.currentCheckpoint.transform.forward + this.currentCheckpoint.transform.position;
            this.transform.position = position + Vector3.up * this.verticalSpawnOffset;
            this.transform.rotation = this.currentCheckpoint.transform.rotation;
        }
    }
This function monitors the car's velocity to determine whether the player is stuck. If the car's velocity is zero while the player is not braking, it indicates that the car is not in a operable state. In this case, the car is repositioned to the last checkpoint.
Coins
Collecting coins is the primary objective of the racing game. Coins are generated at regular intervals with horizontal offset.
    private void GenerateCoins()
    {
        SplineC roadSpline = this.road.spline;
        this.generatedCoinObjects = new GameObject[this.coinGenerationOptions.totalCoinsCount];
        for (float i = 2; i < this.coinGenerationOptions.totalCoinsCount + 2; i++)
        {
            float horizontalOffset = this.coinGenerationOptions.randomHorizontalOffset ? Random.Range(-this.coinGenerationOptions.maxHorizontalOffset, this.coinGenerationOptions.maxHorizontalOffset) : 0;
            float splinePos = i / (this.coinGenerationOptions.totalCoinsCount + 2);
            Vector3 pos = roadSpline.GetSplineValue(splinePos) + Vector3.up * this.coinGenerationOptions.verticalOffset;
            Vector3 tangent = roadSpline.GetSplineValue(i / 10f, true);
            pos += Vector3.Cross(tangent.normalized, Vector3.up) * horizontalOffset;
            GameObject coin = Instantiate(this.coinGenerationOptions.coinObject, pos, Quaternion.identity);
            this.generatedCoinObjects[Mathf.FloorToInt(i) - 2] = coin;
        }
    }
Car Controls
Each car model consists of a body and four wheels, with a WheelCollider attached to each wheel. The WheelCollider provides individual control over each wheel, allowing for a realistic driving experience.
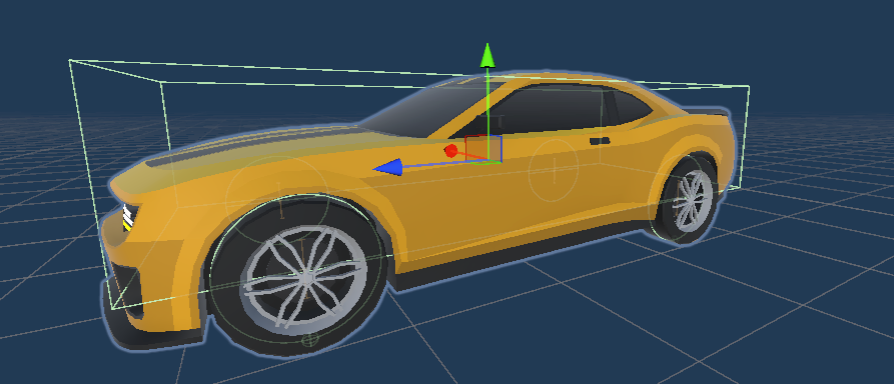
Car model and wheel colliders (Click to enlarge)
The lines surrounding the wheels are the wheel colliders.
Acceleration
Players can choose between two driving modes, automatic acceleration and manual acceleration, which determine whether the car will automatically accelerate or not.
    if ((this.drivingMode == DrivingModes.Auto && this.currentSpeed < maxSpeed) || (this.drivingMode == DrivingModes.Manual && this.isAccelerating))
    {
      foreach (WheelController wheelController in this.wheelControllers)
      {
        if (wheelController.isFront)
        {
          float motorTorque = Mathf.Lerp(0, this.carParameters.motorTorque, this.currentSpeed / maxSpeed); // Reduce speed when reaching the max speed
          wheelController.SetMotorTorque(motorTorque);
        }
        else
        {
          wheelController.SetMotorTorque(0); // Set motor torque to 0 for back wheels
        }
      }
    }
The car is accelerated by applying torque to the front wheels. As the speed of the car increases, the applied torque gradually decreases until it reaches zero at the top speed.
Braking
    this.wheelCollider.motorTorque = 0;
    this.wheelCollider.brakeTorque = torque * (this.isFront ? this.frontBrakeRatio : this.rearBrakeRatio);
To mimic the feeling of braking in a real car, a different braking torque is applied to the front and back wheels.
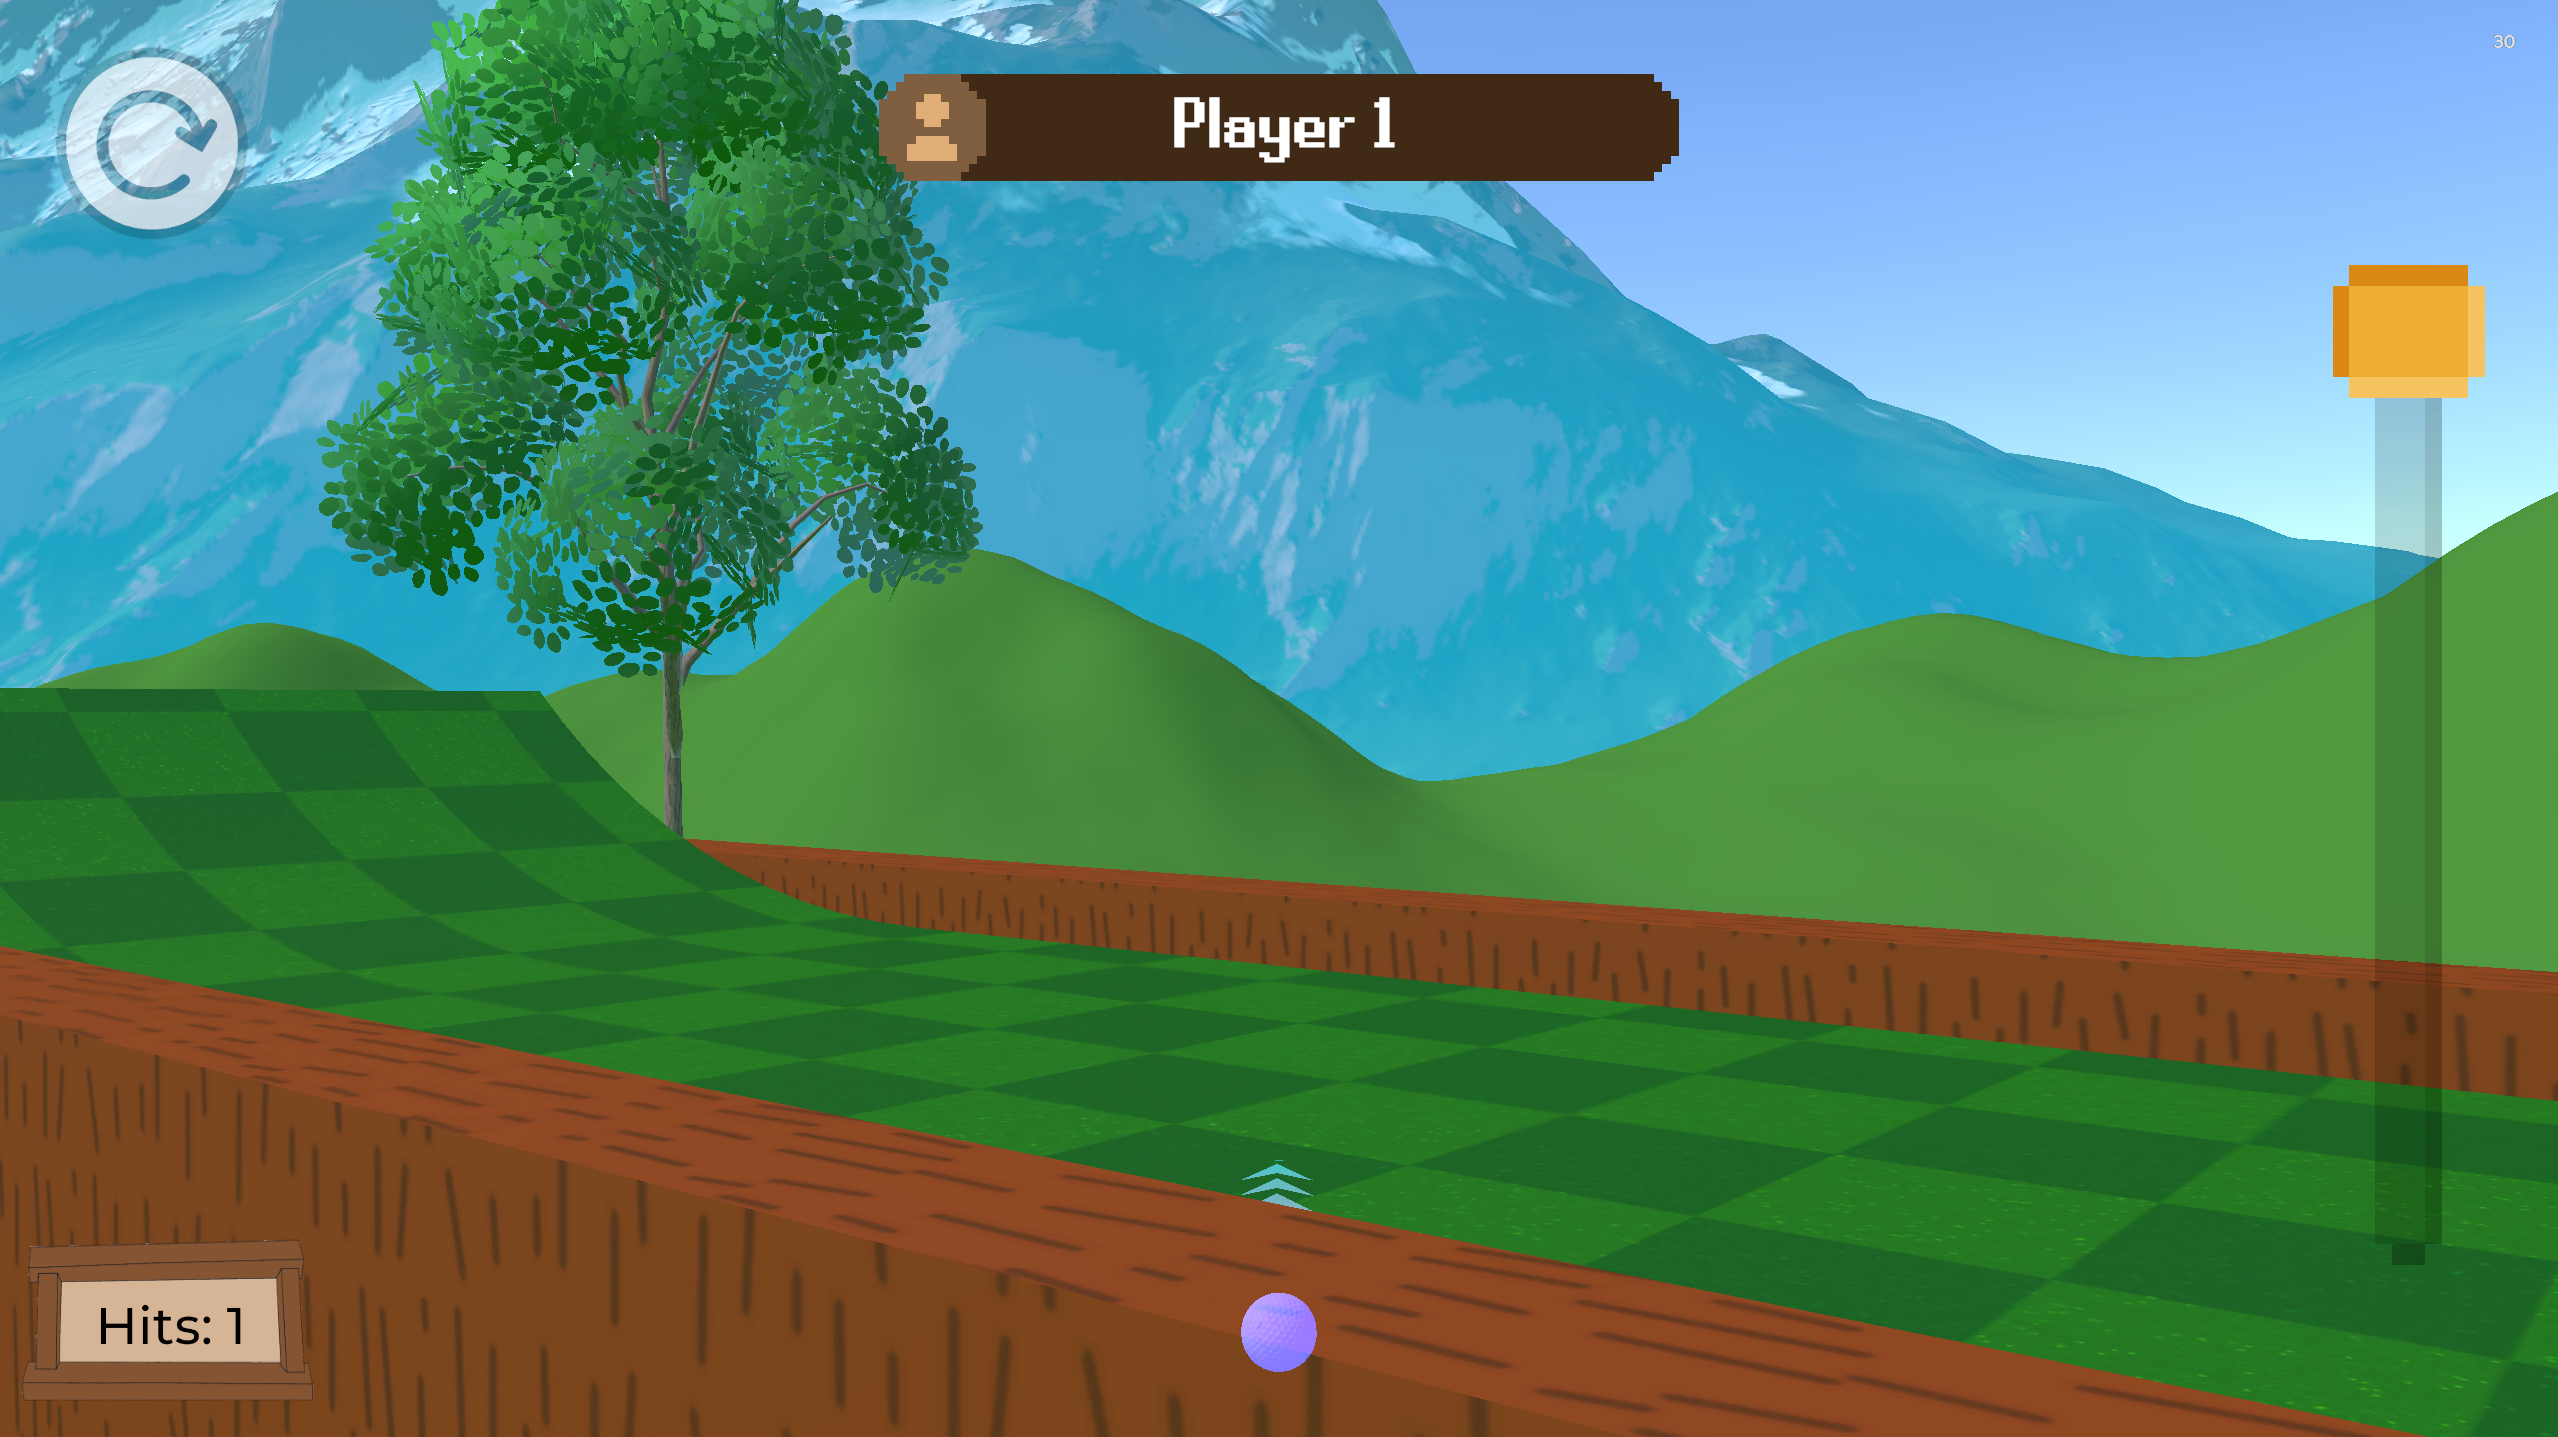
Golf
Game Management
The golf game consists of multiple levels contained within a single scene, managed by interconnected classes:
- MapBallController: Handles level switching.
- ScoreKeeper: Manages and stores player scores
- PlayerController: Controls the movement of the golf ball.
- CamController: Renders the ball and applies camera transformations.
Game Levels
    shuffledMaps = new List(Maps);
    // Shuffle the remaining maps
    for (int i = 0; i < shuffledMaps.Count; i++)
    {
        GameObject temp = shuffledMaps[i];
        int randomIndex = Random.Range(i, shuffledMaps.Count);
        shuffledMaps[i] = shuffledMaps[randomIndex];
        shuffledMaps[randomIndex] = temp;
        shuffledMaps[i].SetActive(i == 0);
    }
    if (gameManager.IsTutorialEnabled)
    {
      shuffledMaps[i].SetActive(false);
      shuffledMaps.Insert(0, tutorialMap);
      this.tutorialMap.SetActive(true);
    }
All levels are stored within the scene and are shuffled before gameplay begins. Only the current level is
displayed, while the others are hidden using SetActive(false). If the tutorial has been
enabled,
the tutorial map is forcibly set to the first map and the rest are shuffled down the array.
    TotalResetPosition();
    UpdateLastSafePosition();
    golfBall.ResetCounter();
    holeCooldown = false;
    if (gameManager.IsTutorialEnabled && mapBallControl.tutorialManager.IsTutorialActive())
    {
        mapBallControl.tutorialManager.onScored(); // Notify the tutorial manager
        Debug.Log("Scored");
        mapBallControl.Change_Map();
    }
    else
    {
        if (currentPlayer == 1)
        {
            mapBallControl.Change_Map();
        }
        currentPlayer = 1 - currentPlayer; // Switch between 0 and 1
    }
Once the player successfully hits the ball into the hole, the golf ball's position and the score are reset,
and the turn passes to the next player. When all players have completed their turns, the next level appears
while the current level is hidden. After all levels are completed, the final scores are passed to the
GameManager.
Golf Ball Control
Camera
CM_FreeLook_Cam.m_XAxis.m_InputAxisValue = Local_Data.Touch_GetAxis_Raw.x * Local_Data.Touch_Speed * Touch_Sensitivity * Time.deltaTime;
The camera is managed using Cinemachine, a modular camera system that requires minimal code. It reads
controller inputs and rotates at the desired speed, making use of its acceleration and maxspeed feature,
rotation for smaller shots are allowed as well as large camera rotations in order to enjoy the map's
scenery.
Additionally when the ball is hidden behind any game components, it is highlighted through walls, as well
as the trajectory path, so the players can better see where they're shooting towards.
Golf ball highlighted behind a wall (Click to enlarge)
Power Control
    while (true)
    {
        float duration = 4.5f; // Duration to go from 0 to 1 and back to 0
        float elapsedTime = 0f;

        // Increase power from 0 to 1
        while (elapsedTime < duration)
        {
            Power_Slider.value = Mathf.Lerp(0, 1, elapsedTime / duration);
            elapsedTime += Time.deltaTime;
            yield return null;
        }

        elapsedTime = 0f;

        // Decrease power from 1 to 0
        while (elapsedTime < duration)
        {
            Power_Slider.value = Mathf.Lerp(1, 0, elapsedTime / duration);
            elapsedTime += Time.deltaTime;
            yield return null;
        }
    }
Shot power is controlled by holding down a key/motion input button, which alternates between minimum and maximum power. Accessibility to this is temporarily disabled during actual shots, as well as during the tutorial in areas where shooting is not expected to control the learning environment.
GolfBall_Rb.AddForce(-GolfBall_LookAt_Camera_Transform.forward * Shoot_Force, ForceMode.Force);
When the key is released, the golf ball will then be launched forward with the selected power.
Golf Ball Physics
Artificial drag is applied to the golf ball while it moves to create a more realistic feel.
  if (bool_GolfBall_isMoving)
  {
      if (GolfBall_Linear_Velocity < GolfBall_Speed_Decrasing_Velocity)
      {
          GolfBall_Rb.angularDrag = Mathf.MoveTowards(GolfBall_Rb.angularDrag, Brake_Angular_Drag, Time.deltaTime * 50);
      }
  }
  else
  {
      GolfBall_Rb.angularDrag = Normal_Angular_Drag;
  }
The golf map components also have their own drag and bounciness settings in order to better emulate more realistic and diverse collision physics with different objects.
Potions Making
Game Management
The potion-making game is divided into two scenes: the Making Scene and the Result Scene. Most of the gameplay takes place in the Making Scene.
Each scene has a separate scene controller, and data is passed between them using a static class that acts as global storage for the game’s data.
Key Components
- PotionGameManager: Manages player turns and resets the game.
- PotionSurface: Handles the player UI and tracks the potion recipe.
- GameData: A static class used for storing game data.
- SecondSceneManager: Manages the game flow in the second scene.
- PotionPlayerController: Handles player movement and camera control.
- DragAndDrop: Manages picking up and dropping ingredients.
Player Camera Control
    if (Input.GetKey(KeyCode.RightArrow)) horizontalDir += 1;
    if (Input.GetKey(KeyCode.LeftArrow)) horizontalDir -= 1;

    // Inverted controls for vertical axis (up arrow looks down, down arrow looks up)
    if (Input.GetKey(KeyCode.UpArrow)) verticalDir += 1;  // Positive for looking down with inverted controls
    if (Input.GetKey(KeyCode.DownArrow)) verticalDir -= 1; // Negative for looking up with inverted controls

    if (horizontalDir != 0) {
      horizontalHoldTime += Time.deltaTime;
    } else if (verticalDir != 0) {
      verticalHoldTime += Time.deltaTime;
    } else {
        horizontalHoldTime = 0f;
    }

    // Calculate acceleration factor (0 to 1)
    float accelFactor = Mathf.Clamp01((horizontalHoldTime - 0.2f) / currentAccelerationTime);
    // Apply additional speed based on hold time
    currentHorizontalSpeed += (currentMaxSpeed - currentInitialSpeed) * accelFactor;

    // Calculate acceleration factor (0 to 1)
    float accelFactor = Mathf.Clamp01((verticalHoldTime - 0.2f) / currentAccelerationTime);
    // Apply additional speed based on hold time
    currentVerticalSpeed += (currentMaxSpeed - currentInitialSpeed) * accelFactor;

    float arrowX = horizontalDir * currentHorizontalSpeed * Time.deltaTime;
    float arrowY = verticalDir * currentVerticalSpeed * Time.deltaTime;

    RotateCamera(arrowX, arrowY);
The camera tracks the player's nose position and maps the input to the arrow keys. To allow precise ingredient selection while maintaining fast movement, the camera rotation speed increases the longer the player moves in a particular direction.
Drag and Drop
Ingredient interaction is handled using Unity's raycasting system, which detects objects along a straight line from a point.
Interaction Process:
- When the crosshair overlaps an ingredient, its material changes to highlight it, and it is stored as the selected ingredient.
- The system waits for player input to determine whether to pick it up.
- If picked up, the ingredient moves in front of the player and follows their movement.
- Pressing the pickup key again drops the ingredient vertically.
      Ray ray;
      Vector2 centerPoint = cursorManager.GetActivePlayerScreenCenter();
      ray = activeCamera.ScreenPointToRay(centerPoint);
      RaycastHit hit;
      bool hitThis = Physics.Raycast(ray, out hit, maxRayDistance) && hit.collider.gameObject == gameObject;
      SetHighlight(hitThis);
    Vector3 targetPosition = activeCamera.transform.position + activeCamera.transform.forward * distanceFromCamera;
    transform.position = Vector3.Lerp(transform.position, targetPosition, Time.deltaTime * smoothSpeed);
Checking Recipe
Once four ingredients are placed into the cauldron, the recipe-checking process begins:
- The ingredients are sorted in order.
- The system iterates through a list of valid recipes and compares them.
- If a match is found, the corresponding message is retrieved from a hash table, else an error message is diaplayed.
- The completed recipe is stored in
GameDataand to be retrieved in the second scene.
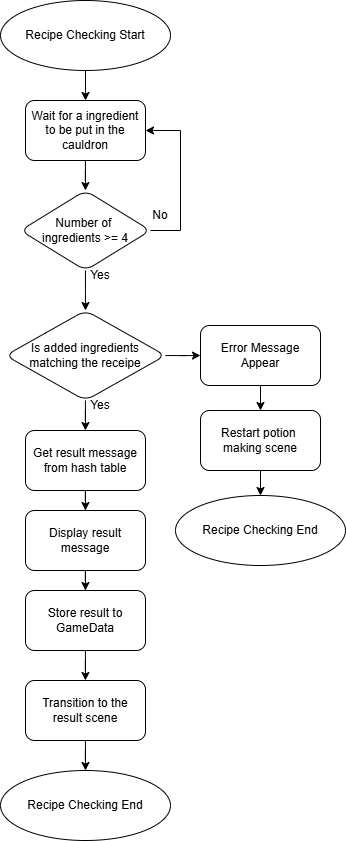
Flow diagram showing the process of checking a recipe (Click to enlarge)
Game Configuration
Configurations for each game are stored in JSON files, allowing players to modify them without opening the project in Unity.
    public static T ReadAndParseJSON(string jsonFileName)
    {
        string path = Path.Combine(Application.streamingAssetsPath, "configs", jsonFileName);
        string jsonString = File.ReadAllText(path);

        return JsonUtility.FromJson(jsonString);
    }
A generic function parses the JSON files and deserializes them into class objects.
    WipeoutConfig config = JsonParser.ReadAndParseJSON("wipeout.json");
    this.gameDuration = config.gameDuration;
The games then apply the corresponding configurations from these objects.