Implementation
Collaboration Opportunities For Further Development
The project that we developed is going to be worked on by future groups because algorithms for image tagging may be more accurate in the future. So, the British Library are interested in new ways to solve this problem since it is not trivial. Consequently, we developed the project so that it is easy for future groups to continue our work. One way that we did this is by making an API, the functions that the API can carry out are:
- Should successfully (GET) the co-occurring tags given a tag.
- Should return {} given a null or nonexistent tag.
- Should successfully (GET) the statistics API.
- Should successfully (GET) search by title resources.
- Should return {} given no result from search by title.
- Should successfully (GET) the search by tag resources.
- Should return {} given no result from search by tag.
- Should successfully (GET) the details of image given the id.
- Should return {} when image id is not found'.
We have also made the project publicly accessible on GitHub.
Furthermore, future groups can ask the team any questions on our community forum.
Testing
Throughout our implementation, we used a test-driven development approach as we created test cases whenever a new feature was about to be implemented. More information about testing can be seen from the testing page.
Extensibility
One of the main requirements was to ensure that the application that we make is extensible so that future projects can continue working our project. We did this by:
- Making a system manual - future development groups need to be able to use the application before they can develop it further so the system manual will help them understand the system requirements necessary to use our project.
- Making a user manual - the user manual shows all of the steps required that future development groups have to take in order to use the features of the system.
- Well-documented and formatted code - this will help future development groups in understanding all of our code so that they can continue our project with ease.
Development of Machine Tagging Features
Although none of the members of our team had previous experience with Machine Learning, through our research we gained enough of an understanding to apply it to our problem. For our problem specifically, there were two main parts to consider:
- Image Processing: Since we are working with images, each piece of data contains a lot of information, which is inefficient to use with machine learning directly. By transforming the image into a more compact representation, its ‘features’, we can get quicker results. Another advantage of this is that we can choose the type of features we use to give better representations for different tags.
- Machine Learning and Classification: By combining our generated image features along with a small set of manually tagged images we can use Weka to generate a model for that tag. If we apply this model to an unknown image, we can classify the tag as being suitable or not – according only to information provided by the manually tagged images.
- Selection of tags to classify by: This was difficult and needed a lot of research and experimentation to determine what could and could not be discovered for our data. On top of this we had to be sure that:
- Even if something is possible to classify by machine learning in a general sense, whether the same thing is true for our dataset. For example the majority of images in our collection are from drawings or paintings and so using an approach that works for natural images by not be so successful for us.
- We can get enough information in our training data sets (manually tagged images) to represent the rest of the data. For example, if we are trying to tag images of cats but all of our training images are of black cats, then we will likely end classifying pictures of black dogs or other animals with black fur too as there is not enough differentiation in our example data.
- Development of image processing algorithms: For each tag that we chose it was necessary to find a method for generating image features that represented that tag accurately. We used three main methods:
- For the ‘sheet music’ and ‘decorative’ tags we used sets of Gabor filters. These filters have the property that they are good at picking up on the same things as the human perception. They do this by giving values according to different frequencies and orientations in an image. This is helpful in the case of sheet music, for instance, which contains a lot of parallel lines but not much else.
- For clustering together images with a similar shape, we used a log-polar histogram. What this shows is how the intensity levels are distributed in the image. To make this as general as possible, we used the weighted mean of the pixel coordinates to determine the centre of the image. The values in the histogram give a distance and angle away from this point.
- Differentiating between colour and black-and-white images proved to be far more difficult than we anticipated and despite working on it for a significant duration during the project still ended up with less successful results than the other machine tagging. The main problem to get around was that many of the images, whilst effectively black and white in real life, were on coloured backgrounds or had colour introduced during the scanning process due to noise. We attempted many different methods to get around this including:
- Finding the mean and variance of the pixels for each channel (even for an image that is shifted away from grey the variance should be low). However, since the values weren’t necessarily normally distributed these didn’t produce great results.
- Clustering to find the two most representative colours in the image. This was in the hope that one colour would be black (the ink) and the other colour would be the colour of the page. This didn’t prove to be as effective as we would have liked, however, as although it picked up on the black-and-white images it didn’t prevent a lot of the colour images from being classified as black-and-white too.
- Selection of machine learning algorithm: As with the selection of tags to use this required a lot of research and experimenting to find our what works best. Ultimately, this was done by trying a variety of the algorithms that Weka offers to see which ones performed best for our data.
Development of Co-occurring Tags Feature
The users of the app can search for images by either tag or title using a text query, which allows them to find images if they know exactly what they are looking for. However, from our testing we discovered that sometimes users don’t quite know the exact query to use and may have to go through a trial and error of many queries to find what they are looking for. To assist with this we came up with two potential solutions:- If the user is on a page for a specific image, then present them with a number of images that are similar to it.
- If the user is on a page for an image and clicks on a tag, then present them with the tags that occur most frequently in the same images as that one.
By presenting the user with frequently co-occurring tags for their currently selected tags they can click on a new tag that seems more appropriate. By repeating this process they can effectively navigate through the dataset using only tags until they have found something they think might be good. From this they can then search for the images that correspond to this tag. This is quicker than using similar images for the app, as it doesn’t have to download a new set of images every time. To generate a list of the most frequently co-occurring tags we used the following method:
- Find a list of unique tags by searching through all the images in the dataset and record all the tags for that image that haven’t been seen already.
- Create a matrix that shows the number of images for which any two tags both apply.
- Sort the columns of the matrix so that each row (a single tag) is in order of frequency.
- Return a list of the first 20 tags (or less, if there aren’t 20 tags that co-occur) for each row. These are the most frequent co-occurring tags.
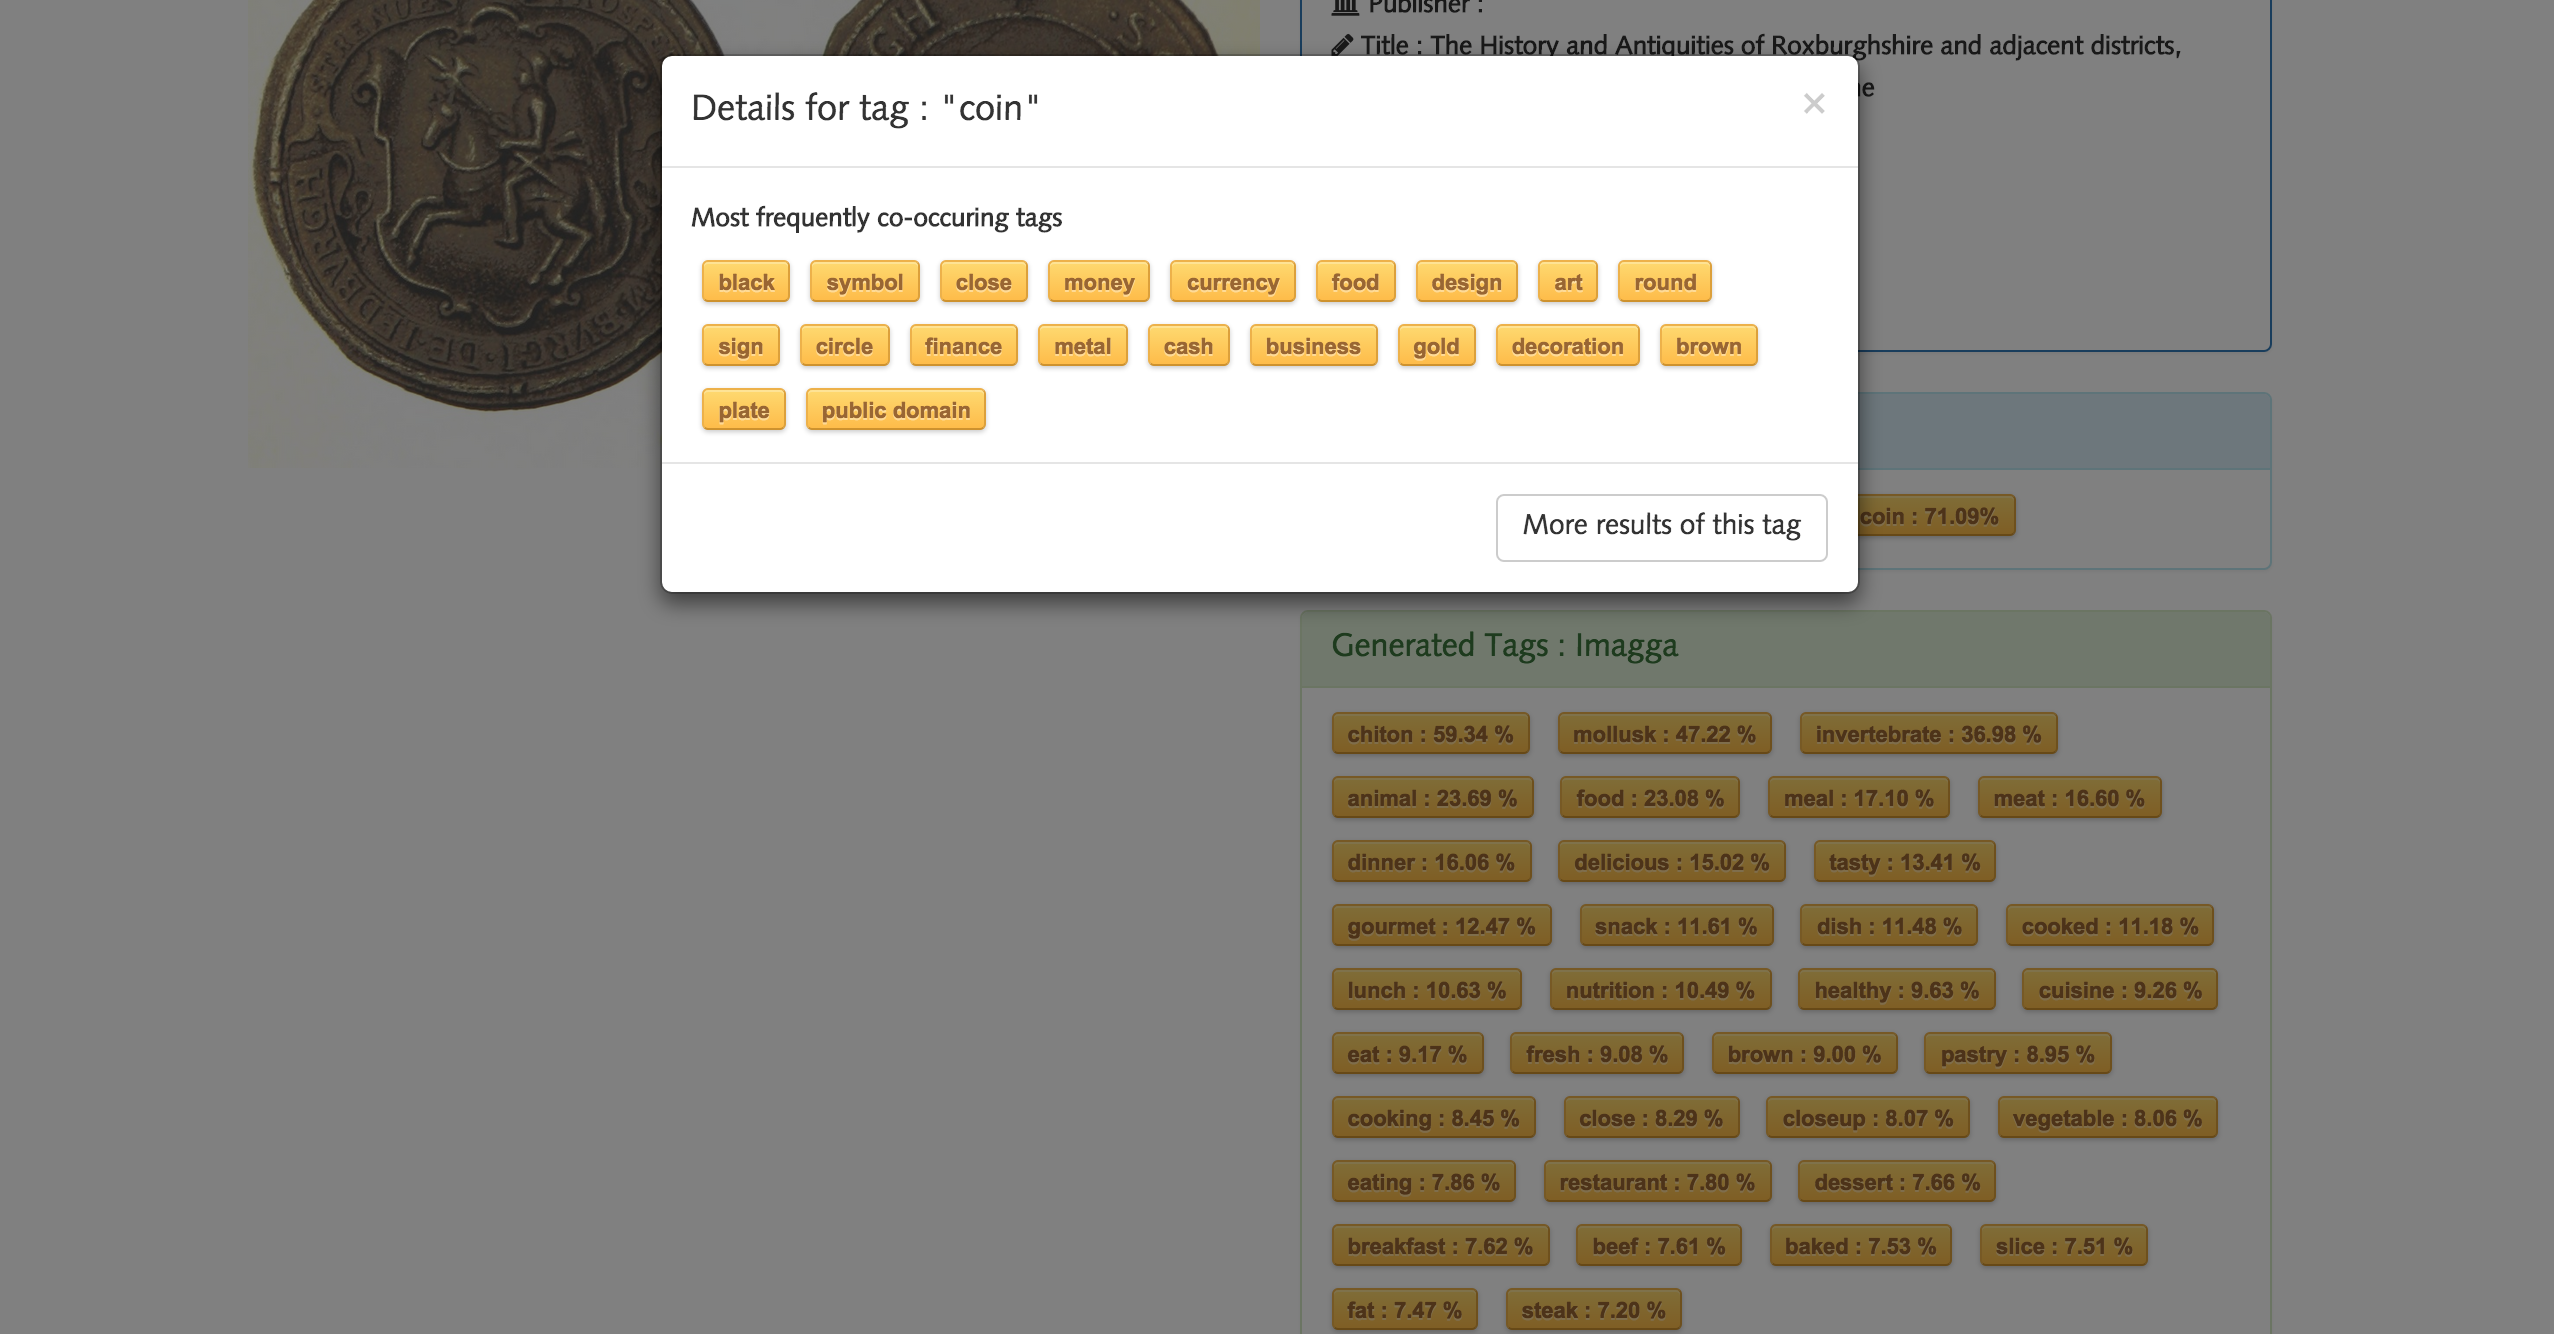
This proved to be very effective, though we noticed an issue in that some tags appeared to co-occur most frequently with just about every other tag, such as ‘public domain’. Since almost all the images have this tag applied to them it always comes up very highly. To prevent this, we used an Information Retrieval technique called Inverse Document Frequency (IDF). What IDF does is essentially give a lower weight or importance to tags that occur a lot in the dataset, as they are likely to not be very good at differentiating between the images. For example, if a single tag were assigned to every single image it would not help the user to narrow down their search with the similar-tags feature, as it is completely independent of the selected tag. Therefore this tag would be weighted as 0. After implementing this, the similar tags appeared to be a lot more specific and closer in meaning to the tag being selected.
Diagrams
UML Diagrams
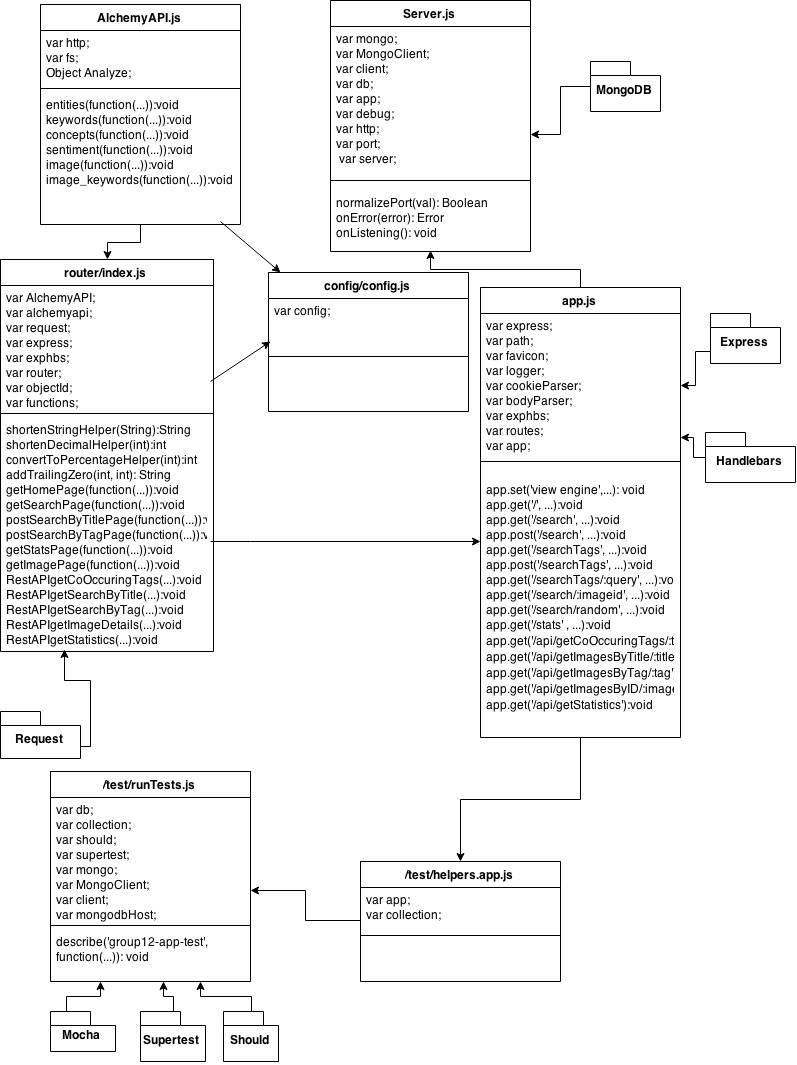
In the initial PoC, we designed a UML diagram that we were going to use for the implementation. However, we realised that the project was more complicated than the original UML diagram that was made. Therefore, we made a more accurate UML diagram that accurately shows the classes used as well as the relationships between them. The following is the UML diagram:
Package Diagram For Testing
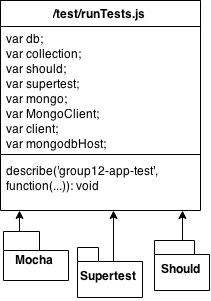
There were some dependencies that we had to make in order to perform unit testing. The main testing tools that we used are Mocha, Supertest and Should. The diagram below shows the class that used these dependencies in order to perform testing:
Package Diagram For the Main Application
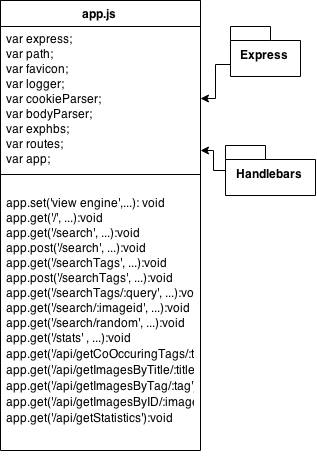
In the main JavaScript file of the application (app.js), there were some dependencies made such as Express and Handlebars. These dependencies were vital to make the project compile and run smoothly. The package diagram showing this is below:
Package Diagram For the Application Router
To route the application successfully, we relied on Request. This allowed us to make HTTP calls which is crucial since we needed to call the AlchemyAPI and the Imagga API. The package diagram below shows which class depended on Request:

Package Diagram For the Server
A class, called Server.js, was made in order to communicate with the server. Our main dependency was MongoDB since this is the database that we are using. The package diagram below shows the dependency made to MongoDB from the class, Server.js:

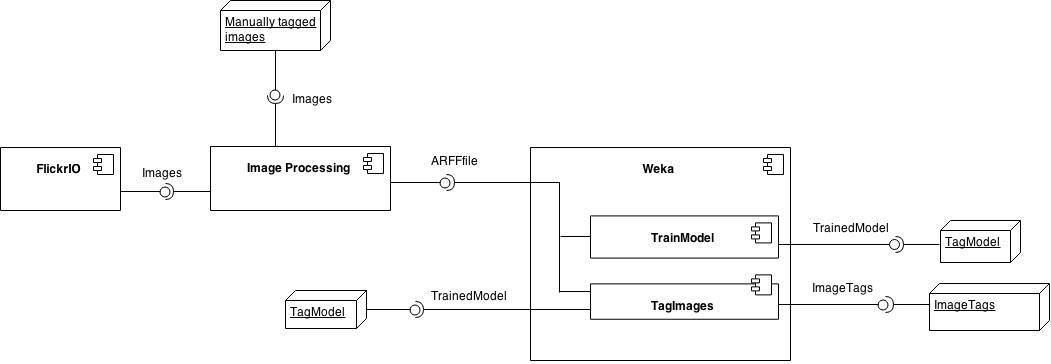
UML Diagram For Machine Learning System Overview
This is an overview of how the different parts of the machine tagging functionality connect. The image processing element is used to create a set of features from image files which can be interpreted by Weka. Features for known images can be classified to create a model and this model can then be run against features for unknown images to determine suitable tags.
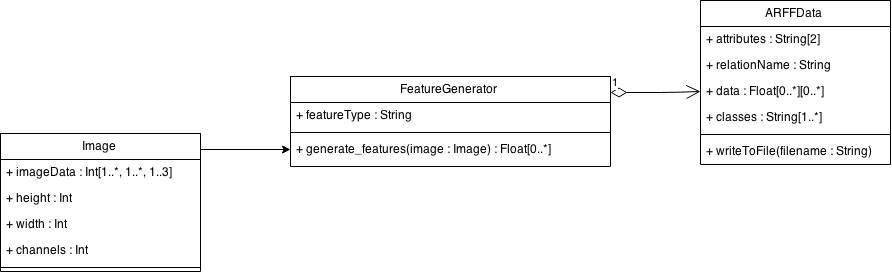
UML Diagram For Image Processing
The structure of the image processing is simple as it just takes an image files and uses a certain type of feature generator to produce a string which represents features for that image. Features for all the images in a collection are converted into the correct format for an ARFF file to be used with Weka.
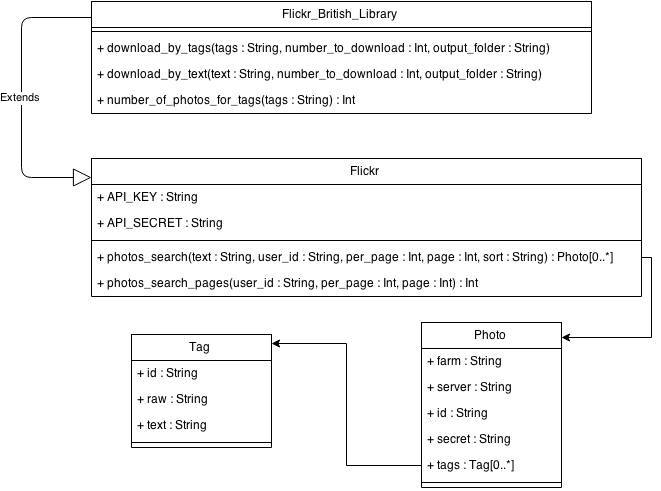
UML Diagram For Flickr
For testing and experimentation it was helpful to be able to download images directly from Flickr according to their tags (on Flickr) or title. We extended the FlickrPy library to make this specific to just the British Library's collection, as well as obtaining only the information relevant to us.
Design Patterns
Design Patterns Used in the Node.js Backend
Front-Controller Pattern - We utilised a front-controller pattern. This pattern is commonly used in web applications,especially in applications that use Model View Controller (MVC) Pattern. A Front-Controller pattern provides a centralized entry for handling the request, namely the ‘controller’. Front controllers are often used in web applications to implement workflows. This pattern also makes it easier to control navigation across a set of related pages (In this case, such as displaying thousands of images using a single interface) from a front controller rather than making individual pages that is responsible for navigation.This pattern is commonly used in web applications, especially in applications that use Model View Controller (MVC) Pattern. Front-Controller pattern provides a centralized entry for handling the request, namely the ‘controller’. Front controllers are often used in web applications to implement workflows. Using a Front-controller pattern makes it easier to control navigation across a set of related pages (In this case, displaying thousands of images using a single interface) from a front controller rather than making individual pages that is responsible for navigation.
Modules - Module patterns are based on Modular programming. It is a software design technique that emphasizes on separating the functionality of a program into independent, interchangeable modules, such that each contains everything necessary to execute only one aspect of the desired functionality. Some characteristics of this design pattern include:
- A portion of the code must have global or public access and be designed for use as global/public code.
- A module must have an initializer function that is equivalent to, or complementary to an object constructor method.
- Most members are functions that perform operations on elements external to the class, provided as arguments by calling functions. Such functions are "utilities", "tools" or "libraries".
Design Patterns used in Python Machine Learning Analysis
The Bridge Design Pattern - For this part of the system we wanted to try and make it as robust as possible whilst keeping it open and easy to experiment with. For this reason we adopted the Bridge design pattern. By doing this, we are decoupling the implementation of our separate components from their abstraction within the system. For instance, though we used the Weka suite of machine learning algorithms to train models for classifying our images, there are many other ways we could have done this with the same input and output; in the future there will be even more. By using a Bridge pattern this part can be replaced and the system will operate in exactly the same way. In order to work in this way, our system takes files as input and saves files as output, rather than linking them with code directly. This does mean there is more manual effort but we thought it was worth it for the improved versatility and ease of production. To make replacing these components easier we tried to use human-readable file formats so that even if the correct libraries aren’t available for processing the files then it is still possible to handle them relatively straightforwardly.
The Adapter Design Pattern - The Adapter pattern is somewhat applicable to this part of the project since we had to handle the accessing of data through the Flickr API as well manipulating our feature data and tag data to work correctly with Weka. However, these were smaller aspects of the project and overall the Bridge pattern makes more sense since we were specifically engineering this part of the system to allow for different implementations. This is especially true in the way we access already tagged data: currently we can pull images according to user tags from Flickr, but this is a fairly unique scenario and any other use will almost certainly be done differently.
Evaluation
Overall, the project was successful since we successfully captured our client’s requirements at the beginning of the project. Then we used an AGILE methodology by having meetings with him regularly regarding the progress of the project (in terms of what needs to be done next). By the end of the project, all of his original requirements were met and we conducted thorough unit and user acceptance testing to ensure that there are minimal bugs in the application. The quote below was the feedback from our client at the end of the project:
"Ali, James, and Muhammad designed a public service that indexed image tags generated by two image recognition APIs (Alchemy and Imagga). Confidence values were returned and features implemented that allowed users to browse by tag and by most frequent co-occurring tag. This work brought the British Library up to date with the state of the art, enabling us to better plan future image recognition work. Ali, James, and Muhammad worked with diligence, confidence, and creativity. The public service they developed is of a high standard and meets our requirements. Requests for changes were actioned quickly and efficiently. The team took instruction well and did not burden the client (me) with unnecessary requests or additional work. All told, they were a pleasure to work with and I’d be delighted were Ali, James, or Muhammad to join a future British Library Big Data Experiment team."
Releases
Throughout the project, we checked with the client to see if the project met our client’s requirements. The first minimum viable product was finished on the 17th March. The second release of the app, which contains have been thoroughly tested was finished and deployed on the 9th April.The latest release, which contains additional features and RESTful APIs was completed on 24th of April. For more details, visit the releases page on github
Screenshots from the first release can be seen below:
First Release
The first release was not deployed yet, it was still being run locally.
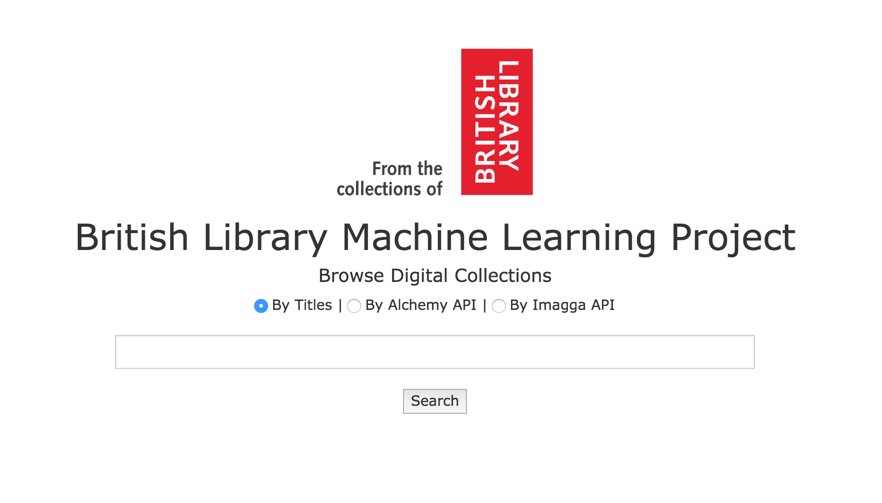
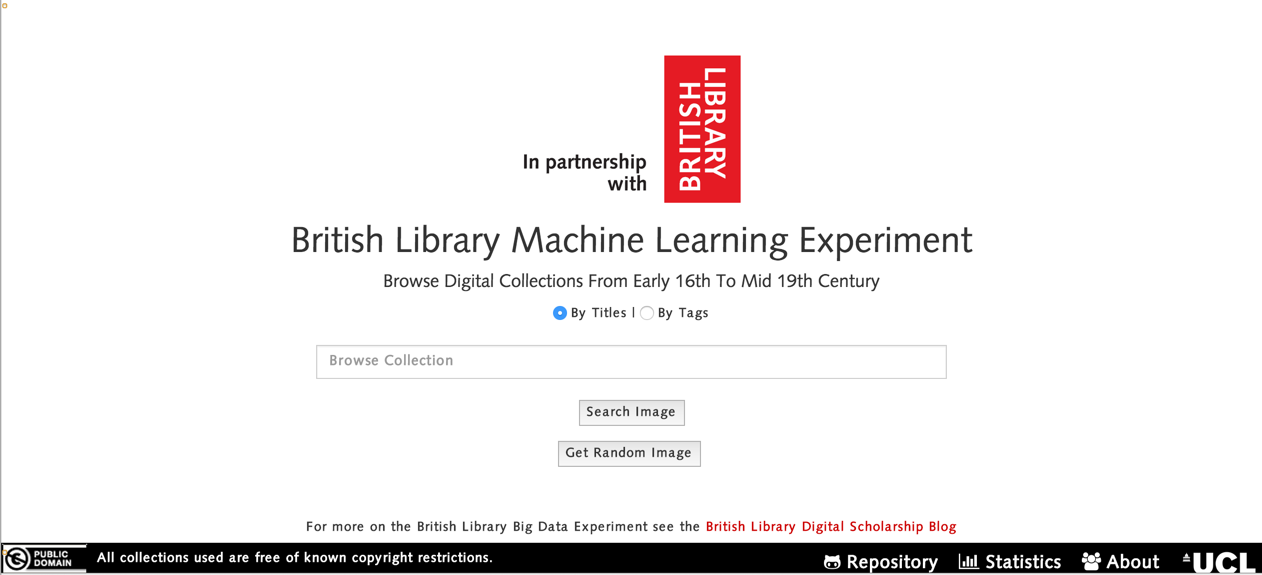
Main Page
Search Page
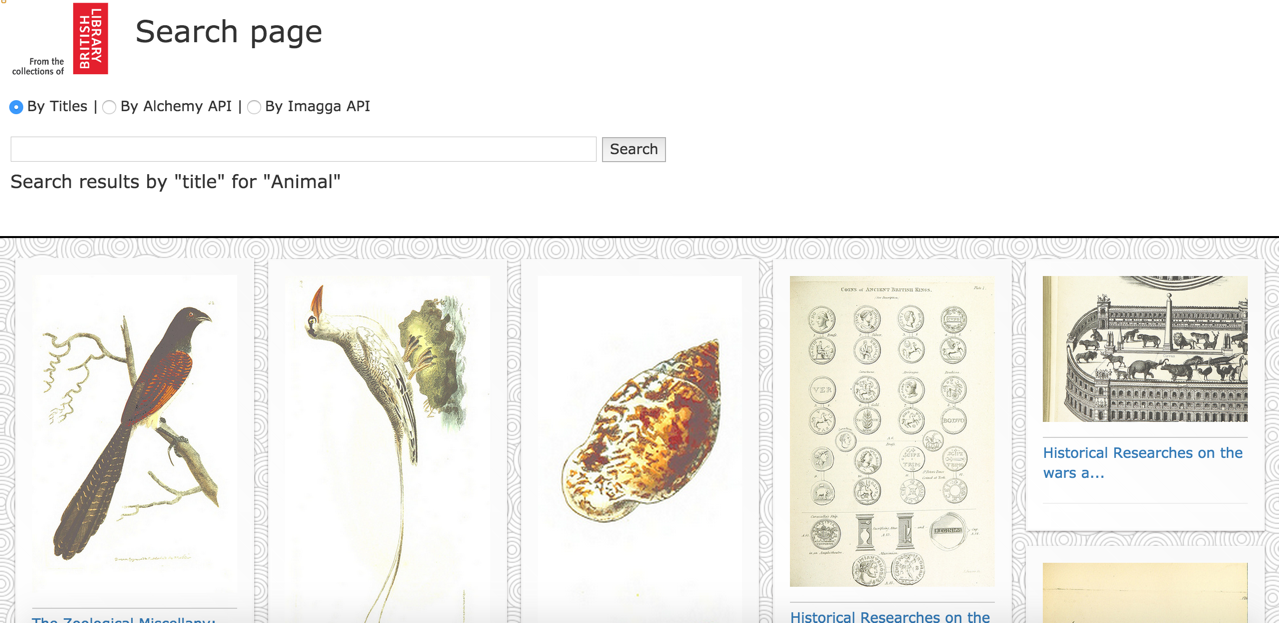
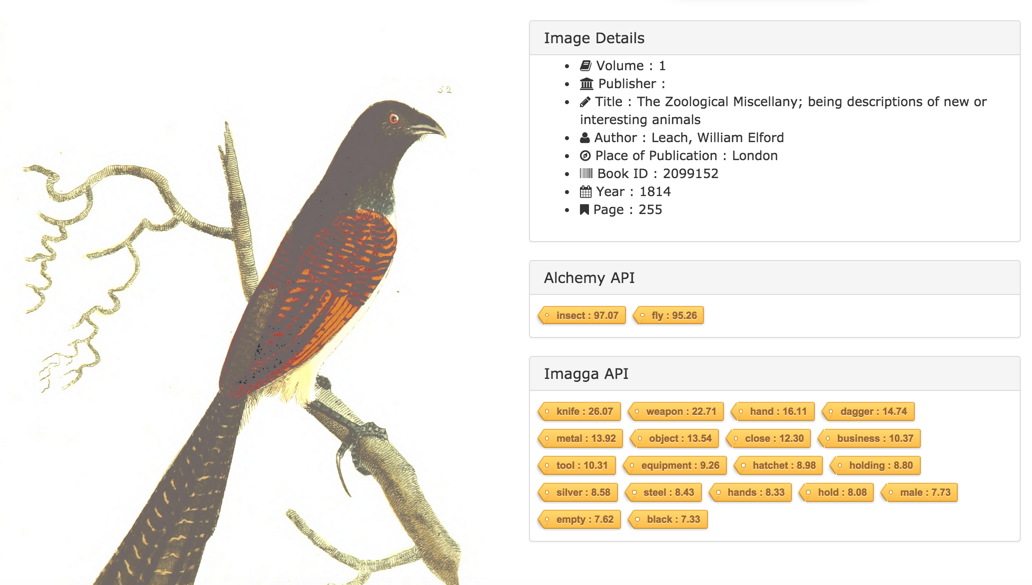
Image Details Page
Second Release
Main Page
Searching Images By Title
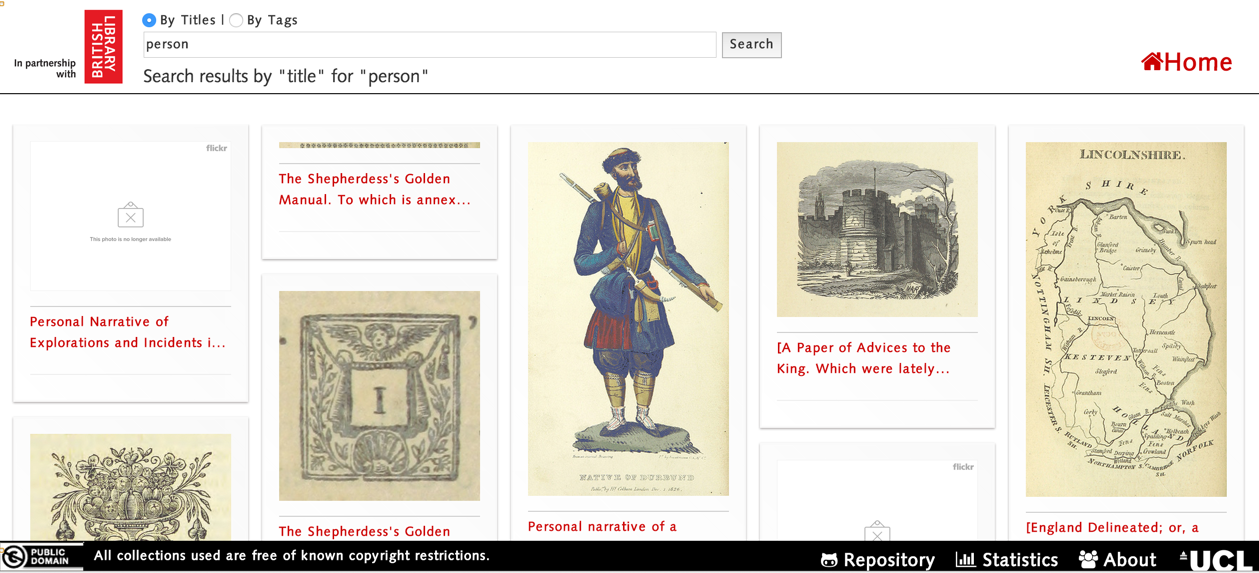
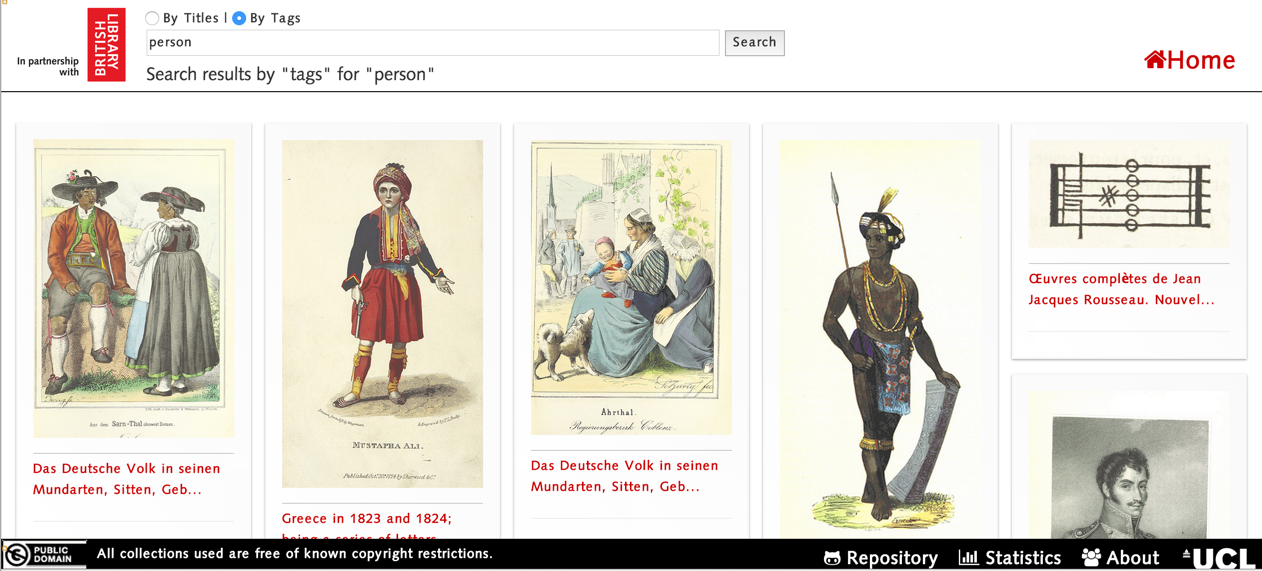
Searching Images By Tags
Get Co-occuring Tags
Viewing a Specific Image
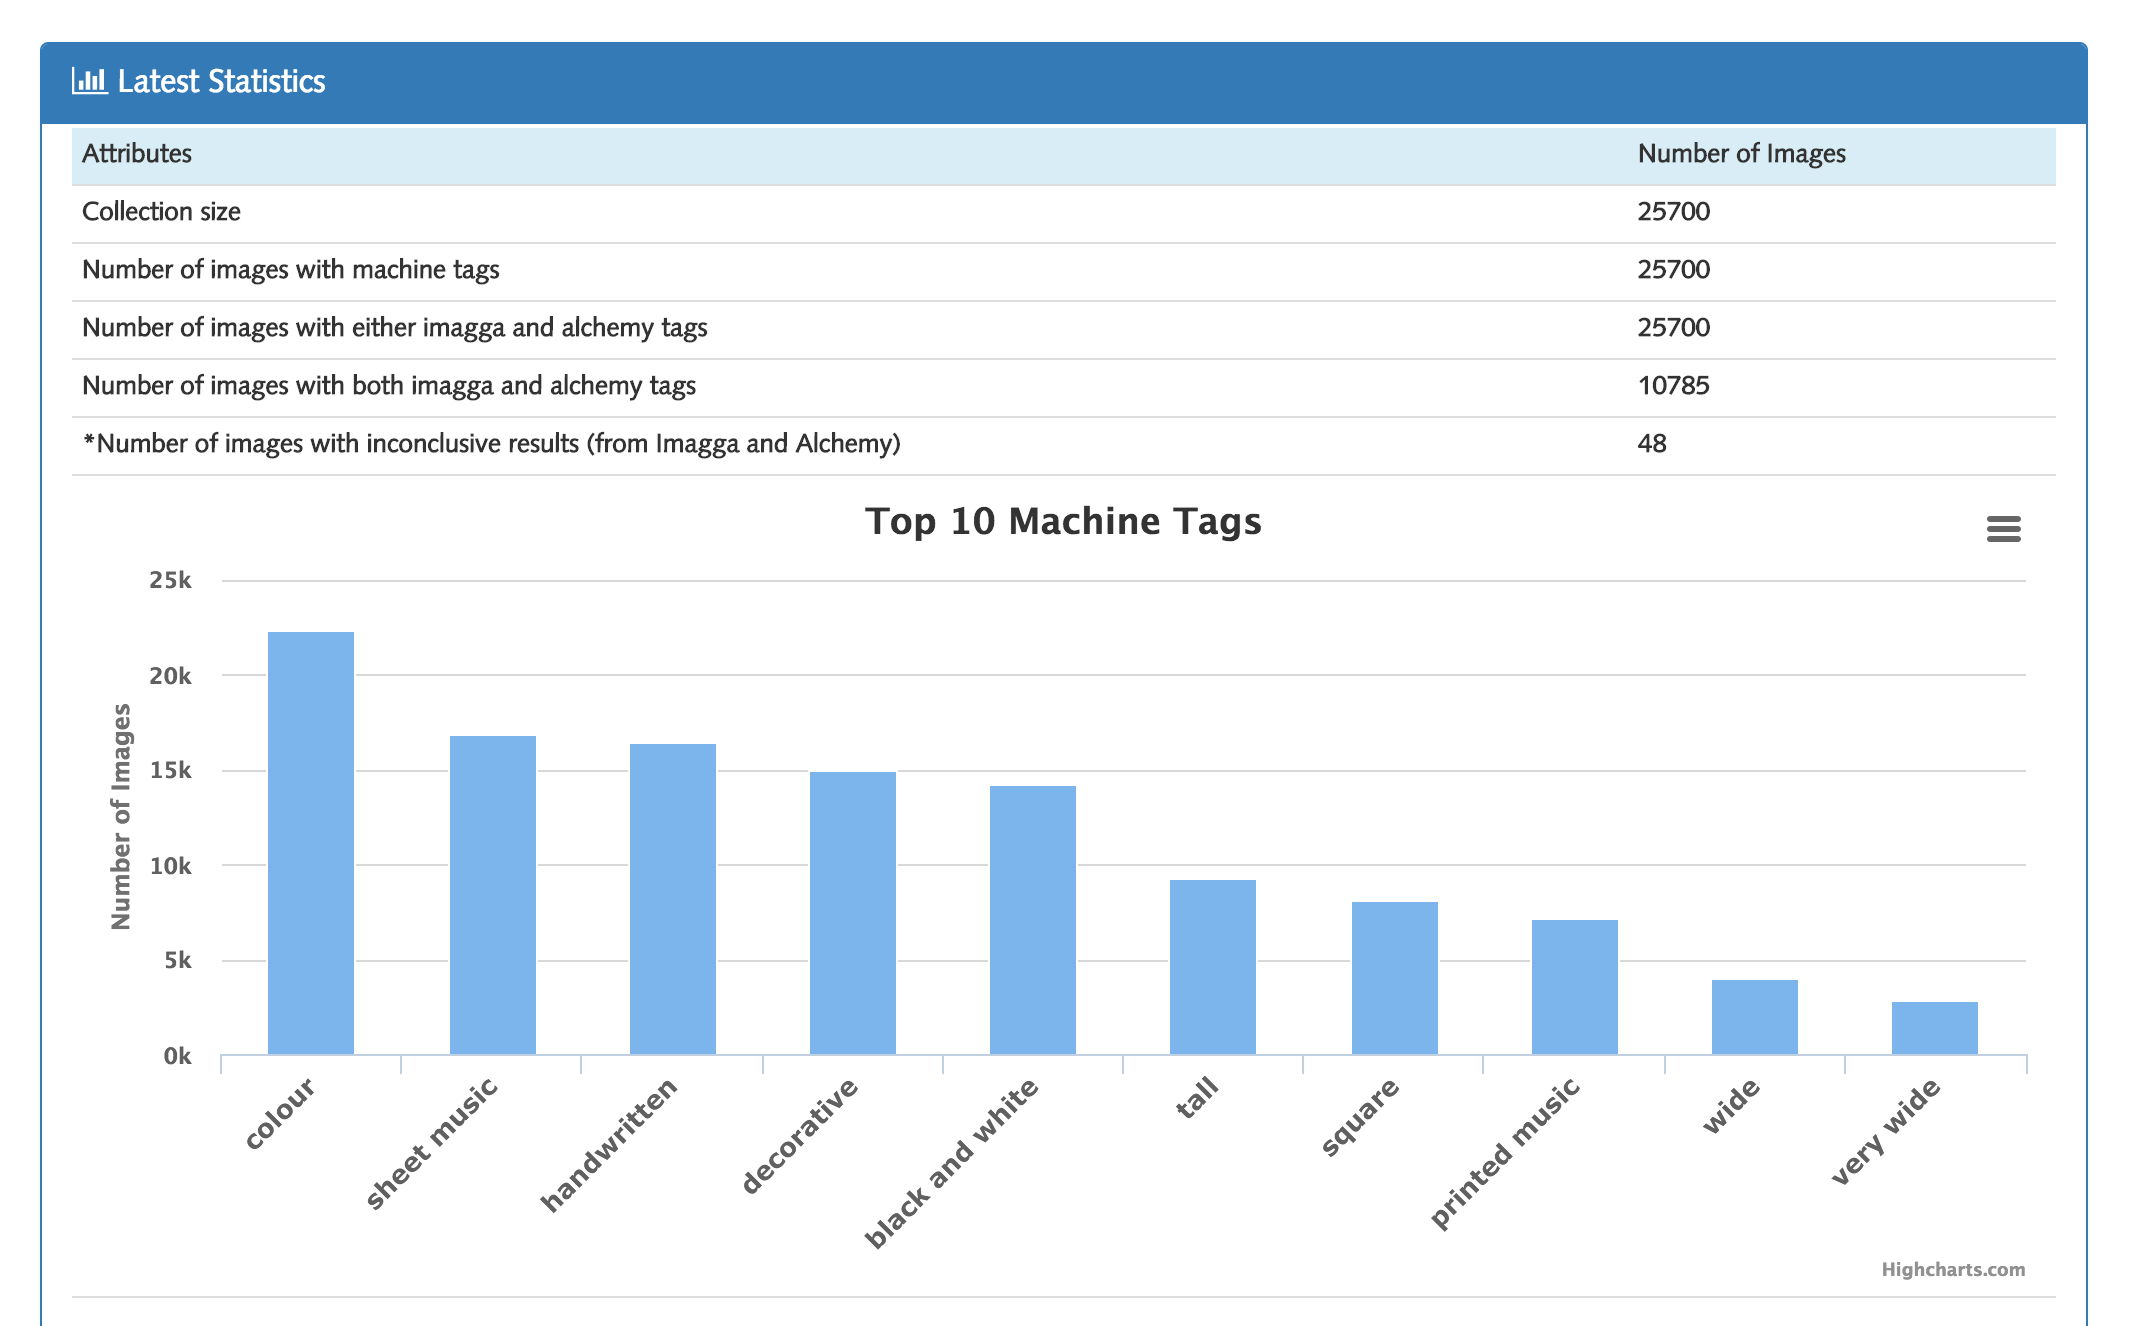
Statistics Page
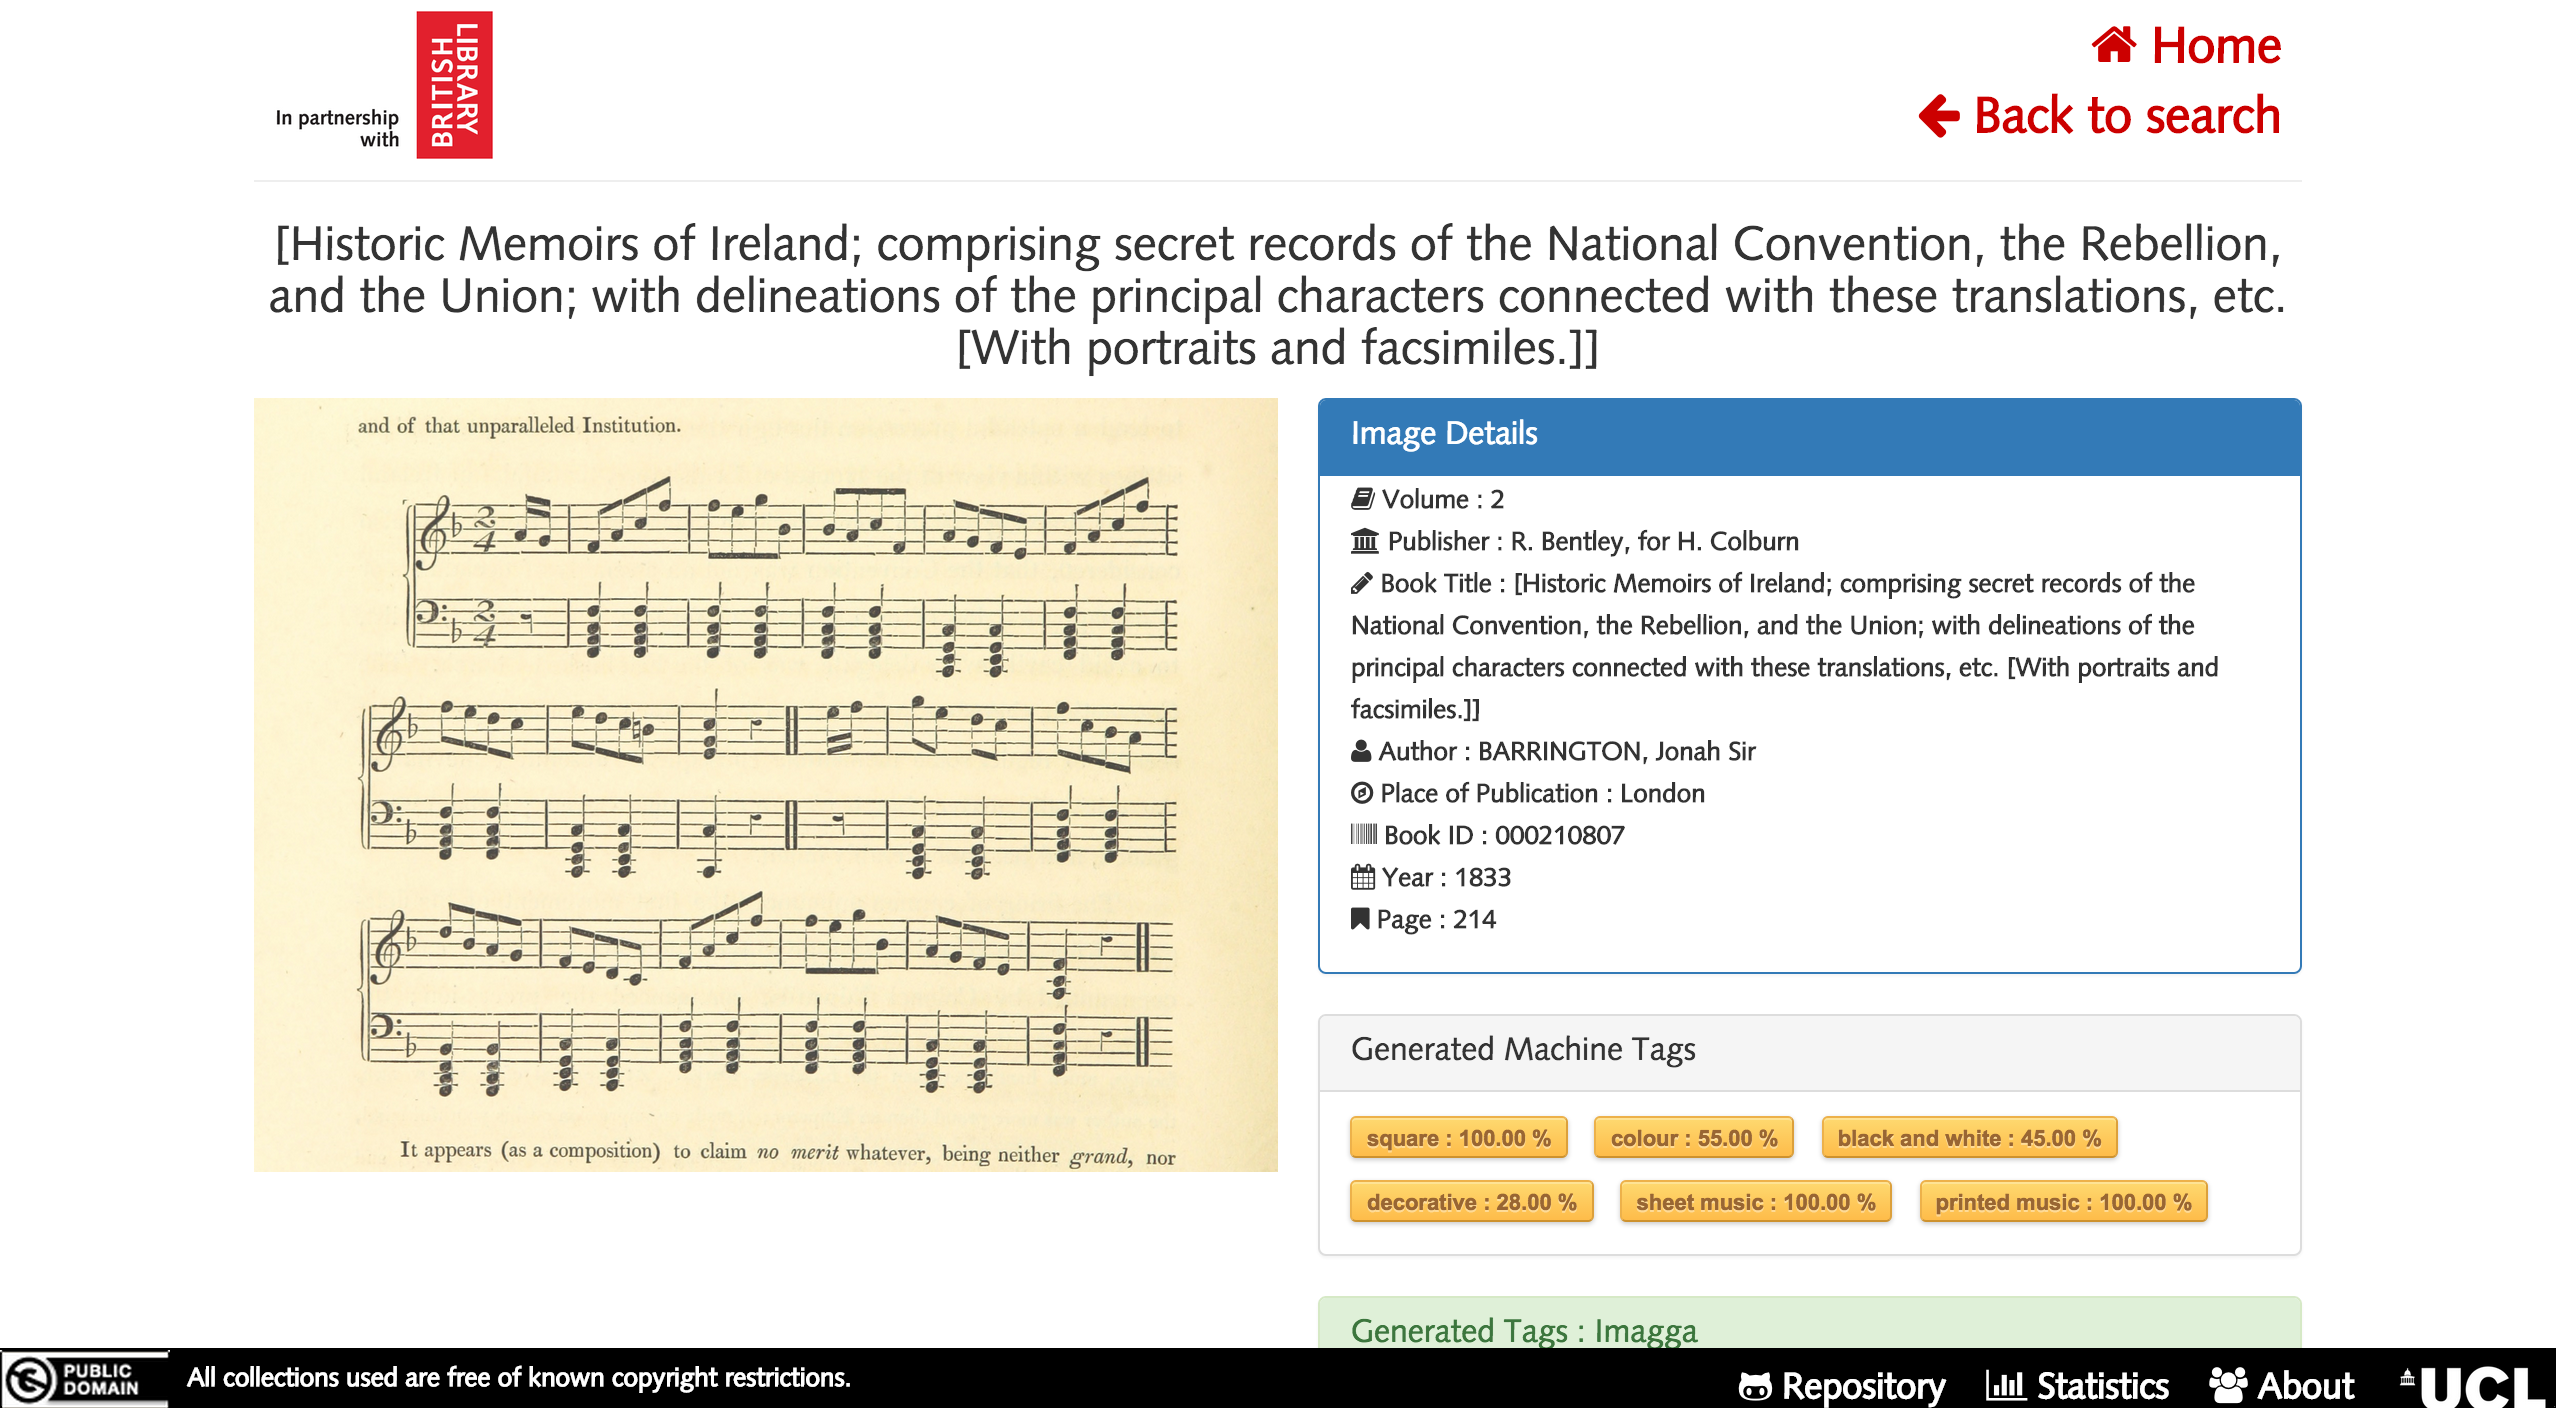
Final Release
In the final release, we've update the backend to give more accurate results and updated the image details page UI to include machine tags and added another chart in the statistics page. Everything else remains the same with the previous release.
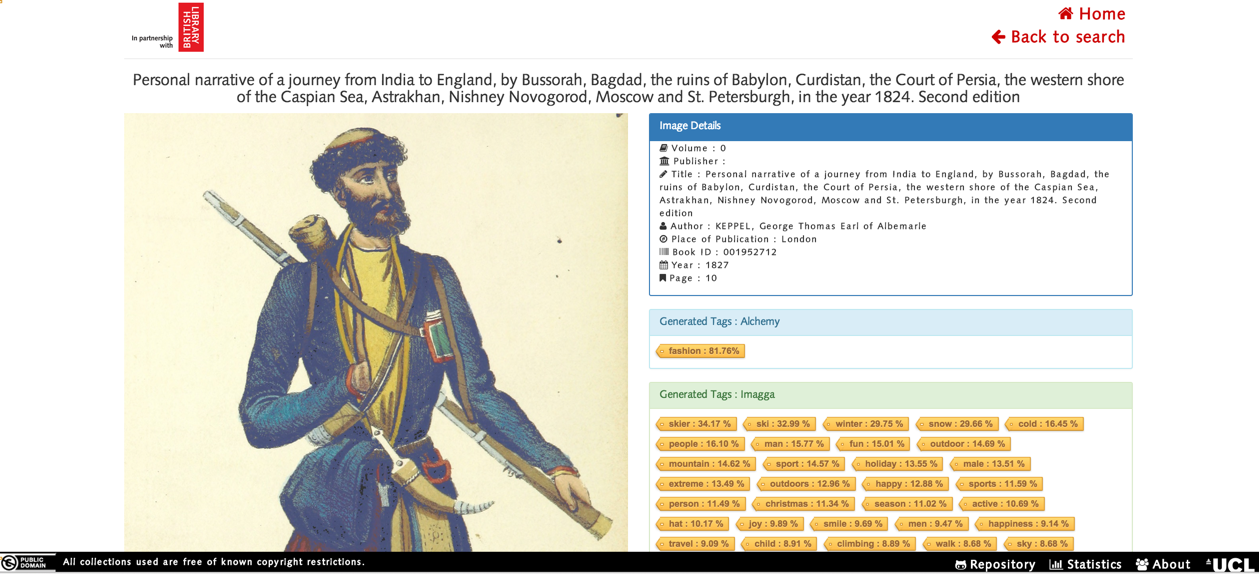
Viewing a Specific Image
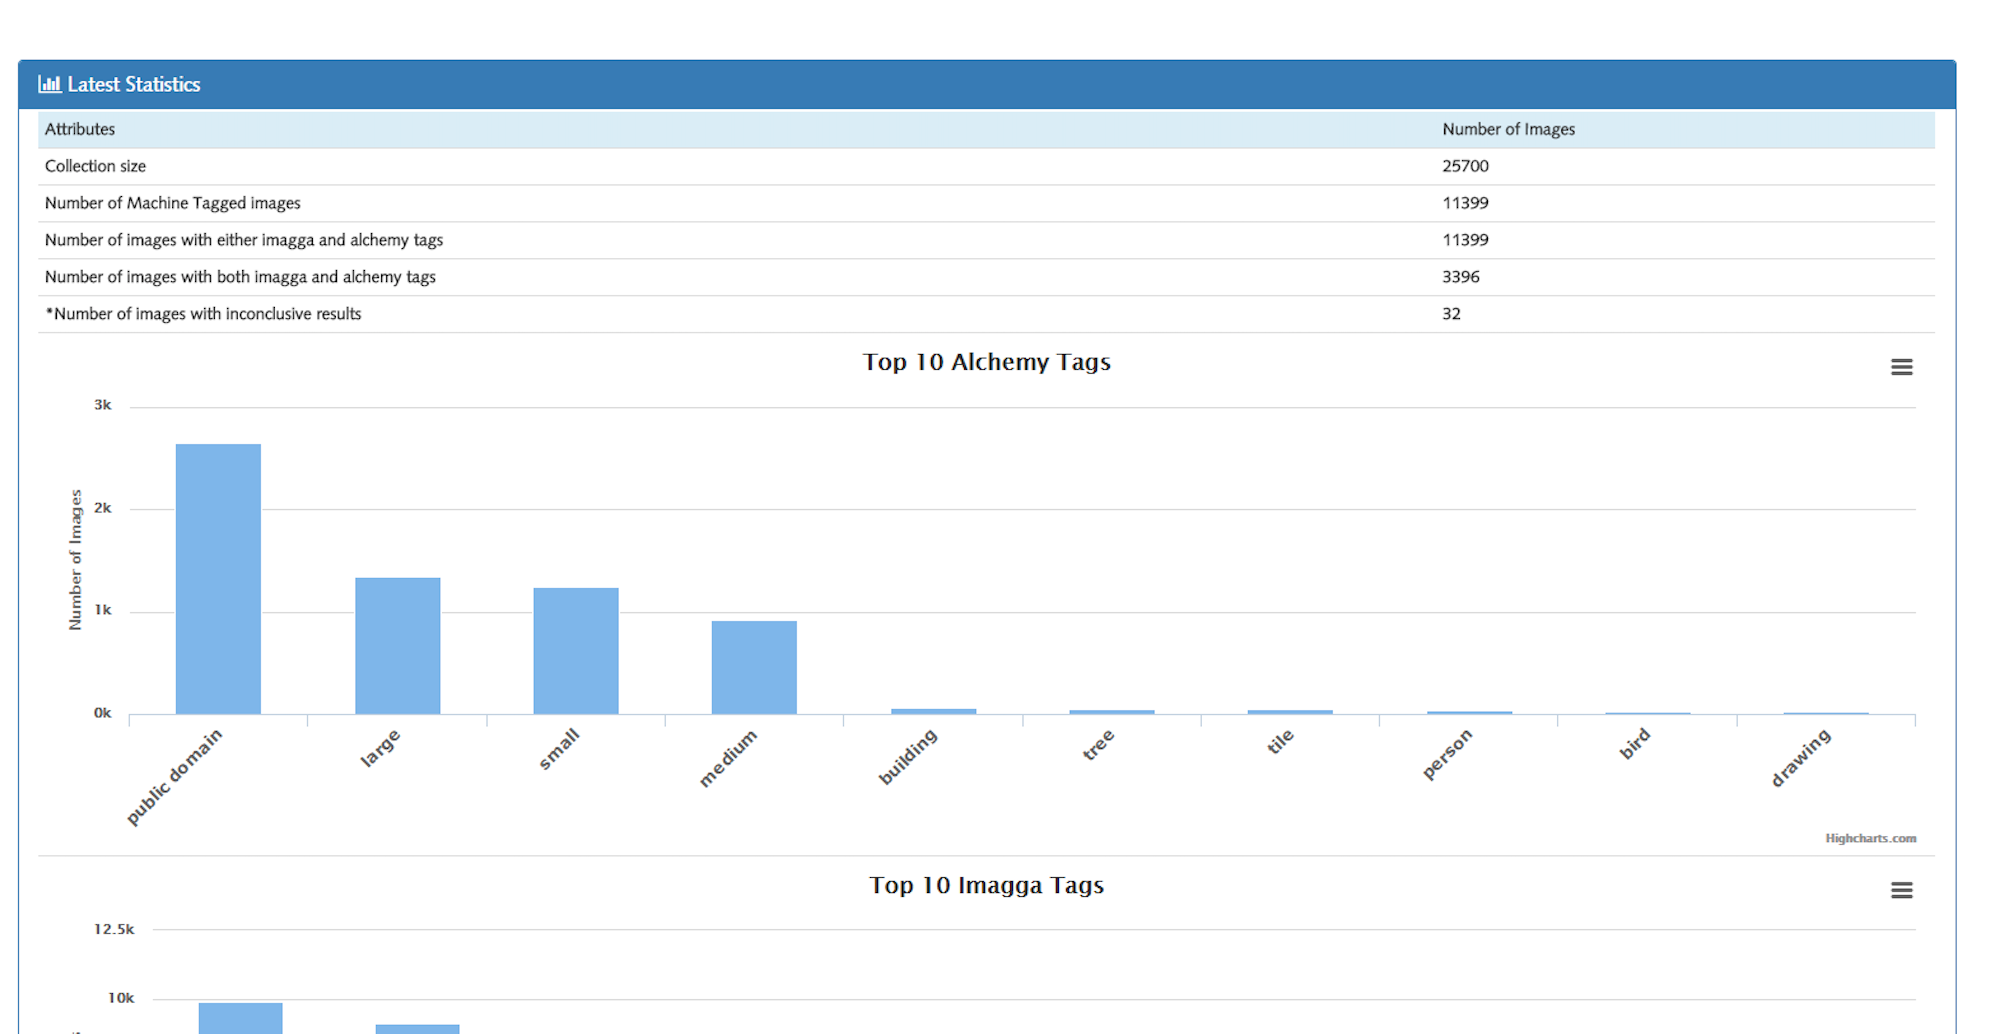
Statistics Page