
IMPLEMENTATION
- Home
- Implementation
Bot Structure Implementation
Tools & Dependencies

MS Bot Framework SDK is used for building up AvaBot.
The language for AvaBot structure and logic is
node.js
Restify is a Node.js web service framework for creating web service for AvaBot.
Axios is a promise based HTTP client for node.js, with which AvaBot can make http requests.
Impl. Overview
1. run AvaBot with a web service
AvaBot as a web app needs to create a web service, which is implemented by using Restify with a messaging endpoint. The service extracts the authentication header and request payload and forwards them to the Bot Adapter. The adapter receives activities from the messaging endpoint and forwards them to the bot.
// Create HTTP server.
const server = restify.createServer();
server.listen(process.env.port || process.env.PORT || 3978, function() {
    console.log(`\n${ server.name } listening to ${ server.url }.`);
});
// Listen for incoming requests.
server.post('/api/messages', (req, res) => {
    adapter.processActivity(req, res, async (context) => {
        // Route the message to the bot's main handler.
        await bot.run(context);
    });
});
2. how AvaBot interacts with user
AvaBot implements the bot handler class, ActivityHandler,
which uses an event emitter and listener pattern. It has two
listener methods, the onMessage() registers a listener
in response to messages and calls the run method of the
bot’s dialog to start or continue the dialog, the
onMembersAdded() listener is active when a first member joins
the conversation. Each method ends by calling next() to
ensure that the next listener is run.
class AvaBot extends ActivityHandler {
  constructor(conversationState, userState, dialog) {
    super();
    ...
    this.onMessage(async (context, next) => {
      console.log('Running dialog with Message Activity.');
        // Run the Dialog with the new message Activity.
        await this.dialog.run(context, this.dialogState);
        await next();
    });
    this.onMembersAdded(async (context, next) => {
      const membersAdded = context.activity.membersAdded;
      for (let cnt = 0; cnt < membersAdded.length; cnt++) {
          if (membersAdded[cnt].id == context.activity.recipient.id) {
              await this.sendSuggestedActions(context);
          }
      }
      await next();
    });
  }
  ...
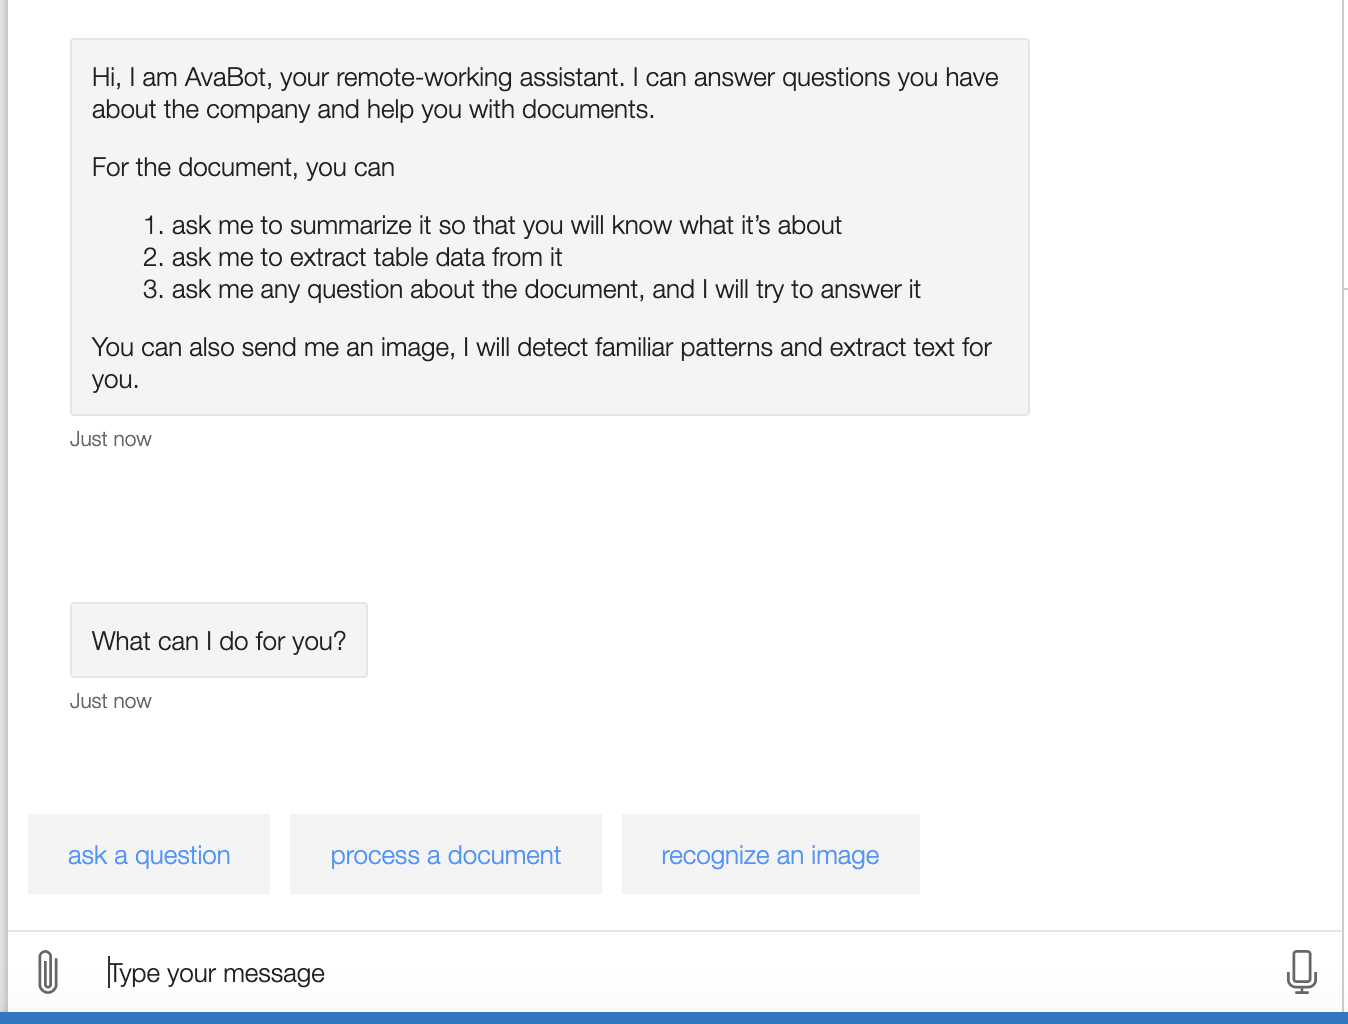
3. AvaBot's waterfall dialog
AvaBot can talk with users interactively to perceive their
needs and serve their demands. It is implemented with
multi-turn and multi-branch conversation flows by creating
prompts and calling them from waterfall dialogs. It contains
3 dialogs, the MainDialog for users to choose which feature
to use and ask for necessary document uploading, the
AnswerDialog to do QnA, and the DocDialog for users to
obtain document processing results. Here is a piece of code
from the mainDialog class, showing how bot’s dialog jumps
from one step to the next:
async startStep(step) {
/* WaterfallStep always finishes with the end of the Waterfall or with another dialog; */
/* Running a prompt here means the next WaterfallStep will be run when the user's response is received.*/
  const msg = step.options.restartMsg ?
              step.options.restartMsg :
              'What can I do for you?';
  return await step.prompt(CHOICE_PROMPT, {
    prompt: msg,
    choices: ChoiceFactory.toChoices([
      'ask a question',
      'process a document',
      'recognize an image'
    ])
  });
}
async chooseStep(step) {
  const choice = step.result.value;
  ...
}
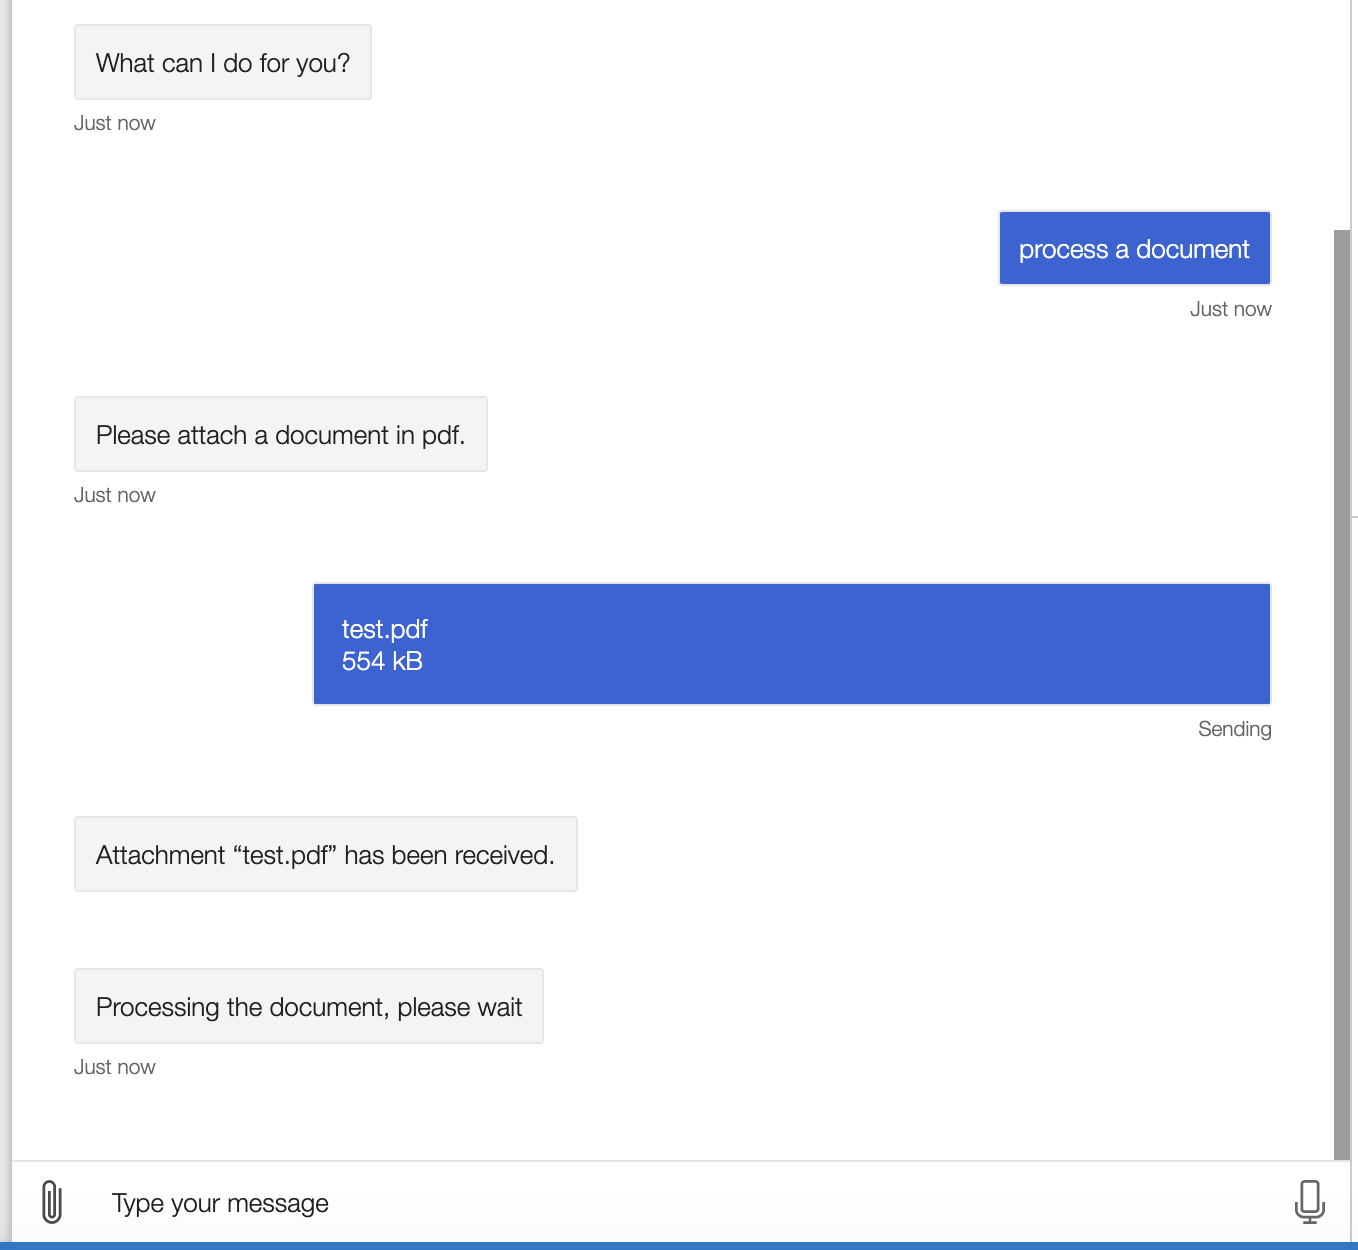
4. how AvaBot receives document and sends for
processing
When the user chooses to process a document, AvaBot receives it and saves it to disk, while forwarding the document to document-processing APIs via HTTP POST request.
async docStep(step) {
  if (step.result && step.result[0].contentUrl) {
    var type = step.result[0].contentType;
    var path = await this.handleIncomingAttachment(
      step.context);
    if (path) {
      await step.context.sendActivity(
        'Processing the document, please wait');
      var data = await this.sendReq(path);
      return await step.beginDialog(DOC_DIALOG, {
        sum: data[0],
        query: data[1],
        form: data[2],
        filepath: path
      });
    }
    ...
5. how AvaBot makes http requests
The received document will be sent to three APIs, where
TextSum API will return the summary result, QA-system API
will return the pre-processing status, and Form-Recog API
will return table data. To optimize the overall processing
time, we applied Promised.allSettled() method, which allows
the requests to be sent simultaneously and halts the dialog
until it has successfully obtained all the three results
regardless of status (Other similar methods like Axios.all()
would fail if any of the request failed).
async sendReq(path) {
  ...
  let reqArr = [axios({
      method: "post",
      …
  }), axios({
      method: "post",
      …
  }), axios({
      method: "post",
      …
  })];
  var output = [];
  await Promise.allSettled(reqArr).then(results => {
    results.forEach(result => {
      if (result.status == 'fulfilled') {
        output.push(result.value.data);
      } else {
        output.push(0);
      }
    })
  })
  return output;
}
The processing results will be directed to DocDialog as the dialog branch begins, when the user will be asked whether
they want doc-summary, table data or to do doc-query. The
advantage of performing the requests before actually letting
users to choose which document processing features they
would like to utilize is that user only need to wait once at
this stage and then can quickly get processing results when
they ask for any of those rather than waiting for each of
the request to be performed if they want to experience
multiple features, even though they don’t, we can still
guarantee the overall waiting time is optimal.
Question Answering Implementation
Impl. Overview
1. configure QnAMaker in AvaBot
The question answering feature is implemented by using the
QnA Maker Azure service, which allows for quick
establishment of a natural conversational layer over FAQ
pages, support websites, product manuals, etc.. In
AnswerDialog, AvaBot uses the connection information
provided by the .env file to establish a connection to the
QnA Maker service: this.qnaMaker.
class AnswerDialog extends ComponentDialog {
  constructor() {
    super(ANSWER_DIALOG);
    try {
      this.qnaMaker = new QnAMaker({
        knowledgeBaseId: process.env.QnAKnowledgebaseId,
        endpointKey: process.env.QnAEndpointKey,
        host: process.env.QnAEndpointHostName
      });
    }
  ...
2. get answer for a question
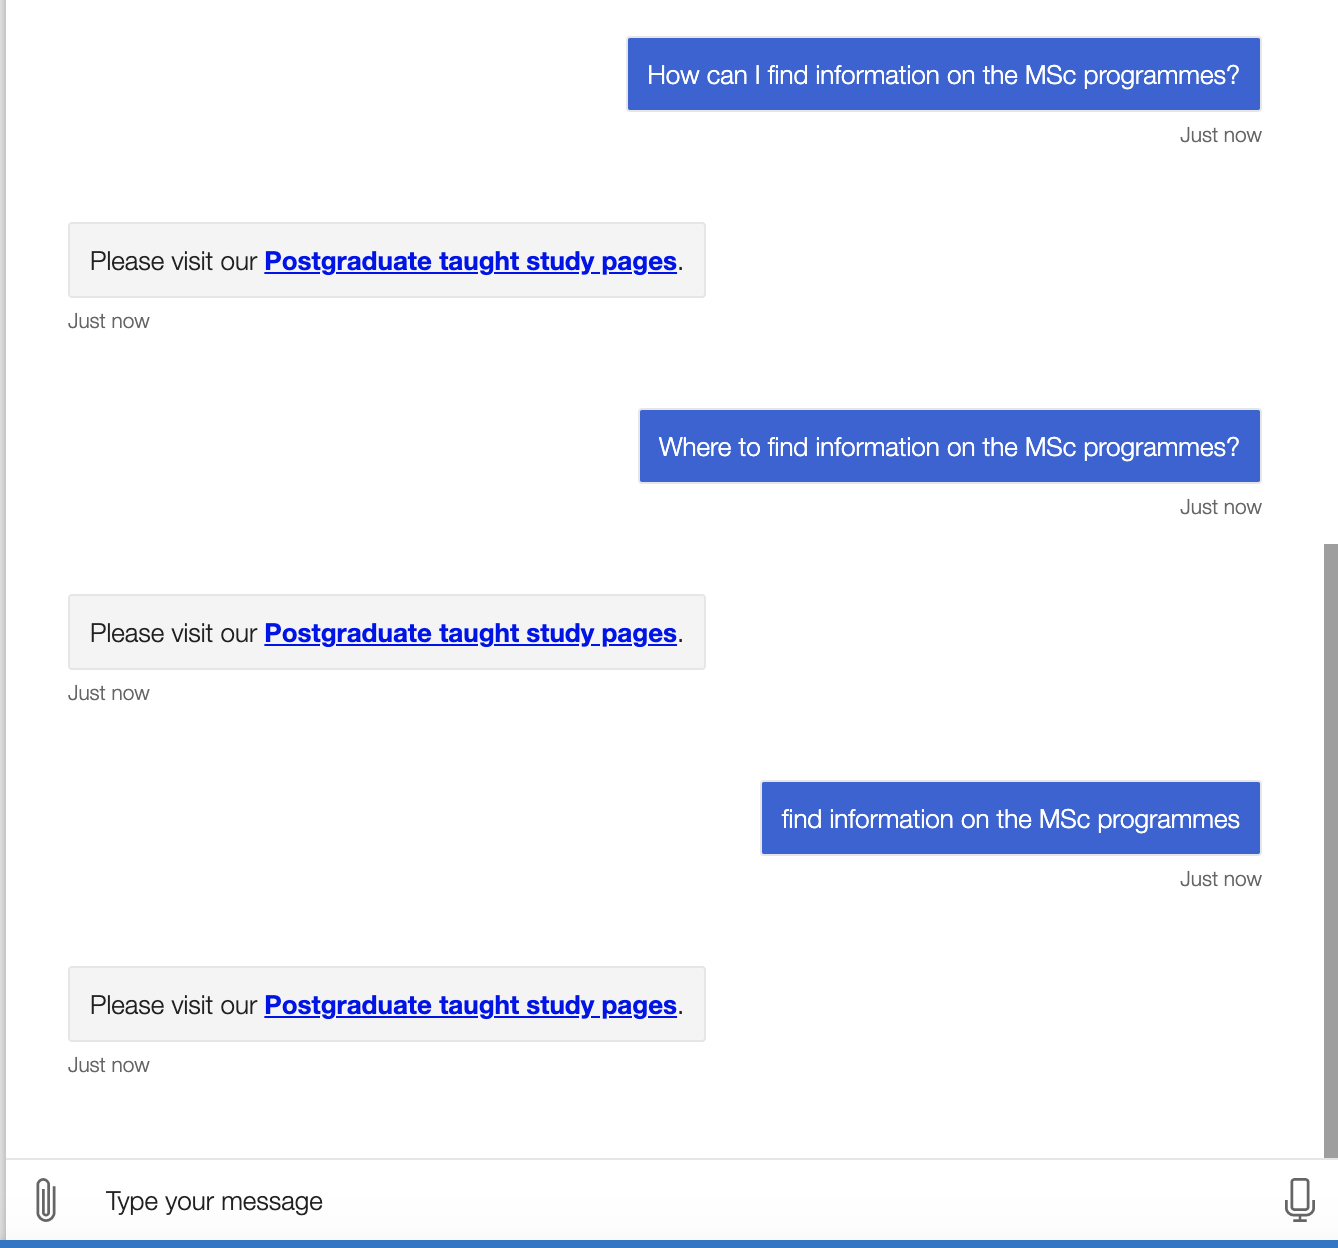
After receiving the question from the user, AvaBot passes it to the QnA Maker service's getAnswers method to get answers from the knowledge base. If QnA Maker returns a response, it will be sent back to the user.
const qnaResults = await this.qnaMaker.getAnswers(stepContext.context);
var msg = '';
if (qnaResults[0]) {
  msg = qnaResults[0].answer;
} else {
  msg = 'No QnA Maker answers were found.';
}
The QnA Maker is able to parse and interpret the question intent for one question asked in different formats.
Text Summarization Implementation
Tools & Dependencies

The text-summary function is written in python.

NLTK: a python package for natural language processing
Sumy: a python module for automatic text summarization
Impl. Overview
1. pre-process document
The document-summary feature is implemented by using TextRank algorithm, with the code referred to and originated from Sumy Python Module (miso belica, Kmkurn and Isarth). Before the summarization, the document is pre-processed with text split into sentences, non-ascii characters removed, and stop-words cleared off.
2. algorithm walk-through
TextRank is a graph-based ranking model for text processing. The vertices are the sentences in the text, and the edges between the vertices (sentences) are of a similarity weight of the two sentences, which is calculated by

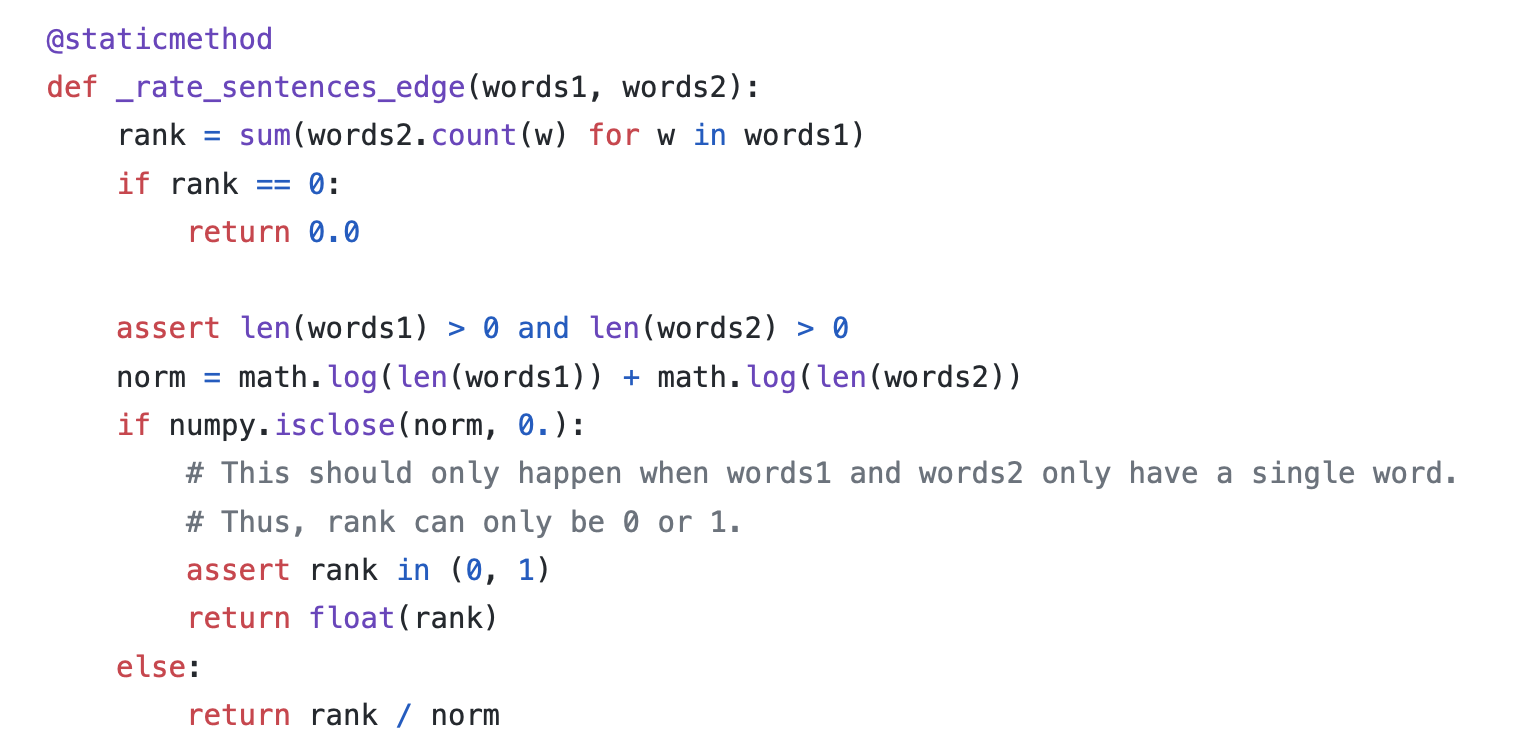
The vertex weight can thus be obtained as shown by the formula, where Wij is the similarity weight added to the corresponding edge that connects the two vertices, d is a damping factor usually set to 0.85 (Brin and Page, 1998).

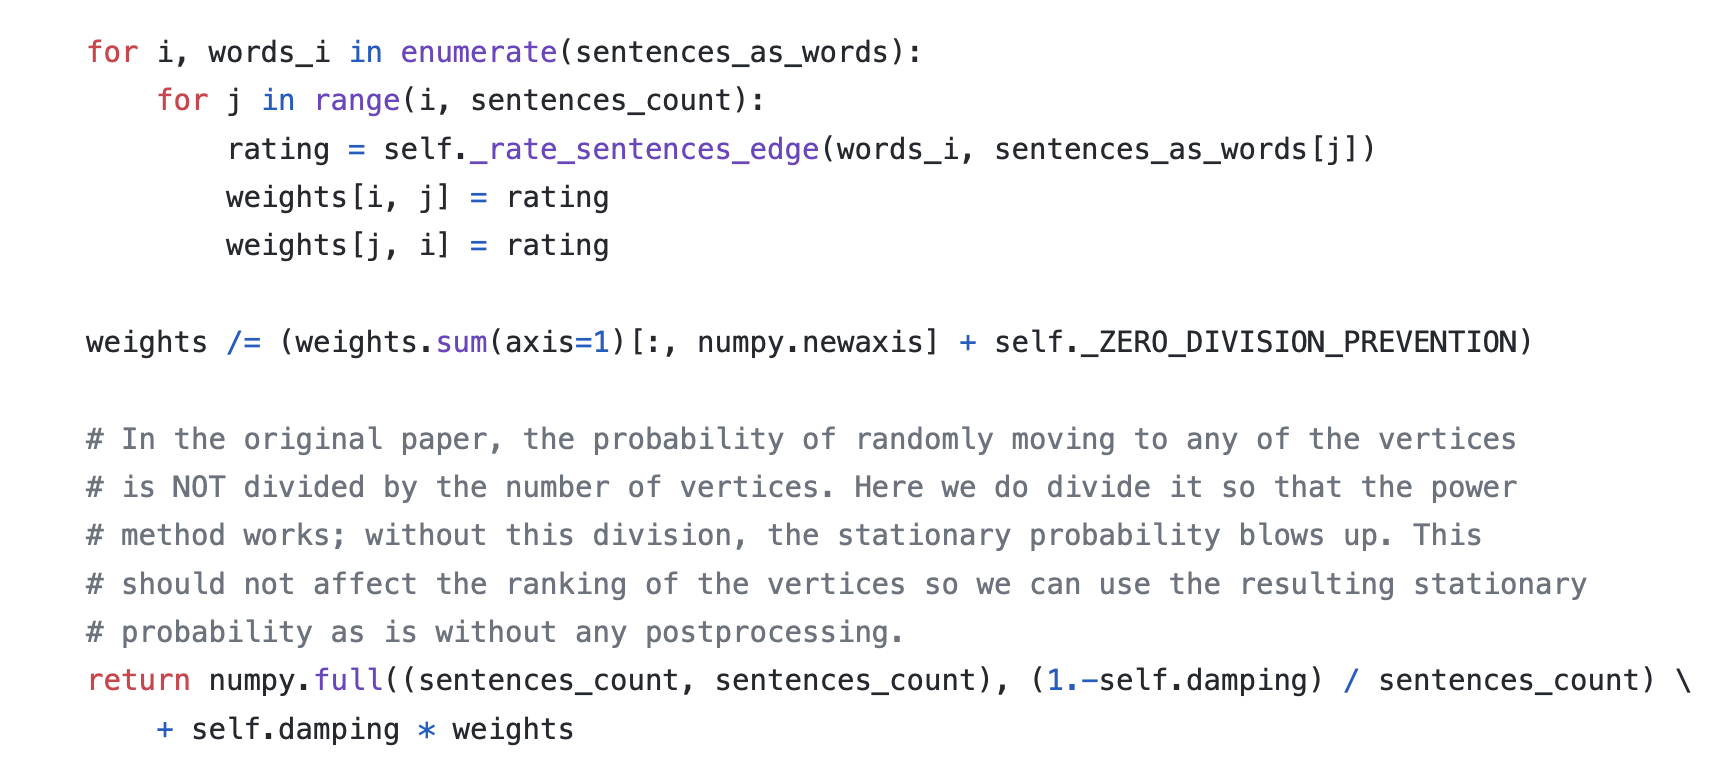
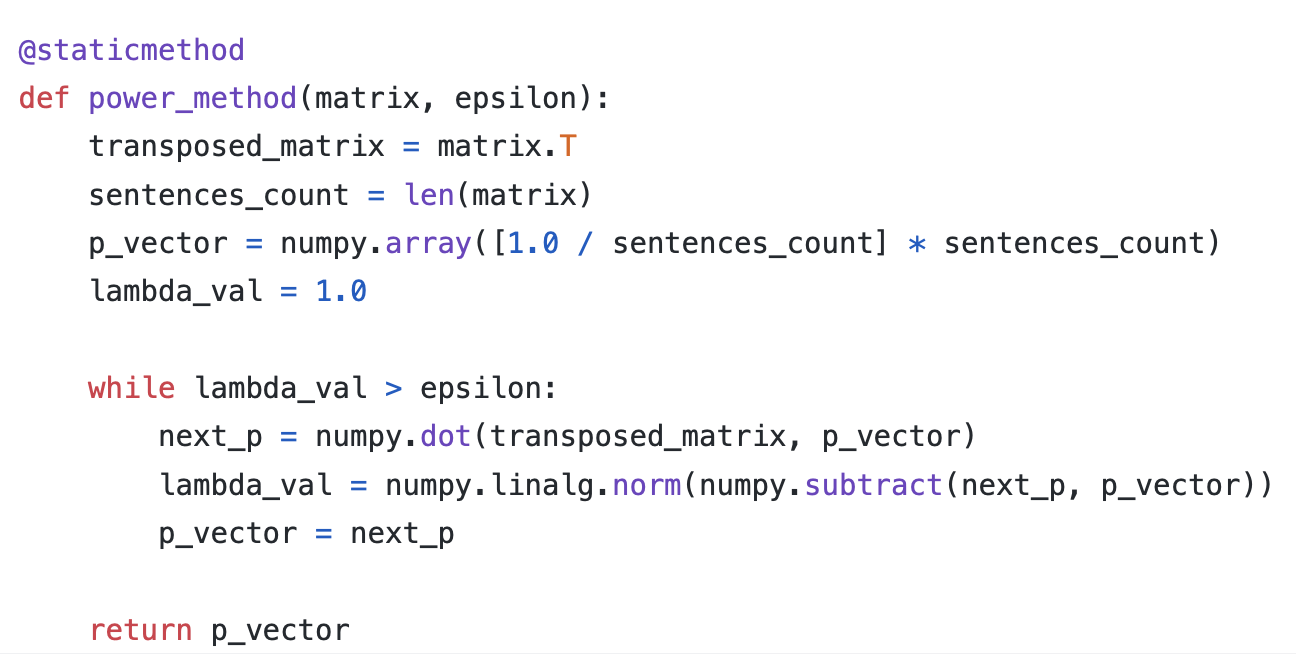
The power_method manipulates the matrix to be a column stochastic matrix. Then the sentence rank is obtained by iteratively dot-producting the stochastic matrix with the rank matrix (initially as [1,1,…,1]) until the rank matrix converges, i.e., the dot-product result is similar to the rank matrix that produces it).
The sentences are matched with their corresponding ranks, where top-ranked ones are displayed to users. The number of sentences to be displayed is heuristically set to be proportional to the document length with the upper limit at 10.
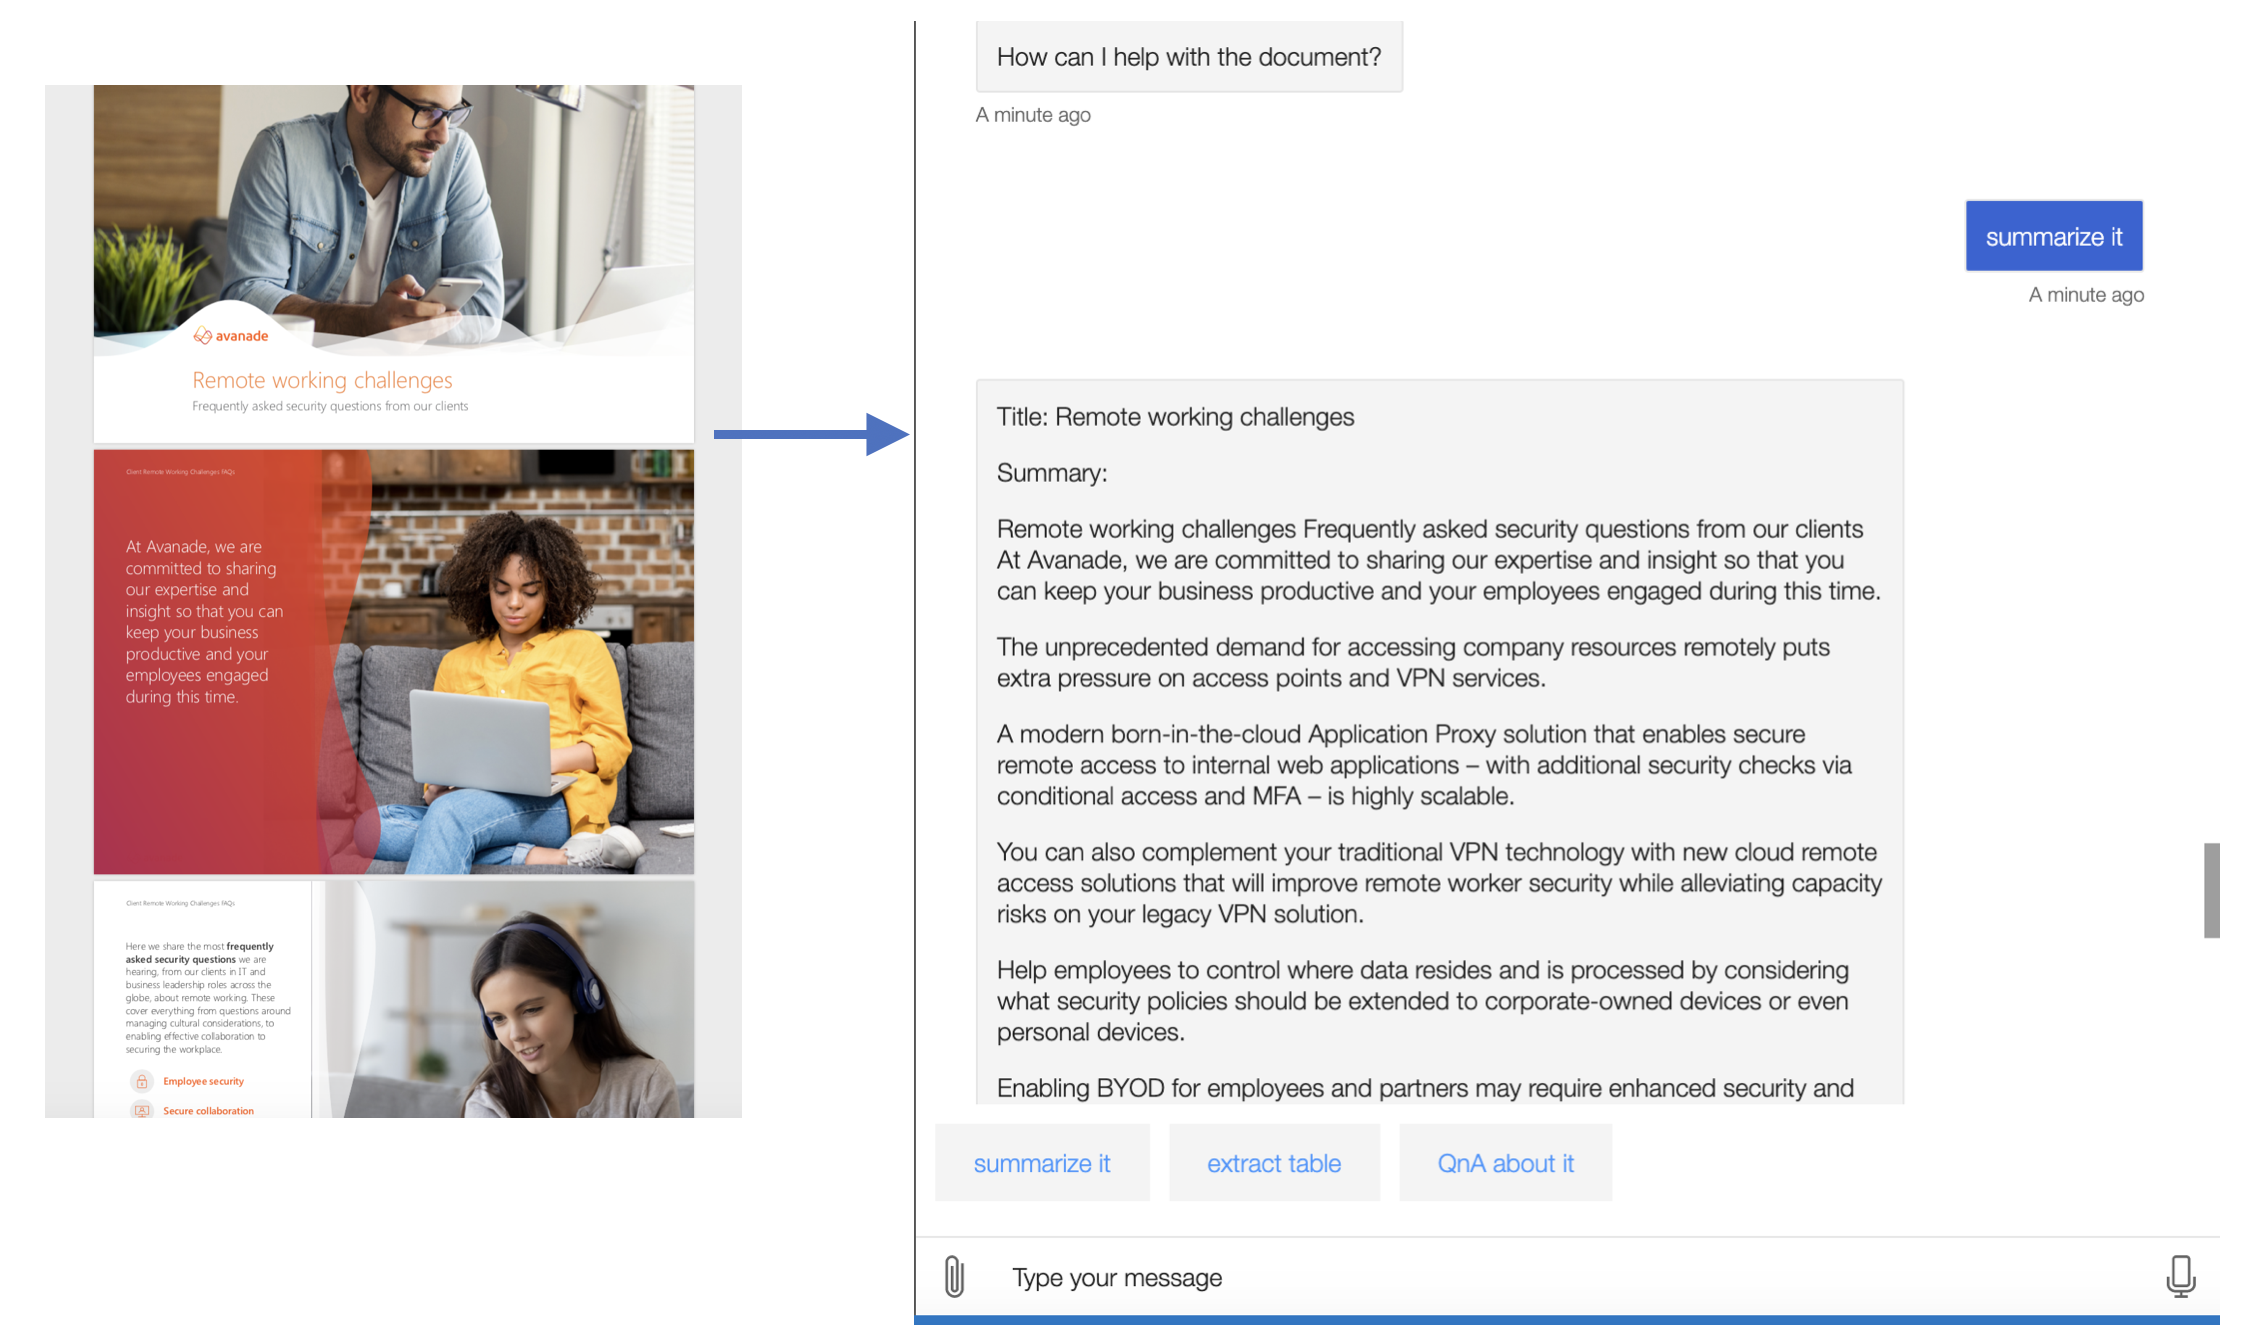
Table & Image Recognition Implementation
Tools & Dependencies
The table & image-recognition function was written in python.
Azure Form Recognizer API was used to recognize forms from documents and images.í
Impl. Overview
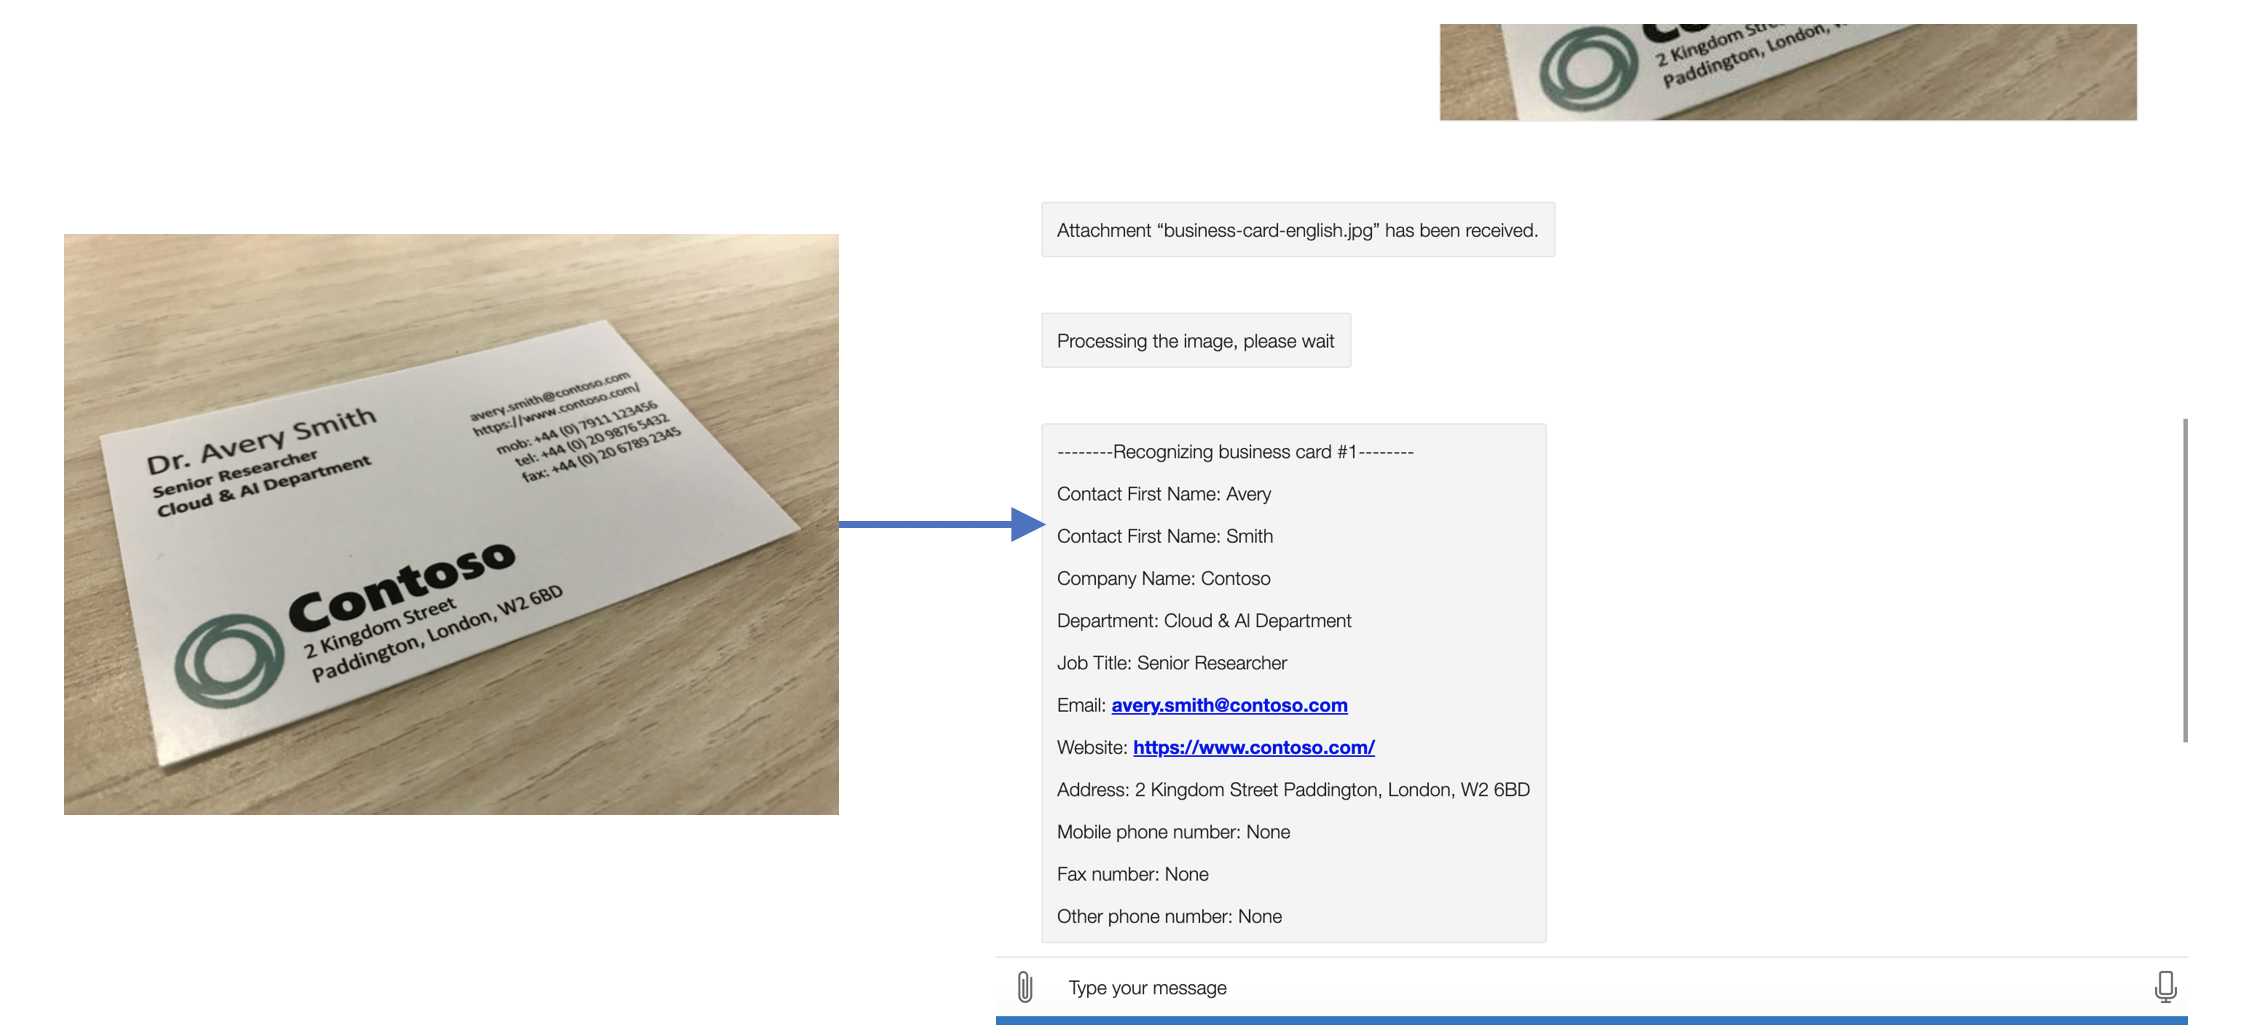
Among all types of images, we have particularly focused on the business-card model for now since it is one of the most commonly used image types for company employees. Here thus lifted the implementation for it as the example.
1. configure the Form Recognizer client
EndPoint and credential key are provided to establish a connection to the Form Recognizer service.
form_recognizer_client = FormRecognizerClient(ENDPOINT, AzureKeyCredential(KEY))
2. get the recognition results
The recognition results for an image of a certain model is obtained by calling the corresponding recognizing method, in this case, form_recognizer_client.begin_recognize_business_cards() is called. Having secured the recognition results, all the possible fields are iterated by using business_card.fields.get(INFO_FIELD), where available ones are collected, reformatted and returned.
def process(file_path):
  with open(file_path, "rb") as card:
    poller = form_recognizer_client.begin_recognize_business_cards(business_card=card, locale="en-GB")
    business_cards = poller.result()
  extractedInfo = []
  ...
  contact_names = business_card.fields.get("ContactNames")
  if contact_names:
    for contact_name in contact_names.value:
      extractedInfo.append("Contact First Name: {}\n".format(contact_name.value["FirstName"].value))
      extractedInfo.append("Contact First Name: {}\n".format(contact_name.value["LastName"].value))
  company_names = business_card.fields.get("CompanyNames")
  if company_names:
    ...
  ...

  return extractedInfo
3. connect to AvaBot via http requests
Every time a request is sent from AvaBot with the document provided by the user to the python function, which was deployed on Azure cloud, the main() method will generate and give back the recognition result in response.
def main(req: func.HttpRequest) -> func.HttpResponse:
  file = req.files.get("file")
  ...
  result = recogBusinessCard.process(file_path)
  result_json = json.dumps(result)
  return func.HttpResponse(result_json)
Here shows the demo of user requesting recognition of information from a business card:
Question-Answering System for Documents
Tools & Dependencies

A open domain QA system framework
An application server to host the system
Reverse Proxy to buffer the file transfering
Impl. Overview
The implementation of the QA system is separated into two parts: document retrieval and natural-language question processing.
Document retrieval
When a POST request arrives, the program first pre-processes the text.
The preprocessing includes
1. Extracting the text from the file attached with the request to the Document object accepted by Haystack
2. Cleaning the text by removing numeric tables, header and footers that are repeated on each page, normalizing empty lines and white spaces
3. Splitting the text into smaller chunks to optimize retrieval
def file_upload(file):
    try:
        file_path = '/tmp/' + file.name + '_tmp'
        with open(file_path, "wb") as buffer:
            buffer.write(file.read())

        if file.filename.split(".")[-1].lower() == "pdf":
            pdf_converter = PDFToTextConverter(
                remove_numeric_tables=True, valid_languages=["en"]
            )
            document = pdf_converter.convert(file_path)
        elif file.filename.split(".")[-1].lower() == "txt":
            txt_converter = TextConverter(
                remove_numeric_tables=True, valid_languages=["en"],
            )
            document = txt_converter.convert(file_path)
        else:
            raise HTTPException(status_code=415, detail=f"Only .pdf and .txt file formats are supported.")

        document = {TEXT_FIELD_NAME: document["text"], "name": file.filename}

        preprocessor = PreProcessor(
            clean_whitespace=REMOVE_WHITESPACE,
            clean_header_footer=REMOVE_HEADER_FOOTER,
            clean_empty_lines=REMOVE_EMPTY_LINES,
            split_by=SPLIT_BY,
            split_length=SPLIT_LENGTH,
            split_overlap=SPLIT_OVERLAP,
            split_respect_sentence_boundary=SPLIT_RESPECT_SENTENCE_BOUNDARY,
        )

        documents = preprocessor.process(document)
After that, the document is sent to the document store for indexing and generating a pipeline. Pipeline sticks powerful building blocks together, which are retriever and reader in our case. We keep this object in the memory which will find answers when questions are given. The QA model deepset/roberta-base-squad2 is used here as it has a quick retrieving speed compared with the others. We sacrifice a little accuracy to have a fast processing speed. Also, as we don't have a GPU on our virtual machine so we have turn the option off. This option will tell pytorch to stop using GPU acceleration.
retriever = ElasticsearchRetriever(document_store=document_store)
reader = FARMReader(model_name_or_path="deepset/roberta-base-squad2", use_gpu=False, context_window_size=500)
p = ExtractiveQAPipeline(reader, retriever)
natural-language question processing
When a query is sent to the system, key extraction is performed to identify the question type, where "who", "when", "what" refer to person, time and description respectively. The question will then be directed to the pipe with top-rated answers returned back.
Here is the pipeline structure:

Elasticseach
There are several options to start the ES on the machine. We run it by using docker image as a daemon as it is easy to configure.
docker run -d -p 9200:9200 -e "discovery.type=single-node" elasticsearch:7.6.2
Nginx & Gunicorn
Gunicorn is using bio concurrency model, which means the worker process will be blocked when a file with large size is sent. As our machine has one-core only CPU, we set the number of worker processes to 2. Hence, it is likely to timeout a connection when several TCP connections flood in together, just because the worker processes are waiting for receiving large files. This is actually a famous disadvantage of Gunicorn.
bind = "0.0.0.0:8000"
timeout = 120
loglevel = "debug"
preload = True
workers = 2
We then added a reverse proxy in front of our application server to get rid of this problem. The buffering reverse proxy will wait until it gets the entire request, then it will pass this request to the application server, which will just process it and deliver the response back to the reverse proxy, being free to receive new requests.
server {
    listen 80;
    server_name {DOMAIN_NAME};

    location / {
        include proxy_params;
        proxy_pass {FILE_PATH};
    }
}