Introduction
The Engduino can be used as a simple pedometer, a device that counts your steps. It works by using the accelerometer sensor on the Engduino, and checks if you are making a step. The accelerometer is used as it checks the change in position based on x, y and z coordinates.
To simplify this idea, think of an object in your hand. It can move forwards-backwards, left-right and up-down or any combination of these. We use these changes to calculate how fast the object was going and whether it was in a specific direction we need and then add to the number of steps if the movement was great enough.
Programming Steps
1. pedometer Action
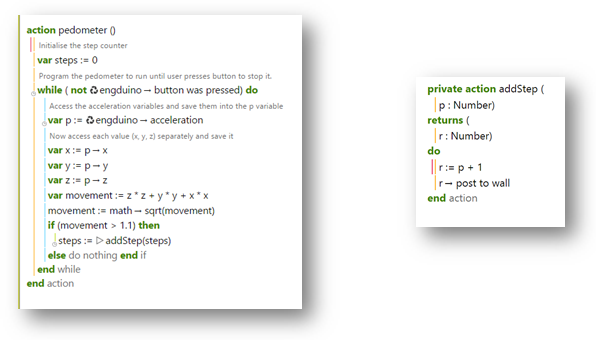
This code makes a simple pedometer which will turn all the LEDs green once the Engduino has registered a step. Let’s break down the code to make it easier to understand and so that we can see what each line does.
var steps:= 0
This sets up a variable called steps which is used in the program to count the number of steps.
while true do
This means that a loop is started which will keep running infinitely. We use this loop to keep checking the sensors and make updates to the Engduino
var p := Engduino -> acceleration
This gets the latest accelerometer values to be used by the program
The value is stored in a variable called p and is in the format (x,y,z) where x,y and z can be any decimal number. The type of value of p is called a vector.
var x:= p -> x
This separates the variable p and takes its x element to put into a variable called x
This method is similar to the code written below which separate out the y and z variables
var movement := (z * z) + (y * y) + (x * x)
This equation is very important to understand and helps to calculate the direction that the Engduino is being moved in as well as how quickly it is moving.
This value is square rooted to get the movement of the Engduino and then we have to compare the value to make sure we are counting a step and not any small movements made by the Engduino.
steps := |> addSteps(steps)
This code will perform the action ‘addSteps’ on the number of steps and return the value to the steps counter. addSteps will just increase ‘steps’ by 1
2. addStep Action
This action takes in a value which is the current number of steps and then adds 1 to it, meaning the user has made a step. The number of steps are then counted so you can see the number of steps you have made so far
P is the variable which is taken in by the action to be increased. It is the number of steps.
R is the variable returned to the program and is the updated total number of steps.
Final Code

Plain text file containing the final version of the code for the pedometer.
Additional Exercises
- Let’s begin with some simple steps. Create and script which gets the accelerometer value from the Engduino and prints it out.
-
- Add to this script by creating a loop which keeps getting the accelerometer value and prints it out constantly. The values should be separated into the separate coordinates, x, y and z.
- Modify the loop to perform the following code:
- Var movement := (z * z) + (y * y) + (x * x)
- movement := math -> sqrt(movement)
- Compare the value gained from this code to a value between 1.0 and 1.7 and print out movement only when you get a value greater than the value you chose.
- Add a new function which adds to the number of steps only when you have a movement value greater than the value you chose in exercise 2.b. Then make the program print out number of steps every time this occurs.
Advanced Pedometer (Optional)
A much better pedometer can be created in C code by using LED lights to show the number of steps you take using tens, hundreds and thousands as different colours and only lighting up a certain amount of LEDs. This method is quite complicated and relies on using the LEDs to show whether a step has been made.
C CodeYou can find an explanation for this code here.