Introduction
For this section of the project, we want to write a Touch Develop action which reads body temperature using the thermistor on Engduino.
Getting started
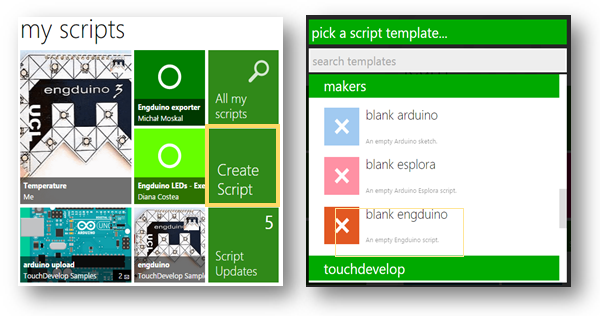
In order to create a script for the project, we need to start from a blank engduino script template.
Programming Steps
1. The Temperature Action
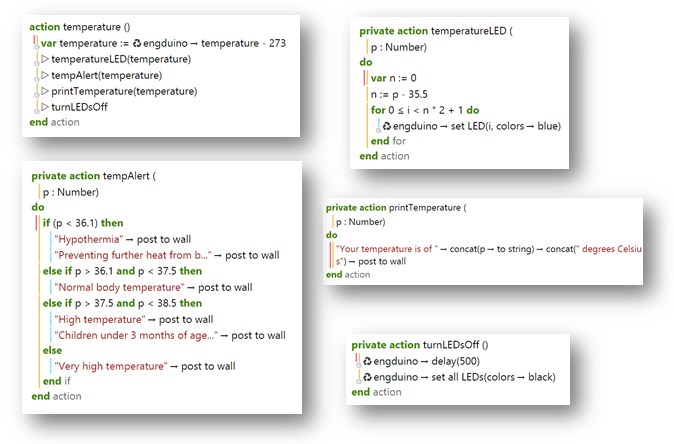
We suggest creating a new action for each sub-section of the project. So for the temperature part, create a new action, named temperature.
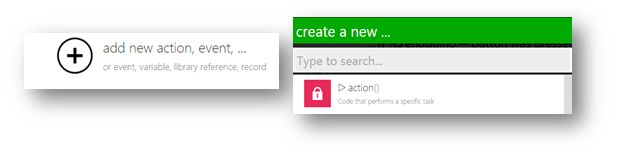
To add a new action, press the add new action, event,… button, and then pick the action option.
2. The Code for reading the Temperature and responding to it
var temperature := engduino -> temperature -273
Declaring a variable temperature that stores the value of temperature which we can get from the reading of temperature sensor on the Engduino. Since the value we get is in degrees Kelvin, we use -273 to turn it into degrees Celsius.
3. Carrying out a sequence of separate actions.
temperatureLED(temperature)
alertRecom(temperature)
printTemperature(temperature)
turnLEDsOff
Using function calls is a way of keeping the code tidy. As temperature is used in some actions, we need to pass it to the action. Therefore, we will create a set of 4 new actions, which will afterwards be called inside the main temperature function.
4. temperatureLED Action
private function temperatureLED(p:Number)
Since variable temperature is passed into the action, we need to input a parameter p which holds the value of temperature:

As we already understood how the for loop works in the previous lesson, we can use it to light up different LEDs when the temperature changes.
The command we use to set LED is:
Engduino -> set LED ( NUMBER , colors -> COLOR )
5. alertRecom Action
This action is used to compare temperature and give suggestions like whether it is in the recommended range.
If statements are used in comparison and -> post to wall is used to display messages. They are both explained in the previous lessons.
6. printTemperature Action
Printing temperature on the screen.
"Temperature: " -> concat ( p -> to string) -> concat (" degrees Celsius" ) -> post to wall
You are already familiar to the post to wall function. Well, the concat function allows for the concatenation of different strings (here, we concatenate three strings: “Temperature: ”, to the string version of the number p, and to the string “ degrees Celsius”). The reason this is necessary is for us to be able to print the whole sentence on the same line, as well as include the number.
7. turnLEDsOff Action
engduino -> delay(1000)
In order to keep the LEDs on for a period of time, we need to delay next command, using the delay function. Notice that the number is in milliseconds, so 1000 is equivalent to 1 second.
engduino -> set all LEDs(colors -> black)
We are able to control all LEDs by using the set all LEDs function and the colour black will turn off LEDs.
Final Code
Plain text file containing the final version of the code for the temperature monitor.
This is the end of the Temperature Section of your project. We hope you have enjoyed it and
can get a better understanding of programming in TouchDevelop.