Overview
To deliver on our key requirements for the project, it was pivotal to manage our work such that debugging, integration and deployment were efficient. We spilt our main project components into separate repositories, each repository holding related features for our application. Having done this, each sub-system/sub-part of the project was developed concurrently, to prevent interrelated conflicts from arising. Our solutions are tailored specifically for our goals, which were to increase the accessibility and utility of remote physiotherapy. We attempted to make a few different systems, so patients have greater choice and options for their physiotherapy, with hopefully at least one solution bringing convenience for patients, depending on their accessibility.
Technologies and Tools
Python 3.9
MotionInput V2's backend codebase was developed entirely in Python, in particular using Python 3.9.

NDI
Using NDI technology we were able to extract videos straight from the Teams call, to be fed into MotionInput.

Javascript and React
For developing a Microsoft Teams Application, we chose Javascript and React libraries as opposed to typescript. This helped us produce a quick yet simple frontend.

Teams Toolkit
For developing Teams Applications, we used the Teams Toolkit. This is a Visual Studio Code extension to aid the development process.

MediaPipe and MatPlotLib
MediaPipe is a cross-platform framework, developed by Google, that can be used as a Python library. We utilised MediaPipe library to collect patient’s motion data.

NPM Packages
We need the following packages to use Fluid Framework so we can deploy Live Share SDK in our application: "fluid-framework” ← Latest Version "@microsoft/live-share" ← Version “^1.0.0-preview.4" "@microsoft/teams-js" ← Version "^2.7.1" In the end, we chose to use LiveShare SDK because our partners explained how it has been built for easy integration into Microsoft Teams. Furthermore, they explained the LiveShare experience and how it has only been deployed (as of 9th February 2023). We saw this as an exciting opportunity to utilise this new SDK, and build something impressive as this was the first project to use this SDK.
NDI Implementation
Python wrapper Implementation
The NDI library is written in C, and our motionInput is written in Python. In this reason, we needed a Python wrapper to call the functions in the C library. We used the python “cffi” module to interact with the NDI library. We define the function signatures and data structures from the NDI C library that will be used in the Python code.
NDI source Finder Implementation
We implemented NDISource class which returns device name and user name of the NDI source. It is necessary in that it makes users easily find device name and user name in MFC. We used “re” python module. The Python re module is a built-in library that provides support for regular expressions (regex) in Python programming. The regular expression we used separates device name and username and return them individually.
NDI source Receiver Implementation
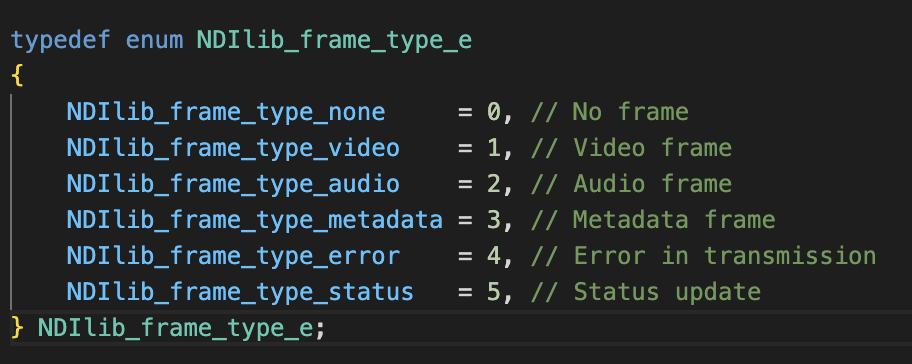
The “enum” python module is mainly used when implementing NDI source receiver. The “enum” module provides support for enumerations, which are sets of symbolic names (members) bound to unique, constant values. Enumerations allow you to define a fixed set of values that can be used in a code, making it more readable and maintainable. When NDI receiver captures video, it returns an integer corresponding to one of the enumeration constants in “NDIlib_frame_type_e”. We then compare the returned integer value whether it is a video source, audio source or error. The code below shows the corresponding integers.(This is not the snippet from MotionInput code)
Microsoft Teams App
Front End
Our Teams Application contains a comprehensive library of both single player and multiplayer games that can be rendered and played over a Teams call. Some games have had controls altered so that they can be played with the MotionInput gestures created by other teams. Furthermore, there are many features implemented into this application. We built the application based on our design principles. With these in mind, we had to create a simple UI, with information that could be only of high utility for the user. Additionally, we had to make the application compact, with limited pages for navigation. This is because we highly valued principles such as reducing the cognitive load. The main feature we added, away from the games, is a demo gesture page to show how to do certain motions. These are embedded as GIF’s within the Teams App. This acts as additional guidance for users who may need some instructions on how to play the games.

Furthermore, it is important for user's to know things such as difficulty and controls for certain games. Therefore, we added customised modals for each game, containing such information.
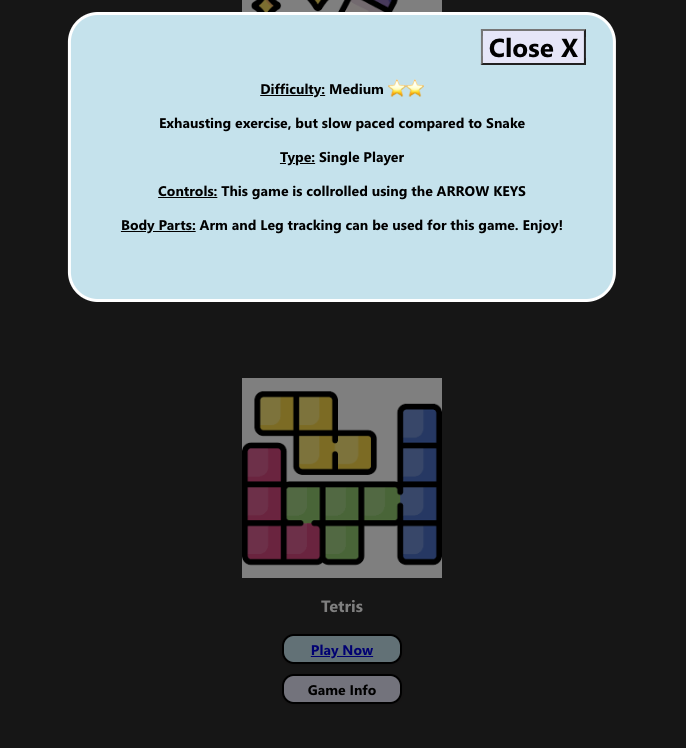
These are just some examples of the features we added to our UI, to ensure ease for the final user, while also keeping option minimal and simplistic.
LiveShare SDK Implementation
We used a new SDK (Software Development Kit), called Live Share SDK. This is a completely brand new technology, only released by Microsoft in February. Being the first project to use Live Share SDK, we thought it was important to not only get some functionality with this software integrated into our Teams application, but also lay out a framework for expansion that can be used in the future, in particular for most one-button static games like Board games. This is to enhance people’s rudimentary understanding of how the software works, given the extremely scarce documentation and example code online.
We will explain how we implemented an example game using Live Share SDK, for this guide I will explain the logic of the code behind Tic-tac-toe. As well as the Fluid Framework fille that interacts with the game, and has helper functions which can easily be utilised for many other games.
Firstly, to enable Live Share SDK to run inside an app, within our meetings, we had to code some permissions in the manifest.template.json:
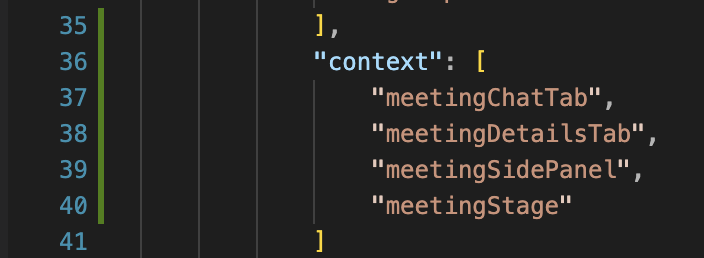
Firstly, this context updates the AppPackage.zip file to allow us to upload our application into meetings.
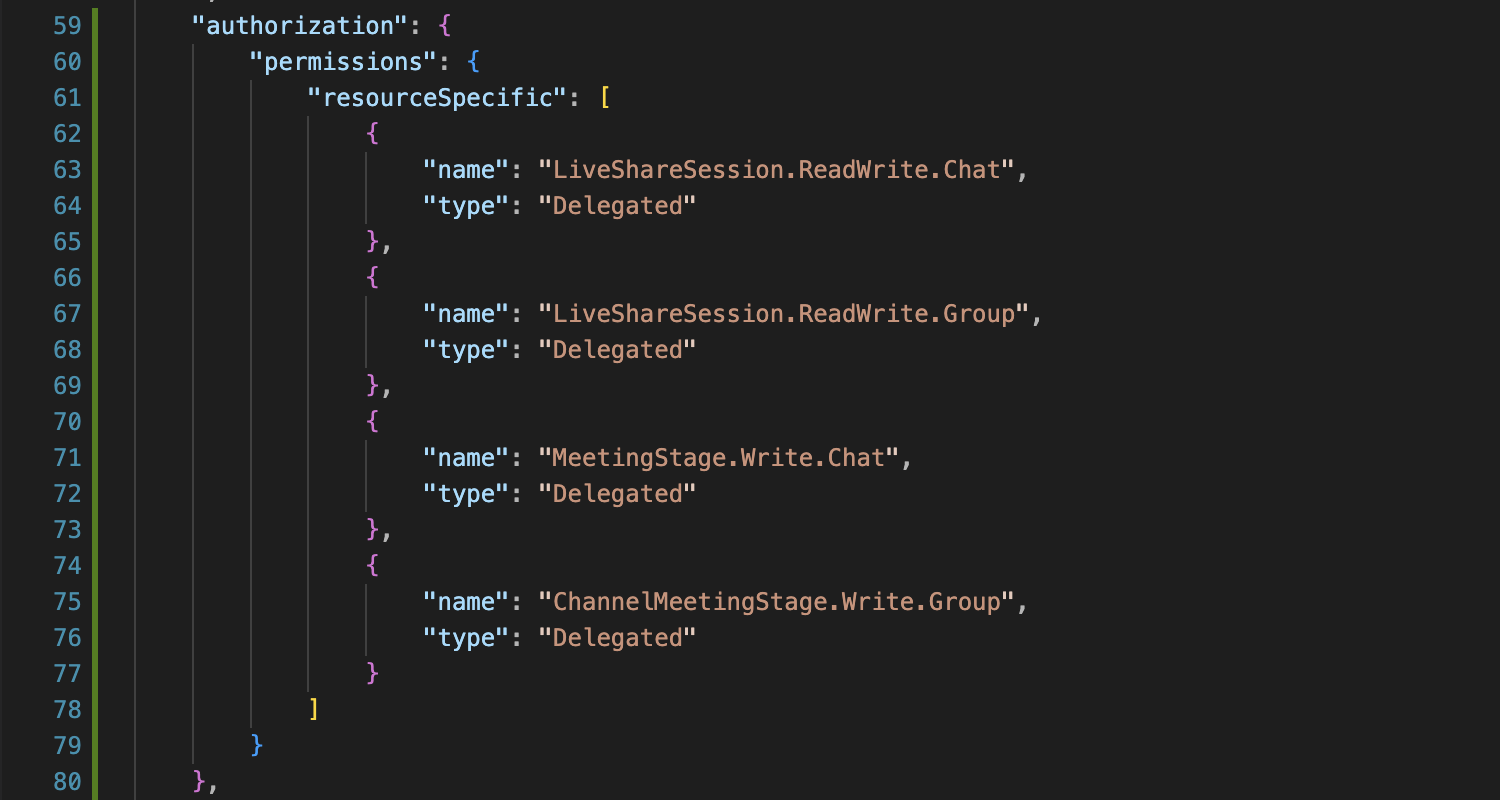
Also inside the same file, we have to add these special authorisation features. They are called ‘Resource specific consents’. This essentially means the owner of the meeting is authorised with these consents, to give to Live Share and the meeting app, so it can use the Live Share objects defined in the Fluid Service.
In the fluidliveshare.js file, we first define the class to return a singleton object, so if several components use fluid they use the same shared instance.
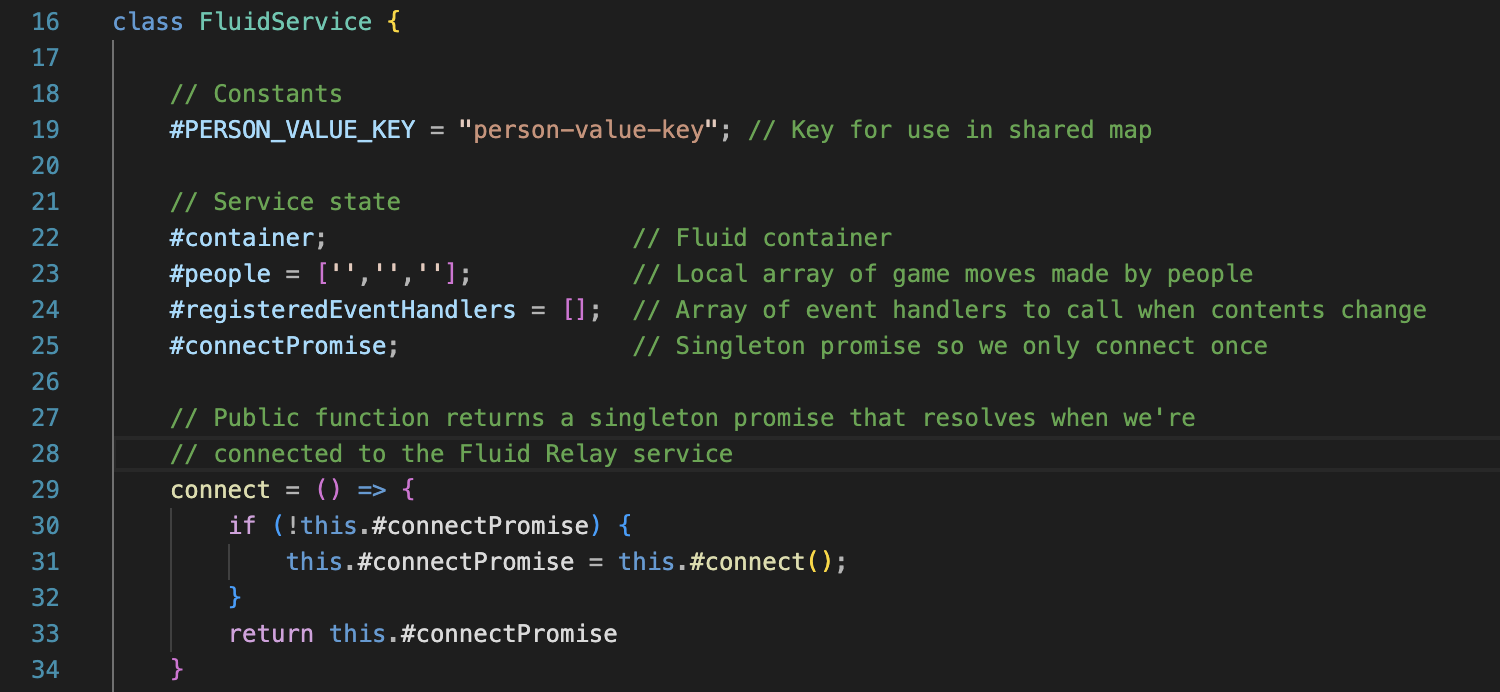
First, Person_Value_Key a single key-value pair inside a shared map which contains a JSON structure with the array which will hold all of our moves in Tic-tac-toe. This is a useful structure to implement as it makes it easy to add easy helper functions to our games and other games for extendability, such as Restart buttons, randomise buttons, etc.
The fluid container, is a container with the shared data between meeting participants, in this case it will be the moves list for Tic-tac-toe. The local array called ‘people’ holds the moves made by all the individuals inside the call. Registered Event Handlers means each UI component that uses the service state, can call a registered event handler if the underlying data of our application changes e.g., if someone makes a move. The connect function returns the ‘connectPromise’ but only connects the first-time, ensuring only a single connection, despite other requested connections. The connection code is below.
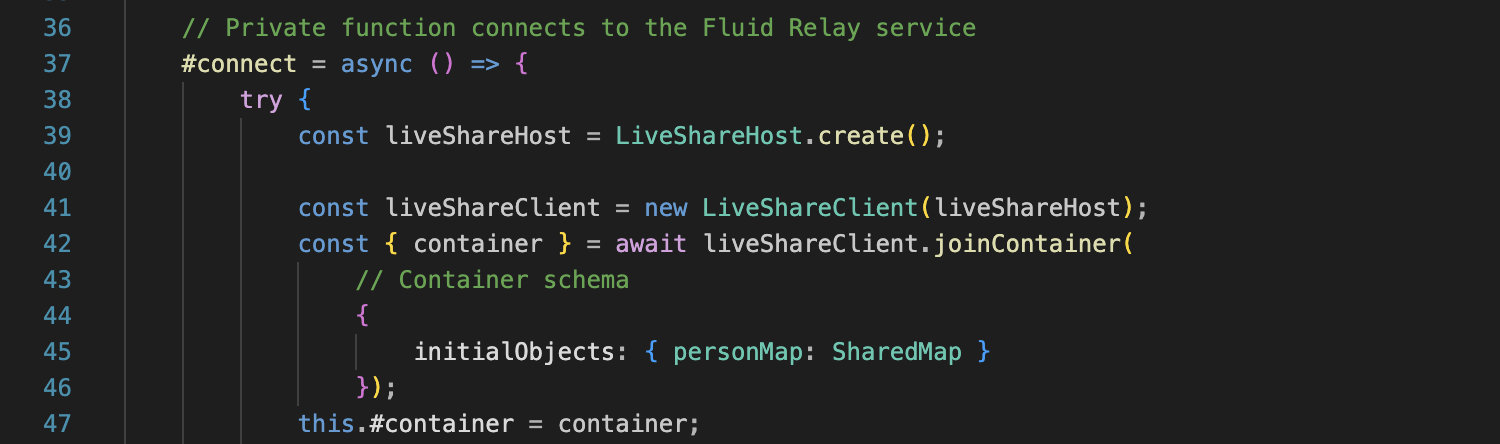
Here we are getting LiveShare hosts and clients via Teams sdk. Then we call the fluid container containing the shared map. And at the end we initiate and store the personMap being a shared map inside the service state.

This segment handles the case of the data changing, by any user in the meeting. If Line 53 detects value changes, a function is called that retrieves the updated personMap and then proceed to re-populate the array again, and then call the registered event handlers. This will alert all components in the state things that the array holding the moves for the game has updated, and updates will happen accordingly.
Finally, we have a updateFluid function, that checks and pushes the changes made to the array (for us the moves). This will call updateFluid, stringify the JSON and update the state for all the people in the meeting. This structure avoids updating our local data first, but updates fluid to call the event handlers and update the UI for everyone in the meeting.

Now the Tic-tac-toe code will be explained as an example. As well as, the helper functions defined in the fluidliveshare.js file I have just been explaining. Then the easy extendability aspect of the code will automatically become clear. (All code explained from now onwards is our Tic-tac-toe code, unless stated otherwise).

This function initialises an internal array. The array has 9 indexes, each array index corresponds to a square in the Tic-tac-toe game and holds an input (i.e. X or O). Every time a click happens on the board; LiveShare shares this array between meeting participants.
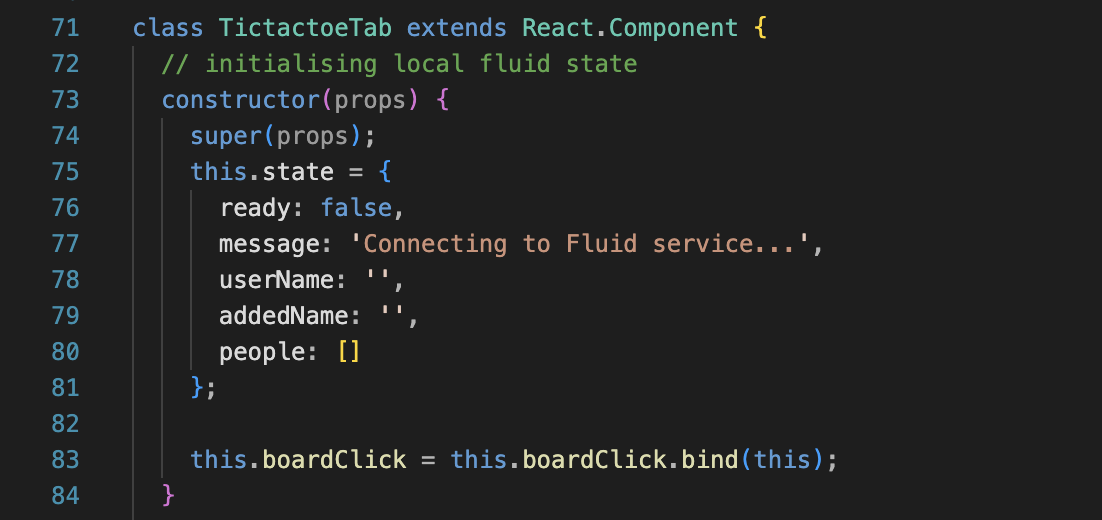
This constructor creates the state. The state here is local, and when prompted fluid will share this state to other meeting participants, who will then update their local state to this. This will synchronise the data, allowing us to create a live collaborative experience.
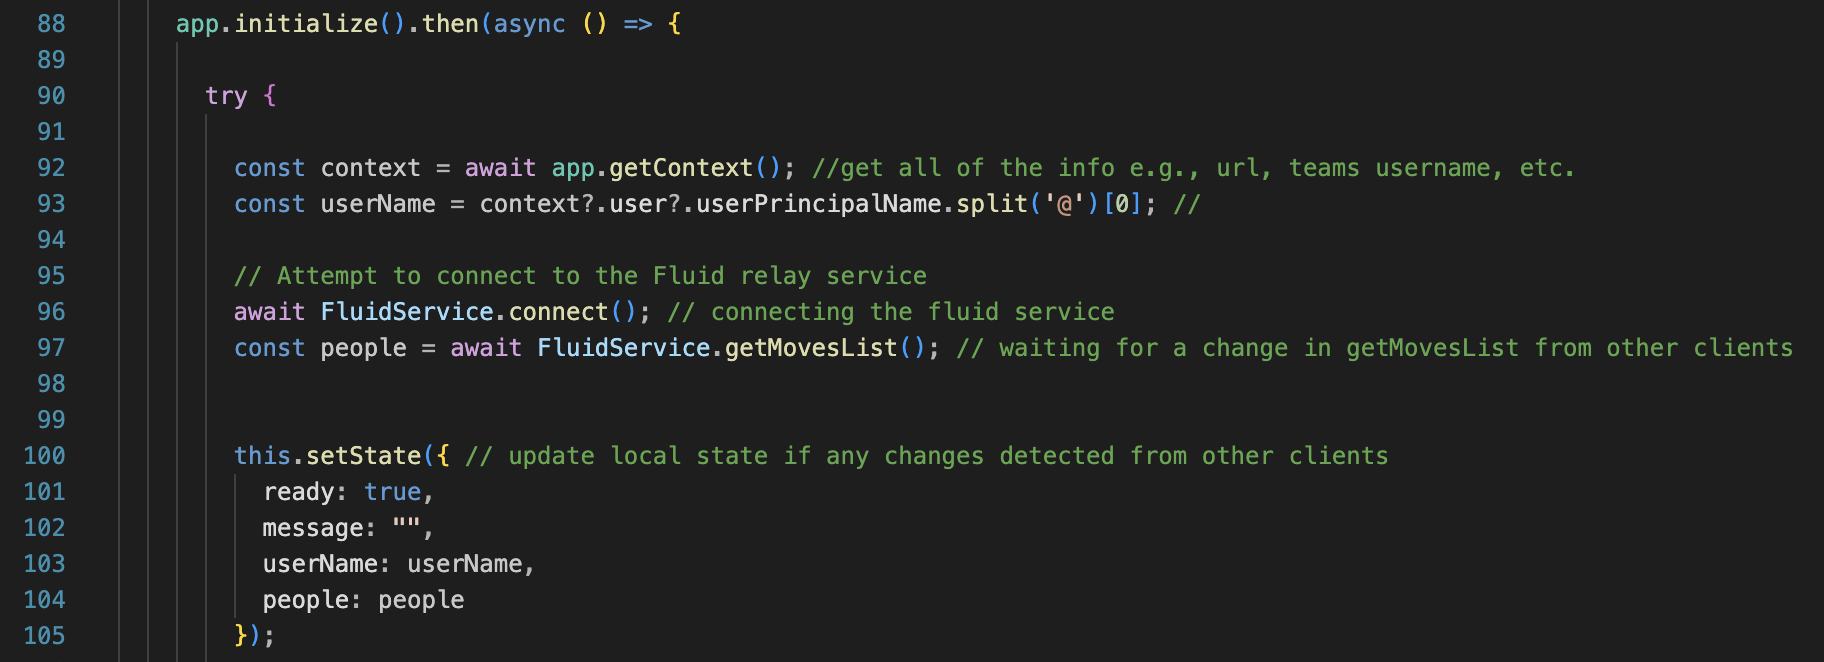
The initialise function is how Fluid initialises a connection with meeting participants. And later we use this to collect the list of moves made in the game. This getMovesList() function is defined in the fluidliveshare.js file and is shown below. Given the fluid structure used, returning this array is all that is needed for us to begin sharing states between meeting participant. So, we change setState (which is the local state), based on the array of moves. This is a simple way of sharing state of any move played in most board games, so this logic can be easily utilised for games such as Reversi, Minesweeper, Snakes & Ladders, etc…

Here is another example of how easily these helper functions can be implemented, called and synced for everyone in the meeting with our Fluid structure:

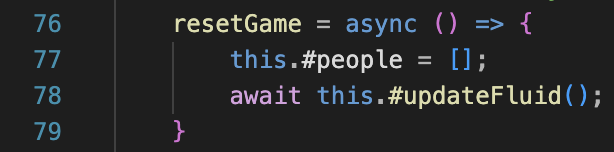
Here is a button restarting the tic-tac-toe game. Below is the helper function.Simply, the array holding all the moves is set to be empty. This will update the state for all meeting participants using updateFluid. All participant’s local state now has an empty moves array. Therefore, there is nothing to show on their screens and the grid will appear empty
This is such an effective framework we have built, we just hope it can be utilised further to build exciting Teams apps, and remote physiotherapy solutions.
Data Tracking Implementation
Calculating angles / distance
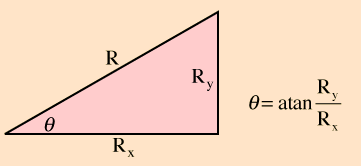
The way of calculating an angle of the elbow and shoulder is the same. We have made a calculate_angle method that gets coordinates of 3 landmarks of the necessary body parts as a parameter.
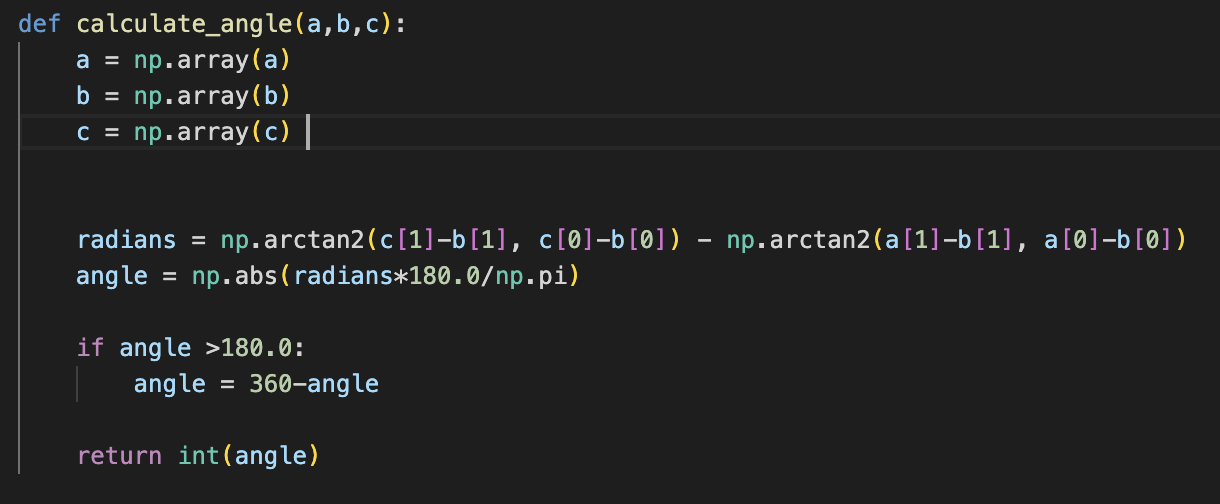
When given coordinates of 3 landmarks, we can calculate the length between them. And using the arctangent(inverse trigonometric function), we calculate the angle. The value we get from calculating arctan2 is radian so we converted it to degree which is more familiar to most of people.
As mentioned above, the way of calculating the angle of the elbow and the shoulder is the same. However, they use different landmarks to calculate the angle.
To calculate angle of the elbow, it requires shoulder, elbow and wrist landmarks.

To calculate angle of the shoulder, it requires shoulder, elbow and hip landmarks.

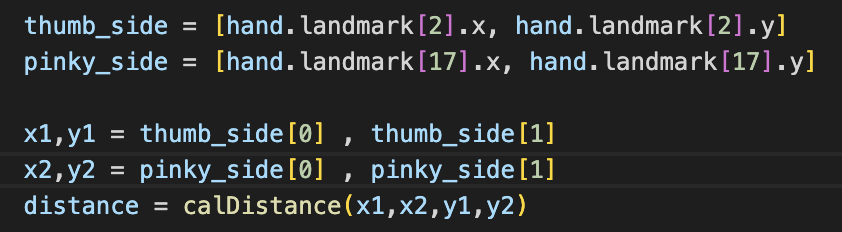
We used the concept of perspective to calculate the distance from the camera. From the image below, you can assume vanishing point to be camera, and street lamp to be your hand. Then, top of the street lamp will be where your thumb is and bottom of it to be where your pinky is. From the view of camera, the distance between thumb and pinky changes depending on the location of the hand. As you can see from the image below, when your hand is far away from the camera, the distance between thumb and pinky is longer than the distance calculated when your hand is close to camera.

We get the coordinates of thumb and pinky location. And use them to calculate the distance between thumb and pinky. Unlike angle of elbow and shoulder, we do not calculate the real distance of our hands from the webcam, but we quantify the distance depending on the location of the hands. For example, when they are close to camera, the distance returns low numbers(1,2 or 3) and if they are located further and further, the distance increases.

This is a mathematical technique we used to calculate the distance between two coordinates.
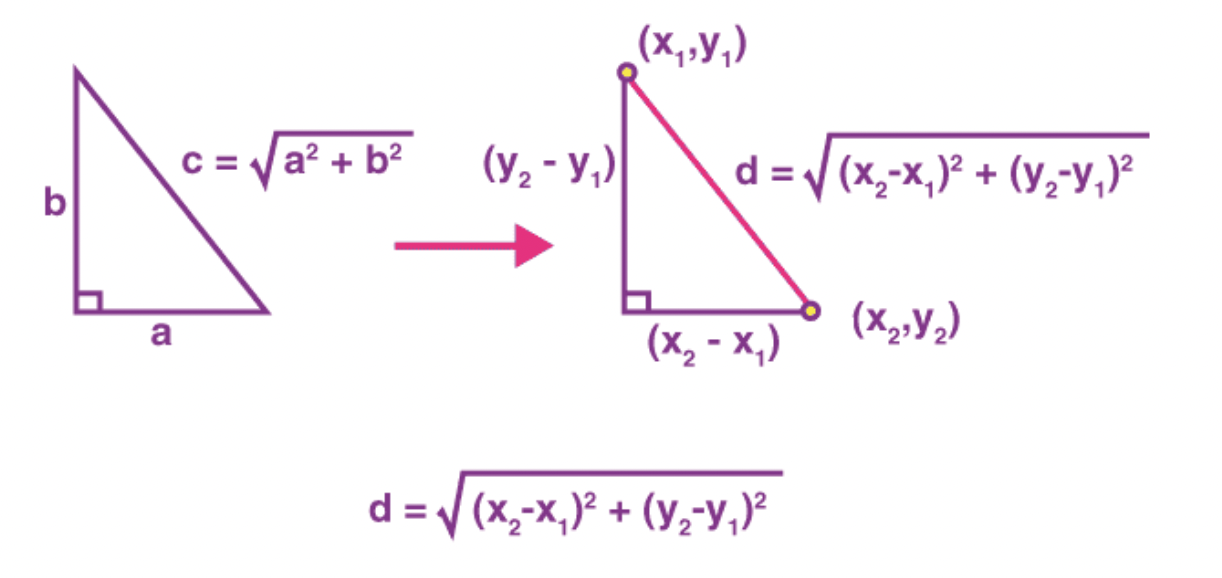
Image Processing Implementation
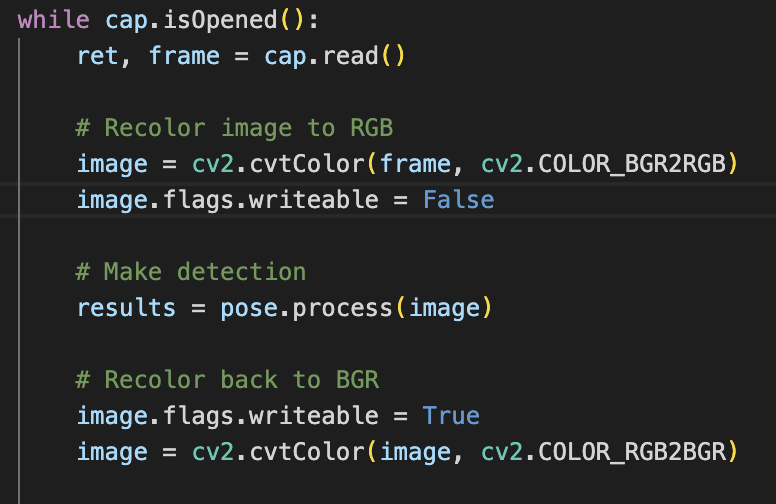
OpenCV uses BGR image format and pose estimation model uses RGB image format. In order to detect landmarks of body parts, the frame should be converted to BGR to RGB to deal with pose estimation model. After that, image should be converted to back to BGR so that it can be shown on the window by OpenCV. This image processing is done all the same for calculating angle of elbow, angle of shoulder and distance of your hands.
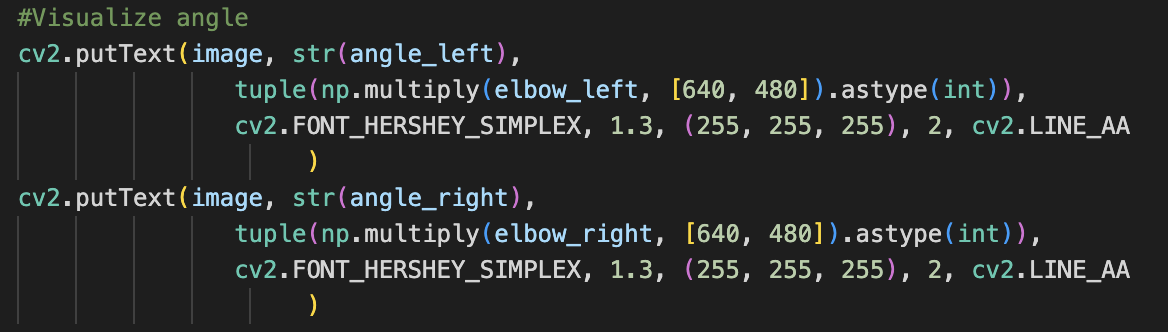
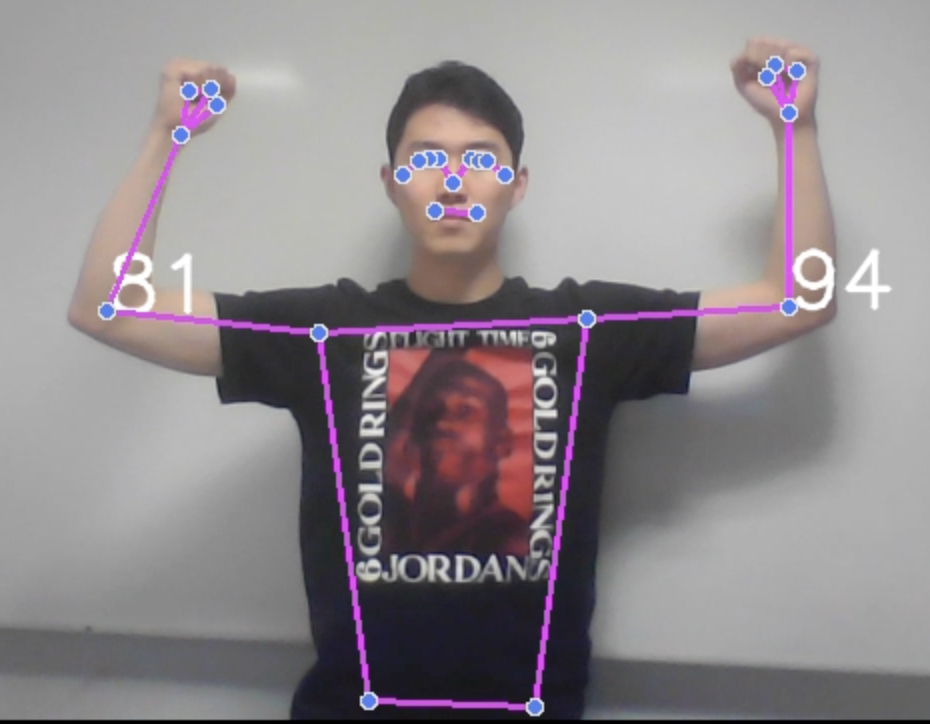
Detection Visualisation
Detection visualisation is an optional part. If you want to show the calculated angle or distance in real time, you can use “cv2.putText” function. The third image shows how it looks like when you implement this feature. In addition, if you want to show landmarks of each body parts as what third image shows, you can use “draw_landmarks” function.

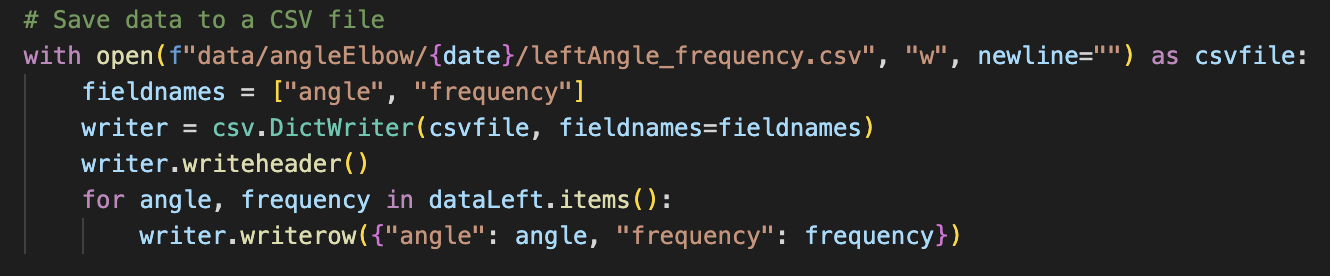
Saving Data
All the data are stored in the list. And to find the frequency of each angles and distances, we used Counter from python collections module. The data is automatically saved in the csv file creating angle and frequency columns. This snippet of code is from elbow.py file and the logic is the same for every files.
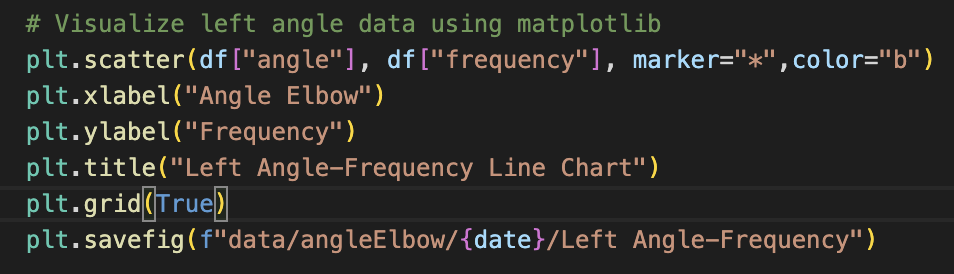
Plotting/Saving Graphs
Scatter plot graphs are made for each left and right side from using the data in the csv files.
Issues and Blockers
Throughout our project we faced numerous blockers that set us back, and resulted in us using certian technologies.
NDI
Originally, we planned on using NDI-In technology. Using NDI-Out we have extracted high-quality video streams from a Teams call, and using built in NDI-In technology, we planned on shipping the video streams back into the Teams call with a game to create a graphic overlay. However, NDI-In got blocked by Microsoft. This left us without a solution for interactive gameplay, until LiveShare SDK got released in February.
Teams Toolkit
With teams toolkit, our team faced numerous bugs and challenges; leading to lots of setbacks. Throughout December to the end of January, we kept receiving Localhost issues. The error was eventually pinpointed on the fact that when VScode launched the 53000 port it would not work. This meant, having to switch the Teams application to run from 53000 port to 3000.
Once this was fixed, we encountered another issue a few weeks later. LiveShare SDK samples did not work. We were give the Dice Roller sample, and after running on multiple devices, the sample did not run as intended, and often gave Ngrok errors. Eventually we recieved an unreleased sample using LiveShare SDK. This did not work for a while, until we found out it only worked on Windows. Thanks to Professor Dean, who supplied a windows laptop, we were eventually able to run the sample code, and try to figure out LiveShare SDK. However, once all the issues were sorted, we only had 14 days to work on LiveShare SDK before the project ended, therefore we were very pressed for time and had to adjust our requirements.