User Manual
- Ensure you have python 3.11 installed
- To run PixelPilot, start by running the file “runner.exe” (python scripts bundled into an executable in the future)
- The program will ask you whether you want to use the 0.5B, the 1.5B or the 3B model. You must type your answer.
- Open up visual studio code.
- Ensure you have the extension installed and running.
These are the ways you can use our extension:
USER_MANUAL.TXT
- Press {Ctrl + Shift + P / Cmd + Shift + P} and select 'PixelPilot: Start'
- A window will open up that would ask a few basic questions regarding the game such as the game stlye, device the game will run on, controller type and game-making tool
- Lastly, the user has to enter a description of what they want their game to be and click 'Submit'.
- Open the Copilot chat using the ‘Toggle Chat’ button at the top of the screen
- Click on ‘+’ at the top right of the chat window if you wish to start a new chat
- Enter ‘@pixel’ followed by your question which could be any prompt
- Press Ctrl + Shift + P / Cmd + Shift + P
- Select ‘PixelPilot: Select Chat Completion Model’ or 'PixelPilot: Select Code Generation Model' or 'PixelPilot: Select Mastery Level'
- Select desired Model/Mastery
OR
- Open the Copilot chat using the ‘Toggle Chat’ button at the top of the screen
- Click on ‘+’ at the top right of the chat window if you wish to start a new chat
- Enter '@pixel /changeChatCompletionModel' or ‘@pixel /changeCodeGenerationModel’ or ‘@pixel /mastery’
- Select desired Model/Mastery
- Open the Copilot chat using the ‘Toggle Chat’ button at the top of the screen
- Click on ‘+’ at the top right of the chat window if you wish to start a new chat
- Enter ‘@pixel /image’ followed by your promt for the image you want to generate
- Wait until the image generation process is going on
- A window pops up with 3 image options generated from the prompt
- Select an option by clicking on the ‘Select Image {ImageNum}’ or regenerate the options by clicking on ‘Regenerate Images’
- Open the Copilot chat using the ‘Toggle Chat’ button at the top of the screen
- Click on ‘+’ at the top right of the chat window if you wish to start a new chat
- Enter ‘@pixel /image’ followed by your promt which contains a hint of which image you want to replace and the new image (Example: ‘@pixel /image please replace the red ball with a blue ball’)
- Wait until the image generation process is going on
- A window pops up with 3 image options generated from the prompt
- Select an option by clicking on the ‘Select Image {ImageNum}’ or regenerate the options by clicking on ‘Regenerate Images’
These features particularly work only for the Qwen-2.5-Coder Model
- Open the Copilot chat using the ‘Toggle Chat’ button at the top of the screen
- Click on ‘+’ at the top right of the chat window if you wish to start a new chat
Enter ‘@pixel’ followed by the prompt which is the description of your game. Remember to explain the game in detail.
The model will generate a series of sub-prompts based on your prompts
For each sub-prompt, type in “G:” and then type in the prompt
For each of these, the model will generate a section of the code for the game
Deployment Manual
These are the key steps for our clients to remember while testing and deploying our extension :
Testing the Extension
Requirements
To use PixelPilot, ensure you have the following :
- Visual Studio Code installed on your system.
- GitHub CoPilot VS Code Extension installed.
- A GitHub account to access AI-powered features.
- Python 3.11 installed on your system.
- Node.js installed on your system.
Getting Started
- Clone the repository.
- Open the repository in VS Code.
- Use the terminal and install the required dependencies by running:
npm install - Start the extension by opening src/extension.ts, then going to the 'Run and Debug' tab using the left panel and then clicking Run Extension.
- Open the chat window in the side panel and interact with PixelPilot using the commands listed below.
Commands
PixelPilot supports the following commands :
@pixel /image
- Description: Generate an image using the PixelPilot extension.
- Usage: Type
@pixel /imagefollowed by a description of the image you want to generate.
@pixel changeChatCompletionModel
- Description: Change the chat completion model used by PixelPilot.
- Usage: Type
@pixel changeChatCompletionModeland select a model from the list.
@pixel changeCodeGenerationModel
- Description: Change the code generation model used by PixelPilot.
- Usage: Type
@pixel changeCodeGenerationModeland select a model from the list.
@pixel mastery
- Description: Set your mastery level to tailor PixelPilot's responses to your skill level.
- Usage: Type @pixel mastery and select a level (NOVICE, INTERMEDIATE, or PRO).
Walkthrough
- Description: Start the interactive walkthrough to create a new game project.
- Usage: Run the command PixelPilot: Start from the Command Palette (Ctrl+Shift+P/Cmd+Shift+P).
Offline Models
PixelPilot supports offline models for image generation and other tasks. Hence before running the extension, follow these instructions :
- Enter this in the terminal while in the directory of the repository :
git submodule initgit submodule update --recursive - Navigate to the backend directory :
cd Backend - Create a Python virtual environment (Python 3.11):
- Windows :
py -3.11 -m venv venv - Mac/Linux :
python3.11 -m venv venv
- Windows :
-
Activate the virtual environment:
- Windows :
- PowerShell :
venv\Scripts\Activate.ps1 - Command Prompt :
venv\Scripts\activate
- PowerShell :
- Mac/Linux :
source venv/bin/activate
- Windows :
- Install dependencies :
pip install -r requirements.txt - Run the python script :
python runner.py - Once done using the extension, interrupt the python script that is running. Then deactivate the virtual environment :
deactivate - To use the extension again reperform steps 4 and 6
Additional Notes
- To break down a game idea into multiple prompts, simply write the game idea in the chat window.
- To generate code based on these prompts, prefix the prompt with
G:and input one prompt at a time.
Troubleshooting
If you encounter any issues:
- Ensure all dependencies are installed.
- Verify that the GitHub CoPilot extension is active and linked to your GitHub account.
- Check the output logs in the Output panel for error messages.
Check the output logs in the Output panel for error messages.
Deploying the extension on Visual Studio Marketplace
- Ensure you have node.js installed
- Run: npm install -g @vscode/vsce
- (this is the VSCE tool, which is used to publish extensions)
- Ensure you have an organisation. If not, follow these steps:
- Sign into azure DevOps
- Select New organization
- Enter a name for your organisation, select the hosting geography and then select continue
- Sign in to your organization by typing “https://dev.azure.com/{yourorganization}”.
- Open the User settings dropdown menu
- Select Personal access tokens
- On the Personal Access Tokens page, select New Token. The website will display this form:
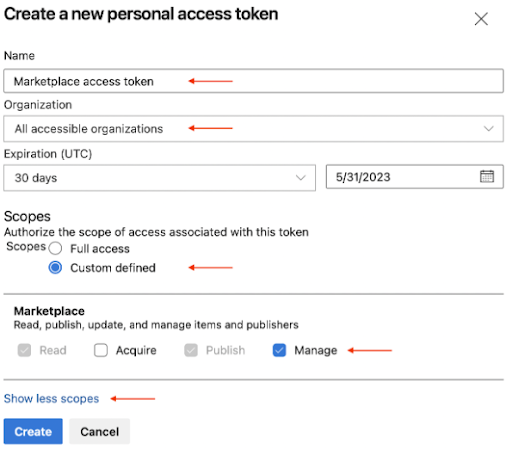
- Select the following details for the token:
- Name: any name you want for the token
- Organization: All accessible organizations
- Expiration (optional): set the desired expiration date for the token
- Scopes - Custom defined: All accessible organizations
- click Show all scopes link below the Scopes section
- in the Scopes list, scroll to Marketplace and select Manage scope
- Click “Create”
- Go to the Visual Studio Marketplace publisher management page.
- Log in with the same Microsoft account you used to create the Personal Access Token
- Click “Create publisher” in the panel on the left
- In the new page, specify the mandatory parameters for a new publisher - identifier and name (ID and Name fields respectively):
- ID: the unique identifier for your publisher in the VSCode Marketplace. This will be used in your extension URLs, and the ID cannot be changed once created.
- Name: the unique name of your publisher that will be displayed in the VSCode Marketplace with your extensions. This can be your company or brand name.
- You can optionally fill out the rest of the fields.
- Click Create
- Change your directory to the directory of the extension.
- Run the following command in your terminal: You will then be asked to type in the Personal Access Token created in the previous step :
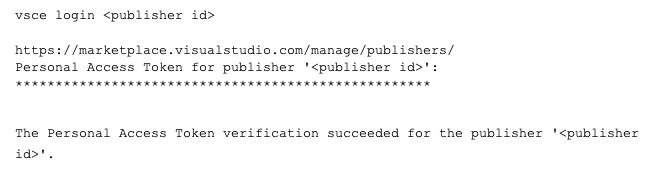
- To publish the extension automatically, use the following command:
vsce publish
Backend Deployment
For the backend, the clients should bundle the python scripts into an executable using PyInstaller. This bundling should occur within a Python3.11 virtual environment and the Python3.11 interpreter should be bundled with the python scripts. After that, they can provide a zip folder to the users that contains the executable, the Backend/fastsdcpu and the Backend/offlineModels folders from our repository. The client should make it clear to the user that they should not change anything within the zip folder especially the directory format.
Legal Issues and Process
Logos: Belong to respective copyright holders (e.g., UCL, Microsoft, TypeScript).
GDPR and Legal Statement
PixelPilot does not collect or process any user information, and thus it is fully GDPR compliant.
Source Code License
PixelPilot is released under the MIT license, which means:
Permission is hereby granted, free of charge, to any person obtaining a copy of this software and associated documentation files (the “Software”), to deal in the Software without restriction...
THE SOFTWARE IS PROVIDED “AS IS”, WITHOUT WARRANTY OF ANY KIND...

Monthly Videos
Check out our monthly videos showcasing the development process and features of PixelPilot.
December
January
Febuary
March
Development Blog
Follow our journey as we build PixelPilot, share progress updates, challenges, and breakthroughs.
Visit the BlogAI References
These are the AI models we took help of when we were making the extension or the report website:
[2] Github CoPilot : https://github.com/features/copilot
GAME_OVER.EXE
Thanks for Exploring Pixel Pilot!
We hope you've enjoyed learning about our VS Code extension for children's game development.