System Architecture

UI Sketch

The PixelPilot Visual Studio Code extension architecture consists of both front-end and back-end components, designed to facilitate interaction between users and the system's AI capabilities.

The front-end is primarily represented by the VSCode Extension Framework API. This interface is responsible for capturing user interactions, such as chat messages or prompt inputs, and forwarding them to the system for processing. The extension runs within the VSCode environment and serves as the main access point for users to engage with the tool. It handles user inputs, displays outputs such as code or images, and provides the interactive elements needed to guide the user experience. Communication with the back-end is achieved via structured API calls, ensuring that requests are processed and responses are returned in real time.

The back-end encompasses core logic for prompt refinement and image generation. These processes interpret the user’s intent and fine-tune prompts before routing them to the appropriate AI model. The image generation logic is responsible for converting user prompts into visual assets, such as game sprites or concept art, while the refining prompts logic ensures that ambiguous or incomplete inputs are transformed into clearer, more actionable tasks for the models.

Underpinning the back-end is a collection of AI models, including both Offline Models and Copilot Models. These models handle the actual generation of outputs—whether code or images—and return the results to the back-end for delivery to the front-end interface. Offline models are tailored for local execution, enabling children to generate content without needing an internet connection, while Copilot models provide more advanced capabilities, potentially leveraging cloud-based resources for greater performance.
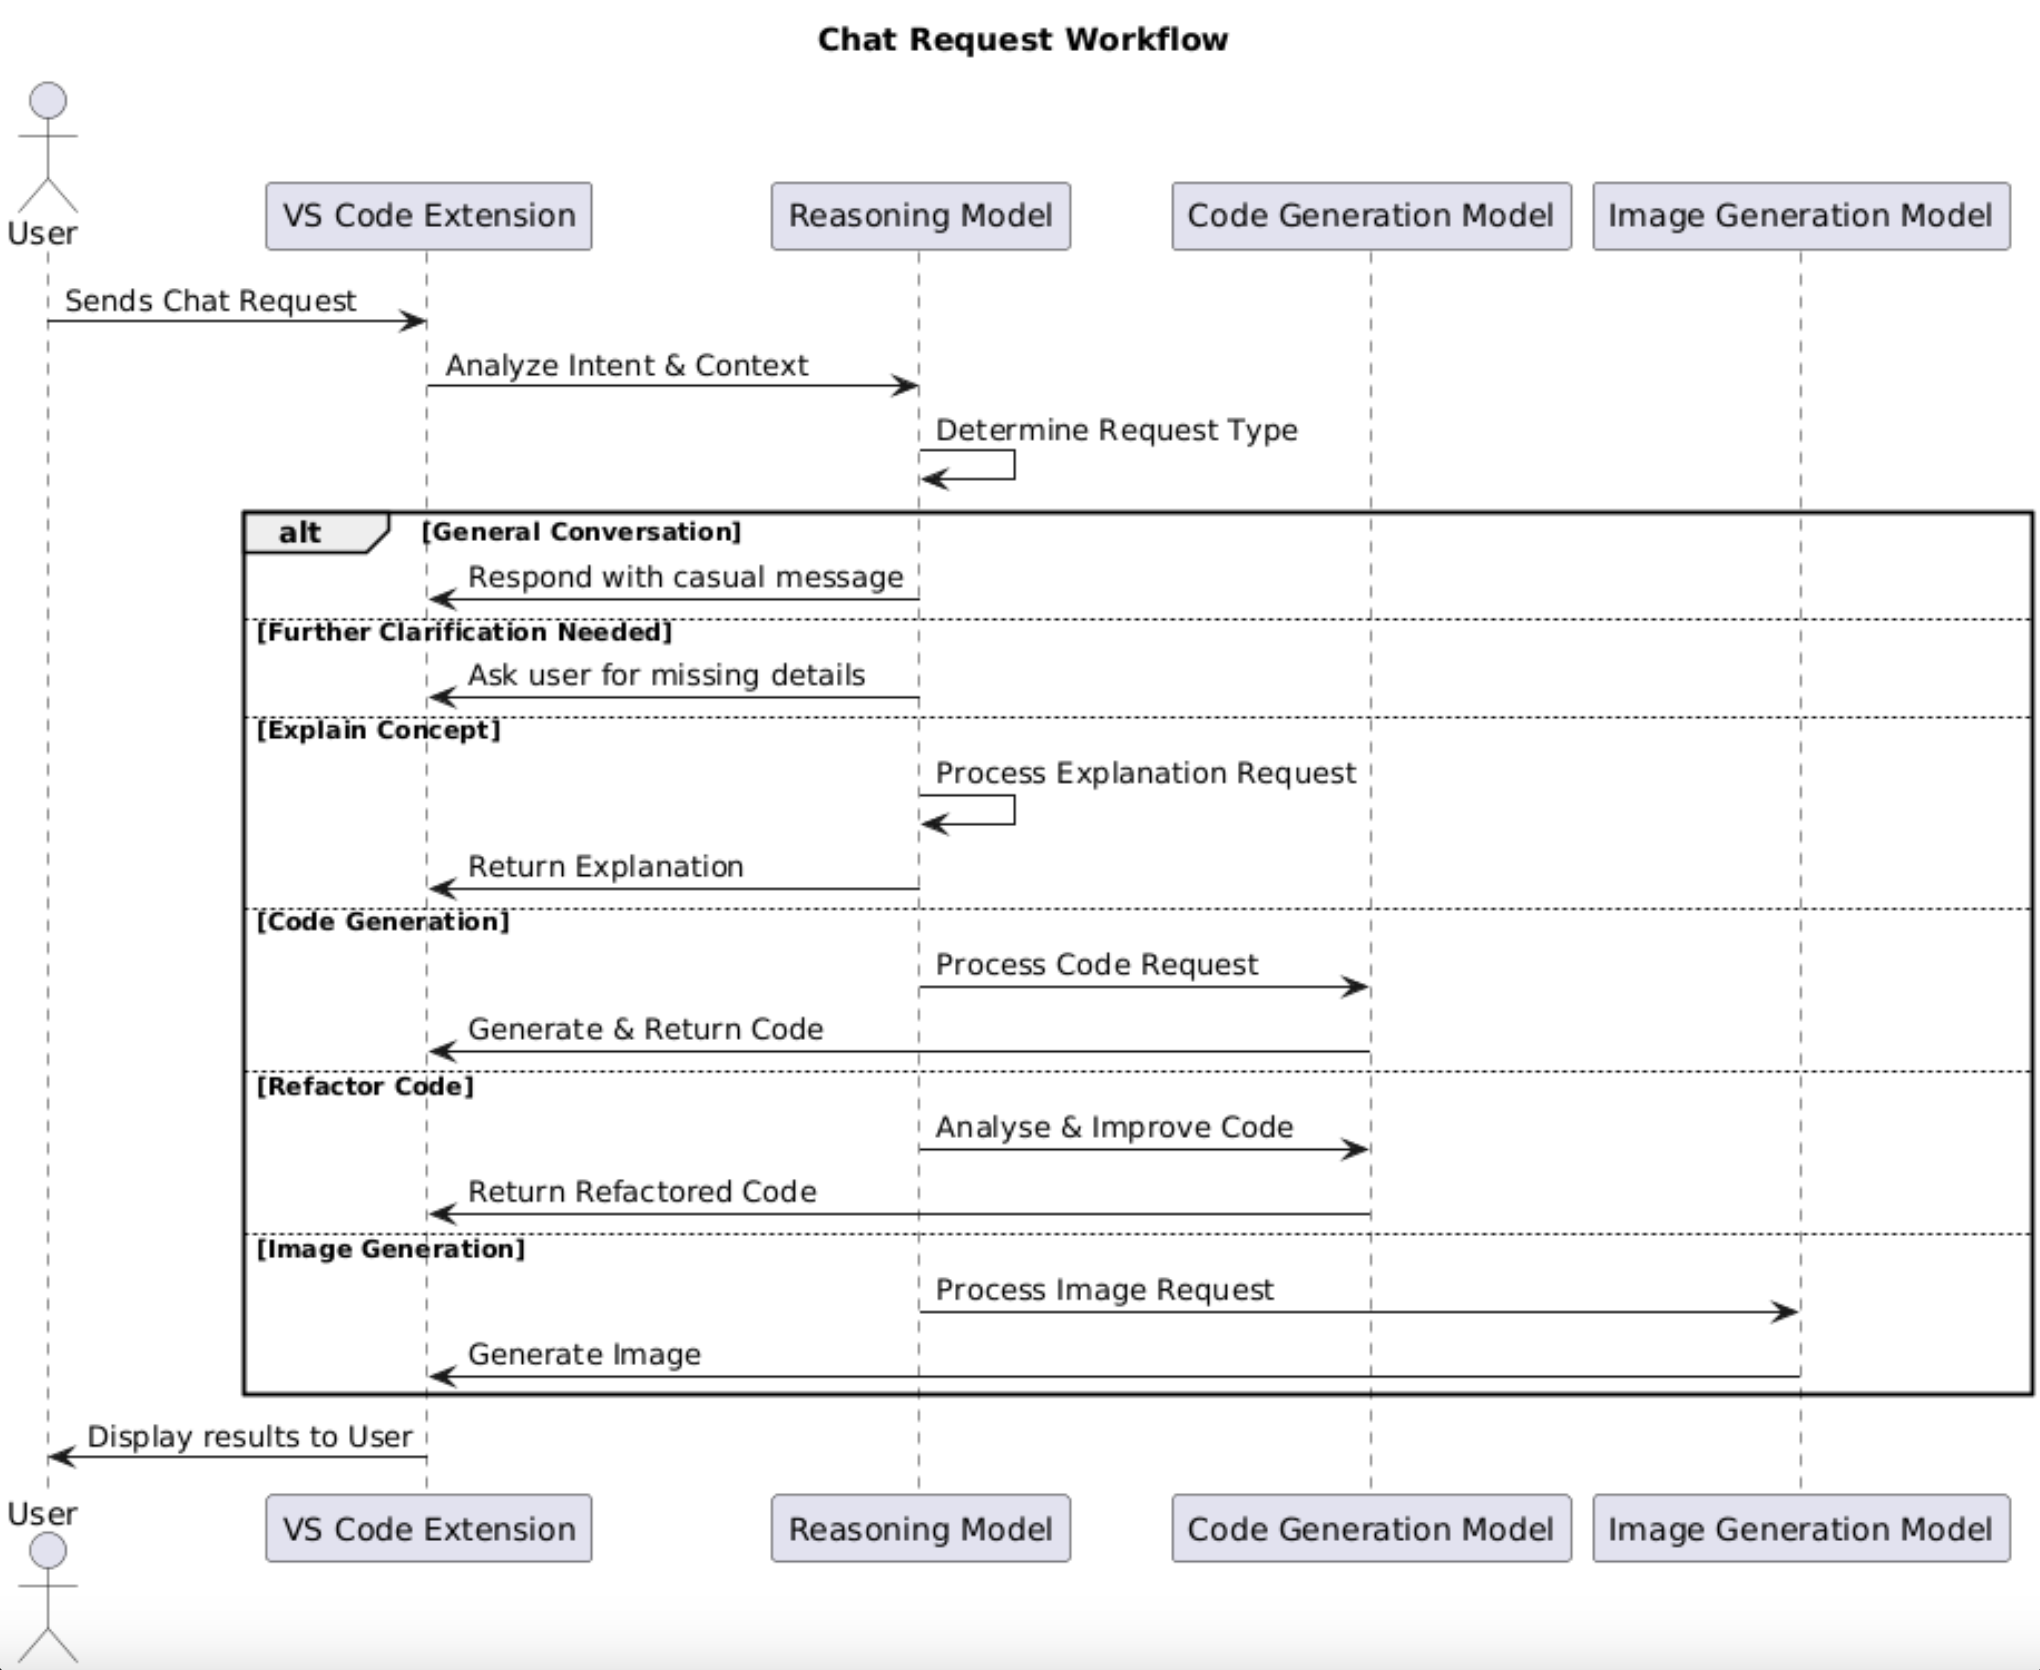
UI Sketch

Diagram Overview

Now diving deeper into the request-handling logic of the system, this sequence diagram illustrates the detailed flow of a user’s interaction once a chat request is made through the VS Code Extension. It showcases how the front-end communicates with the back-end reasoning logic and various AI models—including the Reasoning Model, Code Generation Model, and Image Generation Model—to analyze the request and generate appropriate responses such as explanations, code snippets, or images.

Actors & Components

The User is the end participant who interacts with the PixelPilot system through the VS Code Extension. They initiate the workflow by submitting a prompt or message, which begins the decision-making process.

The VS Code Extension functions as the front-end interface and communication bridge between the user and the intelligent models running in the back-end. It collects user input, passes it along for processing, and renders the resulting output—be it code, explanations, or visuals—back to the user in the editor.

The Reasoning Model sits at the core of the decision-making process. It interprets the user's intent and context to determine the type of request being made. This model handles a variety of tasks, including responding to general conversation, requesting clarification for ambiguous input, and offering conceptual explanations for educational queries.

The Code Generation Model is activated when the user’s request relates to creating or editing code. It either generates fresh code based on user input or refactors existing code to improve quality, clarity, or performance.

The Image Generation Model is responsible for handling visual requests, such as generating images for game assets or user interface designs. When invoked, it processes the given prompt and returns the corresponding image output to the front-end.

Workflow Breakdown

The workflow begins when the user sends a chat request through the VS Code Extension. This request is then forwarded to the Reasoning Model, which analyzes the intent and context of the message to determine what kind of request it is handling.

Based on this analysis, the system follows one of several paths. For general conversation, the Reasoning Model simply responds with a casual message (e.g., a greeting or light interaction). If the message lacks clarity, the model prompts the user for further information to proceed. When the user asks for a concept explanation, the Reasoning Model processes the request and returns an informative response.

If the user is requesting code generation, the Code Generation Model is invoked. It creates the appropriate code and sends it back through the extension. In the case of a refactor code request, the same model analyzes the provided code and returns a cleaner or improved version.

When the user prompts for image generation, the Image Generation Model processes the image request and provides the generated visual.

Finally, once a response is generated by any of the models, the VS Code Extension displays the results to the user, completing the request cycle

Design Patterns

Model-View-Controller (MVC)

The PixelPilot project adopts the Model-View-Controller (MVC) design pattern to separate concerns and improve code organization.This pattern divides the application into three interconnected components:

Model (Data & Logic Layer):

  • src/util/ai.ts
  • src/util/initProject.ts
  • src/util/imageGen.ts
  • src/util/prompts.json
  • src/types/index.ts

View (User Interface Layer):

  • src/views/

Controller (Logic & Input Handling Layer):

  • src/commands/start.ts
  • src/extension.ts
  • src/handler.ts

VSCode Extension Framework

Although PixelPilot is organized around the MVC pattern, its design is more accurately shaped by the VSCode Extension Framework, which defines how extensions are structured, activated, and interact with the host environment. Rather than enforcing rigid MVC roles, this framework emphasizes an event-driven model built around command registration (vscode.commands.registerCommand), lifecycle hooks (activate and deactivate), and context management through the ExtensionContext object. These features provide a natural modular structure: commands act like controllers, utility files behave as the logic layer (model), and Webviews serve as the customizable user interface (view). The framework’s conventions allow for seamless integration with VSCode’s API, promoting scalability, separation of concerns, and responsiveness without the need for a tightly coupled architecture. As a result, PixelPilot follows a framework-oriented structure that maps to MVC roles, but operates within the expectations and best practices of the VSCode extension ecosystem.

Design Pattern Use in PixelPilot
MVC Pattern PixelPilot separates responsibilities using the MVC pattern: utility functions and prompt logic as the Model, UI components in the views folder as the View, and command handlers (e.g. start.ts, handler.ts) as the Controller. This modular approach supports easier debugging, better collaboration, and maintainability.
VSCode Extension Framework The core architectural pattern guiding PixelPilot’s design. It uses VSCode’s command-based lifecycle (activate, registerCommand), Webview UI rendering, and ExtensionContext for managing state and interactions—providing flexibility and scalability tailored for VSCode.
Encapsulation Logic-heavy utility files like ai.ts, imageGen.ts, and initProject.ts encapsulate specific functionality for prompt generation, image rendering, and project setup. These self-contained modules abstract away internal implementation details and expose clear interfaces, improving code readability and reusability.
Strategy Pattern The functions in ai.ts, initProject.ts, and imageGen.ts encapsulate different strategies for handling AI prompts, project initialization, and code/image generation. This allows the app to switch logic paths depending on the selected tab or feature, promoting flexibility.

Data Storage

PixelPilot does not use databases to store data. The things we store include the results of all the images generated by FastSD CPU. There images are saved in 'fastsdcpu/result'. We also store a few configuration variables that change dynamically. These include 'imageDescriptions []' and 'imageDests []'. These configuration variables store the image descriptions and image destinations of the images saved in the assets folder. They are structured as parallel lists, meaning that corresponding elements across the two lists are directly associated. Specifically, for any given index i, the string stored in imageDescriptions[i] represents the textual description used to create an image. Concurrently, the string located at imageDests[i] provides the file path or destination where that very image, generated from the description in imageDescriptions[i], is saved.

The reason for this approach : We first thoought of simply saving them as global varibales but that resulted in the variables resetting to an empty list everytime the extension is run which resulted in errors as we had images that did not have descriptions so we could not compare properly while replacing an image. So instead we took a different approach by setting them as configuration variables so they do not reset, everytime the extension is run. We also added an updateImageState() function that goes through the imageDests list and compares the image names of the images with the paths and deletes all the image destinations and descriptions if there does not exist an image at the path stored in imageDests list. We call this function everytime we change anything in the imageDescriptions or imageDests list and we call it once every 60 seconds in case there are any issues or if the kid has changed to a seperate directory.

Here is some code we used for this approach :


This is from the ImageGen.ts file -
const imageDescriptions: string[] = vscode.workspace.getConfiguration().get('imageGen.imageDescriptions', []);
const imageDests: string[] = vscode.workspace.getConfiguration().get('imageGen.imageDests', []);

function saveState() {
    vscode.workspace.getConfiguration().update('imageGen.imageDescriptions', imageDescriptions, vscode.ConfigurationTarget.Global);
    vscode.workspace.getConfiguration().update('imageGen.imageDests', imageDests, vscode.ConfigurationTarget.Global);
}

export async function updateImageState() {
    const parentPath = vscode.workspace.workspaceFolders?.[0]?.uri.path || '';
    const assetsPath = path.join(parentPath, 'assets');
    const imagesPath = path.join(assetsPath, 'images');

    const existingFiles = await vscode.workspace.findFiles('assets/images/*');

    const existingFilePaths = existingFiles.map(file => file.fsPath);

    const updatedImageDescriptions: string[] = [];
    const updatedImageDests: string[] = [];

    for (let i = 0; i < imageDests.length; i++) {
        const fileDest = path.join(parentPath, imageDests[i]);
        if (existingFilePaths.includes(fileDest)) {
            updatedImageDescriptions.push(imageDescriptions[i]);
            updatedImageDests.push(imageDests[i]);
        }
    }

    imageDescriptions.length = 0;
    imageDests.length = 0;

    imageDescriptions.push(...updatedImageDescriptions);
    imageDests.push(...updatedImageDests);

    saveState();
}

This is from the extension.ts file -
export function activate(context: vscode.ExtensionContext) {
    outputChannel.show();
   
    updateImageState().catch(console.error);
  
        // Set up a periodic check to update the image state
    setInterval(() => {
        updateImageState().catch(console.error);
    }, 60000); // Check every 60 seconds


Packages and APIs

To support both online and offline AI interactions within PixelPilot, we incorporated a number of external packages and SDKs. These tools played a crucial role in enabling communication with cloud-based models, handling authentication, and structuring requests/responses. Below are the key packages and APIs integrated into our system:

Microsoft Azure Inference API

The Microsoft Azure Inference API provides hosted access to a range of large language models, including GPT-4o, Phi-4, LLaMA-3.3-70B-Instruct, and DeepSeek-V3. We used Azure’s Inference API to handle online chat completions and prompt-based code generation when an internet connection is available.

This API allowed us to offload computationally intensive tasks to the cloud while maintaining structured responses. To ensure performance and reliability, we configured the API with low-temperature settings and enforced JSON output formats where possible. This enabled seamless integration with our front-end logic and ensured consistent results for users.

@azure-rest/ai-inference

We used the official Azure SDK package @azure-rest/ai-inference to interact with the Azure Inference API. This SDK allowed us to send prompts and receive streamed or batch completions from the hosted models through a structured and well-documented REST interface. The SDK simplifies endpoint configuration and error handling, making it easier to switch between models dynamically depending on the user's chosen mode or task.

@azure/core-auth & @azure/core-sse

These two packages serve as supporting dependencies for secure and real-time API communication

  • @azure/core-auth handles the authentication and token management required to access Azure's AI services securely.
  • @azure/core-sse enables Server-Sent Events (SSE), allowing us to stream AI responses back to the extension in real-time, which improves interactivity and responsiveness.

node-fetch

We also used node-fetch, a lightweight implementation of the Fetch API for Node.js, for custom HTTP requests when SDK support was insufficient or when we needed low-level control over the request payloads. It provided us with flexibility to interact with various endpoints, parse headers, and handle retries or fallbacks when necessary.

NEXT_LEVEL.EXE

Ready to See How We Built It?

Discover the implementation details of Pixel Pilot and how we brought our design to life.