Implementation
Turning design into practice ⚙️
Project Summary and Features
Before we delve into the implementation details, let's take a moment to summarize the key features of our Webex Log Viewer project.
Our project is a dynamic web platform that empowers Cisco engineers to effortlessly explore and analyze log files generated during WebEx calls. The website not only offers an intuitive interface for viewing and navigating logs but also integrates a state-of-the-art AI agent based on a Retrieval-Augmented Generation (RAG) framework. This AI agent enhances the log analysis process by providing real-time insights and recommendations.
With a strong focus on precision and efficiency, our platform features fully customizable filter options that improve the accuracy of record filtering, ensuring that users retrieve exactly the data they need.
Key Features
Before we dive deep into the implementations, here's a summary of some of the key features of our project, and whether it has been ported to the existing Cisco platform (🟩) or is part of our prototype (🟨):
- Customizable Filter Groups (ported 🟩): Tailor filter configurations to meet specific search criteria for more refined log analysis.
- Advanced Search (ported 🟩): Utilize regex capabilities for flexible and powerful search queries.
- Keyword/Regex Highlighting (ported 🟩): Highlight keywords and regex matches in the log table with algorithmically generarted colors for better visibility.
- Split-Pane View With Record Jumping (ported 🟩): Two panes for simultaneous viewing of both full logs and filtered logs
- Asynchronous and Incremental Highlighting (prototype 🟨): Apply filters without blocking the UI, allowing for real-time updates and a smoother user experience.
- LLM ChatBot Assistance (prototype 🟨): Interact with our intelligent AI agent for real-time insights, summaries, and recommendations.
To ensure smooth operation and rapid response times, our backend is meticulously engineered to handle high-volume log data efficiently while seamlessly interacting with the AI agent. We have placed a big focus on making as many processes asynchronous as possible to minimize any UI blocking, thereby providing a truly seamless and responsive user experience.
Respository Structure
In our project, we are managing two distinct repositories:
- Prototype Repository: This repository was developed independently from the ground up.
- Cisco's Existing Platform Repository: In this repository, we are contributing directly to Cisco's established platform.
Frontend & User Interaction
Implementation of Custom Filter Groups in Log Viewer
Since this feature was fully ported to the official Cisco repo, all the code snippets and gif demonstrations are taken directly from the repo and not our prototype 😎.
Overview
The Custom Filter Groups feature empowers users to create, edit, update, and delete predefined sets of filters to refine log data based on specific criteria. Implemented using modern JavaScript (ES6+) and leveraging the LocalStorage Web API for data persistence, this feature enables users to dynamically apply filters to the log table, ensuring that only the most relevant log entries are displayed.
A Bit of Context (Without Diving Into Too Much Detail)
To better understand the implementation of the Custom Filter Groups feature, let's take a small step back and try to understand the other functions already in the codebase (since the whole point is to integrate with the existing codebase without breaking anything)
The previous tool already had a set of hardcoded filters, and to make things easier we first had to decide on a format that's a blend between the existing filters and what we wanted to achieve.
Existing Format
// toggle list of filters
{
  "category": {
    icon: "icon-name",
    filters: {
      filter_name: { friendly: "Friendly Name" }
      ...
    }
  }
}

// toggle messages keywords
{
  "filter_name": [
    { regex: "regex", text: "text" },
    { regex: "regex", text: "text" },
    ...
  ]
}
This format was a bit overly complicated, grouping filters into two different objects.
Format We Wanted
{
  "filter_group_name" {
    title: "Friendly Name",
    description: "Description",
    keywords: [
      { regex: "regex", text: "text", color: "#color", case_sensitive: true, enabled: true },
      { regex: "regex", text: "text", color: "#color", case_sensitive: true, enabled: true },
      ...
    ]
  }
}
This format is much simpler and easier to understand, with all the filters in one place.
Balancing sticking to the original format and refactoring a better format led us to the following format:
Final Format
// ? indicates that the field is optional (could be undefined)
{
  "category": {
    icon: "icon-name",
    filter_groups: {
      filter_group_name: {
        friendly: "Friendly Name",
        description?: "Description",
        keywords: [
          { regex: true, text: "text", color?: "#color", caseSensitive?: true, enabled?: true },
          { regex: false, text: "text", color?: "#color", caseSensitive?: false, enabled?: false },
          ...,
        ]
      }
    }
  }
}
This format keeps the same category structure as the original, but puts everything in one place and adds the extra fields we wanted. Hence refactoring the original code to this format was very easy and then we were perfectly set up to add our changes!
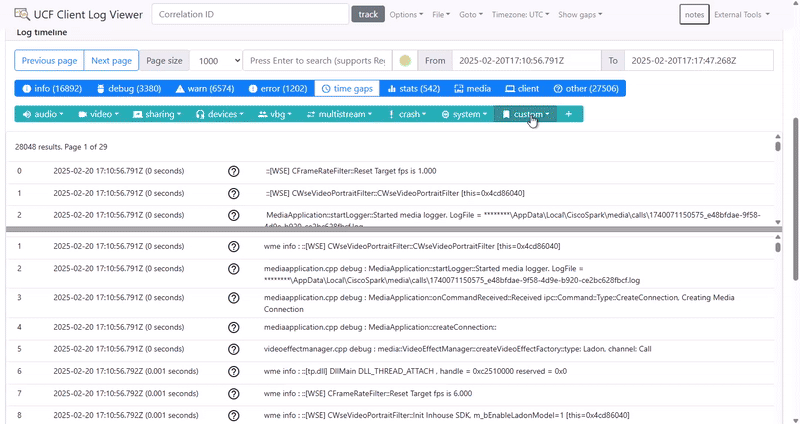
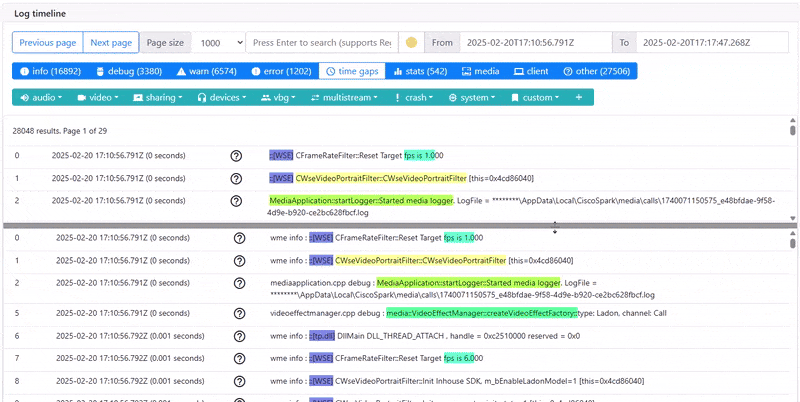
There is also a function called addAdvancedFilterBar() that draws the UI for the advanced
filter bar in its current state (screenshot for reference). When adding a checkbox for each filter group,
the function attaches an event handler to call the function handle_search() when a checkbox
is clicked.

We later modify this function to add ability to add a new filter group and ability to edit any existing filter group. Now with this little bit of context we can move on to the actual implementation of the Custom Filter Groups feature!
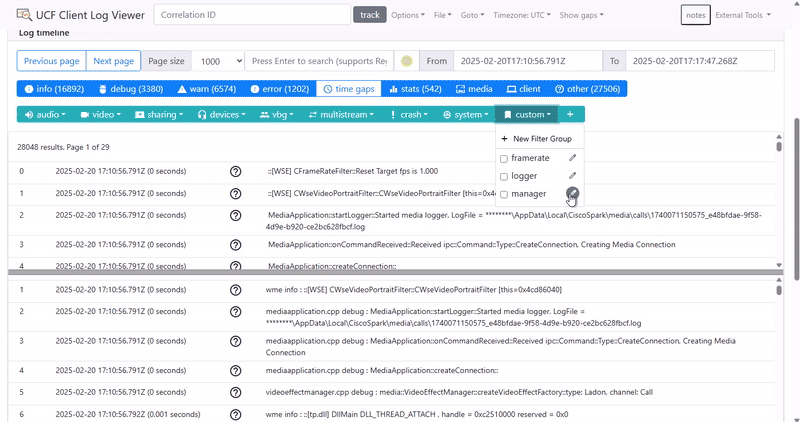
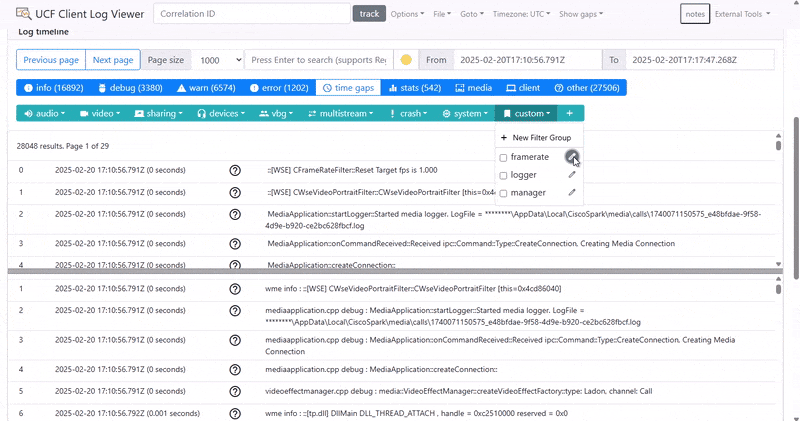
Creating a New Filter Group
Note that the lagginess here is due to this being recorded through a Cisco virtual machine and then converted into a gif.
Users can add a new filter group through a modal dialog in the interface. Within the modal, multiple filters can be added dynamically (each filter has text, an optional regex flag, and a description). The following code snippet demonstrates the setup of the modal:
Click to expand code snippet
/**
 * Initializes and displays the "Add Custom Filter Group" modal.
 * Clears previous modal inputs, adds a default filter row, and sets up footer buttons.
 */
function setupAddFilterModal() {
    // Set modal title and clear previous values
    document.querySelector("#filterGroupModal .modal-title").textContent = "Add Custom Filter Group";
    document.getElementById("filter-group-title").value = '';
    document.getElementById("filter-group-description").value = '';
    document.getElementById("filter-list").innerHTML = '';

    // Add one default filter input row
    addFilterGroup();

    // Set up modal footer buttons
    const modalFooter = document.querySelector("#filterGroupModal .modal-footer");
    modalFooter.innerHTML = `
        <div class="d-flex justify-content-between w-100 align-items-center">
            <button type="button" id="add-filter-btn" class="btn btn-primary">Add Filter</button>
            <button type="button" id="save-filter-group-btn" class="btn btn-success">Save</button>
        </div>
    `;
    document.getElementById("add-filter-btn").addEventListener("click", addFilterGroup);
    document.getElementById("save-filter-group-btn").onclick = () => saveFilterGroup("custom", null);

    // Show modal and disable closing via backdrop click or ESC key
    $('#filterGroupModal').modal({
        backdrop: 'static',
        keyboard: false
    }).modal('show');
}
In the code above, the setupAddFilterModal() function initializes the modal for adding a
new
custom filter group. It clears any previous values, sets up the modal title, and adds a default filter
row.
Also, notice the event listeners for the "Add Filter" and "Save" buttons to allow users
to add
more filters or save the filter group.
document.getElementById("add-filter-btn").addEventListener("click", addFilterGroup);
document.getElementById("save-filter-group-btn").onclick = () => saveFilterGroup("custom", null);
We go into more detail about the addFilterGroup() and saveFilterGroup()
functions in the
following sections.
Furthermore, we use jQuery to manage the modal's visibility as seen with the
$('#filterGroupModal').modal(...)
part of the code and to control the modal's behavior (e.g., disabling closing via backdrop click or ESC
key). We also use
Bootstrap's modal component to create a responsive and user-friendly interface.
Adding Filter Input Rows
The addFilterGroup() function is responsible for dynamically adding new filter input rows
to
the modal. Each row includes inputs for filter text, regex and case-sensitive options, color picker,
filter description, a remove button, as well as checkboxes for enabling or disabling the filter.
Click to expand code snippet
/**
 * Adds a new filter input row to the filter list in the modal.
 * The row includes inputs for filter text, regex and case-sensitive options, color picker,
 * filter description, and a remove button.
 */
function addFilterGroup() {
    const filterList = document.getElementById("filter-list");
    const filterHTML = `
        <div class="input-group mb-2 d-flex align-items-center">
            <div class="input-group-prepend">
                <div class="input-group-text d-flex align-items-center" style="height: 38px;">
                    <input type="checkbox" class="filter-enabled" title="Enabled" checked>
                </div>
            </div>
            <input type="text" class="form-control filter-text" placeholder="Filter text">
            <div class="input-group-prepend mr-2">
                <div class="input-group-text">
                    <input type="checkbox" class="filter-regex mr-1" title="Regex"><span>Regex</span>
                </div>
                <div class="input-group-text">
                    <input type="checkbox" class="filter-case-sensitive mr-1" title="Match Case"><span>Match Case</span>
                </div>
                <div class="input-group-text rounded-right" style="background-color: transparent;">
                    <input type="color" class="filter-color" value="${generateGoodColor()}" title="Pick a color">
                </div>
            </div>
            <input type="text" class="form-control filter-description mr-2" placeholder="Filter description">
            <button type="button" class="btn btn-danger remove-filter-btn d-flex justify-content-center align-items-center">
                <svg class="svg-icon" xmlns="http://www.w3.org/2000/svg" height="24px" viewBox="0 -960 960 960" width="24px" fill="white">
                    <path d="M280-120q-33 0-56.5-23.5T200-200v-520h-40v-80h200v-40h240v40h200v80h-40v520q0 33-23.5 56.5T680-120H280Zm400-600H280v520h400v-600ZM360-280h80v-360h-80v360Zm160 0h80v-360h-80v360ZM280-720v520-520Z"/>
                </svg>
            </button>
        </div>
    `;
    filterList.insertAdjacentHTML('beforeend', filterHTML);
}
We later go into detail about the generateGoodColor() function, as it's quite more
complex that it seems at first glance, and a lot of experimentation and testing went into it to make sure
generates "good" colors 🎨
Saving Filter Groups
The saveFilterGroup() function saves or updates a custom filter group based on the data
entered in the modal.
It gathers all the filter settings from each input row, validates that a title is provided and at least
one filter is defined,
and then updates the localStorage accordingly. If the filter group’s title has been modified during an
edit, the old entry is removed
before saving the new one. Finally, the function refreshes the advanced filter bar, triggers a new search
to reflect the changes, and
closes the modal.
Click to expand the saveFilterGroup() code snippet
/**
 * Saves or updates a filter group based on the data provided in the modal.
 * If editing an existing group, the old title is replaced if changed.
 * After saving, the advanced filter bar and search results are updated.
 *
 * @param {string} category - The category of the filter group.
 * @param {string|null} [filterGroupTitle=null] - The original title of the filter group (if editing).
 */
function saveFilterGroup(category, filterGroupTitle = null) {
    const title = document.getElementById("filter-group-title").value.trim();
    const description = document.getElementById("filter-group-description").value.trim();
    const filters = [];

    // Collect all filters from the modal
    document.querySelectorAll("#filter-list .input-group").forEach((group) => {
        const text = group.querySelector(".filter-text").value.trim();
        const regex = group.querySelector(".filter-regex").checked;
        const caseSensitive = group.querySelector(".filter-case-sensitive").checked;
        const color = group.querySelector(".filter-color").value;
        const filterDescription = group.querySelector(".filter-description").value.trim();
        const enabled = group.querySelector(".filter-enabled").checked;

        if (text) {
            filters.push({ text, regex, caseSensitive, color, description: filterDescription, enabled });
        }
    });

    // Validate inputs
    if (!title) {
        alert("Please provide a title for the filter group.");
        return;
    }
    if (filters.length === 0) {
        alert("Please add at least one filter.");
        return;
    }

    // If the title was changed during an edit, delete the old entry
    if (filterGroupTitle !== title) {
        delete filterCategories[category].filter_groups[filterGroupTitle];
        const category_set = enabledFilterGroups.get(category);
        if (category_set && category_set.has(filterGroupTitle)) {
            category_set.delete(filterGroupTitle);
            category_set.add(title);
        }
    }

    filterCategories[category].filter_groups[title] = {
        friendly: title,
        description: description,
        keywords: filters
    };

    window.localStorage.setItem('filterCategories', JSON.stringify(filterCategories));

    // Update the advanced filter bar and search results
    addAdvancedFilterBar();
    setupAddFilterButton();
    handle_search();

    // Close the modal
    $('#filterGroupModal').modal('hide');
}
In addition to saving and updating filter groups, it's crucial to initialize the filter group
functionality on page load.
This is handled by the initFilterGroups() function, which checks localStorage for previously
saved filter groups.
If found, it loads them; otherwise, it uses default settings. The function also sets up the advanced
filter bar and delegates event handling
for removing individual filter rows.
Click to expand the initFilterGroups() code snippet
/**
 * Initializes all filter group functionality.
 */
function initFilterGroups() {
    const storedGroups = window.localStorage.getItem('filterCategories');
    if (storedGroups) {
        filterCategories = JSON.parse(storedGroups);
    } else {
        filterCategories = LOG_MESSAGE_TOGGLE_LIST;
        window.localStorage.setItem('filterCategories', JSON.stringify(filterCategories));
    }

    addAdvancedFilterBar();
    setupAddFilterButton();

    // Delegate deletion of individual filter rows in the modal.
    $(document).on('click', '.remove-filter-btn', function () {
        $(this).closest('.input-group').remove();
    });
}
Together, these functions ensure that custom filter groups are persistently stored, seamlessly updated, and properly initialized, providing a smooth user experience and robust management of filter settings.
Editing Filter Groups
The editFilterGroup() function opens the modal pre-populated with an existing filter group's
data,
allowing the user to modify its title, description, and filter settings. The modal footer is updated to
include buttons for
adding new filters, saving changes, and deleting the filter group.
Click to expand code snippet for editFilterGroup()
/**
 * Opens the modal to edit an existing filter group.
 * The modal is populated with the group's current data, allowing the user to make changes.
 *
 * @param {string} category - The category of the filter group.
 * @param {string} filterGroup - The identifier of the filter group to edit.
 */
function editFilterGroup(category, filterGroup) {
    const group = filterCategories[category].filter_groups[filterGroup];

    // Set modal title to indicate editing mode
    document.querySelector("#filterGroupModal .modal-title").textContent = "Edit Custom Filter Group";

    // Populate modal fields with the current group data
    document.getElementById("filter-group-title").value = group.friendly;
    document.getElementById("filter-group-description").value = group.description || "";

    // Clear the filter list and populate it with the group's filters
    const filterList = document.getElementById("filter-list");
    filterList.innerHTML = ""; // Clear existing filters
    group.keywords.forEach((filter) => {
        if (!filter.color) {
            filter.color = generateGoodColor();
        }
        const filterHTML = `
            <div class="input-group mb-2 d-flex align-items-center">
                <div class="input-group-prepend">
                    <div class="input-group-text d-flex align-items-center" style="height: 38px;">
                        <input type="checkbox" class="filter-enabled" title="Enabled" ${ (filter.enabled === undefined || filter.enabled) ? "checked" : "" }>
                    </div>
                </div>
                <input type="text" class="form-control filter-text" placeholder="Filter text" value="${ filter.text }">
                <div class="input-group-prepend mr-2">
                    <div class="input-group-text">
                        <input type="checkbox" class="filter-regex mr-1" title="Regex" ${ filter.regex ? "checked" : "" }> <span>Regex</span>
                    </div>
                    <div class="input-group-text">
                        <input type="checkbox" class="filter-case-sensitive mr-1" title="Match Case" ${ (filter.caseSensitive === undefined || filter.caseSensitive) ? "checked" : "" }>
                        <span>Match Case</span>
                    </div>
                    <div class="input-group-text rounded-right" style="background-color: transparent;">
                        <input type="color" class="filter-color" value="${ filter.color }" title="Pick a color">
                    </div>
                </div>
                <input type="text" class="form-control filter-description mr-2" placeholder="Filter description" value="${ filter.description || '' }">
                <button type="button" class="btn btn-danger remove-filter-btn d-flex justify-content-center align-items-center">
                    <svg class="svg-icon" xmlns="http://www.w3.org/2000/svg" height="24px" viewBox="0 -960 960 960" width="24px" fill="white">
                        <path d="M280-120q-33 0-56.5-23.5T200-200v-520h-40v-80h200v-40h240v40h200v80h-40v520q0 33-23.5 56.5T680-120H280Zm400-600H280v520h400v-600ZM360-280h80v-360h-80v360Zm160 0h80v-360h-80v360ZM280-720v520-520Z"/>
                    </svg>
                </button>
            </div>
        `;
        filterList.insertAdjacentHTML("beforeend", filterHTML);
    });

    // Set up modal footer buttons for editing
    const modalFooter = document.querySelector("#filterGroupModal .modal-footer");
    modalFooter.innerHTML = `
        <div class="d-flex justify-content-between w-100 align-items-center">
            <button type="button" id="add-filter-btn" class="btn btn-primary">Add Filter</button>
            <div class="flex gap-2">
                <button type="button" id="save-filter-group-btn" class="btn btn-success">Save</button>
                <button type="button" id="delete-filter-group-btn" class="btn btn-danger">Delete</button>
            </div>
        </div>
    `;

    // Attach event listener for adding new filters dynamically
    document.getElementById("add-filter-btn").addEventListener("click", addFilterGroup);

    // Attach event listener for saving the filter group
    document.getElementById("save-filter-group-btn").onclick = () => saveFilterGroup(category, filterGroup);

    // Attach event listener for deleting the filter group
    document.getElementById("delete-filter-group-btn").addEventListener("click", () => {
        deleteFilterGroup(category, filterGroup);
        $('#filterGroupModal').modal('hide'); // Close the modal after deletion
    });

    // Show modal and disable closing via backdrop click or ESC key
    $('#filterGroupModal').modal({
        backdrop: 'static',
        keyboard: false
    }).modal('show');
}
In the code above, once the modal is populated with the existing filter group's data, users can add new
filters or modify existing ones.
The updated UI provides buttons to save the changes (via saveFilterGroup()) or delete the
entire group (via deleteFilterGroup()),
ensuring a smooth and flexible filter management experience.
To allow the user to actually edit the filter group, we've decided to add the edit button next to each filter group within the category dropdown, as can be seen in the gif above.
Click to expand code snippet for edit button integration
const editButton = $('<button>', {
    type: 'button',
    class: 'btn btn-sm btn-outline-secondary edit-filter-group-btn rounded-circle p-1'
}).on('click', function () {
    editFilterGroup(category, toggle);
});

// ... rest of dropdown setup

dropdownItem.append(editButton);
Enabling and Disabling Filter Groups
Since this is a frequently used operation, we focused on optimizing the performance of enabling and
disabling filter groups. We use a Map of Sets to hold the enabled filter groups
for each category. This design allows for constant-time (O(1)) insertions and deletions, which is critical
for maintaining performance when toggling filters. Each filter group is represented as a (category,
filter_group) pair within the global
filterCategories object.
Click to expand code snippet
// --- DEFINED IN THE GLOBALS SECTION ---

/**
* Map of sets holding category, filter_group information.
* @type {Map<string, Set<string>>}
*/
const enabledFilterGroups = new Map();

/**
 * Global object holding filter categories.
 * @type {Object.<string, LogMessageToggleCategory>}
 */
let filterCategories = {};

// --- END OF GLOBALS SECTION ---

// --- INSIDE THE addAdvancedFilterBar() FUNCTION ---

// Iterated in reverse order to show the most recently added/edited filter groups first
Object.keys(filterCategories[category].filter_groups).reverse().forEach(toggle => {
    const checkboxId = 'toggle-' + toggle;
    const checkbox = $('', {
        type: 'checkbox',
        class: 'form-check-input',
        id: checkboxId,
        checked: enabledFilterGroups.has(category) && enabledFilterGroups.get(category).has(toggle)
    }).on('change', function () {
        // Toggle the state in the enabledFilterGroups map
        if (enabledFilterGroups.has(category)) {
            const category_set = enabledFilterGroups.get(category);
            if (category_set.has(toggle)) {
                category_set.delete(toggle);
            } else {
                category_set.add(toggle);
            }
            if (category_set.size === 0) {
                enabledFilterGroups.delete(category);
            }
        } else {
            enabledFilterGroups.set(category, new Set([toggle]));
        }
        handle_search();
    });
    // ... rest of checkbox setup (along with adding an edit button and UI)
});
Deleting Filter Groups
The deleteFilterGroup() function allows users to remove an existing filter group after a
confirmation prompt.
It deletes the filter group from both the enabledFilterGroups and
filterCategories data structures,
updates local storage, and refreshes the advanced filter bar.
Click to expand code snippet
/**
 * Deletes a filter group after user confirmation.
 * Removes the filter group from both the enabledFilterGroups and filterCategories,
 * then updates the advanced filter bar.
 *
 * @param {string} category - The category of the filter group.
 * @param {string} group - The identifier of the filter group to delete.
 */
function deleteFilterGroup(category, group) {
    const confirmDelete = confirm("Are you sure you want to delete this filter group?");
    if (!confirmDelete) return;

    // Remove the selected filter group from enabledFilterGroups if present
    const category_set = enabledFilterGroups.get(category);
    if (category_set && category_set.has(group)) {
        category_set.delete(group);
        if (category_set.size === 0) {
            enabledFilterGroups.delete(category);
        }
    }

    // Delete the filter group from the filterCategories
    delete filterCategories[category].filter_groups[group];

    window.localStorage.setItem('filterCategories', JSON.stringify(filterCategories));

    addAdvancedFilterBar();
    setupAddFilterButton();
}
Generating Good Highlight Colors
Our system features an innovative algorithm to generate an infinite sequence of highlight colors for our filter groups that are both visually distinct and aesthetically pleasing. These colors are optimized to look great on a white background with black text. After extensive experimentation and continuous feedback from our Cisco clients, we fine‐tuned the parameters to strike the perfect balance. The algorithm leverages the golden ratio to increment the hue, ensuring each new color is sufficiently different from the last, while dynamically adjusting saturation and lightness for optimal readability.
Click to expand code snippet
/**
  * Global hue value for generating pastel colors.
  * Maintained in the range [0, 1). Initialized to a random value.
  * @type {number}
  */
let currentHue = Math.random();

/**
  * Generates a semi pastel HEX color using the golden ratio to increment hue.
  * More saturated than usual pastel colors.
  * Relies on a global variable `currentHue` (0 ≤ currentHue < 1). If not set, it is initialized randomly.
  * More about pastel colors here: https://en.wikipedia.org/wiki/Pastel_(color)
  *
  * @returns {string} Good color in HEX format.
  */
function generateGoodColor() {
    const goldenRatioConjugate = 0.618033988749895;
    if (typeof currentHue === 'undefined') {
        currentHue = Math.random();
    }
    currentHue = (currentHue + goldenRatioConjugate) % 1;
    let hueDegrees = Math.floor(currentHue * 360);

    let saturation = 95 + Math.floor(Math.random() * 6); // 95-100%
    let lightness = 60 + Math.floor(Math.random() * 11); // 60-70%

    // some hues don't look great for these ranges of saturation and lightness:
    // - Below 15°, above 320°, between 210° and 290° become too pastel.
    // Instead, we set saturation and lightness to more balanced values.
    if (hueDegrees < 15 || hueDegrees >= 300 || (hueDegrees >= 210 && hueDegrees < 290)) {
        saturation = 70;
        lightness = 70;
    }

    return hslToHex(hueDegrees, saturation, lightness);
}
Implementation of Advanced Filtering (Text, Regex & Date)
This section provides a detailed overview on how we implemented the advanced filtering functionality in our system, including the use of text, regex, and date filters, as well as any performance optimizations we made.
Filtering With Text and Regex (+ Caching)
Our filtering mechanism combines plain text and regex matching to search through log records efficiently. A key performance improvement we implemented is regex caching. Instead of compiling a regex pattern for every log record on the fly, we cache the compiled pattern within each filter keyword. This optimization dramatically reduces processing time—improving filtering speed by almost 3x compared to dynamic regex compilation!
Click to expand code snippet
/**
 * Retrieves the list of currently enabled filter keywords.
 *
 * @returns {Keyword[]} An array of enabled filter keywords.
 */
function getEnabledFilterKeywords() {
    const filterKeywords = [];
    for (const [category, groups] of enabledFilterGroups) {
        for (const group of groups) {
            const keywords = filterCategories[category].filter_groups[group].keywords;
            for (let i = 0; i < keywords.length; i++) {
                if (keywords[i].enabled !== undefined && !keywords[i].enabled) {
                    continue;
                }
                if (!keywords[i].pattern) {
                    const caseSensitive = keywords[i].caseSensitive !== undefined ? keywords[i].caseSensitive : true;
                    if (keywords[i].regex) {
                        keywords[i].pattern = new RegExp(keywords[i].text, caseSensitive ? '' : 'i');
                    } else {
                        const escapedFilterText = keywords[i].text.replace(/[.*+?^${}()|[\]\\]/g, '\\$&');
                        keywords[i].pattern = new RegExp(escapedFilterText, caseSensitive ? '' : 'i');
                    }
                }
                filterKeywords.push(keywords[i]);
            }
        }
    }
    return filterKeywords;
}

/**
 * Filters logs by searching within the `message` field and retaining logs that match specific keywords.
 *
 * @param {Keyword[]} filterKeywords - An array of keywords to filter by.
 */
function filterItemsByFilterGroups(filterKeywords) {
    if (filterKeywords.length !== 0) {
        let new_items = [];
        const filterLimit = max_page_size;
        for (let i = 0; new_items.length < filterLimit && i < filtered_items.length; i++) {
            const log = filtered_items[i];
            if (filterKeywords.some(keyword => {
                const caseSensitive = keyword.caseSensitive !== undefined ? keyword.caseSensitive : true;
                if (keyword.regex) {
                    const pattern = keyword.pattern;
                    return pattern.test(log.message);
                } else {
                    return caseSensitive
                        ? log.message.includes(keyword.text)
                        : log.message.toLowerCase().includes(keyword.text.toLocaleLowerCase());
                }
            })) {
                new_items.push(filtered_items[i]);
            }
        }
        filtered_items = new_items;
    }
}
Our implementation leverages native JavaScript regex (RegEx module) and string matching (.includes)
functionality.
The getEnabledFilterKeywords() function retrieves the enabled filter keywords, compiling
regex patterns
for regex filters and escaping text for non-regex filters (later for highlighting purposes).
The filterItemsByFilterGroups() function filters the logs based on the enabled filter
keywords.
It checks if the log message matches any of the enabled keywords, using the compiled regex patterns or
string matching as appropriate. Notice the use of .some functional style to check if any
of the keywords
match the log message (this is very efficient as it will stop checking as soon as it finds a match).
Keyword Highlighting
Our keyword highlighting feature visually emphasizes matched log entries by wrapping them with a colored highlight. To enhance readability, filters are applied in descending order of keyword length, minimizing overlapping highlights. Each filter is assigned a distinct highlight color generated dynamically to ensure clarity and differentiation.
The implementation leverages previously cached regular expressions to efficiently perform keyword matching, significantly improving performance—especially noticeable with extensive log datasets.
Click to expand highlightText() implementation
/**
 * Highlights keyword matches in text by wrapping them in a span with a background color.
 * Filters are sorted by descending length to avoid overlap. Missing colors are assigned programmatically.
 *
 * @param {string} text - The text to process.
 * @param {Keyword[]} filters - Array of filter keywords.
 * @returns {string} The processed HTML text with highlights.
 */
function highlightText(text, filters) {
    let highlighted = text;

    // Sort filters by length of text to avoid overlapping highlights
    filters.sort((a, b) => b.text.length - a.text.length);

    filters.forEach(filter => {
        // Assign color if not already set
        if (!filter.color) {
            filter.color = generateGoodColor();
        }
        // Use cached regex pattern for efficient matching
        highlighted = highlighted.replace(filter.pattern, (match) => {
            return `<span style="background-color: ${filter.color};">${match}</span>`;
        });
    });

    return highlighted;
}
Date-Time Filtering and Persistence
In our prototype, we implement date-time filtering by leveraging localStorage to persist user
preferences for date ranges. This ensures that if a user applies a date filter, the selection is not lost
on page refreshes. The date filter settings are stored as strings in the format
"YYYY-MM-DDTHH:MM:SS.SSSZ". The code snippet below demonstrates how we initialize the date
inputs from localStorage within our initSearch function:
Click to expand date-time initialization code
if (!window.localStorage.getItem("fromDate")) {
    window.localStorage.setItem("fromDate", "");
} else {
    document.getElementById("from-timestamp").value = window.localStorage.getItem("fromDate");
}

if (!window.localStorage.getItem("toDate")) {
    window.localStorage.setItem("toDate", "");
} else {
    document.getElementById("to-timestamp").value = window.localStorage.getItem("toDate");
}

if (!window.localStorage.getItem("useDate")) {
    window.localStorage.setItem("useDate", "true");
} else if (window.localStorage.getItem("useDate") == "false") {
    document.getElementById("apply-date-chkbox").checked = false;
} else {
    document.getElementById("apply-date-chkbox").checked = true;
}
To further ensure robust date filtering, we implemented custom functions to validate and apply the date
filters. The function
isValidDate() checks that the entered date string adheres to our expected format and falls
within reasonable bounds,
while isWithinDate() uses the validated dates to determine whether a log's timestamp falls
within the user-specified range.
This function is later integrated into our overall filtering logic, particularly in our experimental
asynchronous and incremental filtering features.
Note that this implementation is part of our prototype; the official Cisco repository already includes
comprehensive date-time filtering functionality.
Click to expand date validation and filtering code
/**
 * Checks if the provided date string is valid.
 *
 * @param {string} dateString - The date string in the format "YYYY-MM-DDTHH:MM:SS.SSSZ".
 * @returns {boolean} True if the date string is valid, false otherwise.
 */
export const isValidDate = (dateString) => {
    if (dateString[dateString.length - 1] != 'Z') {
        return false;
    }
    dateString = dateString.substring(0, dateString.length - 1);
    const DateTimeSplit = dateString.split("T");
    const Date = DateTimeSplit[0].split("-");
    const Time = DateTimeSplit[1].split(":");

    if (Date.length != 3 || Time.length != 3) {
        return false;
    }
    if (!(("0000" <= Date[0] && Date[0] <= "9999") &&
          ("00" <= Date[1] && Date[1] <= "11") &&
          ("00" <= Date[2] && Date[2] <= "31"))) {
        return false;
    }
    if (!(("00" <= Time[0] && Time[0] <= "59") &&
          ("00" <= Time[1] && Time[1] <= "59"))) {
        return false;
    }
    const SecondsSplit = Time[2].split(".");
    if (!(("00" <= SecondsSplit[0] && SecondsSplit[0] <= "59") &&
          ("000" <= SecondsSplit[1] && SecondsSplit[1] <= "999"))) {
        return false;
    }
    return true;
}

/**
 * Determines if a log record's timestamp falls within the user-defined date range.
 *
 * @param {Object} log - The log record object containing a "timestamp" property.
 * @returns {boolean} True if the log's timestamp is within the date range or if date filtering is disabled.
 */
export const isWithinDate = (log) => {
    if (!document.getElementById("apply-date-chkbox").checked) {
        return true;
    }
    const fromTimeStamp = document.getElementById("from-timestamp").value;
    const toTimeStamp = document.getElementById("to-timestamp").value;
    if (fromTimeStamp === "" || toTimeStamp === "") {
        return true;
    }
    if (!isValidDate(fromTimeStamp) || !isValidDate(toTimeStamp)) {
        console.log("INVALID TIMESTAMPS");
        return false;
    }
    const logTimeStamp = log["timestamp"];
    return (fromTimeStamp <= logTimeStamp && logTimeStamp <= toTimeStamp);
}
Advanced Table View With Asynchronous & Incremental Filtering
This section provides a detailed overview of how we implemented the advanced double table view with asynchronous and incremental filtering.
Key features here (not all covered individually):
- Resizable Double Table View
- Pagination
- Asynchronous & Incremental Filtering
- Record Jumping
Furthermore, in this section we go over our prototype implementation since it includes asyncronous & incremental filtering, which is not yet available in the official Cisco repository. We did manage to port the resizable double table view & record jumping features to the official repository, so you can find them there as well.
Asynchronous & Incremental Rendering
To achieve a seamless and responsive user interface, we implemented asynchronous and incremental rendering for log entries. Instead of rendering large log datasets all at once—which would lead to noticeable UI blocking—we render logs incrementally using small chunks. This technique provides immediate feedback to the user and significantly enhances perceived performance.
The core of this approach revolves around the scheduleChunkFor function, which efficiently
schedules the processing of log data during the browser's idle periods or asynchronously using
setTimeout as a fallback. This ensures the browser remains responsive even when processing
extensive logs. We also have a cancelScheduledChunkFor function to cancel any previously
scheduled chunks if a new one is requested.
Click to expand scheduleChunkFor & cancelScheduledChunkFor
implementations
/**
* Schedule a callback when idle.
* @param {Function} callback - The function to schedule.
* @param {string} id - Table identifier for the scheduled chunk.
*/
const scheduleChunkFor = (callback, id) => {
    if (window.requestIdleCallback) {
        scheduledChunks[id] = requestIdleCallback(callback);
    } else {
        scheduledChunks[id] = setTimeout(callback, 0);
    }
};

/**
 * Cancel a scheduled callback.
 * @param {string} id - Identifier for the scheduled chunk.
 */
const cancelScheduledChunkFor = (id) => {
    if (scheduledChunks[id] !== null) {
        if (window.cancelIdleCallback) {
            cancelIdleCallback(scheduledChunks[id]);
        } else {
            clearTimeout(scheduledChunks[id]);
        }
        scheduledChunks[id] = null;
    }
};
The main asynchronous and incremental filtering logic is encapsulated within applyFilters.
This function progressively filters log entries, updating two tables simultaneously: one for all logs and
another for filtered logs. It leverages small processing chunks scheduled asynchronously to prevent UI
blocking.
To manage concurrent operations, before scheduling a new processing chunk the code calls
cancelScheduledChunkFor for both "all-logs" and "filtered-logs". This ensures that any
previously scheduled callbacks (which may be running concurrently) are cancelled so that they do not
conflict with the new filter processing task. In other words, it maintains consistency by eliminating
stale processing operations when the filter criteria or user actions change.
This approach prevents race conditions and overlapping tasks during asynchronous processing, ensuring the responsiveness and correctness of both the full log view and the filtered log view.
Click to expand applyFilters implementation
/**
 * Applies filters incrementally and asynchronously to log entries.
 *
 * @param {Array} filters - Array of filters to apply to log entries.
 */
 export const applyFilters = (filters) => {
    cancelScheduledChunkFor("all-logs");
    cancelScheduledChunkFor("filtered-logs");

    // Clear tables and render headers.
    document.getElementById("all-logs-table").innerHTML = "";
    document.getElementById("filtered-logs-table").innerHTML = "";
    renderHeader("all-logs");
    renderHeader("filtered-logs");

    const filteredLogs = [];
    const chunkSize = ROWS_PER_PAGE; // adjust as needed
    let lastFilteredRenderIndex = 0;
    let i = 0;

    function processChunk() {
        const chunkStart = i;
        const end = Math.min(i + chunkSize, allLogs.length);
        for (; i < end; i++) {
            const log = allLogs[i];
            if (!isWithinDate(log)) continue;

            // Check filters and add matching logs.
            if (checkMatch(log, filters)) {
                filteredLogs.push(log);
            }
        }

        // Always render the processed chunk for all logs.
        renderChunk(allLogs, chunkStart, i, "all-logs", filters);

        // Render any new filtered logs that have been added.
        if (filteredLogs.length > lastFilteredRenderIndex) {
            renderChunk(
                filteredLogs,
                lastFilteredRenderIndex,
                filteredLogs.length,
                "filtered-logs",
                filters
            );
            lastFilteredRenderIndex = filteredLogs.length;
        }

        if (i < allLogs.length) {
            scheduleChunkFor(processChunk, "all-logs");
        }
    }

    processChunk();
};
And here's the renderChunk() function, which is responsible for rendering the specific
chunks of log entries.
Click to expand renderChunk() implementation
/**
 * Renders a chunk of log entries into a specified table and updates its pagination.
 *
 * This function takes an array of log objects and renders a subset (chunk) defined by the start and end indices
 * into a table body identified by the provided `id` parameter. This allows us to use the same rendering code for multiple
 * tables (for example, one for filtered logs and another for a different view) by simply specifying a different `id`.
 *
 * @param {Object[]} logs - Array of log objects to render.
 * @param {number} start - The starting index (inclusive) of the log chunk to render.
 * @param {number} end - The ending index (exclusive) of the log chunk to render.
 * @param {string} [id="filtered-logs"] - Identifier for selecting which table to render to. The table body element should have an ID in the format `${id}-tbody`.
 * @param {Array} [filters=[]] - Array of filter keywords to use for highlighting text within each log entry.
 */
export const renderChunk = (logs, start, end, id = "filtered-logs", filters = []) => {
    if (logs.length === 0) {
        console.log("No logs to render.");
        return;
    }

    // Retrieve the table body element by constructing the element's ID.
    const tbody = document.getElementById(`${id}-tbody`);
    if (!tbody) {
        console.error(`Table body element with id "${id}-tbody" not found.`);
        return;
    }

    // Extract headers from the first log object (assuming all logs share the same structure).
    const headers = Object.keys(logs[0]);
    const rows = [];

    // Generate table rows for each log in the specified chunk.
    for (let i = start; i < end && i < logs.length; i++) {
        const log = logs[i];
        rows.push(`
            <tr id="log-${log.id}">
                ${headers.map(header => `<td>${highlightText(String(log[header]), filters)}</td>`).join('')}
            </tr>
        `);
    }

    // Append the generated rows to the table body.
    tbody.insertAdjacentHTML('beforeend', rows.join(''));

    // Update the pagination controls for the table specified by the id.
    renderPagination(id);
};
With this asynchronous approach, our implementation provides a smooth user experience by incrementally updating both "All Logs" and "Filtered Logs" views without noticeable delays or UI freezes, especially important for very large datasets. This method ensures efficient resource management and responsiveness even when multiple filters or extensive logs are involved.
Split Table View With Record Jumping
To significantly enhance usability and navigation within large log datasets, we implemented a dual-table interface with synchronized "record jumping" behavior. The interface consists of two vertically resizable panes: the upper pane displaying "All Logs", and the lower pane showing "Filtered Logs". Users can smoothly resize these panes using a draggable divider, improving readability and facilitating efficient log analysis.
Initially, in our prototype, we used the Split.js library to manage the split-pane functionality:
Click to expand prototype split-pane initialization
// Initialize the vertical split-pane with Split.js
Split(['#all-logs-pane', '#filtered-logs-pane'], {
    direction: 'vertical',
    sizes: [50, 50],
    gutterSize: 5,
    minSize: 100,
    gutter: (index, direction) => {
        const gutter = document.createElement('div');
        gutter.className = `gutter gutter-${direction}`;
        gutter.style.height = '10px';
        gutter.style.cursor = 'row-resize';
        gutter.style.position = 'relative';

        const line = document.createElement('div');
        line.style.position = 'absolute';
        line.style.top = '50%';
        line.style.left = '0';
        line.style.right = '0';
        line.style.height = '5px';
        line.style.backgroundColor = '#ccc';
        line.style.transform = 'translateY(-50%)';

        gutter.appendChild(line);
        return gutter;
    }
});However, for the official Cisco repository, we reimplemented this split-pane behavior entirely using vanilla JavaScript, eliminating external dependencies. This simplifies maintainability and ensures compliance with Cisco’s internal standards. The technical details of this vanilla implementation are straightforward and largely uninteresting, thus we omit them here.
Record Jumping Implementation
A critical feature in the dual-table view is "record jumping." When a user clicks a log entry in the filtered logs pane, the interface automatically navigates to and highlights the corresponding entry in the "All Logs" pane. This allows engineers to swiftly locate specific log records within the full context of the original log file.
Click to expand record-jumping behavior implementation
// Handle click events on rows within the filtered logs table.
const filteredTable = document.getElementById("filtered-logs-table");
if (filteredTable) {
    filteredTable.addEventListener("click", (e) => {
        // Identify the clicked row, even if a child element was clicked.
        const clickedRow = e.target.closest("tr");
        if (clickedRow && clickedRow.id) {
            const rowId = clickedRow.id; // Format "log-"
            const rowNum = parseInt(rowId.replace("log-", ""), 10);
            const targetPage = Math.floor((rowNum - 1) / ROWS_PER_PAGE);

            // Navigate the "All Logs" table to the corresponding page.
            if (window.allLogsPageUpdater) {
                window.allLogsPageUpdater(targetPage);
            }

            // Brief delay to ensure the target row is visible before scrolling and highlighting.
            setTimeout(() => {
                const fullRow = document.querySelector(`#all-logs-table tr#${rowId}`);
                if (fullRow) {
                    fullRow.scrollIntoView({ behavior: "smooth", block: "center" });
                    fullRow.classList.add("highlight");
                    setTimeout(() => fullRow.classList.remove("highlight"), 2000);
                }
            }, 150);
        }
    });
}
The basic idea here is that I identify the clicked row, extract its ID, and parse the row number from it.
Notice here how I not only have to scroll to the row, but also navigate to the correct page in the
"All Logs" table. Luckily, the logs have sequential IDs, and the formula Math.floor((rowNum - 1) /
ROWS_PER_PAGE) gives us the correct page number for the "All Logs" table.
To our delight, JS already provides a built-in function to scroll to the row:
scrollIntoView(). This function
scrolls the row into view, and we can specify the behavior (smooth or instant) and the position (top,
center, or bottom).
We also add a highlight effect to the row for 2 seconds, making it visually distinct when selected.
Agent Chat Bot UI
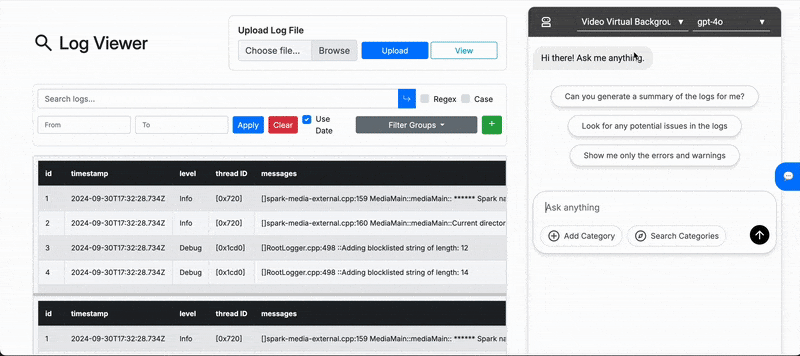
Note: The AI Agent UI shown above exists purely in our prototype and is not included in the official Cisco repository.
As mentioned earlier, our agent chatbot features an advanced interactive UI. While modals and dialogs for
features like category creation and search closely mirror those detailed in the custom filter groups
section, here
we'll highlight the primary functionality: the asynchronous processing and display of streamed agent
responses using the processStream() and processAction() functions.
processStream() Function
The processStream() function handles incoming streaming responses from the backend AI
endpoint. It utilizes JavaScript's Stream API to asynchronously parse the Server-Sent Events (SSE) data.
The streamed data, decoded incrementally using the TextDecoder, is split and parsed into
action objects, which are then passed onto the processAction() function for handling.
Click to expand processStream() implementation
// Processes streamed server-sent events (SSE)
const processStream = async (stream, messagesContainer, loadingMessage) => {
  const decoder = new TextDecoder("utf-8");
  const reader = stream.getReader();
  let buffer = "";

  while (true) {
    const { done, value } = await reader.read();
    if (done) break;
    buffer += decoder.decode(value, { stream: true });
    let parts = buffer.split("\n\n");
    buffer = parts.pop();

    for (const part of parts) {
      if (part.startsWith("data: ")) {
        const dataStr = part.substring(6).trim();
        if (dataStr === "[DONE]") {
          break;
        }
        try {
          const action = JSON.parse(dataStr);
          processAction(action, messagesContainer);
        } catch (e) {
          console.error("Error parsing action", e);
        }
      }
    }
  }

  // Remove loading message after streaming is complete
  loadingMessage?.remove();
};
processAction() Function
The processAction() function is responsible for interpreting each individual action received
from the stream and dynamically updating the chatbot UI accordingly. Actions handled by this function
include:
- Summary Decision: Displays agent decision on whether a summary is necessary.
- Issue Decision: Displays agent decision regarding evaluation of known issues.
- Filter Decision: Displays agent decision on the need for additional filters.
- Add Filter: Dynamically generates and displays new filter groups based on AI suggestions.
- Generate Summary: Displays generated summaries and associated statistics.
- Flag Issue: Highlights detected issues with interactive expandable details.
Below is a simplified version of the processAction() function implementation:
Click to expand simplified processAction() implementation
const processAction = (action, messagesContainer) => {
  let messageEl = document.createElement("div");
  messageEl.className = "chat-message bot";

  switch (action.type) {
    case "summary_decision":
    case "issue_decision":
    case "filter_decision":
      messageEl.innerHTML = `
        <div class="thinking-header">
          <span>${action.type.replace("_", " ")}</span>
          <span class="animated-ellipsis">...</span>
        </div>
        <div class="thinking-details" style="display:none">${action.body.explanation}</div>
      `;
      messageEl.querySelector(".thinking-header").onclick = () => {
        const details = messageEl.querySelector(".thinking-details");
        details.style.display = details.style.display === "none" ? "block" : "none";
      };
      messagesContainer.appendChild(messageEl);
      if (!action.body.generate_summary && !action.body.evaluate_issues && !action.body.should_add_filter) {
        setTimeout(() => messageEl.remove(), 3000);
      }
      break;

    case "add_filter":
      extendFilterGroups([action.body.filter_group]);
      let filterContent = `
        <strong>Filter Group Added: ${action.body.filter_group.title}</strong>
        <p>${action.body.filter_group.description}</p>
        <table>
          <thead><tr><th>Keyword</th><th>Description</th></tr></thead>
          <tbody>
      `;
      action.body.filter_group.filters.forEach(filter => {
        filterContent += `
          <tr>
            <td><span style="background-color:${filter.color}">${filter.text}</span></td>
            <td>${filter.description}</td>
          </tr>
        `;
      });
      filterContent += "</tbody></table>";
      messageEl.innerHTML = filterContent;
      messagesContainer.appendChild(messageEl);
      break;

    case "generate_summary":
      messageEl.innerHTML = marked.parse(createMarkdownTable(action.body.stats) + "\n" + action.body.summary);
      messagesContainer.appendChild(messageEl);
      break;

    case "flag_issue":
      messageEl.innerHTML = `
        <div class="flag-issue-header">
          <strong style="color:#950606">Detected issue: ${action.body.issue}</strong>
          <span>▼</span>
        </div>
        <div class="flag-issue-details" style="display:none">${marked.parse(action.body.summary)}</div>
      `;
      messageEl.querySelector(".flag-issue-header").onclick = () => {
        const details = messageEl.querySelector(".flag-issue-details");
        details.style.display = details.style.display === "none" ? "block" : "none";
      };
      messagesContainer.appendChild(messageEl);
      break;
  }

  messagesContainer.scrollTop = messagesContainer.scrollHeight;
};
Notice here we also use the marked.js library to parse markdown content, enhancing the
readability and formatting of agent responses.
These implementations collectively facilitate a responsive, interactive, and dynamic chat interface, significantly enhancing the user experience by clearly conveying agent decisions, results, and insights in real time.
Note: This section is our major extension to the original requirements and all Cisco requirements have been met in the front-end section. However, the Cisco clients have shown great interest in these experimental features, especially the AI agent, as they hold great value. They've even expressed interest in including these for future projects and will use our prototype as a reference!
Backend: Database & AI Agent
Database & Semantic Search
Our backend leverages Elasticsearch as the primary database, providing efficient storage, retrieval, and semantic search capabilities for log files. FastAPI serves as the web framework, offering robust internal APIs for seamless data handling and integration with the front end. Additionally, the backend intelligently utilizes hardware acceleration (GPU or CPU) to maximize performance, especially for embedding computations used in semantic search.
Backend Setup with FastAPI and Uvicorn
Our backend server is built using Python's FastAPI framework, known for its high performance, ease of use, and automatic API documentation generation. FastAPI also seamlessly integrates with Uvicorn, an efficient asynchronous ASGI web server.
The following snippet illustrates how we initialize the FastAPI app with middleware for handling Cross-Origin Resource Sharing (CORS) policies, ensuring smooth communication with the frontend:
Expand to view FastAPI initialization
# Load environment variables
load_dotenv()

# Initialize FastAPI app
app = FastAPI()

# Setup CORS middleware
app.add_middleware(
    CORSMiddleware,
    allow_origins=["*"],
    allow_origin_regex=".*",
    allow_credentials=True,
    allow_methods=["*"],
    allow_headers=["*"],
)

# Run the app with uvicorn
if __name__ == "__main__":
    import uvicorn

    uvicorn.run(app, host="0.0.0.0", port=8000)
This straightforward setup ensures the backend can serve requests asynchronously, making full use of Python's modern asynchronous features to achieve high performance and scalability.
Elasticsearch Database Structure & Management
In Elasticsearch, each log file corresponds uniquely to an ES index, simplifying database operations.
- Pushing Logs to Elasticsearch: When a new log file is uploaded, the system first checks if an index with the given identifier already exists. If it does, the previous entries are cleared, and the new logs are inserted. Otherwise, a fresh index with the proper mapping is created. This strategy ensures efficient updates without index proliferation.
- Fetching Logs from Elasticsearch: Logs are retrieved using Elasticsearch’s scroll API. This scroll mechanism maintains the search context active for two minutes, fetching records in batches of 1,000. It allows efficient retrieval and pagination of large datasets, minimizing overhead and enhancing performance.
Expand to view FastAPI endpoints code snippet
# FastAPI Endpoint for uploading logs
@app.post("/table/{id}")
async def upload_file(id: str, request: Request, background_tasks: BackgroundTasks):
    data = await request.json()
    const_logs = data.get("logs")
    title = data.get("title", str(id))
    description = data.get("description", "")

    response = push_to_elastic_search(const_logs, id, title, description)
    background_tasks.add_task(update_embeddings_for_logs, id)

    return response

# FastAPI Endpoint for retrieving logs
@app.get("/table/{id}")
def get_from_elasticsearch(id: str):
    logs = retrieve_logs_from_elasticsearch(str(id))
    for log in logs:
        log.pop("embedding", None)
    return logs

# FastAPI Endpoint for deleting logs
@app.delete("/table/{id}")
async def delete_file(id: str):
    es = Elasticsearch(...)
    if es.indices.exists(index=id):
        es.indices.delete(index=id)
        return {"status": "success", "message": "log table deleted successfully"}
    else:
        return {"status": "error", "message": f"log file with id: {id} not found"}
Semantic Search & Embeddings
To significantly enhance log analysis, our backend implements semantic search leveraging embeddings
generated by the msmarco-MiniLM-L12-cos-v5 sentence transformer. This allows for semantic
similarity queries that outperform traditional keyword-based searches, providing engineers with
contextually relevant log entries.
Embeddings are computed asynchronously to maintain UI responsiveness, as demonstrated below:
Expand to view embedding generation snippet
# Initialize embedding model
emb_model = SentenceTransformer(
    "sentence-transformers/msmarco-MiniLM-L12-cos-v5",
    device=device,
)

def compute_embeddings(input_data):
    texts = [text[0] for text in input_data]
    embeddings = emb_model.encode(
        texts, batch_size=64, convert_to_tensor=True, show_progress_bar=False
    )
    return [embedding.tolist() for embedding in embeddings]
Vector Similarity Search with Elasticsearch
Semantic queries utilize Elasticsearch’s KNN functionality, efficiently retrieving log entries semantically similar to user queries. This feature greatly enhances search accuracy and provides contextually relevant results instantly.
Expand to view KNN search implementation
def search_similar(q: str, index: str, k: int = 10):
    query_embedding = compute_embeddings([q])[0]

    response = es.search(
        index=index,
        knn={
            "field": "embedding",
            "query_vector": query_embedding,
            "num_candidates": 50,
            "k": k,
        },
        size=k,
    )
    hits = response.get("hits", {}).get("hits", [])
    logs = [hit["_source"] for hit in hits]
    for log in logs:
        log.pop("embedding", None)
    return logs
Hardware Acceleration for Optimal Performance
Our implementation dynamically selects the best available hardware—prioritizing GPU—to optimize embedding computation speed. This strategy significantly improves responsiveness, especially under heavy workloads.
Expand to view hardware selection snippet
# Determine computation device (GPU, MPS, CPU)
device = (
    "cuda" if torch.cuda.is_available() else
    "mps" if torch.backends.mps.is_available() else
    "cpu"
)
Overall, this integrated backend approach—combining robust API design via FastAPI, efficient data management with Elasticsearch, sophisticated semantic search capabilities, and intelligent hardware utilization—ensures our Webex Log Viewer remains performant, scalable, and highly responsive to Cisco engineers’ needs.
AI Agent Implementation
The AI agent in our system leverages advanced generative models to provide intelligent, interactive log analysis. We encapsulate its functionalities within clearly defined components, each performing a specific role in the interaction pipeline, ensuring modularity and maintainability.
Chat Stream Endpoint with Server-Sent Events (SSE)
The core interaction occurs via the /chat_stream endpoint, implemented using FastAPI and
asynchronous Server-Sent Events (SSE). This ensures real-time updates and a responsive user experience by
incrementally sending AI-generated actions to the frontend as soon as they are available.
The AI agent's workflow in the endpoint follows these structured steps:
- Summary Generation Decision: Based on log statistics, decides if a summary is relevant.
- Summary Generation: If required, provides a concise summary of the logs.
- Known Issue Evaluation Decision: Decides whether known issues need to be evaluated.
- Issue Evaluation: Evaluates logs against known issues using semantic and keyword-based matching.
- Filter Decision: Determines if a dynamic filter should be created.
- Filter Group Generation: Generates a filter group based on detected issues.
Each step asynchronously streams results immediately, minimizing UI blocking.
Expand to view Chat Stream Endpoint implementation
@app.post("/chat_stream")
async def chat_stream(request: ChatRequest):
    if not request.message or not request.logs or not request.log_id:
        raise HTTPException(status_code=400, detail="Message and logs are required")

    chat_agent = ChatAgent(models[request.model], base_prompt)

    async def event_generator():
        # Step-by-step asynchronous workflow.
        generate_summary, explanation = await chat_agent.decide_summary(request.message, request.logs)
        yield Action(type="summary_decision", body={"generate_summary": generate_summary, "explanation": explanation}).model_dump_json()

        if generate_summary:
            summary_text, stats = await chat_agent.generate_summary(request.message, request.logs)
            yield Action(type="generate_summary", body={"summary": summary_text, "stats": stats}).model_dump_json()

        evaluate_issues, explanation = await chat_agent.evaluate_decision(request.message)
        yield Action(type="issue_decision", body={"evaluate_issues": evaluate_issues, "explanation": explanation}).model_dump_json()

        detected_issues = {}
        if evaluate_issues:
            known_issues = request.known_issues or {}
            issue_context = {issue: {
                "description": details["description"],
                "context": details["context"],
                "keywords": details["keywords"],
                "conditions": details["conditions"],
                "resolution": details["resolution"],
                "logs": extract_top_rows(request.logs, details["keywords"])
            } for issue, details in known_issues.items()}

            similar_logs = search_similar(request.message, request.log_id, k=5)
            for issue, details in issue_context.items():
                issue_text = await chat_agent.evaluate_issue(issue, details, request.message, similar_logs)
                if issue_text.strip():
                    detected_issues[issue] = details
                    yield Action(type="flag_issue", body={"issue": issue, "summary": issue_text}).model_dump_json()

        should_add_filter, filter_explanation = await chat_agent.decide_filter(request.message, detected_issues)
        yield Action(type="filter_decision", body={"should_add_filter": should_add_filter, "explanation": filter_explanation}).model_dump_json()

        if should_add_filter:
            filter_group = await chat_agent.generate_filter_group(request.message, detected_issues)
            yield Action(type="add_filter", body={"filter_group": filter_group}).model_dump_json()

        yield "data: [DONE]\n\n"

    return StreamingResponse(event_generator(), media_type="text/event-stream")
ChatAgent Class: Modular & Step-by-step Processing
The ChatAgent class encapsulates all interaction logic, breaking down the AI decision-making
process into clearly defined, asynchronous methods. These methods use structured prompts and carefully
process AI responses to determine next steps, improving maintainability and clarity.
Methods include:
decide_summary(): Determines summary relevance using log statistics.generate_summary(): Generates concise log summaries.evaluate_decision(): Decides whether to evaluate known issues.evaluate_issue(): Evaluates logs against specific known issues.decide_filter(): Decides on the necessity of filter groups.generate_filter_group(): Generates detailed filter groups as structured JSON objects.
Expand to view ChatAgent class example
class ChatAgent:
        def __init__(self, model: ModelClient, base_prompt: str):
            self.model = model
            self.base_prompt = base_prompt
            self.stats = None

        async def decide_summary(
            self, message: str, logs: list[dict[str, Any]]
        ) -> tuple[bool, str]:
            level_counts = get_log_level_counts(logs)
            self.stats = compute_stats(level_counts)
            stats_str = json.dumps(self.stats, default=str, indent=2)

            prompt = f"""{self.base_prompt}
    Log Statistics:
    {stats_str}

    User Query: {message}

    Should a summary be generated?
    - If generating a summary is not relevant or the query is specific (e.g. "filter for debug logs"), respond with: no: .
    - If additional context is needed and a summary would be helpful, respond with: yes:

    Respond with exactly one line in the following format:
    yes: [brief explanation]
    or
    no: [brief explanation]

    Do not include any extra text.
    """
            response = await self.model.chat_completion(prompt)
            print("Response:", response)
            if response:
                try:
                    cleaned = response.strip()
                    if ":" in cleaned:
                        decision_part, explanation = cleaned.split(":", 1)
                        return decision_part.strip().lower() == "yes", explanation.strip()
                    else:
                        return False, cleaned
                except Exception as e:
                    print("Error decoding decision:", e)
            return False, ""

        async def generate_summary(
            self, message: str, logs: list[dict[str, Any]]
        ) -> tuple[str, dict]:
            if self.stats is None:
                level_counts = get_log_level_counts(logs)
                self.stats = compute_stats(level_counts)
            stats_str = json.dumps(self.stats, default=str, indent=2)

            prompt = f"""{self.base_prompt}
    Log Statistics:
    {stats_str}

    User Query: {message}

    Generate a summary of the log statistics. Respond with just the explanation:"""
            summary = await self.model.chat_completion(prompt)
            return summary, get_simple_stats(logs)

        async def evaluate_decision(self, message: str) -> tuple[bool, str]:
            prompt = f"""{self.base_prompt}
    User Query: {message}

    Should I look for known issues in the logs?
    - If the user query is specific (e.g. "generate me a summary", "filter for debug logs") and does not mention problems or issues, then respond with: no: [brief explanation].
    - Only respond with yes if the query is asking for detecting issues or problems in the logs.
    Respond in exactly one line in the following format (without any markdown or extra text):
    yes: [brief explanation]
    or
    no: [brief explanation]
    """
            response = await self.model.chat_completion(prompt)
            if response:
                try:
                    # Clean the response (e.g. remove any stray formatting) and split by colon.
                    cleaned = response.strip()
                    if ":" in cleaned:
                        decision_part, explanation = cleaned.split(":", 1)
                        decision = decision_part.strip().lower() == "yes"
                        return decision, explanation.strip()
                    else:
                        # If no colon is found, assume a default 'no' and return the whole text as explanation.
                        return False, cleaned
                except Exception as e:
                    print("Error decoding decision:", e)
            return False, ""

        async def evaluate_issue(
            self,
            issue: str,
            details: str | dict,
            message: str,
            similar_logs: list[dict[str, Any]],
        ) -> str:
            prompt = f"""{self.base_prompt}
    Known Issue: "{issue}"
    Issue Details:
    {json.dumps(details, indent=2)}

    Similar Logs (note that these are done through a simple semantic search, and is very prone to not being relevant):
    {json.dumps(similar_logs, indent=2)}

    User Query: {message}

    Based on the above, should this issue be flagged?
    If yes, respond in the following format:
    **Issue Summary**:

    **Resolution**:

    Else, respond with an empty string.
    Note: if the details json does not have a logs field or the logs field is empty, respond with an empty string.
    """
            print("Prompt:", prompt)
            return await self.model.chat_completion(prompt)

            # New method to decide if a filter should be added.

        async def decide_filter(
            self, message: str, detected_issues: dict[str, Any]
        ) -> tuple[bool, str]:
            prompt = f"""{self.base_prompt}
    User Query: {message}

    Issues Detected (with their keywords):
    {json.dumps(detected_issues, indent=2)}

    Should I add a filter to refine the log output?
    - If the query implies filtering (e.g. "show only errors", "filter out debug logs") or mentions keywords/regex, respond with: yes: [brief explanation].
    - Also, if there are detected issues, there is likely keywords there that can be used for filtering.
    - Otherwise, respond with: no: [brief explanation].
    Respond in exactly one line in the following format:
    yes: [brief explanation]
    or
    no: [brief explanation]
    Do not include any extra text.
    """
            response = await self.model.chat_completion(prompt)
            if response:
                try:
                    cleaned = response.strip()
                    if ":" in cleaned:
                        decision_part, explanation = cleaned.split(":", 1)
                        decision = decision_part.strip().lower() == "yes"
                        return decision, explanation.strip()
                    else:
                        return False, cleaned
                except Exception as e:
                    print("Error decoding filter decision:", e)
            return False, ""

        # New method to generate a filter group.
        async def generate_filter_group(
            self, message: str, detected_issues: dict[str, Any]
        ) -> dict:
            prompt = f"""{self.base_prompt}
    User Query: {message}

    Issues Detected (with their keywords):
    {json.dumps(detected_issues, indent=2)}

    Generate a filter group in JSON format with the following structure:
    {{
      "title": string,
      "description": string,
      "filters": [
        {{
          "text": string,
          "regex": boolean,
          "caseSensitive": boolean,
          "color": string,
          "description": string
        }}
        // You may include additional filters if needed.
      ]
    }}

    Make sure to follow these guidelines:
    - The title should be a short, descriptive name for the filter group.
    - The description should be a brief explanation of the filter group.
    - Each filter should have a text field with the keyword or regex pattern to match.
    - The regex field should be true if the text is a regex pattern, false otherwise.
    - The caseSensitive field should be true if the filter should be case-sensitive, false otherwise.
        - In most cases, it should be false to match case-insensitively.
    - The color field should be a hex color code.
        - Keep in mind it will be in a light gray background on black text, so choose a highlight color that is appropriate.
        - Mostly go for a light color that is easy on the eyes.
        - Make sure colors are varied enough to distinguish between different filters.
    - The description field should be a brief explanation of the filter, like a comment.

    The filter group should capture the intent of the user's request in terms of log filtering. Do not include any extra text.
    """
            response = await self.model.chat_completion(prompt)
            cleaned = clean_response_content(response.strip()) if response else ""
            try:
                filter_group = json.loads(cleaned)
                return filter_group
            except Exception as e:
                print("Error decoding filter group:", e)
                return {}
ModelClient Abstraction: Flexible Model Integration
Our AI implementation abstracts away the specific model details behind a unified ModelClient
interface. This design pattern enables seamless switching between various LLM implementations, whether
they are cloud-hosted models (such as OpenAI GPT) or locally deployed models like Llama.cpp-based offline
models. This design significantly simplifies the integration and testing of different generative models
without changing the application logic.
We defined two implementations:
- OpenAIModelClient: Uses the OpenAI API to interact with online GPT models.
- OfflineModelClient: Leverages locally deployed Llama.cpp models for offline inference.
Expand to view ModelClient abstraction
class ModelClient(abc.ABC):
    @abc.abstractmethod
    async def chat_completion(self, prompt: str) -> str:
        pass

class OpenAIModelClient(ModelClient):
    def __init__(self, api_key: str, model: str):
        from openai import OpenAI
        self.client = OpenAI(api_key=api_key)
        self.model = model

    async def chat_completion(self, prompt: str) -> str:
        response = await asyncio.to_thread(
            self.client.chat.completions.create,
            model=self.model,
            messages=[{"role": "system", "content": prompt}],
        )
        return response.choices[0].message.content or ""

class OfflineModelClient(ModelClient):
    def __init__(self, model_path: str, context_window: int = 1024):
        self.model = Llama(model_path=model_path, n_gpu_layers=-1, n_ctx=context_window)

    async def chat_completion(self, prompt: str) -> str:
        output = self.model.create_chat_completion(messages=[{"role": "system", "content": prompt}])
        return output["choices"][0]["message"]["content"] or ""
This design achieves complete model-agnosticism, greatly enhancing maintainability, extensibility, and ease of deployment across diverse hardware setups and deployment environments.