Dependencies and Tools
We developed MotionInput V3 using a number of dependencies and technologies:
Python 3.9
MotionInput V2's backend codebase was developed entirely in Python, and therefore it is most straightforward to re-engineer the codebase using the same language, with Python 3.9 in particular being used. Utilising a Webcam Input, the video stream is analysed frame by frame. The raw images are processed to obtain useful information (which gestures are active in the current frame) by open-source libraries, depending on the mode (using hands, body, head, eyes or speech).

MediaPipe
MediaPipe is a cross-platform framework, developed by Google, that can be used as a Python library, as well as for Android, IOS and devices such as Raspberry Pi. It includes 11 Machine Learning models, whose purpose is to analyse and process images/videos/audio [1]. In our case, MediaPipe library is used for Hand and Body Modules. While the hand mode utilises MediaPipe Hands, full body mode makes use of MediaPipe Pose.

Dlib
Dlib is an open-source tool, with a licence that allows its use free of charge for any project, in both industry and academia [2]. The usability of Dlib library for MotionInput consists in identifying 68 landmarks on the face, which can be used to recognise gestures for the Head Module.

OpenVino
OpenVINO is a free cross-platform toolkit developed by Intel. It is used in many computer vision applications to process images with the capabilities retained after training a neural network [3]. OpenVINO was useful in the development of MotionInput to estimate eye gaze vectors for the Eyes Module.

Vosk
Vosk is an open source speech recognition toolkit, able to identify over 20 languages. It can be utilised on many devices/programming languages, including Python [4]. The Vosk library was used in our codebase for the Speech Module, for voice recognition.

OpenCV
OpenCV is an open source library, which is mainly focusing on computer vision. In MotionInput, OpenCV library is used to get and process images from the camera for each frame and also to display the processed image in the view window.

References
- [1] "Models and Model Cards", mediapipe [online], 2022. Available: https://google.github.io/mediapipe/solutions/models. [Accessed: 10- Mar- 2022].
- [2] "dlib C++ Library", Dlib.net [online], 2022. Available: http://dlib.net/. [Accessed: 10- Mar- 2022].
- [3] "Intel Distribution of OpenVINO Toolkit", Intel [online], 2022. Available: https://www.intel.com/content/www/us/en/developer/tools/openvino-toolkit/overview.html. [Accessed: 10- Mar- 2022].
- [4] "VOSK Offline Speech Recognition API", VOSK Offline Speech Recognition API [online], 2022. Available: https://alphacephei.com/vosk/. [Accessed: 10- Mar- 2022].
New Architecture
The beginning of our implementation process was to build the new architecture that we proposed. Shown here is an in-depth technical overview of the classes that implement the architecture. As in the System Design section, we split the architecture into 2 layers: the Core Layer and the MotionInput Layer. However, whereas the design section presented a brief discussion on each class' purpose, this section delves into the technical aspects, being more code-driven to show how it's been added to the system.
Core Layer
-
RawData
The RawData class was simply an abstraction for a python dictionary of the form {“body part name”: {“landmark name”: landmark coordinates}}. The reasoning behind using said class instead of just the dictionary was to enforce the structure.

RawData class skeleton -
Position
The Position class in the core is simply an interface that needs to be implemented in every module. Each module's Position instance is initialised with all the landmarks (raw_data) detected on the frame for said module and names of the primitives (used_primitives) that need to be calculated.

Position class skeleton Initially, just like in the v2 code, we were calculating all primitives for every frame. However, we soon realised that when loading the gestures into the model, we can deduce what primitives are currently used and calculate only those. Hence if no gesture is currently concerned if the thumb is stretched we can avoid performing this calculation each frame. In addition to implementing this interface, each module can also add other methods to remove the need of performing common calculations from the classes that will be using the Position. An example of such a method is
get_palm_height()in HandPosition. -
Gesture
The core Gesture is an abstract class that every module is expected to extend adding their own commonly used methods (e.g. to get the total distance travelled by the centre of the palm).

Gesture class skeleton Once the Gesture is initialised, it is updated by the model each frame until the Gesture instance decides to deactivate - returning a False after the
update()method is called. By calling theupdate()each frame we let the Gesture store the latest Position instance of the respective body part. A Gesture is initialised with its name, aposition_checker()method, a PositionTracker method, and optionally an integer determining the maximum size of the position queue.The
position_checkeris the method the Gesture instance can use to check if it is still active (at the end of eachupdate()call). What the method does is simply checking that all the primitives are still in the correct states.The PositionTracker instance is an instance of the same tracker from which the Gesture was initialised. It is needed in the Gesture in order to be able to get a new Position instance each frame from the same tracker. This is done so that one module could have multiple different trackers (e.g. multiple hands in the HandModule) and the Gestures would stay dependent only on one tracker (e.g. only on the right hand).
The maximum size of the position queue was added as we realised that some gestures (like the gesture in the head module which has simply the condition of the nose being in the frame) may remain active for long periods of time. In these cases, there is usually no need to store all the Positions from the frames that the gesture has been active. Therefore we switched to storing the Position instances in a queue and allowed each module to determine how many Position instances at most would be stored.
-
LandmarkDetector
The core's LandmarkDetector is a very simple interface that needs to be implemented by each module. Each frame it is given the image retrieved from the camera and the RawData instance to add its own landmarks to.

LandmarkDetector class skeleton -
PositionTracker
The Position tracker is initialised with the name of the body part it is tracking as well as the appropriate modules Position class for it to create an instance of each frame.
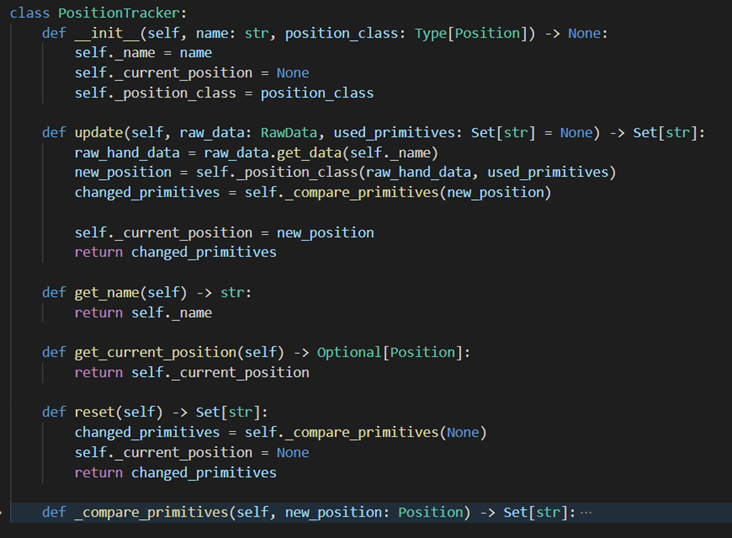
PositionTracker class + relevant class methods Each frame (if the module that the tracker belongs to is active) the
update()method is called with the RawData and the names of the primitives to calculate. We use the arguments to create a Position instance and then after comparing it to the previous frames Position, that we have stored, we return a set of all the primitives that changed between them. There are a few rules used to determine the used primitives:If either the previous or new Position is None (which is in cases if either the body part is no longer in the frame or the tracker was reset) all used primitives are considered to have changed.
If the sets of used primitives between the 2 frames changed, the primitives that were either added or removed are also considered to have changed.
-
GestureFactory
The GestureFactory is initialised with the name of the gesture, the appropriate module’s Gesture class and the set of primitives that describe the gesture.
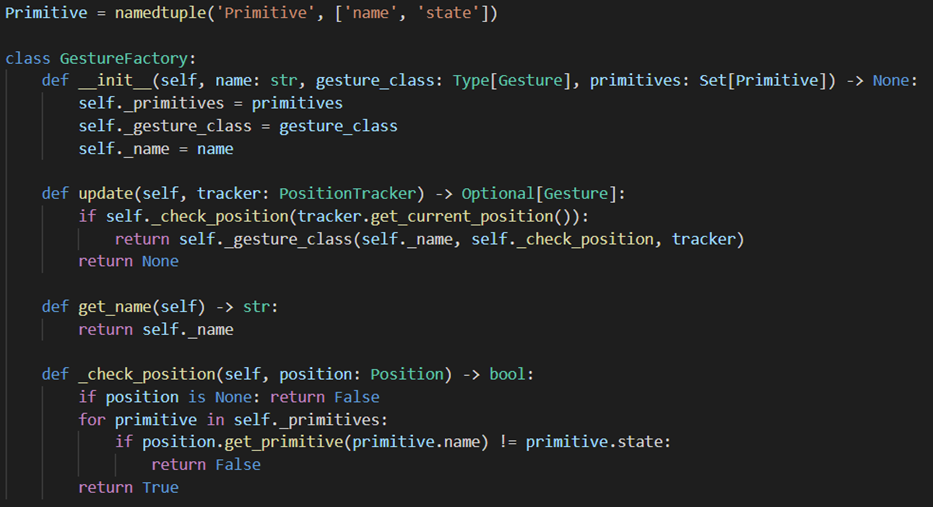
GestureFactory class + relevant class methods As the
update()method is called, we check if the last Position in the provided tracker matches the gesture, in which case a new Gesture instance is created. For checking if the Position matches the gesture we use the_check_position()method which simply iterates over all the primitives of interest (aka the ones given upon initialization of the factory) and checks if they are in the states required. This is also the method that gets passed into the newly initialised Gesture instance and is used to continuously verify if the Gesture is active. -
Module
The Module class contains all the logic needed to use a module and to implement a specific module, like HandModule, the child class simply needs to overwrite the class variables with its own. In many cases the modules will also overwrite some of the methods like the
calibrate()or the_do_pre_initialization().
Module class skeleton The
calibrate()method can be called through the protocol by the GUI whenever the model is not running. This method starts a separate process (usually with its own view window) that calibrates all the needed values for the module, which are then stored in the config file. When using the modules themselves however we work under the assumption that everything is calibrated whenever the MI is used. As some of the modules have an ML model that takes a bit of time to initialise we created the pre initialization methods. The pre-initialization can be called before the modules are initialised for the first time which will then perform all the time-consuming setup. The intent of this is so that the GUI could pre-initialise for example the BodyModule before the user has even started the MI backend. As for the actual frame by frame use of the Module class, it provides the abstraction of the gesture recognition process from the Model class. Each frame it is given the camera image and the RawData instance to populate with landmarks. The Module then returns a set of Gesture instances that were created by the frame. This is done by:- Processing the frame with the LandmarkDetector (ML library) to get all the landmark coordinates in the RawData instance.
- Updating all the PositionTrackers with the RawData and from there geting the set of all the module’s primitives, that had changed since the last frame.
- Updating every GestureFactory that uses any of the changed primitives, from where we might get some new Gesture instances.
In case all initially added gestures have been removed from the module, upon the
update_and_get_activated_gestures()method being called we don't actually process the frame but simply return the empty set. Adding gestures to a model is as simple as passing the name of the gesture and the set of primitives it is composed of - thus pairs of primitive names from the module's Position, together with their desired states. From that, we create the needed GestureFactories. For each primitive that is contained in any of our gestures, we have a mapping in the_primitive_to_gesture_factoriesdictionary to all the factory instances that use it. This allows us to efficiently find all the factories we need to update whenever some primitives change state. This is also the dictionary that we use to determine the set of used primitives, thus the set of primitives that the Position needs to calculate each frame. -
GestureEvent
The GestureEvent class in the core is just an interface, created in order to give the developers as much freedom as possible and yet allow the rest of the system to use the different GestureEvent classes interchangeably.
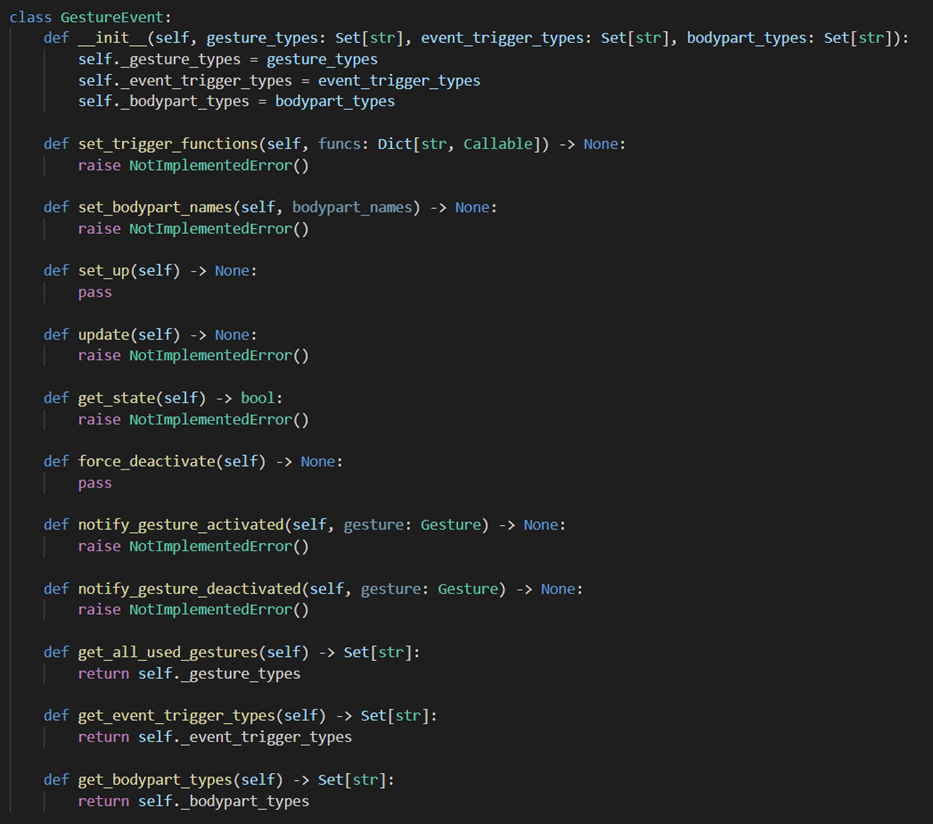
GestureEvent class skeleton The few notable methods here are the
set_up()andforce_deactivate()methods. They were added in as we realised that, when changing modes (aka the set of events in the model) many events have some functionality that needs to be performed either as they are first added to the model or before they are removed. The reason why theset_up()functionality can not be done on initialization is that there is a difference between when the events are created by the EventMapper and when they are actually added to the module. These two methods are what we often use to get things like the area of interest or extremity triggers to show up on the View window or to be removed from there at the right time. Theforce_deactivate()method is also meant to be used for purposes like releasing a click or a key that has been held down by an event in order to avoid any weird behaviours if the mode of interaction is changed while the event is still active. -
Model
Model is the class that we use to abstract all the gesture detection and event triggering logic from the rest of the system. The functionality of the model and thus the methods can be viewed in 2 parts. The methods that are used as the functionality is configured - this when events, gestures and modules are added, And then the methods for the frame-by-frame processing.

Model class skeleton Adding of Modules is done simply by providing the name and the instance of the said module, w hich then gets added to the
_modulesdictionary. Due to Gesture instances being initialised only if they are performed, no Gesture instances are passed to the model. Instead, the name of the model the gesture belongs to, the name of the gesture and the set of primitives (tuple: name of the primitive along with its desired state) of interest in the given model. The gesture name and the primitives are then passed to the respective module, for it to create the GestureFactories. Adding the Events is also done by providing its name and instance. The events need to be initialised outside of the model as the methods of the handler that have external dependencies have to be mapped to the events and we desire the model to be self-contained. Whenever an event is added, we query the event for the names of all the gestures it uses and then store that in the_gesture_to_eventdictionary, to allow for fast lookup of all the events that depend on a gesture whenever it activates or deactivates. The same dictionary is also used to track what gestures are no longer used (when events are removed) to notify the modules to avoid processing any unnecessary gestures. There actually is no method for adding events, instead, theswitch_events()method is used. This is done to prevent unnecessary removal of any gestures - only after the new events are added we remove the unused gestures according to the_gesture_to_eventdictionary. The incorrect removal of gestures can cause problems as it may lead to either false triggering or deactivation of some events that use it.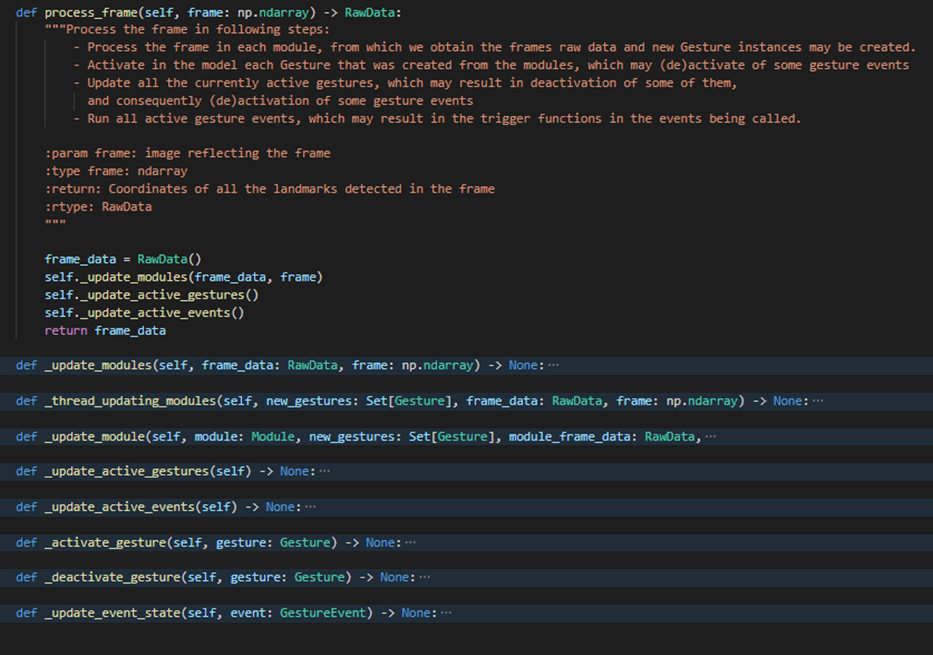
process_frame()method in the Model classThe frame processing is done in 3 simple steps.
- First we process the frame image in all the modules and from there get all the
Gesture instances, if any have been activated by the frame.
Whenever we are using more than one module, we process them in parallel threads. This is possible as we delegated all the time-consuming ML processing (retrieving the landmarks from the image and then calculating the primitives) to the modules.
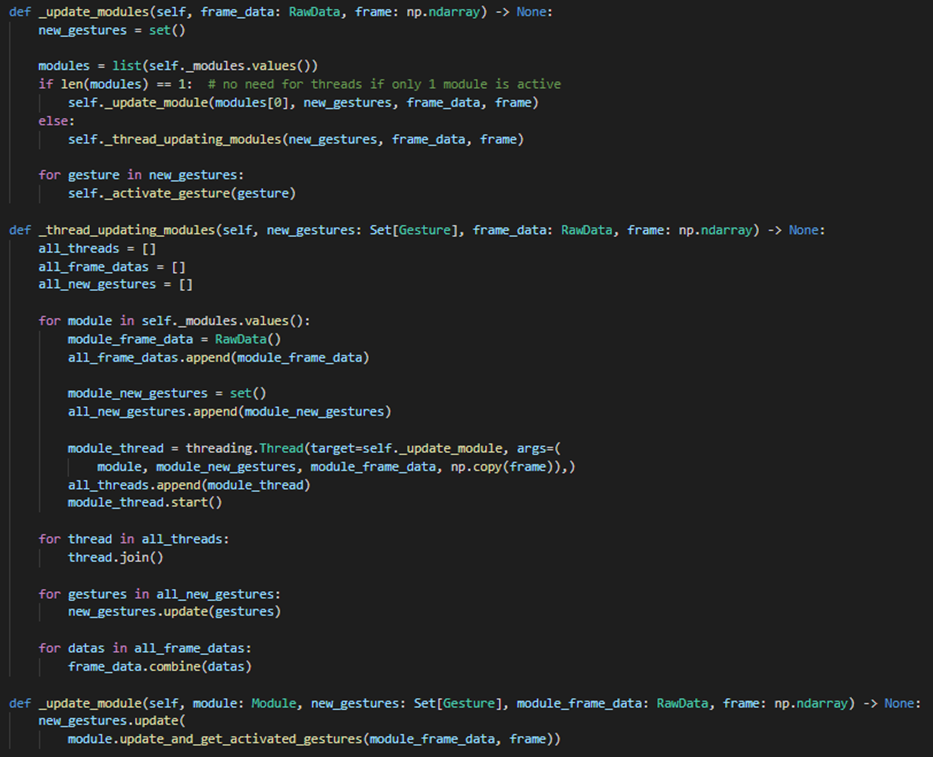
Methods for updating the used modules in the Model class - Second we go through our set of all currently active Gestures
and update them, which may lead to some of them deactivating.
Note that whenever a gesture in the model activates or deactivates we also notify all the events that use said gesture which may lead to the events activating or deactivating.
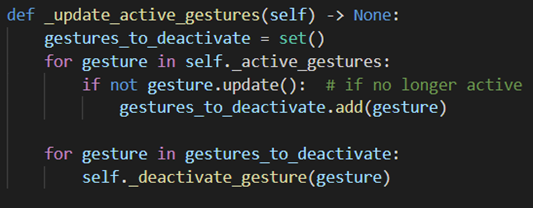
update_active_gestures()method in the Model class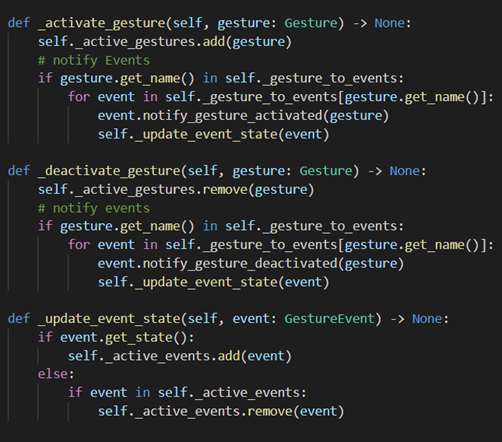
Methods for activating and deactivating gestures and therefore events in the Model class - Lastly we update all of our currently active events. This may lead to some of the
trigger methods being called which then is handled outside of the model.
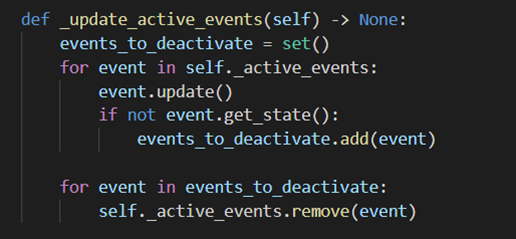
update_active_events()method in the Model class
- First we process the frame image in all the modules and from there get all the
Gesture instances, if any have been activated by the frame.
MotionInput Layer
-
JSON Editors
The JSONEditors are implemented as the JSONEditor parent class that contains all the logic for reading and writing the JSON files and then the 4 child classes:
- ConfigEditor that is used to read the config.json
- GestureEditor for reading the gestures.json. It contains the method to verify the format but also allows to get the data right away as a set of primitives for the GestureLoader.
- EventEditor for reading the events.json and contains the methods to validate the format of the events.
- ModeEditor for reading the mode_controller.json and maintaining the correct structure of the file.
The JSON Editors were implemented by Oluwaponmile Femi-Sunmaila from Team 30, and therefore the code showcase is not credited here.
-
Config (Singleton)
The config class is essentially a wrapper for the ConfigEditor, where we ensure that there is only one instance present at once.

Config class methods and Singleton pattern We decided to keep the Config and the ConfigEditor separate as the Config is used by classes such as the Positions or GestureEvents where the intention is simply retrieving the data and not editing anything. The ConfigEditor on the other hand is meant to be used only by the GUI communication and possibly few handlers.

Example of using the Config class to retrieve a value from the config.json file Thanks to the singleton design pattern, any class can access any config it wants without the need to pass any parameters in or re-reading the JSON file.
-
GestureLoader
The GestureLoader has a very simple implementation of iteration over all the desired gesture names, getting the primitives from the JSON file through GestureEditor and then adding the gesture to the model, possibly together with the needed module.
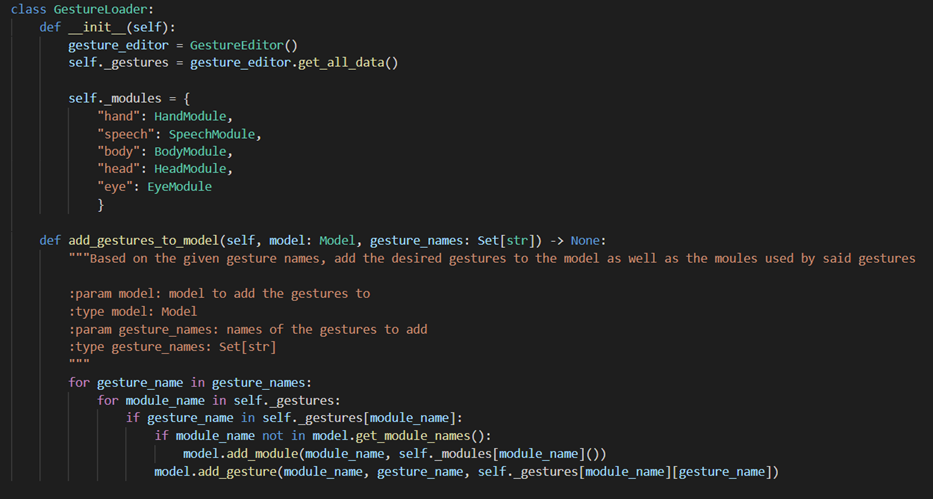
Start of GestureLoader class The gestures are stored in the JSON file in the following form:
"gesture_name": { "primitive_1": bool, "primitive_2": bool, "primitive_3": bool, ... } -
EventMapper
EventMapper is used to add or remove any events to or from the model. The addition and removal of the events is implemented as just a single
switch_events_in_model()method - this is done due to the similar switch method in the model.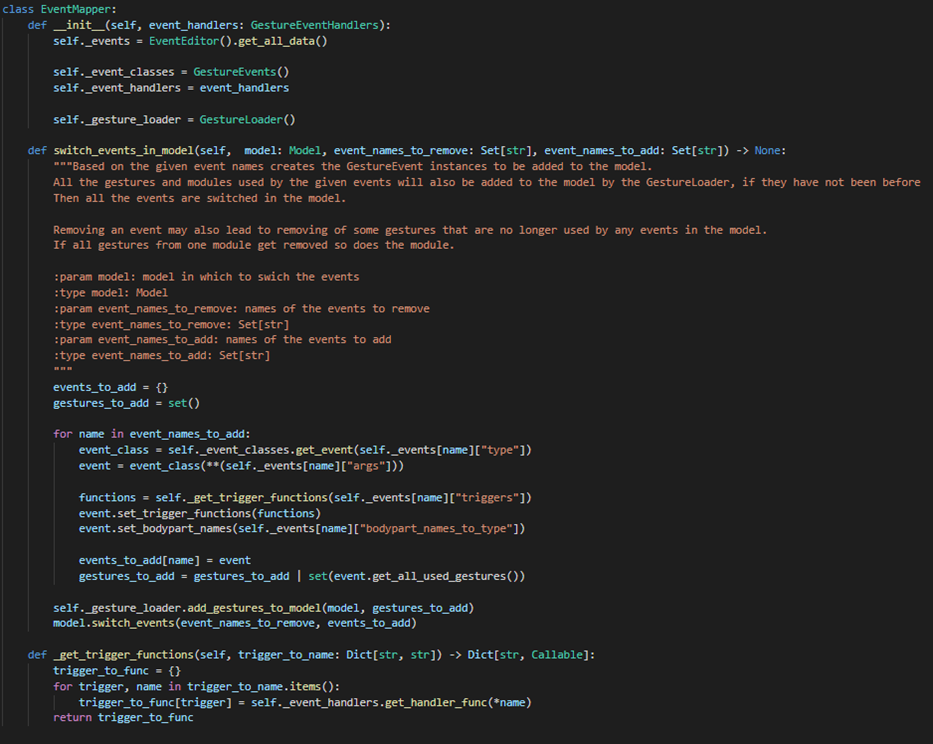
EventMapper class with selected methods The GestureEvents are initialised based on the configuration in the events.json, where they are stored in the following form:
"event_name": {
                            "type": "GestureEvent_class_name",
                            "args": {
                              "arg_1": val,
                              "arg_2": val,
                              ...
                            },
                            "bodypart_names_to_type": {
                              "modules_tracker_name_1": "events_bodypart_name",
                              ...
                            },
                            "triggers": {
                              "trigger_1_name": ["GestureEventHandler_class_name","method_name"],
                              "trigger_2_name": ["GestureEventHandler_class_name","method_name"],
                              ...
                            }
                    }
As we initialise all the events we keep a set of all the gestures the events use and afterwards use the GestureLoader to add those gestures and all necessary modules to the model. -
ModeController
The ModeController is used to switch between the modes of interaction, so changing the mode is done simply by removing all the events of the previous mode and adding in the new ones.

ModeController class with selected methods The
set_next_mode()method is used to change the mode that will be active starting the next frame. Thechange_mode_if_needed()method is called then every frame between processing the images by the model. This implementation was chosen as it is important that modes are not changed in the middle of processing a frame in the event. Inset_next_mode()the parameter with the name of the next mode is optional, if the specific mode name is not given we simply use the iteration order to determine what the next mode is. This allows us to iterate through our modes without the handlers needing to keep track of the modes but also leaves the opportunity for switching to a specific mode. We also have theclose()method as we want to ensure that before shutting down the MI all the events are removed from the model - to ensure that all the events are stopped (so for example the key that is being held down is released). What events are contained in each mode as well as the iteration order and the default mode to load is all read from JSON through the ModeEditor. The JSON file has the following format:"default": "mode_name", "iteration_order": { "mode_name_1": "mode_name_2", "mode_name_2": "mode_name_1", "mode_name_3": "mode_name_3", ... }, "modes": { "mode_name_1":[ "event_name_1", "event_name_2" ... ], "mode_name_2": [ "event_name_1", ... ], … }As we initialise all the events we keep a set of all the gestures the events use and afterwards use the GestureLoader to add those gestures and all necessary modules to the model. -
DisplayElement
The DisplayElement class is an interface, allowing for an unlimited number of child classes to be created to display different items and graphics onto the same frame, whilst using the exact same structure so that classes that deal with DisplayElements, like the View class, do not need to know the specifics of how each child class is implemented.
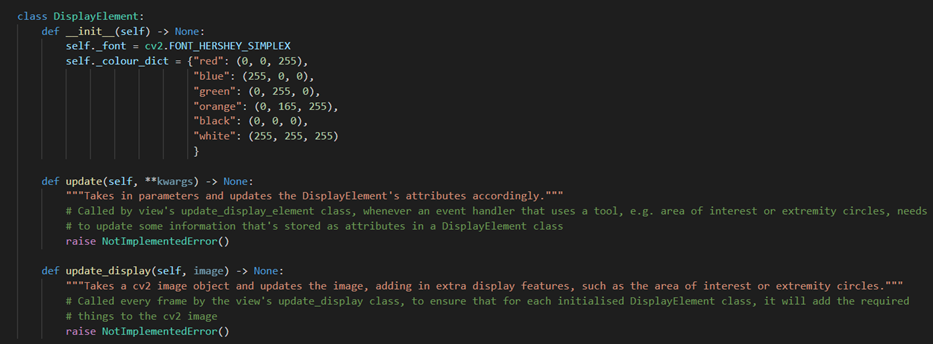
DisplayElement class skeleton There are however some shared private attributes for consistency, such as
_fontwhich is the font that is used in any text displayed, and_colour_dictwhich is a dictionary of colour names as key and its RGB tuple as value, to dictate the colour of any item displayed. Child classes will have more attributes that affect how and what will be drawn on the frame. We will use the example of ExtremityCirclesElement, which represents the hit trigger circles, which are red or green circles with a number corresponding to the number of times an extremity trigger has been activated.
ExtremityCirclesElement class skeleton This class handles an attribute,
_extremity_circles_dictwhich is a dictionary storing the names of each extremity trigger to be displayed as key, and a 3-tuple ((x,y), activated, repeats) consisting of the coordinates of the centre of the circle to be drawn, whether its corresponding trigger was activated or not, and the number of times the trigger has been activated before. We can clearly see how this would affect what is drawn onto the image, as the position is determined by the coordinates, the colour is determined by the activation, and the number inside the circle is determined by the repeats.
update()method from the ExtremityCirclesElement classThe update(**kwargs) method is what is used to update a DisplayElement’s stored attributes. The arguments passed into update either directly reassign the value of one of the attributes, or are used to calculate or determine the updated value of the attribute. This method is used in the View class’
update_display_element()method. Again using the example of ExtremityCirclesElement, its update method takes aextremity_circles_dictparameter, which is simply reassigned to the ExtremityCircleElement’s_extremity_circles_dictattribute, to update the information about the extremity circle’s coordinates, activation and repeats. Theupdate_display(image)method takes an image object, and updates the image with a new graphic or feature drawn onto the image.
update_display()method from the ExtremityCirclesElement classFor example, for ExtremityCirclesElement, the cv2.circle function allows for a circle to be drawn onto the image, representing an extremity trigger circle. cv2.putText then allows for text to be drawn, which is used to add the number of repeats inside the circle.
-
View
The View class is used to handle the window that displays the live web camera image and all the graphics that need to be added to it. (e.g. the extremity triggers or the area of interest). Items/Graphics are drawn to the view via the use of DisplayElement classes.

View class skeleton To display the view window we use OpenCV
imshow()function. The frame window can be closed in 3 ways.- Each frame we check if the esc key has been pressed or if the
window has been closed by the [x] button. In this case we not only close the window but
also change the
_closed_by_the_uservariable to True so that the rest of the system can act accordingly - at the moment that means also shutting down the MI. - By calling the
hide()method we can close the window but keep MI running as usual, thus we keep updating the display elements as usual so that whenever theshow()method is called all the display elements are accurate. - Lastly we can simply close the window by externally calling the
close()method.
Note that, as the OpenCV does not work very well with multithreading it is important that
update_display()and theclose()method are always called from the same thread. With every frame passed to the view, the view will call each DisplayElement and pass the frame, allowing each DisplayElement to take the image and draw what it needs to into the view, which is then displayed. To keep track of all the DisplayElements that draw to the frame, we have a dictionary_display_element_classeswhich stores a reference name of the DisplayElement as a key, and a dictionary which contains the class type of the DisplayElement, for example, AreaOfInterestElement, and then any arguments it requires on initialisation.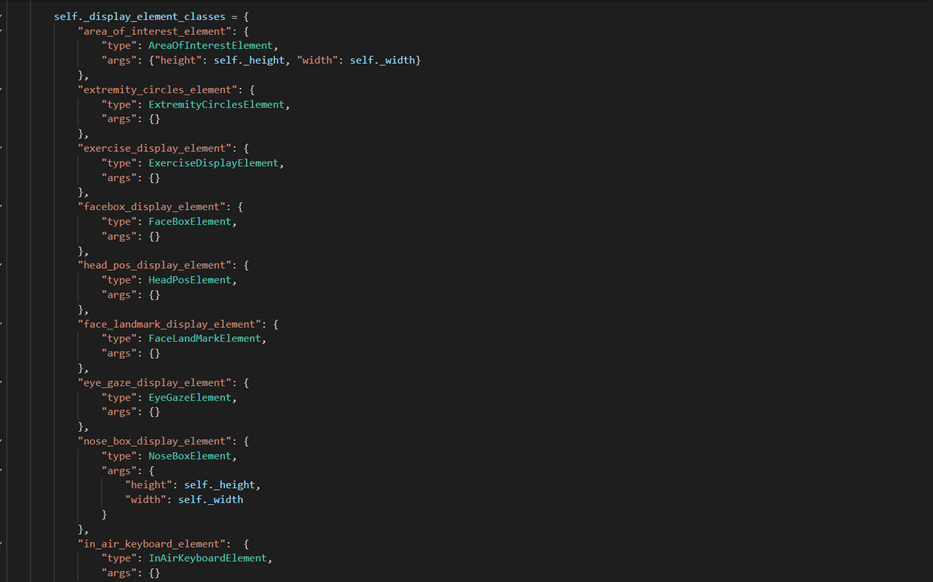
_display_element_classesattribute in the View classWe also have another dictionary,
_display_element_dict, which contains the initialised instance of each DisplayElement class that is actually being used by the view. This allows us to access the initialised instances in one place, and their methods accordingly. DisplayElement instances need to have their attributes updated to change what they draw to the frame. The information to update their attributes is controlled by and comes from the related gesture event handlers that do actions that affect what is displayed on the screen. For example, ExtremityCircles is a gesture event handler that affects extremity triggers, for example whether to show one as activated or deactivated, or to update the number of repeats for a trigger. ExtremityActions needs some way of telling the DisplayElement class responsible for the extremity circles (ExtremityCirclesElement) the information for each trigger to display. View has a method that provides this bridge to let the event handler communicate with the DisplayElement, without having the event handler to directly access a DisplayElement instance.
update_display_element()method from the View classThe event handler has a reference to the View class instance, and allows it to use a method
update_display_element(), which has arguments for the reference name of the display element we want to update the attributes for, and update_args which is a dictionary of the argument that we want to pass through the DisplayElement’s update method. Firstly, we check that the name is a valid reference name, and then whether the DisplayElement class with that reference name has been initialised and added to “_display_element_dict”. If not, then it initialises it and adds it. Then, it accesses the DisplayElement instance using the “name” parameter and calls its update method, passing it “update_args” as keyword arguments, allowing the DisplayElement’s attributes to be updated. To allow each display element to draw on each processed frame, the View’supdate_display()method is used after each image returned by the Camera class.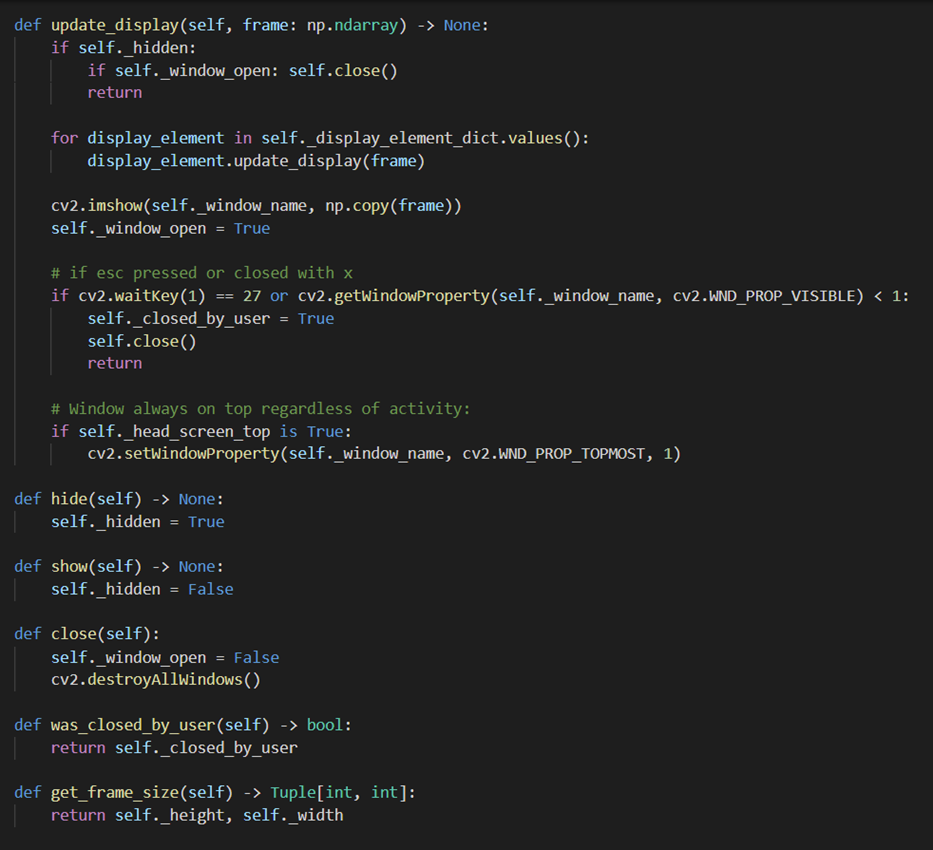
update_display()class in the View classThis class loops through the
_display_element_dictdictionary and calls each DisplayElement instance’supdate_display()method, passing in the image object (frame). Each DisplayElement then draws its required item/graphic to the image, which appears on the screen. - Each frame we check if the esc key has been pressed or if the
window has been closed by the [x] button. In this case we not only close the window but
also change the
-
Camera
The Camera class is used to read the image from the camera each frame.

Camera class and its methods As reading the image from the camera is a time-consuming task, it was greatly lowering our possible frame rate. To optimise this we decided to read the camera in a separate thread, to remove the delay between processing 2 consecutive frames in the model. We simply store the read image in the
_framevariable and return the copy of that value whenever a frame is requested. The reason for returning a copy is that whenever the reading of the frame takes a longer time than processing it in the MI we end up using the same frame twice in the row. This can cause problems in cases where the view image is altered. At first we planned on using a frame buffer to make sure that each frame gets processed but later decided against it as for live interaction with the computer it is more important for the most recent frame to get processed and if some frames are skipped no problems are caused. -
MotionInputAPI
The MotionInputAPI class combines all the methods that the app built on the backend needs into one class.
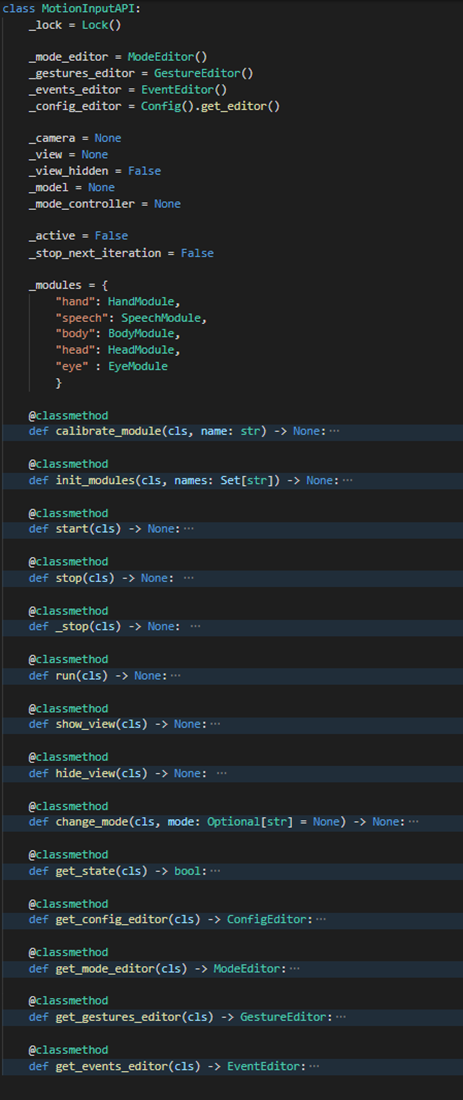
MotionInputAPI skeleton The biggest challenge when implementing this class was the fact that it is expected to be called from different threads. In the current MI app the
run()method is called from the motioninput.py (from the main thread) and the rest of the methods are called from the communicator thread. Most of the threading problems were solvable simply by using theLock()from pythons threading library. However, some issues remained due to the OpenCV we use for the view not being thread-safe.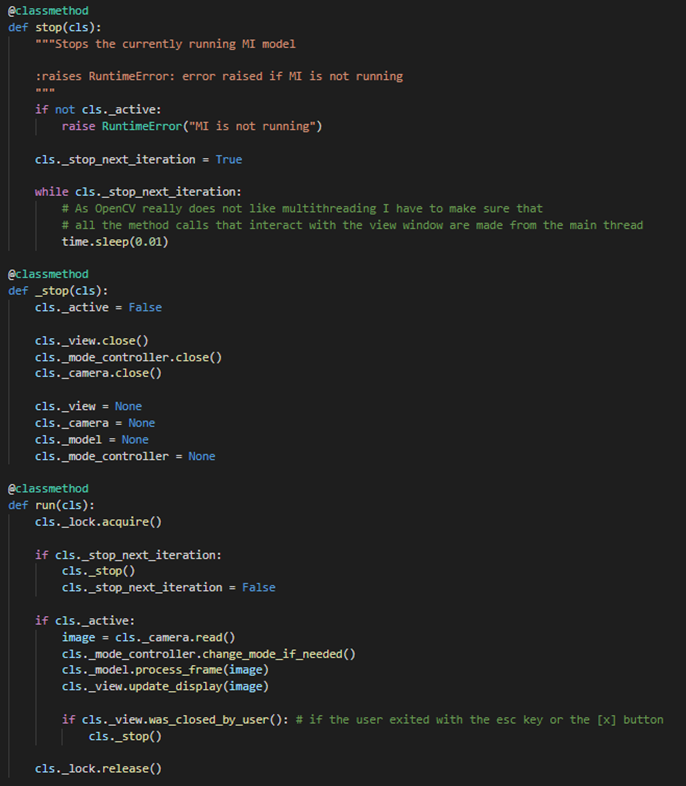
stop()andrun()methods from the MotionInputAPI classInitially, instead of having the need for the
run()method to be continuously called we intended to just start a thread after therun()was called once that would continuously run the frame by frame processing. We soon realised, however, that the approach needed to be changed as the OpenCV methods and thus the_view.update_display()and_view.close()have to be called from the main thread. This led us to this solution where motioninput.py continuously runs the API and whenever the communicator thread calls theclose()method, the system and thus including the view is only closed at the start of the nextrun()call by the main thread.
Code from the main thread launching the API In order to allow MI to be run without the GUI (for either testing or micro builds) if the motioninput_api.py file is run we start the MI system.
Hands Module
When first creating the core, it was decided to simultaneously develop the basic Hands module functionality for both testing purposes as well as demonstrating the functionality and capability of the new architecture. The following features were added by our team: moving the mouse, area of interest, idle mode, clicking, double-clicking, dragging, zooming (implemented as actual zooming and not a scroll event like in V2), scrolling, and single touchpoint press. The hand module functionality was then further expanded by Team 34, adding modes such as inking and an in-air keyboard.
-
HandLandmarkDetector
The hand module’s LandmarkDetector is largely based on the Hand class in the MotionInput v2 code. The class utilises MediaPipe Hands to process each frame, detect all the 21 landmarks on each hand and then store their coordinates in the RawData.
-
HandPosition
The HandPosition class is also largely based on the Hand class in the MotionInput v2 code. Each frame the RawData is analysed and from there the primitives of interest are calculated.
-
HandGesture
The HandGesture class inherits most of its functionality from the Gesture class. As in the current iteration of MI, there weren't any hand gestures that were influenced by a longer interval of frames; there was not yet any need for methods like the total distance travelled while the gesture has been held. However as the gestures become more complex, they will hopefully be added in the future.
Body Module
The body module was the 2nd module to be implemented after the Hands module, and was developed to show the possibility of multiple modules being created and added to MotionInput, and to show how 2 modules could be combined together. The Body module is concerned with full-body motion detection and interaction. The body module retains the same 2 main modes of interaction that MotionInput v2’s body module had: extremity hit triggers and repetitious exercise, as well as 2 new modes that were created by our team: extremity triggers + walking mode, and gamepad mode. Team 33 also developed an adaptation of the gamepad mode, called "FPS" mode, which combined the gamepad mode with using the hands as a cursor.
-
BodyLandmarkDetector
The body module LandmarkDetector is also similar to the landmark detection used in the BodySetup class of the old MotionInput v2 code. MediaPipe Pose is used by BodyLandmarkDetector to process each frame image, detect all 33 3D landmarks across the body, and to add the detected coordinates into RawData.
-
BodyPosition
The body module Position class is based off of the landmark coordinate processing and calculations performed in the BodySetup class of the old MotionInput v2 code. Each frame, the coordinates of the landmarks from RawData are extracted, converted into a numpy array, and then analysed. If the landmarks relate to the extremity triggers, they are checked for their proximity to the corresponding extremity circle region. If they are within the region, then the extremity’s primitive is activated. For exercise detection, all 33 landmarks need to be considered as they make up the user’s pose, where they are analysed with our PoseClassification class to determine whether the pose makes up an exercise state. If it does, then the exercise state’s primitive is activated.
Pose Classification
The PoseClassification class is originally from the MotionInput v2 codebase, with small modifications to fit our architecture. This class allows for the loading in of ML training files consisting of .csv files containing landmark coordinates, to produce a training set. PoseClassification uses this training set to be a k-NN algorithm classifier, in order to read a set of landmarks (the user’s pose) and to classify the type of pose (whether it is an exercise state).
-
BodyGesture
The BodyGesture class similarly inherits most of its functionality from the Gesture class. Gestures relating to the body mode do not need any calculations performed on its data, so the BodyGesture class is only for storing the concept of a gesture that is from the body module, since this did not exist in MotionInput V2.
Head Module
The third module implemented is Head module, after Hand and Body modules. The Head module demonstrates how facial recognition and tracking can be used functionally to control the computer. There are two main modes that use the Head module: nose position and nose direction. These two modes differ from each other in terms of mouse movement. Nose position mode mappes the coordinate of the nose in the image (provided as input), to new coordinates, for the computer screen, where the mouse moves to. In contrast, the nose direction uses a nose box in the centre of the image, and whenever the nose is directed to left/right/up/down of it, the mouse moves on the screen in that direction (this was implemented by Andrzej). Except for the mouse mousements, the modes work the same. Both of them include left clicking, right clicking, double clicking and dragging, which are triggered by the same gesture for nose position and nose direction. In addition, the second mode has 2 extra futures: zooming and scrolling.
-
HeadLandmarkDetector
In MotionInput v3, HeadLandmarkDetector uses the Dlib library in order to process each frame and get the 68 facial landmarks. Then, all the coordinates are added to RawData. The code is based on __init__.py in the previous version of the code.
-
HeadPosition
HeadPosition class is again, based on __init__.py in MotionInput v2. Its main purpose is using the landmarks detected by the HeadLandmarkDetector class in order to find which of the primitives are active. In the case of head module, the primitives are the same as gestures (each gesture has only one primitive): open mouth, smiling, raise eyebrows, fish face. HeadPosition uses a helper class, HeadBiometrics, based on utils.py, in MI V2, which calculates distances and ratios, such as mouth aspect ratio (MAR) or eye aspect ratio (EAR).
-
HeadGesture
As with the Gesture classes of the modules described previously, HeadGesture inherits all the methods from Gesture class. That is the case because there are no gestures recognisable only after a longer interval of frames, and no gestures for the head module require extra processing.
Eyes Module
The Eyes module was last functional module from MotionInput V2 that was added. The Eye module demonstrates the use of eye-gazing inference technology, allowing for users to move the cursor with the direction of their eye gaze.
-
EyeLandmarkDetector
EyeLandmarkDetector is a class that, using OpenVINO, identifies landmarks on the user’s face and add them to RawData. In order to process the frames, some helper classes, such as FaceResults or OnlyNose are utilised.
-
EyePosition
EyePosition classis is used to find out which of the primitives are active, given the landmarks for the current frame. In contrast to the other module, in EyePosition class the primitives are utilised a bit differently. For instance, the gaze vector, which shows the area where the user is looking at the screen, is considered a primitive.
-
EyeGesture
As mentioned for the similar classes of the other modules, this class inherits the functionalities of Gesture class. At the moment, MotionInput v3 does not include gestures that would require a specific change in EyeGesture class, in addition to the capabilities of Gesture class.
Speech Module
The Speech Module was the first proposed additional module for MotionInput V3, and since the architecture was clearly designed for the camera and gesture based modules, it was a challenge to adapt the speech module to the system without breaking the architecture. We needed to adapt the speech module to use the same LandmarkDetector, Position and Gesture logic as the rest of the modules so that it could also be used interchangeably with the other modules in the GestureEvents, and so that adding gestures and events for the speech module would follow the same pattern in the JSON files. The speech module was mostly developed by Samuel Emilolorun. Our team provided support in adapting it to the architecture and this created the skeleton for the 3 following classes in the module.
-
SpeechLandmarkDetector
As the Speech module is not calculated from the camera images we needed to adapt the
get_raw_data()of the LandmarkDetector to make sense with the frame by frame processing nature. To solve this issue we create a new Ask-Kita thread from the SpeechLandmarkDetector whenever it is initialised. This allows us to analyse the audio from the device using the Vosk library in parallel with reading the camera. And each frame when theget_raw_data()is called we ignore the camera image and simply return the phrase that has been most recently detected by the Ask-Kita as the name of the landmark. -
SpeechPosition
The primitives in this module were used to symbolise phrases of interest. Unlike in the other modules there are no preset primitives that the Position is capable of calculating. The SpeechPosition class analyses the phrase returned from the SpechLandmarkDetector and detects if any of the primitives of interest are contained in it. Thus for example if the primitives of interest are “stop” and “start” and the phrase from the SpeechLandmarkDetector was “now let’s try to stop the system” the _primitives would be set to {“stop”: True, “start”: False}
-
SpeechGesture
Although technically the speech Gestures can be made of multiple primitives and thus multiple phrases, in the system currently all the speech gestures are synonymous to the phrase.
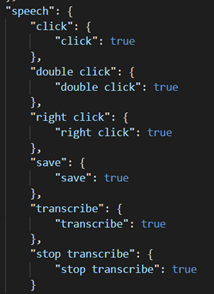
Speech gestures stored in gestures.json What makes the SpeechGesture different from other modules Gestures is that Instead of using the PositionTracker instance if it is still active, it just deactivates after one frame.

update()method from the SpeechGesture classAs a result, we have the SpeechGestures that can be freely used in the GestureEvents just like the other modules, and whenever they activate we know that the phrase we are interested in has just been said by the user.


