Implementation

Our implementation extends both MotionInput and FISECARE, systems previously developed by last year's teams. As a result, we inherited the existing architecture of most features, while adding our own implementation of new functionalities.

Dependencies and Tools


Python

The choice to use Python 3.9 implement our project was made due to the ease of use of the language, and the availability of libraries that we could use to implement our project.


Python logo


MediaPipe

MediaPipe is an open-source cross-platform framework developed by Google [1] that enables the building of scalable real-time applications for various devices. Our project utilizes MediaPipe's computer vision capabilities to extract key landmarks for hand and head, enabling accurate tracking and analysis of user movement and behavior. By leveraging MediaPipe's advanced features, we are able to develop a high-performance, reliable and user-friendly system that meets the needs of our clients.


MediaPipe logo


Scikit-Learn

Scikit-Learn is a machine learning library for Python [2] that provides a range of tools for building predictive models. Our project utilizes Scikit-Learn to train the models required to project the user's hand and nose positions onto the screen from an angle. Using Scikit-Learn's powerful algorithms and extensive documentation, we are able to build highly customised models for each user, and can effectively learn from input data and make accurate predictions accordingly.


Scikit-Learn logo


OpenCV

OpenCV is an extremely powerful and versatile computer vision library [3] that goes beyond just capturing camera frames. In addition to capturing and processing images and videos, OpenCV provides a wide range of tools and functions for solving many computer vision problems.


In our project, we utilised OpenCV to solve the Perspective-n-Point (PnP) problem [4], which is a fundamental problem in computer vision that involves estimating the pose of an object relative to a camera. OpenCV provides a robust implementation of the PnP algorithm that, in combination with its implementation of solving Rodrigues’ formula and projection matrices [5], enabled us to accurately estimate the position and orientation of the user's head relative to the camera, which is essential for our system to accurately project the user's head movements onto the screen.


OpenCV logo

References

MotionInput Navigation Modes

This section introduces a unique addition to the MotionInput architecture in the form of hand and head modes. This documentation outlines the core workflow for the navigation modes, as well as a detailed breakdown of the purpose and functionality of each component.


    In mode_controller.json, all our navigation modes can be found, including:


  • bedside_nav_right_touch: navigate using the right hand at an angle, with hand gestures and speech commands.
  • bedside_nav_left_touch: navigate using the left hand at an angle, with hand gestures and speech commands.
  • bedside_nav_face_speech: navigate using nose tracking and use speech commands for interaction with the system.
  • bedside_nav_face_gestures: navigate using nose tracking and use facial gestures for interaction with the system.
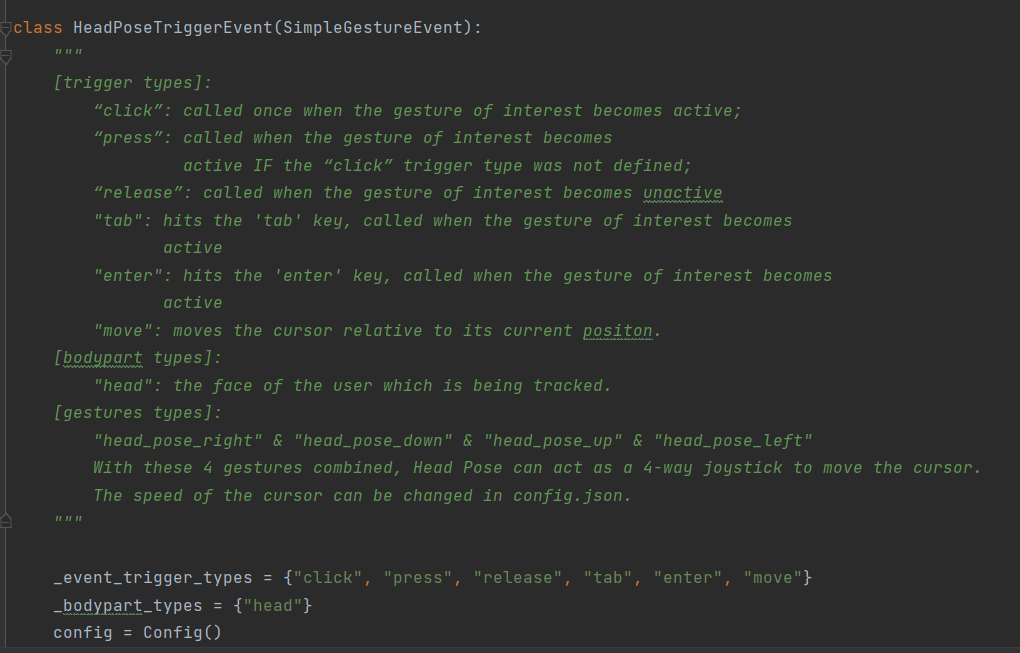
  • bedside_nav_face_joystick_cursor_speech: navigate the cursor with head pose like a 4-way joystick, and interact with the system with speech commands.
  • bedside_nav_face_joystick_cursor_gesture: navigate the cursor with head pose like a 4-way joystick, and interact with the system with facial gestures.
  • In order to recognise the angle from which the user sits towards the camera, it is agreed by the team that a preliminary calibration stage is essential. Next comes the question: which type of data should we calibrate and consequently, how do we establish the mapping from the data to various navigation events? To answer these questions, the team explored various possibilities.


    Initially, we tested the idea of measuring the angle of the plane in which the user is moving in, and applying perspective transformation directly on the frame, which then gets fed into MotionInput ‘s primitive implementation of hand and facial recognition models. This idea was finally rejected because either the hand became unrecognisable, or the recognition became highly inaccurate after the hand got warped along with the frame.


    Then, we resorted to a machine-learning based method. That is, using a machine learning model to directly make predictions of gesture events based on raw landmark positions detected in each frame. This answers the second question on mapping of data — machine learning models creates mappings from input to output, as well as taking into account the natural movement of the user’s hand and face. This way it provides flexibility to the user to control their system in a manner that is intuitive to them and comfortable.


    To ensure compatibility with the existing MotionInput architecture, the navigation modes are designed in the following way:


    1. Calibration
      • Record user data of a particular type (location of landmarks, or angle of rotation of head).
      • Train a machine learning model using data collected, dump the model into a file in data/models.
    2. Running
      1. Depending on the navigation mode set in config.json, the corresponding navigation handler class will be run. To maintain consistency, all navigation handlers follow the same routine.

      2. Load the model from data/models.
      3. For each frame captured:
        1. Record user data of the same type.
        2. Model makes inference on data captured.
        3. Invoke navigation events corresponding to the prediction made.
    Parent calibration class, from which both calibration for hand and head navigation inherits.
  • The current iteration of hand mode uses a linear regression model to map from landmarks of user’s hand to a particular location on screen.


    In the calibration stage, a flickering dot moves across the screen and the user is instructed to follow it with their hand. During this process, the hand landmarks will be recorded on the backstage as input, and the locations of the flickering dot are treated as labels. Then, a sklearn linear regression model will be fit into the dataset and dumped as a joblib file.


    In config.json, where all mapping from mode names to actual navigation classes are stored, our new hand mode corresponds to scripts/gesture_events/hand_active_event.py. According to the workflow, it loads the joblib file as the model and starts recording hand landmarks, and calls a corresponding gesture after the model makes predictions. This is done in the update() function of the class as shown in the snippet of code below. The existing HandActiveEvent was manipulated to also provide the functionality of side-of-hand tracking in addition to its original function of palm-of-hand tracking.


    Code snippet for updating cursor position when user's hand is active

  • Note: Due to a revamping of the facial navigation module of MotionInput, nose tracking and a 4-way joystick now join the new facialNav module as a sub-component. For the interaction of facial navigation modes with MotionInput, as well as the invocation of gesture events, please follow website of team 36. Here we focus on how we detect, recognise and map user data to gestures.


    Nose tracking originated from hand tracking. After the development of hand tracking was complete, an experiment was conducted to replace hand detection with face detection, with the landmark of the nose tip being the dominant controller landmark. In this case, the linear regression model then takes user facial landmarks as input, and corresponding position on the screen as labels. Users only need to move their head around, and the model will infer an absolute position on the screen where the cursor will land. The experiment result went well, with users being able to move the cursor to the approximately intended positions most of the time. An issue that arose was jittering of the cursor when the user does not move their head, and we suspected that it is due to MediaPipe’s face recognition model. As a countermeasure, we applied a stabilising effect, which will essentially prevent the cursor from moving too far when triggered by involuntary or very brief but rapid movement. Other smoothing techniques are implemented in /scripts/gesture_events_handlers/desktop_mouse.py from the scipy.ndimage package.


    Navigation using nose tracking is defined in scripts/gesture_events/bedside_face_tracking_event.py. The prediction of loaded regressor triggers cursor move event, as is described by the workflow.

  • Head pose started out as an idea to explore alternatives to absolute screen position prediction. It is proposed based on the observation that having to track the cursor all the time can be tiring and frustrating for users, hence a more easy way of navigation was needed.


    The idea is to have the user face a particular direction, and the cursor will move in that direction. This is similar to the 4-way joystick on a game controller, where the user can only move the cursor in the 4 cardinal directions. The user can then use the joystick to move the cursor to the desired position on the screen. This is a more intuitive way of navigation, as the user does not have to track the cursor all the time.


    Contrary to a regressor, head pose navigation is designed with a classifier — that is, the model classifies which direction the user is facing towards. This simplification of prediction outcomes has a higher tolerance for each output, which results in reduced jittering of cursor movement.


    The HeadPose class detects the position of the user's head by obtaining 2D and 3D coordinates of facial landmarks through the get_2D_face() and get_3D_face() methods. It then uses the Perspective-n-Point (PnP) algorithm [1] to determine the position and orientation of the user's head relative to the camera. The resulting Euler angles of the head pose are computed and returned as a list of three values - pitch, yaw, and roll. This list is the data being recorded as user input for the classifier.


    Using OpenCV's built-in methods to solve Perspective-n-Point problem, and obtain euler angles.

    The following sketch illustrates the first iteration for calibration window: a flickering dot moves in a “cross” trajectory, and the user is instructed to move their head in the same direction with dot.


    Sketch showing the interactive calibration process.

    In this iteration, the centermost dot is labelled as “front”, while the other dots on the side are labelled by their corresponding directions to the centre. This resulted in overfitting classifiers — a very subtle movement in user's head gets immediately recognised as moving away from the frontal direction. More dots were added in the cross as a second iteration, with the points one step away from the centre also labelled as “front”, which helped to alleviate the problem. Many more possible solutions were also proposed during development, including continuous trajectory with discrete labels, and trajectories in various shapes (e.g. ∞ symbol) but were unfortunately never implemented due to time constraints.


    Navigation using head pose is defined in scripts/gesture_events/head_pose_trigger_events.py. Currently, predictions made by the classifier would trigger cursor move events in a similar way as the other two modes, but the simplicity of head pose makes the mode highly flexible. It is proposed that instead of moving the cursor that requires precise control, head pose navigation can be used to navigate directly across all clickable components on a browser, e.g. a turn right movement triggers selection of a button directly on the right-hand side.


    Code snippet showing the event class triggered by Head Pose navigation mode.

    The HeadPoseTriggerEvent class is built similarly to the MouthTriggerEvent class. Likewise, each direction can be mapped to various different trigger types. Currently, as shown in the snippet above, the HeadPoseTriggerEvent can be used to click, move the cursor, trigger the enter key or tab on your keyboard or drag the cursor. Simply adding new trigger types to the list can extend the class’ capabilities.


    Example of event that moves a cursor in a particular direction, when triggered by a single head turn movement.

    For moving the cursor, an abstract method called ‘move’ was added to the Event class. For each head pose direction, the implementation of the method ‘move’ was slightly different to move the cursor in the direction corresponding to each gesture event. For example, looking to your right will cause the cursor to move to the right.

  • Due to the extendability of the MotionInput API, we are easily able to manipulate the navigation modes (listed above) to include existing gesture events such as speech commands or facial gestures to these new modes. However, we also created a number of new gesture events which are found in the events.json file:


    • bedside_right_hand_move: tracks right hand from an angle.
    • bedside_left_hand_move: tracks left hand from an angle.
    • bedside_nose_tracking: tracks nose from an angle.

    The above events utilise the classes BedsideFaceTrackingEvent and HandActiveEvent which were created or edited to provide the functionality of side-of-hand and side-of-face tracking. Both these event classes inherit from the SimpleGestureEvent class which was created by the previous developers of MotionInput and include the necessary abstract methods to update and trigger an action with a gesture.

UCL FISECARE V2

UCL FISECARE V2 allows users to personalise their Bedside Navigator by opening applications that the user saved in the Settings/executables.json file.


Up to 5 applications are allowed. This is made possible by creating new Process objects for each of the executables listed in the JSON file. Here is an example JSON file with 2 applications entered by the user.


Example JSON file, with custom application settings.

Example custom application in UCL FISECARE UI.

Each button is handled by its own class. Within each class e.g. ’Executable1.cs’, the file path saved in the executable.json file is read and a new Process is created. The Process is then started and the application is launched.


Example code snippet for launching an application.

Each class has the methods:

  • public static bool exeChangeState(): this method is used to change the state of the Process object and is called whenever its corresponding button is clicked. There are two possible states: ‘exeRunning’ is true or false.
    • If exeRunning is false then startExe() is called.
    • else if exeRunning is true then stopExe() is called..
  • private static void startExe(): Create a new process given the file path of the executable and displays the app.
  • private static void stopExe(): Kills the process and closes the application.