MFC is the first interaction between the user and our program, it allows the user to calibrate their settings.
The following functions can be found in our MFC code:
OnQueryDragIcon: Returns the handle to an icon (HCURSOR) when the user drags the minimized window of the application. This function ensures that the correct cursor icon is displayed during the drag operation.
OnBnClickedBlueradio, OnBnClickedRedradio, OnBnClickedGreenradio: These functions set the PointColour variable based on the user's selection of a color through radio buttons in the dialog. The color choices are Blue, Red, and Green, respectively.
OnBnClickedOk: Executes when the user clicks the "OK" button. It performs a save operation (details of the save function are not provided) and then calls CDialogEx::OnOK() to close the dialog box.
OnBnClickedCancel: Called when the user clicks the "Cancel" button. It simply calls CDialogEx::OnCancel() to close the dialog without saving changes.
OnBnClickedBlueradiocursor, OnBnClickedRedradiocursor, OnBnClickedGreenradiocursor: Similar to the point color selection functions, these set the CursorColour variable according to the user's choice of color for the cursor. The options are again Blue, Red, and Green.
OnDeltaposSpin1: Handles the event for a numeric spinner control, adjusting a value that seems to represent a radius. It increases or decreases the radius by 5 units based on the user's interaction. The radius is constrained to a minimum of 30 and a maximum of 90 units. The current radius value is displayed to the user.
The purpose of this JSON file is to provide a structured configuration for an eye gaze tracking system. It serves as a central repository for specifying key parameters that control various aspects of the system's behaviour and appearance. Each parameter is accompanied by a corresponding description (__parameter_name) explaining its purpose and default value. These configuration settings are crucial for customising the behaviour and appearance of the eye gaze tracking system, ensuring optimal performance and user experience. The following parameter s can be found within the config.json file:
Cursor Denoise Level: This parameter specifies the waiting time to take the average of mouse movement. Lower values make the mouse movement smoother but may cause lag. The default value is 0.15 seconds.
Distance Verifier Time: Specifies the time allowed for users to see the distance checker, with a default value of 6 seconds.
Calibration Point Duration: Determines the time duration for displaying each calibration point during the calibration process. The default value is 5 seconds, with a requirement that it must not be lower than 1.
Calibration Point Color: Defines the colour of the calibration points, with the default colour set to [0, 255, 0].
Cursor Highlight Color: Specifies the colour of the cursor highlight, with the default colour set to [50, 50, 50, 150], where 150 represents the alpha value for transparency.
Cursor Highlight Radius: Sets the radius of the cursor highlight, with the default value being 80 pixels.
The heatmap code serves the purpose of positioning the user correctly for calibration and is primarily implemented in the distanceChecker.py file. The core of this file is the check_distance() function, which continuously assesses the user's distance from the camera and triggers alerts if it exceeds the acceptable range. When invoked within the main function, the distance checker function runs until the user is within the 'green zone' for a predetermined duration, indicating an optimal position for calibration to proceed.
The code utilises landmarks from Mediapipe, specifically those of the left and right eyes and the nose, to construct a triangle. The area of this triangle serves as a metric for determining the user's distance from the webcam. It intuitively follows that a larger area corresponds to closer proximity, while a smaller area indicates a greater distance, as the user's face appears smaller in the camera image.
Additionally, the distanceChecker.py file incorporates a colour-coding function, number_to_bgr(), to visually indicate the user's proximity status. The triangle is coloured green when the user is within the designated distance range, orange when they are on the verge of being out of range (suggesting a suboptimal position for calibration), and red when they are either too close or too far for adequate eye landmark detection, hindering proper calibration.
Callibration UI:
The transparent_overlay.py file orchestrates the creation of a transparent overlay window for guiding users through the calibration process in computer vision applications. At the heart of this functionality lies the TransparentWindow class, which leverages PyQt5 to construct a custom widget. Through inheritance from QWidget, this class gains the ability to manage custom rendering via the paintEvent method. Within this method, QPainter is employed to draw calibration markers and cursor highlights, enhancing the user experience with visual cues.
Moreover, PyQt properties such as marker_position, marker_size, and cursor_position facilitate dynamic updates to the overlay's elements. These properties enable precise control over the position and appearance of calibration markers and cursor highlights, ensuring alignment with user interactions. Additionally, methods like display_marker and hide_marker provide convenient interfaces for showing or hiding calibration markers based on application state or user input.
The ApplicationOverlay class serves as the orchestrator of the overlay application's logic and interaction handling. It initializes the TransparentWindow instance and sets up event listeners to capture mouse movements(‘on_move’) and keyboard inputs (‘on_press’). This enables real-time responsiveness to user actions, allowing for seamless interaction with the calibration interface. Furthermore, a message queue mechanism is employed to communicate calibration progress updates, triggering corresponding actions such as marker display or hide operations.
In essence, the transparent_overlay.py file encapsulates a robust framework for creating and managing transparent overlay windows in computer vision applications. By harnessing the power of PyQt5 and integrating with system-level APIs, it delivers a sophisticated yet intuitive user experience, guiding users through the calibration process with precision and clarity.
Projective transformation:
The projective transformer is implemented across two files: calibration.py and transform.py.
The Calibration class primarily handles the process of calibrating the system, ensuring accurate mapping between physical space and the digital environment. It orchestrates the calibration procedure by defining a set of calibration points on the screen, typically represented as a grid or a pattern.
During the calibration process, it progressively captures data points corresponding to the user's landmarks, such as eye positions, and calculates the average positions for each calibration point. These average positions are then used to create quadrilateral objects, representing the calibration planes.
Once all calibration points are processed, the FourSurfaceProjectiveTransformer is initialised using these quadrilaterals, along with the screen dimensions. This transformer is pivotal for accurately transforming points between the calibrated space and the screen space.
The transform.py module houses essential classes and methods for performing projective transformations. It defines the Point and Quadrilateral classes, which are fundamental building blocks for representing geometric entities in two-dimensional space.
The ProjectiveTransformer class implements the core functionality for transforming points between two quadrilaterals using projective transformation matrices. It leverages OpenCV's functionality to compute these transformation matrices based on the corresponding points in both quadrilaterals.
Furthermore, the FourSurfaceProjectiveTransformer class extends this functionality to handle transformations between multiple neighbouring quadrilaterals as the code splits the screen into its own set of four quadrilaterals each which will receive its own unique projective transformation. This is particularly useful as it further customises the user calibration annulling any significant skew from a singular point if it was to be treated as the screen being a single quadrilateral.
In conclusion, the combined implementation of calibration.py and transform.py forms the basis of calibrating and transforming points within a computer vision system. By accurately mapping points between physical space and the screen, this system enables precise interaction and visualisation, facilitating a wide range of applications such as eye tracking, gesture recognition, and augmented reality.
Within the EyeTracker.py module, denoising techniques are integrated into the image preprocessing pipeline to enhance the quality of captured frames (line 6-16). These techniques are applied within the get_a_camera_image() method, where each frame retrieved from the camera undergoes denoising operations before further processing. Specifically, denoising functions such as Gaussian blur or median filtering from OpenCV can be utilized within this method to mitigate noise interference and improve the reliability of subsequent eye landmark detection algorithms.
Similarly, the cursor control functionality is implemented within the track_eyes() method (line 33-42). This method calculates the precise position of the cursor based on the coordinates of the detected eyes and performs geometric transformations to map these coordinates from the camera frame to the screen space. The transformed coordinates are then used to control the system's mouse cursor, enabling seamless interaction with graphical user interface elements. This integration ensures that the eye tracking system provides users with a natural and intuitive means of interacting with digital interfaces, thereby enhancing usability and accessibility.
Implementation of Class Diagrams
Our software relies on a set of classes, each crucial to a fundamental feature of our system. These classes are detailed within the systems design section. Consequently, due to the structured nature of our system, we have found it most effective to organize our code implementation based on the operational structure of these classes.
Main.py
The main.py file leverages various libraries and modules.Key features include a user-friendly start message interface facilitated by pyautogui, keyboard event handling for termination via the pynput library, and management of a control panel through the transparent_overlay module. The core functionality revolves around continuous eye tracking and cursor control orchestrated by the main() function. Multi-processing capabilities are utilized for responsiveness, with separate processes managing eye tracking and the control panel.
The function begins by importing the pyautogui library, which provides utilities for automating GUI interactions. This library allows us to create a confirmation dialog box for user interaction.
Within the function, pyautogui.confirm() method is utilized to display a dialog box with the specified text, title, and buttons. The text parameter contains the message "Click OK to start the Eye Gaze Tracker", while the title parameter sets the title of the dialog box to "Start". The buttons parameter is a list containing the options "OK" and "Cancel", giving the user the choice to either start the Eye Gaze Tracker or cancel the operation.
The function then checks the value of response. If the user clicked "OK", the function returns True, indicating that the user has agreed to start the Eye Gaze Tracker. Otherwise, if the user clicked "Cancel" or closed the dialog, the function returns False, indicating that the user has opted not to start the Eye Gaze Tracker.
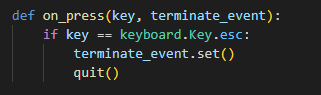
The on_press() function is designed to handle keyboard events, particularly key presses. It accepts two parameters: key, representing the key that was pressed, and terminate_event, an event object used for signaling termination.
Within the function, it first checks if the key parameter is equal to keyboard.Key.esc, which corresponds to the escape key. This check is implemented using an if statement.
If the escape key is pressed, two actions are performed. 1.terminate_event.set() is called. This method sets the state of the terminate_event event object, indicating that termination has been requested. This mechanism is commonly used in concurrent programming to signal other threads or processes to terminate gracefully. 2.The quit() function is invoked. This function terminates the execution of the Python interpreter, effectively ending the program. It relinquishes control back to the operating system
The run_control_panel_process() function orchestrates the operation of a control panel process, taking three parameters: paused_state, q, and terminate_event. Within its core, a while loop is established, continuously running until the terminate_event is set. This loop ensures the sustained execution of the control panel process.
During each iteration, the create_control_panel() function is invoked, with paused_state and q likely facilitating control over the panel's state and enabling communication through a queue, respectively.
Upon the setting of the terminate_event, indicative of a termination request, the loop ceases, and a notification message confirming the termination of the control panel process is emitted.
In essence, run_control_panel_process() provides robust management for the control panel process, allowing for its smooth operation while offering a structured means for termination when necessary.
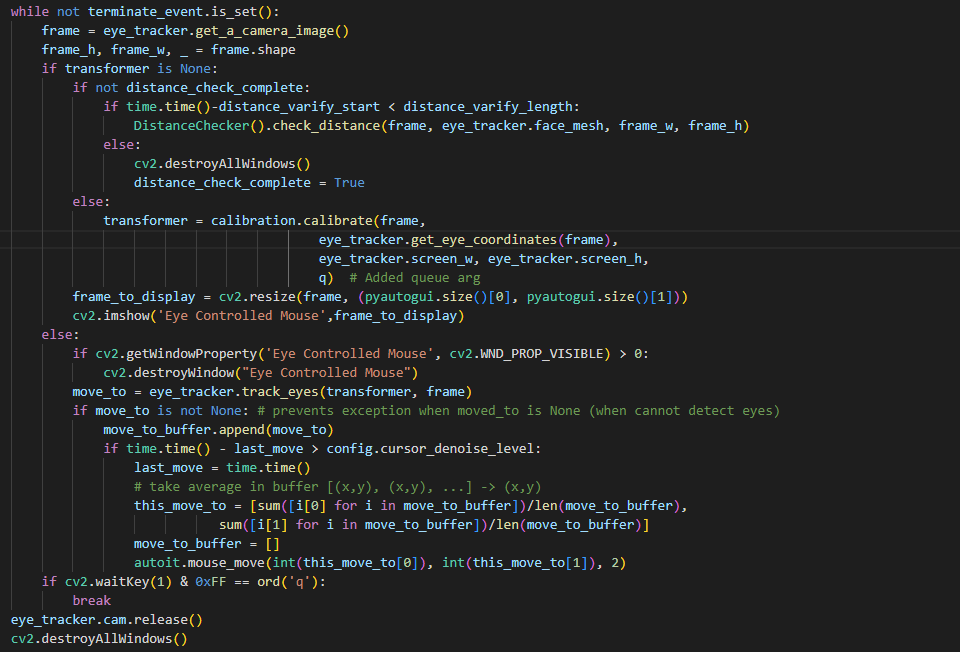
The main() function serves as the core component of the eye gaze tracking system, orchestrating various processes and handling user interactions. It accepts four parameters: paused_state, q, terminate_event, and start_event.
At the outset, the function waits for the start_event to be set, signifying the user's readiness to commence the eye gaze tracking process.Upon initialization, it configures the PyAutoGUI library to disable the fail-safe mechanism, ensuring uninterrupted operation. Additionally, instances of ClickController, EyeTracker, and Calibration classes are created to facilitate mouse clicks, eye tracking, and calibration processes, respectively.
A loop is then established to continuously monitor the system's state until termination is requested (terminate_event.is_set()). Within this loop, the function retrieves camera frames, checks distances, performs calibration, and tracks eye movements. The graphical interface, displaying the real-time camera feed resized to the screen dimensions, is updated accordingly.
While loop that conducts main progam.
During eye movement tracking, the function monitors user input to allow for graceful termination (if cv2.waitKey(1) & 0xFF == ord('q'):).
Upon termination, resources are released, including the camera, and all OpenCV windows are closed to ensure a clean exit.
The main() function is invoked within the __main__ block, ensuring it's executed only when the script is run directly. Additionally, it checks for the availability of at least two CPU cores and prompts the user with a start message using the show_start_message() function.
Furthermore, it initializes synchronization primitives (Value, Queue, and Event) and minimizes the code runner window to enhance user experience.Subsequently, it creates and starts two separate subprocesses (p1 and p2) to execute the main() function and run_control_panel_process() function concurrently.
A keyboard listener is set up to handle user input, specifically listening for the ESC key (on_press() function), which signals the termination of the program.
Finally, the script waits for the subprocesses to finish execution before printing a termination message and concluding the program's execution.
EyeTracker.py
The EyeTracker.py module maximise use of the mediapipe library for facial landmark detection and OpenCV (cv2) for camera interaction, it captures and processes frames to extract eye coordinates. Through methods such as get_eye_coordinates() and track_eyes(), it facilitates accurate tracking of eye movements and translates them into cursor control. Additionally, it provides functionality for toggling the pause state and ensures proper mapping between screen and camera coordinates. With logging capabilities for debugging and error handling, this module serves as a robust foundation for eye tracking within the application.
The __init__() method in the EyeTracker class initializes the EyeTracker object with necessary attributes and configurations.
Firstly, it takes a click_controller parameter, representing an instance of a class responsible for mouse click control or cursor manipulation. This parameter is stored as self.click_controller, enabling interaction with mouse events.
Next, it initializes the Face Mesh model from the mediapipe library for facial landmark detection. This model, instantiated as mp.solutions.face_mesh.FaceMesh(refine_landmarks=True), is configured to refine detected landmarks for improved accuracy in facial feature tracking.
The method then initializes the camera using OpenCV (cv2.VideoCapture(0, cv2.CAP_DSHOW)), specifying the default camera index (0) and utilizing the DirectShow backend for video capture, particularly suitable for Windows systems. Subsequently, it sets the camera resolution to its maximum values of 1280x720 pixels, enhancing accuracy in capturing video frames.
Additional attributes are set to store the camera width (self.cam_w) and height (self.cam_h). These values are obtained from the camera properties using OpenCV's get() method.
Furthermore, the method waits for a brief period (5 milliseconds) to warm up the camera, ensuring stable operation. It also retrieves the screen size using pyautogui.size(), storing the width and height as self.screen_w and self.screen_h, respectively.
Finally, informational logs are generated to record the screen and camera sizes, providing insight into the setup process. These logs are emitted using the logging module.
Initialisation function for the eye tracking class
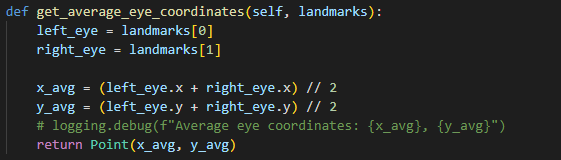
The get_average_eye_coordinates() method in the EyeTracker class calculates the average coordinates of the left and right eyes based on the landmarks detected by the facial landmark detection model.
Firstly, the method takes a landmarks parameter, which presumably contains information about the landmarks detected for both eyes.
It then retrieves the coordinates of the left and right eyes from the landmarks list. Assuming the landmarks are structured such that landmarks[0] represents the left eye and landmarks[1] represents the right eye, these coordinates are assigned to the left_eye and right_eye variables, respectively.
Next, the method computes the average x and y coordinates of the eyes. This is achieved by summing the x-coordinates of the left and right eyes (left_eye.x and right_eye.x) and dividing the sum by 2 to obtain the average x-coordinate. Similarly, the same process is applied to the y-coordinates (left_eye.y and right_eye.y) to calculate the average y-coordinate.
Finally, the method returns a Point object initialized with the calculated average x and y coordinates, encapsulating the averaged eye coordinates into a single entity for ease of use.
Additionally, a debug log statement is provided (commented out) for logging purposes, which could be uncommented if debugging information is required during execution. This log statement displays the calculated average eye coordinates, aiding in troubleshooting or analysis if necessary.
The get_eye_coordinates() method within the EyeTracker class plays a pivotal role in extracting eye coordinates from a given frame using the Face Mesh model. Upon receiving a frame, the method initiates by converting the frame's color space from BGR to RGB format through the cv2.cvtColor() function from the OpenCV library. This step is essential as the Face Mesh model operates on frames in RGB format.
Following color conversion, the RGB frame undergoes facial landmark detection via the process() method of the Face Mesh model. This process yields a set of landmarks corresponding to various facial features. If the output indicates the detection of multiple faces (output.multi_face_landmarks is non-empty), the method proceeds to extract landmarks associated with the first detected face for further analysis.
Subsequently, specific landmarks representing the left and right eyes are extracted from the detected facial landmarks. These landmarks are accessed from the landmarks list with predefined indices (landmarks[468] and landmarks[473]). These indices are standardized within the Face Mesh model, ensuring consistent identification of eye landmarks across different frames.
Upon obtaining the eye landmarks, their coordinates are normalized and then scaled to match the dimensions of the camera frame. This conversion ensures that the coordinates accurately represent the positions of the eyes within the camera's field of view, facilitating precise eye tracking.
To enhance accuracy, the method computes the average coordinates of the left and right eyes. This is achieved by taking the arithmetic mean of the x and y coordinates of the respective eye landmarks. The averaged coordinates provide a consolidated representation of the eyes' positions, minimizing potential discrepancies arising from individual landmark variations.
To end, the method encapsulates the averaged eye coordinates into a Point object and returns it. This encapsulation facilitates seamless integration with other components of the eye tracking system, enabling further processing or manipulation as needed. Overall, the get_eye_coordinates() method serves as a crucial component in the eye tracking pipeline, enabling accurate and reliable extraction of eye positions from video frames.
The track_eyes() method within the EyeTracker class is fundamental for monitoring and translating eye movement into screen coordinates. Initially, it utilizes the get_eye_coordinates() method to extract the precise coordinates of the user's eyes from a provided frame, employing the underlying facial landmark detection mechanisms to achieve accuracy. Subsequently, if valid eye coordinates are obtained, the method proceeds to transform these coordinates from camera space to screen space using the supplied transformer object. Additionally, the method optionally visualizes the eye locations on the frame via the _plot_location() method, facilitating real-time monitoring and debugging of eye tracking performance. Ultimately, the method returns the transformed screen coordinates, representing where the user is looking on the screen. This functionality is essential for enabling hands-free computer interaction, allowing users to control the cursor or interact with on-screen elements effortlessly based on their eye movements.
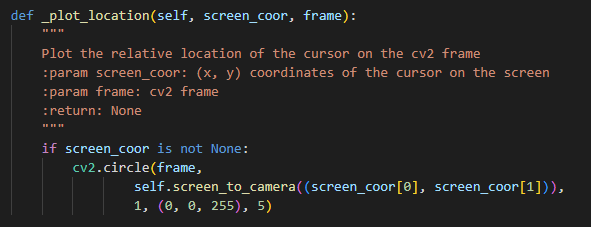
The _plot_location() method in the EyeTracker class is a crucial tool for providing technical insight into eye tracking systems. Upon receiving cursor coordinates, it checks for validity before plotting them as a small red circle on an OpenCV frame. This function not only aids real-time monitoring but also assists in debugging by offering immediate visual feedback on cursor positioning. By converting screen coordinates to camera coordinates, it ensures alignment with the camera's perspective, maintaining accuracy in representation. This technical feature facilitates efficient evaluation and optimization of eye tracking algorithms and cursor control systems, enhancing overall performance and usability.
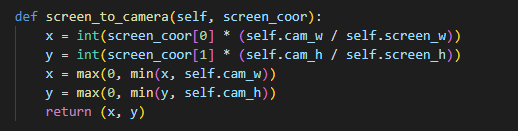
The screen_to_camera() method within the EyeTracker class serves a critical role in translating user gaze from screen coordinates to camera coordinates, a fundamental step in the eye tracking process. This method operates by scaling the input screen coordinates based on the ratio of the camera's dimensions to those of the screen. By maintaining proportional relationships between the coordinates, it ensures that the converted camera coordinates accurately reflect the user's visual focus within the camera frame.
Furthermore, to prevent any discrepancies caused by coordinates exceeding the boundaries of the camera frame, the method incorporates clipping. This essential step restricts the converted coordinates to fall within the valid range of the camera's width and height, thus preserving the integrity of the spatial mapping between screen and camera spaces. Clipping safeguards against inaccuracies that may arise from out-of-bounds coordinates, ensuring the reliability of the eye tracking system's output.
Additionally, the method finalizes the transformation process by performing integer conversion on the scaled and clipped coordinates. This conversion ensures that the resulting camera coordinates are discrete pixel values, which are essential for accurate pixel-based operations within the camera frame. By providing a precise representation of the user's gaze location within the frame, this step enhances the overall accuracy and effectiveness of the eye tracking system in capturing and analyzing visual behavior.
screen_to_camera function s
TransparentOverlay.py
The transparent_overlay.py file provides functionality for creating transparent overlay windows and managing marker animations within them. Leveraging libraries such as PyQt5 for window creation and pynput for mouse movement detection, it allows for the creation of frameless windows with translucent backgrounds, enabling overlaying on the screen. The TransparentWindow class defines the window's appearance and marker display, while the ApplicationOverlay class manages user input events and communication with the overlay window through a message queue. The file includes a function create_control_panel() for initializing the overlay application, making it suitable for various interactive overlay applications and demonstrations.
The __init__ method within the TransparentWindow class serves as the constructor for creating instances of transparent overlay windows. It initializes various attributes including the window's name, screen dimensions, and marker properties. Utilizing the win32api library, it retrieves the screen width and height to determine the dimensions of the overlay window. Additionally, it retrieves the desktop's screen geometry using QApplication.desktop() from PyQt5 to ensure compatibility across different screen resolutions. The method initializes attributes for marker display and cursor tracking, setting their initial positions and sizes. Finally, it calls the initUI() method to initialize the user interface components of the overlay window.
Initialisation function for TransparentOverlay class
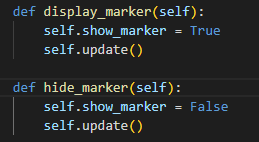
The display_marker method toggles the visibility of the marker within the transparent overlay window. By setting the show_marker attribute to True, it indicates that the marker should be displayed. After updating the window's content using the update method, changes in the marker's visibility are reflected on the window. Conversely, the hide_marker method sets the show_marker attribute to False, indicating that the marker should be hidden. Similar to display_marker, it calls the update method to refresh the window's content, ensuring that the marker's visibility change is applied promptly. These methods provide convenient control over the visibility of the marker within the overlay window.
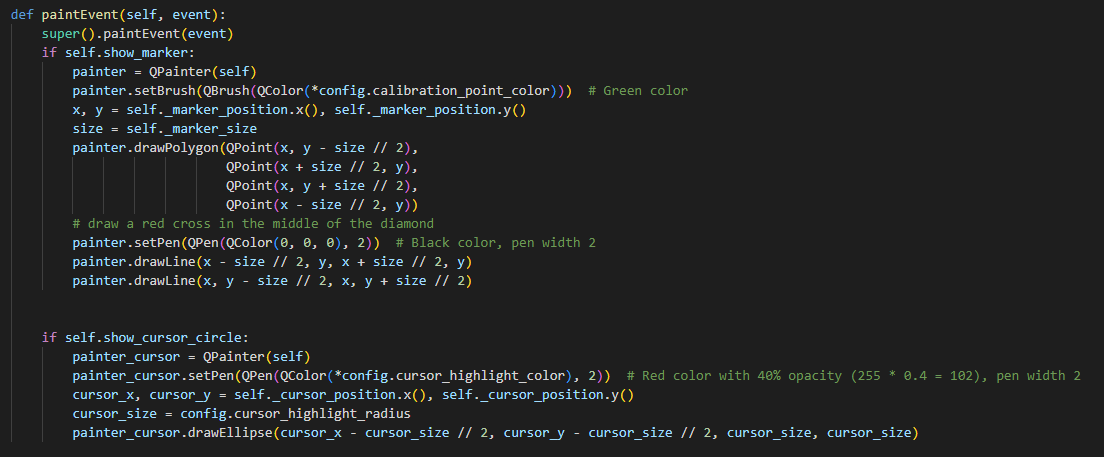
The paintEvent method handles the rendering of the overlay window's graphical content. When triggered, it first invokes the superclass's paintEvent to ensure proper event propagation. Upon verifying that the show_marker flag is set, it initializes a QPainter object for rendering shapes and applies the specified brush color and size settings to draw the marker. The marker, depicted as a diamond shape, is defined by a series of points, with additional lines drawn to create a cross at its center, enhancing visibility. Subsequently, if the show_cursor_circle attribute is enabled, another QPainter instance is instantiated to render the cursor circle. This circle's appearance, including color, size, and position, is determined by configuration parameters. Overall, this method orchestrates the dynamic visualization of the overlay window's graphical elements, providing intricate control over their rendering based on the application's state.
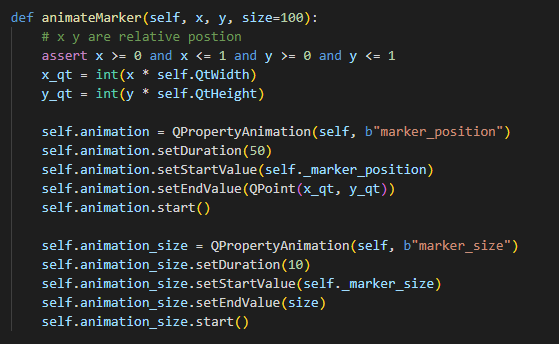
The animateMarker method orchestrates the animation of the marker's movement and size adjustments within the overlay window. It takes normalized coordinates x and y, representing the relative position of the marker within the window, with values ranging from 0 to 1. These coordinates are then converted to absolute positions within the window dimensions (QtWidth and QtHeight). Subsequently, two QPropertyAnimation objects are instantiated to animate the marker's position and size changes.
The first animation, targeting the marker's position (marker_position property), transitions smoothly from its current position to the specified endpoint, determined by the converted x_qt and y_qt coordinates. The animation duration, denoted by setDuration, is set to 50 milliseconds to ensure a responsive and fluid transition. Similarly, the second animation (animation_size) adjusts the marker's size (marker_size property) from its initial value to the specified size. This animation's duration is shorter, set to 10 milliseconds, facilitating rapid size changes..
Overall, this method facilitates the dynamic animation of the marker within the overlay window, enhancing user experience and providing visual feedback in response to relevant events or interactions.
animateMarker function
ApplicationOverlay.py
The ApplicationOverlay class serves as the backbone for managing interactions between the user, system events, and the transparent overlay window. It orchestrates essential functionalities such as handling keyboard and mouse events, updating cursor positions within the overlay window, and responding to specific actions like drawing markers or completing calibration. With its capability to continuously listen for messages and adjust the overlay accordingly, it provides a seamless user experience for eye-tracking applications. Additionally, the script offers a convenient entry point through the create_control_panel function, simplifying the setup and execution of the overlay application.
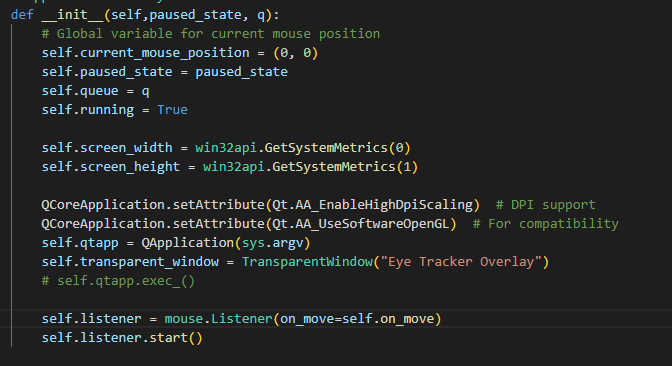
The __init__ method of the ApplicationOverlay class initializes various attributes and resources required for managing the overlay application. It sets up parameters like the paused state, a queue for handling messages, and flags for managing the application's running state. Additionally, it retrieves the screen dimensions using the win32api.GetSystemMetrics function and configures Qt application attributes for DPI scaling and OpenGL compatibility. Moreover, it initializes a Qt application instance and creates a transparent window named "Eye Tracker Overlay" using the TransparentWindow class. Lastly, it starts a listener to monitor mouse movements using the mouse.Listener class, enabling real-time updates of the cursor position within the overlay window
Initialisation function for ApplicationOverlay class
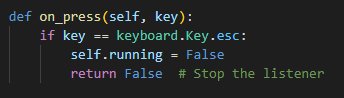
The on_press method of the ApplicationOverlay class is responsible for handling keyboard events. It checks if the pressed key is the escape key (keyboard.Key.esc). If it is, it sets the running attribute to False, indicating that the application should stop running, and returns False to stop the listener.
The on_move method of the ApplicationOverlay class is invoked whenever there is a mouse movement. It updates the current_mouse_position attribute with the new coordinates (x, y) of the mouse cursor. Additionally, it updates the position of the cursor within the transparent window by calculating the relative position of the cursor based on the screen dimensions and the dimensions of the transparent window.
The run method in the ApplicationOverlay class is the main execution loop of the application. It starts by initializing a keyboard listener (kb_listener) that listens for keypress events.
Inside the loop, it continuously checks if there are any messages in the queue (self.queue). If there are, it processes the messages. If the message indicates that a diamond shape should be drawn (message['action'] == 'draw' and message['shape'] == 'diamond'), it displays the marker on the transparent window at the specified position with the specified size using the display_marker and animateMarker methods of the TransparentWindow class. If the message indicates that the calibration is complete (message['action'] == 'calibration_complete'), it hides the marker using the hide_marker method.
Additionally, the method checks for a keypress event for the 'q' key using cv2.waitKey(1). If the 'q' key is pressed, it hides the marker and breaks out of the loop.
Finally, once the loop exits, it quits the Qt application, stops the keyboard listener, and stops the mouse listener
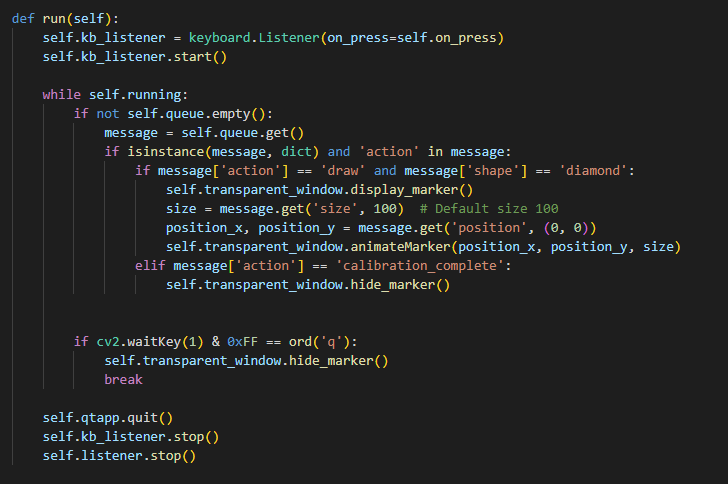
The check_distance function is designed to analyze facial landmarks detected in a given frame and calculate the distance between specific points, namely the left eye, right eye, and nose tip. This function is typically utilized in the context of facial analysis or eye-tracking applications.
Within the function, the processed_frame is the result of processing the input frame using a facial landmark detection model, such as the one provided by the face_mesh object. If the model successfully detects multiple face landmarks in the frame (processed_frame.multi_face_landmarks), the function proceeds to extract the coordinates of the relevant landmarks.
Using the coordinates of the left eye, right eye, and nose tip, the function computes the area of the triangle formed by these points. This calculation is based on the determinant formula for the area of a triangle in Cartesian coordinates.
The number_to_bgr function, which is called within check_distance, plays a crucial role in visualizing the computed area. This auxiliary function maps the computed area to a color gradient ranging from green to red, similar to a heatmap. The color gradient indicates the magnitude of the computed area, providing a visual representation of the distance between the facial landmarks.
By visualizing the computed distances using color gradients, developers and users can gain insights into the spatial relationships between facial landmarks, facilitating various applications such as gaze tracking, facial expression analysis, or facial feature measurement. Additionally, the function incorporates error handling to address scenarios where no landmarks are detected, ensuring robustness and reliability in real-world scenarios.
check_distance function
Calibration.py
The Calibration class orchestrates the calibration process for eye tracking systems, leveraging a series of calibration points distributed across the screen. It dynamically adjusts the size and color of a visual marker to guide users' gaze to each point, while continuously updating based on elapsed time. Landmark data from detected facial features is utilized to refine the calibration points, with outliers mitigated for improved precision. Upon completion, the class computes the average coordinates for each point and constructs quadrilateral representations of calibration planes. These planes serve as the foundation for creating a FourSurfaceProjectiveTransformer object, facilitating the accurate mapping of gaze coordinates to screen positions. This transformer enables seamless integration of eye tracking functionalities into various applications, ensuring precise and reliable performance.
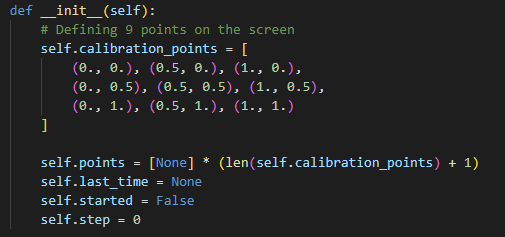
The __init__ method within the Calibration class serves as the constructor, responsible for initializing the object's state and parameters. Initially, it defines nine calibration points distributed across the screen, each represented by a tuple containing (x, y) coordinates. These points are strategically positioned to cover various regions of the display, with (0, 0) denoting the top-left corner and (1, 1) representing the bottom-right corner.
Upon instantiation, several instance variables are initialized. Firstly, self.calibration_points holds the predefined calibration points. Secondly, self.points is created as a list intended to store data points collected during the calibration process. Initially, it's populated with None values, awaiting the gathering of actual data. Additionally, self.last_time stores the timestamp of the last calibration step, initialized as None. The boolean self.started flag indicates whether the calibration process has commenced, starting with False. Finally, self.step keeps track of the current step in the calibration process, initialized to zero.
In summary, the __init__ method establishes the groundwork for the Calibration object, defining calibration points, setting up variables for data storage and progression tracking, and initializing the calibration process's starting step.
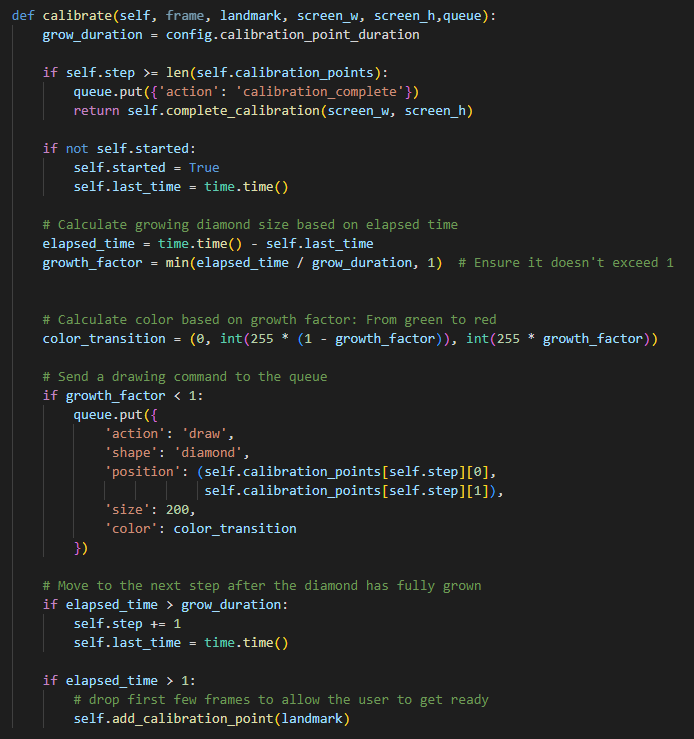
The calibrate method in the Calibration class orchestrates the calibration process by dynamically rendering calibration points on the screen, prompting the user to focus their gaze on each point in succession.
Initially, the method calculates the duration for the calibration points to grow based on the configured calibration point duration from the config object. If the calibration process has reached its completion, determined by self.step exceeding the total number of calibration points, a message indicating calibration completion is sent to the queue, and the method transitions to the complete_calibration function to finalize the calibration process.
If the calibration process hasn't started (self.started is False), the method sets self.started to True and records the current time using time.time().
Subsequently, the method calculates the elapsed time since the last calibration point was presented, as well as the growth factor of the current calibration point based on the elapsed time and the configured duration. This growth factor is used to determine the color transition of the calibration point, gradually shifting from green to red as it grows.
A drawing command is then added to the queue to render the current calibration point on the screen as a diamond shape with a size of 200 pixels and the calculated color transition.
Once the diamond has fully grown, as indicated by the elapsed time surpassing the calibration point duration, the method increments self.step to move to the next calibration point and updates self.last_time with the current time.
During the calibration process, the method adds the current landmark position to the list of calibration points (self.add_calibration_point(landmark)) if the elapsed time exceeds one second, allowing the user time to prepare before the calibration begins in earnest.
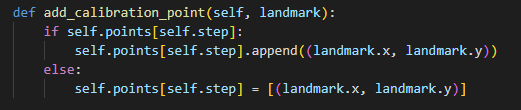
The add_calibration_point method in the Calibration class is responsible for adding the coordinates of the user's gaze, represented by a landmark, to the list of calibration points.
It first checks if there are existing points for the current calibration step (self.points[self.step]). If there are, it appends the coordinates of the current landmark ((landmark.x, landmark.y)) to the list of points for the current step. If there are no existing points for the current step, indicating that it's the first time a point is being added for this step, it initializes a new list containing the coordinates of the current landmark and assigns it to self.points[self.step].
This process ensures that each calibration step contains a list of coordinates corresponding to the user's gaze positions recorded during the calibration process.
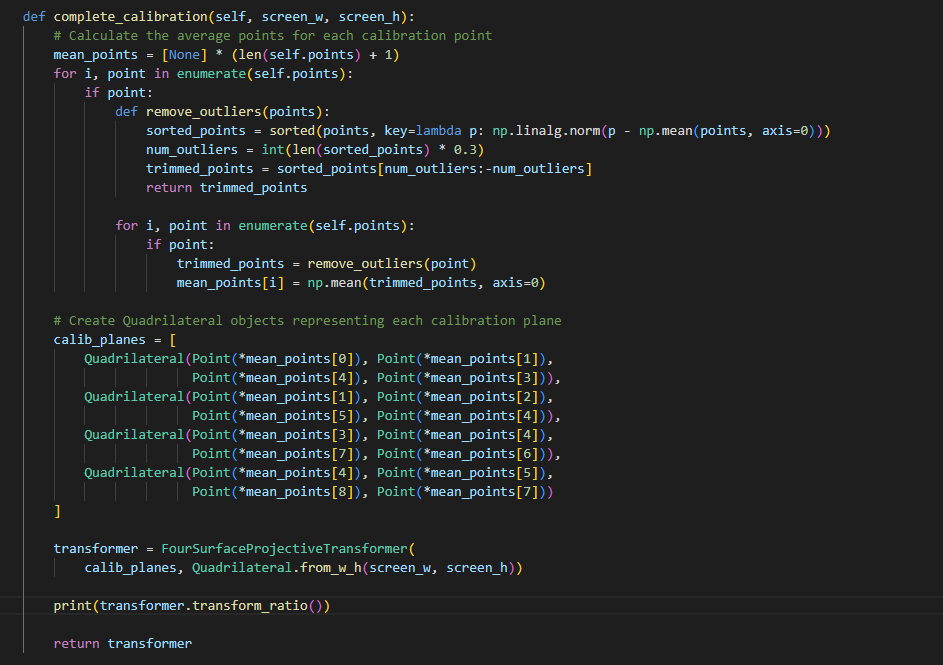
The complete_calibration method in the Calibration class finalizes the calibration process by calculating the average points for each calibration point based on the recorded gaze positions during the calibration steps.
It first initializes a list mean_points to store the calculated mean coordinates for each calibration point. Then, it iterates over each step in the calibration process, checking if points were recorded. For each step with recorded points, it removes outliers from the list of recorded points using a function remove_outliers, which sorts the points based on their distance from the mean and trims a percentage of outliers from both ends of the sorted list.
After removing outliers, it calculates the mean of the remaining points and stores the result in the mean_points list.
Next, the method creates Quadrilateral objects representing each calibration plane using the calculated mean points. These quadrilaterals define the boundaries of the calibration areas on the screen.
Finally, it initializes a FourSurfaceProjectiveTransformer object with the calibration planes and a reference quadrilateral representing the entire screen. This transformer object is used to perform perspective transformations based on the calibration data.
The method concludes by printing the transformation ratios, which provide insights into how the calibration data will be used to transform gaze positions to screen coordinates, and returns the initialized transformer object.
complete_calibration function
Transform.py
The transform.py file encapsulates a collection of classes aimed at geometric transformations and perspective projection in 2D space. It begins with the definition of a Point class representing coordinates in 2D space and a Quadrilateral class modeling quadrilateral shapes with methods for containment checks, distance calculations, and area computation. Subsequently, the ProjectiveTransformer class facilitates point transformation between two quadrilaterals using projective transformation matrices. Extending this functionality, the FourSurfaceProjectiveTransformer class specializes in transforming points from four adjacent quadrilaterals to a target quadrilateral, enhancing accuracy by segmenting the target into smaller surfaces. The script concludes with a testing scenario to validate the transformation functionality and measure accuracy through area computations.
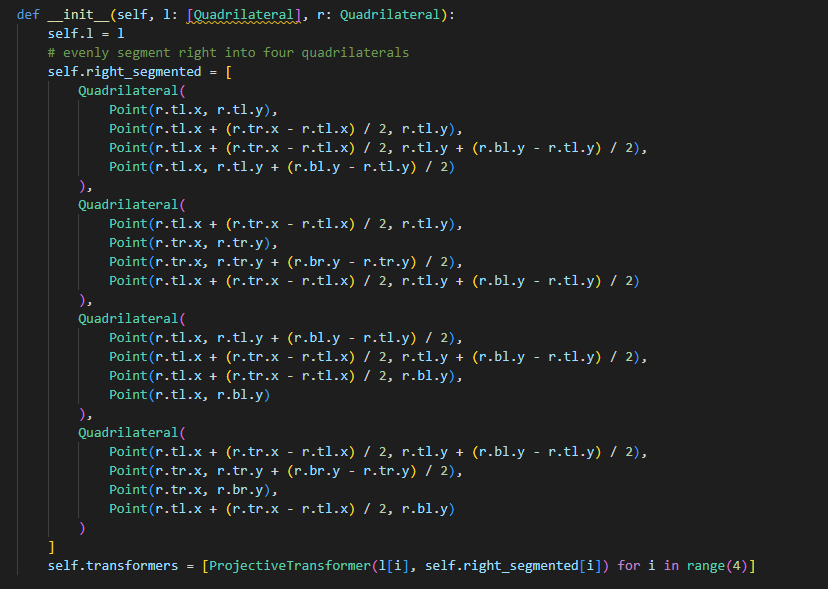
The __init__ method in the FourSurfaceProjectiveTransformer class initializes the transformer with left and right quadrilaterals, l and r respectively. It segments the right quadrilateral into four smaller quadrilaterals to match the left quadrilateral's layout, ensuring a one-to-one correspondence between them. Each segment is defined by dividing the sides of the original right quadrilateral in half and forming four new quadrilaterals. It then creates four ProjectiveTransformer instances, each corresponding to a pair of neighboring quadrilaterals (one from the left and one from the segmented right). These transformers are used to transform points from the left quadrilateral to their corresponding locations in the segmented right quadrilaterals.
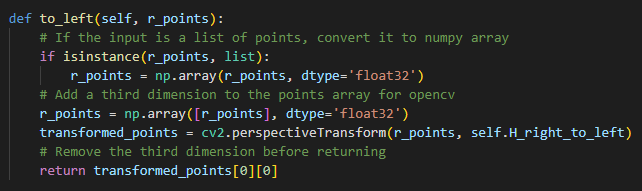
The to_left method within the ProjectiveTransformer class takes a list of points r_points in the destination quadrilateral (right) and transforms them to the corresponding points in the source quadrilateral (left). It first checks if the input r_points is a list and converts it into a NumPy array of type float32 if needed. Then, it adds a third dimension to the points array, as required by OpenCV for perspective transformation. Using the transformation matrix H_right_to_left computed during initialization, it transforms the points from the destination quadrilateral to the source quadrilateral. Finally, it returns the transformed points after removing the third dimension to ensure compatibility with further processing.
The to_right method in the FourSurfaceProjectiveTransformer class takes a point from the left quadrilateral (l_point) and transforms it to the corresponding location in the segmented right quadrilaterals. It iterates over the four segments of the left quadrilateral and checks if the point falls within each segment using the contains method of the Quadrilateral class. If the point is found within a segment, the method uses the corresponding transformer to perform the transformation and returns the transformed point. If the point is not within any segment, it selects the transformer associated with the segment having the smallest distance from the point to the centre of mass of the left quadrilateral, ensuring accurate transformation even if the point lies near the boundary between segments.