MotionInput Implementation
As seen from the system design, our project uses a wide range of sub-systems that work together all in MotionInput to perform the tasks. This section is split up into two sections: MFC implementation and MotionInput implementation.
Mouse Control
We have included two vastly different ways to control the mouse in games, default mouse and joystick mouse. We also included the option for no mouse as well. Here is how each of the mouse options is implemented.
Default Mouse
IMPORTANT NOTE: This method of mouse movement was for the most part not implemented by us but by team 32 of last year’s cohort more specifically by Carmen Meinson. We made minor changes to it to make it work with our implementation.
This implementation of controlling the mouse sees the use of a display box as a visual reference to position your hand as seen below:
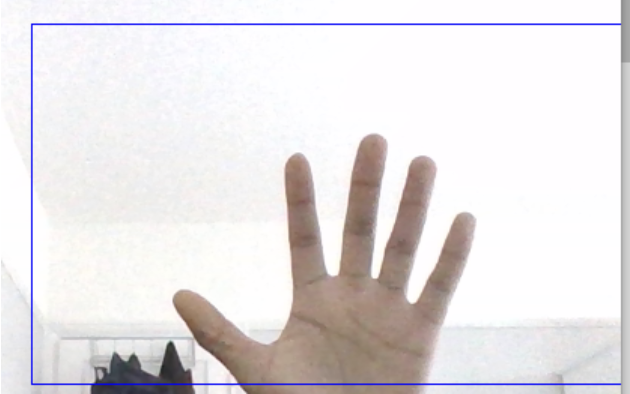
The position of the centre of the hand gives the absolute position of the cursor on screen. This makes use of the “hand_active_event” gesture event as shown below:
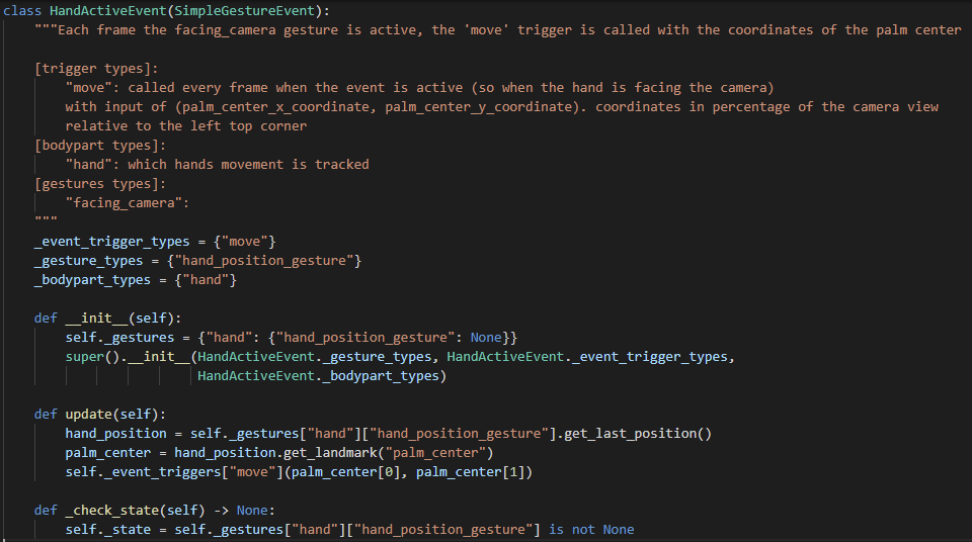
The update function is called constantly when the hand moves inside the box. Coordinates are measured from the bottom left corner of the box so in the example in the figure above. Since the position is absolute, the hand position in the above example is near the bottom of the centre therefore the cursor on screen will be near the centre of the bottom of the screen in a similar position. For extra context on how the update() function works here is the event profile for the default mouse control:
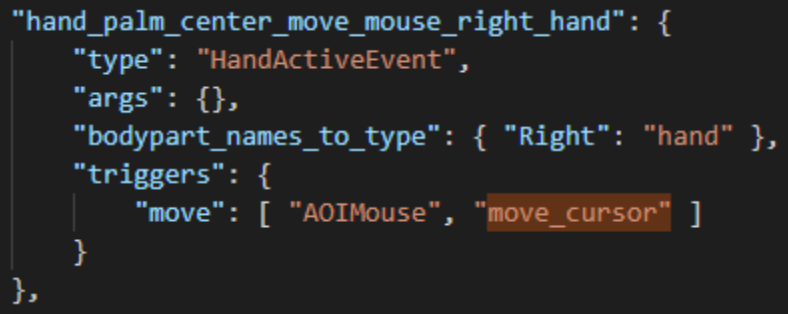
Whenever self._event_riggers[“move”](palm_center[0], palm_center[1]) is called, this takes the coordinate position of the centre of the palm received two lines before and passes those coordinates to the “move_cursor” function of the AOI mouse gesture event handler class of which can be seen below:
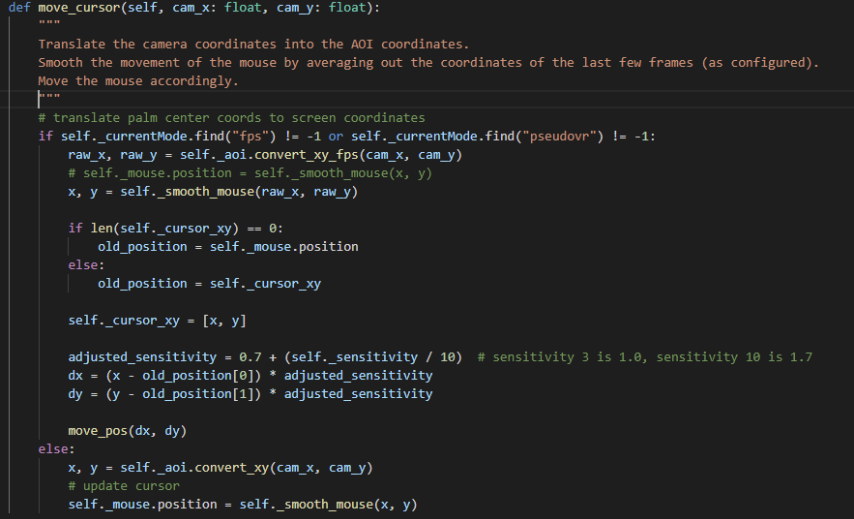
The function acts differently depending on whether the mode is a “fps” or “pseudoVR” mode. In that case the mouse calculates the position of where the mouse should be depending on the fps of the camera position. For our modes this is not relevant and, in all cases, we use the else statement at the bottom describing the mapping of the coordinates to the dimensions of the screen and then setting the position of the mouse to those coordinates. To prevent jerky movement with the mouse there is a smoother class that is used to manage this as seen below:

The “Pynput” dependency is used to simulate the movement of the mouse. Overall, this results in smooth movement of the mouse on screen and in any game.
The second mode of mouse movement is vastly different.
Joystick Mouse
This interpretation of move movement likens the mouse control to the same way as a modern-day controller joystick where if the hand is consistently on one side of the centre, the mouse will continuously move in that direction. The difference this makes in gameplay is that a player’s view is not constrained by the size of the hand box shown on screen as it does with the default mouse. The player can see in far more directions far easier than with the default mouse as a result we decided to focus on this mode a lot.
An example of what this would look like is below:
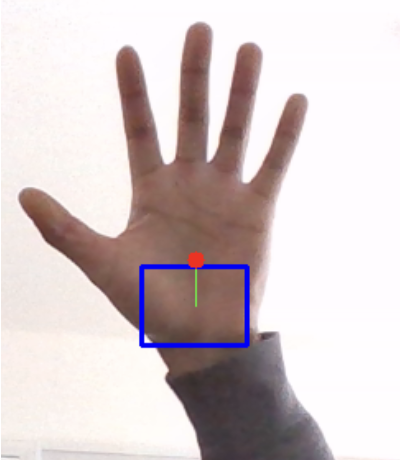
In comparison to the default mouse box, the display of this mouse box is a lot smaller only there to indicate the centre of the box as unlike the default mouse box there is no boundary on the mouse box so the hand can be used to move the mouse provided it can be seen anywhere in the camera view. The red dot indicates the centre of the palm which is what is tracked, and the green line is it to the centre of the box. In this example the hand is above the centre of the box so the mouse would continuously move up in game. Its implementation is below:
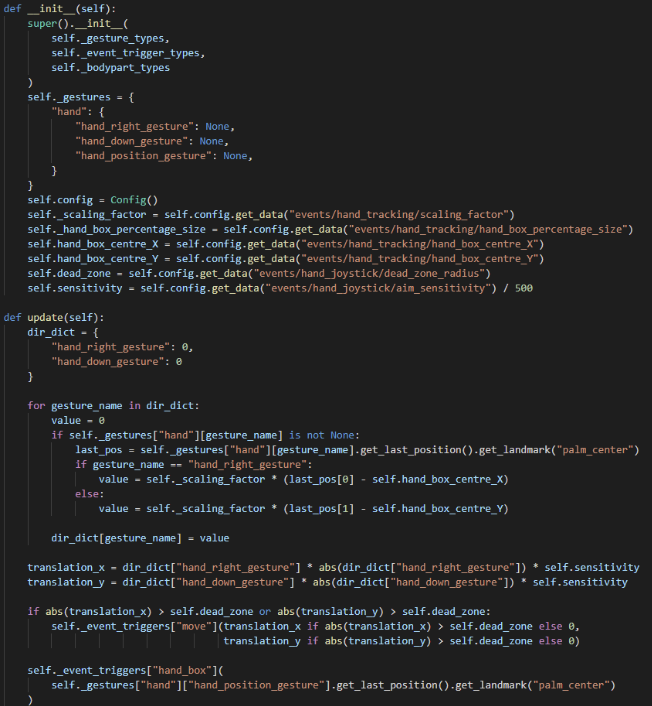
Note: Besides the constructor and update function, the rest of the class has been omitted as much of it resembles the structure of figure 2.
Again, the update function is called continuously provided the hand is in frame. The coordinates are stored in a dictionary and then transformed into the relative position from it to the centre of the hand box in both the x and y direction. Then the positions are transformed by a simple quadratic function in an attempt to replicate the behaviour of aim in modern day controllers. This means that small deviations from the centre of the box will move the cursor less than having proportionality between distance from the centre of the box and speed of mouse. Similarly large deviations from the centre will result in a much faster movement of the mouse. This rate is adjusted using a “config.json” parameter “aim_Sensitivity” which can be adjusted by the user in the MFC window.
There is another adjustable parameter in “config.json” called “dead_zone_radius” which determines a radius in which if the hand is within comparatively to the centre of the hand box no motion will be processed. This is an important feature so that the user can keep the mouse still easily since without it the mouse is almost always moving even if minutely. The event assigned to using this method can be seen below:
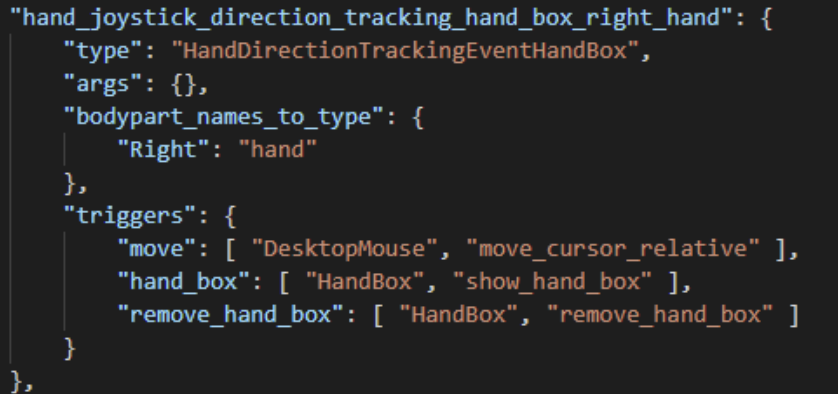
The joystick mouse uses the “desktop_mouse” event handler instead of “aoi_mouse” and uses the “move_cursor_relative” function as seen below:
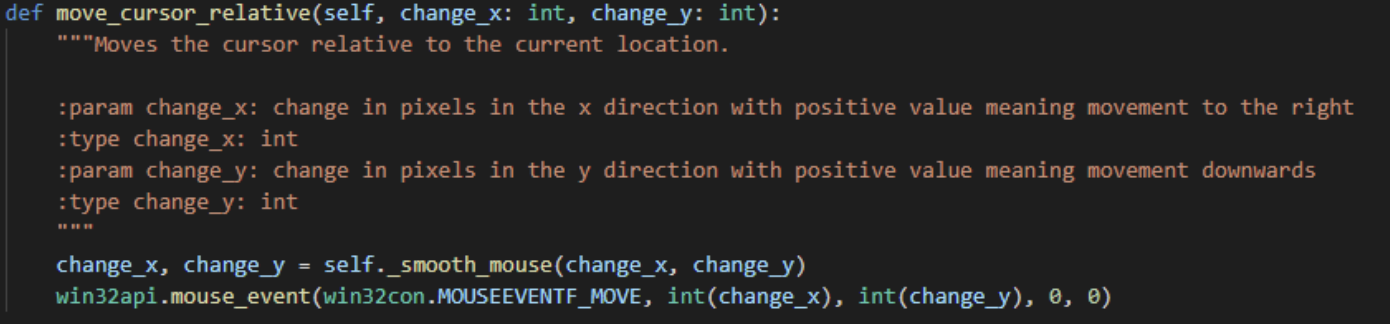
It makes more sense to move the cursor relatively instead of absolutely and hence functions are used to do this. A big issue we ran into was that moving relatively was not being detected when using “Pynput”, as a result we had to investigate alternatives that worked in game. As seen above we used the “win32api” external class which was the only class in our research that allowed for relative mouse movement in game.
We as a team has more involvement working on this method of mouse movement, so we recommend players use this mouse movement type if mouse control is needed.
IMPORTANT NOTE: In these explanations mouse movement has been assumed to be done for right-handed use, for both methods we have implemented left-handed control as well that are almost identical to the right-hand implementations.
Movement control (WASD)
In most PC games, the use of the w, a, s and d buttons are used to control up, left, down and right movement respectively and in those games are probably the most important keys on the keyboard due to controlling movement, we changed the way MotionInput implemented this to be a lot more flexible and include combinations of movement in 8 axes rather than 4.
The Old Implementation
In previous implementations the use of extremity triggers was used to control WASD as on-screen buttons that would be triggered by touching them in the camera view with the wrist as seen below:
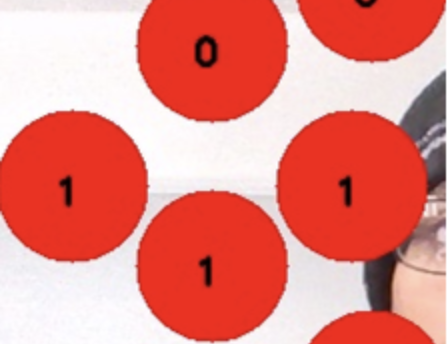
There were many issues with this implementation including the following:
- You could only hit one trigger at a time
- Detection of the wrist wasn’t always so accurate
- Despite being quite large they were quite hard to hit without diverting all attention from the game to it
- Moving between triggers was slow
As a result, we decided to implement a new system that aimed to fix all these issues.
The New Implementation: Joystick Hand Box
Learning from our experience with the mouse joystick we decided to implement a joystick-like implementation to movement in a similar way. By detecting the position of the palm of the hand from the centre of the box, the position can be likened to different zones indicating which keys to press. A diagram can be seen below:
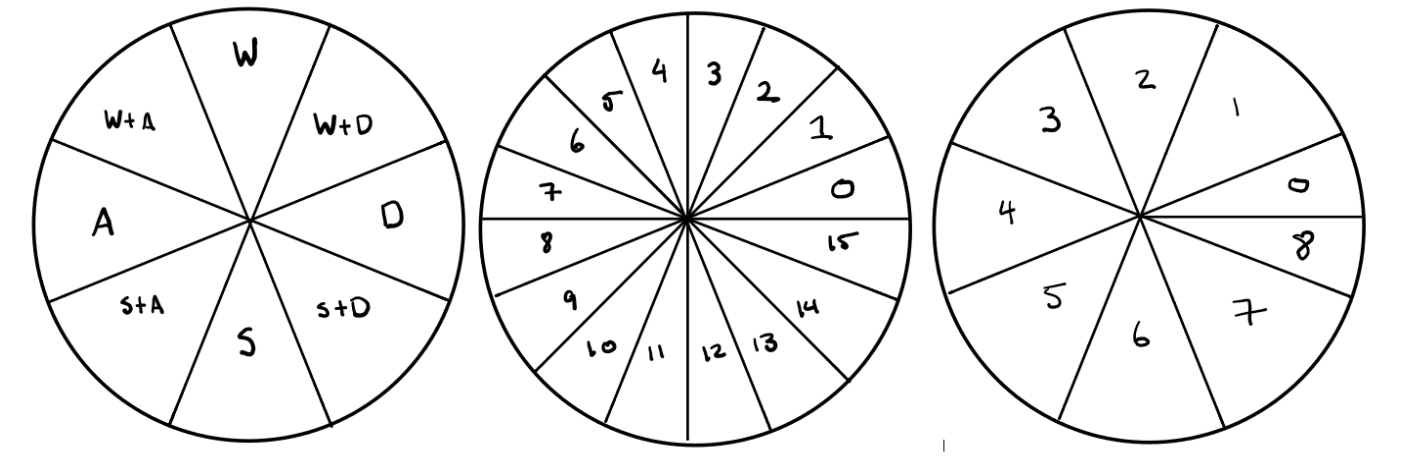
We wanted eight zones to include the combinations of keys. To do this, we split the area of interest to 16 zones by calculating the angle from the horizontal plane and floor dividing by 22.5 to give 16 zones from 0 to 15. Then by adding 1 to each zone and floor dividing by two we get 8 distinct zones (0 and 8 are classed as one zone) that we set specific key bindings to. The code implementation is below:
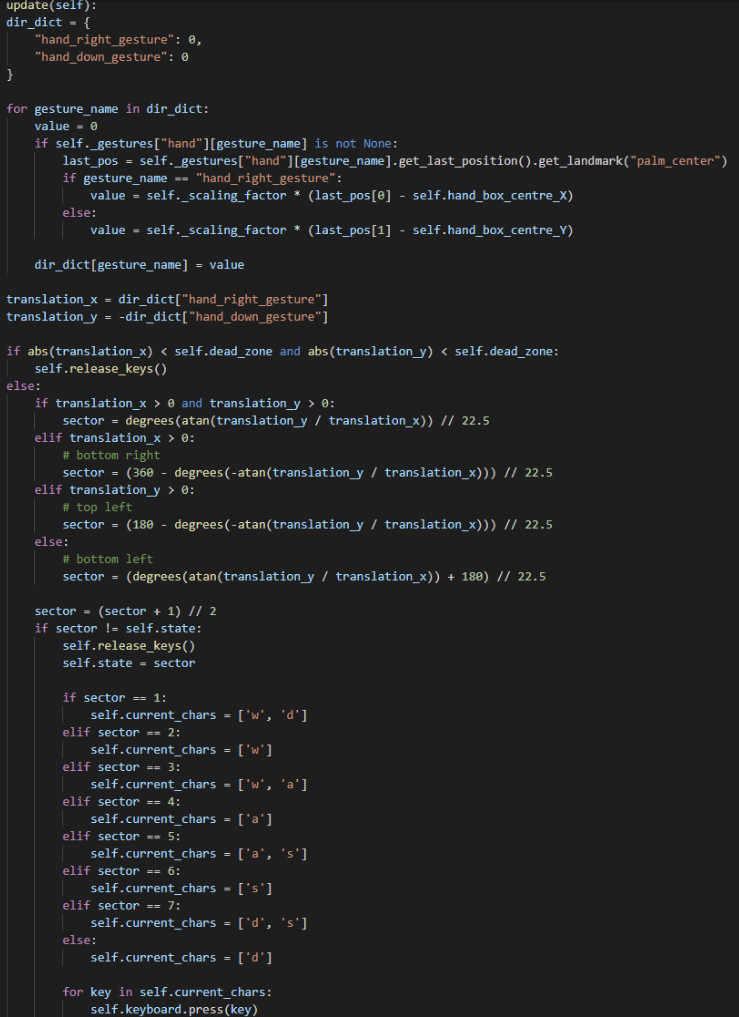
As seen by the image above, the function receives the coordinates, transforms them in relation to the centre of the hand box, then calculates the angle of the position of the hand palm to designate the sector that it lies in to figure out which keys to press. It, with help from other functions handle the releasing of the keys when the hand is out of frame or in the centre. Similarly, to the mouse movement joystick, dead zones are included to make it easy for the user to stop movement. This function does not require the use of any event handlers.
MotionInput – Compatibility Layer
Our implementation of the recorders relies on processing and comparing JSON files, which is completely different from how the existing MotionInput handles gesture processing. This meant we had to add a layer onto MotionInput to integrate our work.
Holistic Module
Since our work concerns both hand and body detection, we decided to make full use of Mediapipe’s Holistic module, which uses some in-house optimizations to provide us both body and hand detection with each frame processing. The previous method used two threads to handle the detections separately, which added extra overhead, duplicating the processing required.
To maintain backwards compatibility within this module, it was designed to amalgamate the existing module classes, allowing each individual module’s implementation to be re-used.
                  def __init__(self):
                  super().__init__()
                  self._position_trackers = {
                      "Left": PositionTracker("Left", HandPosition),
                      "Right": PositionTracker("Right", HandPosition),
                      "body": PositionTracker("body", BodyPosition)
                  }

                  self.pose_detector = PoseDetector()
                  self.gesture_detector = GestureDetector()

                  self.config = Config()

                  self._factory_dicts = {
                      "body": {},
                      "hand": {}
                  }
Here is an example of the Holistic Module class’ init function. We define things in the same manner as they are used in their respective modules. Essentially, this module funnels the separate trackers into the correct things MotionInput requires, whilst allowing us to define the additional things we now require, like the pose_detector and gesture_detector. We need access to the raw data landmarks to process them each frame, and following the trace stack leads back to this class being the best place to inject our necessary components.
                  def _update_trackers_and_factories(self, raw_data: RawData) -> Set[Gesture]:
                  """This gets called per frame, so we'll do our stuff here"""
                  self.pose_detector.process(raw_data=raw_data)

                  body = raw_data.get_data("raw_body")
                  if body is not None:
                      self.gesture_detector.process(body["raw"])

                  return self._inner_update_trackers_and_factories(raw_data)
As the code explains, this function is called by a controller class every frame, which allows us to compute our gesture/pose detection in parallel to the processing that is handled by MotionInput.
Integration
Criticisms
To allow developers to easily use our system with MotionInput, the overall architecture would need to be redesigned a bit.
The main thing we felt MotionInput handled poorly was its main approach to “dynamic” code. By using JSON files, it implies a level of developer customisation - they should be able to change the config easily to tweak values, for example. JSON implementation extends this to gestures, which implies that gestures should also easily be modifiable by editing/creating JSON files.
However, this quickly falls apart as the Python code needs mapping to certain JSON files and re-writing the same exact thing that is written in some of them. Why bother with so-called “dynamic gesture handling” if the reality is that they need to be hardcoded anyway?
Take for example events.json. JSON files specify which Python class to call, and they also specify the body parts to use and triggers that it should recognise. However, navigating to any of these classes will reveal that the same information must be hardcoded into the gesture class too. What use is there then in duplicating this information?
This is just one such case. Another huge issue is that modification of files extends to multiple JSONs. If you add a gesture, you must edit all associated Python files, but also mode_controller.json, gestures.json and events.json. Furthermore, gestures.json sometimes does nothing but literally repeat things for the sake of it.
                  Example:

                  "zip": {

                     "zip": true

                  }
Since our work also revolved around adding support for a variety of games, for a variety of users, we also needed speech commands. However, for all speech commands, you must add the phrase and map it to true just to get it working. There is simply no reason why this should be needed. All relevant/related code should be modular and self-contained; there is just too much coupling right now in MotionInput.
There are instances in the code where keybinding needs to be declared in multiple places, across files and sometimes within even the same file (take the extremity_triggers for example in config.json, where keys need to be redeclared in the file later on for the gamepad mode). Which of these keybindings is actually the one that matters?
Solution
Due to all these concerns getting in the way of a smooth implementation procedure, we decided to do something about it. We would ensure that any new things we add would maintain backwards compatibility with the existing solutions.
Extremity triggers should be easily customisable and configurable. They should allow them to be triggered by whichever module/landmark the user decides to trigger them by.
Custom poses should have native support, allowing handedness/key binding configuration. In the same vein, gestures should also be supported (a JSON format needs to be defined allowing these to be mixed and matched).
There should be a directory defining all JSON gestures - a gesture library. This should be used as a reference for what gestures are available. Game JSON files are created, referencing all the JSON gestures they want to use. The code then should load these gestures according to the reference. This removes code duplication while also providing a simple way for game-specific things to be loaded.
Tools and front-end interfaces for displaying all available gestures and packaging them into JSON files should be the preferred way of modification. The code may define an interface for these JSON files as a reference, but the loading and handling should once again be centralised to a class.
Priority should be given to mouse/movement, extremity triggers, gestures & poses, speech commands in that order. The code should be ready to include all other things used in MotionInput however.
JSON Architecture
We decided that each game’s data should be contained within one JSON file. This seemed optimal, following a NoSQL design approach that makes sense when dealing with JSON documents.
Extremity Triggers
                  "extremity_triggers": [
                  {
                    "landmark": "right_wrist_extremity",
                    "coordinates": [350, 220],
                    "action": "key_down",
                    "key": "w"
                  },
                  {
                    "landmark": "right_wrist_extremity",
                    "coordinates": [550, 320],
                    "action": "key_press",
                    "key": "d"
                  }
                ]
These should be an array of triggers, defined using the above format. MotionInput currently uses a 640x480 capture window, to which all coordinates are relative to. The coordinates defined here should be the same.
Due to the feedback received from various other teams, another thing we thought that may be beneficial is the landmarks field. This gives the ability to customise which landmark is used to detect a hit, rather than being bound to the wrists. These use the "left_wrist_extremity" as the default value though, if the field is not present.
Extremity triggers can either be held, or not. Hence, there are two possible actions: "key_down" and "key_press". If a "key_down" is used, the corresponding key is held down whilst the extremity trigger is activated. Release is handled automatically once the extremity trigger is deactivated.
"key_press" is a single “click” of a key. This gets triggered on release, meaning that for any time period involving an activation and deactivation of an extremity trigger, only one press of the key is ensured.
Poses / Gestures
                  "poses": {
                    "fist": {
                      "action": "key_down",
                      "args": ["."],
                      "hand": "left"
                    },
                    "peace": {
                      "action": "key_down",
                      "args": ["/"]
                  }
                }
Poses (the shapes that can be formed by the hands) and gestures (the motions made by the body), are defined in the following method. Each key references an existing recorded pose (stored in a separate library directory), with the actions following the same format as mentioned in the previous section. However, to allow for key combinations to be triggered, the "args" field is an array of key strings. Extremity triggers were implemented with support for only one key; hence support was kept like that. Since the implementation of poses and gestures was left to us, though, we decided allowing multiple keys was a better approach.
Speech
                "speech": {
                  "recover": {
                    "action": "key_press",
                    "args": ["1"]
                  },
                  "scan": {
                    "action": "key_press",
                    "args": ["v"]
                  }
                }
We keep the action and args fields consistent with the definitions of poses/gestures. The only difference with speech commands is that the key becomes the phrase that needs to be said. This ensures that there are unique values and there do not exist duplicates of the same phrase.
Config
                "config": {
                  "mouse": "joystick",
                  "hand": "right",
                  "default_events": [
                    "hand_movement_joystick_left_hand"
                  ]
                }

                "mouse": "joystick" | “default” | null

                "hand": "left" | “right” | null
Each game profile allows definition of camera type and which hand to use. If "mouse" is omitted, it defaults to no mouse. If "hand" is omitted, it defaults to the right hand. We also allow an array of "default_events" to be defined, if existing MotionInput events want to be included in the game profile.
Runtime Injection
After MotionInput loads the mode, gestures and events, but before it begins the event loop, we hook into the variables containing the loaded data. This is done only if a game profile exists for the defined mode in `mode_controller.json`, and if a mode does not exist under the same name. Here, the data is fetched from the game profile and broken down into the individual components required. These are “injected” into the variables storing this data, meaning we do not need alter the JSON files themselves, preventing any alteration of pre-existing configurations.
                def inject_game_data(self):
                  current_mode = self._current_mode
                  game_editor = GameEditor.from_mode(self._current_mode)
                  game_config = game_editor.get_all_data()
                  mouse_mode = game_config["config"].get("mouse")
                  hand = game_config["config"].get("hand", "right")
                  default_events = game_config["config"].get("default_events")

                  swap_hands = False
                  if mouse_mode == "joystick":
                      self._current_mode = self._next_mode = f"hand_joystick_{hand}"
                      swap_hands = True
                  elif mouse_mode in ("default", "mouse"):
                      self._current_mode = self._next_mode = f"fps_mouse_{hand}"
                      swap_hands = True
                  else:
                      self._current_mode = self._next_mode = "empty"

                  if swap_hands:
                      main_hand = f"{hand}_hand"
                      opposite_hand = "left_hand" if hand == "right" else "right_hand"
                      for index, event in enumerate(default_events):
                          if event.startswith("hand_movement_joystick"):
                              default_events[index] = event.replace(main_hand, opposite_hand)
                          else:
                              default_events[index] = event.replace(opposite_hand, main_hand)

                  self._mode_editor.data["current_mode"] = self._current_mode
                  self._mappings[self._current_mode] = current_mode

                  if default_events:
                      self._modes[self._current_mode].update(default_events)

                  extremity_triggers = game_config.get("extremity_triggers")
                  if extremity_triggers:
                      self.add_extremity_triggers(extremity_triggers)

                  speech_commands = game_config.get("speech")
                  if speech_commands:
                      self.add_speech_commands(speech_commands)
MFC Implementation
To launch and configure our MotionInput applications, we used Microsoft Foundation Class (MFC) applications which were assigned to us since we were to launch our software to the Windows Store. This way possible users only need to download from the Windows Store to use our application. Some of the key functions of the MFC implementations include:
- Visual buttons and dropdowns
- Reading and writing to JSON files
- Loaders for external files
- Launch executable functionality
Launch Executable Functionality
There are many different menu items in our MFC applications as can be seen here:
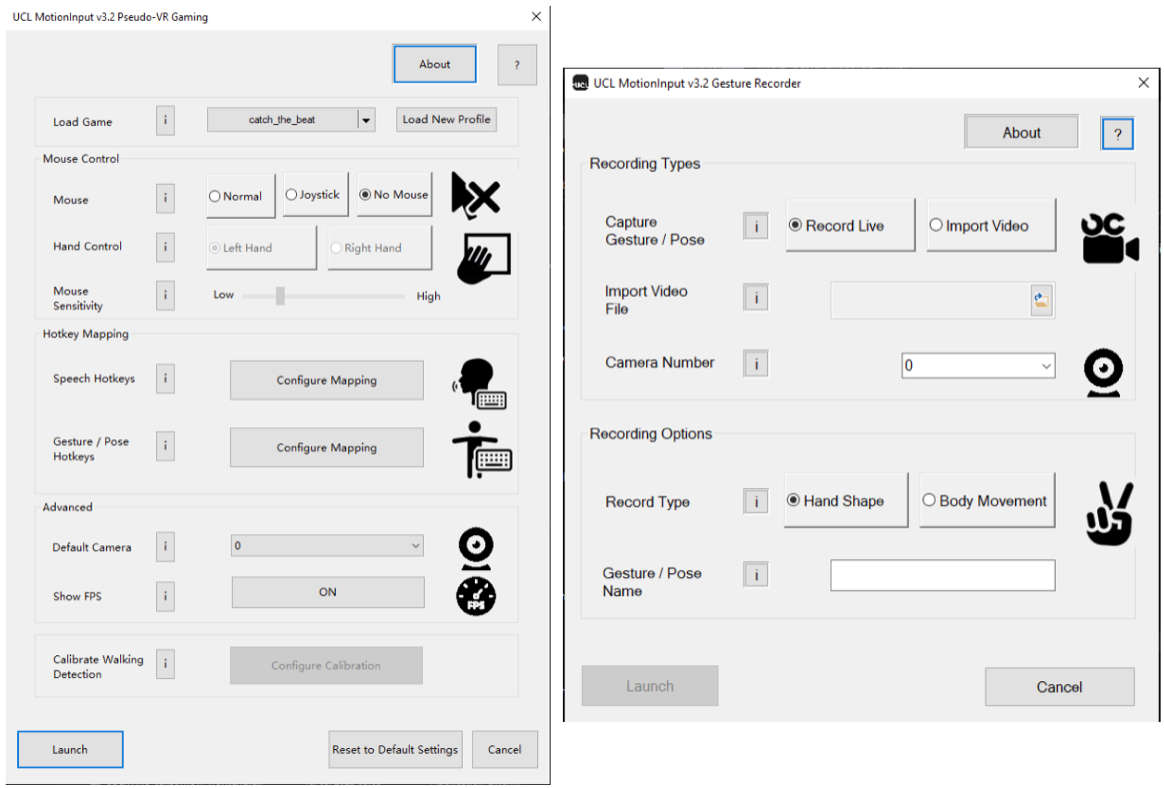
Each menu item has to be individually implemented and aligned in the layout and then changes detected to see if the user has changed anything. The following section describes the process of the latter part of that implementation.
To format the first of all initialize the following items the following code is used:
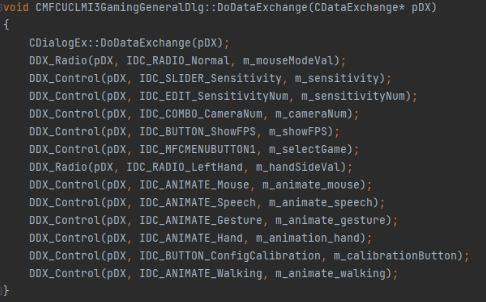
Crucially for a lot of these checkboxes and dropdowns, default values must be set, not only for the launch of the application but also to match the behavior of the mode selected and depending on the choices of other selection for some options. An example of this can be seen below:

This principle is applied to all the options on screen and are formatted automatically to make the layout of the screen.
JSON File Reading and Writing
JSON files are used throughout the MFCs to change data in the MotionInput and Gesture Recorder applications. The data in these files determine the modes and configurations of the application when launched and hence makes a large difference to the functionality of each application.
For example:
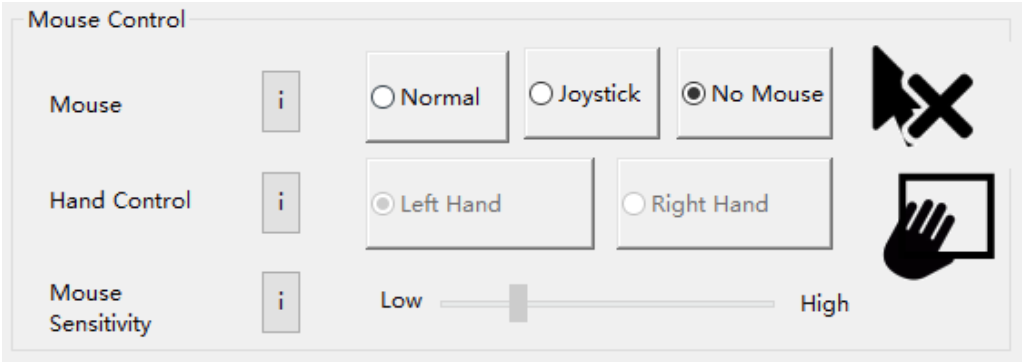
In this example there are three options that you can choose, normal, joystick and no mouse. This changed the “mouse” parameter in the “config” mentioned in the section before. The implementation to do this in the MFC C++ code can be seen below
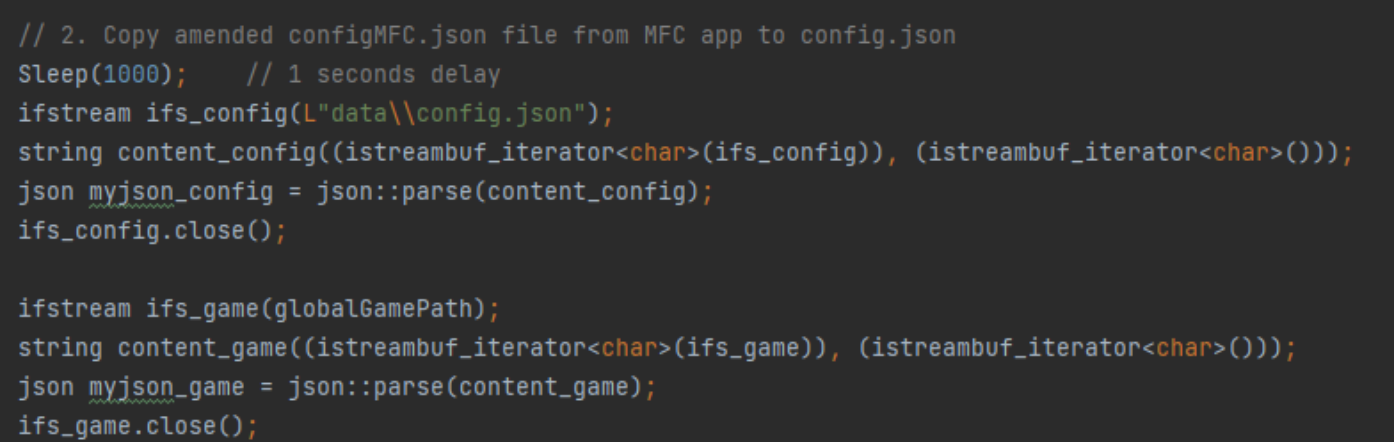
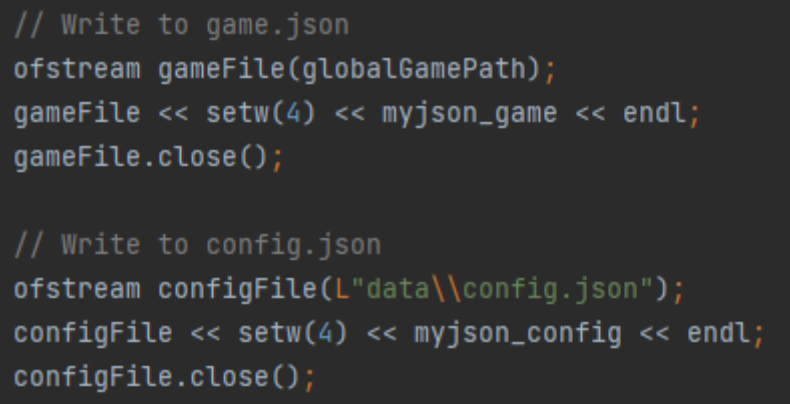
This segment of code shows the reading and loading of json files. Firstly the file “config.json” is loaded into “myjson_config” which determines the generic parameters across all game modes. Then the current game path is loaded into “myjson_game”. This path is determined by a dropdown in the MFC as can be seen below:

This way the user can select which game mode to use and modify. By loading a specific game mode, the code automatically loads the parameters into the rest of the MFC window. It is key to note that the variables are of type “json” which is an externally defined class type from Niels Lohmann’s JSON for Modern C++ Applications library. This way json manipulation can be done easily and seamlessly from within MFC.
To change a JSON file after a box has been selected can be seen in the code below:

There is also the other conditions for the Joystick and No Mouse buttons. This checks to see if the button has been selected. If so the sensitivity value is set to a global value and is shown on screen and more importantly in the final line it sets the mouse parameter of the game to “default” which represents the default mouse mode. At this point the JSON has not been overwritten, after this check the following code overwrites the files:
This is a repeated pattern across the entire MFC for both game and config parameters. Some are controlled by dropdowns, sliders and as seen here multiple-choice boxes but the principles remain. Check to see if the selection item has been chosen and then write to the JSON files.
Loaders for External Files
Throughout our MFC’s there are a few contexts where files (more specifically JSON files) need to be loaded into the MFC to be stored as future data. One of those situations can be seen in one of the figures above including loading files.
Very simply a generic system dialog option must be opened to allow for the user to browse their folders to find the file that they are looking for. To implement the launch of a system dialog option the following code is used:
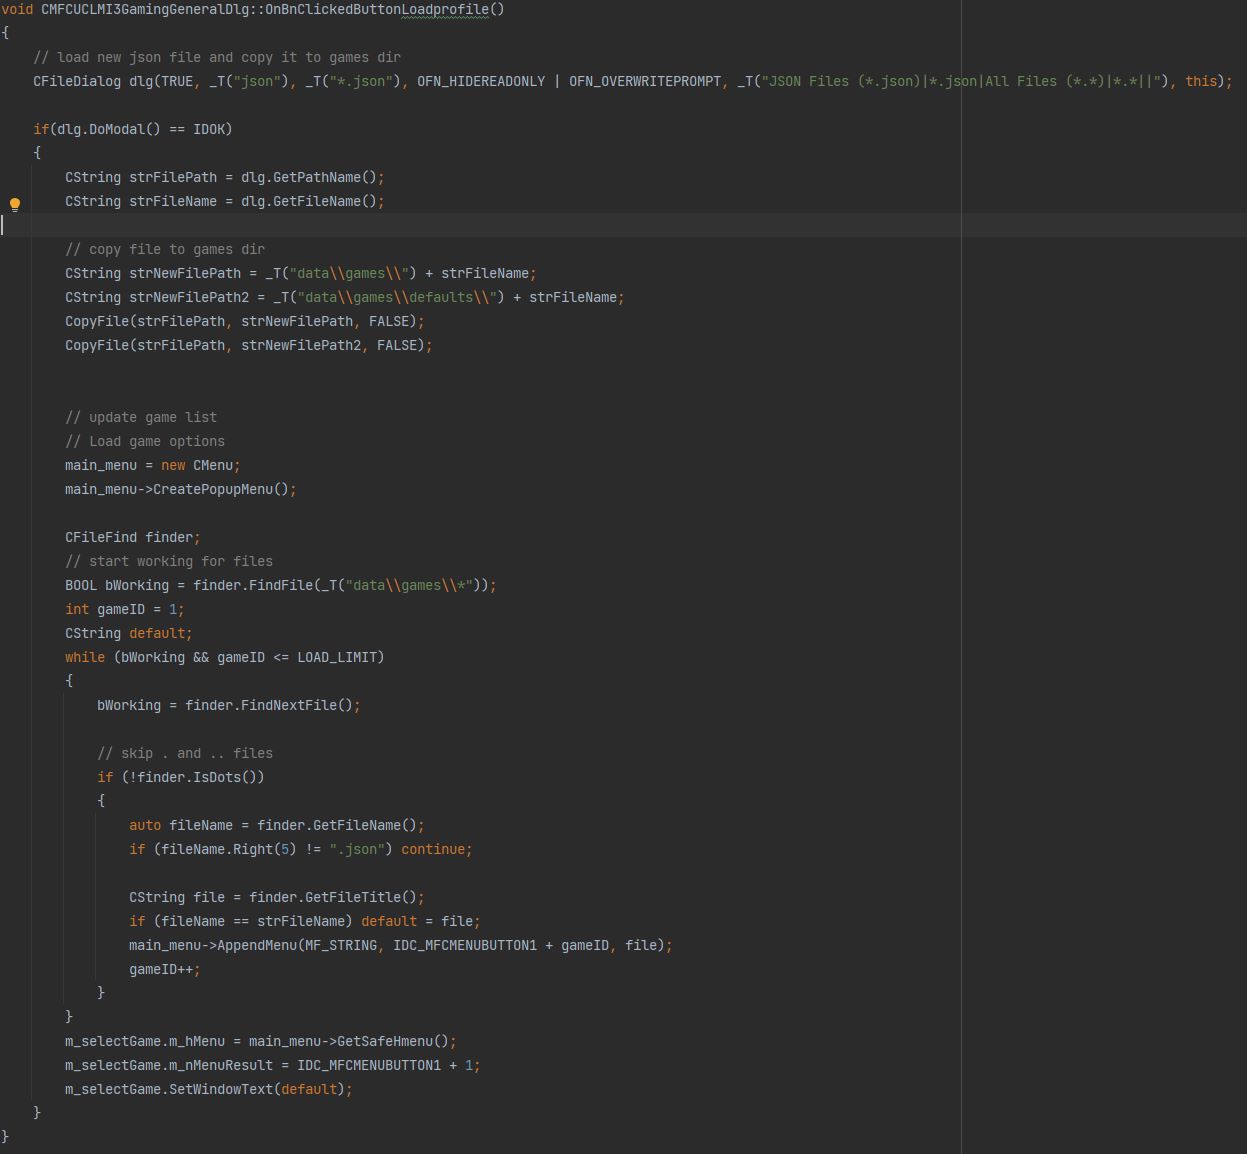
At the start, a dialog is opened to retrieve the path of your file but then a lot of processing needs to be done which includes checking you have selected a valid JSON file, copy all the contents of it into the data folder of the MFC, automatically selecting it in the MFC and changing the options to match that of the newly loaded file. The other places where files are loaded follow the same structure in principle.
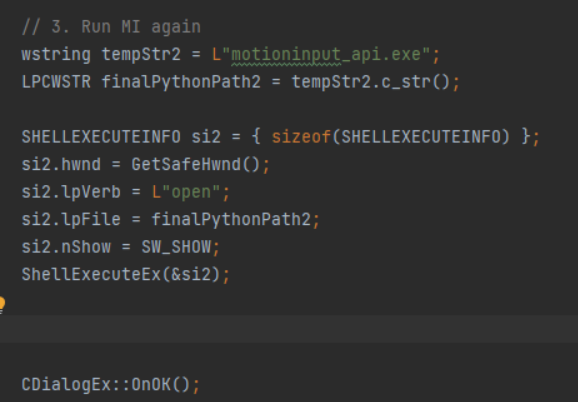
Launch Executable
When executing the MotionInput application, it needs to be launched from the MFC whilst taking into account all the settings that have been applied. The settings are finally written to the data files and then the MotionInput application, which will use those data files, is launched using the following code: