Design
Architecture
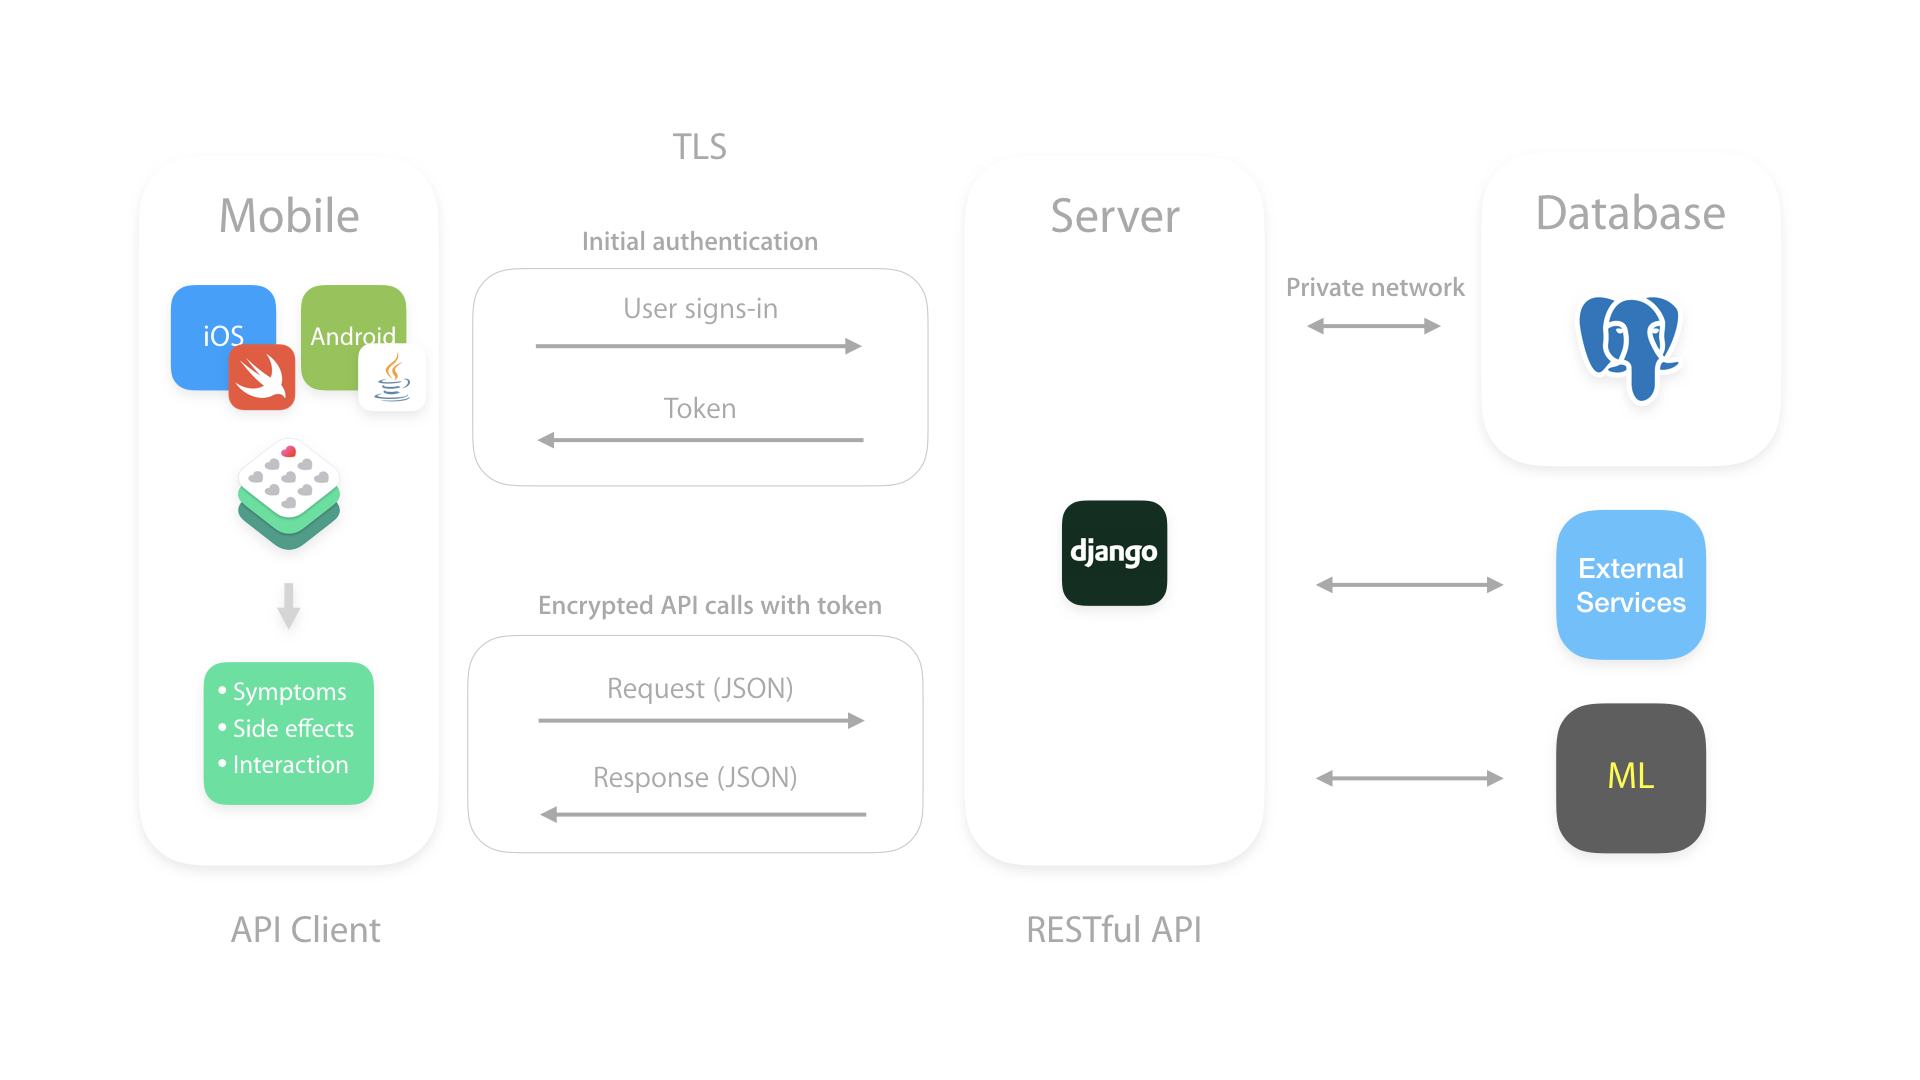
The whole system is made up of different components that include both mobile clients for Android and iOS, the Django server thath serves the RESTful API and PostgreSQL database which stores the data.
With the mobile clients we collect data straight from the patient (symptoms, side effects, interactions…). Next, all the data recorded with the mobile clients it is posted to the RESTful server and then it is stored in the database. For security and scalability reasons, the only way a mobile client can store data is through the RESTful server, it cannot connect directly to the database.
Server
Class diagram
Design
The endpoints our API are the following:
- Create a new patient.
- Create symptom list for a patient.
- Retrieve symptom list for a patient
- Create a side effect questionnaire for a patient.
- Retrieve a side effect questionnaire for a patient
- Retrieve all symptoms for a patient.
- Retrieve all side effect questionnaires for a patient
Note that there are not update nor remove endpoints for all the models, this is because our client does not consider this as a requirement for the current stage of development. Probably, when in the future the clinician portal is developed we will have to implement the new endpoints.
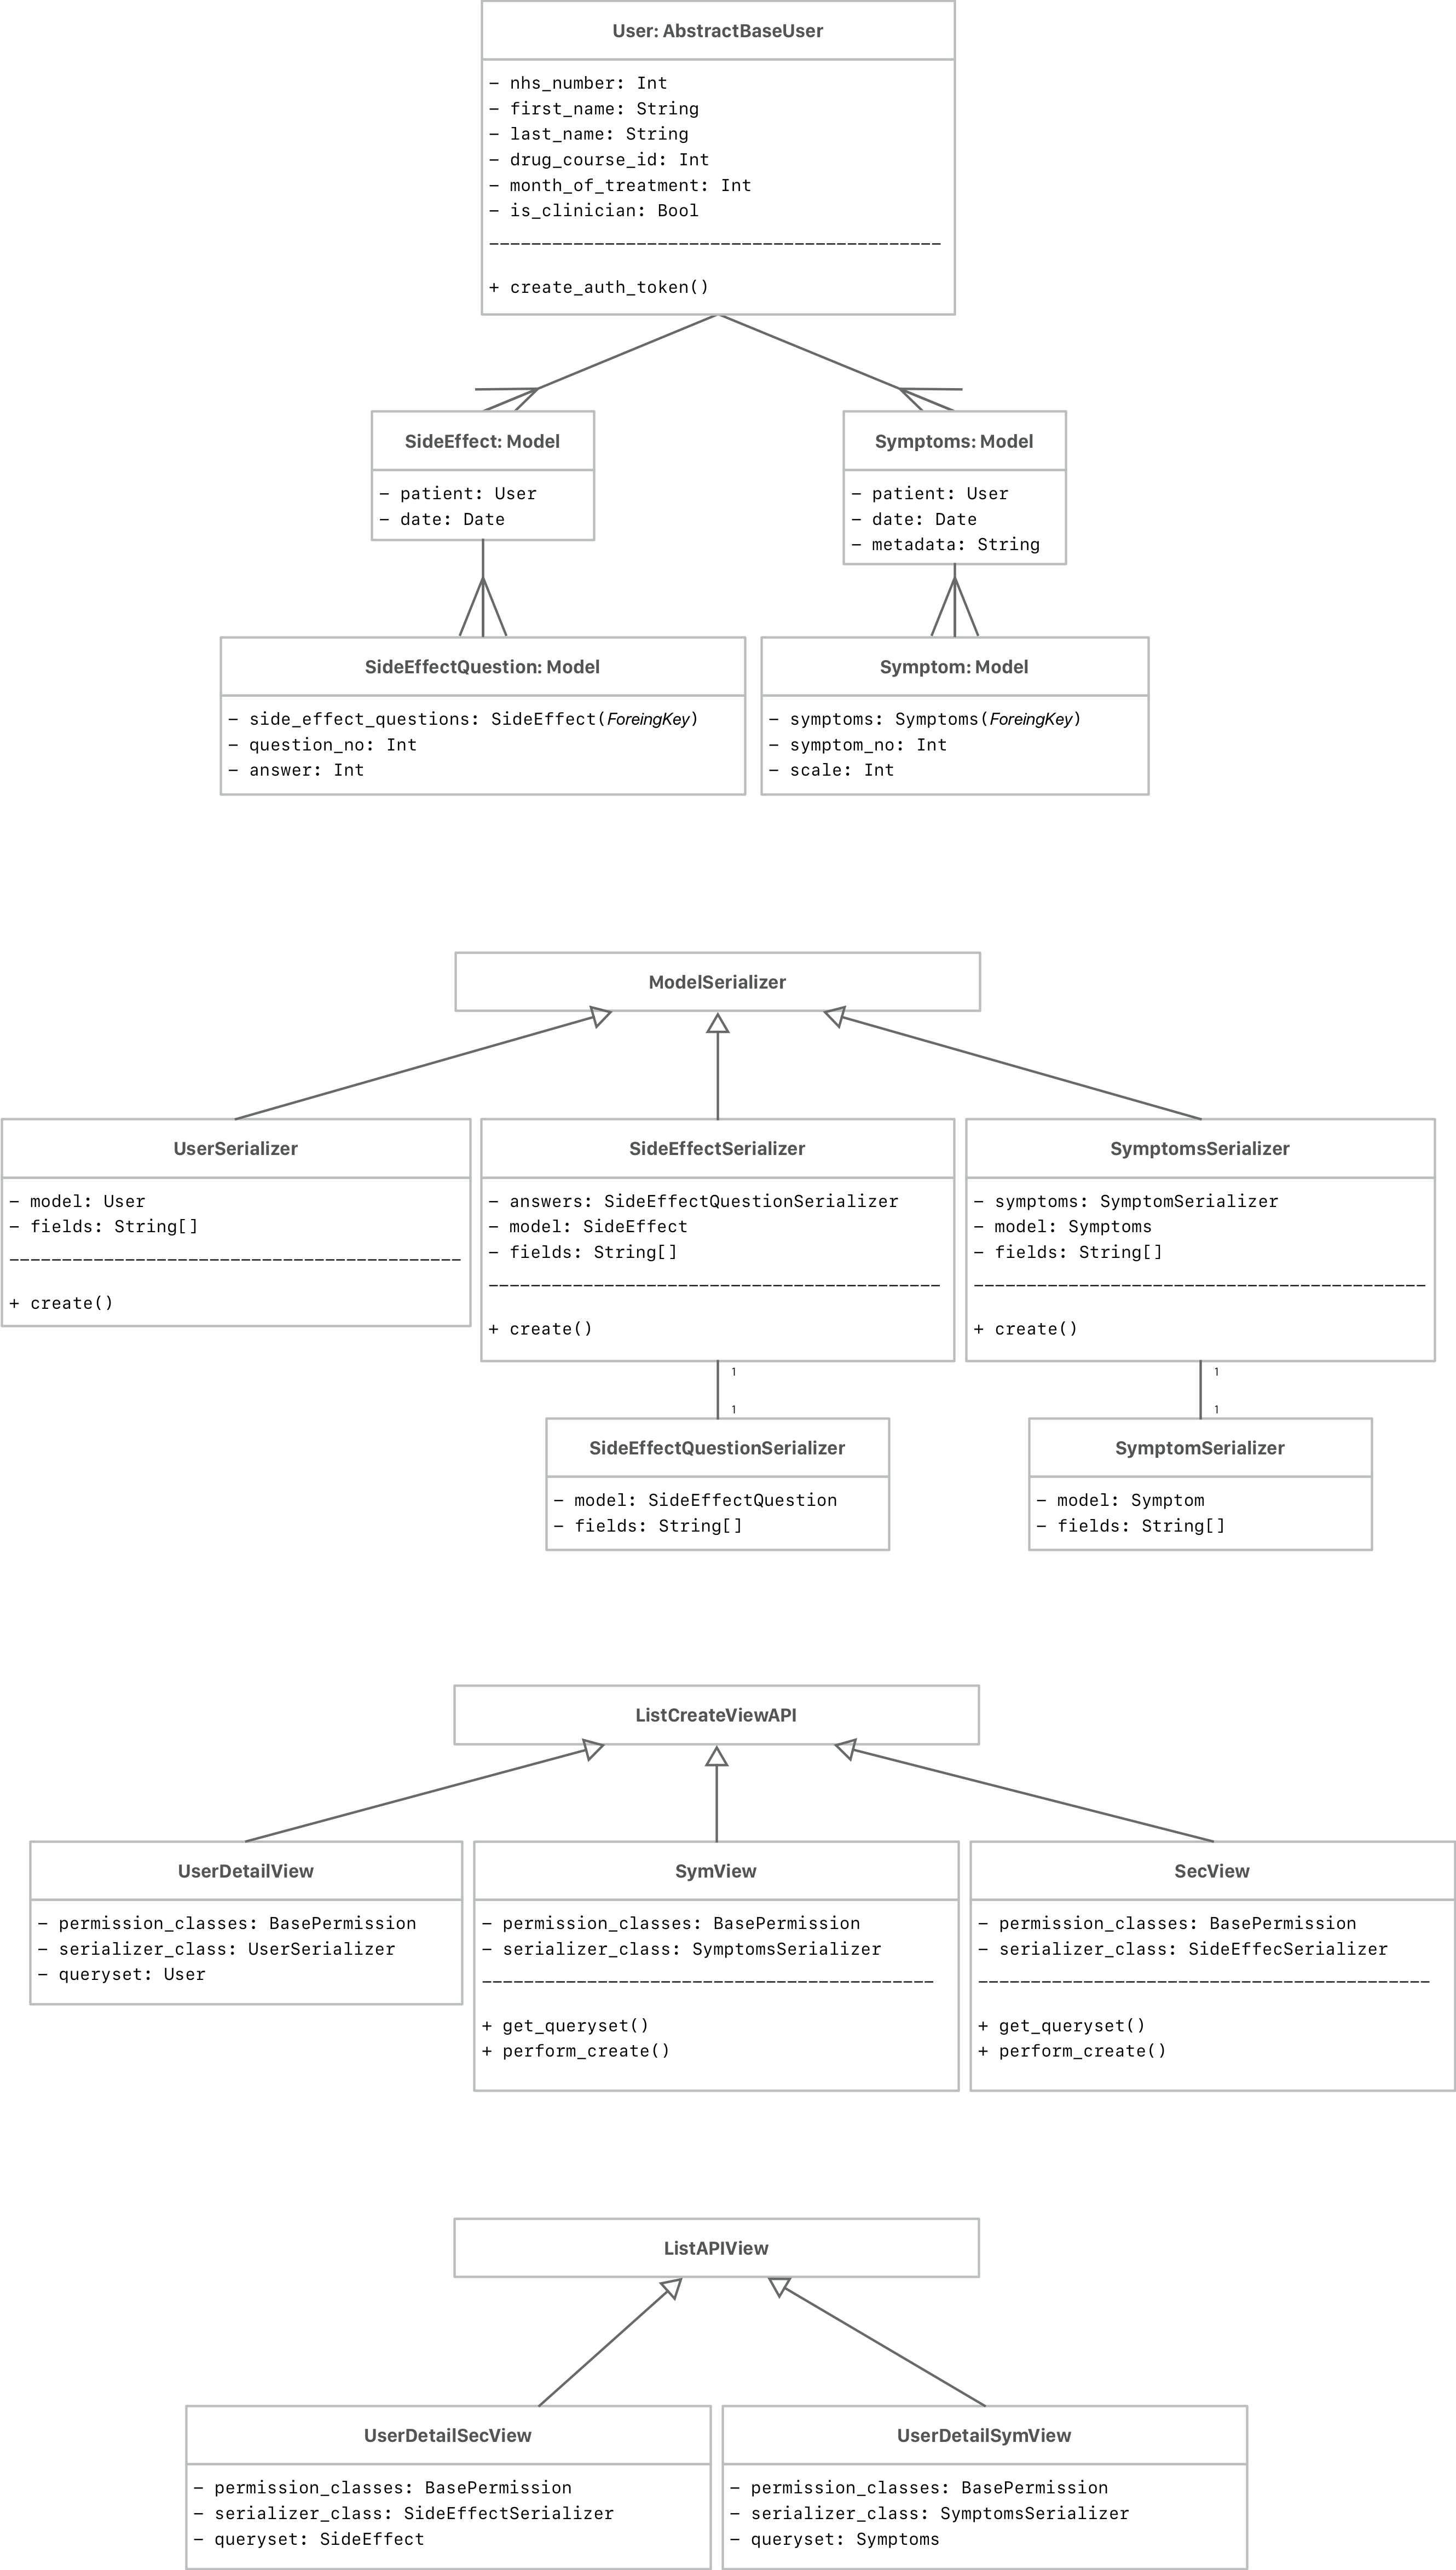
Django accesses and manages data through Python objects referred to as models. Models define the structure of stored data [23]. We have models for:
- Patient.
- Symptoms list made of symptoms.
- Side effect questionnaire made of side effect questions.
Once we have the models, we need serializers. Serializers are defined by DRF as:
Serializers allow complex data such as querysets and model instances to be converted to native Python datatypes that can then be easily rendered into JSON, XML or other content types [24]. Serializers also provide deserialization, allowing parsed data to be converted back into complex types, after first validating the incoming data.
Hence, with the defined serialisers we can [25]:
- Get model data from the database in JSON.
- Use them like forms to validate data and create instances of a model.
Finally in order to serve the stored models that are in our database to the clients will use Views. They will allows a URL to get data from a serialiser and return that data to a user/endpoint. Since we are using DRF we will use the Generic Views and ViewSets which is the specific version of Class-Based Views [26] from DRF. This results to be a powerful pattern that allows us to reuse common functionality allowing us to quickly build API views that map closely to our database models.
We have:
ListCreateAPIView: used for read-write endpoints to represent a collection of model instances. We use it for the creation of symptoms, side effects and patients.
ListAPIView: used for read-only endpoints to represent a collection of model instances. We use if for listing side effects and symptoms for specific patients.
RetrieveUpdateDestroyAPIView: used for read-write-delete endpoints to represent a single model instance. We use it for patients.
We have added an isClinician variable to the user so we can use the same model for a patient or a clinician. The clinician for now just has the option to register new patients via the complementary web portal, therefore there is no need to create a specific model for clinician.
To obtain this we have added object level permissions, therefore clinicians can only create new patients and a single patient is the only one who create and view her corresponding side effects and symptoms.
Finally, now that we have the permissions we need an authentication system. DRF provides a number of authentication schemes out of the box. Since we are going to use the same authentication schema all over the API, we only need to set up a global one using the DEFAULT_AUTHENTICATION_CLASSES setting.
RESTful API security
Security is essential since we are storing patient data. Therefore we are following Open Web Application Security Project [27] security guidelines for our RESTful API:
- Secure REST services must only provide HTTPS endpoints. Once the server is deployed we will use Transport Layer Security (TLS) encryption. We can use letsencrypt, an automated mechanism to request and renew free domain validated certificates.
- JWT: we are using JSON Web Tokens (JWT) as the format for security tokens. We have chosen JWT [28] to secure pure API endpoints because it ensures a stateless exchange of tokens between the client and the server. We do not need to store access tokens in a database worry about sessions. Making it easier for the mobile clients to make requests. In order to get this we are using djangorestframework-jwt package which provides a JWT Authentication class as well as a mechanism for clients to obtain a JWT given the username and password.
- Input validation: thanks to the models and serialisers we have field level validation.
- Private netowork between the Django server and the database: the database is isolated and the only way to access it is through our Django server.
Implementation of server key functionalities
Secure authentication
First of all the first time the patient installs the app she will need to authenticate, therefore we will need to request the specific token from the server:
In urls.py:
url(r’^get_auth_token/$', rest_framework_views.obtain_auth_token, name=‘get_auth_token’)
If the authentication credentials are correct the mobile client will get a response with the token from our server.
The request and response would look like this:
URL:
[POST] http://[server_url]/get_auth_token/Body:
{“username":"0000000001","password":"pass1234"}Response:
{ "token": “3cd945bb61f3da2c1dd61abdbc6ef6a3431f391a" }
Posting symptoms and side effects
A patient records a set of symptoms from the mobile app and saves them. Since the patient now is authenticated the mobile app can start posting symptoms. In order to store them in our database we have the following model for symptoms:
In models.py:
class Symptoms(models.Model):
    patient = models.ForeignKey(settings.AUTH_USER_MODEL, on_delete=models.CASCADE)
    date = models.DateTimeField(auto_now=True)

class Symptom(models.Model):
    symptom = models.ForeignKey( Symptoms, related_name='symptoms',on_delete=models.CASCADE) symptom_no = models.IntegerField()
    scale = models.IntegerField()
In order to serialise and map the symptoms models into JSON we have defined a serialiser in serializers.py:
class SymptomSerializer(serializers.ModelSerializer):
    class Meta:
       model = Symptom
        fields = ('symptom_no', 'scale')

class SymptomsSerializer(serializers.ModelSerializer):
   symptoms = SymptomSerializer(many=True)

    class Meta:
        model = Symptoms
        fields = ('date', 'symptoms')

    def create(self, validated_data):
        symptoms_data = validated_data.pop('symptoms')
        symptoms = Symptoms.objects.create(**validated_data)
        for symptom_data in symptoms_data:
            Symptom.objects.create(symptom=symptoms, **symptom_data)
        return symptoms
To serve it in views.py:
class SymCreateView(generics.ListCreateAPIView):
    permission_classes = (permissions.IsAuthenticated, IsPatient)
       serializer_class = SymptomsSerializer

    def get_queryset(self):
        user = self.request.user
        return Symptoms.objects.filter(patient=user)

    def perform_create(self, serializer):
        serializer.save(patient=self.request.user)
And in urls.py:
url(r'^sym/$', SymCreateView.as_view(), name="create")
The mobile request would look like this:
URL:
[POST] http://[server_url]/sym/Header:
Authorization: Token 3cd945bb61f3da2c1dd61abdbc6ef6a3431f391aBody:
{“symptoms":[{"symptom_no":"1","scale":"8"},{"symptom_no":"2","scale":"10"}]}Response:
{
    "date": "2018-02-01T12:01:49.694580Z",
    "symptoms":
    [
        { "symptom_no": 1, "scale": 8 },
        {"symptom_no": 2, "scale": 10 }
    ]
}
This implementation also handles the GET requests for the different views that offer it.
Mobile
Sequence diagram

iOS
Class diagram
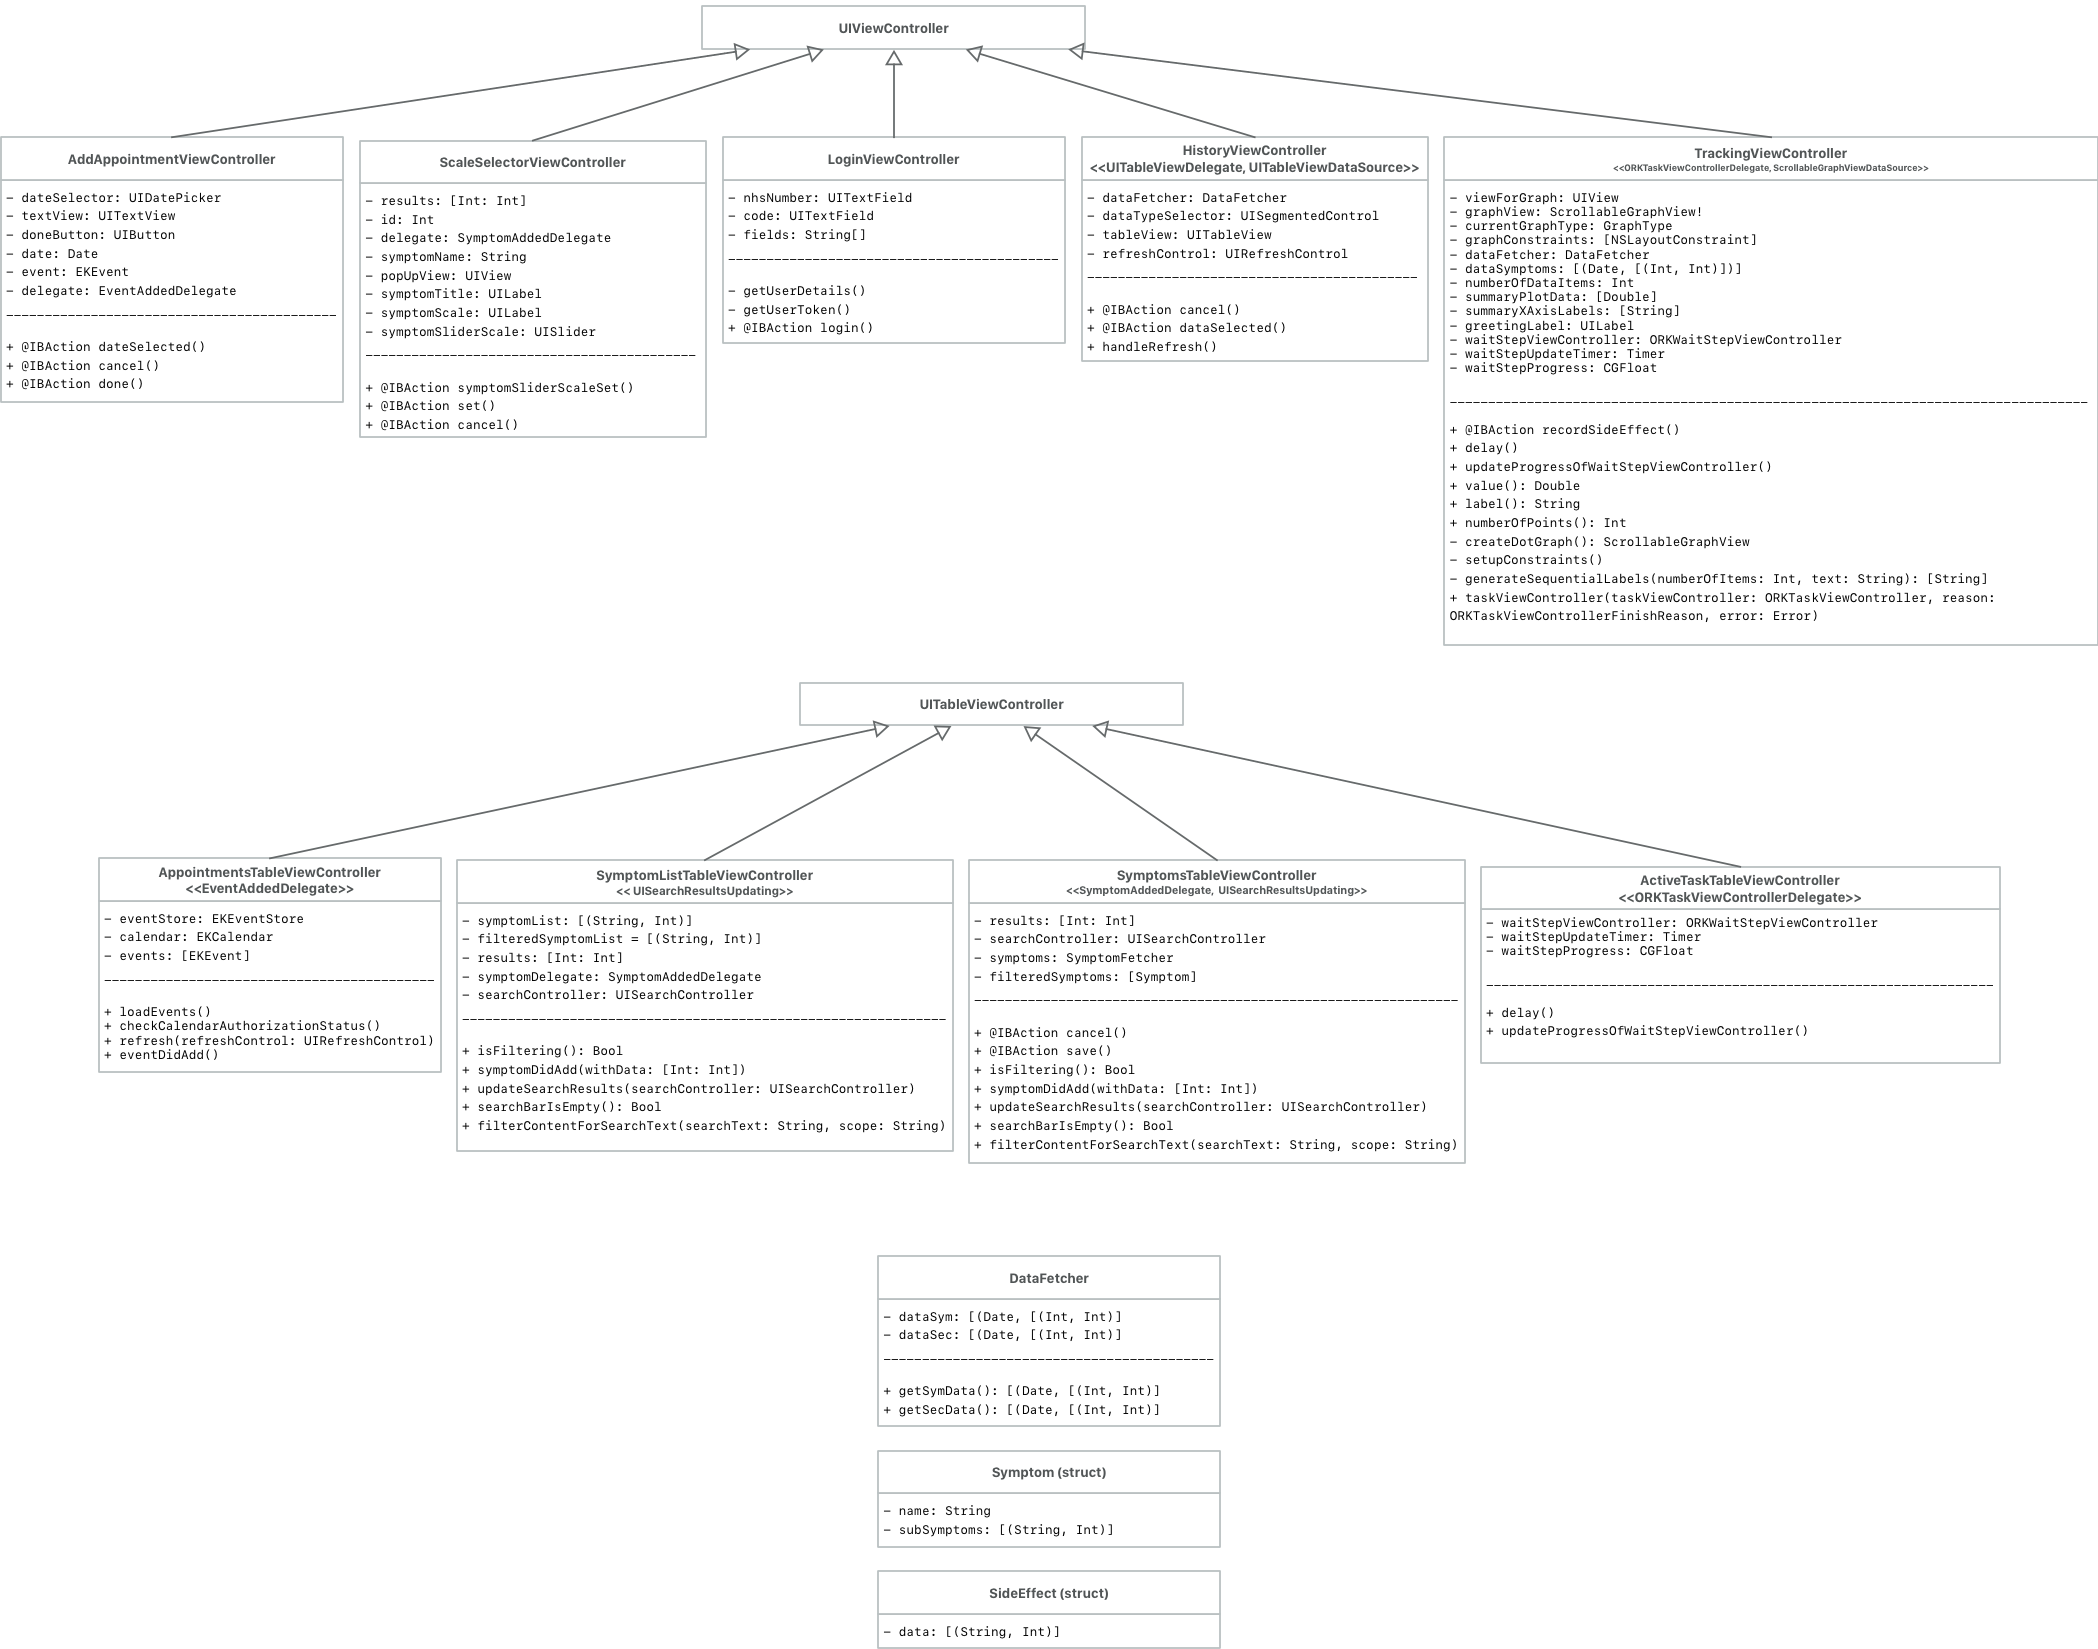
Design
The iOS app mainly consists of UIViewControllers and UITableViewControllers. View controllers are the foundation of iOS app’s internal structure. Each view controller manages a portion of the app’s user interface as well as the interactions between that interface and the underlying data [29].
View controllers also facilitate transitions between different parts of your user interface. On the other hand, UITableViewControllers are also used to serve content but in the form of a table view [30].
For example, all the views that require to display list of symptoms to select from or to display data history from symptoms and side effects, are using a UITableViewController.
To make all the HTTP requests to the server we are using Alamofire [31], an HTTP Networking framework in Swift. We are using for:
- URL / JSON / plist Parameter Encoding
- Authentication with URLCredential
- HTTP Response Validation
- TLS Certificate and Public Key Pinning
- Network Reachability
To keep the token securely stored we are using Locksmith [32], this eases the process to work with the iOS keychain in Swift. We are also using it because:
- It is simple and powerful.
- Provides access to all of the keychain’s metadata with strongly typed results.
We are also using ReserachKit to the side effect questionnaires and Active Tasks and ScrollableGraphView to enable data visualisation through graphs. With ScrollableGraphView [33] we can visualise simple discrete datasets and allow the user to scroll through the graph.
Implementation of iOS main functionalities
Secure authentication
In order for the mobile client to post to the server we are using Alamofire. To get the patient token and then store it securely locally:
Alamofire.request("\(URLConstants.AzureServer)/get_auth_token/", method: .post, parameters: parameters, encoding: JSONEncoding.default).validate().responseJSON {
    response in
        switch response.result {
            case .success:
                let responseJSON = response.result.value as! [String: Any]
                print(responseJSON["token"]!)
                print("Success!")
                do {
                    try Locksmith.saveData(data: ["token": responseJSON["token"]!], forUserAccount: "patient")
                } catch {
                }
                completion(true)
            case .failure(let error):
                completion(false)
                print(error)
    }
}
Posting symptoms and side effects
A similar method would be used to post symptoms and side effects to the server and also to retrieve them:
var data = [String: [[String : String]]]()
data ["symptoms"] = results!.map{["symptom_no" : String($0), "scale" : String($1)]}

let dictionary = Locksmith.loadDataForUserAccount(userAccount: "patient")
let tokenString = "Token " + (dictionary!["token"] as! String)

let headers: HTTPHeaders = [
    "Authorization": tokenString,
]

let parameters: [String: Any] = data

Alamofire.request("\(URLConstants.AzureServer)/sym/", method: .post, parameters: parameters, encoding:JSONEncoding.default, headers: headers)
    .responseJSON { response in
        print(response)
}
Visualise data in graphs
To display the summary of the recorded symptoms in a graph we use ScrollableGraphView:
let graphView = ScrollableGraphView(frame: frame, dataSource: self)

let dotPlot = DotPlot(identifier: "dot")
let referenceLines = ReferenceLines()

graphView.addPlot(plot: dotPlot)
graphView.addReferenceLines(referenceLines: referenceLines)
graphView.showsHorizontalScrollIndicator = false
Integration with Research Kit
To present side effect questionnaires we are using Surveys [34] from Apple ResearchKit.
A survey is a sequence of questions that you use to collect data from your users.
Each step object handles a specific question in the survey, such as “Do you have any signs of infection?” or “Have you noticed any rash?”. To present a side effect questionnaire we have created the following ORKOrderedTask:
var steps = [ORKStep]()
let instructionStep = ORKInstructionStep(identifier: "IntroStep")
instructionStep.title = "Dimethyl Fumarate Questionnaire"
instructionStep.text = "Answer the following questions."
steps += [instructionStep]

let q1 = ORKQuestionStep(identifier: "4", title: "Do you have flushing?", answer: answerFormat)
let q2 = ORKQuestionStep(identifier: "5", title: "Dou have stomach problems, like diarrhoea, vomiting, cramps orindigestion?", answer: answerFormat)
let q3 = ORKQuestionStep(identifier: "6", title: "Have you noticed any rash?", answer: answerFormat)
let q4 = ORKQuestionStep(identifier: "7", title: "Do you feel any signs of brain infection?", answer: answerFormat)
steps += [q1,q2,q3,q4]

return ORKOrderedTask(identifier: "DimethylTask", steps: steps)
To deliver Active Tasks we are using the set of predefined Active Tasks provided by ReserachKit, these ones fall into six categories: motor activities, fitness, cognition, voice, audio, and hand dexterity. For example, the first task presents the fitness pre-defined Active Task. For this example, a short walking and rest durations of 20 seconds each are used:
private var fitnessTask: ORKTask {
    return ORKOrderedTask.fitnessCheck(withIdentifier: String(describing:Identifier.fitnessTask),intendedUseDescription: exampleDescription, walkDuration: 20, restDuration: 20, options: [])
}
This second example is a reaction time task, the user shakes the device in response to a visual clue on the device’s screen:
private var reactionTimeTask: ORKTask  {
     return ORKOrderedTask.reactionTime(withIdentifier: String(describing:Identifier.reactionTime),intendedUseDescription: exampleDescription, maximumStimulusInterval: 10, minimumStimulusInterval: 4,thresholdAcceleration: 0.5, numberOfAttempts: 3, timeout: 3, successSound: 0, timeoutSound: 0, failureSound:UInt32(kSystemSoundID_Vibrate), options: [])
}
Then, to present the Active Tasks we make use of the ORKTaskViewController object:
let taskListRow = TaskListRow.sections[3].rows[(indexPath as NSIndexPath).row]

// Create a task from the `TaskListRow` to present in the `ORKTaskViewController`.
let task = taskListRow.representedTask

let taskViewController = ORKTaskViewController(task: task, taskRun: nil)

// Make sure we receive events from `taskViewController`.
taskViewController.delegate = self

// Assign a directory to store `taskViewController` output.
taskViewController.outputDirectory = FileManager.default.urls(for: .documentDirectory, in: .userDomainMask).first!

/*
 We present the task directly, but it is also possible to use segues.
 The task property of the task view controller can be set any time before
 the task view controller is presented.
 */
present(taskViewController, animated: true, completion: nil)
Android
Class diagram
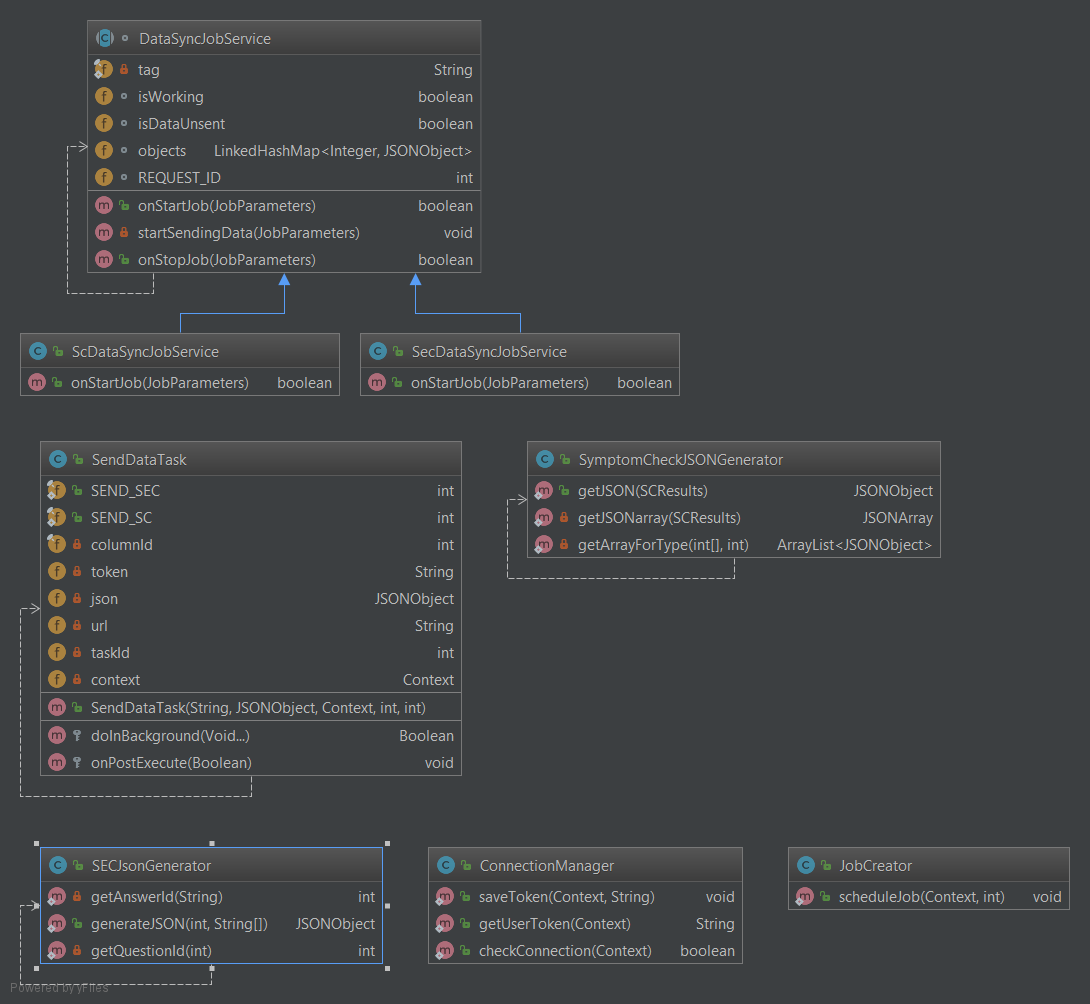
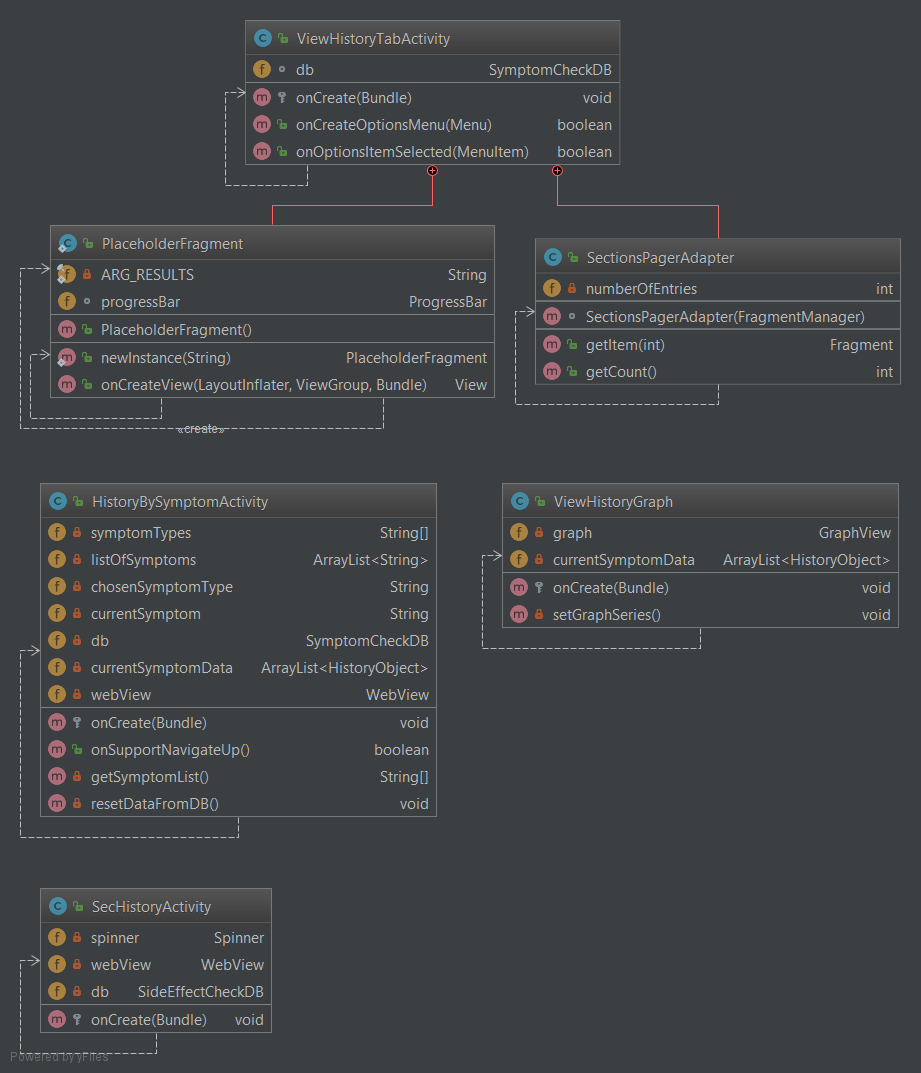
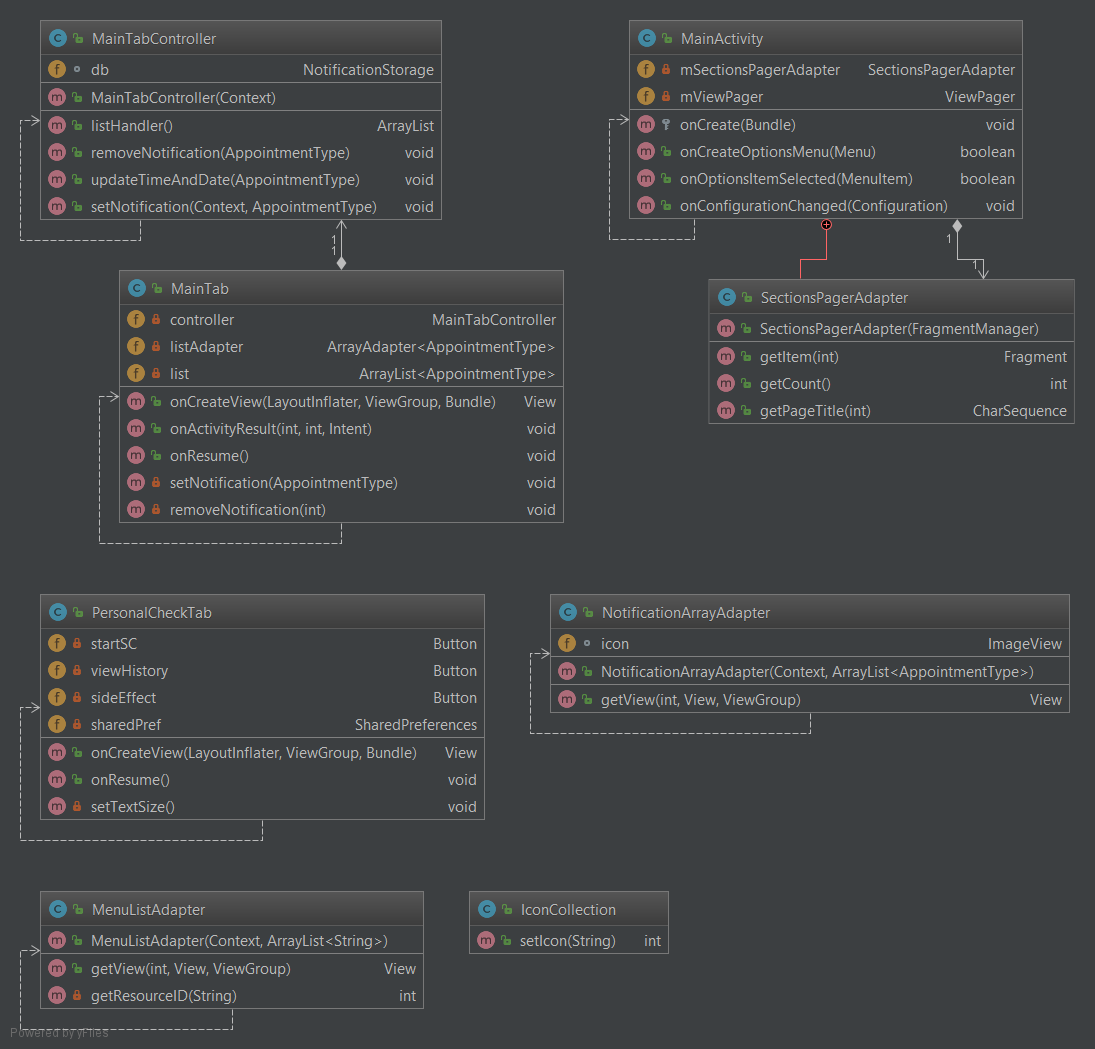
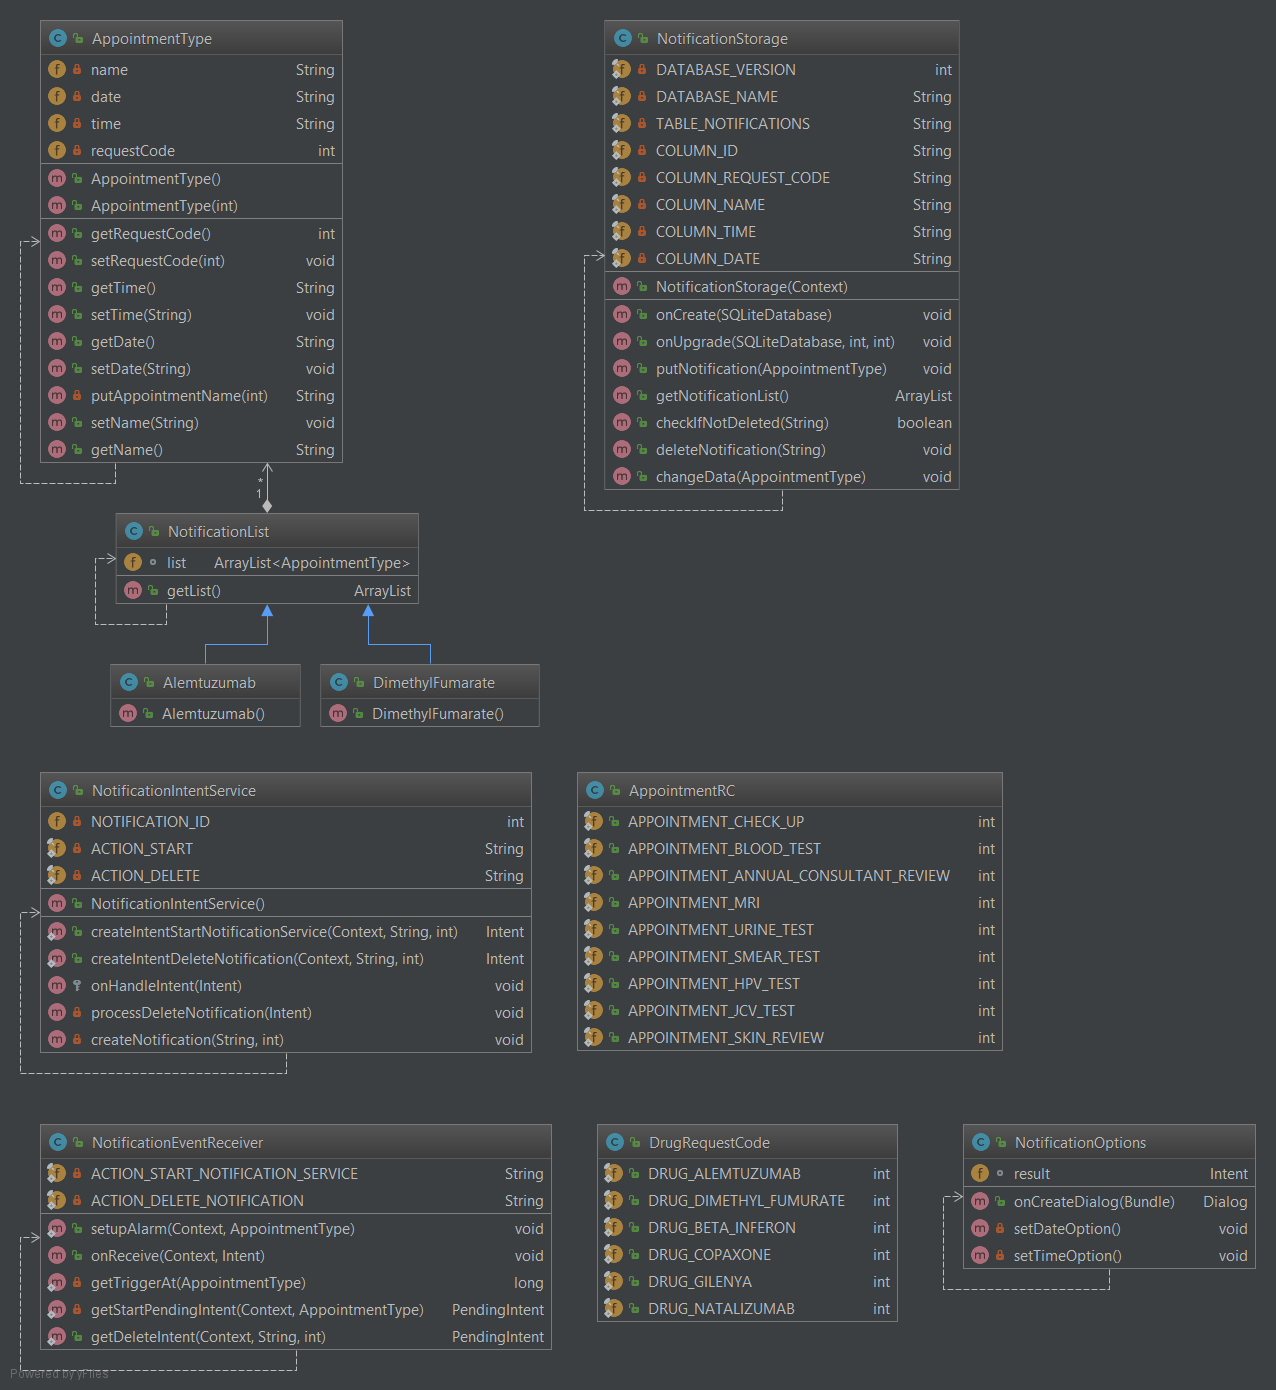
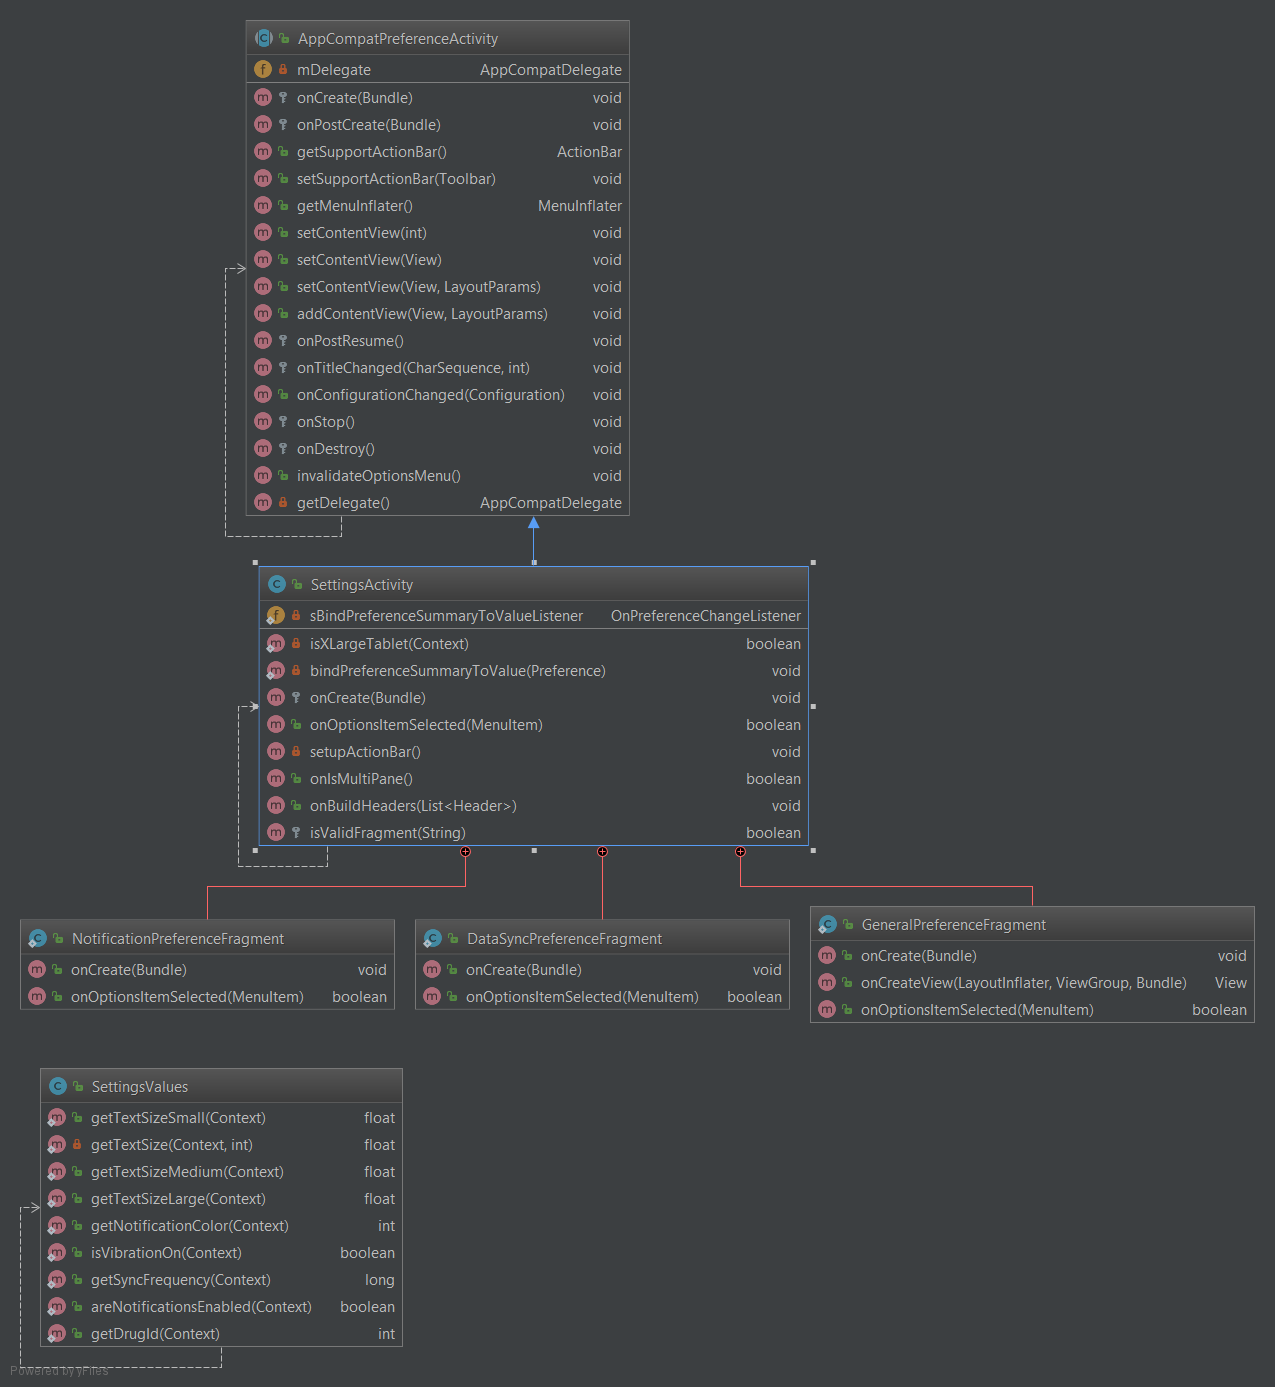
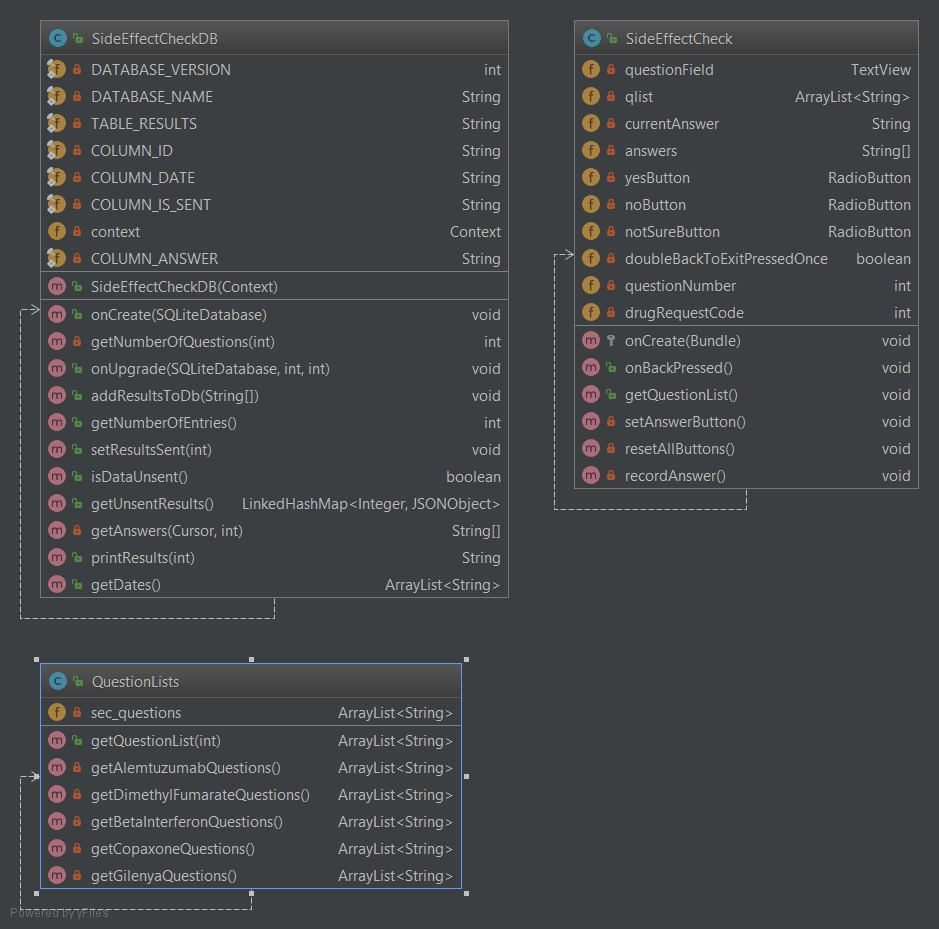
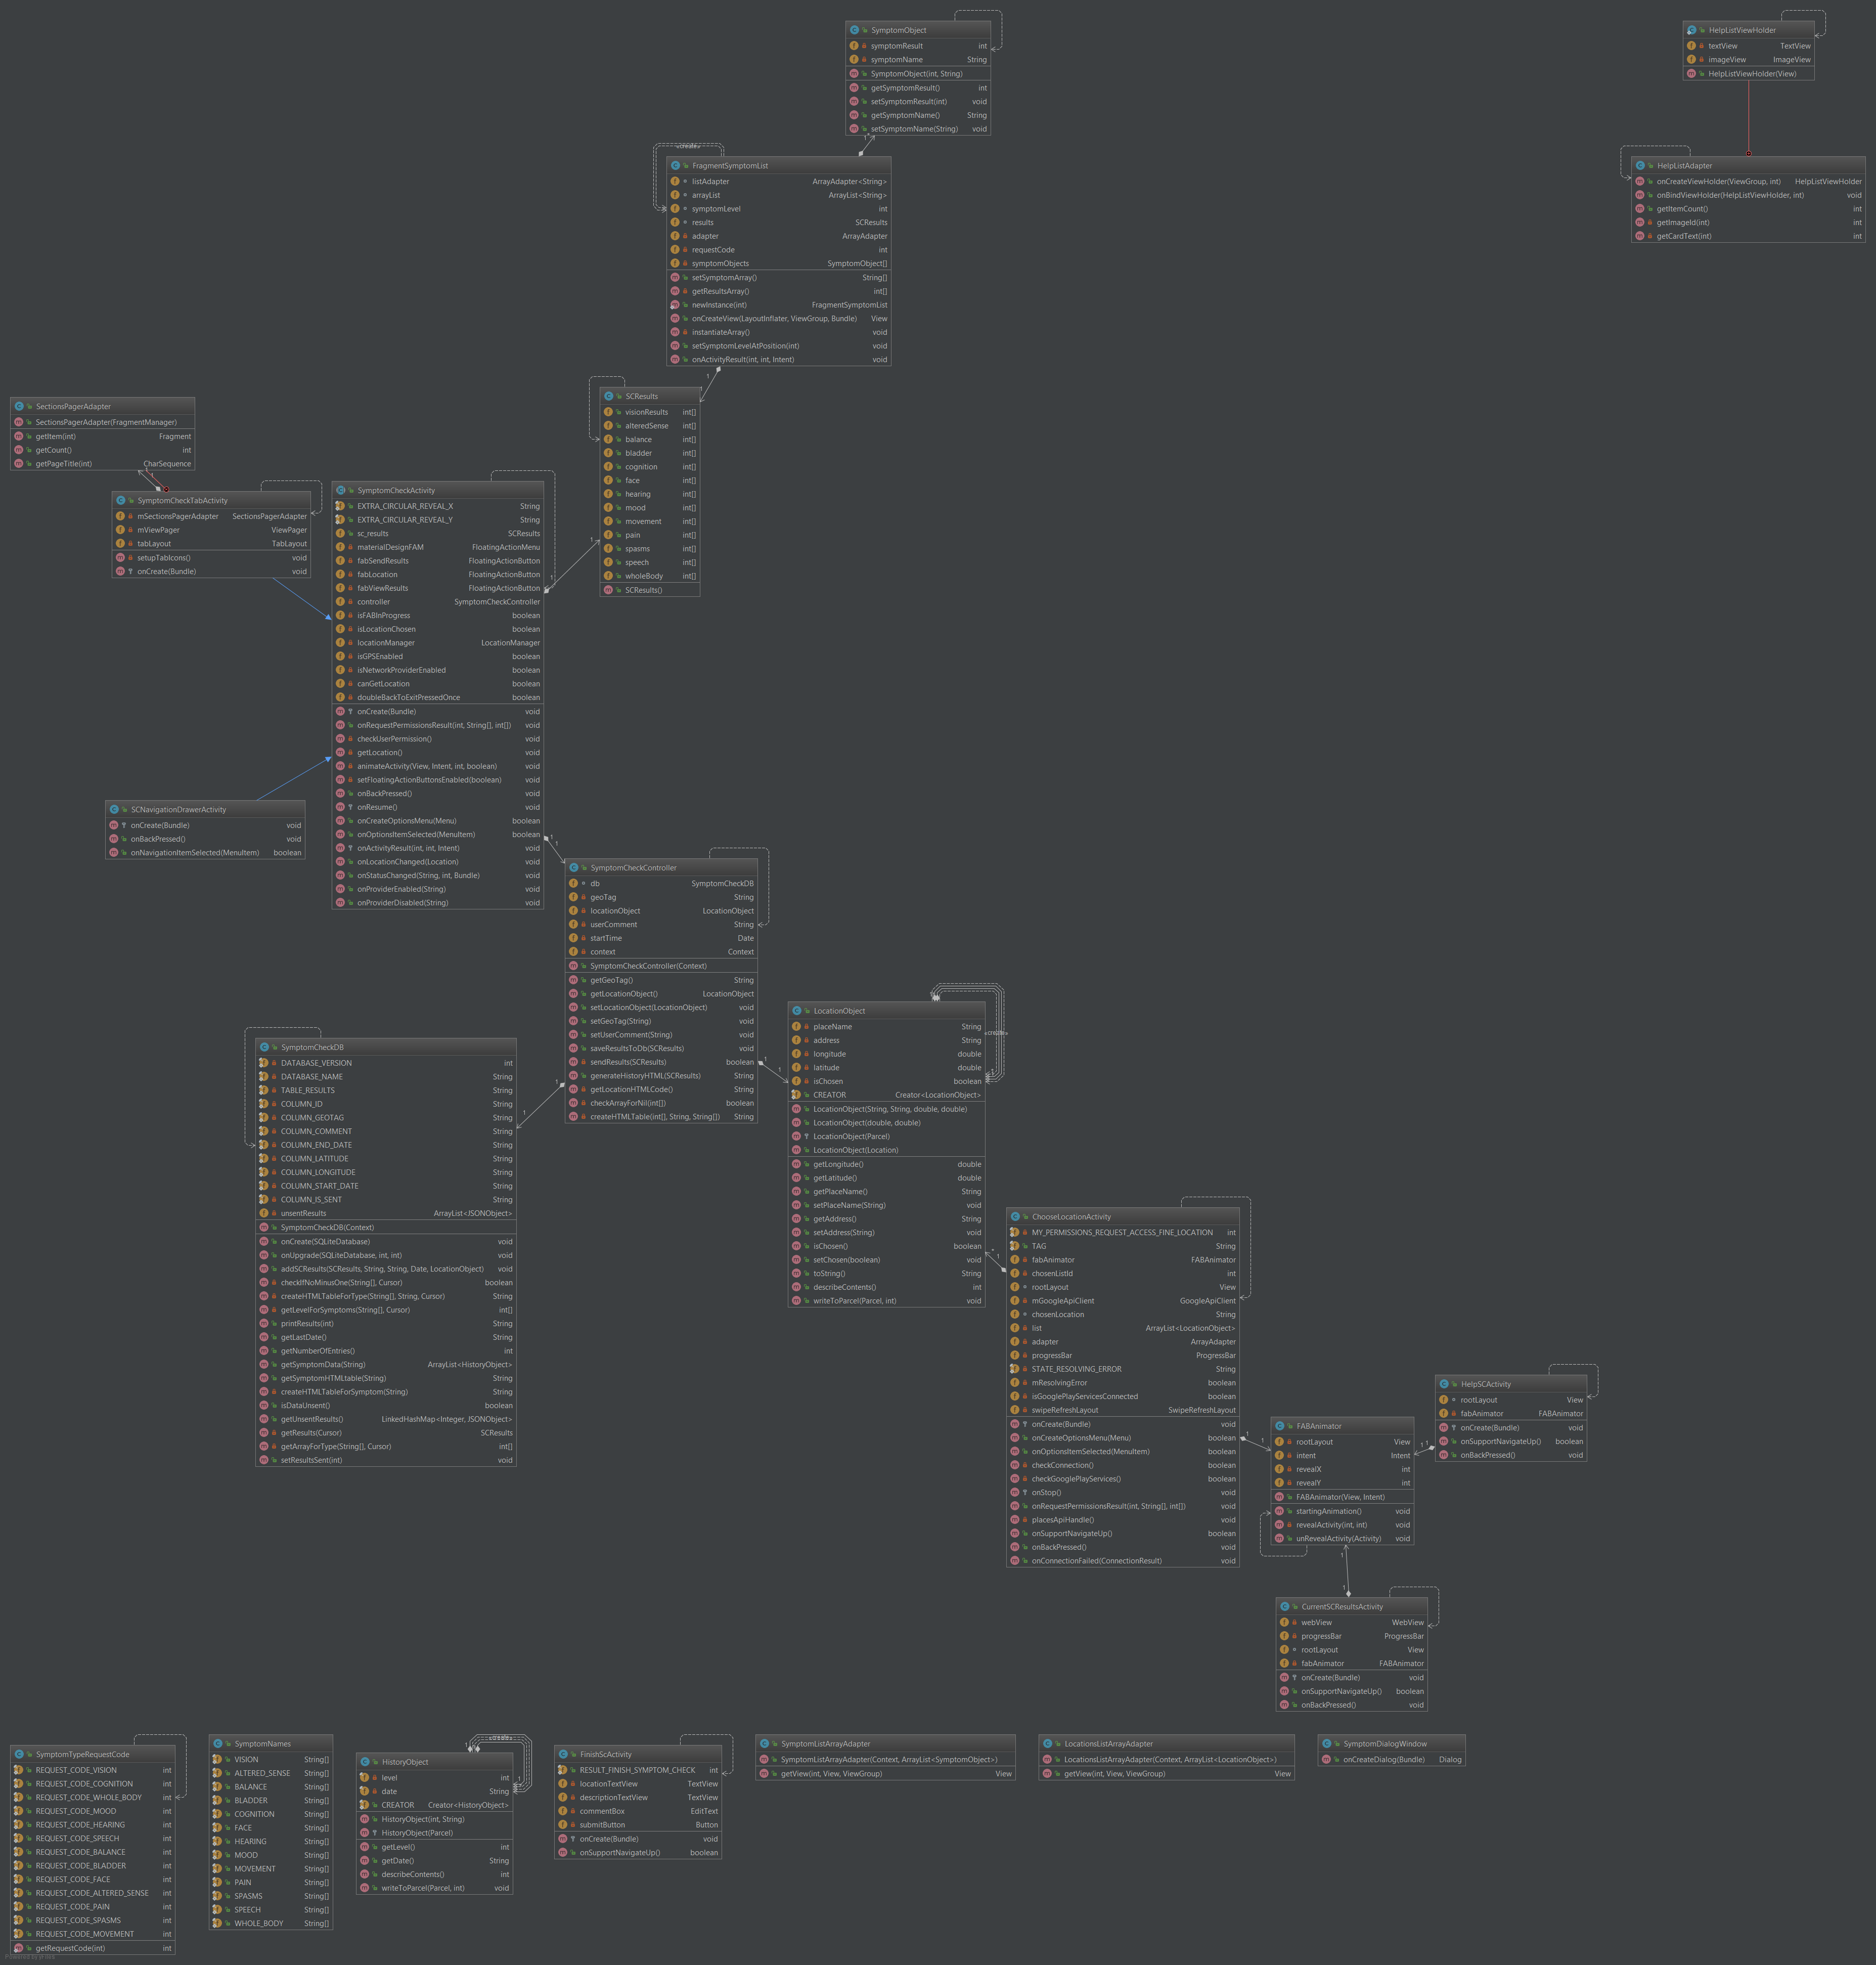
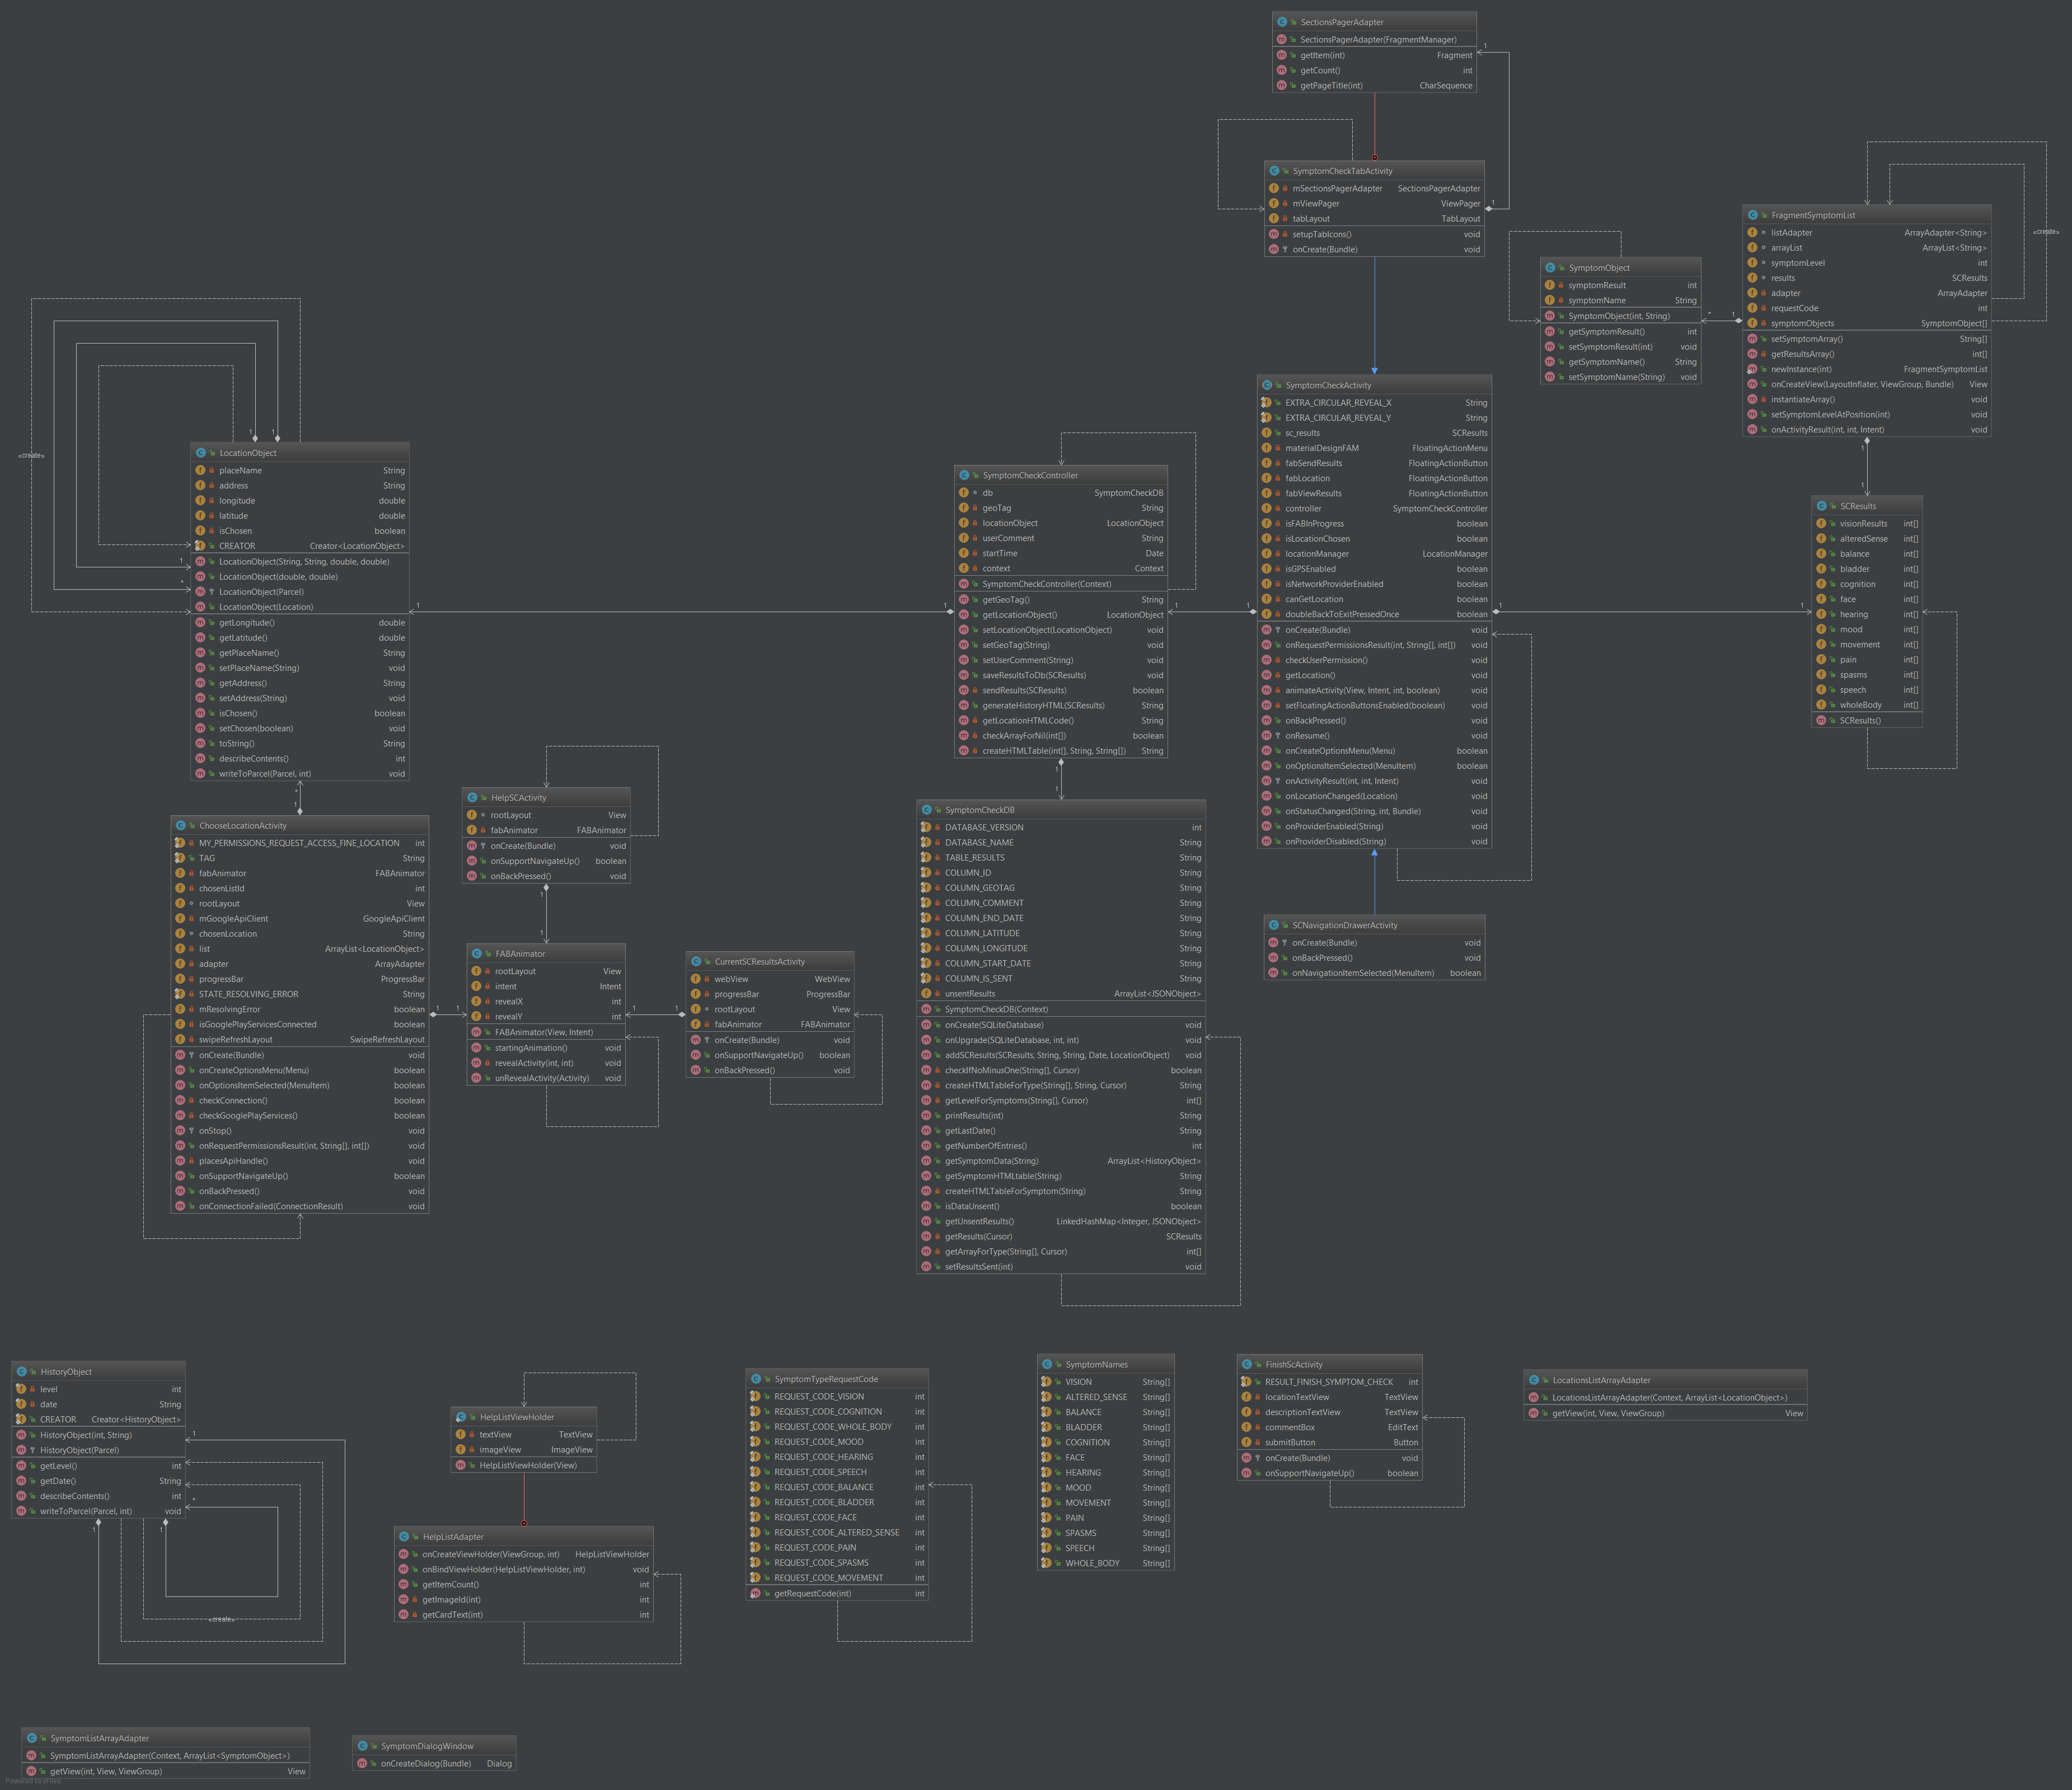
Design
The user token retrieved from the server is stored Android KeyStore, which stores encrypted data in device’s hardware. We are using Secure Preference Store library [35] that deals with the choice of the most suitable encryption mechanism supported on a device. It also provides implementation of saving data to the KeyStore.
 SecuredPreferenceStore.init(context, new DefaultRecoveryHandler());
 SecuredPreferenceStore prefStore = SecuredPreferenceStore.getSharedInstance();
 String token = response.split(":")[1].replace("\"", "").replace("}", "");
 Log.d("saved token", token);
 prefStore.edit().putString("userToken", token).apply();
Initially, we used standard HttpURLConnection to make calls to the server, it had bugs and issues with JSON encoding, hence we decided to use Ok HTTP library [36] that maintains HTTP requests neatly and clearly. Here is an example of a POST request to the server:
try {
    RequestBody body = RequestBody.create(MediaType.parse("application/json; charset=utf-8"), json.toString());
    OkHttpClient client = new OkHttpClient();
    Request request = new Request.Builder().url(url).post(body).addHeader("Authorization", "Token " + token).build();
    Response response = client.newCall(request).execute();
    Log.d("server response", response.body().string());
    return response.code() == 201;
} catch (Exception e) {
    e.printStackTrace();
}
Implementation of Android main functionalities
Symptom Check
Symptom Check has two different UI design variants, which can be chosen by the patient in settings. The choice is between two navigation elements for selecting symptom type: Navigation Drawer Activity or Tab Activity. The former requires the user to open a side menu by pressing a button in the toolbar or performing a swiping gesture from the left side of the screen, the latter uses tabs that can be switched with the same gesture or simply clicking on a tab.
In order to improve the user experience, it had been decided to replace the previously used toolbar buttons to a new widget Floating Action Menu (FAM) [37]. FAM library implements the construction of a menu, consisting of a standard UI element Floating Action Buttons (FAB), following Material Design guidelines [38]. FAM contains transition points to Send Results, Choose Location and View Results activities.
When user picks a symptom from the chosen type, a dialog window will be displayed. The symptom level is assigned using number picker UI element. The dialog window contains positive button to apply changes, and negative to discard them.
final NumberPicker numberPicker = new NumberPicker(getActivity());
numberPicker.setMinValue(0);
numberPicker.setMaxValue(10);
AlertDialog.Builder builder = new AlertDialog.Builder(getActivity()).setView(numberPicker);
builder.setPositiveButton(android.R.string.ok, new DialogInterface.OnClickListener() {
    @Override public void onClick(DialogInterface dialog, int which) {
        Intent result = new Intent();
        result.putExtra("Symptom level", numberPicker.getValue());
        getTargetFragment().onActivityResult(getTargetRequestCode(), Activity.RESULT_OK, result);
        dismiss();
    }
});
builder.setNegativeButton(android.R.string.cancel, new DialogInterface.OnClickListener() {
    @Override public void onClick(DialogInterface dialog, int which) {
        dismiss();
    }
});
builder.setTitle("Symptom level");
return builder.show();
One of the requirements of the app is to obtain users' location. The Android app has two ways track them. The first way is using GPS or Mobile network provider, which updates coordinates each minute, or each 100 meters moved.
private void getLocation() {
    if (!isLocationChosen) {
        try {
            if (canGetLocation) {
                String provider = "";
                if (isGPSEnabled) {
                    provider = LocationManager.GPS_PROVIDER;
                } else if (isNetworkProviderEnabled) {
                    provider = LocationManager.NETWORK_PROVIDER;
                }
                locationManager.requestLocationUpdates(provider, 1000 * 60, 100, this);
                if (locationManager != null) {
                    Location lastKnownLocation = locationManager.getLastKnownLocation(LocationManager.GPS_PROVIDER);
                    if (lastKnownLocation != null) {
                        controller.setLocationObject(new LocationObject(lastKnownLocation));
                    }
                }
            } else {
                controller.setLocationObject(new LocationObject(0.0, 0.0));
            }
        } catch (SecurityException e) {
            e.printStackTrace();
        }
    }
}
The second way to obtain user location is using Google Place API, which retrieves places’ (such as offices, living blocks, public places, etc...) names and their full addresses from the Google Maps information. Then, all the places are identified using user’s location coordinates from GPS or mobile network provider. This API allows users to precisely indicate their location.
for (PlaceLikelihood placeLikelihood: likelyPlaces) {
    Log.i(TAG, String.format("Place '%s' %s has likelihood: %g", placeLikelihood.getPlace().getName(), placeLikelihood.getPlace().getAddress(), placeLikelihood.getLikelihood()));
    LocationObject object = new LocationObject(placeLikelihood.getPlace().getName().toString(), placeLikelihood.getPlace().getAddress().toString(), placeLikelihood.getPlace().getLatLng().latitude, placeLikelihood.getPlace().getLatLng().longitude);
    list.add(object);
}
When the record is complete, the user presses the submit button, results are saved to the SQLite table and sent using Send Data Assync Task. If the device fails to establish connection with the server, the data synchronization job will be scheduled. The data sync Job Service will attempt to send user results when the internet connection is available on a chosen frequency.
public static void scheduleJob(Context context, int jobID) {
    long syncFrequency = SettingsValues.getSyncFrequency(context);
    JobScheduler jobScheduler = (JobScheduler) context.getSystemService(JOB_SCHEDULER_SERVICE);
    if (syncFrequency > 0) {
        ComponentName componentName;
        if (jobID == 1) {
            componentName = new ComponentName(context, ScDataSyncJobService.class);
        } else {
            componentName = new ComponentName(context, SecDataSyncJobService.class);
        }
        JobInfo jobInfo = new JobInfo.Builder(jobID, componentName).setRequiresCharging(false).setRequiredNetworkType(JobInfo.NETWORK_TYPE_UNMETERED).setPeriodic(syncFrequency).build();
        int resultCode = jobScheduler.schedule(jobInfo);
        if (resultCode == JobScheduler.RESULT_SUCCESS) {
            Log.d("jobSchedule", "Job scheduled!");
        } else {
            Log.d("jobSchedule", "Job not scheduled");
        }
    } else {
        jobScheduler.cancel(jobID);
        Log.d("jobSchedule", "Job is not scheduled. Data sync is off");
        Toast.makeText(context, "Unable to send results. Data sync is off", Toast.LENGTH_LONG).show();
    }
}
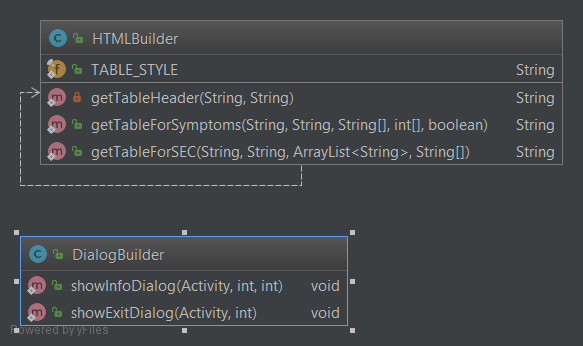
History
Previously, Symptom Check and Side Effect Check test results were displayed as a plain text in text view, we have decided to replace it with a web view widget instead. The web view allows us to load and display an html file or string which is generated in the HTML Builder class. HTML and CSS grants higher customisability to the text displayed than a simple text view. All data is grouped into tables that are created using following method:
 StringBuilder HTML = new StringBuilder(getTableHeader(column1, column2));
 for (int i = 0; i < column1Data.length; i++) {
     if (column2Data[i] < 0 && !includeNegative) {
         continue;
     }
     HTML.append("<tr>" + "<td>").append(column1Data[i]).append("</td>").append("<td>").append(column2Data[i]).append("</tr>");
 }
 HTML.append("</table>")
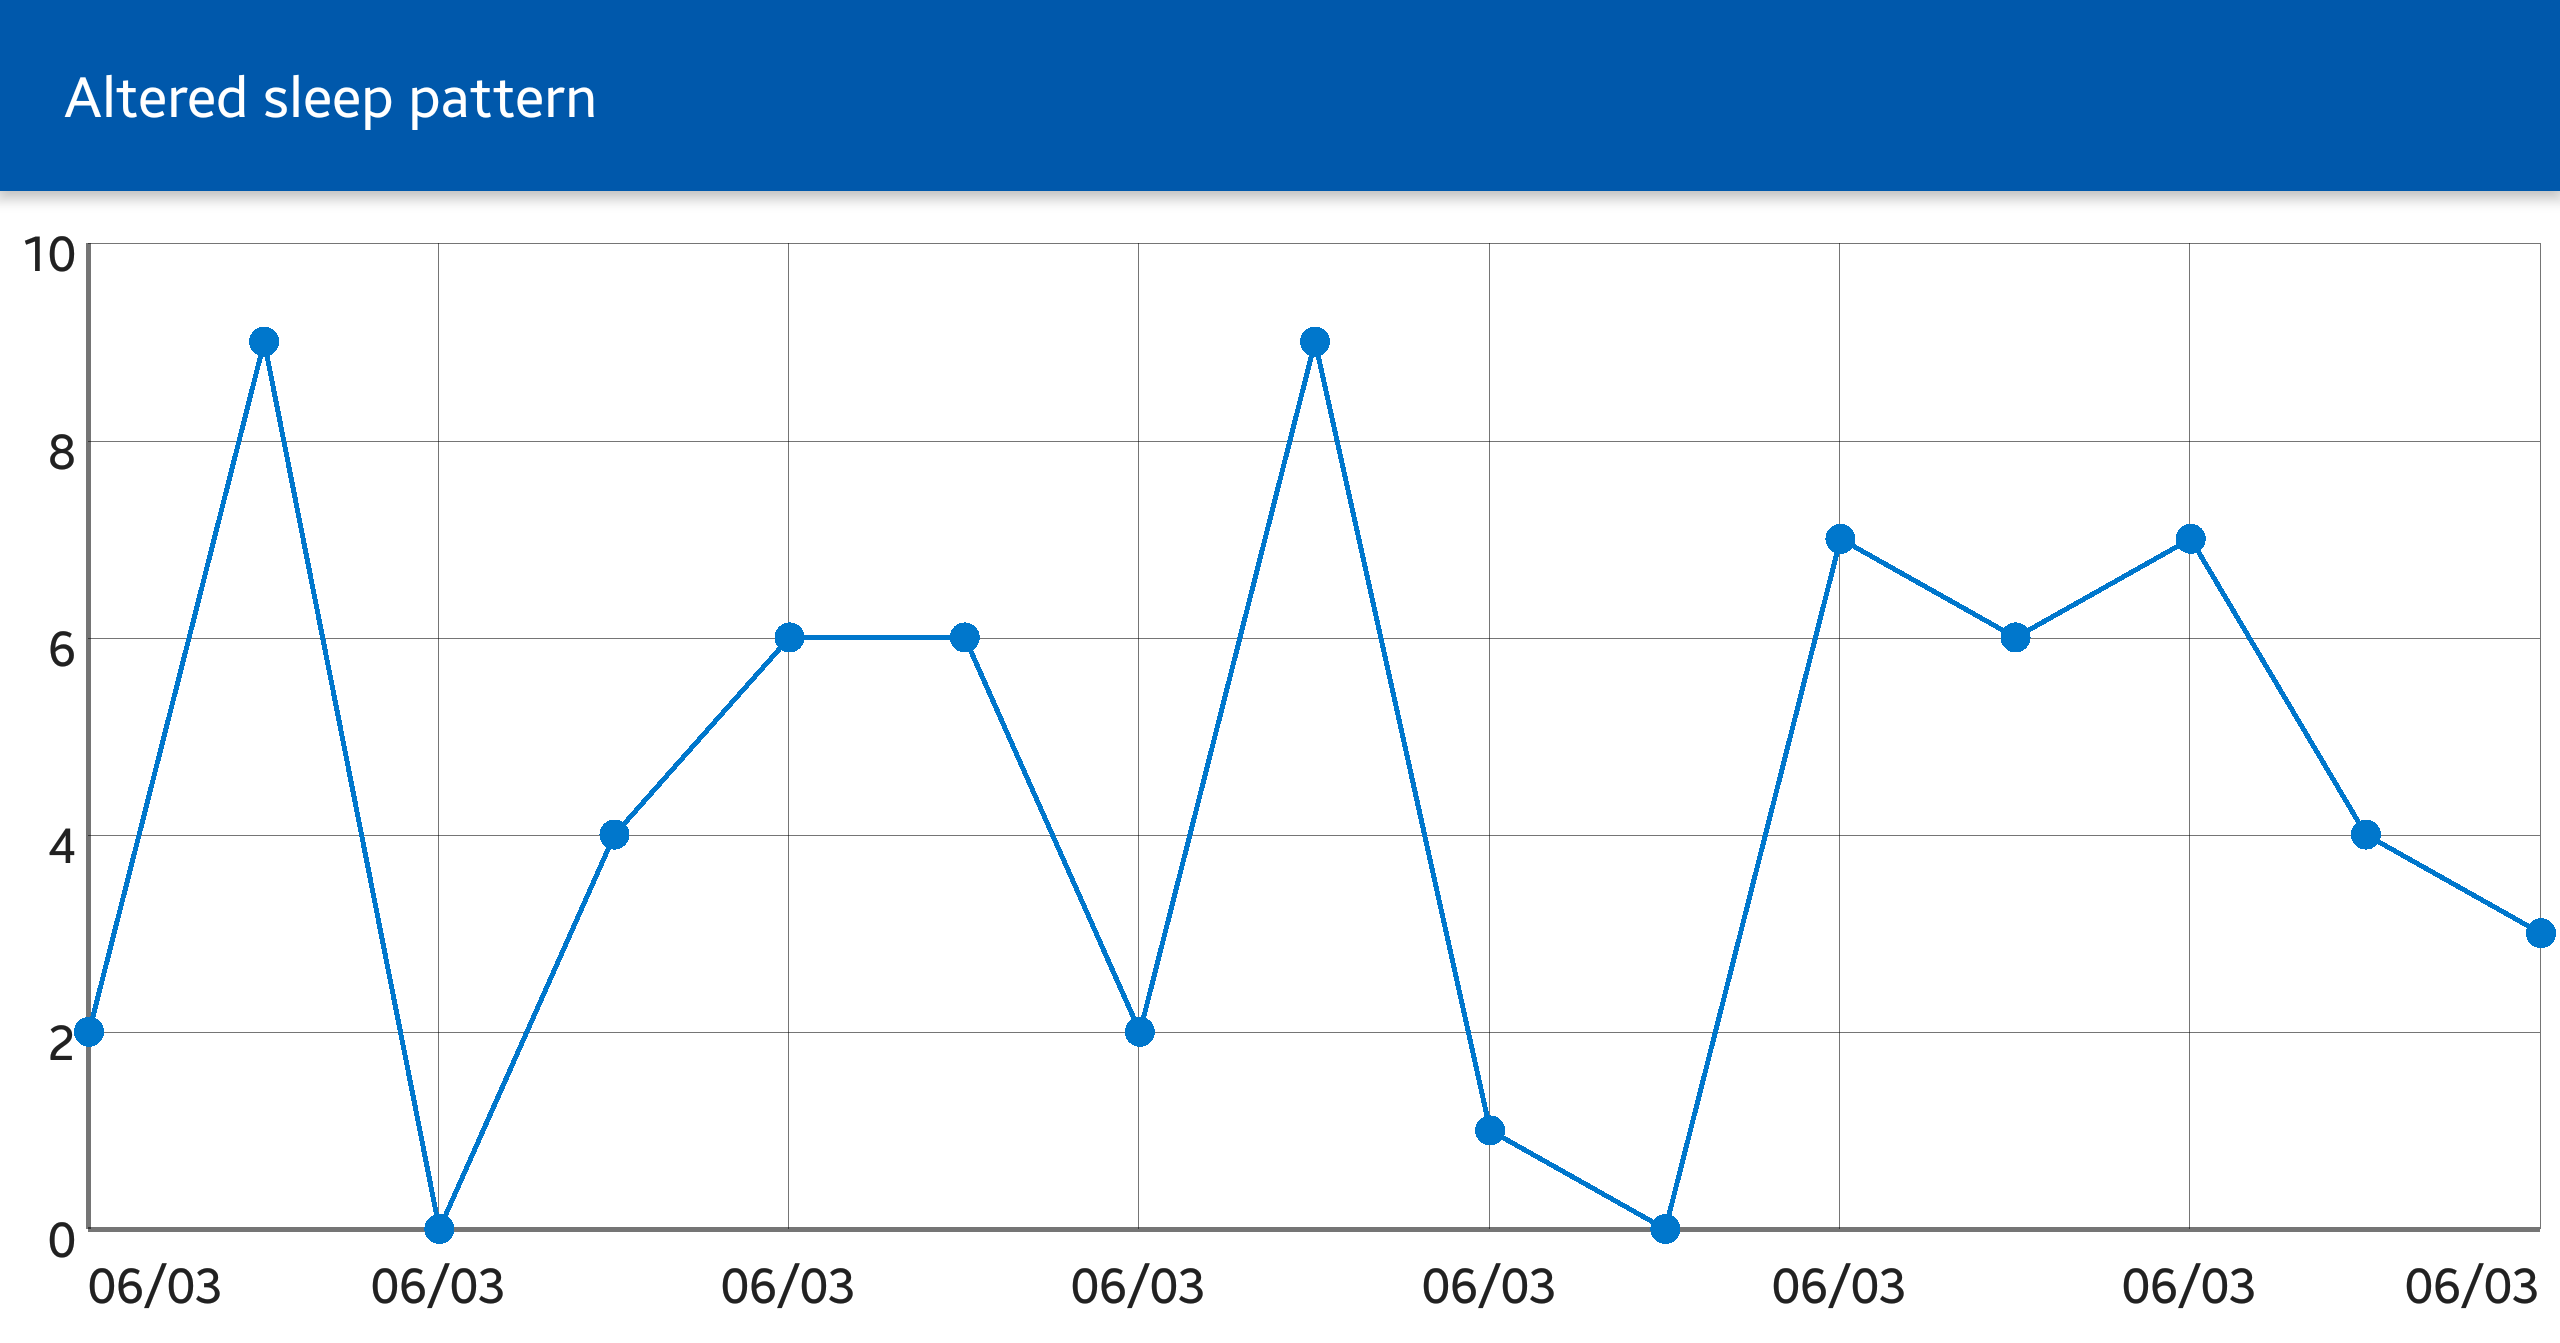
To view the progression of a certain symptom, the Android app provides a visual representation using line graphs. Graphs are displayed in the Graph View widget from an external library [39]. Graph View widget is highly customisable including features such as unlimited number of graphs, the ability to fully set axis labels, as well as making the graph scrollable and zoomable.
Settings
The Android app has three types of settings: General, Notifications and Data sync.
General settings include all UI related options. User can switch between to exit modes that prevents unsaved progress during a Symptoms or Side Effect test to be discarded, this includes either a dialog window or a double tapping back button.
SharedPreferences sharedPref = PreferenceManager.getDefaultSharedPreferences(this);
if (sharedPref.getBoolean("double_tap_exit", false)) {
    if (doubleBackToExitPressedOnce) {
        super.onBackPressed();
        return;
    }
    this.doubleBackToExitPressedOnce = true;
    Toast.makeText(this, R.string.toast_exit_double_tap, Toast.LENGTH_SHORT).show();
    new Handler().postDelayed(new Runnable() {
        @Override public void run() {
            doubleBackToExitPressedOnce = false;
        }
    }, 2000);
} else {
    DialogBuilder.showExitDialog(this, R.string.dialog_text_exit_sec);
Second option in General's section is switching between two UI designs (navigation widgets) for Symptom Check. The last option is switching between three text sizes, this affects buttons, text views and custom List View cells layouts.
The Notification settings includes three customisation options: setting ringtone, switching vibration on and off, picking notification indicator colour on supported devices. For the last one, we are using Color Picker library [40]. This library provides a new dialog window to pick from the wide range of colours. Finally, the Data sync settings grants user an option to switch off automatic data synchronisation with the server or changing sync frequency.
Complementary web portal
We also developed a complementary web portal for the current stage of development. This one enables clinicians the possibility to register new patients into the system. Since it is not a requirement we created an MVP making use of php. The web portal uses cURL library for http requests.
Sequence diagram

Implementation of complementary website main functionalities
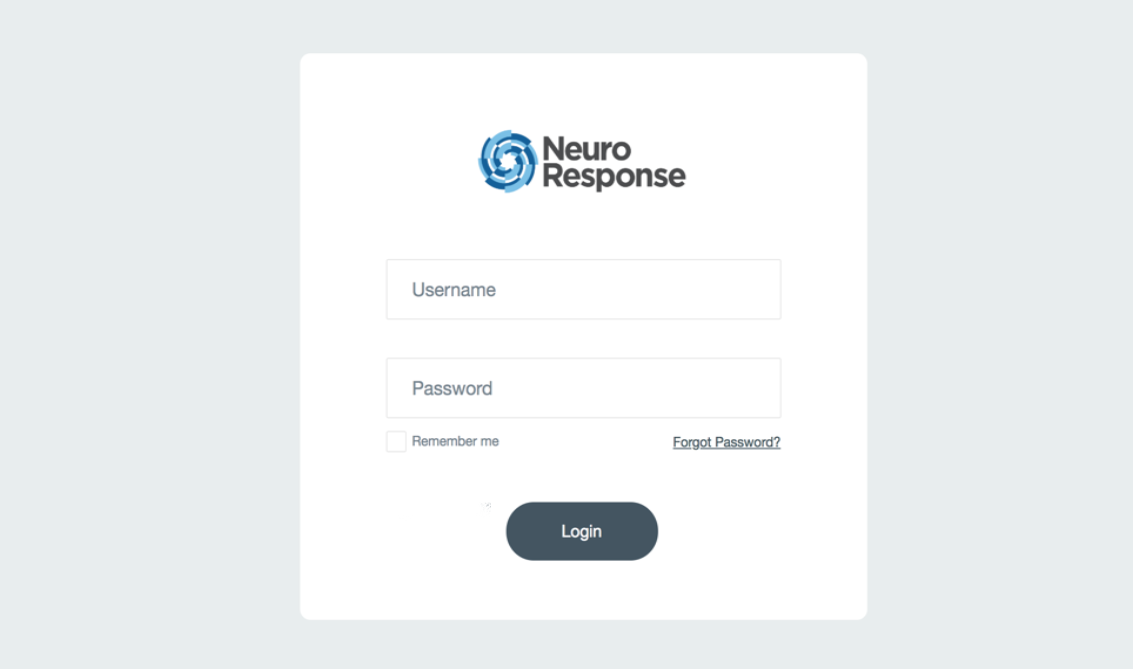
Clinician Login
Clinician Login works in a similar way as Create New Patient, but in this case, the token is first received as a response of the get_token POST request. It can then be used as a header to make further requests.
Create New Patient
The cURL functions we used to make http requests is from a PHP supported library called libcurl. With cURL, the patient’s information is passed to the API through a POST request along with the clinician’s token. A new patient account will then be created with the information shown on the screen if there is no previous record for that account, otherwise it will report an error message saying that the NHS Number already exists.
CURLOPT_CUSTOMREQUEST => "POST",
CURLOPT_POSTFIELDS => array(
        'nhs_number' => $nhs_number,
        'first_name' => $first_name,
        'password' => $password,
        'drug_course_id' => $drug_course_id,
        'month_of_treatment' => $month_of_treatment
    ),
    CURLOPT_HTTPHEADER => array(
        "Authorization: Token {$token}",
        "Cache-Control: no-cache",
        "Postman-Token: 93077037-bef0-45a1-bbde-da38e93b9483",
        "content-type: multipart/form-data; boundary=----WebKitFormBoundary7MA4YWxkTrZu0gW"
    ),
  ));
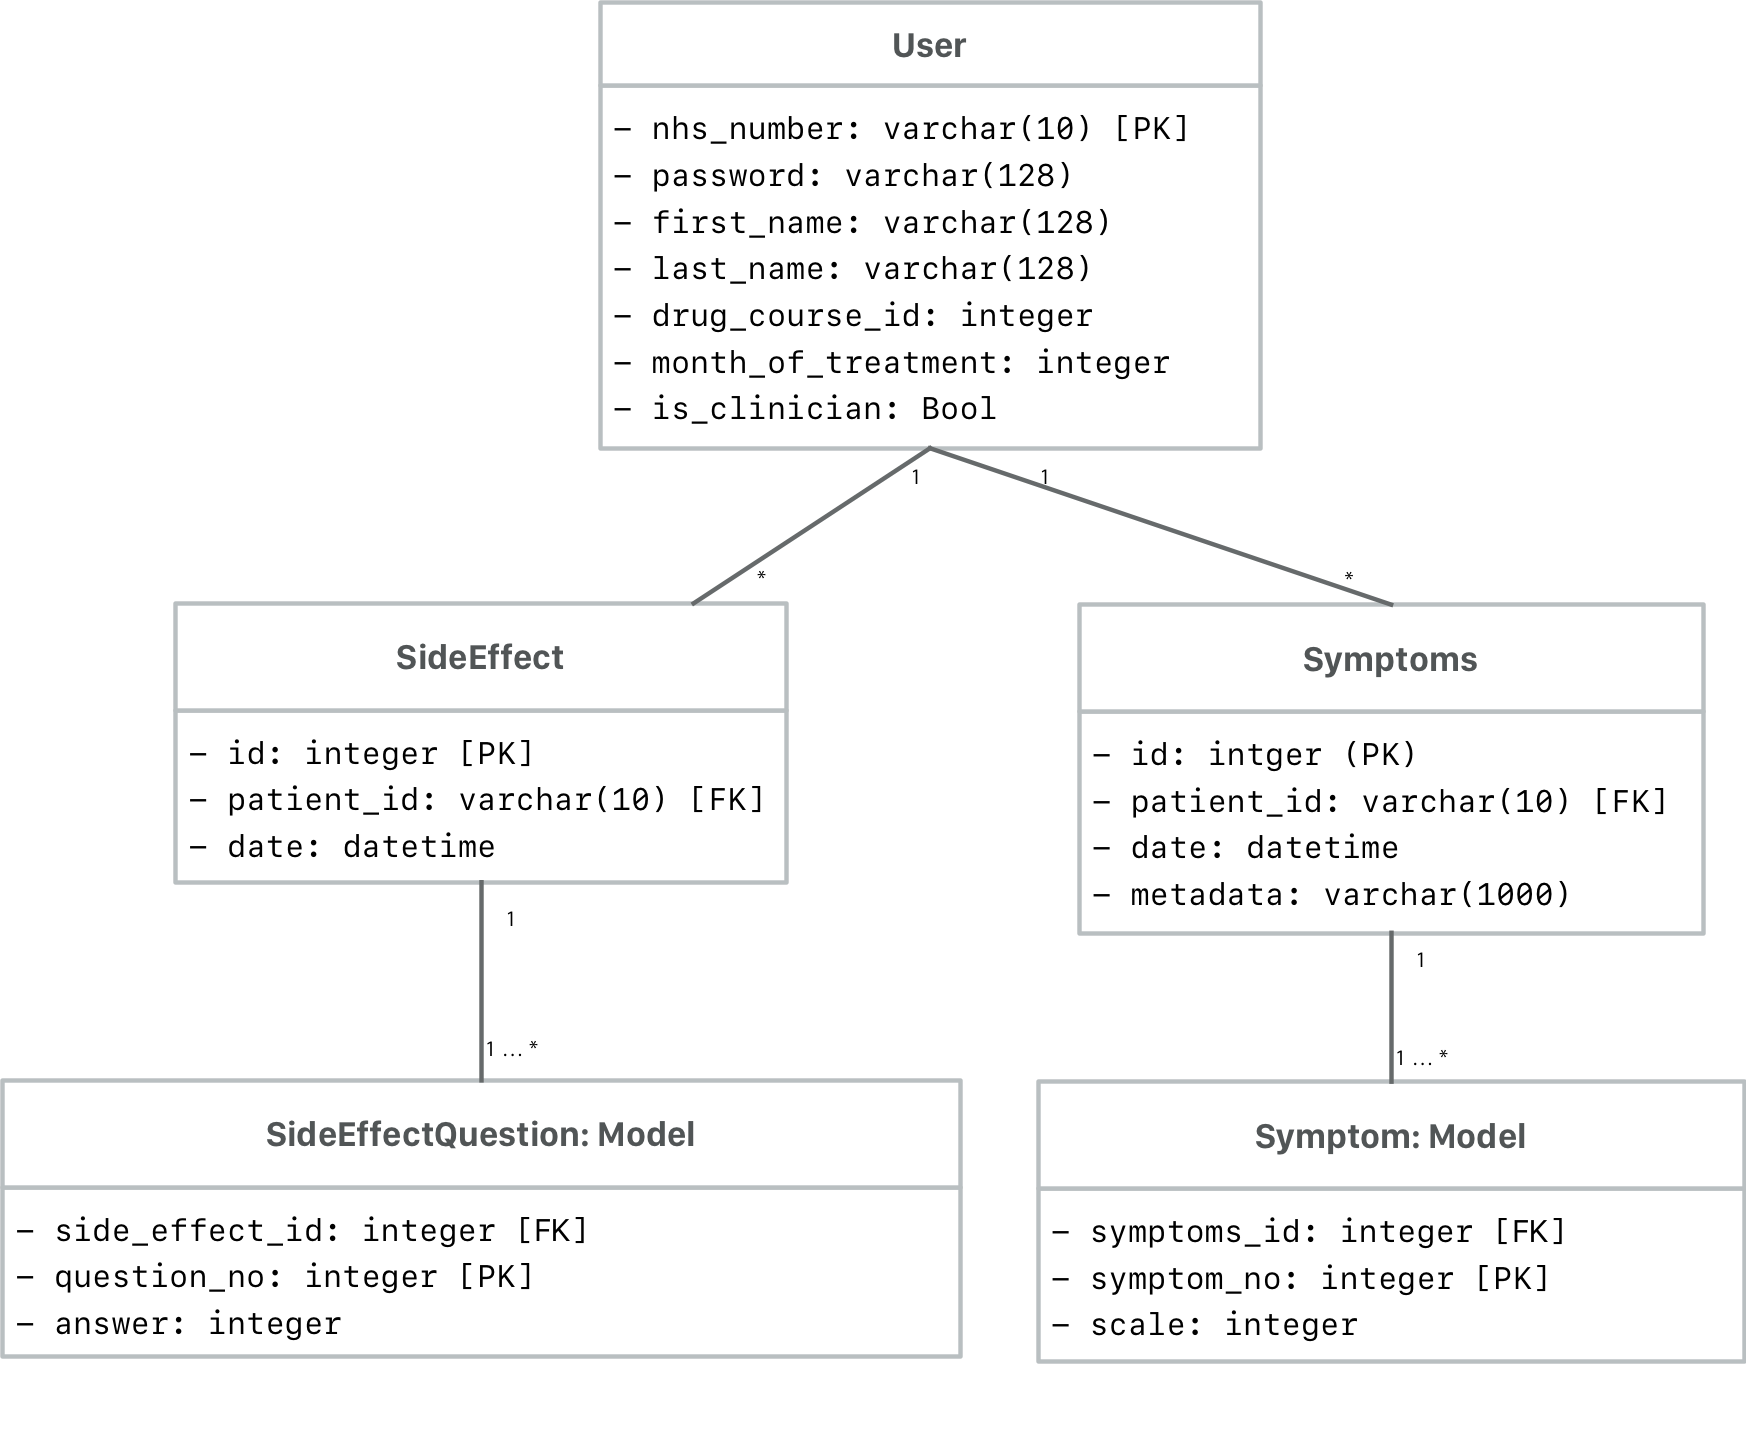
Database schema
This is the resulting database schema originated with Django’s built in ORM with our defined models.
Deployment
Since one of the requirements of our clients was to deploy it through a testing phase with 10 users, we have a testing server for RESTful API on Azure which our mobile apps are connected to:
- Django server (RESTful API) running on a Ubuntu 16.04 virtual machine.
- PostgreSQL database running on another Ubuntu 16.04 virtual machine.
- Both virtual machines connected through a virtual private network.
- Ngnix installed on Django server to reverse proxy the Django app, giving us access to its security and performance features.
Design patterns
Server
Django’s MVC
The Model-View-Controller patter (MVC) is widely used in web applications. A model is the representation of data, this allows you to extract data from a database using this model layer. The benefit here is that you can you use the same model for multiple databases.
The view is what the user sees, it is essentially the UI and it can allow the user to input information if programmed to do so.
The controller is what links the model and view. It uses logic to determine what data to get from the database and then how to display that data in the view for the user.
However in Django, the term “view” describes the data that gets presented to the user. It is not necessarily how the data looks, but which data is presented. The view describes which data you see, not how you see it. In our case, a “view” is the Python callback function for a particular URL, because that callback function describes which data is presented. In our case, all the GenericViews are the views.
The controllers in Django it is the framework itself: the machinery that sends a request to the appropriate view, according to the Django URL configuration.
In our application the model, which is represented by the models.py files, we have everything that is related with the data, the objects that are going to populate the database. Next, the controller is all the URL configuration, this section handles how the information/data should be sent according to the URL request endpoint. Finally, view, is the intermediary between the models and the controller, it accesses the data from the models and it delivers the response, for example the PatientDetails GenericView.
Active Record
Active record [41] is a design pattern that helps in the accessing of data from databases. Since an object has data and logic associated with it, the Active Record design pattern puts data access logic in the domain object, so people will know how to access data and input their own data to and from the same universal database. This is important for our project as it, since we are accessing the patients and assessments data from the database through the defined models, and at the same time, in the future we will need to access data in the same way from a central database once fully deployed.
We are using this design pattern when we are linking the models to our database. Our models file, in Django, contains the source of information of our data, in our case we define the objects User, SideEffects, SideEffectQuestion, Symptoms and Symptom. Each model maps to a database table. In the models we define, every aspect of the object is encapsulated.
Factory Pattern
The factory design pattern is a creational pattern which helps us to create an object without showing the creational logic to the client and then it returns the object of that class referring through an interface.
In our case, we are using when we have to create the serialisers. A serialiser, in Django Rest Framework, is composed by Field objects which uses the field factory to instantiate those objects. For example, the class UserSerializer with the field “‘password” is created using DRF’s serializer.CharField() factory method.
Adapter Pattern
The adapter pattern [42] allows two incompatible classes to work together. It does this by essentially changing the interface of one class to fit that which is expected by the other class.
In Django this pattern in used in a variety of places, often when we need the application to be configured to be able to handle different solutions. Our most common case, is the support for the database engine. This functionality comes already implemented in with Django, we can see it in django.db, django.contrib.sessions, rest_framework.authentication, rest_framework.permissions…
This pattern is really useful in our project since it offers us the flexibility to change the database engine or the authentication protocol with just a line of code. Therefore, it offers us a lot of flexibility and scalability without having to change the logical structure of our controller.
Django’s design philosophy
Although they are not properly design patters, Django follows a couple of design philosophies that have the same aims as design patterns have.
The first one is loose coupling and tight cohesion, in our application the template structure doesn’t knows anything about the web requests, the database it is not concerned about the data that has to displayed and the views don’t care which controller infrastructure is used.
The template system also separates logic from presentation, following the MVC design pattern. For this reason, the views do not add any more functionality than just their main aim, deliver the data to the requests.
Finally, we have e tried to us as much as possible GenericViews. Django developers saw that there were certain patterns that were a really common practice in view development, so they abstracted them and created this types of views. The same applies to Django Rest Framework, allowing us to compose bits of reusable behaviour. DRF framework takes advantage of this by providing a number of pre-built views that provide for commonly used patterns. For example, we are using generics.ListCreateAPIView for most of the views concerned with object listing and creation. If we need to modify the behaviour, we do not need to write a new class from scratch, but just override various methods form the preexistent class.
Mobile
iOS
iOS's MVC
The Model-View-Controller (MVC) design pattern assigns objects in an application one of three roles: model, view, or controller [43]. In our iOS app all the view controllers serve as the communication pipeline between views and the data model.
However, using this pattern we have fallen in one of the biggest problems that suffers the iOS community, Massive View Controller. Since we were not dealing with local data, we ended up having most of the logic inside the View-Controller class. For example, we were networking and parsing inside the ViewController classes. This is the case of the SymptomsTableViewController.
It is difficult to come up with a solution to the Massive ViewController, so it often winds up becoming technical debt.
Delegate pattern
We use the delegate pattern to solve one of the hardest problem in software development: communication and sharing of information between objects [44]. Delegates are a design pattern that allows one object to send messages to another object when a specific event happens. We achieve:
- Avoid tight coupling of objects.
- Modify behavior and appearance without the need to sub class objects.
- Allow tasks to be handled off to any arbitrary object.
We are using it mainly for the situation where we have an object which has to communicate with another object. Think about a ParentVC which has presented modally a ChildVC. After ChildVC has completed his goal, it has to communicate to ParentVC he wants to be dismissed. It is implemented by defining a protocol that encapsulates the delegated responsibilities, such that a conforming type (known as a delegate) is guaranteed to provide the functionality that has been delegated [45].
The delegate class adopts the protocol and implements its requirements. On the other end, we have the delegator class which defines a variable property will the store the reference to the delegate objects once it is initialised. The protocols we have are:
- EventAddedDelegate.
- SymptomAddedDelegate.
Android
MVP
Our choice of design patterns in Android application is MVP, which separates the application into three layers: Model, View, Presenter. Each component has its responsibilities and the connection between these components is managed by the Presenter.
- The Model manages how data is stored, created and changed in the application.
- The View is a passive interface, this includes Activities and Fragments and UI widgets inside them.
- The Presenter acts as the bridge. It fetches data from the Model and displays it in the View. It also processes user interactions and data input delivered to it by the View.
MVP design pattern brings more flexibility to the view components, data model and grants an ability to reuse these two parts for different tasks, whereas presenter is tied up to a certain task and it is dependent on a certain model and a view.
References
[23] Mozilla Foundation. (2018) "Server Side Django Models". [Online] Avaiable at: https://developer.mozilla.org/en-US/docs/Learn/Server-side/Django/Models
[24] Django Rest Framework. (2017) "Serializers". [Online] Avaiable at: http://www.django-rest-framework.org/api-guide/serializers/
[25] Dylan Stein. (2017) "Modern Django — Part 2: REST APIs, Apps, and Django REST Framework". [Online] Avaiable at: https://medium.com/@djstein/modern-django-part-2-rest-apis-apps-and-django-rest-framework-ea0cac5ab104
[26] Django Project. (2018) "Class Based Views". [Online] Avaiable at: https://docs.djangoproject.com/en/2.0/topics/class-based-views/
[27] OWASP. (2017) "REST Security Cheat Sheet". [Online] Avaiable at: https://www.owasp.org/index.php/REST_Security_Cheat_Sheet
[28] JWT. (2018) "Json Web Tokens". [Online] Avaiable at: https://jwt.io
[29] Apple. (2018) "The Role of View Controllers". [Online] Avaiable at: https://developer.apple.com/library/content/featuredarticles/ViewControllerPGforiPhoneOS/
[30] Apple. (2018) "UITableViewController". [Online] Avaiable at: https://developer.apple.com/documentation/uikit/uitableviewcontroller
[31] Rohan Nagar. (2018) "Alamofire". [Online] Avaiable at: https://github.com/Alamofire/Alamofire#features
[32] Matthew Palmer. (2018) "Locksmith". [Online] Avaiable at: https://github.com/matthewpalmer/Locksmith
[33] Phillip C.. (2018) "ScrollableGraphView". [Online] Avaiable at: https://github.com/philackm/ScrollableGraphView
[34] Apple. (2018) "Reseach Kit Documentation". [Online] Avaiable at: http://researchkit.org/docs/docs/Survey/CreatingSurveys.html
[35] Mehedi Hasan. (2017) "Secured-Preference-Store". [Online] Avaiable at: https://github.com/iamMehedi/Secured-Preference-Store
[36] Square, Inc. (2016) "OkHttp". [Online] Avaiable at: http://square.github.io/okhttp/
[37] Dmytro Tarianyk. (2015) "https://github.com/Clans/FloatingActionButton". [Online] Avaiable at: https://github.com/Clans/FloatingActionButton
[38] Google. (2018) "Material Documentation". [Online] Avaiable at: https://material.io/guidelines/components/buttons-floating-action-button.html#buttons-floating-action-button-transitions
[39] Jonas Gehring. (2018) "GraphView". [Online] Avaiable at: http://www.android-graphview.org/
[40] QuadFlask. (2017) "Color Picker". [Online] Avaiable at: https://github.com/QuadFlask/colorpicker
[41] Fowler, Martin. (2018) "Active Record". [Online] Avaiable at: https://www.martinfowler.com/eaaCatalog/activeRecord.html
[42] Wikipedia. (2018) "Adapter Pattern". [Online] Avaiable at: ttps://en.wikipedia.org/wiki/Adapter_patternl
[43] Apple. (2018) "Apple Documentation: MVC". [Online] Avaiable at: https://developer.apple.com/library/content/documentation/General/Conceptual/DevPedia-CocoaCore/MVC.html
[44] James Rochabrun. (2017) "Implementing delegates in Swift, step by step". [Online] Avaiable at: https://medium.com/@jamesrochabrun/implementing-delegates-in-swift-step-by-step-d3211cbac3ef
[45] Apple. (2015) "Apple Dcumentation: Protocals". [Online] Avaiable at: https://developer.apple.com/library/content/documentation/Swift/Conceptual/Swift_Programming_Language/Protocols.html