Appendices
1. User Manual
Below is a guide on how to use HazardID in order to tag hazard reports efficiently.
1.1 Prerequisites
Navigate to the website:
https://hazard-id.streamlit.app/
1.2 Settings
The three dots on the top right corner of your screen is the page settings. Press on this to access the settings menu.
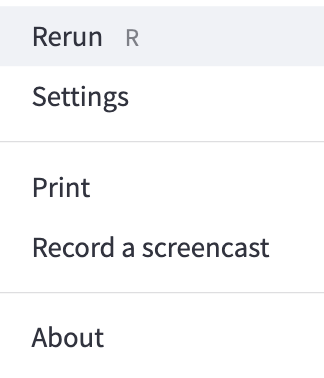
“Rerun” (or pressing the “R” key on the keyboard) will rerun that specific page of the app. Please feel free to use it if something does not work correctly.
“Settings” will take you to a small settings menu, where you can change the aspect ratio of the tool and toggle dark/light mode.
“Print” will prompt your computer to print the current page.
“Record a screencast” will allow you to take a video clip of your screen.
“About” will tell you about the current Streamlit version.
These settings can be accessed at any time by clicking on those three dots.
1.3 Logging In
You should be redirected to this page:
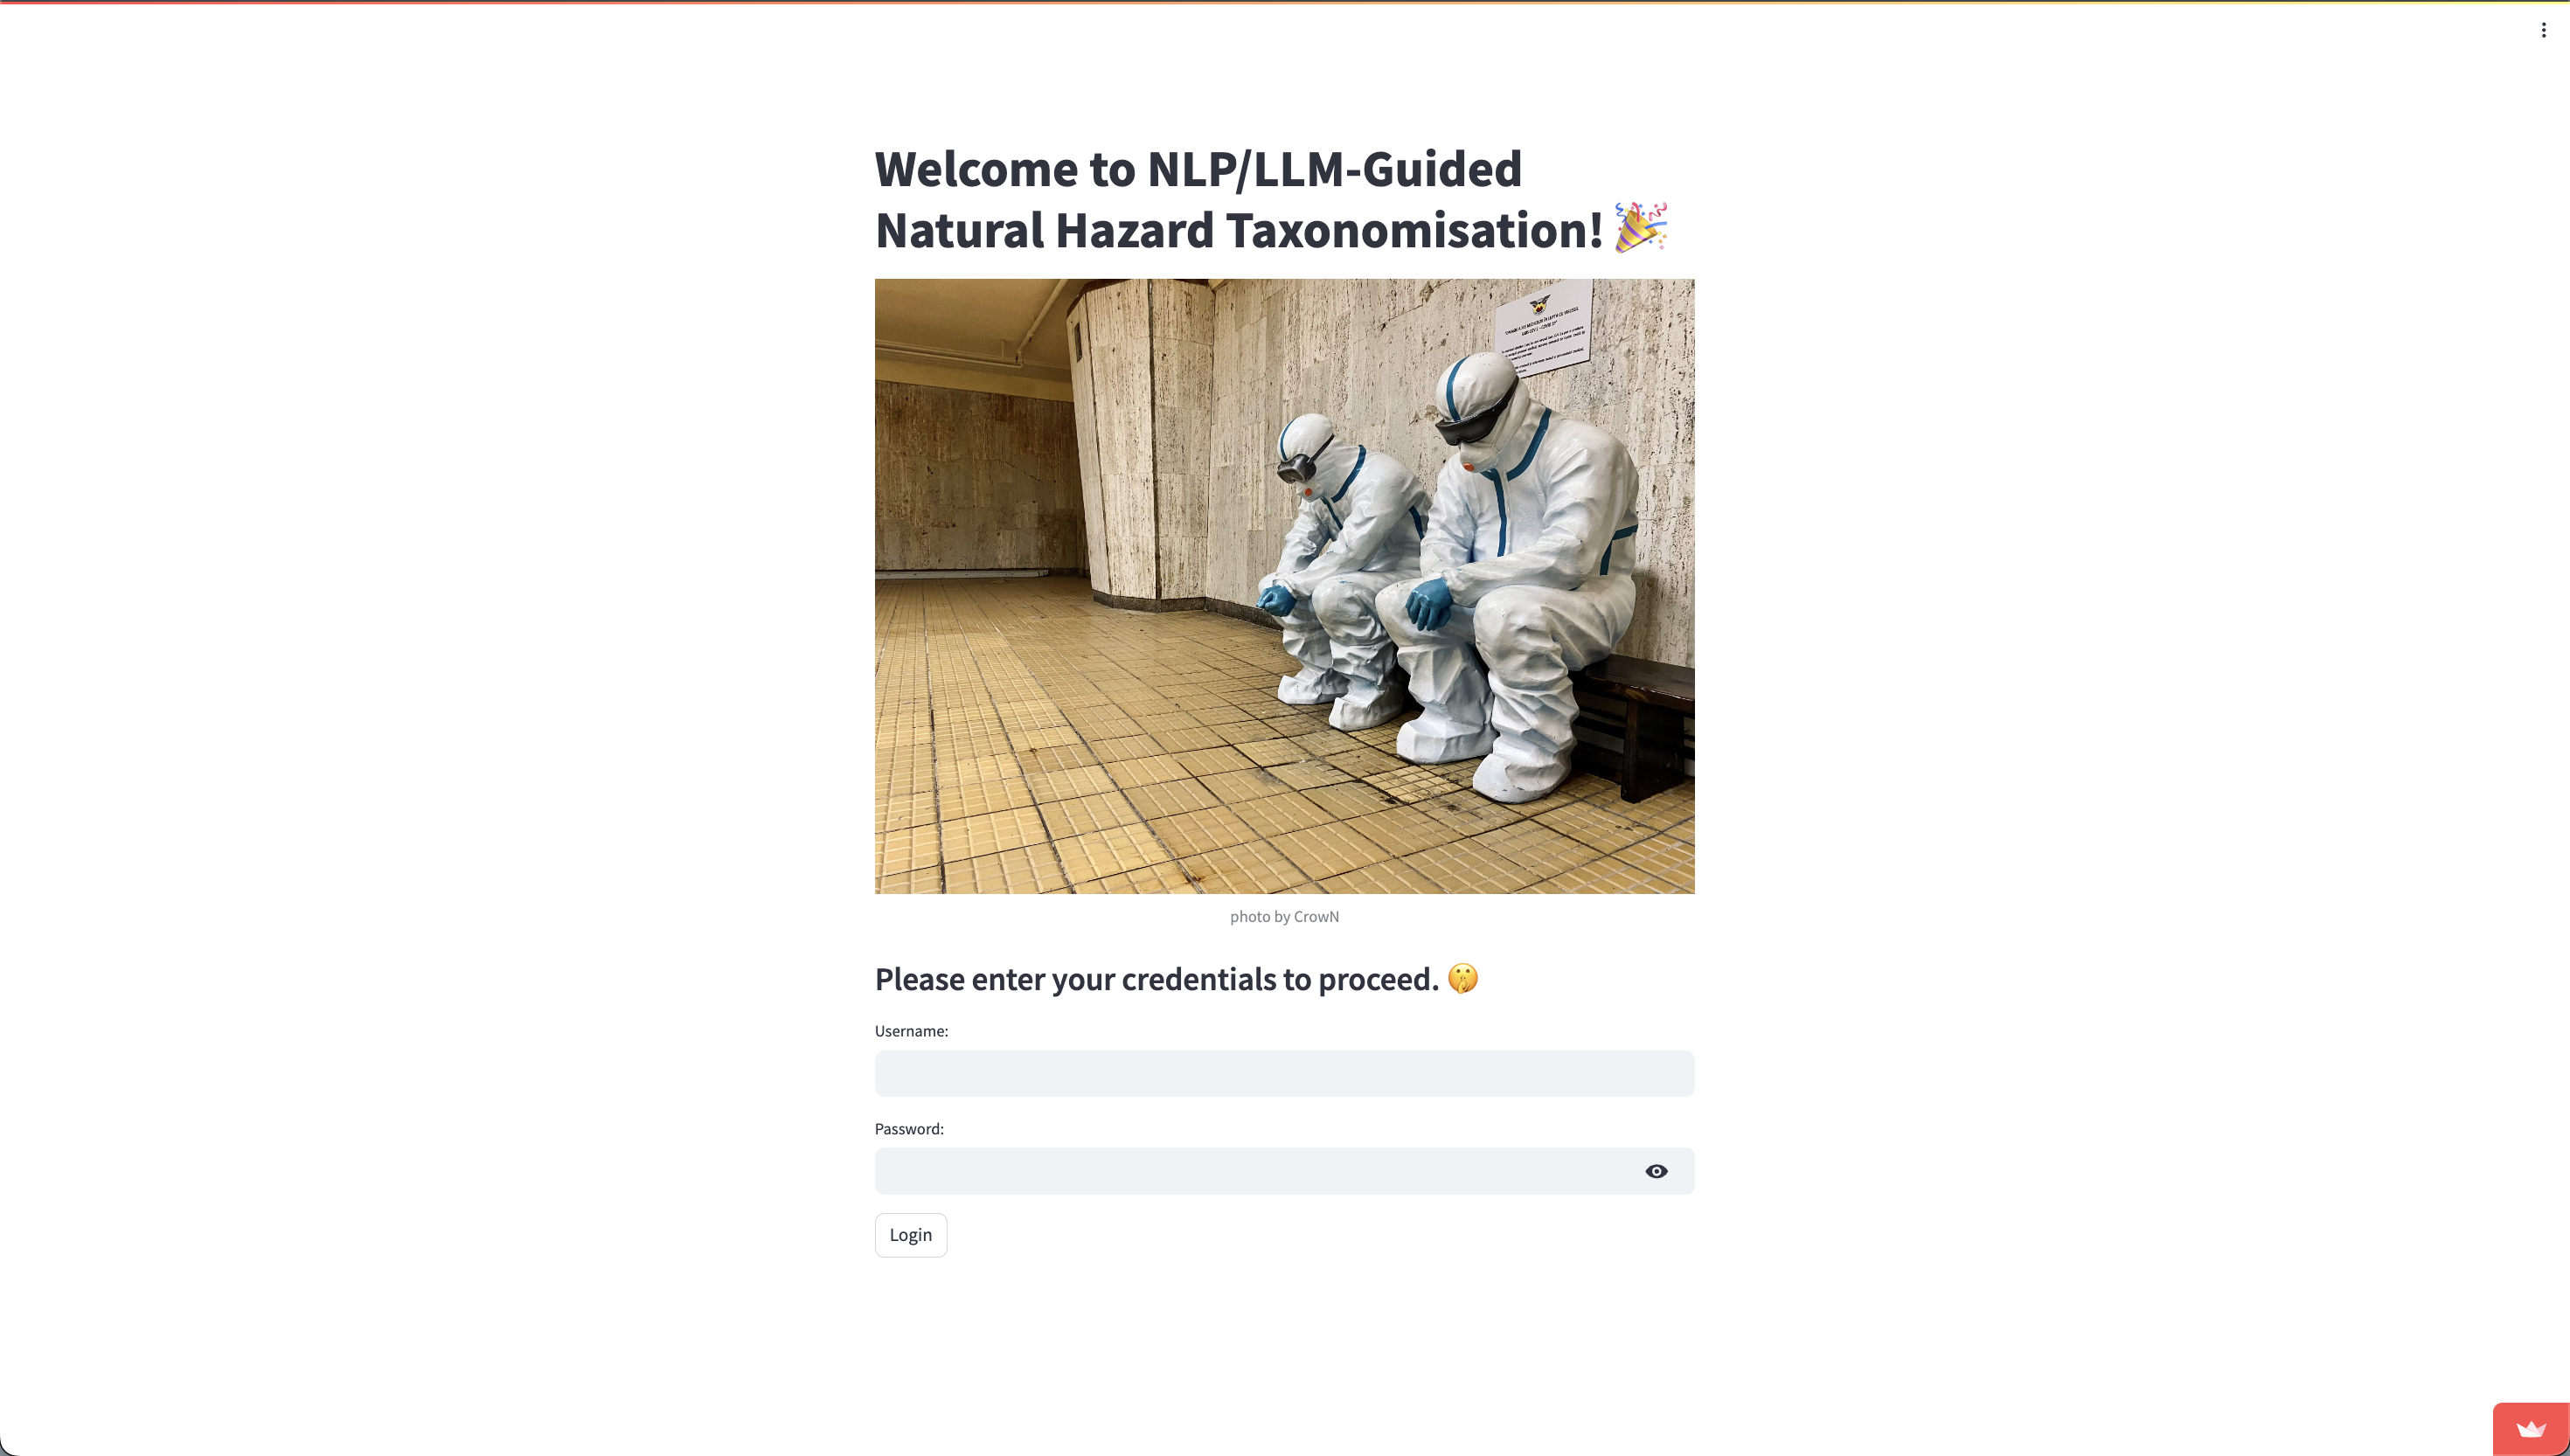
Please use the test credentials noted below to log in. Once you have filled in the username and password fields, please press the Login button.
Username: demo
Password: hazard
1.4 Choosing a Model
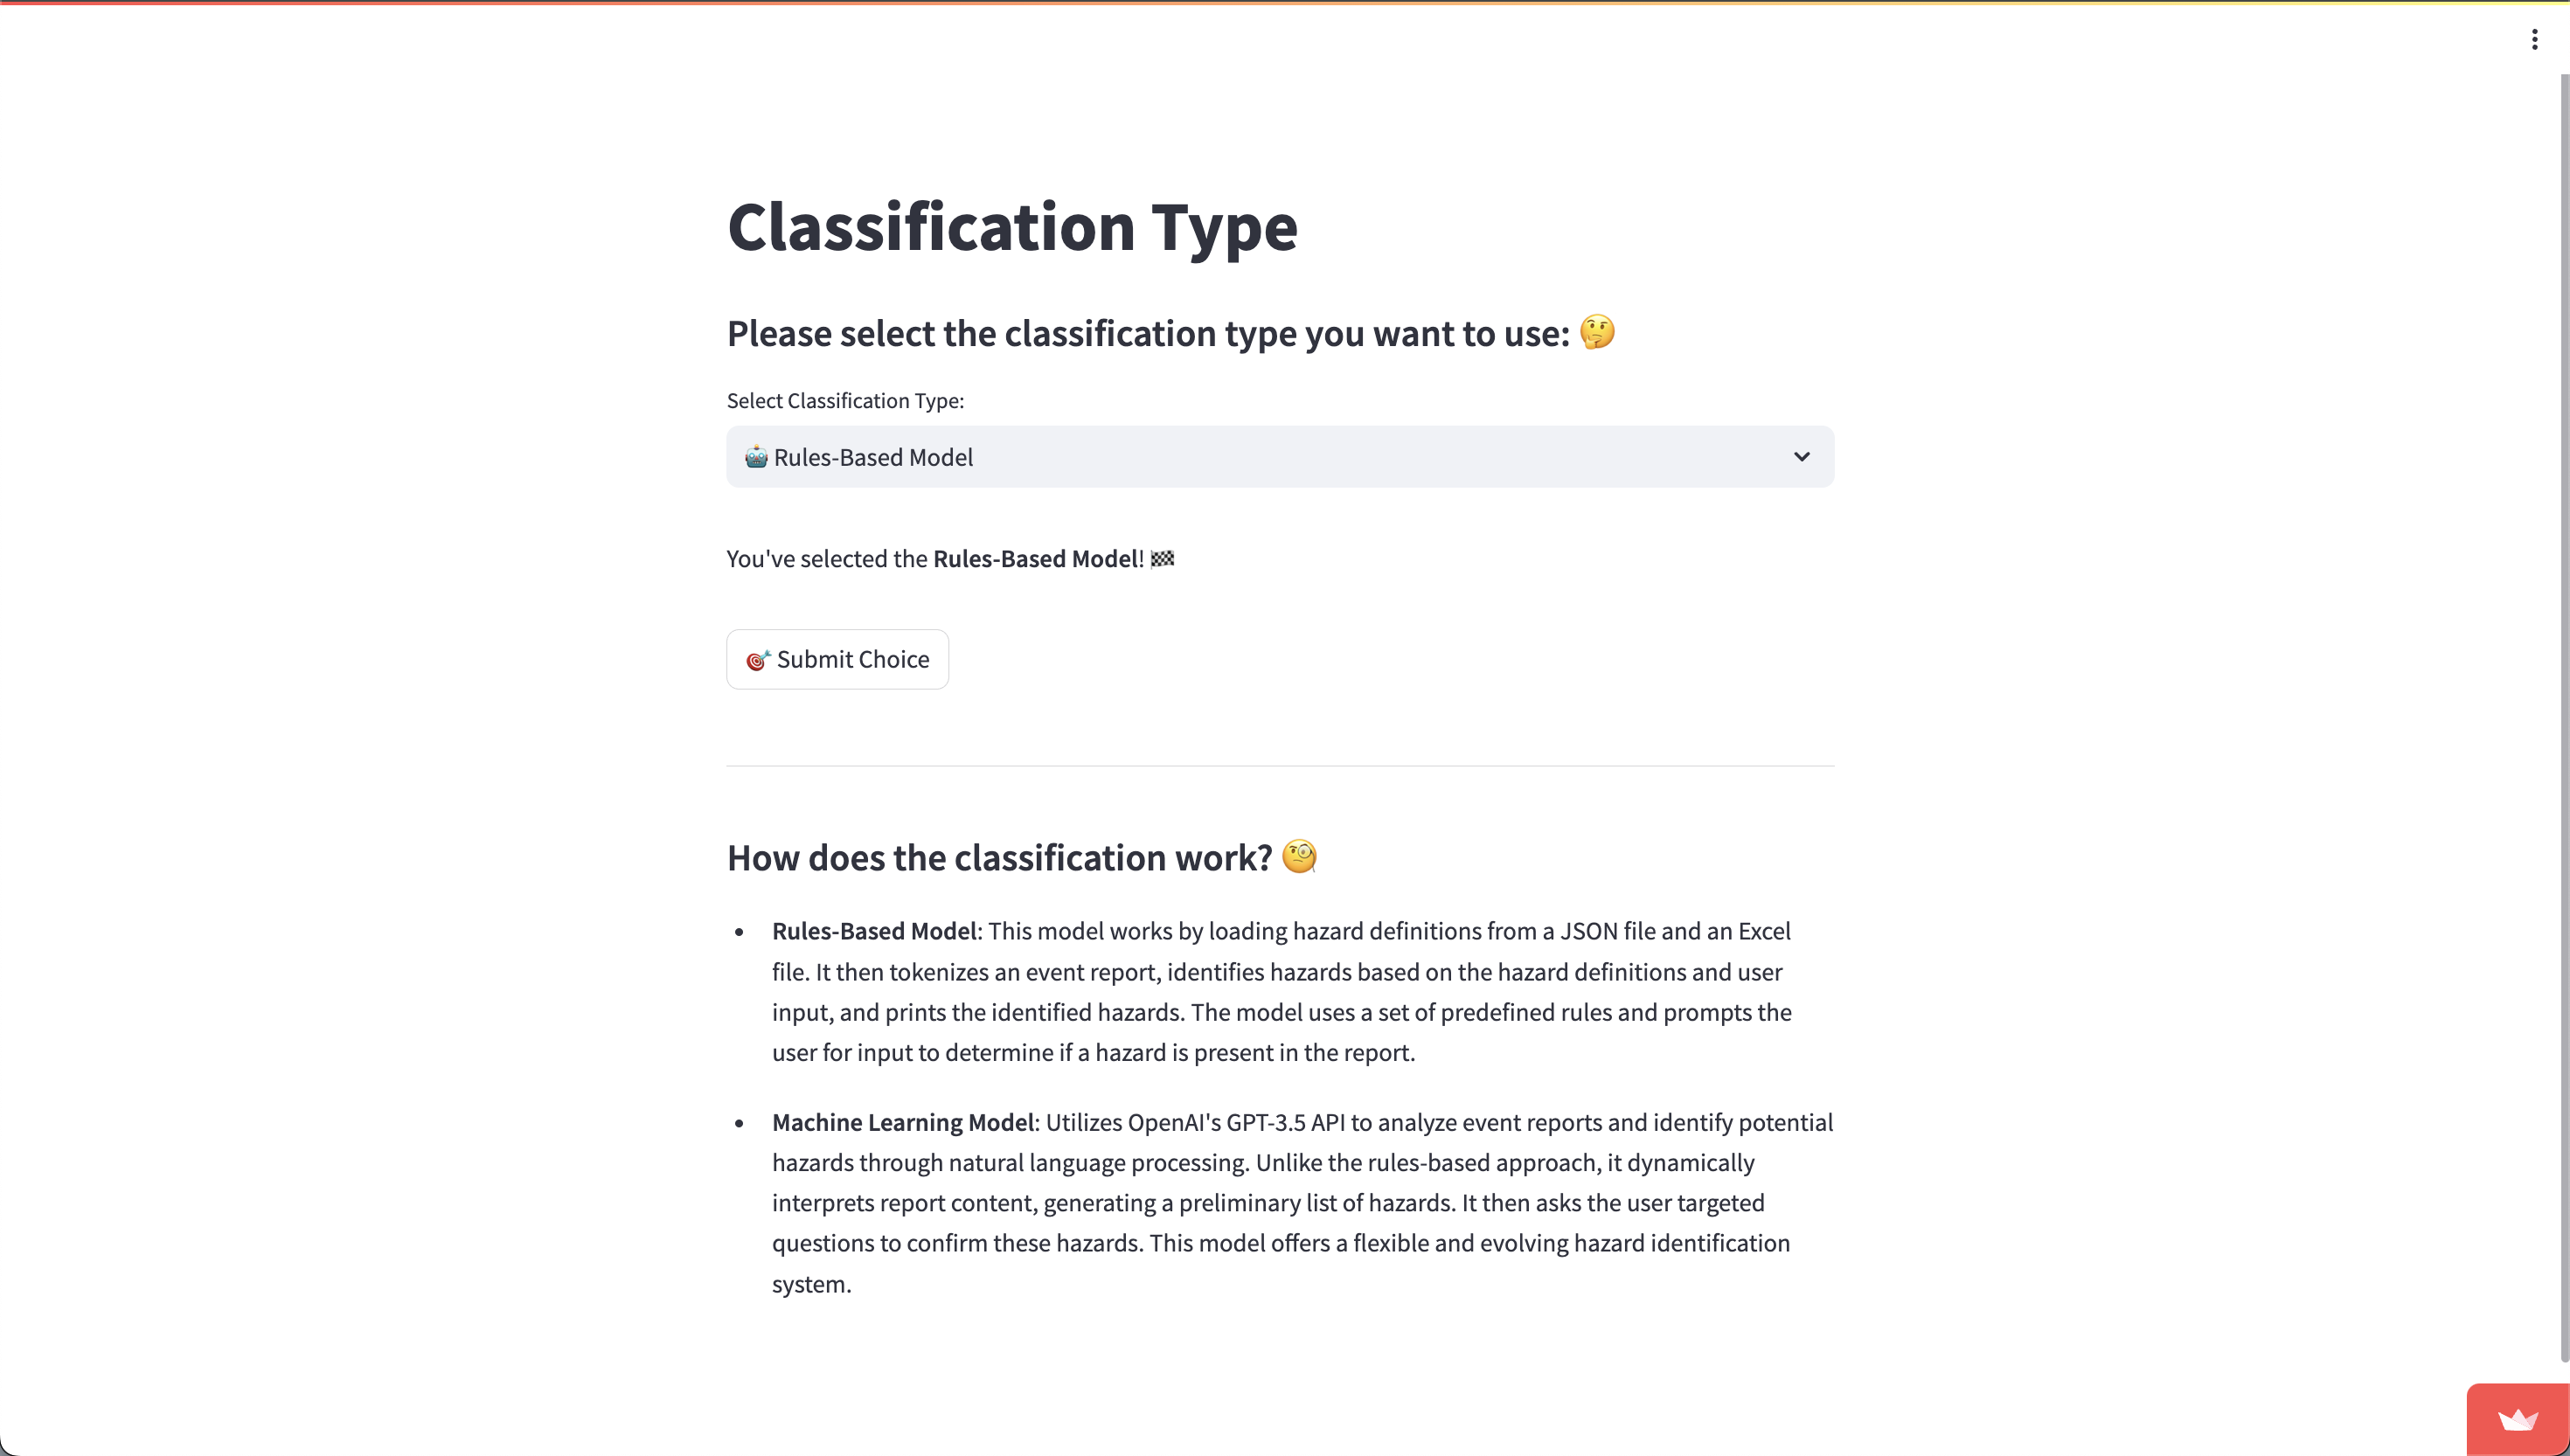
Once you have logged in, you should be redirected to the “Choose Model” page. Here, you can select the model which will start identifying the hazards in your hazard report.
There are two versions you can use: the Rules-Based version (which uses keyword matching), and the Machine Learning version (which uses the GPT API). To select a model, click on the field below “Select Classification Type”. The model that is currently selected will be shown just under this field. Once you are happy with the model type, press “Submit Choice”.
1.5 Entering Hazard Report
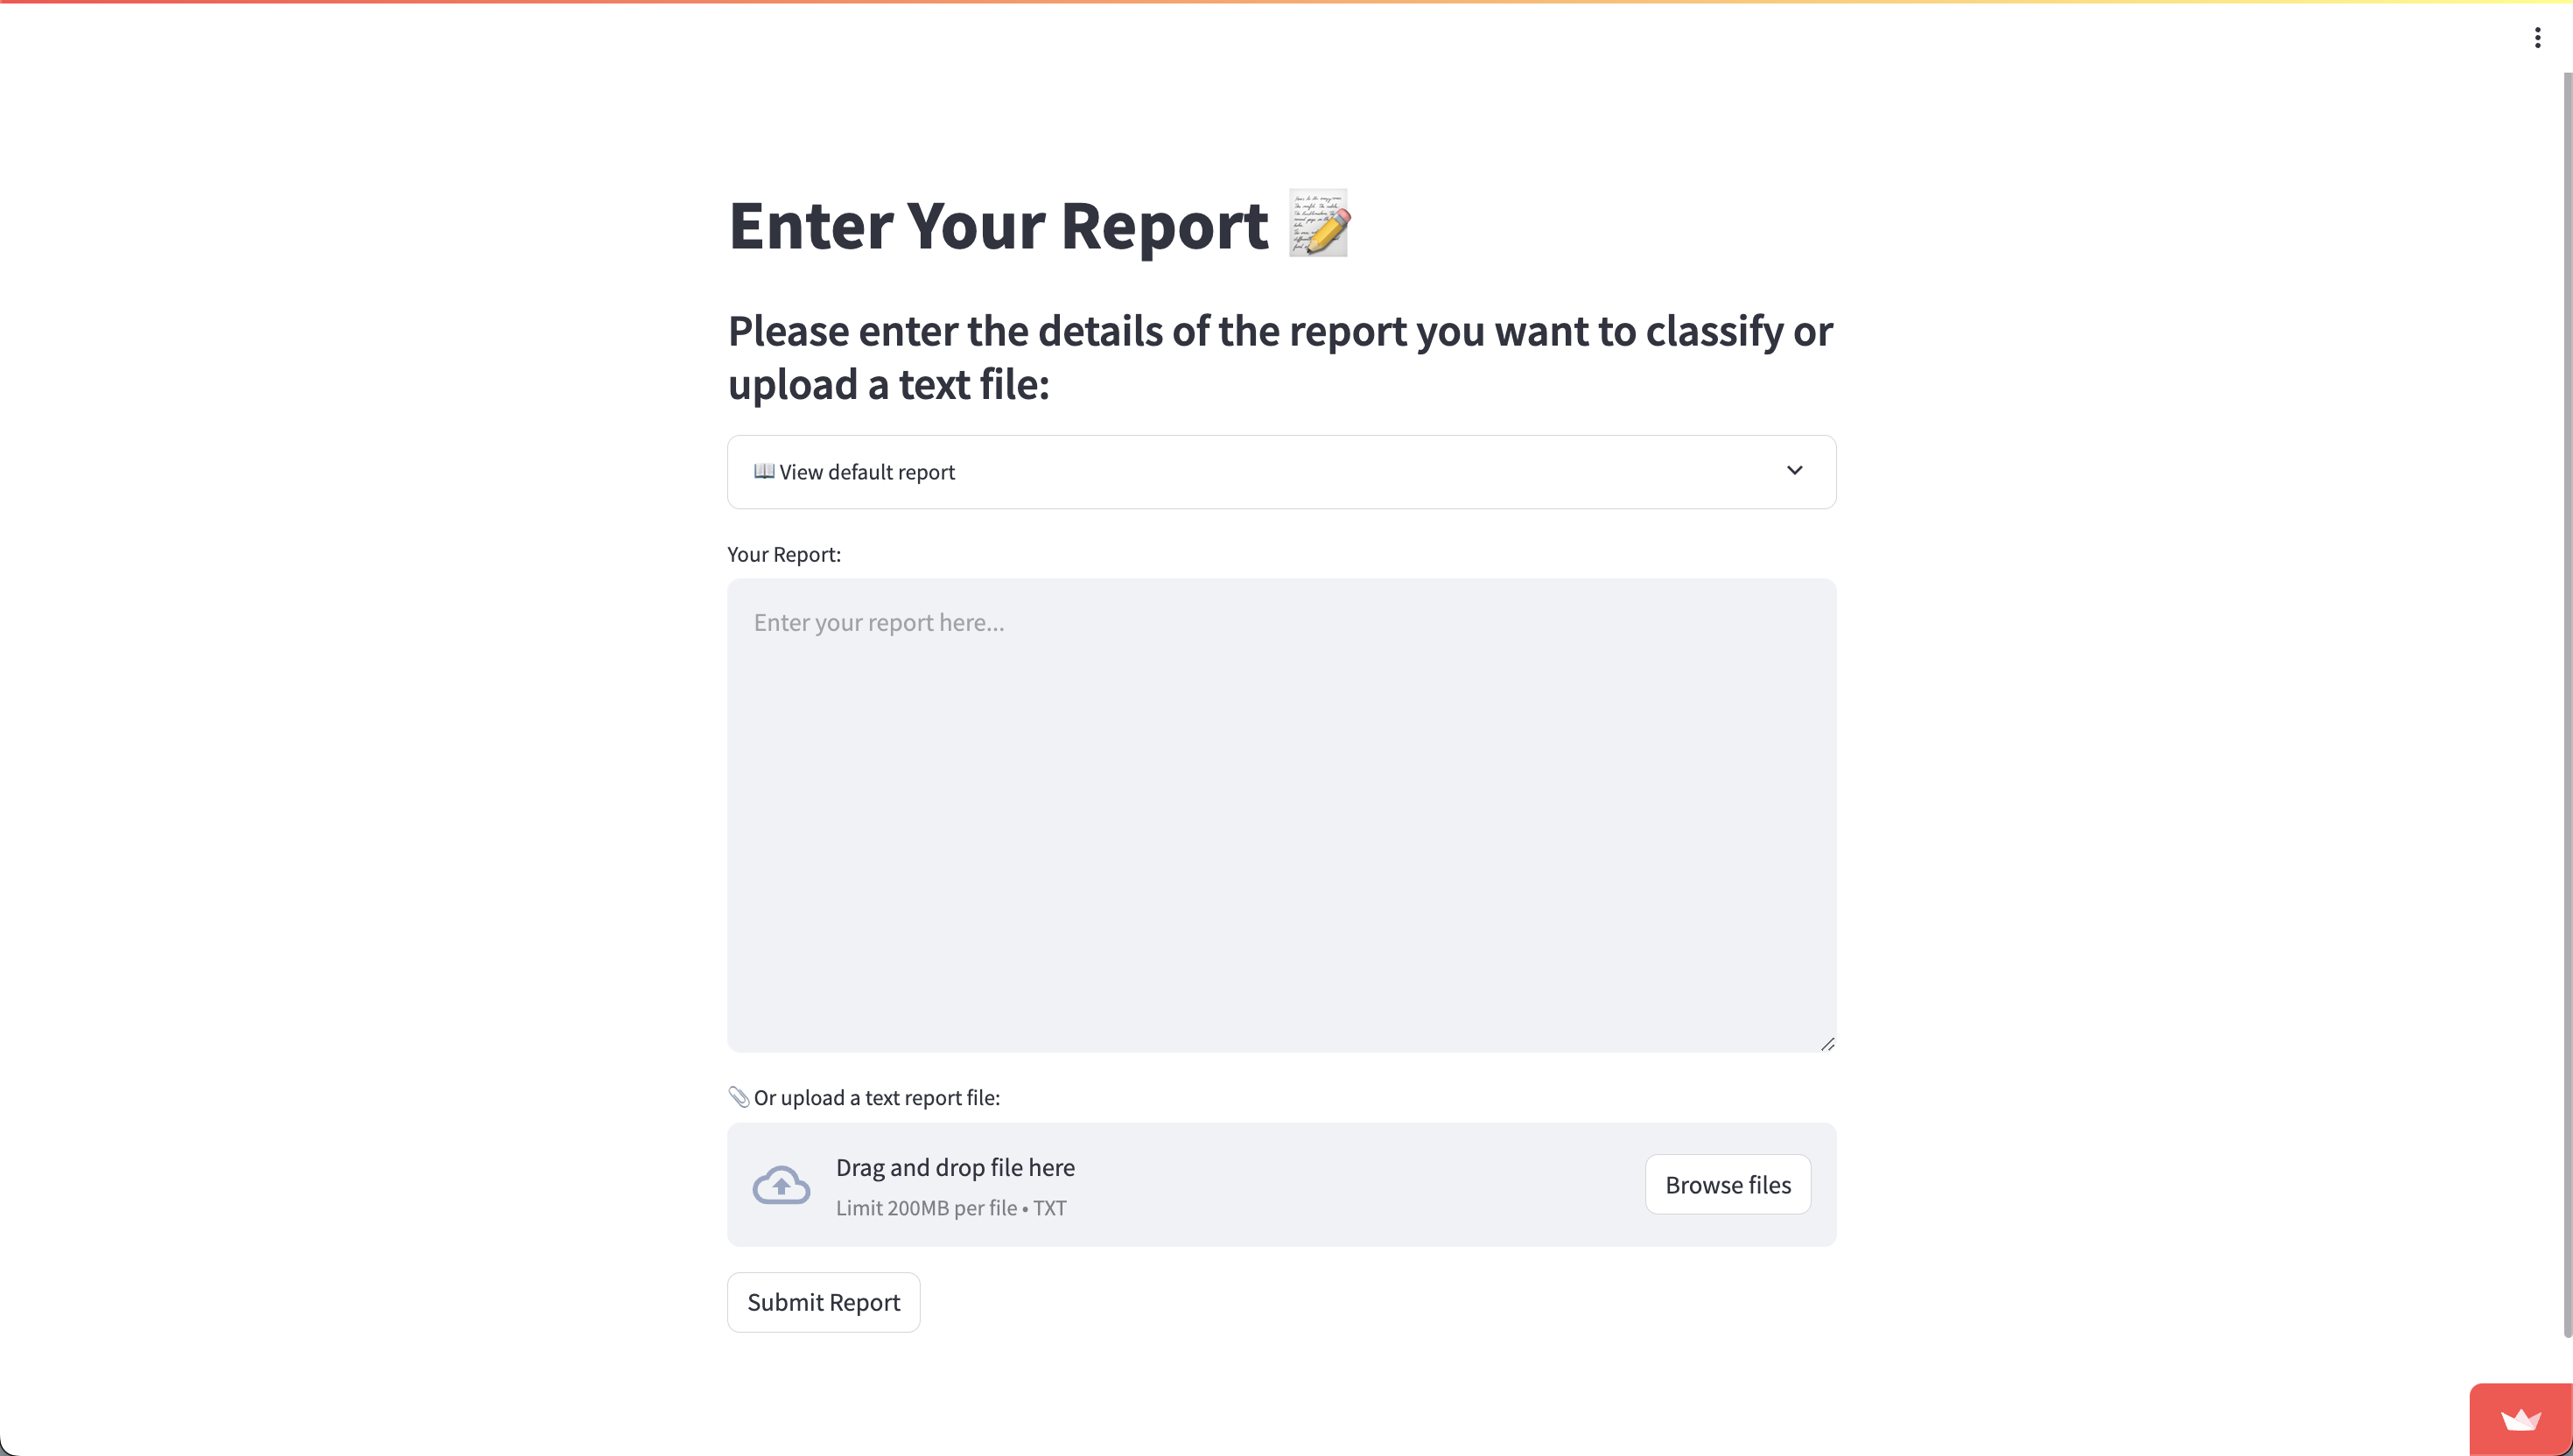
HazardID allows for three distinct methods of report submission:
- Typing the Report: Users can directly type the content of the hazard report into a designated text field within the application.
- Uploading a Text File: For convenience, users can upload a report saved as a text file, allowing for the rapid submission of pre-existing documents.
- Using a Preloaded Default Report: The application also provides a selection of default reports that users can use. This option is particularly useful for training purposes or for users unfamiliar with the types of hazards typically encountered.f
1.6 Answering Clarification Questions
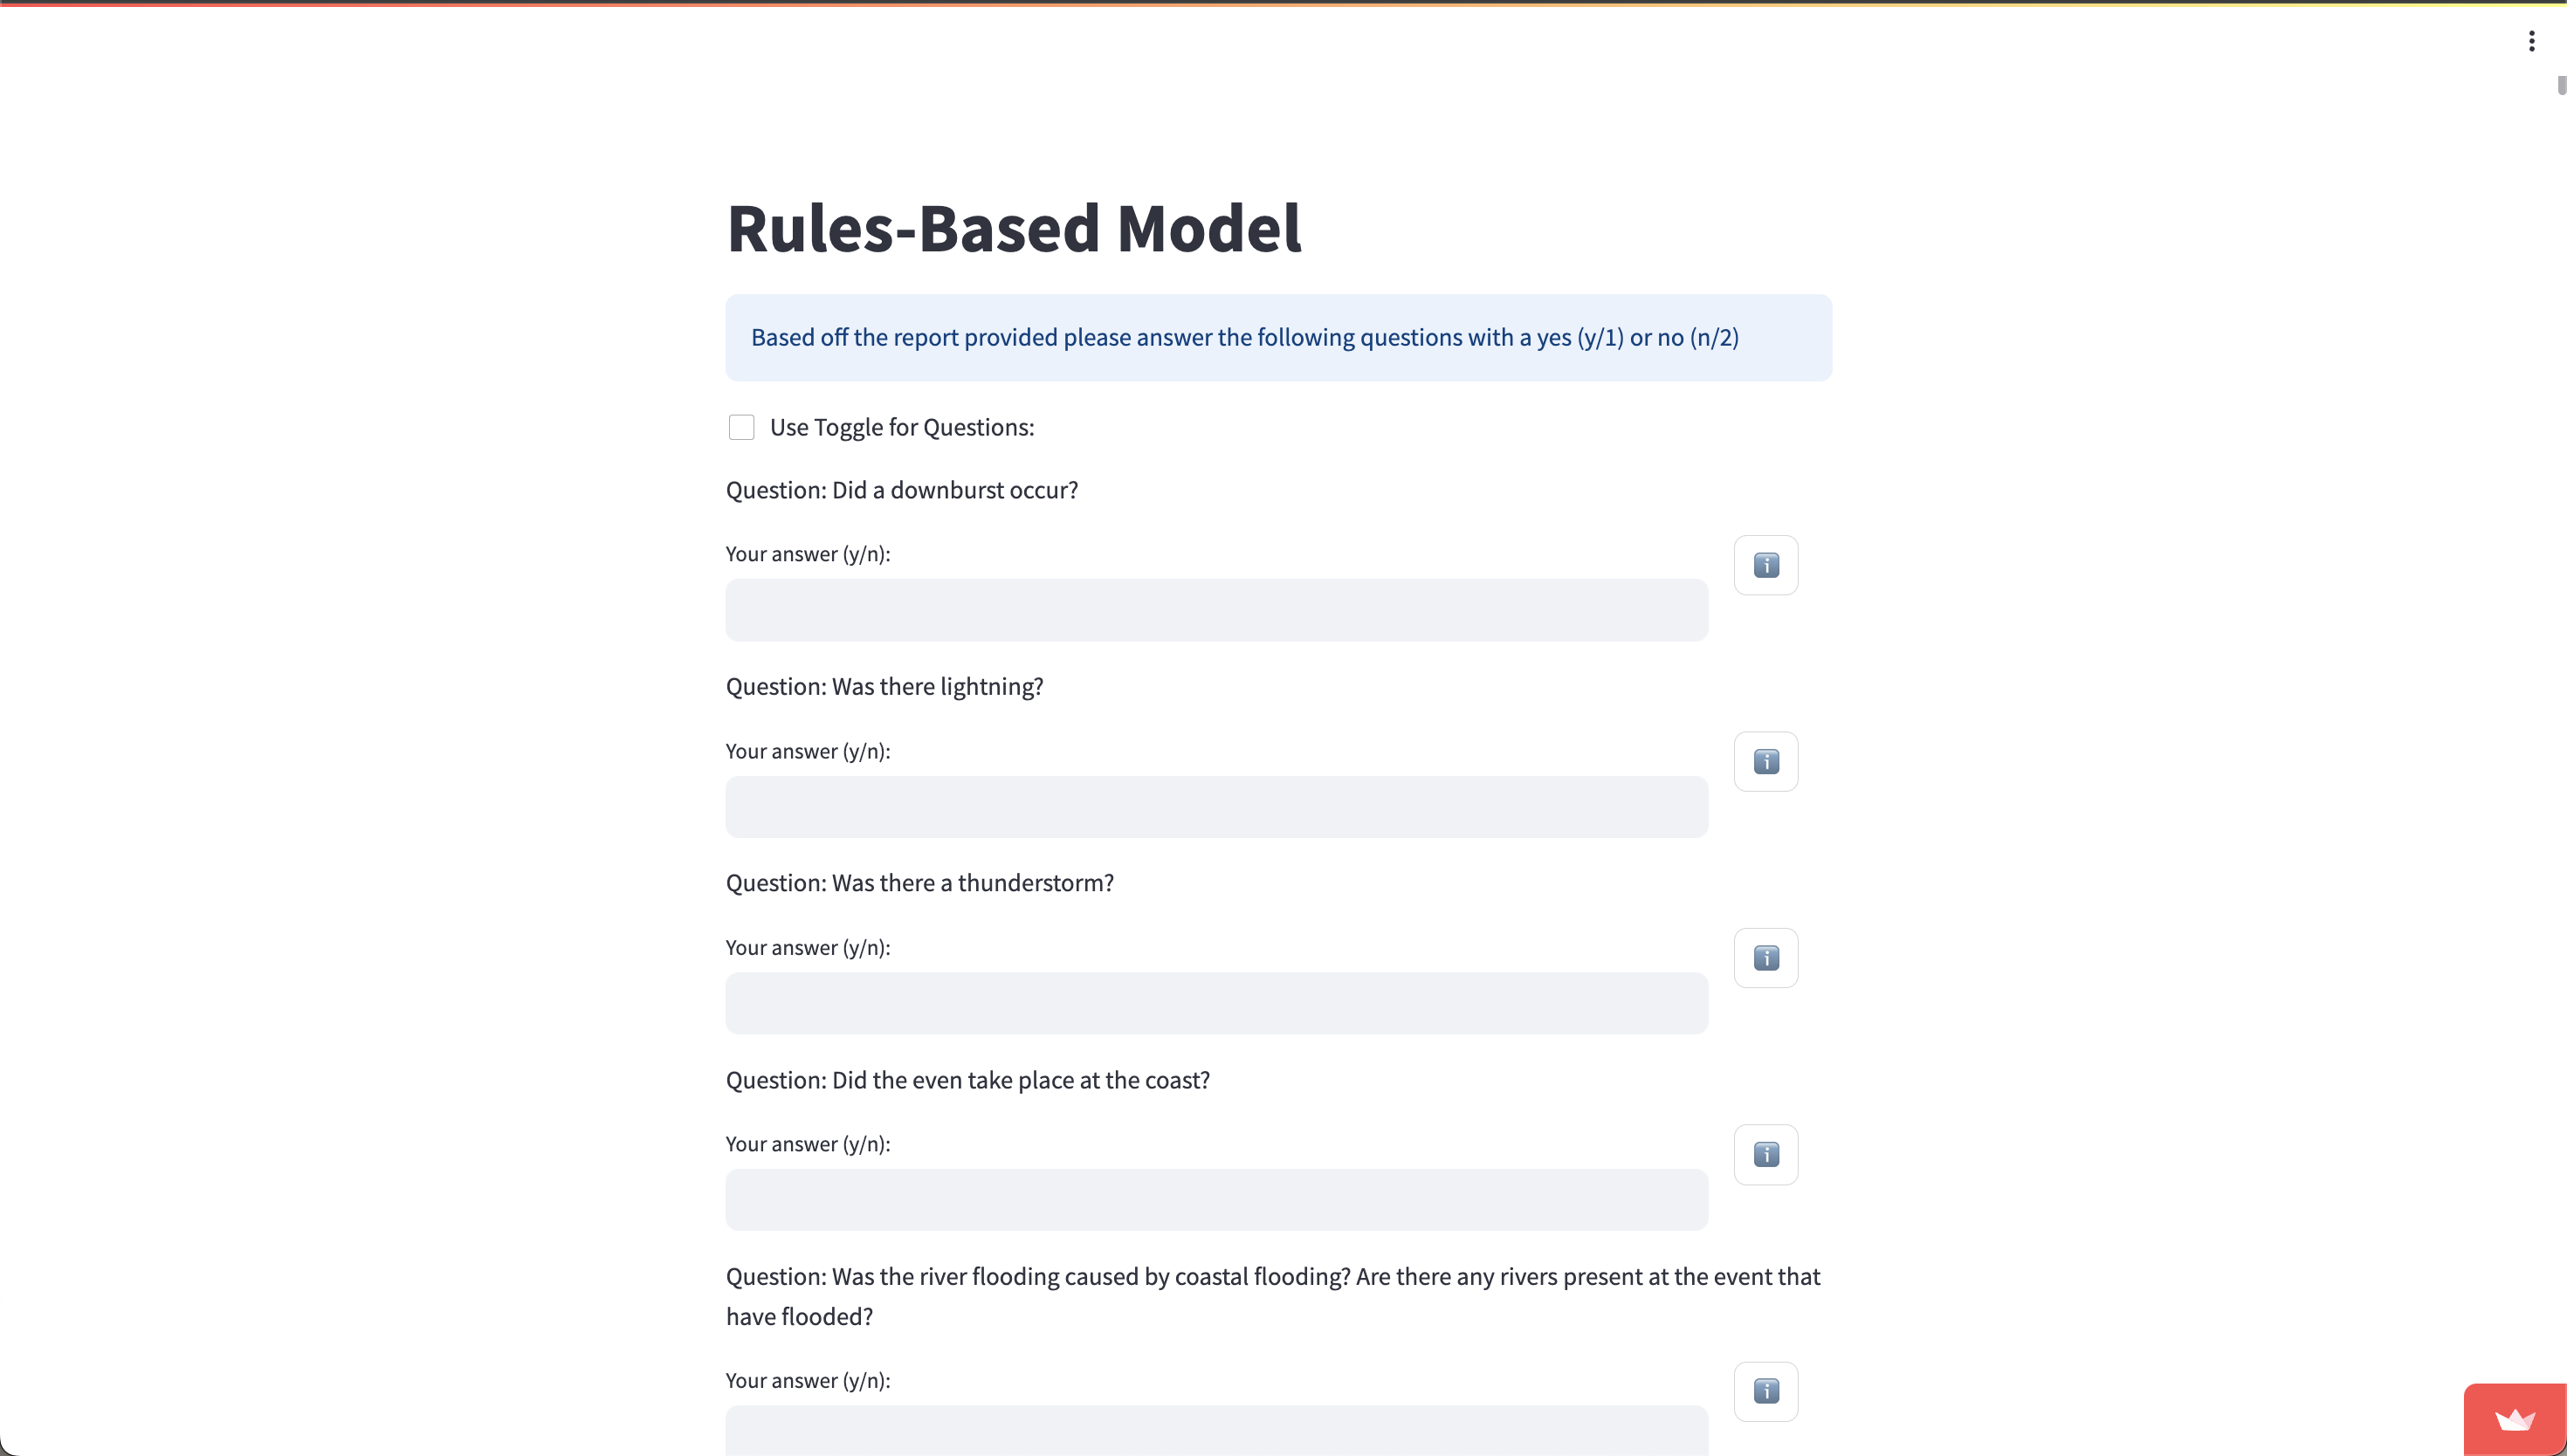
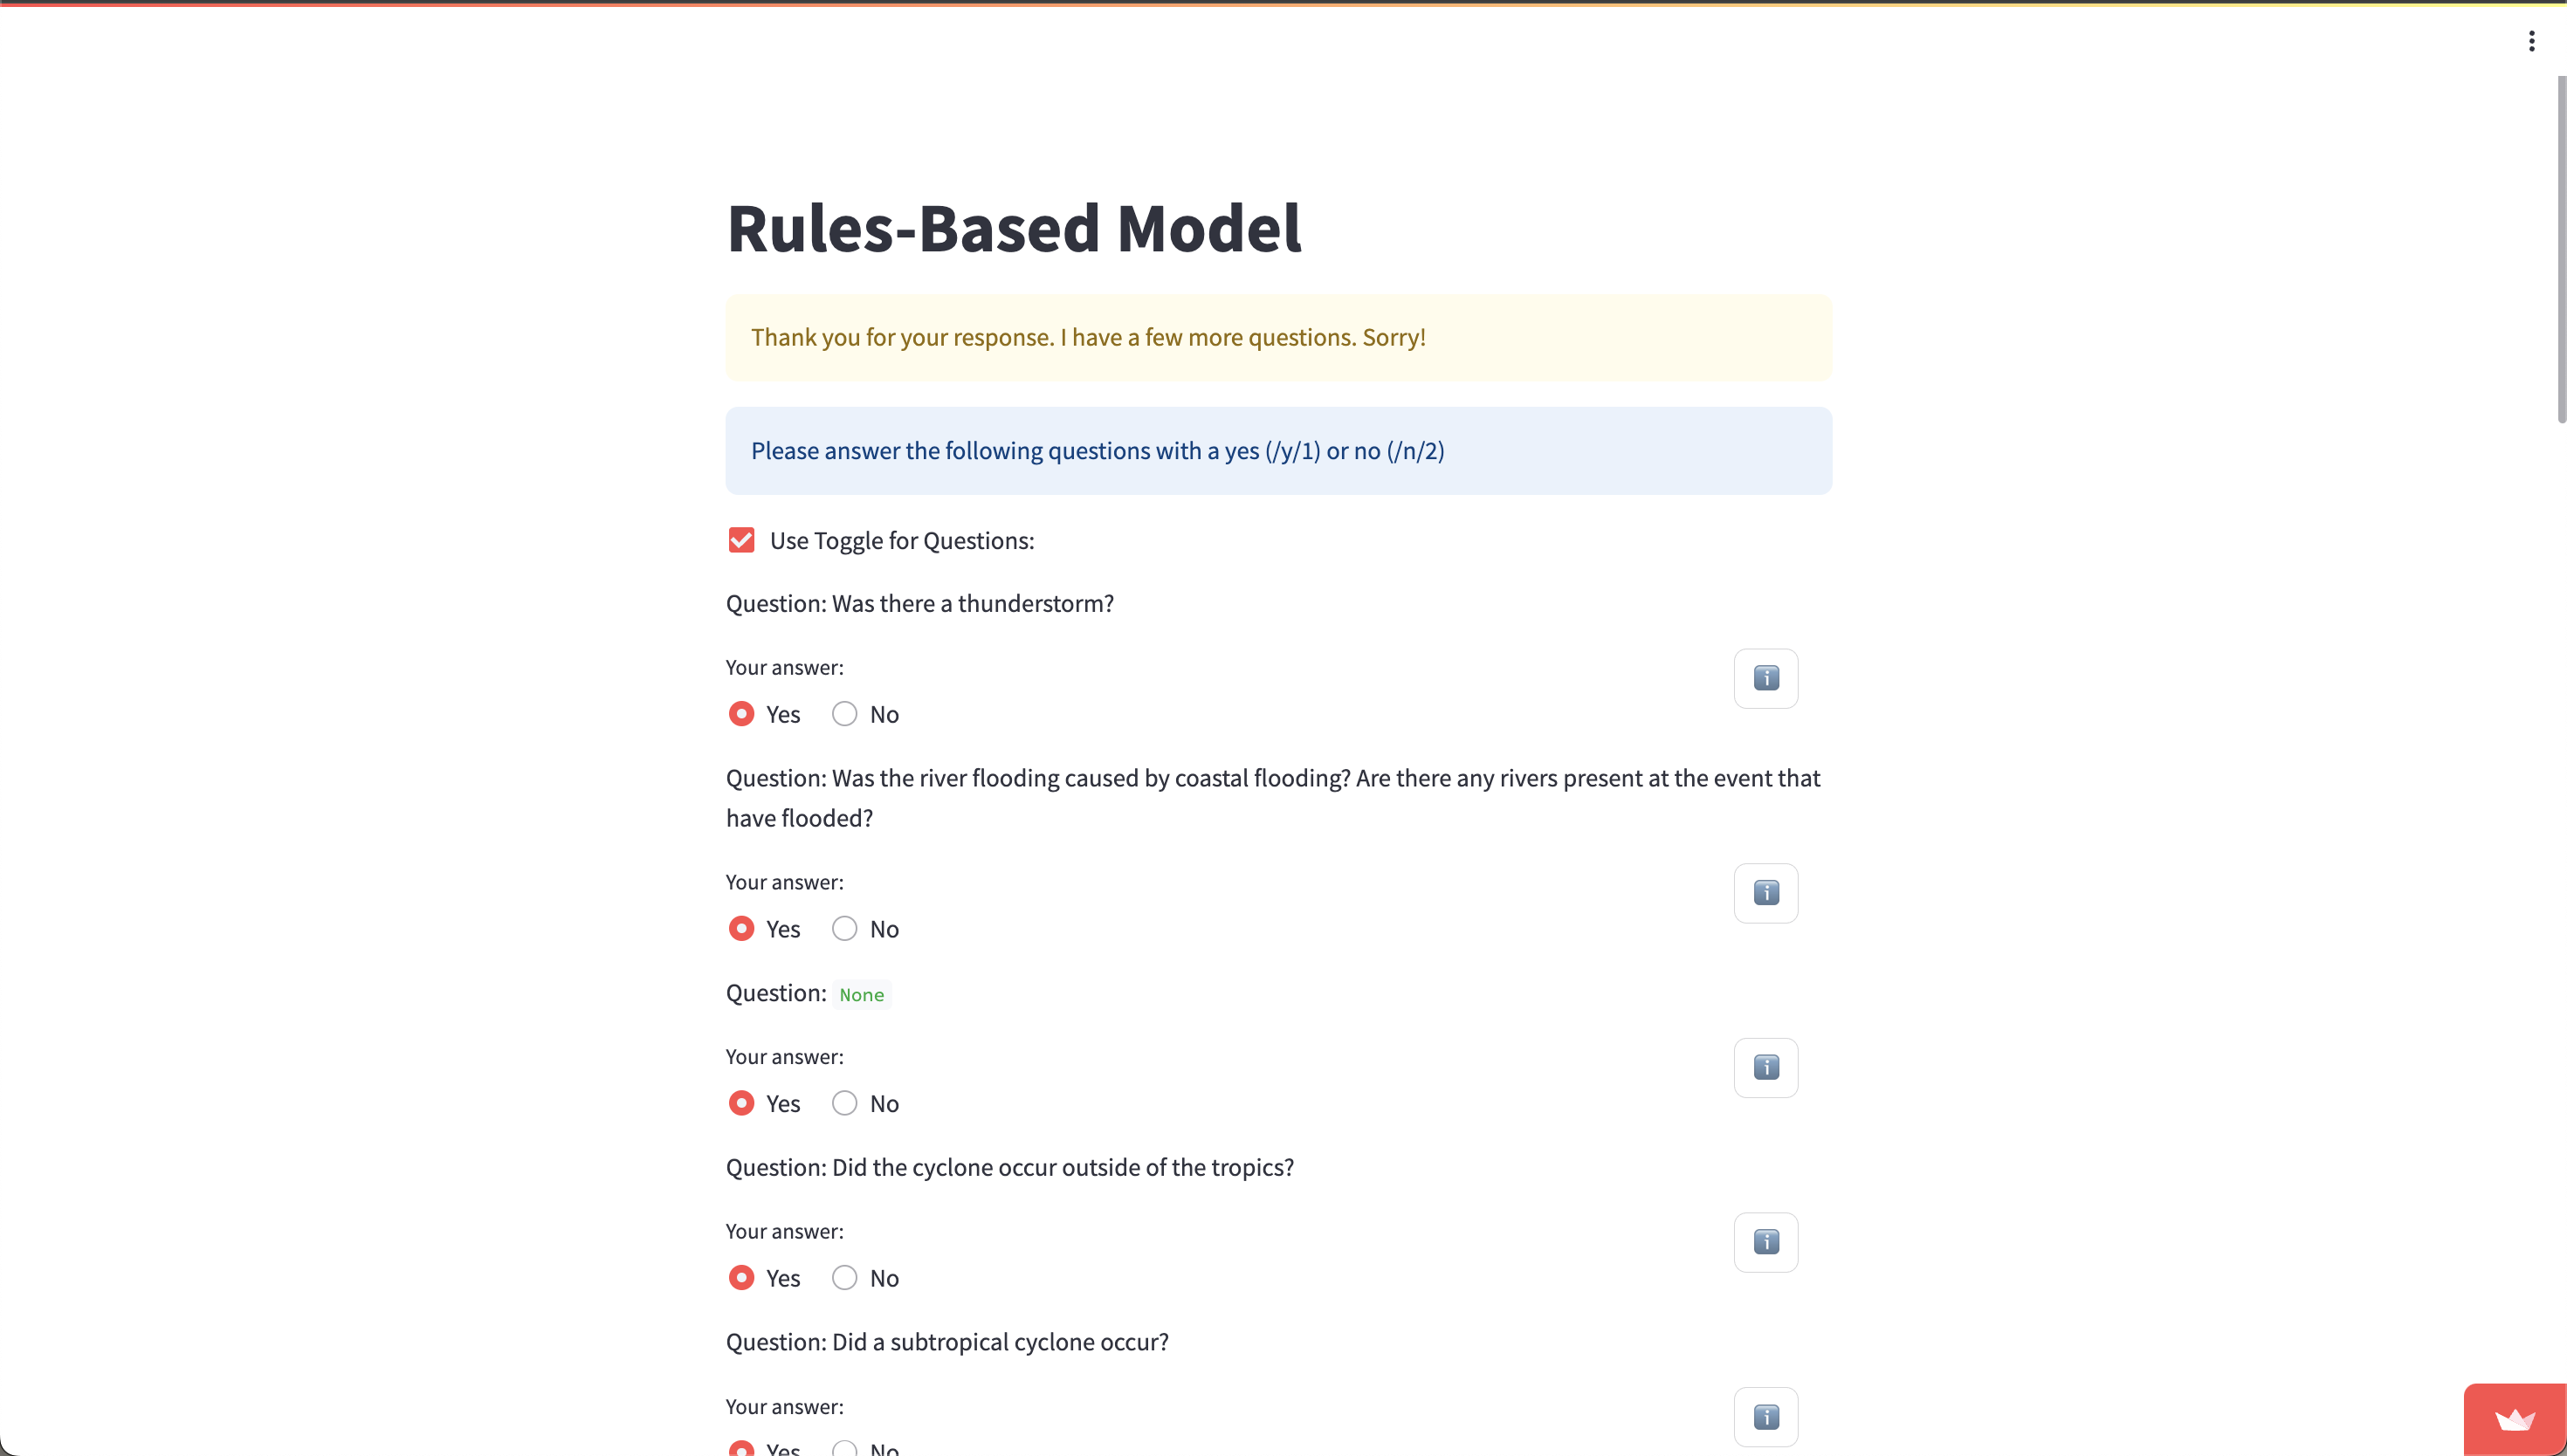
You will now be presented with a series of clarification questions based off the report that you must answer. You can choose to answer with “y” or “n” by typing it manually, or you can switch to a toggle-based system by checking the box labelled “Use Toggle for Questions”. The “i” button will reveal a drop down menu with the hazard definition. Please press on it if you are not sure about the question being asked.
Once you are finished, press “Submit Answers”. If any upstream hazards are matched (that is, associated hazards exist for any of the hazards that you replied “yes” to), then you will be presented with another round of questions. The process for answering these is similar to the first round.
1.7 Matched Hazards and Exporting
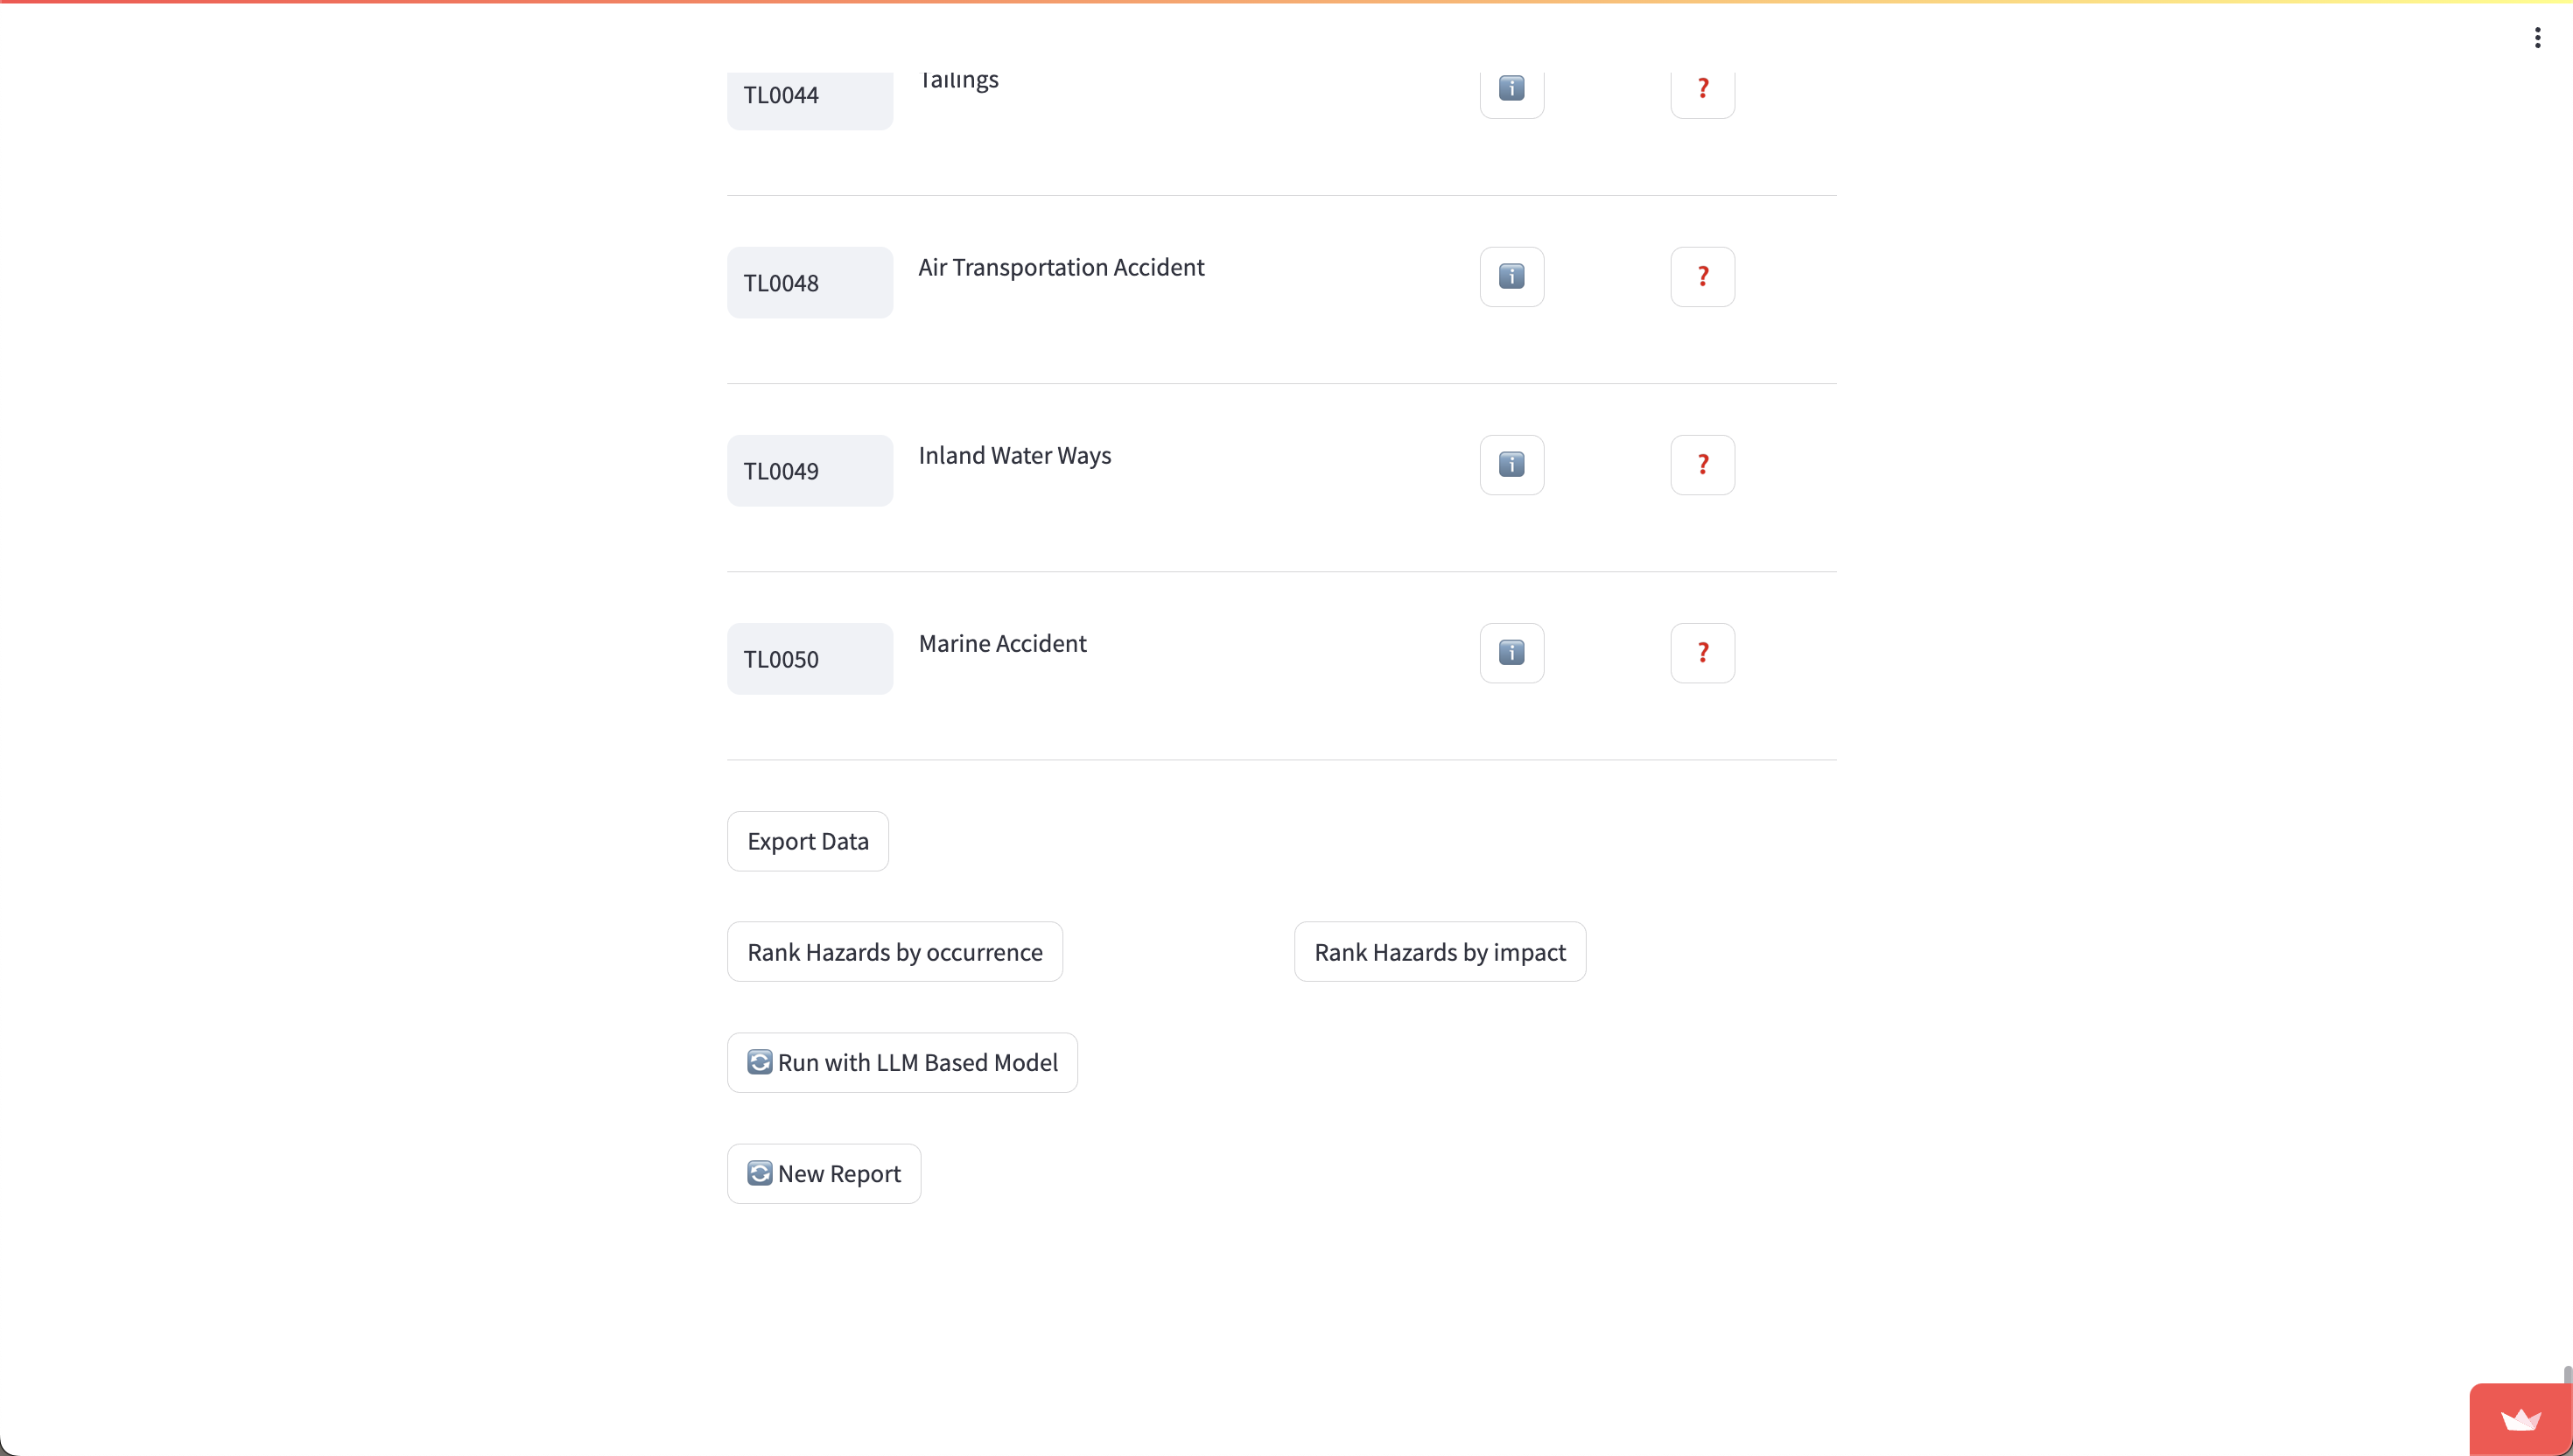
Once all questions have been answered, you will be presented with a list of matched hazards. Clicking on the “i” will let you read their official definitions, and clicking on the “?” will present you with any hazards that are semantically similar in definition to the matched hazard.
You can rank the hazards by both occurrence and impact by clicking on the respective buttons.
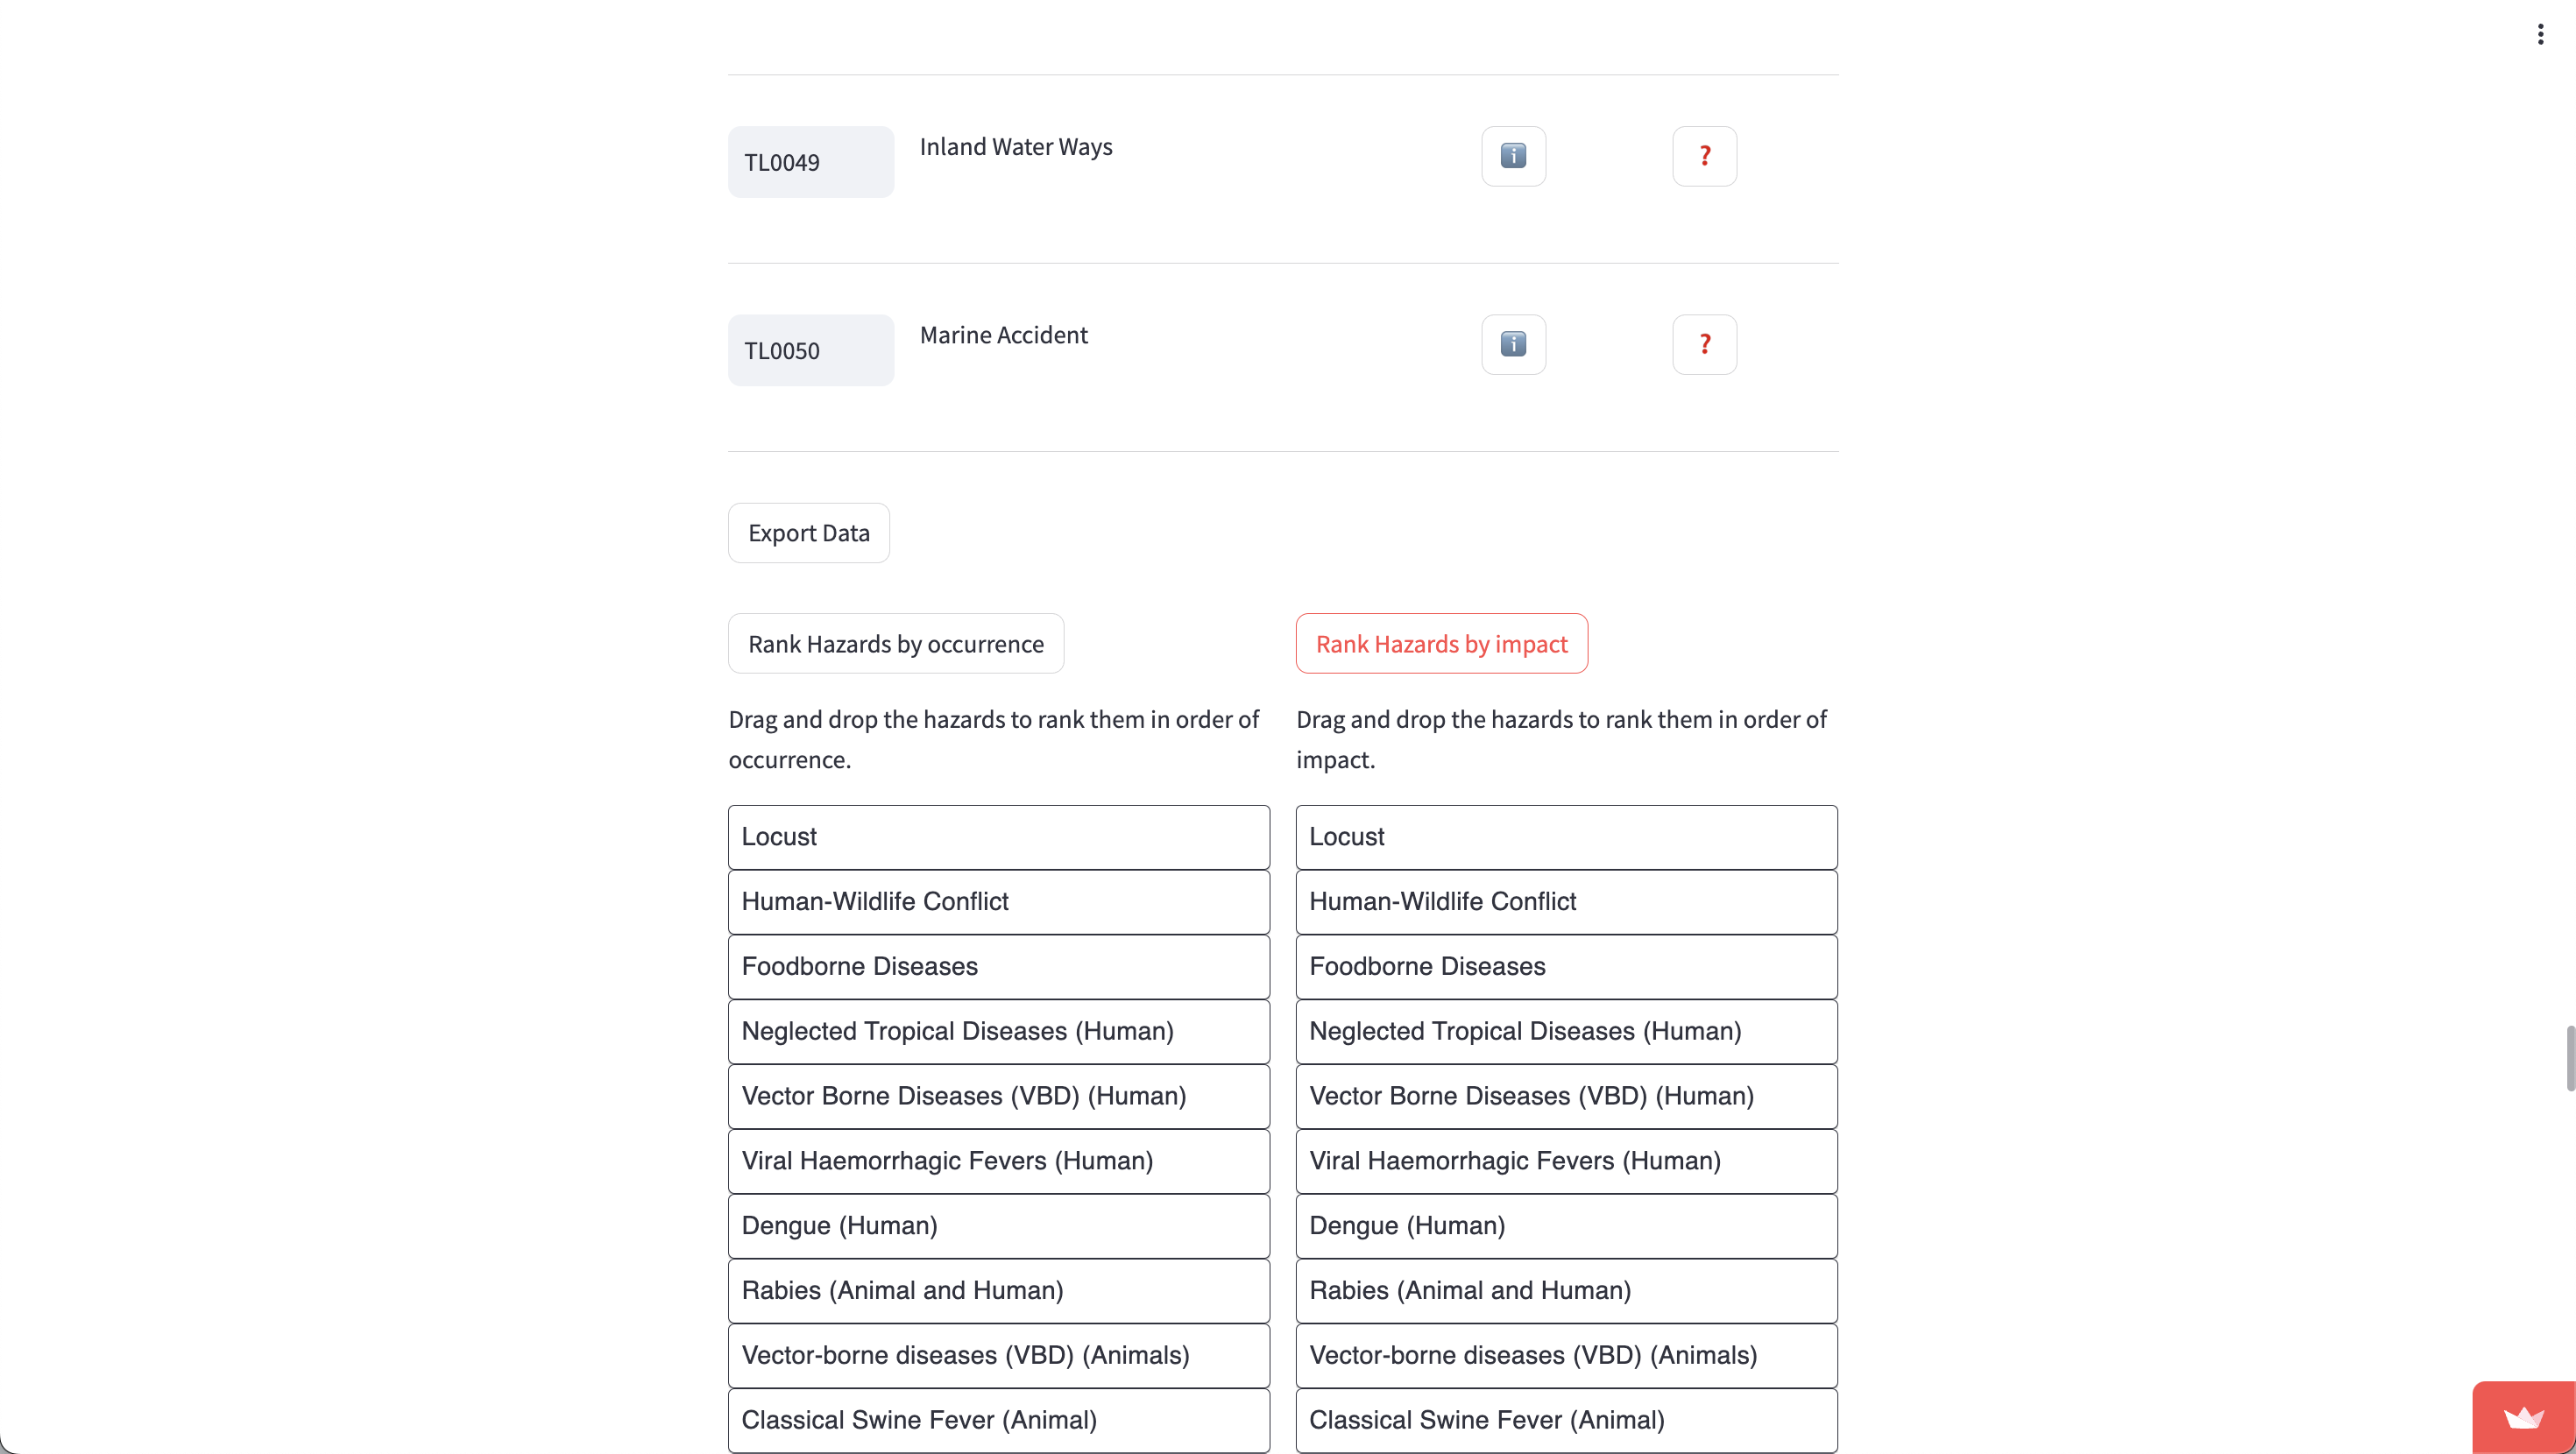
Simply drag and drop the blocks into their respective positions. You can export both of the ranked hazards by clicking on the “Export” button below each set of blocks.
Now, you can export the data of matched hazards by pressing on “Export Data”. You will be presented with a “Download data as CSV” button - press this to download a CSV version of all matched hazard codes.
Finally, you can choose to rerun the identification process with the other model (that you did not choose), and return to step 1.6, or use the tool again from scratch to tag another report (and return to step 1.4).
2. Deployment Manual
To ease the deployment process, the team created a deploy script (deploy.sh) that sets up all of the virtual environments and sets up the Google Cloud project on the Google account of your choice. This deploy script also sets up the necessary environment to run any component of the tool individually.
When the deployment process is complete, any component of the tool (specifically, the frontend, AssociationMatrix Generator, Confusion Matrix Generator, and the command line rules-based model) can be run by following the instructions of the run.sh script.
2.1 Automated Deployment
First, run deploy.sh by running this command in the top directory:
bash deploy.sh
Then, after filling all the Google Cloud details, run the following command:
bash run.sh
to launch the command line utility.
2.2 Deploying Manually
We understand that users may want to manually deploy components of the tool. To do so, please follow the following steps.
2.2.1 Manual API deployment to Google Cloud
To deploy to Google Cloud manually, please follow the following steps:
-
Create a new Project in Google Cloud and enable billing
-
Enable the following APIs for this project
- Google Cloud Functions
- Google Cloud Storage
- Secret Manager
-
Create a new secret for your OpenAI API key
-
Create a new storage bucket called
hazard_definitions_bucketand upload thehazard_definitions.jsonlocated in/tools/dataof the GitHub repository -
Install the Google Cloud CLI, authenticate with it, and switch to the repository you created:
gcloud auth
gcloud config set project {Your Project ID} -
Use GCloud CLI to deploy the function using a command like the following. Ensure the entry point is
classify:gcloud functions deploy hazard-id --gen2 --region=europe-west2 --runtime=nodejs20 --entry-point=classify --trigger-http --allow-unauthenticated -
Add your previously created OpenAI API Key secret to the newly created Google Cloud Function, exposing it as an environment variable called
OPENAI_API_KEY. -
Ensure that your Cloud Run Service Agent for the project and the new Google Cloud Function have sufficient permissions to access the
hazard_definitions_bucketand its contents. -
Copy the trigger URL for the Google Cloud Function.
-
In the GitHub repo’s
/frontendfolder, modify the .env file with your new endpoint. It should be in the following format:USERNAMES="hamish,demo"
PASSWORD="hazard"
API_URL_ML="{Your trigger URL}/classify/startGPTClassification"
API_URL_RB="{Your trigger URL}/classify/startClassification"
API_URL_REFINE="{Your trigger URL}/classify/refineClassification"
API_URL_CONFUSION="{Your trigger URL}/classify/getHazardsByCode"
2.2.2 Manual Deployment of Association Matrix Generator
To run the Association Matrix Generator manually, please follow the steps as detailed. Please also note that the association matrix requires significantly powerful hardware to run properly.
- Navigate to the
/toolsdirectory.
cd tools
- Install all requirements in
/tools/requirement.txt.
pip3 install -r requirement.txt
- Change directories to
/tools/AssociationMatrix.
cd AssociationMatrix
- Create a directory named
outin the current directory.
mkdir out
- Download the model from HuggingFace.
# Define models directory
models_dir="./models"

# Create models directory
mkdir -p "$models_dir"

# Download file from Hugging Face (replace with the actual URL)
hugging_face_url="https://huggingface.co/TheBloke/Llama-2-13B-chat-GGUF/resolve/main/llama-2-13b-chat.Q5_K_M.gguf"
wget "$hugging_face_url" -O "$models_dir/13B-chat-GGUF-q5_K_M.gguf"
- Run the following command to start the generation:
python3 llamaCTransformerAssocGenerator.py > output.log &
2.2.3 Manually Run Confusion Matrix Generator
To generate the confusion matrix manually, follow the steps below:
- Navigate to the ConfusionMatrix directory
cd tools/ConfusionMatrix
- Run the following command:
python3 ConfusionMatrix.py
2.2.4 Manually deploy Streamlit Frontend
To run a local version of the frontend, please follow these steps:
- Navigate to the frontend directory:
cd frontend
- Install all requirements in
frontend/requirements.txt.
pip3 install -r requirements.txt
- Run the following command:
streamlit run app.py
Now, a localhost instance will be deployed in your browser.
2.3 Running System Tests
Both systems tests for the API and the command-line rules-based model can be run with a simple script:
bash test.sh
You will then be presented with a command-line utility that will let you choose which component to run the tests for.
3. OpenAPI Specification
openapi: 3.0.0
info:
  title: HazardID Classification API
  description: API for classifying reports based on hazard definitions and refining those classifications. Also provides hazard information based on UNDRR-ISC hazard codes.
  version: "1.0.0"
paths:
  /classify/startClassification:
    post:
      summary: Initiate report classification
      requestBody:
        required: true
        content:
          application/json:
            schema:
              type: object
              properties:
                report:
                  type: string
                  description: Report text to be classified.
              required:
                - report
      responses:
        '200':
          description: Classification questions based on report
          content:
            application/json:
              schema:
                type: array
                items:
                  type: object
                  properties:
                    question:
                      type: string
                    hazardCode:
                      type: string
        '400':
          description: Bad request if report is missing
  /classify/startGPTClassification:
    post:
      summary: Start classification using GPT for hazard identification
      requestBody:
        description: Same as /startClassification
        required: true
        content:
          application/json:
            schema:
              $ref: '#/components/schemas/ClassificationRequest'
      responses:
        '200':
          description: GPT-identified hazards and questions based on report
          content:
            application/json:
              schema:
                $ref: '#/components/schemas/QuestionsResponse'
  /classify/startCombinedClassification:
    post:
      summary: Combine standard and GPT classification methods
      requestBody:
        description: Initiate repor classification using GPT and rules based methods
        required: true
        content:
          application/json:
            schema:
              $ref: '#/components/schemas/ClassificationRequest'
      responses:
        '200':
          description: Combined set of questions from both methods
          content:
            application/json:
              schema:
                $ref: '#/components/schemas/QuestionsResponse'
  /classify/refineClassification:
    post:
      summary: Refine classification with confirmed and rejected hazards
      requestBody:
        required: true
        content:
          application/json:
            schema:
              type: object
              properties:
                confirmed:
                  type: array
                  items:
                    type: string
                rejected:
                  type: array
                  items:
                    type: string
              required:
                - confirmed
                - rejected
      responses:
        '200':
          description: Further refined questions
          content:
            application/json:
              schema:
                type: array
                items:
                  type: object
                  properties:
                    question:
                      type: string
                    hazardCode:
                      type: string
        '400':
          description: Bad request if confirmed or rejected hazards are missing
  /classify/getHazardsByCode:
    post:
      summary: Get hazard definitions by codes
      requestBody:
        required: true
        content:
          application/json:
            schema:
              type: object
              properties:
                hazardCodes:
                  type: array
                  items:
                    type: string
              required:
                - hazardCodes
      responses:
        '200':
          description: Hazard definitions for the provided codes
          content:
            application/json:
              schema:
                type: array
                items:
                  type: object
                  properties:
                    Hazard_Code:
                      type: string
                    Description:
                      type: string
components:
  schemas:
    ClassificationRequest:
      type: object
      properties:
        report:
          type: string
          description: Report text to be classified.
      required:
        - report
    QuestionsResponse:
      type: array
      items:
        type: object
        properties:
          question:
            type: string
          hazardCode:
            type: string