Implementation
Main Tool
1. API
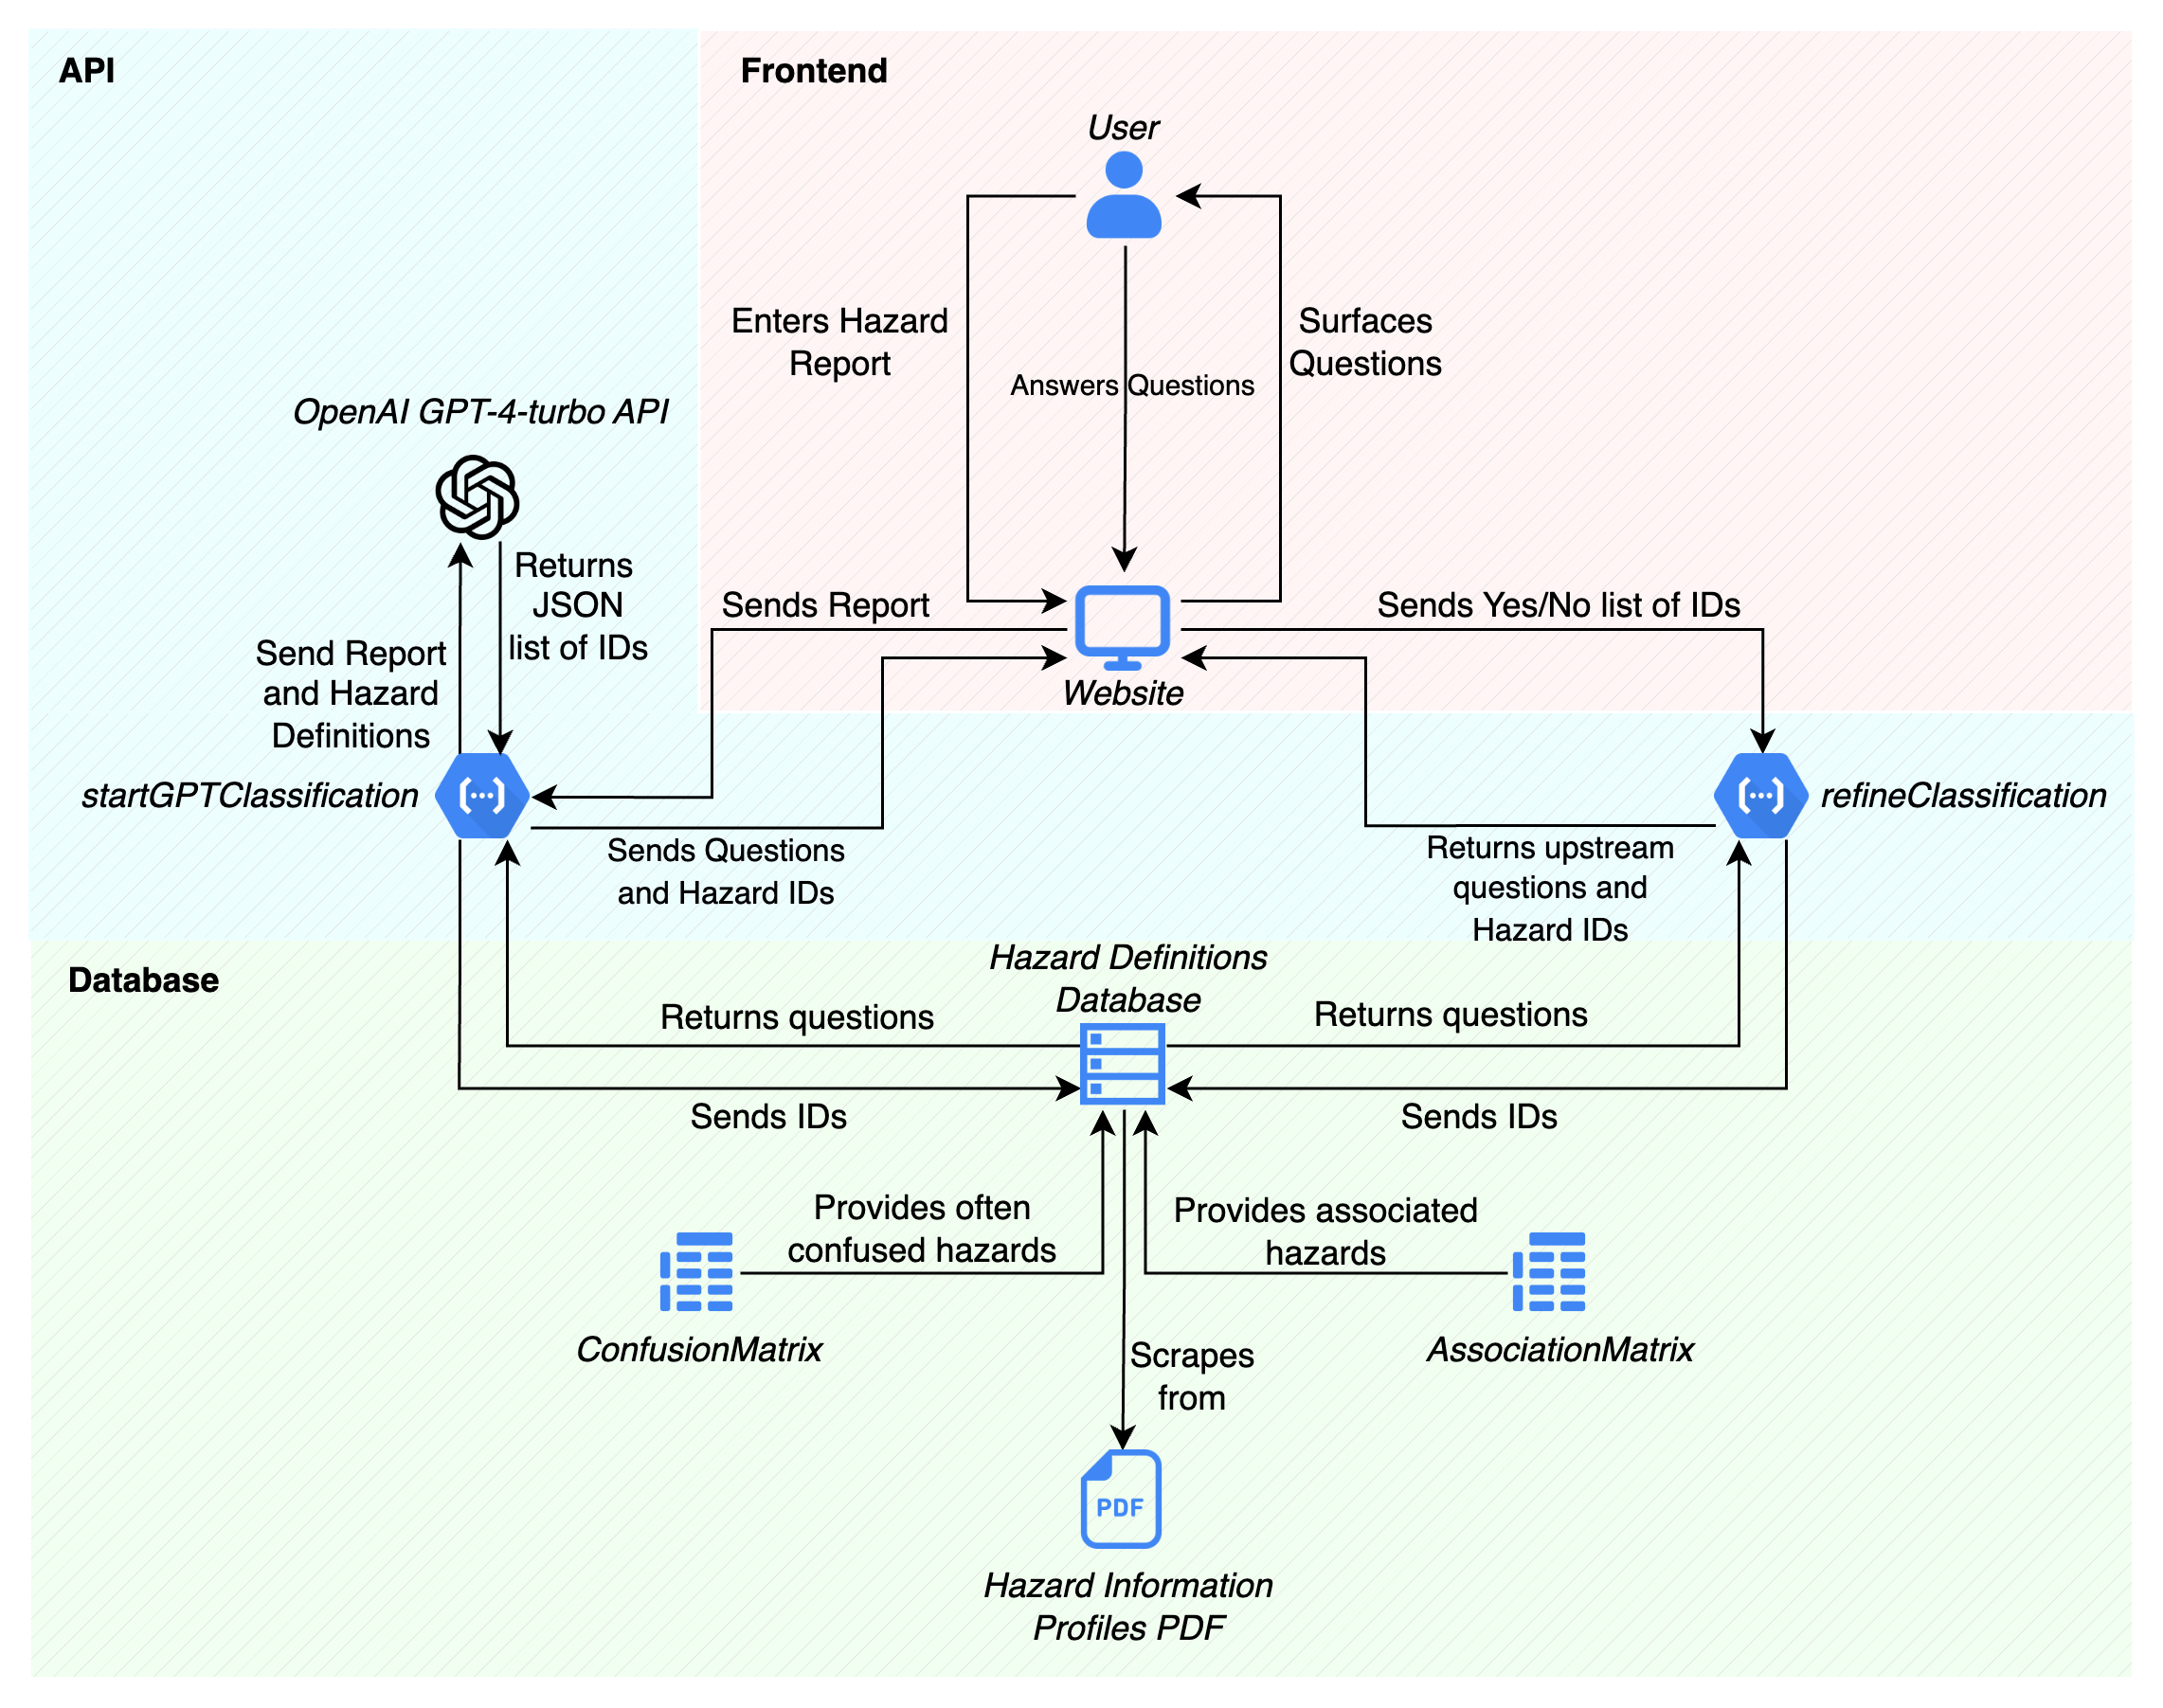
Our core API is implemented using Express.js and hosted on Google Cloud Functions.
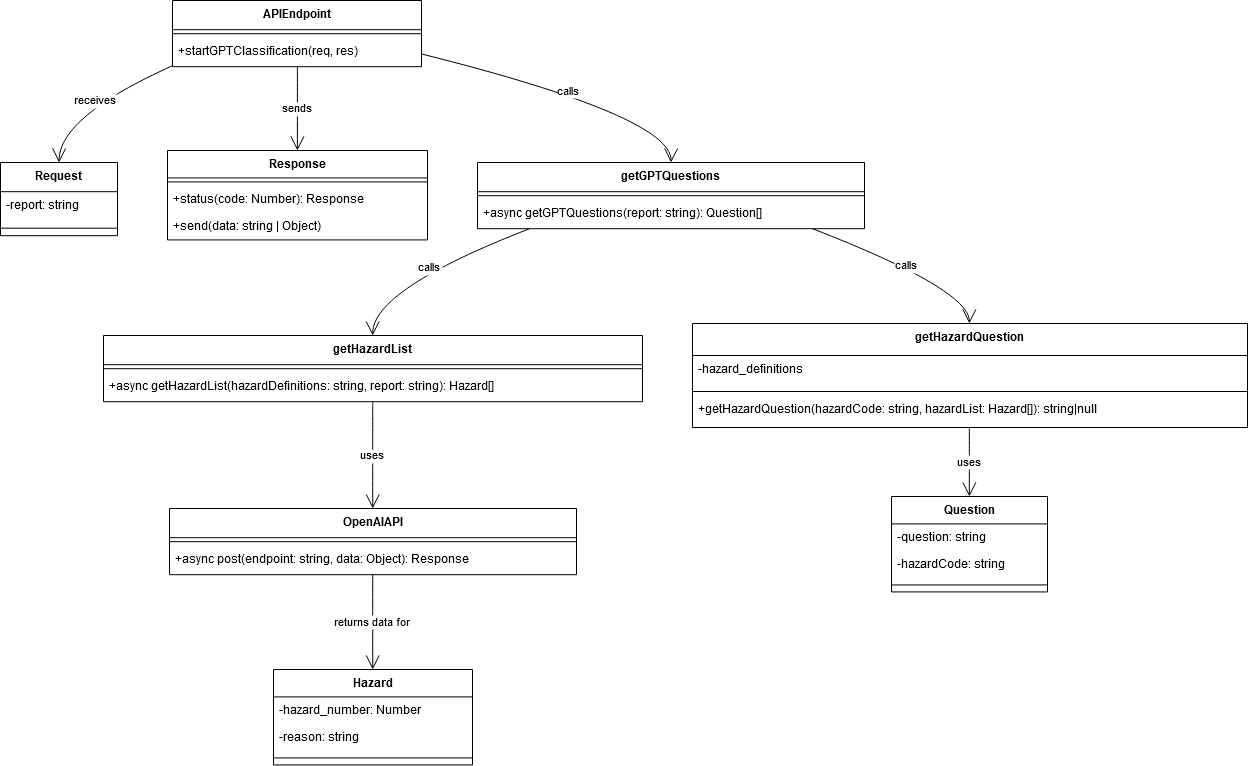
Figure 1b: A UML diagram for the API structure.
Our API design applies design principles and patterns to improve its maintainability, scalability, and readability. Key principles include separation of concerns, single responsibility, and DRY (Don't Repeat Yourself). We use patterns like Factory, Strategy, and Singleton where applicable.
We made sure to design around modularisation, a service layer for business logic, and pattern-based enhancements.
1.1 File Structure
/
|- controllers/
|  |- classificationController.js
|- services/
|  |- classificationService.js
|  |- hazardDefinitionService.js
|- routes/
|  |- classificationRoutes.js
|- app.js
|- package.json
This structure supports separation of concerns, separating it into business logic, HTTP request handling, and configuration, making it easier to manage, scale, extend, and test.
1.2 app.js
const express = require('express');
const classificationRoutes = require('./routes/classificationRoutes');
const app = express();

app.use(express.json());

app.use('/classify', classificationRoutes);

exports.classify = app;
The main app.js initializes the express.js app and adds the classification routes from ‘/routes/classificationRoutes’. These routes are then exposed to the /classify endpoint.
const express = require('express');
const classificationController = require('../controllers/classificationController');
const router = express.Router();

router.post('/startClassification', classificationController.startClassification);
router.post('/refineClassification', classificationController.refineClassification);
router.post('/startGPTClassification', classificationController.startGPTClassification);
router.post('/getConfusedHazards', classificationController.getConfusedHazards);

module.exports = router;
1.3 classificationRoutes.js
Design
We implemented a Router design pattern, allowing us to declare routes in a modular fashion, handle different paths and HTTP methods (GET, POST, etc.) with specific controller actions. This makes the application's routing more manageable and scalable by segregating route declarations from the main application file.
Implementation
We use express.Router() to manage traffic flow to different features of our controller layer based on the requested resource. The routes are declared in this file, and their associated classificationController endpoint is linked.
1.4 classificationController.js
const classificationService = require('../services/classificationService');

exports.startClassification = async (req, res) => {
    try {
        const report = req.body.report;
        if (!report) {
            return res.status(400).send("Report is required");
        }

        const questions = await classificationService.startClassification(report);
        return res.status(200).send(questions);
    } catch (error) {
        console.error('Error in startClassification:', error);
        return res.status(500).send("An internal error occurred");
    }
};

exports.refineClassification = async (req, res) => {
    try {
        const { confirmed, rejected } = req.body;
        if (!confirmed || !rejected) {
            return res.status(400).send("Both confirmed and rejected hazards are required");
        }

        const questions = await classificationService.refineClassification(confirmed, rejected);
        return res.status(200).send(questions);
    } catch (error) {
        console.error('Error in refineClassification:', error);
        return res.status(500).send("An internal error occurred");
    }
};

exports.startGPTClassification = async (req, res) => {
    try {
        const report = req.body.report;
        if (!report) {
            return res.status(400).send("Report is required");
        }

        const questions = await classificationService.startGPTClassification(report);
        return res.status(200).send(questions);
    } catch (error) {
        console.error('Error in startGPTClassification:', error);
        return res.status(500).send("An internal error occurred");
    }
};

exports.getConfusedHazards = async (req, res) => {
    try {
        const hazardCodes = req.body.hazardCodes;
        if (!hazardCodes) {
            return res.status(400).send("Hazard codes are required");
        }

        const confusedHazards = await classificationService.getConfusedHazards(hazardCodes);
        return res.status(200).send(confusedHazards);
    } catch (error) {
        console.error('Error in getConfusedHazards:', error);
        return res.status(500).send("An internal error occurred");
    }
};
Design
The classificationController is the first point of contact for incoming HTTP requests. Its primary role is to interpret the request, validate the input, and then delegate the processing to the services layer. After receiving the processed data back from the service, the controller formats and sends an HTTP response to the client. This separation allows the controller to focus solely on request handling and response sending, without being cluttered with extra logic.
Implementation
The controllers use asynchronous functions (async/await) to handle potentially long-running operations, namely the LLM processing of the hazard report. This approach ensures that the Node.js event loop is not blocked, allowing the server to handle other incoming requests while waiting for a response from the service layer.
Error handling is done using try/catch blocks, allowing the application to catch and respond to errors gracefully.
1.5 classificationService.js
const natural = require('natural');
const axios = require("axios");
const hazardDefinitionService = require('./hazardDefinitionService');

class ClassificationService {
  constructor() {
    this.tokenizer = new natural.WordTokenizer();
  }

  async startClassification(report) {
    const hazardDefinitions = await hazardDefinitionService.getHazardDefinitions();

    return this.getReportQuestions(report, hazardDefinitions);
  }

  async startGPTClassification(report) {
    const hazardDefinitions = await hazardDefinitionService.getHazardDefinitions();

    return this.getGPTQuestions(report, hazardDefinitions);
  }

  async refineClassification(confirmed, rejected) {
    const hazardDefinitions = await hazardDefinitionService.getHazardDefinitions();

    return this.getUpstreamQuestions(confirmed, rejected, hazardDefinitions);
  }

  async getConfusedHazards(hazardCodes) {
    const hazardDefinitions = await hazardDefinitionService.getHazardDefinitions();

    return hazardDefinitions.filter(hazard => hazardCodes.includes(hazard.Hazard_Code.toLowerCase()));
  }
}

module.exports = new ClassificationService();
Design
By separating the classification logic into its service (ClassificationService), the application's architecture cleanly divides the responsibilities. Controllers handle HTTP request/response cycles, while the service layer deals with the classification logic.
Each classification method (startClassification, startGPTClassification, refineClassification, getConfusedHazards) targets a specific classification task, adhering to the Single Responsibility Principle.
Implementation
Natural Language Processing (NLP): We leverage the natural NLP library for tokenising report text.
External API Requests: We use axios for HTTP requests to the GPT-34-turbo API.
1.6 Individual Endpoint Flow
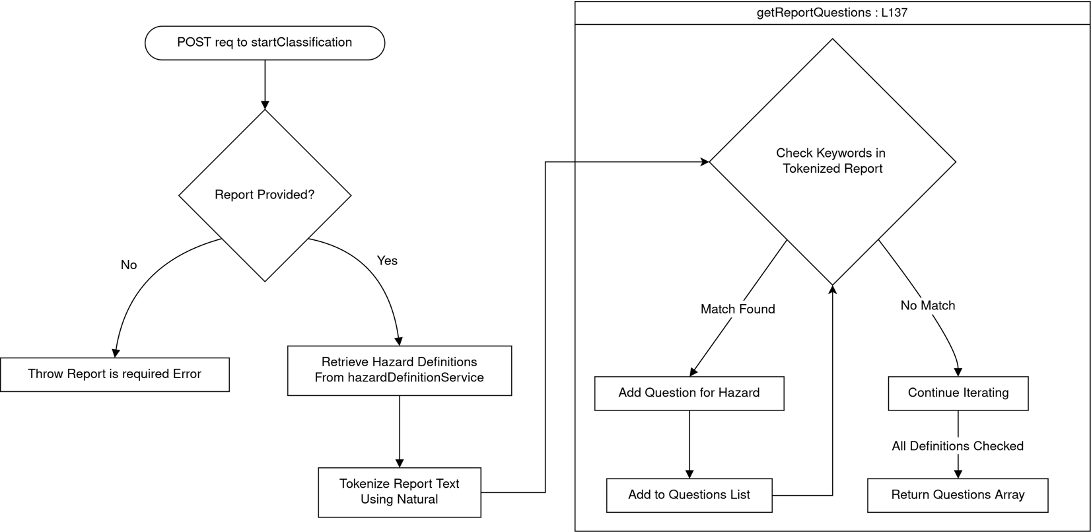
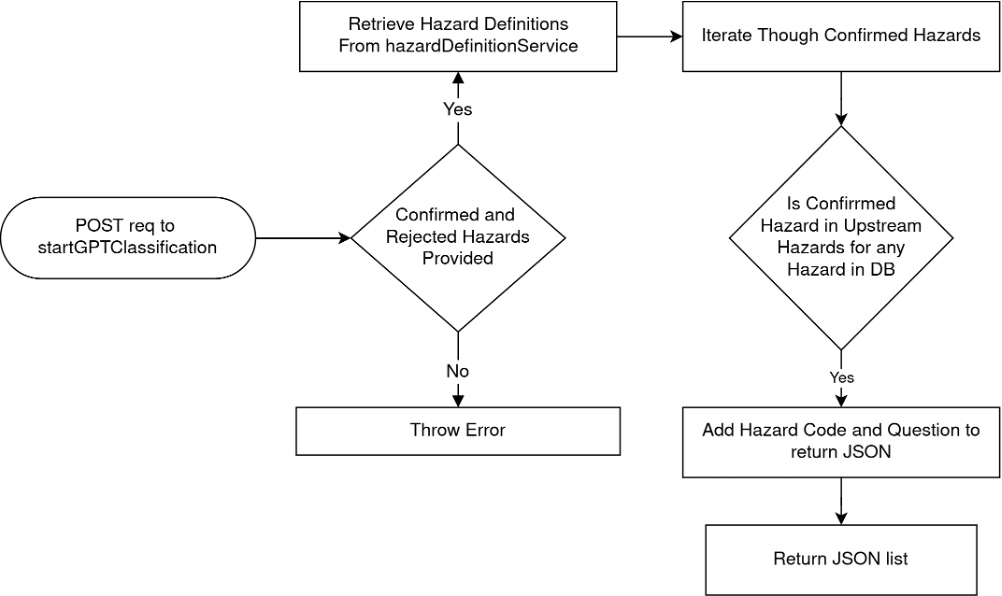
1.6.1 startClassification Endpoint
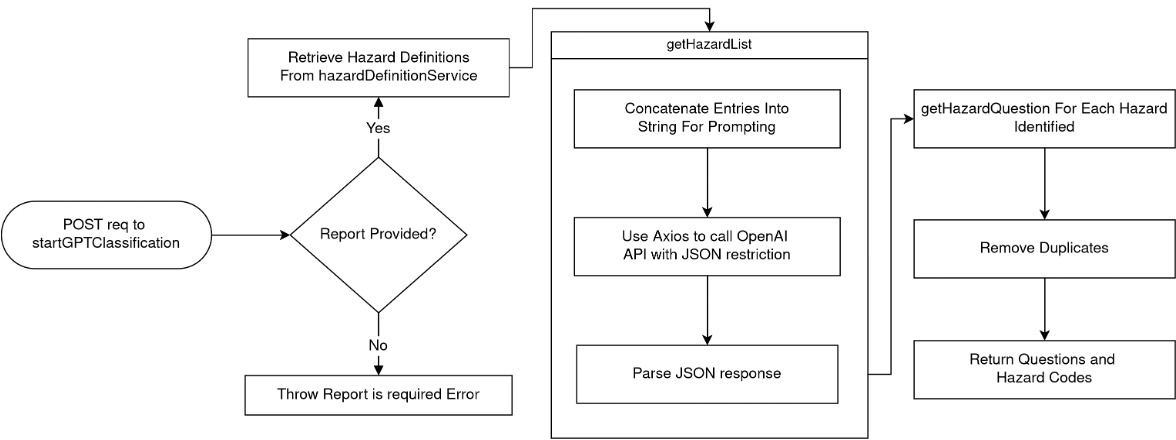
1.6.2 startGPTClassification Endpoint
1.6.3 refineClassification Endpoint
2. Association Matrix
2.1 Program Flow
N.B. The AssociationMatrix as generated by the group was generated using the local version on the UCL CS machines. The Colab version was left in the codebase as the group recognised that the the UCL CS machines are not readily available. In reality, however, it would take an unfeasible amount of time to generate the entire matrix using the T4 GPU on Colab. It does provide for a simple demonstration on how the the generation functions.
2.2 Design
The AssociationMatrix was written on a Python Jupyter Notebook to approach the execution of Llama2 in a step-by-step manner. Llama2 was used as the LLM to generate the Association matrix, due to this component of the tool being a one-time generated spreadsheet with a large number of LLM invocations. ChatGPT or any other paid solutions would prove too costly - Llama2’s open-source nature meant that with access to powerful enough computers (through SSH-ing into UCL servers), this was the most cost-effective solution.
The notebook is distinctly divided into steps, each step being encapsulated in a separate code cell. This modularisation allowed for more readable code, better organisation, easier maintenance, and efficient debugging.
The documentation feature on Jupyter Notebooks was taken advantage of to provide explanations for each step, guiding a potential code reviewer through the logic and purpose of the code. This was to ensure that any reader would know exactly what a certain component did and what each line of code achieved.
In terms of design patterns, a procedural programming style was employed, breaking down the overall task into a sequence of steps that made progression more manageable. Similar to the API, principles such as DRY and KISS were strictly upheld to maintain code readability.
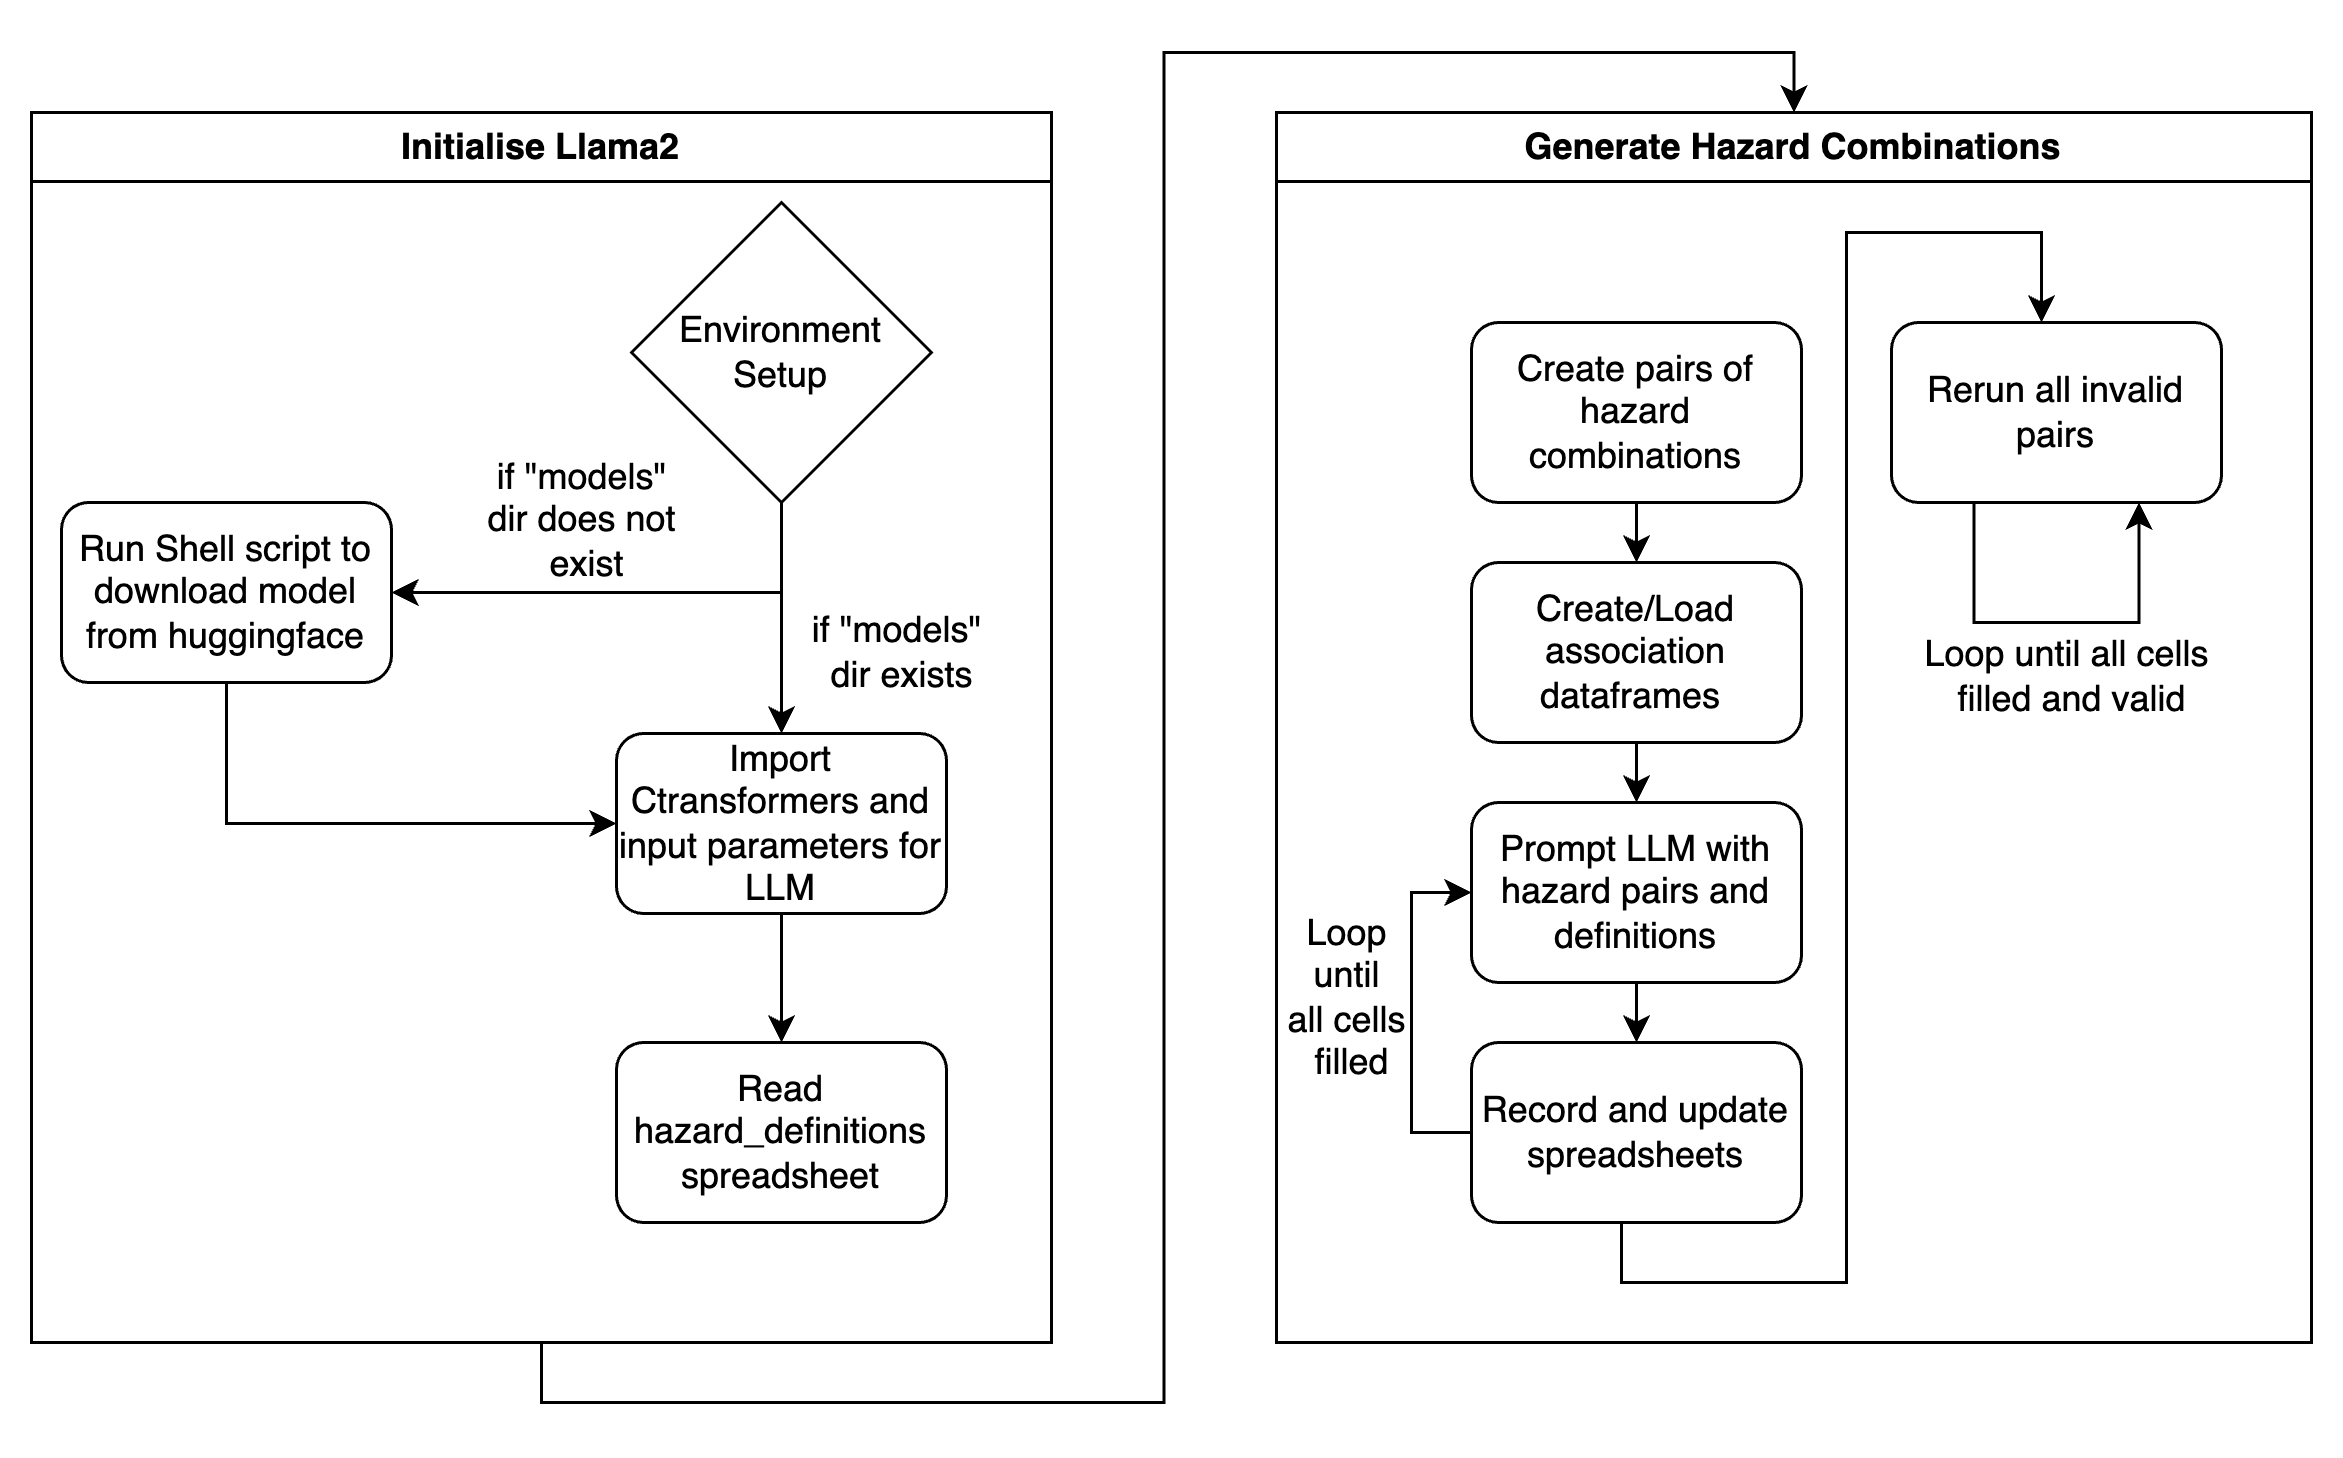
After the environment was set up (i.e. all requirements and the model were downloaded), the CTransformers library was imported to set up the Llama2 LLM. Then, the hazard_definitions spreadsheet would be read to get the hazard names as well as their definitions.
The generation of the matrix itself was rather simple: if no pre-existing spreadsheet was present, a new dataframe of size 303 x 303 was created to represent the matrix. If a pre-existing spreadsheet was present, this creation step was skipped and the first empty cell was found to continue generation. The LLM would then be prompted through the combination of pairs, and the Excel spreadsheet was continuously updated every 20 generations to ensure no concurrent modifications. When the LLM gave an invalid response (i.e. no score was given), the program recognised this, and placed “-1” into the cell as a temporary placeholder. After the initial passthrough, the program then looped back to find all instances of invalid responses, and ran those pairs through the LLM again. This continued until there were no invalid responses remaining in the spreadsheet.
In addition to noting down the numerical score, a separate spreadsheet (justifications.xlsx) recorded the entire response as output by the LLM. This spreadsheet was used to validate the score given by the LLM, as it contained a quick justification as to why it had scored a specific pair a certain number.
2.3 Implementation
2.3.1 CTransformers and Initialising the LLM
from ctransformers import AutoModelForCausalLM

llm = AutoModelForCausalLM.from_pretrained(
    model_path_or_repo_id="./models/13B-chat-GGUF-q5_K_M.gguf",
    model_file="13B-chat-GGUF-q5_K_M.gguf",
    model_type="llama",
    max_new_tokens=75,
    repetition_penalty=1.2,
    temperature=0.25,
    top_p=0.95,
    top_k=150,
    threads=22,
    batch_size=40,
    gpu_layers=50,
)
By using the Python binding for the HuggingFace Transformers library (CTransformers), the initialisation of Llama2 was done seamlessly and with minimal code. The AutoModelForCausalLM.from_pretrained() class method loads the pre-trained language model from a local file, initialises it according to the parameters, and returns an llm object. The llm object abstracts all the specific details of setting up an LLM with pre-trained weights, and allows the codebase to begin prompting the LLM immediately, as well as store the response.
The parameters were decided with respect to the task requirements and the desired behaviour of Llama2. The max_new_tokens parameter was set to 75 to ensure that the LLM did not take too long to generate, but would still generate enough to give a cohesive justification to its score. The repetition_penalty, temperature, top_p, and top_k parameters controlled various aspects of the language model's generation process, influencing elements such as the diversity of generated responses, the likelihood of repeating patterns, and the selection of tokens based on probability distribution. Finally, the threads , batch_size , and gpu_layers parameter values were set to reflect the optimal values to be run on the UCL CS machines.
2.3.2 Extracting the score from response
def extract_score(response):
    """
    Extracts the likelihood score from the user's response.

    Parameters:
    response (str): The user's response.

    Returns:
    float: The extracted likelihood score if found, -1 otherwise.
    """
    user_input = response

    # use regular expression to extract the number between 0 and 5"
    likelihood_match = re.search(r"\b([0-5]|\([0-5]\))\b", user_input)

    # check if a match is found and print the extracted number
    if likelihood_match:
        extracted_likelihood = float(likelihood_match.group(1) or likelihood_match.group(2))
        print("Extracted Likelihood:", extracted_likelihood)
        return extracted_likelihood
    else:
        print("No likelihood score found.")
        return -1
As the LLM gave rather well-structured and patterned responses, a simple regex-based approach was employed to extract the numerical score from the LLM’s response. The function extract_score() searched the response for the first instance of a number between 0 and 5, and returned that number. If no likelihood score was matched, it would return -1 to signify invalidity.
Although the group was confident that this approach had a low error margin due to the predictable structure of the LLM’s responses, the justifications table was available to validate the score in scores table.
2.3.3 Prompting the LLM
def run_llm(hazard1, hazard2, def1, def2):
    """
    Run a likelihood assessment using a Language Model (LLM) to evaluate the likelihood that a given hazard1 causes hazard2.

    Parameters:
    - hazard1 (str): The first hazard in the assessment.
    - hazard2 (str): The second hazard in the assessment.
    - def1 (str): The definition of the first hazard.
    - def2 (str): The definition of the second hazard.

    Returns:
    tuple: A tuple containing the numerical score representing the likelihood assessment (ranging from 0 to 5) and the detailed response from the language model.
    """
    # cut definitions to be only first sentence
    def1 = def1.split(".")[0]
    def2 = def2.split(".")[0]

    # begin prompting
    prompt = f"""What is the likelihood that {hazard1} causes {hazard2}, bearing in mind:
    {hazard1}: {def1}
    {hazard2}: {def2}
    """

    super_prompt = f"""
    SYSTEM: We're evaluating the likelihood of various hazards causing specific outcomes. Your responses should be one number between 0 and 5, following the below scale. Include a short explanation for your score, as it helps understand the reasoning behind your assessment.

    - 0: Almost never
    - 1: Very Unlikely
    - 2: Unlikely
    - 3: Likely
    - 4: Very likely
    - 5: Almost always

    Given the above, consider the following query:

    USER: {prompt}

    ASSISTANT:
    """

    response = llm(super_prompt)
    print(f"Running: {hazard1}, {hazard2}")
    print(response)
    score = extract_score(response)
    print("====================================")
    return (score, response)
The prompt passed to the LLM was quickly determined to be the most crucial factor in the LLM generating valid responses. Through trial and error, the group found that the following prompt reflected the best answers. A scale was provided for the score to ensure uniformity across different invocations of the LLM. Along with the hazard names, the official ISC-UNDRR taxonomy scheme definitions were provided as context as well. This was done so that the LLM’s answer would be more specifically tailored.
3. Confusion Matrix
3.1 Design
ConfusionMatrixGenerator is designed to analyse and visualise similarity among hazard descriptions using Natural Language Processing (NLP) techniques. It leverages a sentence transformer model for embedding sentences and cosine similarity to measure the likeness between these embeddings. The main goal is to identify hazards that are significantly similar in their descriptions, potentially leading to misclassification or misunderstanding.
3.1.1 Components and Workflow
- Initialisation: The class
ConfusionMatrixGeneratoris initialised with a sentence transformer model, a data file path containing hazard information, and an output folder path. Upon initialisation, it loads the hazard information into a pandas DataFrame, sets up the model, and initialises placeholders for various attributes. - Data Processing and Analysis:
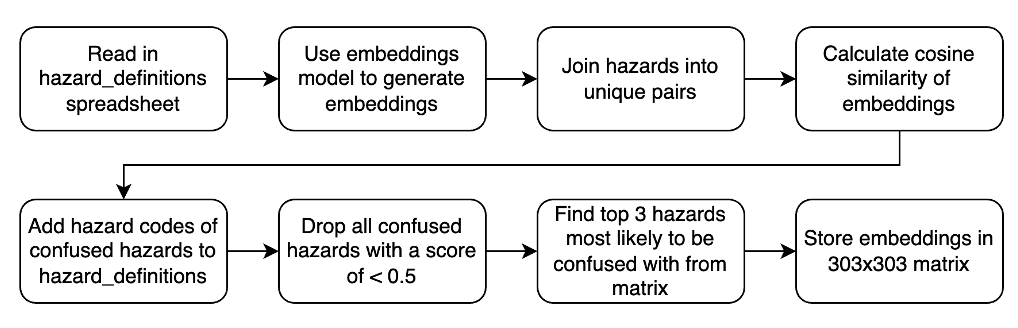
- Similarity Matrix Generation: The core analytical step involves generating a similarity matrix for all hazard descriptions using the sentence transformer model for embeddings and calculating pairwise cosine similarities.
- Category Line Identification: To visualise the similarity matrix with additional context, the script identifies boundaries between different hazard categories, aiding in the interpretation of the heatmap visualisation.
- Visualisation:
- Heatmap Visualisation: We implemented two ways to visualise the results; a static heatmap using
matplotlibandseaborn, and an interactive heatmap usingplotly. Both visualisations include lines to demarcate categories, with the interactive version offering the ability to hover over a cell to see the score, as well as zooming capabilities.
- Heatmap Visualisation: We implemented two ways to visualise the results; a static heatmap using
- Output Generation:
- Similarity Pairs and Confused Hazards: Our script generates pairs of hazard codes along with their similarity scores, filters these pairs based on a threshold, and identifies the most similar hazards for each hazard, deemed as "confused hazards."
- Exporting Results: Outputs, including the confusion matrix, list of confused hazards, and updated hazard definitions with confused hazards added, are saved as Excel and JSON files for further analysis and integration with our existing tools.
3.1.2 Design Patterns and Principles
Although the code was run only once, it was still designed with good practices in mind. Object-Oriented Principles were once again kept in mind, with ConfusionMatrixGenerator being encapsulated within its own class. The SRP (Single Responsibility Principle) was strictly adhered to, with all methods having unique purposes and thus allowing for Separation of Concerns. In conclusion, the code was written in OOP to be easily readable, modifiable, and reusable - all necessary factors to ensure a smooth handover of the codebase to the clients.
3.2 Implementation
The implementation details of ConfusionMatrixGenerator highlight several key programming practices and libraries relevant to data science and NLP:
- Libraries Utilized: We used
pandasfor data manipulation,NumPyfor numerical operations,seabornandmatplotlibfor visualization,Plotlyfor interactive visualization, andsklearnalongsidesentence_transformersfor NLP tasks. - Method Implementation:
find_category_linesmethod processes category data to find boundary lines for visualisation, showcasing pandas' data manipulation strength.visualize_heatmapandshow_plotly_heatmapmethods demonstrate the use ofseaborn,matplotlib, andPlotlyfor creating insightful visualizations of the similarity matrix, catering to both static and interactive needs.save_similarity_matrix,generate_similarity_pairs,filter_similarity_pairs, andgenerate_confused_hazardsmethods illustrate the use ofpandasfor creating, manipulating, and exporting data frames based on the analysis of similarity scores.runandrun_plotly_heatmapmethods encapsulate the workflow of the tool, from generating embeddings and similarity matrices to producing visualisations and saving outputs, highlighting the procedural approach to handling the tool's core functionalities.
- Data Flow and Processing:
- The script emphasises a structured approach to data analysis, starting from raw hazard descriptions to extracting insights (confused hazards) and visualizing these insights in an accessible manner.
- The use of cosine similarity for analysing textual data points to the application of NLP techniques for understanding semantic similarities beyond simple textual comparisons.
4. Front-End
The front-end of our application is developed using Streamlit, a powerful framework for building interactive web applications. The front-end serves as an interface through which the users can authenticate themselves, interact with the classification system, and select classification models. It also allows users to upload their reports and receive both matched hazards and their respective definitions.
4.1 Code Design
In developing the front-end for our application, we adopted a pragmatic approach, utilizing design patterns that foster readability, maintainability, and scalability. The codebase also demonstrated Object-Oriented Principles, encouraging key ideas such as abstraction, encapsulation, and inheritance. Implementing such principles in a codebase enhanced its readability and maintainability by organizing code into modular and reusable components. This approach also promoted code extensibility, making it easier to adapt and scale the software as requirements evolved.
4.1.1 Model-View-Controller (MVC)
Although Streamlit abstracts away traditional web development complexities, we adhered to an MVC-like pattern. Our 'view' is the Streamlit interface, 'controller' logic is embedded within interaction handlers, and our 'model' is represented by data management functions and API interactions. This separation enhances the code's organization and clarity.
4.1.2 Factory Pattern
Where multiple objects or components need to be created, we employ the factory pattern to abstract the creation logic. This allows us to instantiate objects based on the classification type without directly coupling the creation logic to the consumer code.
4.1.3 Decorator Pattern
To enhance the functionality of our Streamlit widgets without modifying their core behaviour, we use decorators like @st.cache_resource. This pattern provides an elegant way to add caching capabilities, thus improving performance by avoiding repeated data loading.
4.1.4 SOLID Principles
Each class and module is designed to embody SOLID principles, ensuring that our application remains easy to extend and refactor. For example, the single responsibility principle is reflected in the separation of user input handling from data processing and API communication logic.
4.1.5 Conclusion
By consistently applying these patterns and principles, our front-end codebase achieves a high standard of quality, mirroring the robust architecture of our backend systems. This disciplined approach to software design significantly contributes to the longevity and success of our application.
4.2 UI / UX design choices
4.2.1 User Experience Design
The frontend design prioritizes simplicity and intuitiveness to accommodate users with varied technical backgrounds. The user flow is linear, guiding users from the login page to the final results section, ensuring a seamless experience. Below is a high-level flow of the user experience.
- User Authentication Page: Ensures secure access to the application. This is needed to protect the API endpoint from unexpected costs.
- Classification Type Selection: Users select the classification model, out of the rules-based and machine learning based model, affecting the API endpoint for retrieving questions.
- Report Submission: Users can enter or upload their reports for classification.
- Questions: Interactive questions based on the report are presented, with users responding to refine hazard identification. The hazard codes for the questions answered yes are sent back to the API to retrieve a set of questions based off upstream (associated) hazards.
4.2.2 Data Presentation
- Hazard Data: Provides users with essential information on identified hazard codes and names, as well as commonly confused hazards.
- Result Display and Export: Users view confirmed hazards with descriptions and have the option to export data for further analysis.
4.3 Implementation
4.3.1 Streamlit Interface
- Initialization: The application starts with importing necessary libraries (
streamlit,pandas,requests) and loading the hazard data from an Excel file. This approach ensures that hazard information is readily available throughout the user session.
import streamlit as st
import pandas as pd
import requests

@st.cache_resource
def load_hazard_data():
    return pd.read_excel('hazard_definitions.xlsx')
- Session State Management: Critical for maintaining user progress, especially for complex interactions involving multiple steps and API communications.
if "confirmed_hazards" not in st.session_state:
    st.session_state["confirmed_hazards"] = []
- User Interactions:
- Authentication: Streamlit widgets (
st.text_input,st.button) capture user credentials. - Classification Type Selection: A dropdown (
st.selectbox) allows users to choose the classification model. - Report Submission: Text area (
st.text_area) and file uploader (st.file_uploader) for inputting the report. - Classification and Follow-up Questions: Display questions retrieved from the API and capture user responses.
- Authentication: Streamlit widgets (
4.3.2 API Communications
The frontend utilises the requests library to communicate with backend services for classification tasks. This includes sending reports for initial classification and following up with refined questions based on user responses.
response = requests.post(api_endpoint, json={"report": report_content})
4.3.3 Displaying Results and Definitions
- Results are shown using
st.tablefor a clear presentation of confirmed hazards and their descriptions, utilizing the mapping function to convert codes to names. - Hazard definitions and confusions are accessible via a button (
st.button), revealing additional information to the user.
4.4 Final Conclusion
The front-end implementation, built with Streamlit, offers a user-friendly interface for complex classification tasks, facilitating easy report submission, interactive questioning, and clear display of results. Through careful design and implementation, we have ensured a seamless and informative user experience that effectively supports the hazard classification process.