LEGAL ISSUES
Liabilities at work
As part of our project, we will be producing a lot of data from which information can be gathered. Some of the data presented by the program may be inaccurate, which can cause major problems depending on the context in which the data is used. In this section, I aim to discuss the kind of errors that may occur. This will allow us to see the kind of liabilities that our project may have and therefore the precautions that should be kept in mind when using our work.
The major component of our application is the detection and identification of the medical objects which occurs on the web service. Due to the nature of the technology used and the input format, the application has a very real chance of identifying objects wrongly or not at all. This mean inaccurate data will be sent to the client application. The client application uses the data from the web service to determine which items have been removed or added to the frame. This may cause the application to show the wrong instrument which has been removed or ping a notification when nothing has changed. As data is also logged from the client application, operation overviews and timelines can be misrepresentative of what actually happened in an operation.
Surgeons using the application may accidently use the wrong tool as the program told them that they picked up a different instrument. Less experienced doctors using the application may also make mistakes as they may be following an overview with an error in it. Due to these factors, our application should NOT be used as the only deciding factor and users should not be reliant on it to identify the medical instruments they pick up. The model we will be producing at the end of the project is for demonstrational purposes as they are trained on a limited set of instruments and images making it even less accurate. However, even if an optimal model was produced, these precautions should still be noted.
Intelectual Property
Surgeons using the application may accidently use the wrong tool as the program told them that they picked up a different instrument. Less experienced doctors using the application may also make mistakes as they may be following an overview with an error in it. Due to these factors, our application should NOT be used as the only deciding factor and users should not be reliant on it to identify the medical instruments they pick up. The model we will be producing at the end of the project is for demonstrational purposes as they are trained on a limited set of instruments and images making it even less accurate. However, even if an optimal model was produced, these precautions should still be noted.
As the Apache 2.0 license is not a copyleft license, this means we can use any license to distribute our final product. Our client has requested that we use the AGPLv3 license for our software. As our client, GOSH Drive, works as a part of the NHS which is part of the public sector, our work is for mainly research purposed and will not have any immediate commercial implications. This means that we want our project to be used to help further research in the medical field. Therefore, we want our software to be built upon in the future, as it is just a proof of concept and will need to be extended for it to be “complete”. The AGPLv3 License is suitable for this as it allows for all users to copy, distribute and modify the software.
Any modified versions of our software that is operated on a network server must also be released alongside the source code. This means that any improvements made to the software become available to all developers which ensures cooperation within the community. This is especially useful as this means any improvements made will always be useful and available to the medical sector.
Data Privacy (GDPR)
To first identify what kind policies we need adopt, we first need to clarify what data we will be handling and how we will use it. The primary input into the software is a webcam feed. The webcam feed should only contain the tray of medical instruments in the operation and therefore we will not be handling any ‘personal data’ about individuals from this input. The program will then retrieve the detection data from the stream and store the changes to the scene in a database for an indefinite amount of time. We would like to use the data to reconstruct operation overviews to allow viewers of the data to learn. Therefore, the data should be represented in a way where it could be accessible to everyone even if it will primarily be used by medical staff.
Personal data can be extracted from each operation, such as patient, location and doctor information. However, this data does not need to be recorded as it does not assist with the purpose of our project. Doctor names can be associated with each operation however this is only after the approval of all subjects has been received. All Doctors should be able to remove their names as they please. By collecting this data, junior doctors and students will be able to see how operations are performed by particularly experienced surgeons as they can be grouped under their name.
The last bit of personal data we will be handling are doctor passwords. Our application will have a login before each operation. This will allow doctors to log the data under their name and load up specific sets of medical instruments onto the system. As we will be storing passwords, we need to make sure that they are stored securely and if a data breach occurs, that they are reported correctly and quickly.
USER MANUAL
The system is comprised of 3 main pages (Login, Detection and Final List View) and a optional statistics page. The relations between these pages can be seen in full in the Page Flow. Photos of each page can be seen in the Final Prototype subsection of the HCI section of the website.
Login Page
Once opening the application the user will automatically be sent to the login page where they will be prompted to enter their login details in order to access the rest of the system.
-
Example Login:
Username: bchan
Password: bchan
The system can also be accessed by choosing the ‘Emergency Login’ option. As medical emergencies happen everyday where time is of the essence, logging in might not always be a the best . For this reason we decided to add the ‘Emergency Login’ option so that the user can access the system and its functionalities with greater ease. The system has been designed in such manner that not logging in will not hinder its main functionalities but will only affect the data as it will no longer to correlated with a specific doctor and surgery.
Detection Page
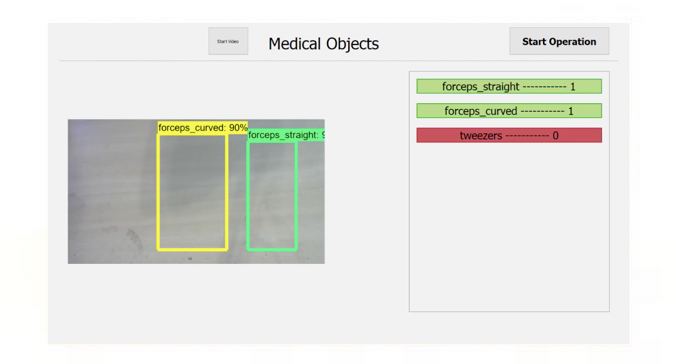
Once logging in the user will be taken to the detection page. The page is split into two sections, the tray view on the left and instrument list on the right. This page is what will be seen during the operation.
The system taken in all the information it is presented after logging in although in order to show the list the user must press the ‘Start Operation’ button. After pressing the button the user can view the instruments on the list on the right. The instrument list is responsive changing as every object is detected.Instruments showcased are in two colours:
-
Red: currently not on the tray
Green: currently on the tary
After finishing the operation the user can press the ‘Stop Operation’ button in order to stop detection and go to the next page.
Final List Page
After completing the operation and pressing the ‘Stop Operation’ button the user is taken to the Final List page. This page is split into two sections, the left hand list (named ‘Full Object List’) on the page is a complete overview of the items used during the operation, while the right hand side list (named 'Missing Objects List’) showcases the items that were not on the tray during the final detection. The 'Missing Objects’ list allows the user to check that every instrument is accounted for after the procedure. Each item on the 'Missing Objects List’ acts as a button. This means that each time an item in the missing objects list is pressed its value decreases by 1. By having this option each time an instrument is accounted for it can be removed from the list by clicking on the items.
The final list page also allows the user to choose to ‘logout’ or view the operation ‘statistics’. These buttons can be seen on the top left and right corner of the page.
The last bit of personal data we will be handling are doctor passwords. Our application will have a login before each operation. This will allow doctors to log the data under their name and load up specific sets of medical instruments onto the system. As we will be storing passwords, we need to make sure that they are stored securely and if a data breach occurs, that they are reported correctly and quickly.
Statistics Page
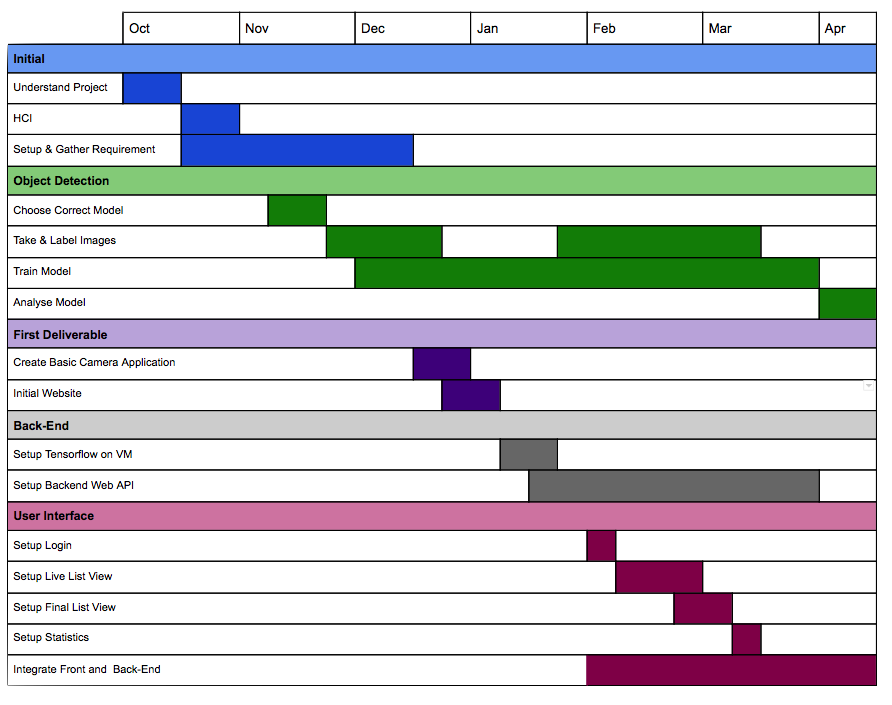
The statistics page is an optional page the user can visit. This page showcases the operation statistics in the form of a Gantt chart. The chart showcases what instruments have been used during the operation and for what period have they been on the tray. This can help give professionals the opportunity to get a clearer view of the operation as a whole and the tools used in that period.
A full PDF version of the document manual can be found here.
TRAINING A MODEL
Our application works with any tensorflow inference graph model. Therefore, we will not include the exact method in which we used to make our model as it has become redundant and the scripts we used have been moved to the legacy section. To make our model we used the Google TensorFlow Object Detection API and trained our own model using the faster_rcnn model configuration (link). All the details in training your own model can be found there in the their git repository.
If you want to use our own pre trained model that we used for our project, it can be found in our sysEngWebAPI git repository (link) under object_detection/instruments_graph. The graph has been trained using around 1500 images of 3 different medical instruments categories (forceps_straight, forceps_curved and tweezers). For each instrument category we only used 1 specific instrument from which we took the images. The instruments can be found at GOSH DRIVE. If you decided to train your own model, the model currently in the object_detection/instruments_graph folder can be replaced and the Web API will still run as intended using the new graph.
WEB API
All the files needed for the WebAPI are found in the sysEngWebAPI git repository (link). If you want to change the model, make a copy of the repository and make changes to your own repository. Then instead of cloning our repository onto the VM, you should clone your own.
In this manual I will be showing how to deploy the API onto a Microsoft Azure VM however you can use any cloud hosting service you want. The first thing you need to do is create a Ubuntu VM on Azure. When creating the VM, we recommend to choose a size under the GPU family as this will enable us to use TensorFlow GPU which is significantly faster than TensorFlow CPU for inferencing.
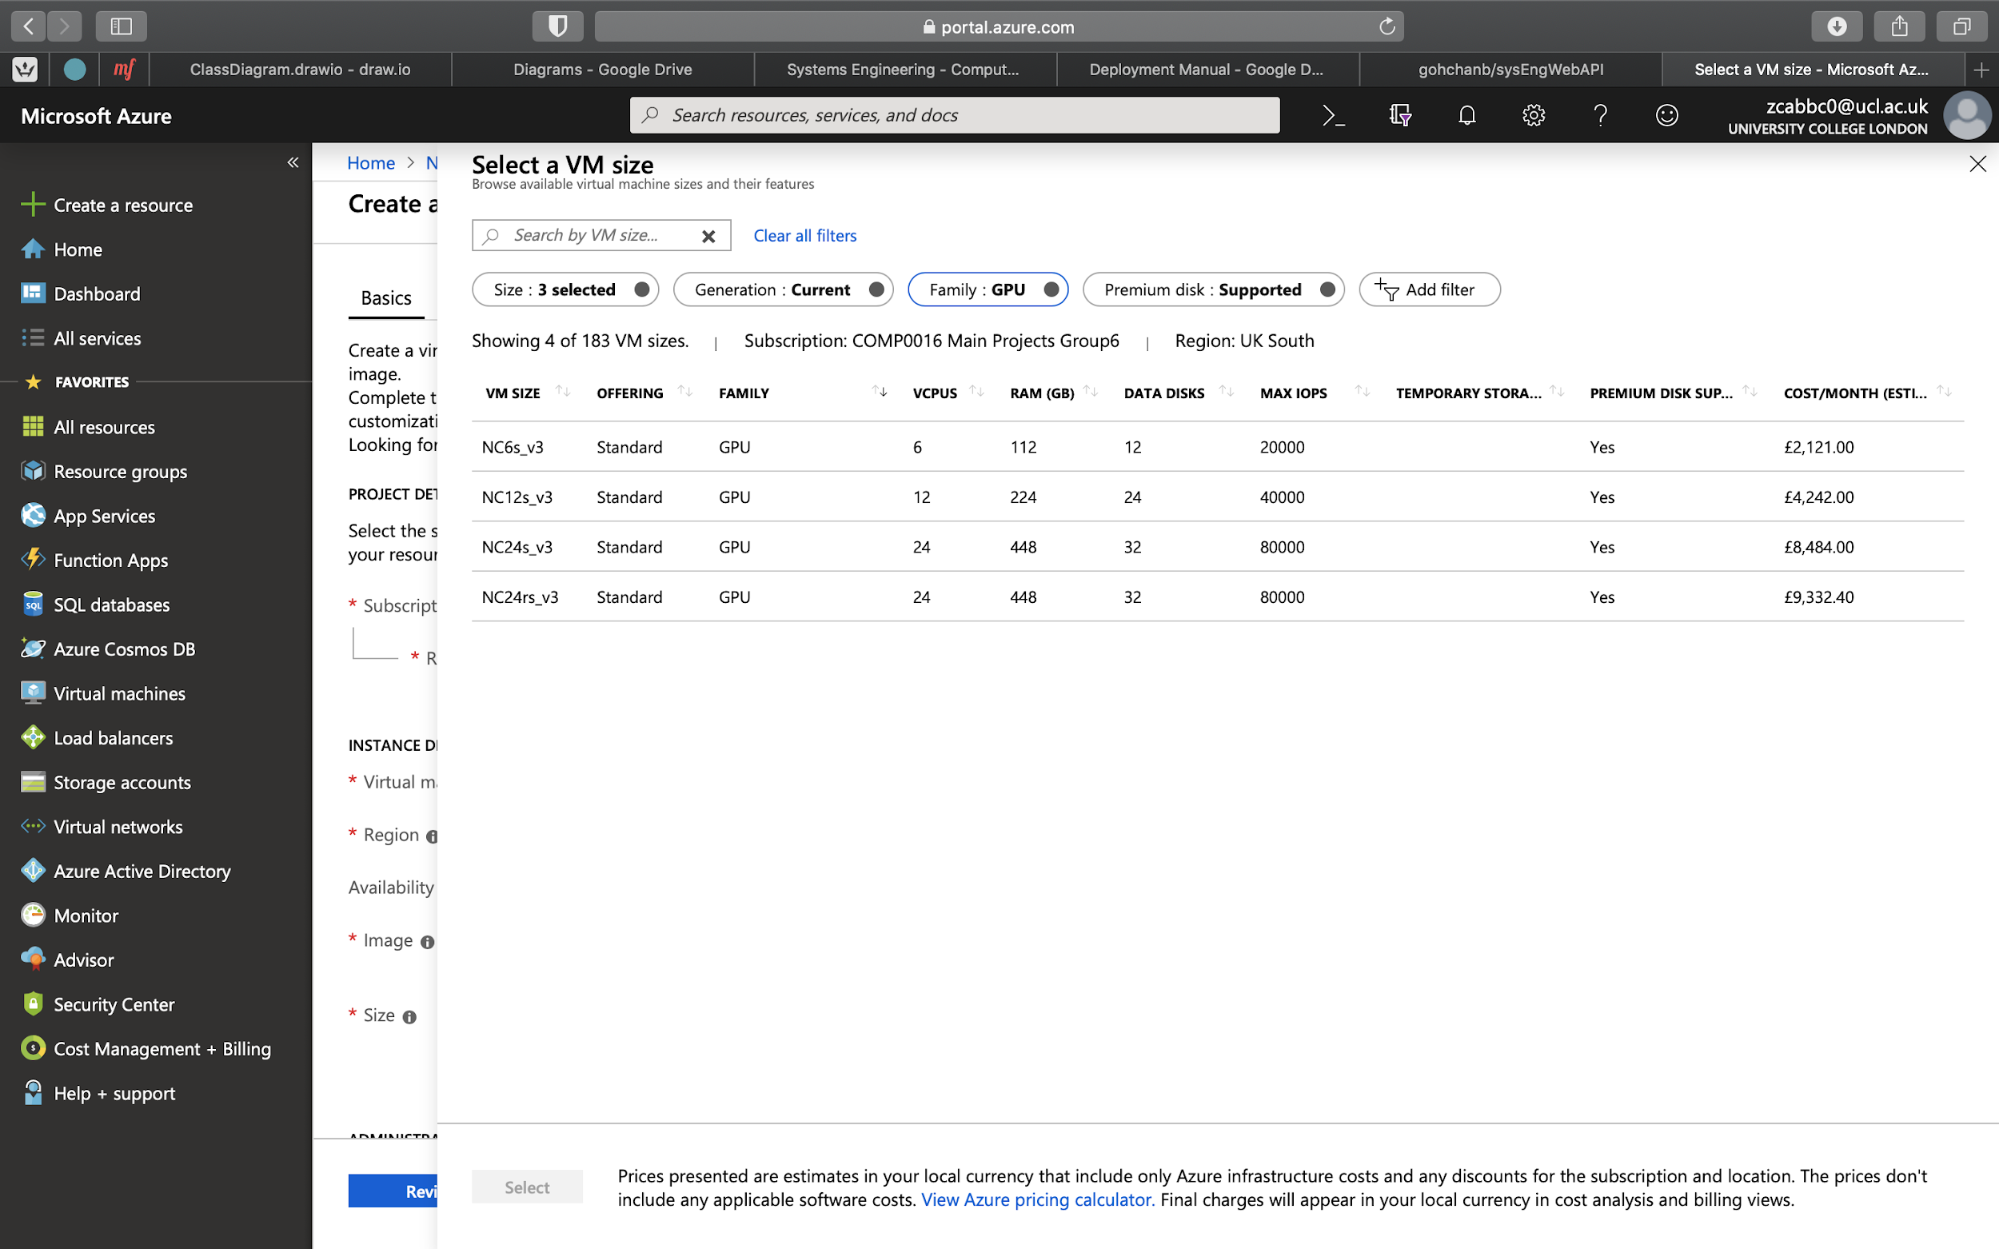
Picking a GPU compatible VM
However this is not necessary. And i will show how to setup the Web API using both methods. The first thing to do once you create the VM is to ssh into the machine or use the ‘Serial console’ located in the ‘Support + Troubleshooting’ section. Once you are into the VM you must run this command.
$sudo apt-get updateNext you must install python3 and pip for that version, for our project we used specifically python3.6.7 so we would recommend you to use the same version or above. Depending on the version of Ubuntu, this may be already installed but you will have to check for your specific version. For the purpose of this manual, whenever i write $python or $pip it means those respective programs for version 3.6.7 of python. Next we need to install TensorFlow onto the machines, this is where the process differs depending on that type of VM you are using.
TensorFlow GPU (VMs in the GPU category/with a CUDA compatible GPU)
Intall Cuda
wget https://developer.nvidia.com/compute/cuda/9.0/Prod/local_installers/cuda-repo-ubuntu1604-9-0-local_9.0.176-1_amd64-deb
sudo dpkg -i cuda-repo-ubuntu1604-9-0-local_9.0.176-1_amd64-deb
sudo apt-key add /var/cuda-repo-9-0-local/7fa2af80.pub
sudo apt-get update
sudo apt-get install -y cuda
rm cuda-repo-ubuntu1604-9-0-local_9.0.176-1_amd64-deb
Install CUDnn
When installing CUDnn we need to have a NVDIA account and login in order to access CUDnn (which is free to create). The system requires CUDnn v7.3.0 in Linux by following these steps below.
Please note that the link in the first line may be invalid when using as each user must be verified therefore you may get the correct link after logging into your specific NVIDIA account copying the link for the cuDNN v7.3.0 Library for Linux for CUDA 9.0
wget https://developer.download.nvidia.com/compute/machine-learning/cudnn/secure/v7.3.0/prod/9.0_2018920/cudnn-9.0-linux-x64-v7.3.0.29.tgz
sudo tar -xzf cudnn-9.0-linux-x64-v7.tgz -C /usr/local
rm cudnn-9.0-linux-x64-v7.tgz
sudo ldconfig
Environment variables
and add the following exports to ~/.bashrc
export CUDA_HOME=/usr/local/cuda-9.0
export PATH=${CUDA_HOME}/bin:${PATH}
export LD_LIBRARY_PATH=${CUDA_HOME}/lib64:/usr/local/cuda/lib64:${LD_LIBRARY_PATH}
Install tensorflow-gpu
sudo apt-get install -y python-pip python-dev
sudo pip install tensorflow-gpu
TensorFlow CPU (VMs without a CUDA compatible GPU)
$pip install tensorflowAll the libraries needed by our application should be installed however is they aren’t they can be installed separately. This can be done by entering into the line below into the terminal but replacing library with the library you want to download.
$pip install libraryThe full list of libraries currently on our VM can be found in the appendix (note: not all of them are used).
To allow the application to communicate with the internet we need to add an inbound security group. To do this, navigate to the network security group for the VM’s resource group. Then go to ‘Inbound Security Rules’ and add the rule corresponding to the app’s port. In our example we use port 65432.
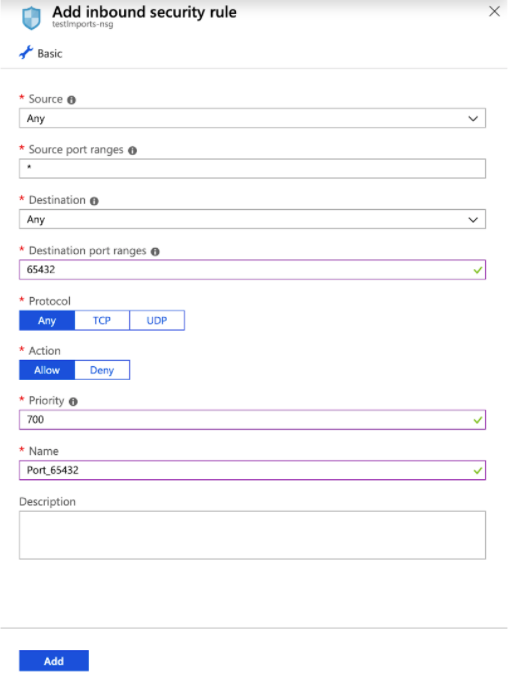
Adding Inbound Security Rule
Next we need to download the git repository and navigate to the folder and run the API
$git clone https://github.com/gohchanb/sysEngWebAPI
$cd sysEngWebAPI
$python app.py
If all is successful, the console should show some TensorFlow information and then print
listening on (‘0.0.0.0’,65432)CLIENT APPLICATION
All the files needed for the client application are found in the ObjectDetectionAPI git repository (link). Like the Web API, we have been using python3.6.7 so we would recommend you to use the same version or above. Therefore, for the purpose of this manual, whenever i write $python or $pip it means those respective programs for version 3.6.7 of python. To setup the environment we highly recommend you to use virtualenv or some other python virtual environment manager.
Once you have activate the virtual environment you need to download the libraries needed by the application. This can be done by entering into the line below into the terminal but replacing library with the library you want to download.
$pip install library The list of libraries that need to be downloaded are listed below, with the versions we used. This should download all the necessary sub libraries as well however the full list can be found in the Appendix.
- pyqt5 (5.12.1)
- numpy (1.16.2)
- matplotlib(3.0.3)
- pillow(6.0.0)
- TensorFlow (1.13.1) - only CPU needed by client
- mysql-connector-python(8.0.15)
- opencv-python (4.0.0.21)
- plotly (3.7.1)
After all the packages have been installed. The client files should be downloaded and you should move into the folder.
$git clone https://github.com/gohchanb/ObjectDetectionAPI
$cd ObjectDetectionAPI
The application uses a database to log all the operation stats, so you have to add a database to your local machine. The schema of the database can be found in the folder under schema.sql and the database with some sample data already inside and a user can be found under dbexport.sql. Either file can be used to import the database onto your local machine. First you need to create the database called systemsEngineering. You might also want to create a user that has access to only the systemsEngineering table. In our project we used ‘sysEng’ as the users username and password.
Once the database has been created, you can import the the database with:
$mysql -u sysEng -p systemsEngineering < schema.sqlor
$mysql -u sysEng -p systemsEngineering < dbexport.sqldepending on which file you would like to use.
Next you need to configure the client application. All the relevant parameters are near the top of the code.
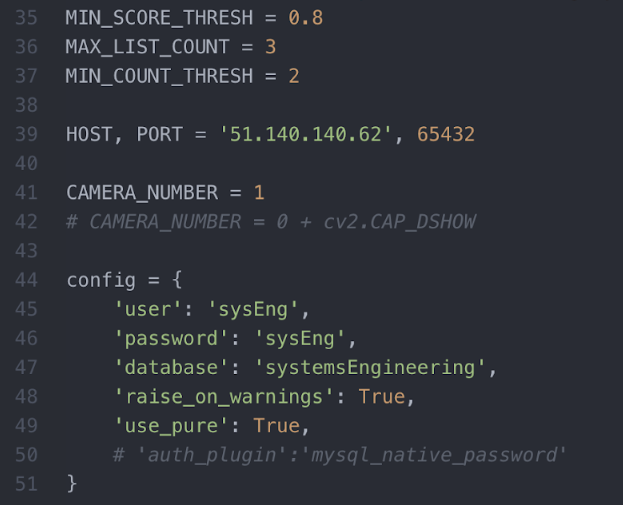
Adding Inbound Security Rule
MIN_SCORE_THRESH is the minimum score needed for an instrument to be registered by the application. We recommend you to keep it at 0.8 but you can change it. MAX_LIST_COUNT and MIN_COUNT_THRESH are variables that describe how the ListObject registers objects. Please refer to the ListObject section in the ‘Key Functionalities’ section to learn how they work, but again we recommend you to keep them unchanged. HOST and PORT refer to the host and port of the WebAPI you should have set up earlier. The PORT number should always be 65432 by default, while the HOST number should be changed depending on the ip-address of your VM. CAMERA_NUMBER refers to the number of the camera on your system that you want to use for your input. If your system only has 1 camera it will probably just be 0 however it will differ for different machines. Lastly we have ‘config’ which is the configuration for the database. Here we are using the login of our custom user we made however u can change the ‘user’ and ‘password’ to any combination which has access to the systemsEngineering database.
Once you have set all this up, you should be able to run the application by running.
$python object_detection_client.pyAPPENDIX
The appendix contains:
- A list of client application packages
- A list of libraries in the vm which
gantt chart