User Interface Design
User Interface Design
Primarily, this project is focused on research and development. It hopes to deliver software that would allow a depth sensing camera to monitor a surgical procedure and in effect provide an extra layer of safety for the patient by ensuring that surgeons do not press too hard with laparoscopic surgery tools and that the tools do not damage a part of the body by accident because the surgeon did not know that they were in fact touching the body.
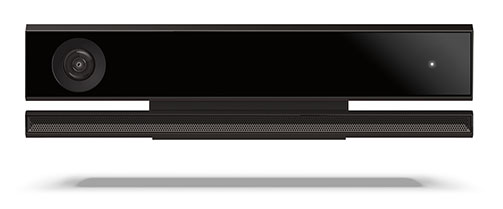
The team has created a User Interface design that serves as our final goal - what we hope to achieve by the end of this project. This UI will showcase all of the functionality of the system that is built in an intuitive and aesthetically pleasing way. The camera feed used for the UI will come from the Kinect 2.0 sensor - acting as a larger-than-scale prototype of the final system - not from an actual size endoscopic camera.
The User Interface will provide feedback to the surgeon in three ways: visually, audible and haptically.
Visual Feedback
Visual feedback will be created by augmenting the feed received from the camera. This will provide the surgeon with information about how far away the tools are away from the body. There will be several different ways in which the feed can be augmented.
Tool Proximity
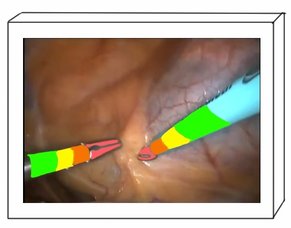
Monitors how close the surgeon’s tools are to the patient’s flesh. It then overlays colours onto the tools on the endoscope terminal to give a visual representation of this. It follows a conventional colour scheme - green for “safe”, yellow and orange for “warning” and red for “danger”.
Tool Width
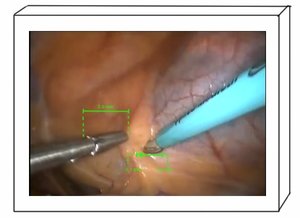
“Tool Width” measures the width of the functional parts of the tools and displays the value on the endoscope terminal. This is useful as when a tool is inserted into the flesh, as the blue tool is in this picture, then the amount of the tool that has entered the flesh can be measured by subtracting the width of the currently visible part of the tool from the original length of the tool. This would help prevent surgeons from accidentally inserting a tool too far into the flesh.
Combinations of Different Augmentations
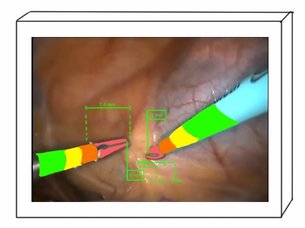
Different augmentations of the camera feed could be combined to give even more detailed images.For example, this image shows the tool proximity augmentation, combined with the tool width augmentation as well as a flag showing the distance in millimetres of the tool from the flesh. These augmentations are not all of the ones that have been designed. To see the full range of ideas for feed augmentations, please refer to the PDF below that details the full design process of the User Interface.
Audio Feedback
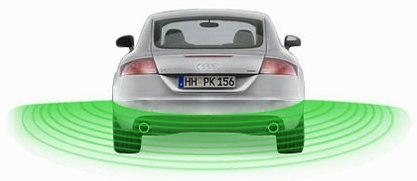
Audio feedback will also indirectly use the depth sensing ability of the camera. This will be done by using the camera to measure the distance between the tools and the flesh. As the tool gets closer to the flesh, then a series of beeps sounds, getting more and more frequent as the tools get closer; much like a car parking sensor.
The advantage of audible feedback is that it would let the surgeon know how close their tools aware to the flesh, without obscuring the view of the procedure in the camera feed by cluttering it with various visual augmentations.
Haptic Feedback
Haptic feedback could be produced in many ways. Ideally, the tools would stiffen in the surgeon’s hands proportionate to the force being applied to them, which would be particularly useful when cutting or gripping parts of the body. However, as this project is using a camera feed to gather information, it cannot measure the force being applied to tools. That would be a job for pressure pads on the tools themselves.
What a camera feed could provide however, is haptic feedback whenever a surgeon’s tool is touching the body. That way, if a tool was accidentally touching a part of the body, the surgeon would know very quickly.
To do this, the system would monitor how close tools are to the body using its depth sensing functionality. When a tool touches a part of the body, the surgeon would be given haptic feedback. However, there is an issue with how this feedback would be provided to the surgeon. The tools certainly cannot vibrate as this would be dangerous for the patients. The surgeon needs the feedback in some other way: through the control unit of the system.
Controlling the System
As the surgeon is scrubbed up during surgery, they will not be able to touch any physical buttons to control the system unless these controls are also sterile. Making physical controls like this is not a viable option due to the expense of having to sterilise them after every procedure.
Rather, the surgeon would control the system through voice command. Voice command is completely hands free, and the technology associated with it is sufficiently advanced to make it a valid option. For example, to turn an augmentation on or off, the surgeon would simply say “turn tool proximity on” or “turn tool width off". There would also be a secondary control system on the endoscope terminal encase the voice commands failed for any reason.
Voice commands could be received either by a microphone array in the operating theatre like the Kinect, or preferably by a small earpiece that the surgeon would wear for the duration of the operation. This earpiece would be similar to a Bluetooth headset, and would have a microphone to receive voice commands and a speaker to give audio feedback to the surgeon.
Ideally, the headset would also be able to vibrate, meaning that it could provide haptic feedback.
Haptic Headset
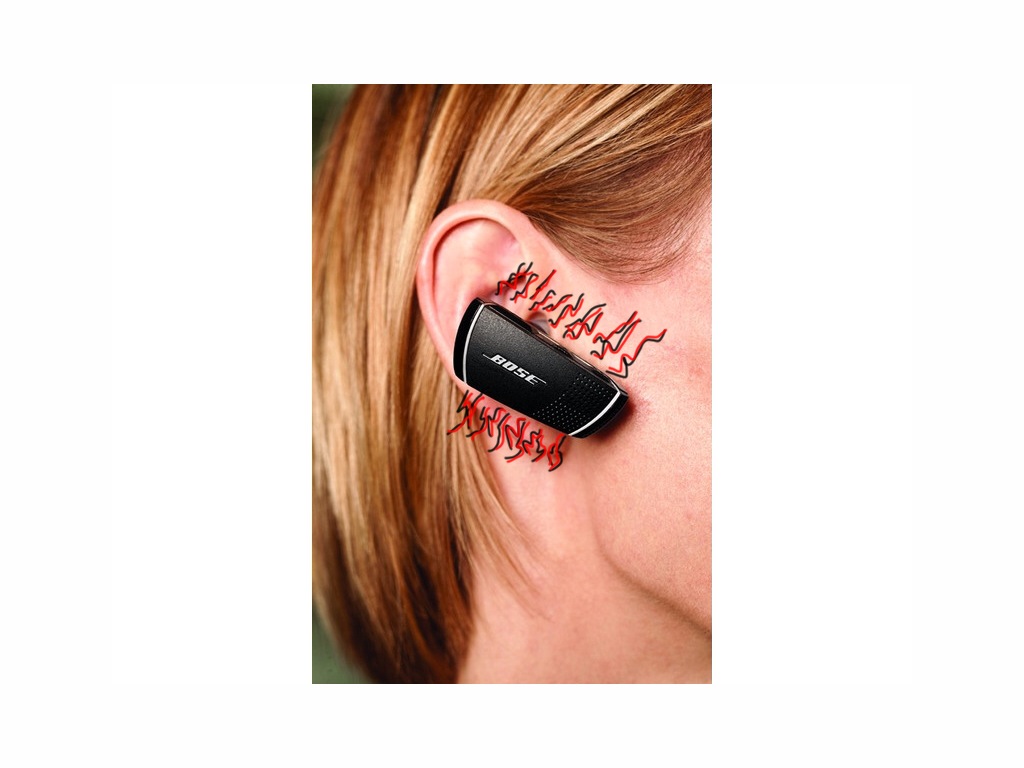
A small headset like this would provide and easy way to control the system, as well as a way of providing audio feedback.
Potential issues with voice control could be that the system will take the surgeon’s normal conversation to be voice commands and turn various features on and off when this was not the surgeon’s intention, which would be extremely aggravating.
The solution to this is to use a design feature similar to the Xbox One - in order to give voice commands the surgeon must initially call the system by name, for example rather than saying “turn tool proximity on” they would need to say “system, turn tool proximity on”. The system would therefore know that unless it hears the keyword “system”, it should not interpret the surgeon’s normal conversation as commands.
Once one command has been given in this fashion, then the system would be in a listening state, meaning that to give further voice commands, the surgeon would not need to call the system by name. If the surgeon wanted to have normal conversation, then they could tell the system to “stop listening”, in which case it would only register commands if called by name once again.
Final UI Design
The user interface therefore has two parts - what is displayed on the endoscope terminal and how the system is controlled.
Endoscope Terminal
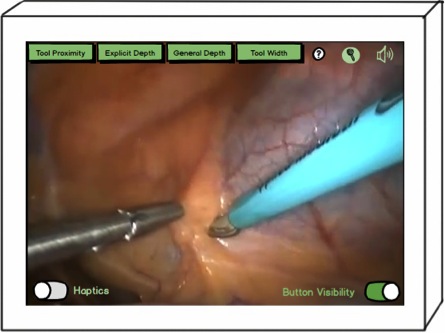
This terminal has many different options for controlling the depth feedback. Four buttons along the top provide options for the different visual augmentations that can be applied to the feed. A help button sits next to these, followed by a microphone icon which will only appear when the system is in the “listening” state. The speaker next to this indicates whether audio feedback is on or not. When audio feedback is turned off, a red cross appears over this icon. Finally the two buttons at the bottom allow haptic feedback to be turned on and off, and button visibility to be turned off so that the surgeon has a full and unobstructed view of operation taking place.
Control unit
Ideally the system would be controlled through voice command with a small bluetooth style headset taking the input, which would also provide audio and haptic feedback. However, should the team not have time to build a prototype of an earpiece control for the system, then the voice control functionality will be provided by the Kinect 2.0 sensor:
All of the information provided on the user interface here can be found in this PDF, which further documents the design process of the user interface, and provides evaluation of the design.